Delivery Settings for Shareholder Materials
IBKR’s default setting for distributing shareholder communications (e.g., proxy materials and annual reports) from U.S. and Canadian issuers is electronic delivery. Under this method the account holder will receive an email notice when information becomes available for a security they hold from our processing agent, Mediant Communications. This notification will provide the necessary links for accessing the information and voting through the Internet in lieu of receiving these documents via postal service. The technology which you will need to secure the information includes access to the Internet and a web browser supporting secure connections. In addition, you will need to be able to read the documents online and print a copy provided your system supports documents in a PDF format.
Other items of note:
- We recommend that you add the following addresses to your email address book to minimize the possibility of communications being routed to your junk folder or rejected by your email provider as spam: InteractiveBrokers@proxydocs.com, InteractiveBrokers@investorelections.com, InteractiveBrokers@proxypush.com, InteractiveBrokers@prospectusdocs.com.
- Issuers reserve the right, and are sometimes required by regulation, to send certain shareholder communications via postal mail regardless of the account holder’s preference for electronic delivery. This will most often be the case for interim or special meetings or for contested voting matters.
- Account holders may withdraw their consent to electronic delivery and revert to postal delivery at any time by submitting a request through the Message Center located within Client Portal. Note that changes to delivery settings are not applied to shareholder materials where the record date has already been sent. Account holders may, therefore, continue to receive deliveries for certain securities via the existing method for a period of 2 to 4 weeks after requesting a change.
- The information above applies solely to shareholder communications associated with U.S. and Canadian issuers. The delivery of communications for securities issued outside of these two countries is typically electronic, but managed directly by the issuer or its agent (i.e., not Mediant).
See also: Non-Objecting Beneficial Owner (NOBO)
Verification of Mobile Telephone Numbers
Background:
Clients who have completed the steps of verifying their mobile telephone numbers with IB will be able to receive account related communications directly to their phones in the form of a text message (SMS). This will help to reduce the need to access the Account Management Message Center for information on items such as Funding. In addition, a verified mobile number is a prerequisite for using the IB Key Authentication via IBKR Mobile or the SMS as second factor authentication.
Verification of a mobile number may be done through one of the following methods:
- Set up messaging for your mobile telephone number. Please see KB2552 for details
- Activate the IB Key Authentication via IBKR Mobile on your smartphone. Please see KB2260 for details
How to verify your mobile phone number
Overview:
This article explains how to verify your mobile phone number.
If the verification of your phone number was not completed during the account application, you can complete it at any time by following these steps:
- Log in to Account Management.
- From the side menu, click on Settings and then on User Settings. Click on the configuration gear correspondent to Mobile Number. If you are using the Classic Account Management, this section can be reached from the top menu Manage Account -> Account Information -> Details -> Profile, by clicking on the link "Modify"
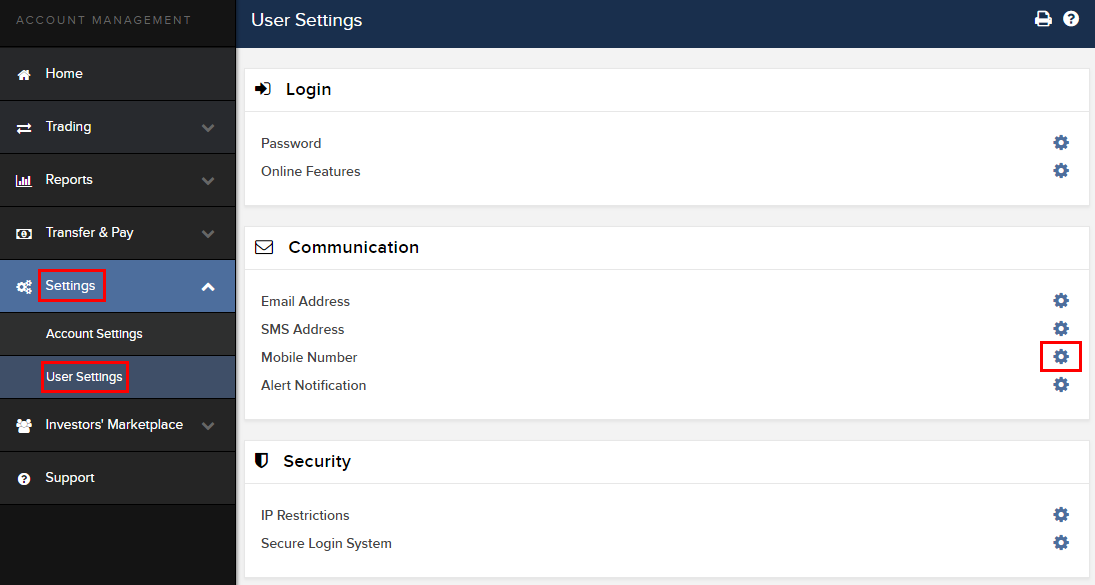
- Click on VERIFY

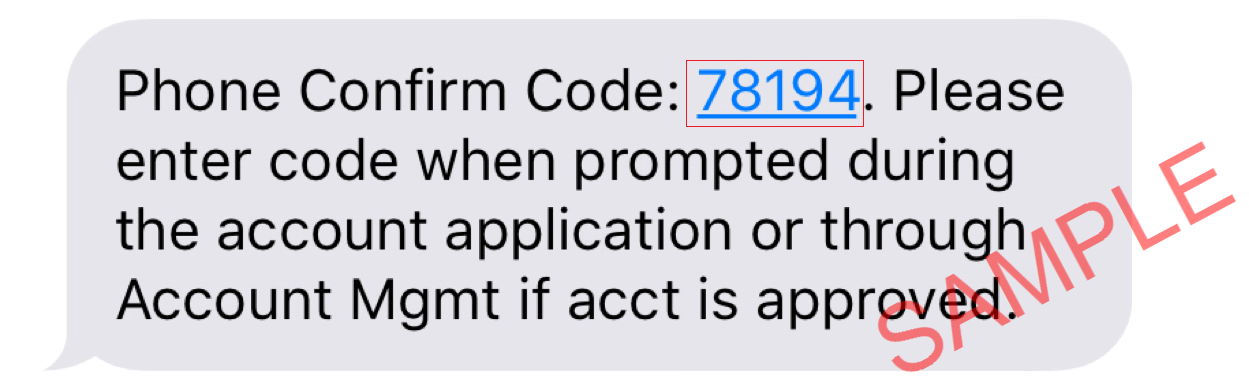
- Open your phone's messages app and you will find the SMS with the Confirm Code we sent to you.
NOTE: message delivery time may vary and in some circumstances it can take few minutes.
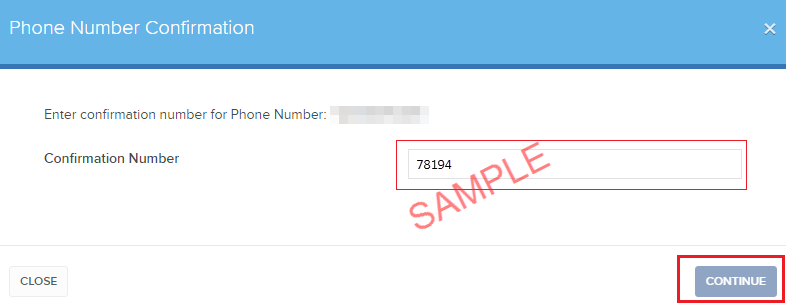
- Enter the Confirm Code you have received into the Confirmation Number field, then click CONTINUE.
- If the code has been accepted, a green check mark will appear under the column SMS Verified. Click CONTINUE to finalize the procedure.
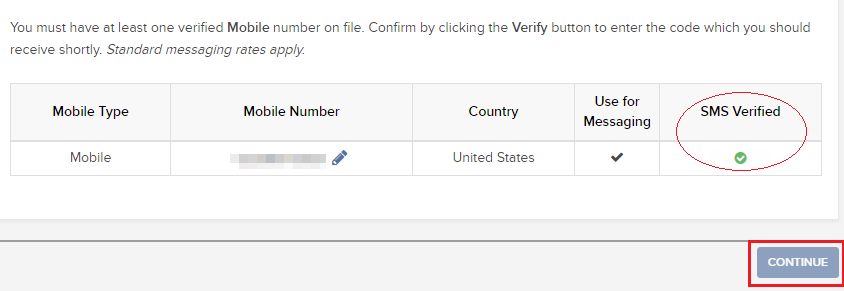
- If your user does not have an active SLS device, it will be automatically enrolled in SMS for Two-Factor Authentication shortly afterwards. For instructions about login authentication via SMS, please see KB3196.
Что значит "Ожидание консультанта" в статусе моего запроса о снятии средств?
Overview:
Выполнив вход в "Портал клиентов", запросившие вывод средств владельцы клиентских счетов могут увидеть статус "Ожидание консультанта" в разделе "История транзакций".
Информация:
Клиенты консультантов могут использовать "Портал клиентов", чтобы создавать запросы о выводе средств так же, как любые другие частные лица. После отправки клиентом подобного запроса консультанту понадобится его одобрить. Если консультант не даст своего согласия, снятие средств все равно совершится, но с задержкой на 3 рабочих дня.
Шаги для подтверждения консультантом:
После отправки клиентским счетом запроса о снятии средств консультант получит уведомление о нем по электронной почте. Чтобы дать свое согласие, консультанту потребуется войти в "Портал консультантов", открыть раздел Упр. клиентами, Панель управления, выбрать вкладку Вопросы на рассмотрении и нажать кнопку "Согласие", чтобы ускорить обработку запроса.
Примечание о периоде резервирования:
Для обеспечения своевременной обработки клиентских запросов о выводе, суммы, превышающие 80% доступных средств, удерживаются до получения согласия консультанта или в течение 3-х календарных дней, если данный срок истечет раньше. Суммы, составляющие меньше 80%, удерживаются до получения согласия консультанта или до следующего рабочего дня.
Данный период существует, чтобы мы могли оповестить консультанта о Вашем запросе о выводе и при необходимости дать ему время сделать эти средства доступными.
Как произвести депозит средств через wire-перевод
Для осуществления безналичного wire-перевода на счет сначала необходимо создать уведомление в "Портале клиентов". После входа в "Портал клиентов" выберите Переводы и платежи, а затем Перевод средств в меню. Затем укажите тип транзакции "Внесение средств" и метод перевода "Банковский перевод".
Вас попросят ввести информацию о Вашем банке, сумму и валюту средств, а также название отправляющей организации. После этого Вам будут предоставлены все реквизиты (напр., номер ABA, код Swift BIC и банковский номер счета) для печати, которые Вы, в свою очередь, сможете передать в свой банк для инициации wire-перевода.
Обращаем Ваше внимание, что создание данного уведомления обязательно, поскольку информация, необходимая Вашему банку для перевода, отличается в зависимости от выбранной валюты. Помимо этого, уведомление также обеспечивает незамедлительное зачисление средств на соответствующий счет после их получения.
При возникновении вопросов обращайтесь в нашу службу поддержки. Контактные номера и часы работы можно найти на странице: https://www.interactivebrokers.co.uk/ru/index.php?f=6005
Client Portal Login Failure using Safari as Browser
Background
Most recent versions of web browsers contain a feature which prompts users to save their user name and password when logging into various sites on the Internet. While convenient in practice, this feature introduces a significant security risk in that it allows anyone with access to the computer to log into those sites where the password has been saved.
Many sites that deal with highly sensitive information, including the Client Portal, have controls which do not allow this feature to be utilized. While most browsers such as Mozilla Firefox, Internet Explorer and Google Chrome allow for such controls, others such as Apple's Safari do not.
As a result, Safari users who attempt to use the password save feature may experience log in failures on future log in attempts.
Solution
Should this log in failure occur, you will need to remove the saved login credentials. To remove the login credentials, follow these steps:
1) When Safari is in the foreground, click on the menu Safari --> Preferences
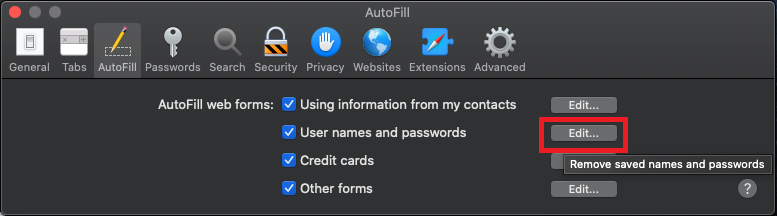
2) Click on the icon AutoFill on the toolbar
3) Click on the button Edit... next to "User names and passwords" (see Figure 1.)
Figure 1.
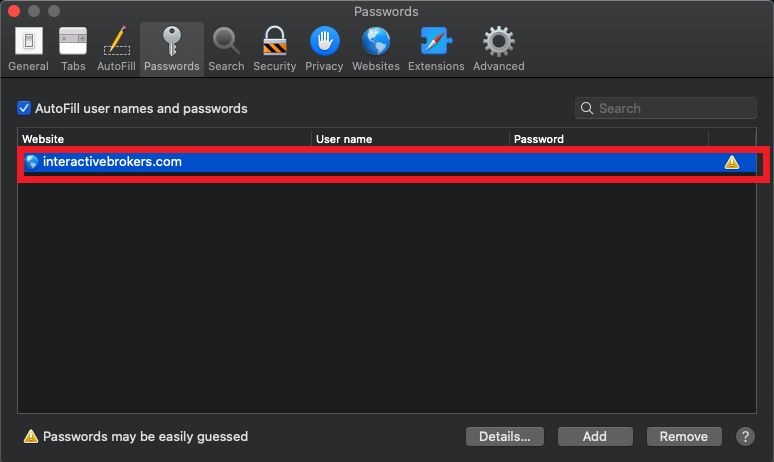
4) Locate the line related to the Client Portal web site and select it (see Figure 2.)
Figure 2.
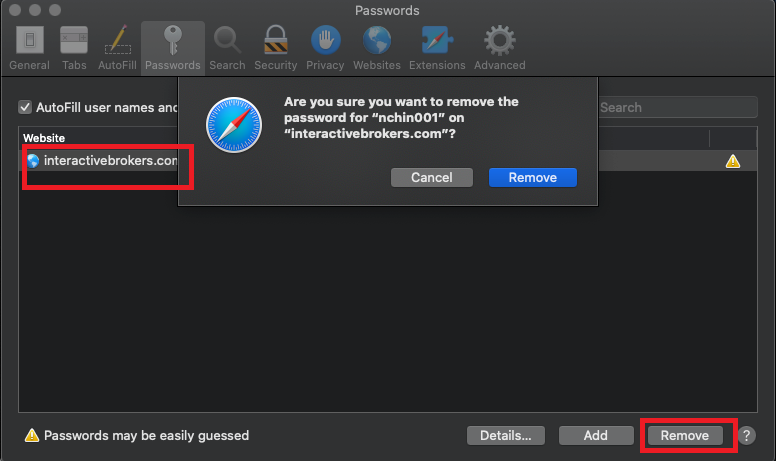
5) Click on the button Remove (see Figure 3.)
Figure 3.
6) Close and reopen Safari. You should now be able to log in . Upon log in you will be prompted whether to save user/pass again for the website. Please answer “Never for this website” or "Not now".
Financial Advisor How To: Linking Related Client Accounts
Overview:
Account linkage provides account holders who maintain multiple accounts under a single advisor, the ability to group the accounts together under a single user name. The benefits of account linking include the following:
- The ability to log into all accounts via a single user name and password;
- Account accessed using a common security device;
- Activity fee minimums, when applicable, are determined based on commissions consolidated across the linked accounts;
- Consolidated reporting of accounts.
While linking may be performed by the client, this article outlines the steps by which an advisor may link accounts on behalf of the client
Steps:
1. Linkage begins by logging into Account Management at the master account level and selecting the Manage Clients, Accounts and then Link Client Accounts menu options.
.jpg)
2. You will then be provided with a drop down list of client which are eligible to be linked. While multiple clients may be linked in a given session, the linkage steps must be completed for a given client before proceeding to another.
.jpg)
3. After selecting the client to be linked, a list of all of the client's accounts that are eligible to be linked will be presented. Here, you will be prompted to specify which of the user names is to be retained for future account access. Once the linkage process has been completed, all other user names will be deactivated.
.jpg)
4. Next you will be presented with the Account Information page where confirmation of the client's personal information will be performed. In the event the client maintains information which differs among accounts (e.g., residential address), you will be prompted to select that which is accurate and is to be retained following completion of linkage.
.jpg)
5. Next, select any or all of the standing banking instructions which will be retained.
.jpg)
6. Confirmation of the linkage request is then provided.
.jpg)
IMPORTANT NOTES:
- You must select the client account with the highest level security device.
- Once the accounts are linked, the unique usernames and passwords for the accounts to be linked with this account will no longer function. The surviving username and password associated with the account will function for all linked accounts.
- Interactive Brokers will link these accounts on Fridays.
- Once the accounts are linked, the security devices for the accounts to be linked with this account will no longer function and the device associated with this account will function for all linked accounts. Those device do not need to be returned to IB, as per KB975
Как получить онлайн-карту кодов безопасности
Overview:
Онлайн-карта кодов безопасности позволяет получить временный доступ к счету и торговой платформе на 21 день. Данное временное решениенеобходимо, как правило, в следующих случаях:
A. У Вас временно нет доступа к своему постоянному устройству безопасности.
B. Вы потеряли свое основное устройство безопасности и хотите запросить новое устройство или сохранить доступ к счету до получения нового постоянного устройства.
Background:
Мы предполагаем, что при указанных выше случаях Вы уже известили службу поддержки IBKR и получили временный код (см. статью KB70). Теперь Вы можете продлить период действия временного доступа следующим образом:
Порядок активации
1. Откройте браузер и зайдите на ibkr.com
2. Нажмите Вход (Log In)

3. Введите свои учетные данные и нажмите Вход. Для завершения аутентификации введите временный код, полученный от службы поддержки IBKR, и снова нажмите Вход.
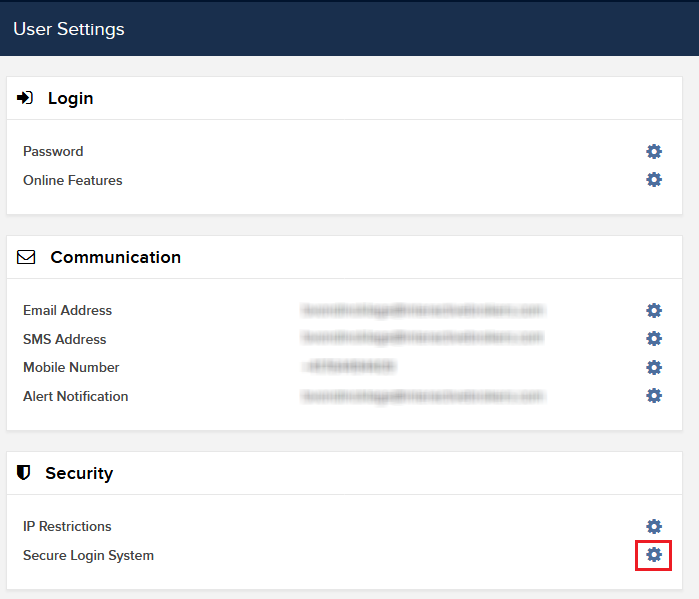
.png)
4. В меню выберите Настройки (Settings), а затем Настройки пользователя (User Settings). Затем в окне Безопасность (Security) щелкните по значку шестеренки (Настройки) напротив Системы безопасного входа1 (Secure Login System).
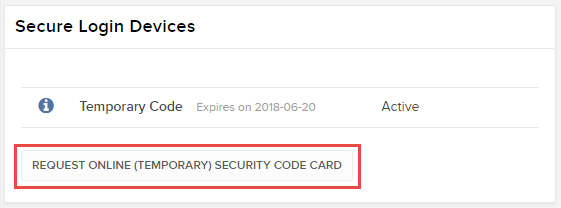
5. Вы увидите список активных устройств безопасности Вашего пользователя. Нажмите на кнопку Запросить (временную) онлайн-карту кодов безопасности (Request Online (Temporary) Security Code Card) под списком.
6. Отобразится Ваша онлайн-карта кодов безопасности. Нажмите Печать2.
(1).png)
7. Убедитесь, что все части карты верно распечатаны и читаемы. Нажмите Далее. 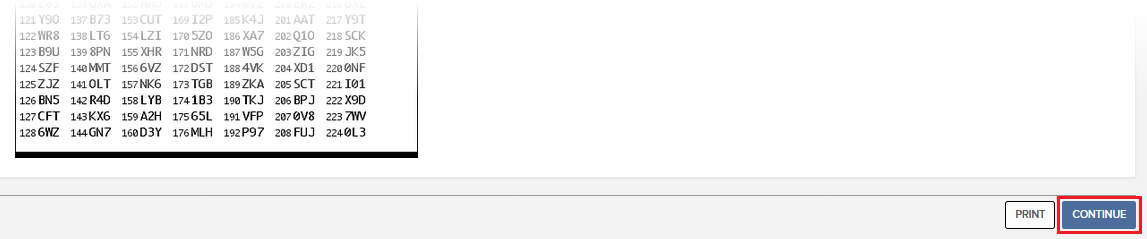
8. На экране активации появятся два числа. Найдите первое число на карте и введите в поле Коды безопасности (Card Values) соответствующий трехзначный код. Затем без пробела введите код для второго числа. Нажмите Далее.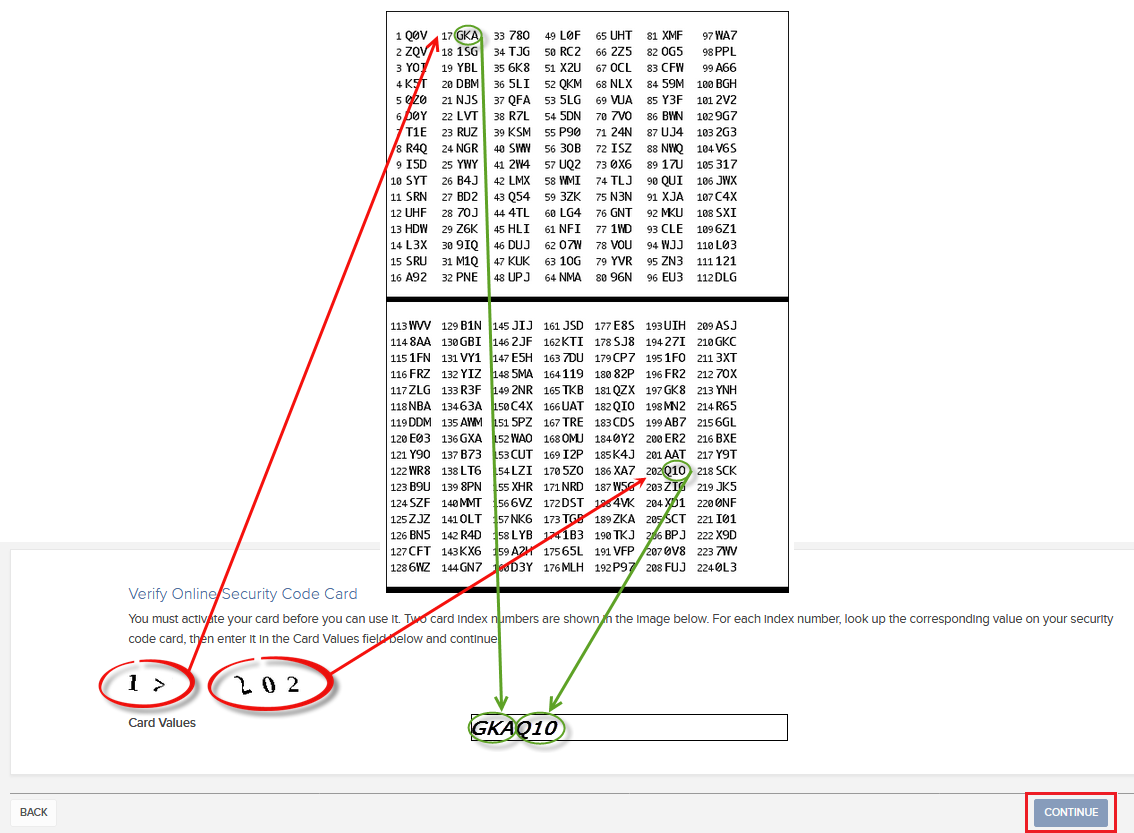
9. Вы увидите подтверждение и данные о сроке действия карты. Для завершения активации нажмите OK. .png)
Примечания
1. Если Вы используете классическое "Управление счетом", выберите в верхнем меню Управление счетом > Безопасность > Система безопасного входа > Устройство защиты
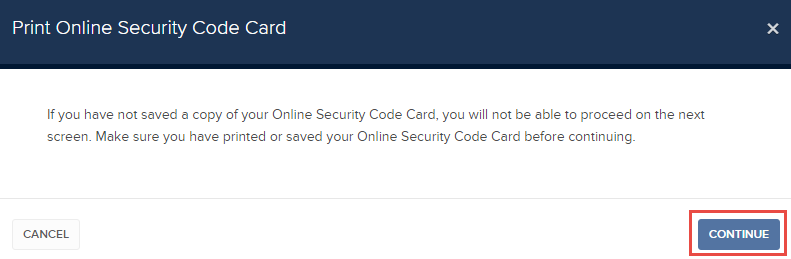
2. Если к Вашему устройству не подключен принтер, щелкните правой кнопкой мыши по картинке с картой и сохраните его как файл изображения. В этом случае при открытии окна активации Вы увидите предупреждение.
Убедитесь, что файл с изображением успешно сохранен на Ваше устройство и читаем, и затем подтвердите свое понимание предупреждения, нажав Далее.
Справка
- Статья KB1131: общая информация о "Системе безопасного входа"
- Статья KB1943: руководство по замене "Цифровой карты безопасности +"
- Статья KB2636: информация и руководства для устройств безопасности
- Статья KB2481: инструкции о совместном использовании устройства безопасного входа двумя и более пользователями
- СтатьяKB2545: как повторно присоединиться к "Системе безопасного входа"
- Статья KB975: как вернуть устройство безопасности IBKR.
- Статья KB2260: как активировать аутентификацию по IB Key через IBKR Mobile
- Статья KB2895: информация о двухфакторной системе на нескольких устройствах (M2FS)
- Статья KB1861: информация о сборах и издержках, связанных с устройствами безопасности
- Статья KB69: информация о сроке действия временного кода доступа
Welcome to Interactive Brokers
Overview:
Now that your account is funded and approved you can start trading. The information below will help you getting
started as a new customer of Interactive Brokers.
- Your Money
- Configure your account to trade
- How to trade
- Trade all over the World
- Five points to enrich your IB experience
1. Your Money
Deposits & Withdrawals General Info. All transactions are administered through your secure Account Management
Deposits
First, you create a deposit notification through your Account Management > Funding > Fund Transfers > Transaction Type: “Deposit” How to create a deposit notification. The second step is to instruct your Bank to do the wire transfer with the bank details provided in your Deposit Notification.
Withdrawals
Create a withdrawal instruction via your secure Account Management > Funding > Fund Transfers > Transaction Type: "Withdrawals" How to create a withdrawal instruction
If you instruct a withdrawal over the Withdrawal limits, it will be considered an exceptional withdrawal and we will therefore need to match bank account holder and IB account. If destination bank account has been used for a deposit, withdrawal will be processed; otherwise, you must contact customer service and provide the documents needed.
Troubleshooting
Deposits: My bank sent the money but I do not see it credited into my IB account. Possible reasons:
a) A fund transfer takes 1-4 business days
b) A Deposit Notification is missing. You have to create it via your Account Management and send a ticket to Customer Service
c) Amending details are missing. Your name or IB account number is missing in the transfer details. You have to contact your bank and ask for the full amending details.
d) ACH initiated by IB is limited to 100k USD in a 7 business period. If you opened a Portfolio Margin account where the initial requirement is 110k, a wire deposit might be the better deposit option to reduce wait time for your first trade. If selecting ACH a wait time of almost 2 weeks or a temporary downgrade to RegT can be possible solutions.
Withdrawals: I have requested a withdrawal but I do not see the money credited to my bank account. Possible reasons:
a) A fund transfer takes 1-4 business days
b) Rejected. Over the max it can be withdrawn. Please check your account cash balance. Note that for regulatory requirements, when the funds are deposited, there is a 3 day holding period before they can be withdrawn.
c) Your bank returned the funds. Probably because receiving bank account and remitting bank account names do not match.
2. Configure your account to trade
Difference between Cash and Margin accounts: If you have chosen the FastTrack application, by default your account type is a cash account with US stock permission. If you would like to get leverage and trade on margin, here how to upgrade to a RegT Margin account
Trading Permissions
In order to be able to trade a particular asset class in a particular country, you need to get the trading permission for it via your Account Management. Please note that trading permissions are free. You might however be asked to sign risk
disclosures required by local regulatory authorities. How to Request Trading Permissions
Market Data
If you want to have market data in real-time for a particular product/exchange, you need to subscribe to a market data package charged by the exchange. How to subscribe to Market data
The Market data assistant will help you choose the right package. Please watch this Video explaining how it works.
Customers have the option to receive delayed market data for free by clicking the Free Delayed Data button from a non-subscribed ticker row.
Advisor Accounts
Have a look at the user guide getting started as advisors. Here you see how to create additional users to your advisor account and grant them access and much more.
3. How to trade
The Trader's University is the place to go when you want to learn how to use our Platforms. Here you will find our webinars, live and recorded in 10 languages and tours and documentation about our various Trading Platforms.
Trader Workstation (TWS)
Traders who require more sophisticated trading tools can use our market maker-designed Trader Workstation (TWS), which optimizes your trading speed and efficiency with an easy-to-use spreadsheet interface, support for more than 60 order types, task-specific trading tools for all trading styles, and real-time account balance and activity monitoring. Try the two models
TWS Mosaic: for intuitive usability, easy trading access, order management, watchlist, charts all in one window or
TWS Classic: the Advanced Order Management for traders who need more advanced tools and algos.
General Description and Information / Quick start guide / Usersguide
Interactive Tours: TWS Basics / TWS configuration / TWS Mosaic
How to place a trade: Video Classic TWS / Video Mosaic
Trading tools: General Description and Information / Users guide
Requirements: How to install Java for Windows / How to install Java for MAC / Port 4000 and 4001 needs to be open
Login TWS / Download TWS
WebTrader
Traders who prefer a clean and simple interface can use our HTML-based WebTrader, which makes it easy to view market data, submit orders, and monitor your account and executions. Use the latest WebTrader from every browser
Quick Start Guide / WebTrader User's Guide
Introduction: Video WebTrader
How to place a Trade: Video WebTrader
Login WebTrader
MobileTrader
Our mobile solutions allow you to trade your IB account on the go. The mobileTWS for iOS and the mobileTWS for BlackBerry are custom-designed for these popular models, while the generic MobileTrader supports most other Smart phones.
General Description and Information
Order Types Order Types available and Description / Videos / Tour / Users guide
Paper Trading General Description and Information / How to get a Paper Trading Account
Once your paper account is created, you can share the market data of your real account with your paper trading account: Account Management > Manage Account > Settings > Paper trading
4. Trade all over the World
IB accounts are multi-currency accounts. Your account can hold different currencies at the same time, this allows you to trade multiple products around the world from a single account.
Base Currency
Your base currency determines the currency of translation for your statements and the currency used for determining margin requirements. Base currency is determined when you open an account. Customers may change their base currency at any time through Account Management.
We do not automatically convert currencies into your Base currency
Currency conversions must be done manually by the customer. In this video you can learn how to do a currency conversion.
In order to open a position denominated in a currency that you do not have in your account, you have two possibilities:
A) Currency conversion.
B) IB Margin Loan. (Not available for Cash Accounts)
Please see this course explaining the mechanics of a foreign transaction.
5. Five points to enrich your IB experience
1. Contract Search
Here you will find all our products, symbols and specifications.
2. IB Knowledge Base
The Knowledge Base is a repository of glossary terms, how-to articles, troubleshooting tips and guidelines designed to assist IB customers with the management of their IB accounts. Just enter in the search button what you are looking for and you will get the answer.
3. Account Management
As our trading platforms give you access to the markets, the Account Management grants you access to your IB account. Use Account Management to manage account-related tasks such as depositing or withdrawing funds, viewing your statements, modifying market data and news subscriptions, changing your trading permissions, and verifying or changing your personal information.
Log In Account Management / AM Quick Start Guide / AM Users Guide
4. Secure Login System
To provide you with the highest level of online security, Interactive Brokers has implemented a Secure Login System (SLS) through which access to your account is subject to two-factor authentication. Two-factor authentication serves to confirm your identity at the point of login using two security factors: 1) Something you know (your username and password combination); and 2) Something you have (an IB issued security device which generates a random, single-use security code). As both knowledge of your username/password and physical possession of the security device are required to login to your account, participation in the Secure Login System virtually eliminates the possibility of anyone other than you accessing your account.
How to Activate your Security Device / How to Obtain a Security Code Card / How to return Security device
In case you forgot your password or lost your security code card, please call us for immediate assistance.
5. Statements and Reports
Easy to view and customize, our statements and reports cover all aspects of your Interactive Brokers account. How to view an Activity Statement
Steps for Importing Worksheet for Form 8949 to TurboTax
Overview:
As a matter of operational convenience and to assist with the preparation of IRS Form 8949 (Sales and Other Dispositions of Capital Assets) IB Prepares a Form 8949 worksheet in each of a PDF, CSV and TXF format on an annual basis. The TXF format allows you to import the information into Turbo Tax Standalone(CD/Download Version) but not the online version. Please click here for to visit our Turbo Tax FAQ's.
How to Import Form 8949 into TurboTax
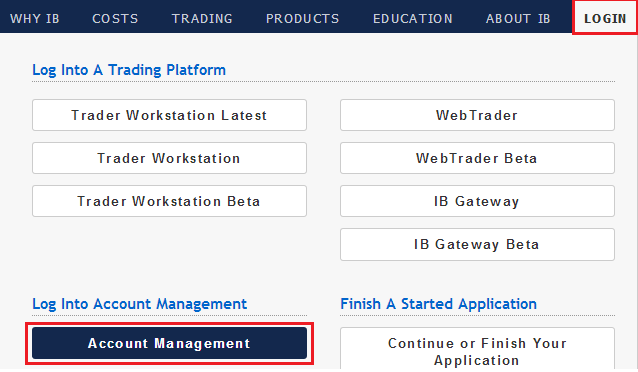
1. Log into Account Management by going to https://www.interactivebrokers.com and select Login and then Account Management from the upper right hand section and enter username/password to log in.
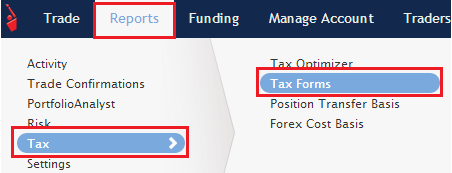
2. Navigate to Reports, Tax and then select Tax Forms
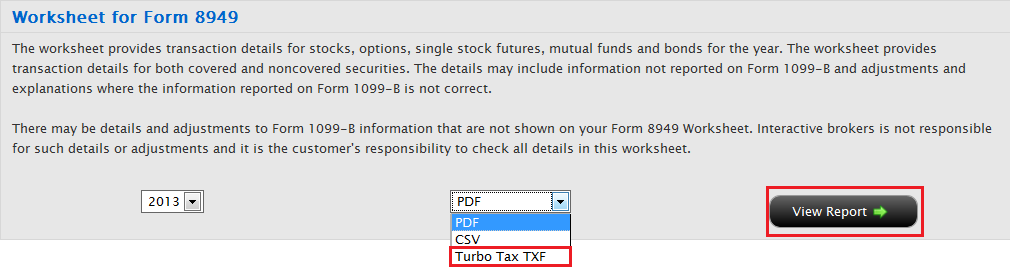
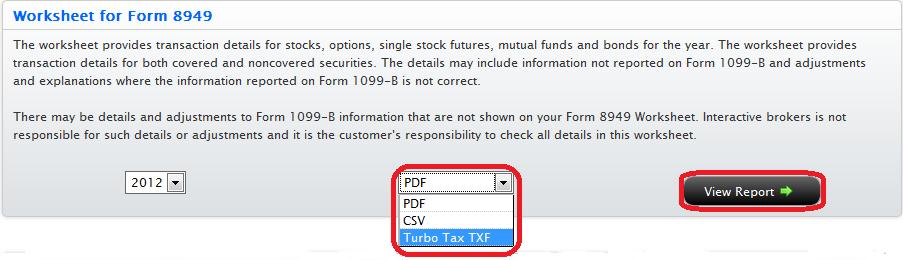
3. Under Worksheet for Form 8949 section, select TurboTax TXF from the drop down menu and select View Report
4. A save dialog box will appear. Please select Save File and then OK.
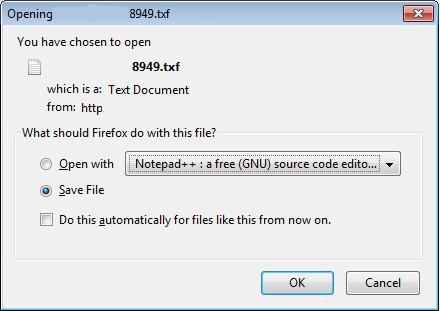
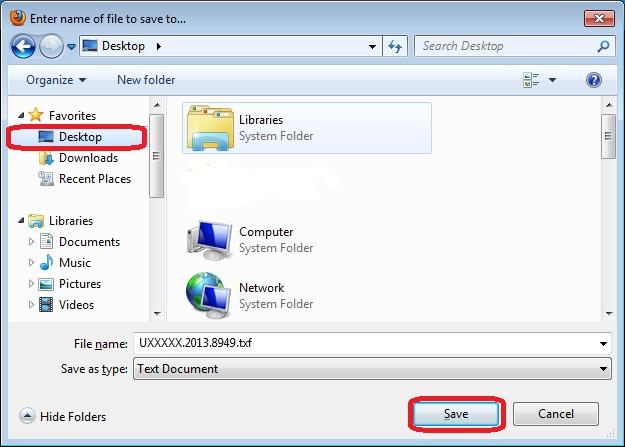
5. Another dialog box will appear. Please select Desktop on the left and then Save. This will save your downloaded file to your desktop
6. Now that the file is downloaded please follow the directions below in Section C to import into TurboTax
Section B (Vertical menu on the left)
1. Log into Account Management by going to www.interactivebrokers.com and select Login and then Account Management from the upper right hand section and enter username/password to log in.
.jpg)
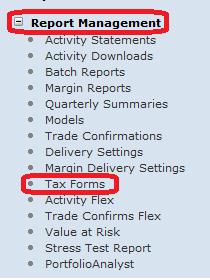
2. On the left please select Report Management and then Tax Forms
3. On the right under Worksheet for Form 8949 section, select TurboTax TXF from the drop down menu and select View Report
4. A save dialog box will appear. Please select Save File and then OK
5. Another dialog box will appear. Please select Desktop on the left and then Save. This will save your download file to your desktop
6. Now that the file is downloaded please follow the directions below in Section C to import TurboTax
Section C (Importing downloaded file into TurboTax)
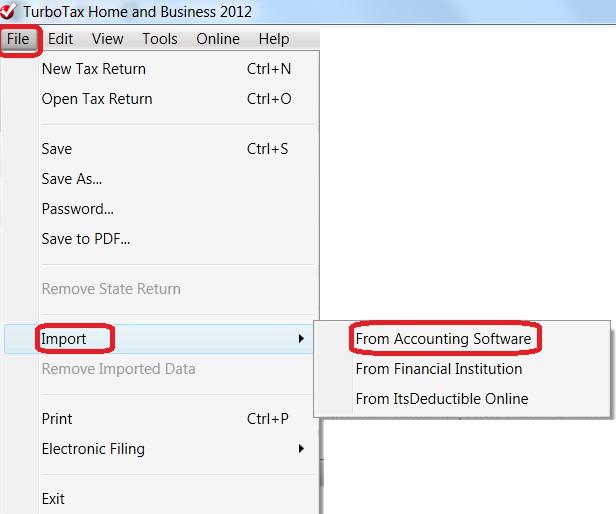
1. Open TurboTax and navigate to File and select “From Accounting Software” under the Import option.
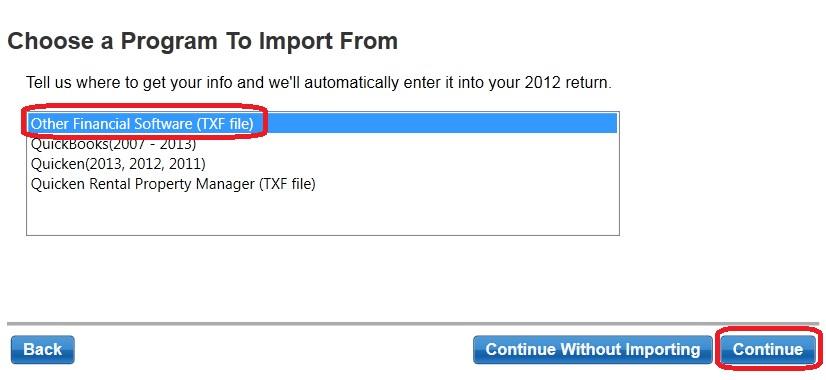
2. A new window will appear with a few options. Please select Other Financial Software (TXF file) and then Continue
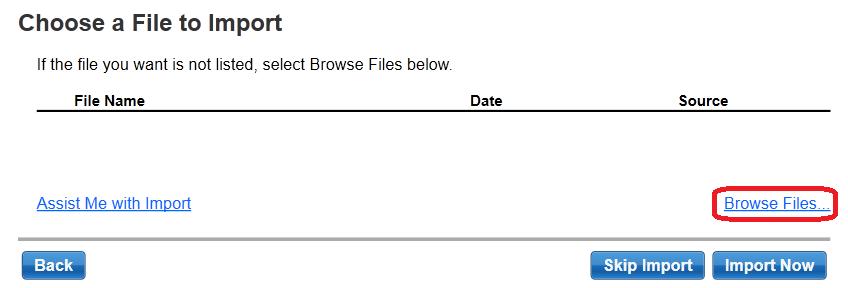
3. On the next screen select Browse Files
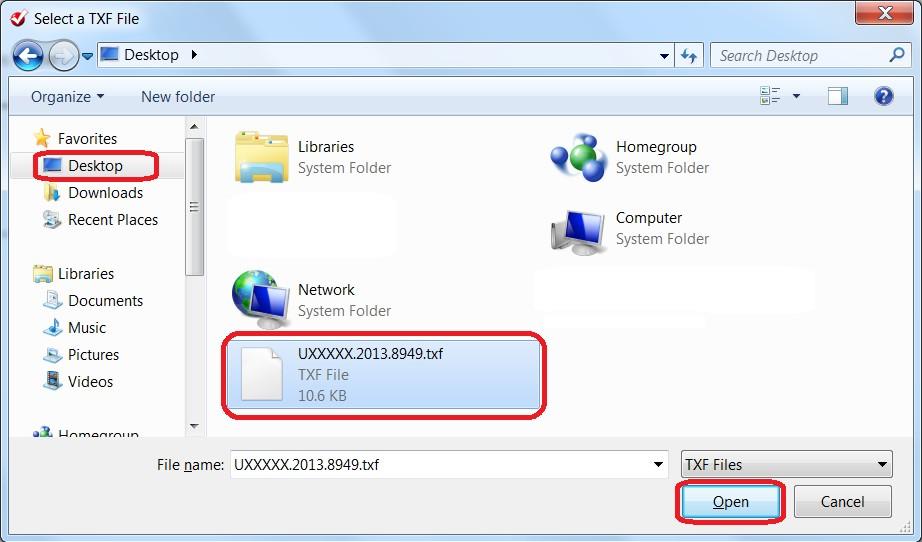
4. A new window will appear. Please select Desktop on the left and then select the file you just saved on your desktop and then select Open.
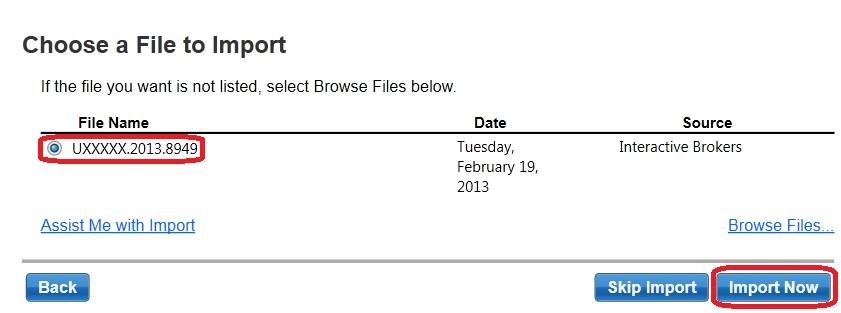
5. A new window will appear with the name of the file. Select Import Now
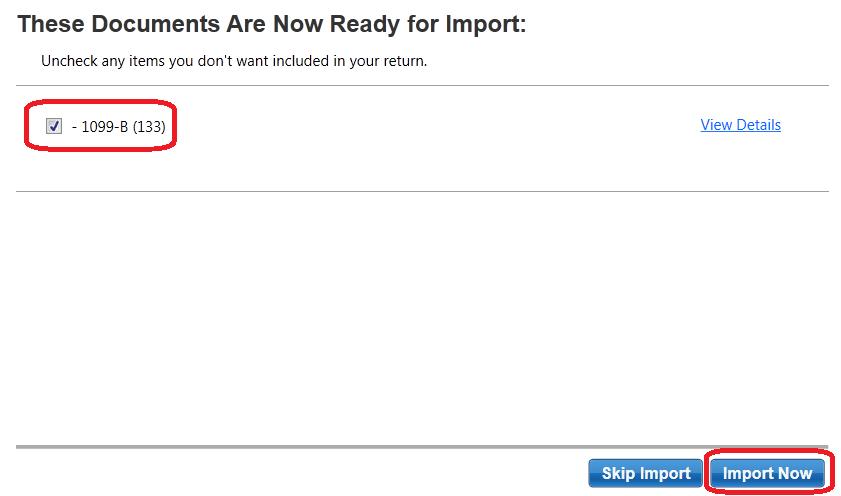
6. On the next page you will see 1099-B (133). Make sure the box next to it is checked and then select Import Now
7. On the last page select Done and all your transactions will now be imported into TurboTax. If you need any additional help navigating TurboTax please contact them directly at http://turbotax.intuit.com/