How to set up sFTP for using Certificate Authentication on Linux
These instructions apply to users who are receiving their statements via sFTP. If you elected to receive your statements via sFTP, you would first need to generate an RSA Key pair.
There are many Linux distributions and there are multiple methods to access the IBKR sFTP server. sFTP clients such as Filezilla can be used. In this article we explain how to realize the connection to the IBKR FTP server using Ubuntu Linux and Filezilla.
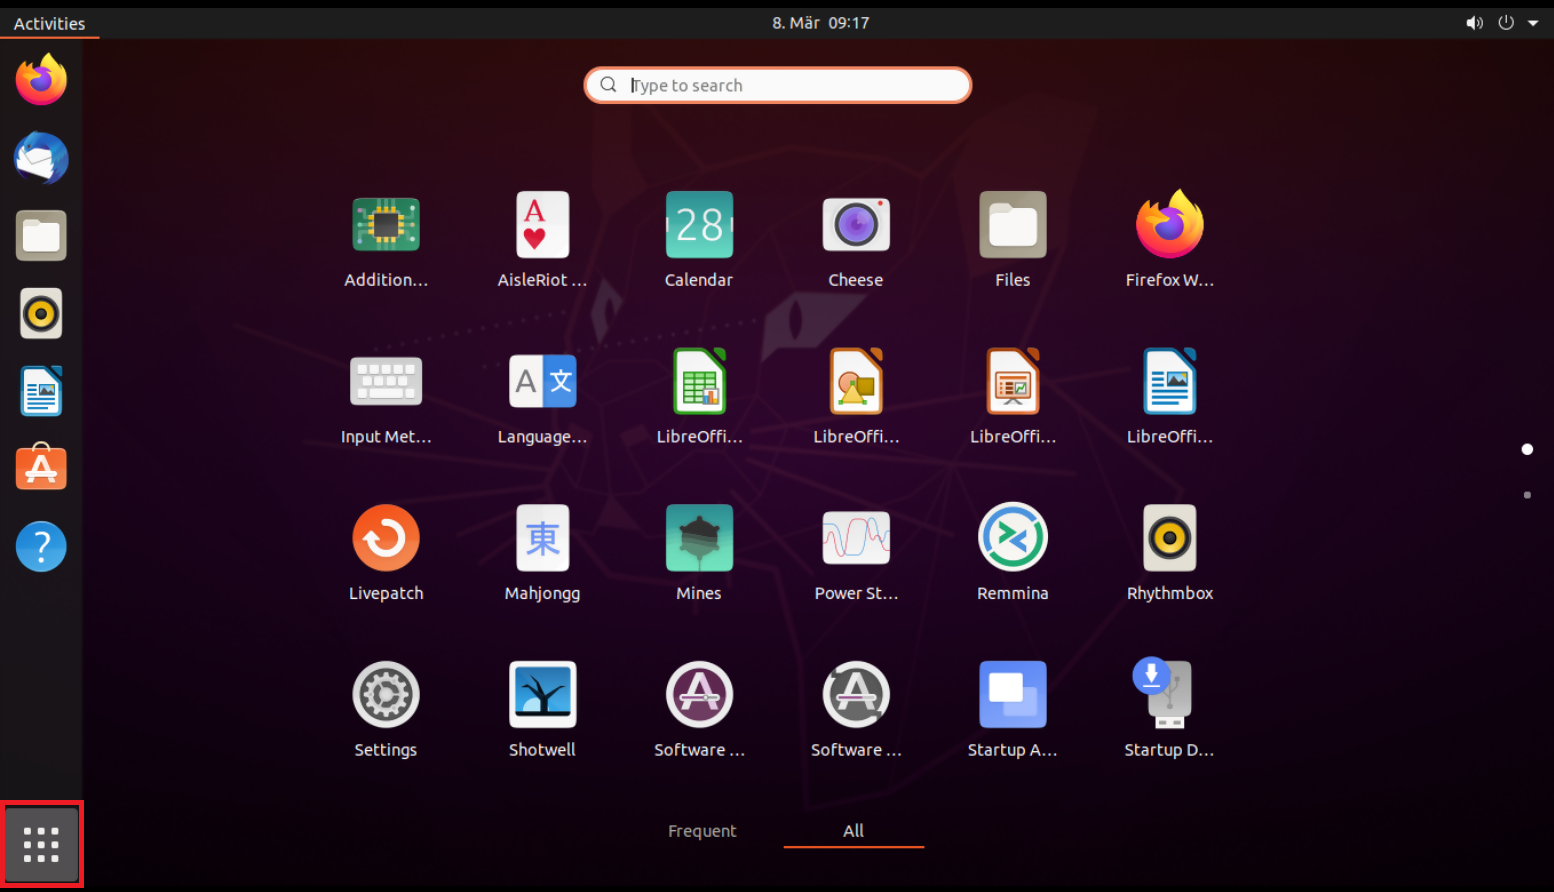
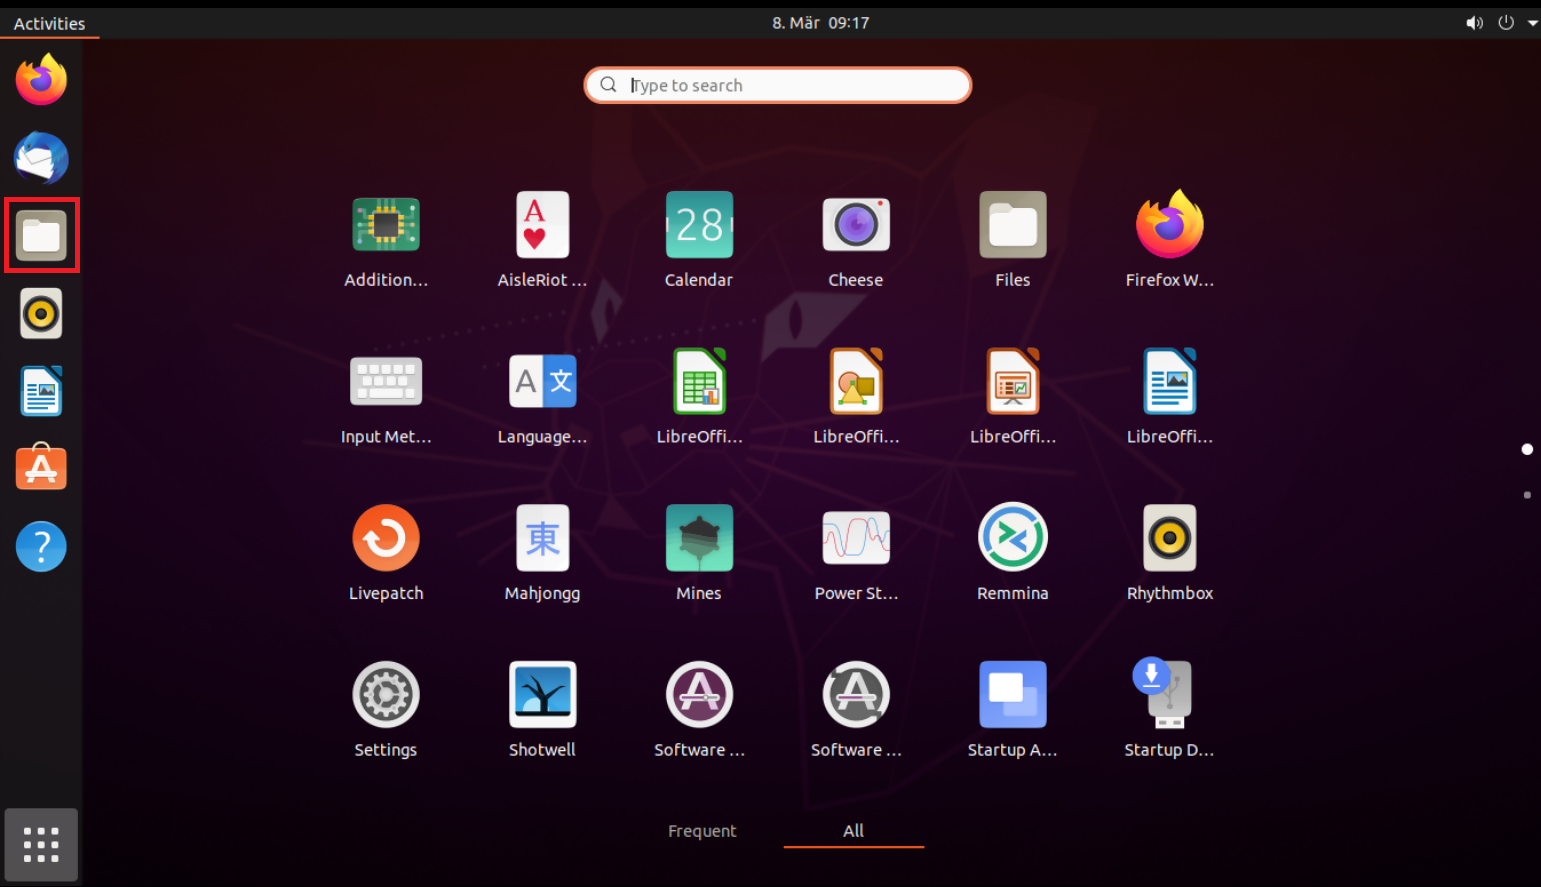
1. On your Linux machine, click on the Applications icon in the bottom left corner of you screen.
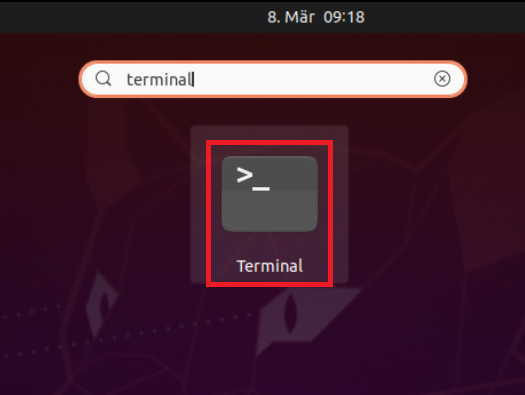
2. In the search box, type terminal and then click on the Terminal icon in the search results.
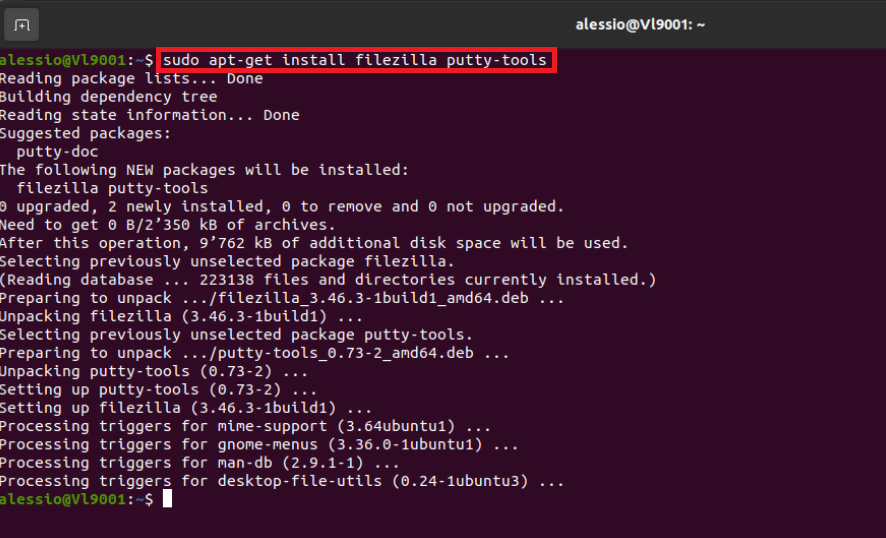
3. In the Terminal window, type sudo apt-get install filezilla putty-tools in order to install the required software. Enter your sudo password when requested.
4. Once the software installation is complete, type puttygen -t rsa -b 2048 -o privatekey.ppk in order to generate the RSA Key pair.
You will be asked to enter a passphrase and type it again to confirm.
PLEASE NOTE: Keeping a secure copy of this password is essential. Any loss of this password will require the whole process to be repeated.

5. Type puttygen -L privatekey.ppk -o public.key in order to export the public part of the Key pair to the file public.key

7. In the search box, type FileZilla and then click on the FileZilla icon in the search results.

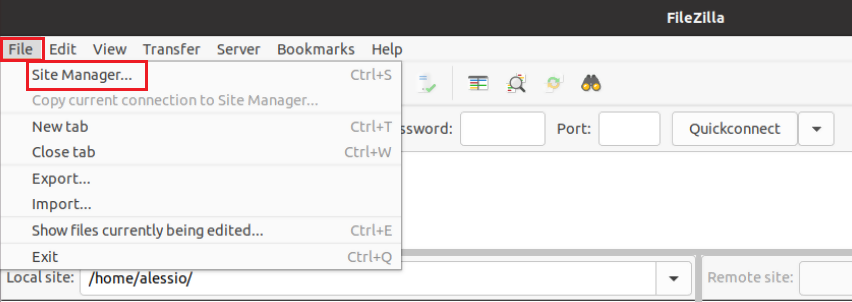
8. Click on the FileZilla top menu File -> Site Manager...
9. In the Site Manager window, click on the button New site to create a new connection.
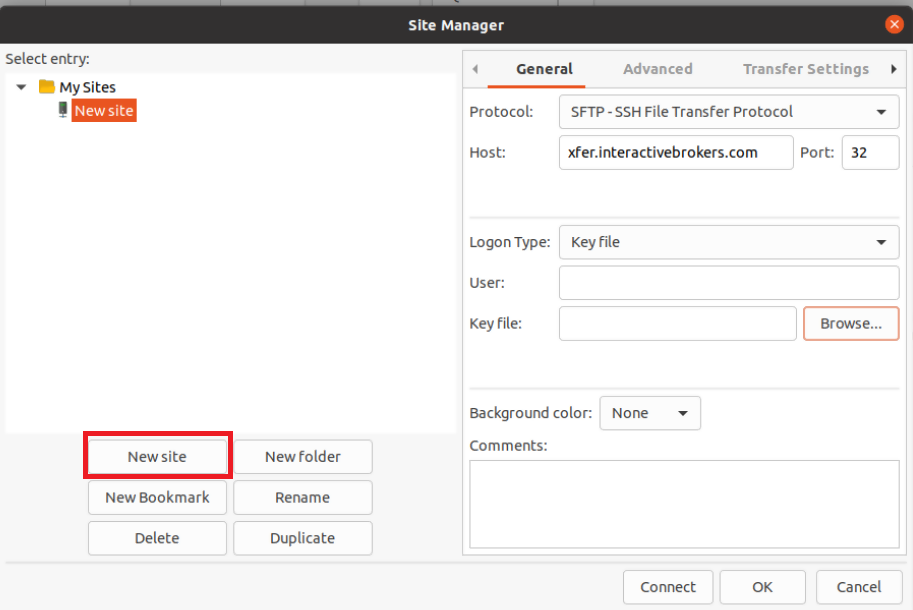
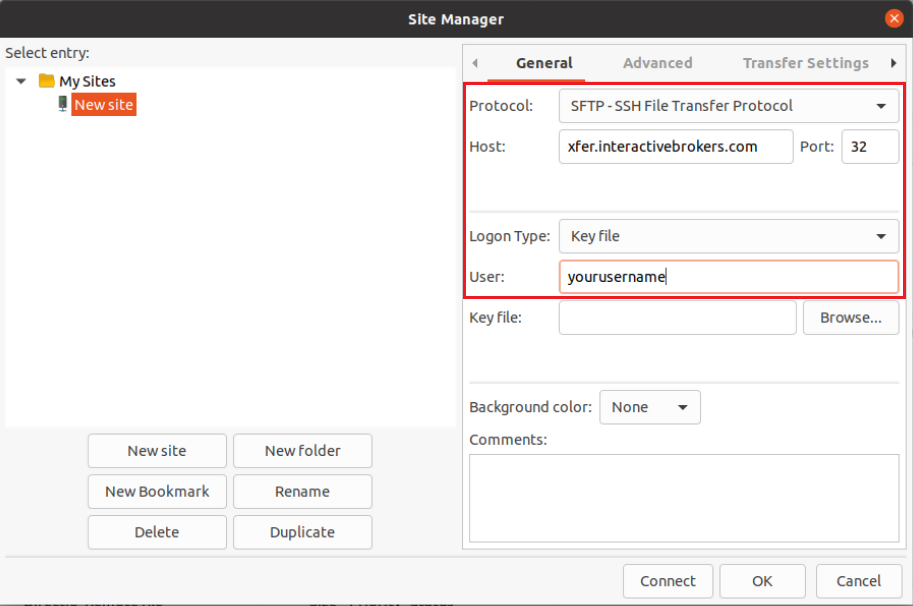
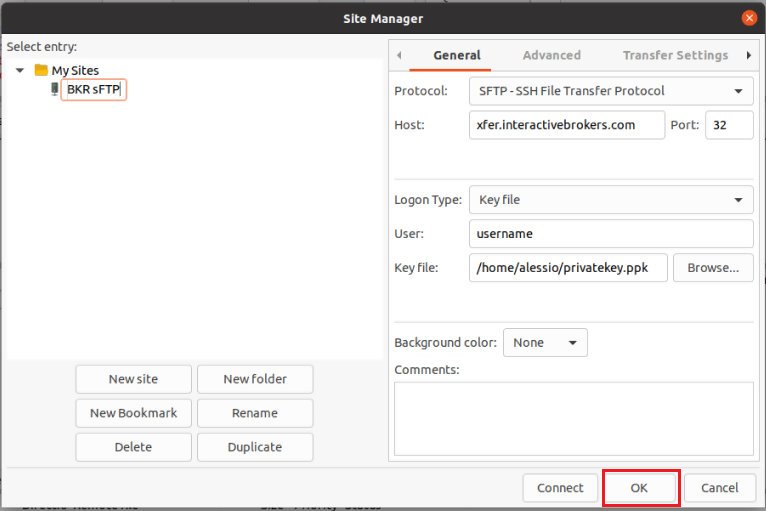
10. In the right panel (called General):
- Select SFTP - SSH File Transfer Protocol as Protocol
- Enter xfer.interactivebrokers.com in the Host field
- Enter 32 in the Port field
- Select Key file as Logon Type
- Enter the username provided to you by Interactive Brokers in the User field
11. Click on Browse next to the Key file field.
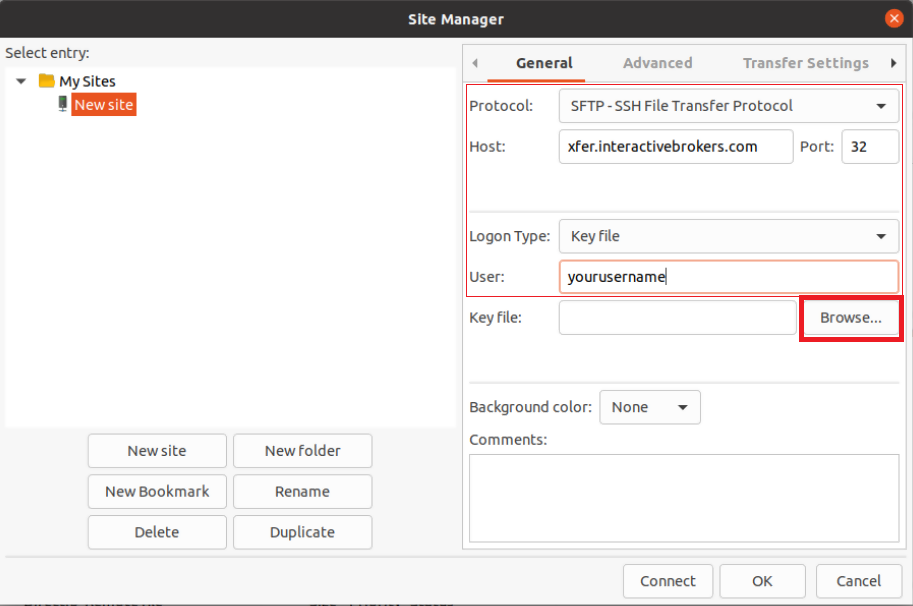
12. Move to the folder where your Key pair was created (normally your user folder: /users/yourusername/). Select the file privatekey.ppk and click on the Open button. This will set it as the Key file in your connection parameters.

13. Click on Rename and select a name of your preference for this connection (e.g. IBKR sFTP). Press Enter to confirm the name.
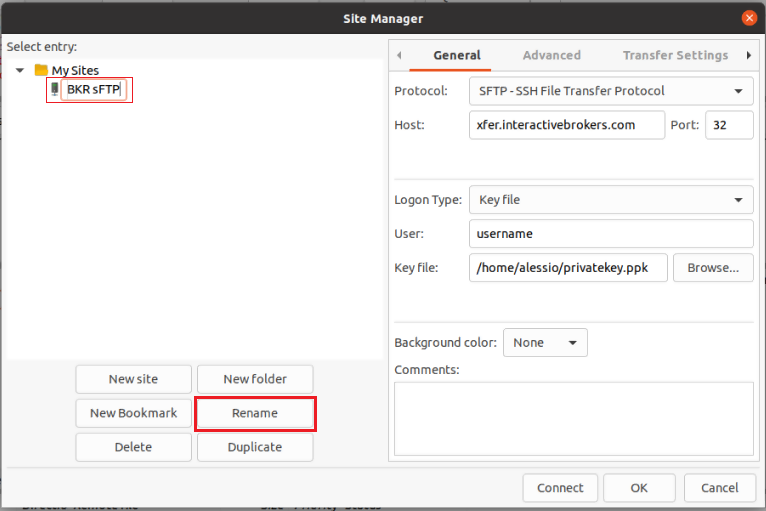
14. Click on OK to save your connection parameters.
15. Click on the folder icon on the left hand toolbar of your Desktop. This will launch the File application.
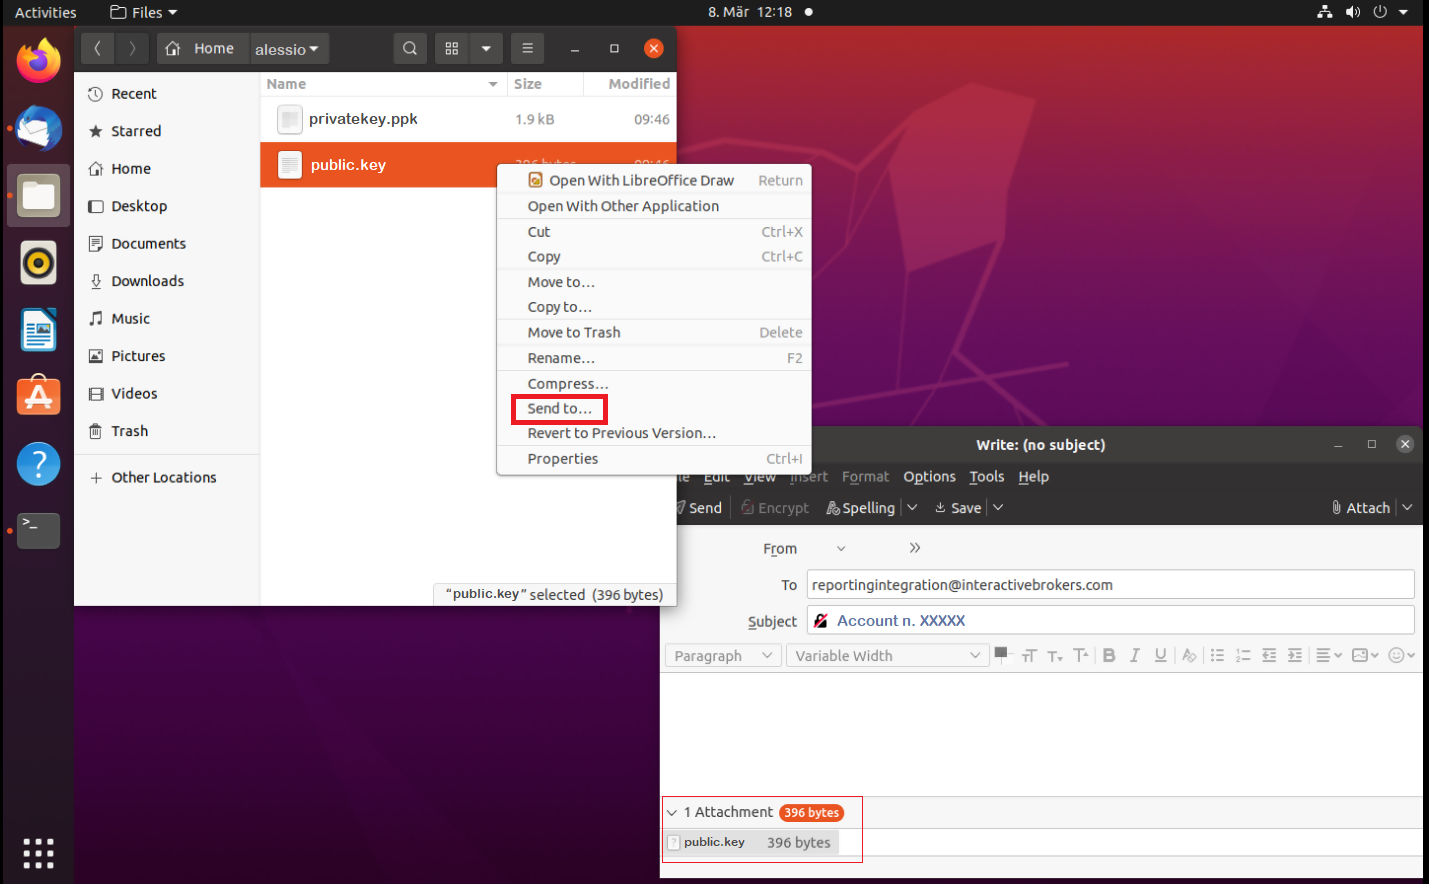
16. Move to the folder where you saved your Key pair (normally your user folder: /users/yourusername/). Right click on the file public.key and select Send to...
The file will be attached to an empty email. Send the email to the Reporting Integration Team, as per IBKB3842.
Important Note: do NOT send us your private key. Send us only your public one
Once IBKR has configured the parameters for your connection on our servers, you will be notified. After that, you will be able to access your sFTP repository by using the Site connection you have created in FileZilla. In case you have not yet set up a Site connection, please follow the steps from 6. to 14. which are a prerequisite to the below steps:
1. Click on the Applications icon in the bottom left corner of you screen.

2. In the search box, type FileZilla and then click on the FileZilla icon in the search results.
3. On the FileZilla top toolbar, click the down arrow icon and select the Site connection you previously created (e.g. IBKR sFTP)

4. FileZilla will now establish a connection to our sFTP Server and show the files present in your repository.
Common issues and solutions
A. The Login Credentials Provided are Incorrect
-
Ensure the correct login details are being used to connect to the sFTP server. The username and password you are entering should match the ones you have received from the Reporting Integration Team.
-
Confirm you have configured your sFTP Client to use the Private Key file for the logon authentication (see steps 9. and 10. of the above procedure.)
B. Server Refused Our Key
-
Try accessing the sFTP server using a different Client (CyberDuck, ect.)
-
Ensure the Private Key file being used to Authenticate the server login attempt is related to the Public Key you originally sent to the Reporting Integration Team.
-
Should the above checks be unable to resolve the issue, please generate a new RSA Public/Private Key pair and send only the Public part to the Reporting Integration Team, as per IBKB3842.
C. Connection Timed Out
-
In case you have an antivirus or a security software installed on your machine, make sure it is not blocking the FTP connection attempt. Normally, security software allows to set up exceptions for specific connections in order to whitelist them.
-
Verify that the public IP Address of the machine running the sFTP client, is the same you have originally provided to the Reporting Integration Team for being whitelisted. You can discover your public IP Address by searching the Internet for “what is my IP”. If your current IP Address is not the same you provided to us, please send it to our Reporting Integration Team for being whitelisted.
-
Ask your network administrator/s to confirm that your firewall allows both incoming and outgoing traffic from/to xfer.interactivebrokers.com on port TCP 32.
-
Should the above steps be unable to resolve the issue, please generate a new RSA Public/Private Key pair and send only the new Public part to our Reporting Integration Team, as per IBKB3842.
References
KB3968 - Generate a key pair using GPG for Windows
KB4205 - Generate a key pair using GPG Suite on macOS
KB4108 - Decrypt your Reports using GPG for Windows
KB4210 - Decrypting Reports using your PGP Key pair on macOS
KB4407 - Generate RSA Key Pair on Windows
KB3968 - Generate a key pair using GPG for Windows
KB4205 - Generate a key pair using GPG Suite on macOS
KB4108 - Decrypt your Reports using GPG for Windows
KB4210 - Decrypting Reports using your PGP Key pair on macOS
KB4407 - Generate RSA Key Pair on Windows
KB4578 - How to Access your Reports using FTP on Windows
KB4580 - How to Access your Reports using FTP on MacOS
KB4409 - How to set up sFTP for using Certificate Authentication on Windows
KB4410 - How to set up sFTP for using Certificate Authentication on macOS
KB4411 - How to backup your public/private Key pair
KB4323 - How to transfer your public/private key pair from one computer to another
KB4410 - How to set up sFTP for using Certificate Authentication on macOS
KB4411 - How to backup your public/private Key pair
KB4323 - How to transfer your public/private key pair from one computer to another
Cryptocurrency Trading at Interactive Brokers Hong Kong
How do I trade cryptocurrency with Interactive Brokers HK?
Before you can trade cryptocurrencies, you need to log into Client Portal and request Cryptocurrency trading permissions. To add the trading permissions:
- Login into Client Portal and selecting the User menu (head and shoulders icon in the top right corner) followed by Settings
- Under Account Settings find the Trading section and click on Trading Permissions.
- Select Cryptocurrency permissions and complete the steps on screen.
Please note, you must be a “Professional” Investor in order to be eligible for Cryptocurrency trading permissions.
Once trading permissions are approved you will be able to trade Bitcoin (BTC) or Ethereum (ETH) in the same way that you trade other products via your Interactive Brokers HK account. Search for the symbol and open it in Quote Details or add it to your Watchlist. Select the symbol to trade, then complete the available parameters to create and then submit the order.
What cryptocurrencies can I trade with Interactive Brokers HK?
Interactive Brokers HK currently offers trading in Bitcoin (BTC) and Ethereum (ETH).
Where are my cryptocurrency assets held?
Cryptocurrency trading through Interactive Brokers Hong Kong is powered by OSL Digital Securities, the world's first Type 1 and 7 Securities and Futures Commission (SFC)-licensed digital asset brokerage and trading platform for professional investors. Interactive Brokers HK customer positions will be maintained 100% in wallets in cold storage with OSL Digital Securities.
What are the trading hours for crypto trading?
IBHK supports cryptocurrency opening and closing trades from Sunday at 3 AM EST through Friday at 4PM EST.
Only closing trades (sells) are supported from Friday at 4 PM EST through Sunday at 3 AM EST.
Who is eligible to trade cryptocurrency with Interactive Brokers HK?
You must be a Professional Investor in order to qualify for Cryptocurrency trading. Eligible clients include individuals with over HKD 8 million in investable assets or institutions with assets greater than HKD 40 million who are residents of Hong Kong.
Are there added spreads or markups for cryptocurrency trades? What are the commissions on crypto trades?
No, there are no added spreads or markups. Cryptocurrency trading on Interactive Brokers’ platform has a low commission of just 0.20% to 0.30% of trade value depending on monthly trade volume with a USD 2.25 minimum per order.
A monthly custody fee of 8 basis points will also be charged on the average daily value of cryptocurrency held in your account.
What order types can I use for cryptocurrency orders?
You can trade cryptocurrencies only using Market or Limit orders. Market orders can be submitted in cash value only (e.g. $10000 worth of BTC). Limit orders can be submitted in either trade value or quantity terms, but the entered trade value will be converted to quantity and transmitted to OSL in quantity terms.
Are cryptocurrency positions marginable?
No, cryptocurrency positions are not marginable.
Can I deposit Bitcoin into/withdraw Bitcoin from my Interactive Brokers HK account?
No, deposits and withdrawals in Bitcoin/Ethereum are not supported.
Are there limits on the amount of cryptocurrency that can be traded/held in my Interactive Brokers HK account?
Cryptocurrency trading is limited to the lesser of 10% of the account’s total equity or USD 1 million.
Can I short-sell cryptocurrencies in my Interactive Brokers HK account?
No, IBHK does not support the short-selling of cryptocurrencies.
How long does it take for cryptocurrency trades to settle at Interactive Brokers HK?
Cryptocurrency trades settle in real time.
What is the minimum order size for cryptocurrency trades at Interactive Brokers HK?
The minimum order size for cryptocurrency trades at Interactive Brokers HK is USD 10.
What times-in-force can I use when trading cryptocurrencies with Interactive Brokers HK?
Times-in-force for BUY limit orders:
- IOC: Immediate or cancel
- Minutes: Order is canceled if not filled within five (5) minutes.
Times-in-force for SELL orders:
- IOC: Immediate or cancel
- Minutes: Order is canceled if not filled within five (5) minutes.
- Day: Order is canceled if not filled by the end of the trading day.
- GTC: Good til Canceled
Как загрузить пакет диагностики через платформу IBKR
Overview:
Некоторые ситуации требуют загрузки лог-файлов и скриншотов для нашей службы поддержки. Эта информация позволит нам лучше разобраться в Вашей проблеме и найти ей решение.
Данная статья содержит пошаговые инструкции по загрузке диагностических и лог-файлов через различные платформы Interactive Brokers.
Примечание: IBKR не следит за хранилищем пакетов диагностики. Если Вы вдруг решите загрузить пакет диагностики без запроса от Interactive Brokers, пожалуйста, проинформируйте нашу службу поддержки, создав тикет в "Центре сообщений" или позвонив нам, иначе Ваш отчет об ошибке не будет рассмотрен.
Перейдите по одной из ссылок ниже согласно используемой Вами платформе:
-
IBKR Mobile (Android)
-
IBKR Mobile (iOS)
1. Войдите в TWS и попытайтесь воспроизвести проблему, с которой Вы столкнулись
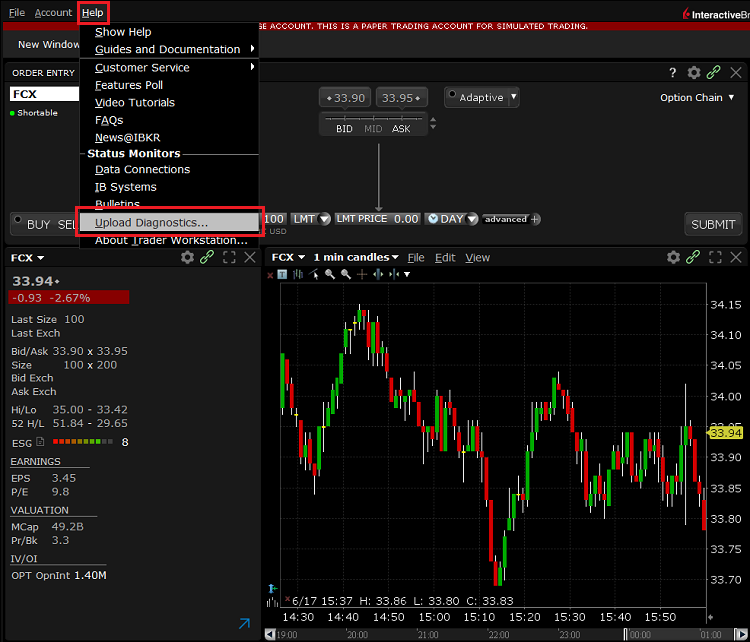
2. Нажмите "Справка" (Help) в левом верхнем углу и выберите "Загрузить диагностику" (Upload Diagnostics). Вы также можете использовать следующие комбинации клавиш в зависимости от Вашей операционной системы:
- На ОС Windows и Linux: нажмите Ctrl+Alt+Q
- На Mac: нажмите Cmd+Option+H
3. Откроется окно загрузки диагностики. В текстовом поле можно указать причину загрузки
4. Если представитель Interactive Brokers попросит Вас добавить логи за прошлые дни или выбрать определенные опции при загрузке диагностики, откройте выпадающее меню в правом верхнем углу, активируйте "Расширенный вид" (Advanced View) и отметьте необходимые пункты из появившихся внизу окна
5. Убедитесь, что графа "Прикрепить скриншот всего рабочего стола" (Include screenshot of entire desktop) отмечена галочкой и нажмите "Отправить" (Submit)
6. Не совершайте никаких действий на Вашем компьютере, пока не увидите сообщение, подтверждающее успешную загрузку диагностики:
А) Если Вы находитесь в окне входа:
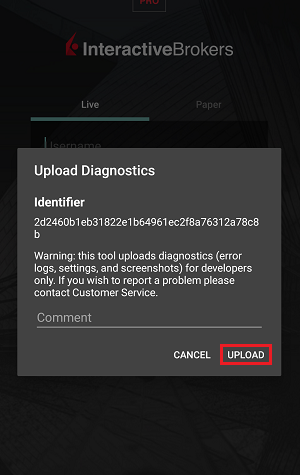
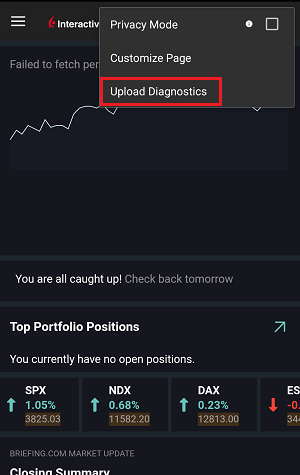
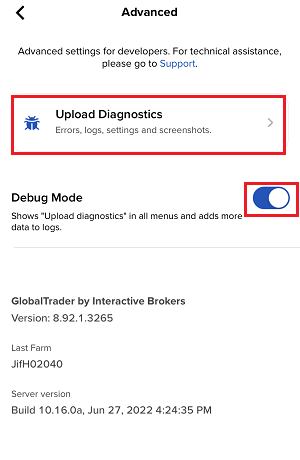
1. Нажмите на значок с тремя точками в правом верхнем углу и выберите "Загрузить диагностику" (Upload Diagnostics)
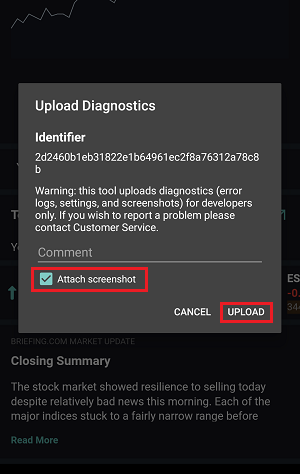
2. Укажите Ваше имя пользователя в поле для комментариев и нажмите "Загрузить" (Upload)
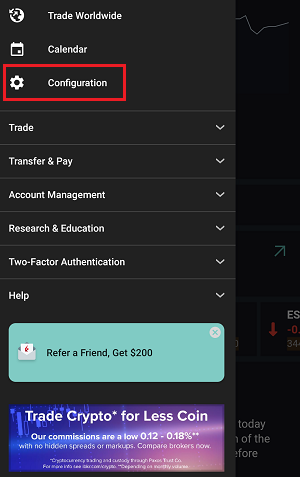
1. Нажмите на значок с тремя горизонтальными линиями в левом верхнем углу, чтобы открыть меню
2. Выберите Конфигурация (Configuration) > Отчеты о проблемах (Trouble Reporting) > поставьте галочку в пункте "Режим отладки" (Debug Mode)
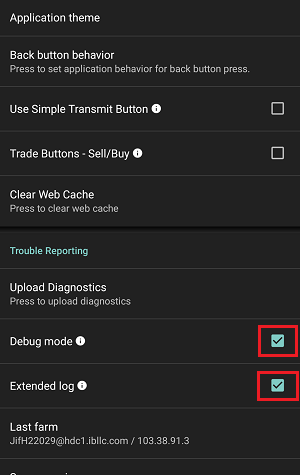
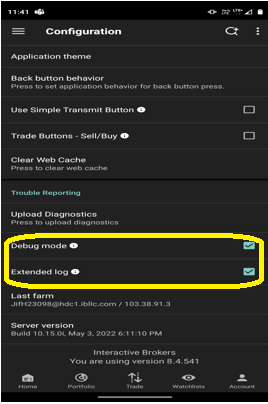
3. Если представитель Interactive Brokers попросит Вас, то поставьте галочку в пункте "Расширенный лог-файл" (Extended Log)
5. Нажмите на значок с тремя точками в правом верхнем углу и выберите "Загрузить диагностику" (Upload Diagnostics)
6. Введите свои комментарии в соответствующее поле и поставьте галочку в графу "Прикрепить скриншот" (Attach Screenshot). Нажмите "Загрузить" (Upload)
А) Если Вы находитесь в окне входа:
1. Быстро нажмите на логотип IBKR пять раз, чтобы открыть меню тестирования
2. В разделе конфигурации активируйте переключатель рядом с пунктом "Режим отладки" (Debug Mode)
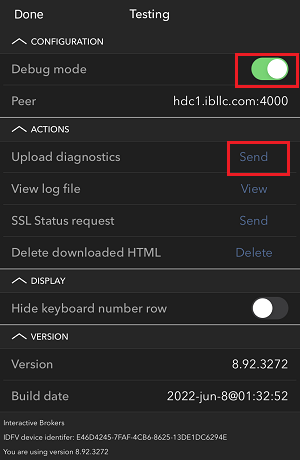
3. Нажмите "Отправить" (Send) в строке "Загрузить диагностику" (Upload Diagnostics)
4. Введите Ваше имя пользователя в поле для комментариев и нажмите "ОК"
1. Сделайте скриншоты проблемы прямо на Вашем телефоне (одновременно нажав физические кнопки включения + громкости)
2. Нажмите на кнопку "Еще" (More) в правом нижнем углу экрана
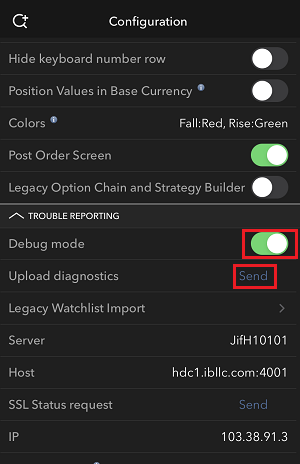
3. Выберите "Конфигурация" (Configuration) и разверните раздел "Отчеты о проблемах" (Trouble Reporting)
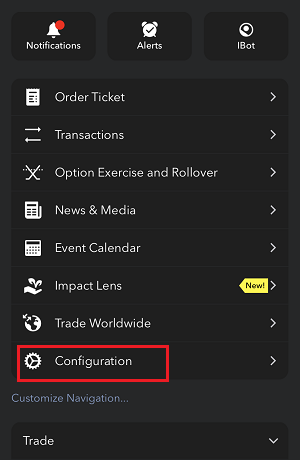
4. Активируйте переключатель рядом с пунктом "Режим отладки" (Debug Mode) и нажмите "Отправить" (Send) в разделе загрузки диагностики.
5. Откроется окно отправки диагностики. Введите свои комментарии в соответствующее поле
6. Нажмите "Прикрепить изображение" (Attach Image), чтобы добавить сохраненные Вами в галерее скриншоты проблемы
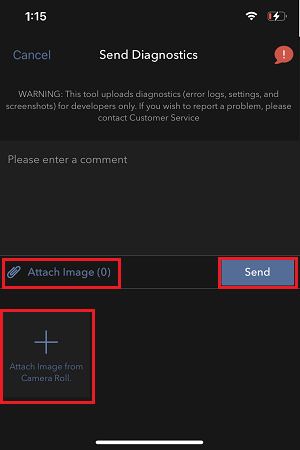
7. Нажмите "Отправить" (Send)
1. Войдите в приложение
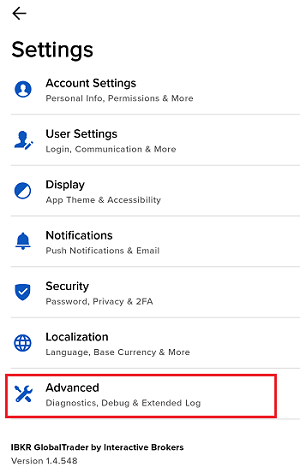
2. Нажмите на значок пользователя в левом верхнем углу и выберите "Настройки" (Settings)

3. Перейдите в раздел расширенных настроек (Advanced) и активируйте переключатель рядом с пунктом "Режим отладки" (Debug Mode)
4. Если представитель Interactive Brokers попросит Вас, то активируйте переключатель рядом с пунктом "Расширенный лог-файл" (Extended Log)
5. Вы увидите всплывающее окно для загрузки диагностики. Введите свои комментарии в соответствующее поле и нажмите "Загрузить" (Upload)
Примечание: Чтобы прислать нам скриншоты IMPACT или IBKR GlobalTrader для Android, Вам потребуется прикрепить их к тикету в "Центре сообщений" согласно инструкциям в статье IBKB1071
1. Войдите в приложение
2. Сделайте скриншоты проблемы прямо на Вашем телефоне (одновременно нажав физические кнопки включения + громкости)
3. Нажмите на значок пользователя в левом верхнем углу и выберите "Настройки" (Settings)
4. Перейдите в раздел расширенных настроек (Advanced)
5. Активируйте переключатель рядом с пунктом "Режим отладки" (Debug Mode) и выберите "Загрузить диагностику" (Upload Diagnostics)
6. Откроется окно отправки диагностики
7. Введите свои комментарии в соответствующее поле и нажмите "Прикрепить изображение" (Attach Image), чтобы добавить сохраненные Вами в галерее скриншоты проблемы
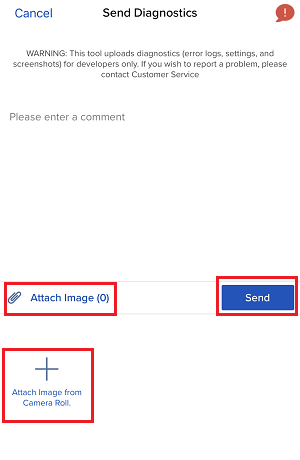
8. Нажмите "Отправить" (Send)
Инструкция по созданию диагностического протокола для "Портала клиентов": IBKB3512
How to Access Your Reports Using FTP on Windows
Overview:
This tutorial assumes you received reports via email or via FTP that were encrypted with the public key you sent to IBKR. If you need guidance to set up the encrypted statement delivery, please refer to this article, which is a prerequisite to the instructions below.
There are multiple methods to access the IBKR FTP server. FTP clients such as Filezilla can be used or you could as well launch the command ftp ftp2.interactivebrokers.com from the Command Prompt or use the Windows Explorer. In this article, we explain how to realize the connection to the IBKR FTP server using Windows Explorer.
Important Note: You will not be able to connect using your browser.
Once you are connected to the IBKR FTP Server, you will have both read and write access to your folder. The retention policy for the files is 100 days - IBKR will automatically purge files after that.
To access your reports using Windows File Explorer:
1. Open the Windows File Explorer by either pressing Windows Key + E on the keyboard. Alternatively, you can type File Explorer into the Windows search box and click on Open
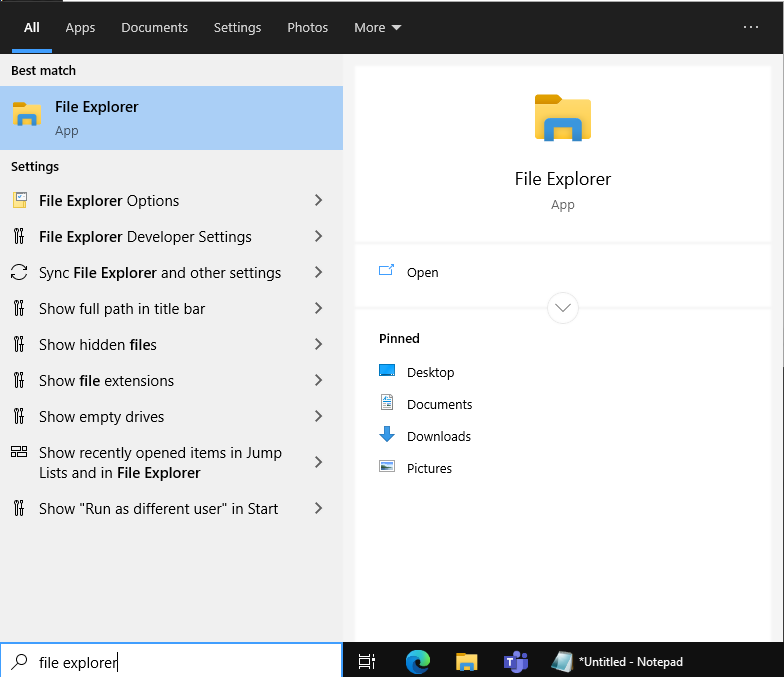
2. In the File Explorer window, type the FTP address, ftp://ftp2.interactivebrokers.com, into the file path at the top of the window and hit Enter.
.png)
3. A window prompting your for credentials will appear. Enter the FTP username and password IBKR provided you with into the correspondent fields and click Log On.
.png)
4. You now have direct access to your FTP folder. Documents and files contained in your FTP folder can now be decrypted using your PGP key, as described in IBKB4108.
.png)
Common issues and solutions
A. Could not log in to the FTP server with the username and password specified
Ensure the correct login details are being used to connect to the FTP server. The username and password you are entering should match the ones you have received from the Reporting Integration Team.
B. Connection Timed Out
-
Enable the Passive (PASV) mode for FTP connections. press Windows Key + S, type Internet Options and open the panel. Move to the Advanced tab and activate the option Use Passive FTP (for firewall and DSL modem compatibility). The passive mode is more firewall-friendly then the active one, since all the connections are initiated from the Client side. If you are using a specific FTP Client, check its connection settings or advanced settings in order to find and enable the Passive (PASV) mode switch.
-
In case you have an antivirus or a security software installed on your machine, make sure it is not blocking the FTP connection attempt. Normally, security software allows to set up exceptions for specific connections in order to whitelist them.
-
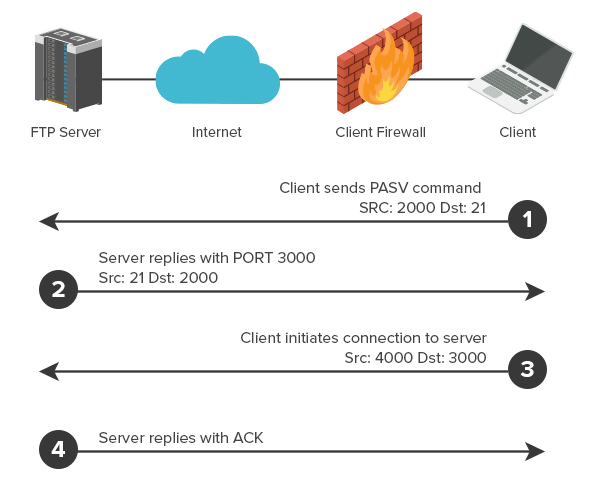
Should the above steps be unable to resolve the issue, ask your network administrator/s to confirm that your firewall allows traffic from/to ftp2.interactivebrokers.com. Note: Your network administrator should consider that every time your FTP Client attempts connecting to our FTP server with Passive mode, it establishes two connections: a command channel (outbound, from random TCP port above 1024 to TCP port 21) and a data channel (outbound, from a random TCP port above 1024 to the TCP port above 1024 which was negotiated through the command channel). Both connections are initiated by the Client side. In the picture below, you can find an example of this connections schema. Please notice that the ports 2000, 3000, 4000 are examples of randomly selected ports and may very well not correspond to the ones used within your specific FTP connection attempt.
References
KB3968 - Generate a key pair using GPG for Windows
KB4205 - Generate a key pair using GPG Suite on macOS
KB4108 - Decrypt your Reports using GPG for Windows
KB4210 - Decrypting Reports using your PGP Key pair on macOS
KB4407 - Generate RSA Key Pair on Windows
KB4580 - How to Access your Reports using FTP on MacOS
KB4409 - How to set up sFTP for using Certificate Authentication on Windows
KB4410 - How to set up sFTP for using Certificate Authentication on macOS
KB4411 - How to backup your public/private Key pair
KB4323 - How to transfer your public/private key pair from one computer to another
KB4409 - How to set up sFTP for using Certificate Authentication on Windows
KB4410 - How to set up sFTP for using Certificate Authentication on macOS
KB4411 - How to backup your public/private Key pair
KB4323 - How to transfer your public/private key pair from one computer to another
How to Upload a Diagnostic Bundle from an IBKR Platform
Overview:
Some support related issues require diagnostics files and logs to be uploaded along with screenshots. The information will help our team to investigate and resolve the issue that you are experiencing.
This article will help you with detailed steps on how to upload diagnostics files and logs from various Interactive Brokers’ trading platforms.
Note: IBKR does not monitor the diagnostic bundle repository throughout the day. Should you spontaneously decide to upload a diagnostic bundle, without being instructed by Interactive Brokers, please inform our Client Services via Message Center ticket or phone call otherwise your error report will go unnoticed.
Please click on one of the links below, according to the platform you are using:
-
IBKR Mobile (Android)
-
IBKR Mobile (iOS)
1. Log in to TWS and try to replicate the issue that you are experiencing
2. Press ‘Help’ at the top left corner and select ‘Upload Diagnostics’. Alternatively, depending on your Operating System, you can use the following keyboard combinations
- For Windows and Linux Operating system: Press Ctrl+Alt+Q
- For Mac: Press Cmd+Option+H
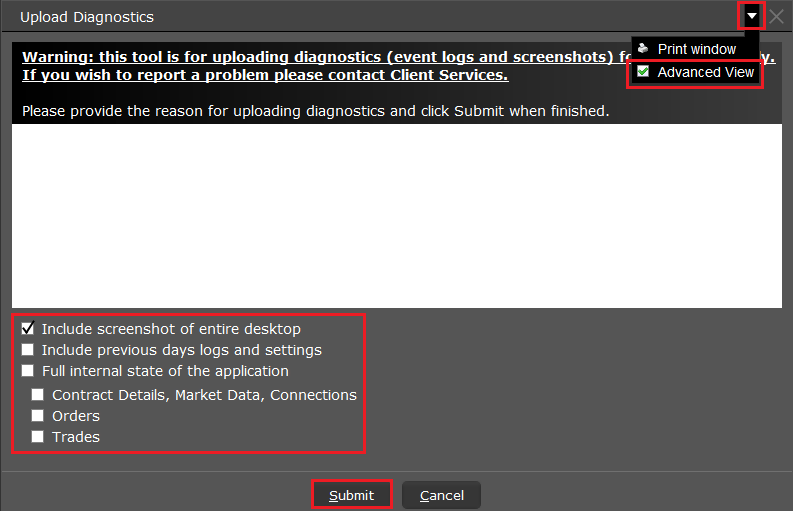
3. The ‘Upload Diagnostics’ window will appear. You may enter the reason for uploading diagnostics in the text box
4. If an Interactive Brokers representative has instructed you to include previous days logs or select specific options when uploading diagnostics, click the dropdown on the right top corner, select ‘Advanced View’ and tick the correspondent checkboxes which will appear on the bottom left part
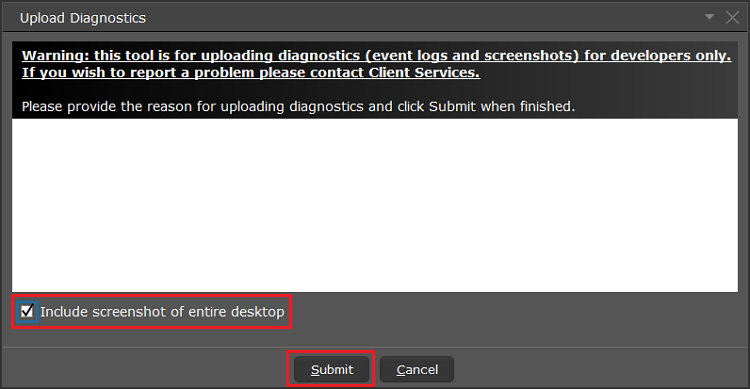
5. Make sure the checkbox ‘Include screenshot of entire desktop’ is enabled and press ‘Submit’
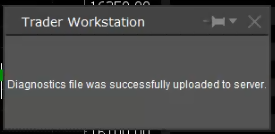
6. Do not perform any action/activity on your computer until you see the below pop-up, confirming that the diagnostics have been successfully uploaded
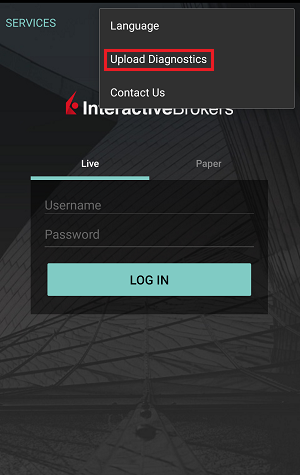
A) If you are at the login Screen:
1. Tap the three dots icon in the right top corner and select ‘Upload Diagnostics’
2. Add your username in the comment section and tap ‘Upload’
1. Tap the three lines icon in the top left corner to open the menu
2. Tap ‘Configuration’> ‘Trouble Reporting’> enable the check box next to ‘Debug mode’
3. If requested by an Interactive Brokers representative, enable the check box next to ‘Extended Log’ as well
5. Tap the three dots icon in the top right corner of the screen and select ‘Upload Diagnostics’
6. Enter your comments in comment section and enable the checkbox next to ‘Attach Screenshot’. Then tap ‘Upload’
A) If you are at the login Screen:
1. Tap five times in a quick sequence on the IBKR logo to open the testing menu
2. Under Configuration, enable the toggle button next to ‘Debug mode’
3. Tap ‘Send’ next to ‘Upload diagnostics’
4. Enter your username in the comments section and tap ‘OK’
1. Capture screenshots displaying the issue you are experiencing directly on the phone (pressing together the physical buttons Power + Volume Up)
2. Tap the option ‘More’ in the right bottom corner of the screen
3. Tap ‘Configuration’ and expand the section ‘Trouble Reporting’
4. Enable the toggle button next to ‘Debug mode’ and, next to ‘Upload diagnostics’, tap ‘Send’
5. The ‘Send Diagnostics’ page will appear. Enter your comments in comment section
6. Tap the ‘Attach Image’ button to attach screenshots of the issue that you have previously saved in your camera roll
7. Tap ‘Send’
1. Log in to the app
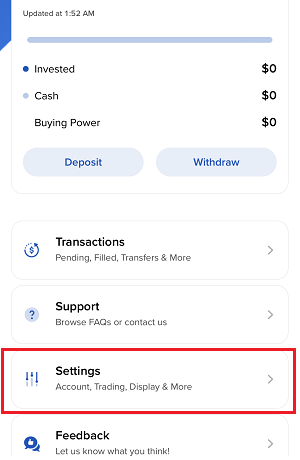
2. Tap the User icon in the top left corner and select ‘Settings’
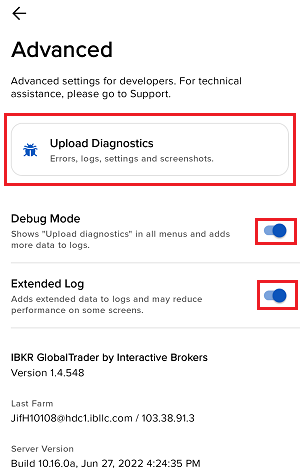
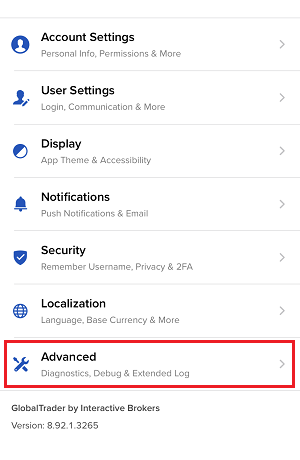
3. Tap the option ‘Advanced’ and enable the toggle button next to ‘Debug mode’
4. If requested by an Interactive Brokers representative, enable as well the toggle button next to ‘Extended Log’
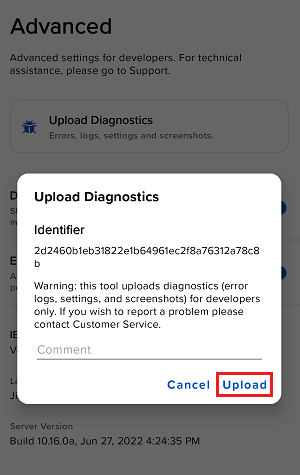
5. You will see an ‘Upload Diagnostics’ pop-up. Enter your comments in the field and tap ‘Upload’
Note: If you need to send us screenshots of IMPACT or IBKR GlobalTrader for Android, you would have to attach them to a Message Center web ticket, as explained in IBKB1071
1. Log in to the app
2. Capture one or more screenshots displaying the issue you are experiencing directly on the phone (pressing the physical buttons Power + Volume Up simultaneously)
3. Now tap the User icon in the top left corner and select ‘Settings’
4. Tap ‘Advanced’
5. Enable the toggle button next to ‘Debug mode’ and tap ‘Upload Diagnostics’
6. The ‘Send Diagnostics’ screen will appear
7. Enter your comments in the field and tap ‘Attach Image’ to attach the screenshot/s you previously saved in your camera roll
8. Tap ‘Send’
A diagnostic trace for Client Portal can be captured following the steps on IBKB3512
Как сгенерировать HAR-файл
Background:
Для решения нестандартных проблем нам иногда необходима дополнительная информация о работе Вашего браузера. Сотрудник поддержки может попросить Вас записать и прислать .har-файл. В данной файле содержится дополнительная информация о сетевых запросах, отправляемых и получаемых Вашим браузером. Чтобы сгенерировать файл, браузер записывает содержимое, время и статус запросов и ответов HTTP/HTTPS в момент возникновения проблемы.
Данная статья содержит инструкцию для генерирования .har-файла. Щелкните по браузеру, который Вы используете:
Чтобы сгенерировать файл HAR в Google Chrome:
1. Откройте Google Chrome и перейдите на страницу с ошибкой.
2. Нажмите CRTL +SHIFT + I на клавиатуре. Либо щелкните по иконке меню (три вертикальные точки в правом верхнем углу окна браузера) и выберите Дополнительные инструменты > Инструменты разработчика.
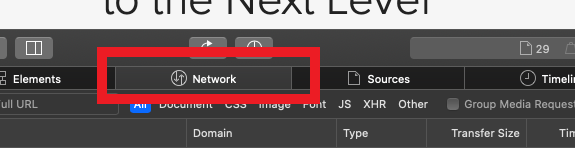
3. Сбоку или снизу экрана откроется панель инструментов разработчика. Откройте вкладку Сеть [Network] (изобр. 1).
Изобр. 1
.png)
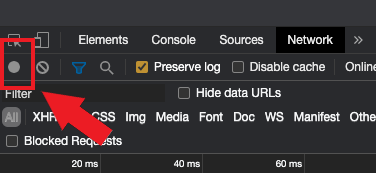
4. В левом верхнем углу окна инструментов разработчика найдите круглую кнопку записи и проверьте, что она красного цвета. Если кнопка серого цвета, нажмите на нее один раз, чтобы начать запись, или просто нажмите CTRL+E (изобр. 2).
Изобр. 2
5. Установите флажок в поле Сохранять журнал [Preserve log] (изобр. 3).
Изобр. 3
.png)
6. Нажмите на кнопку Сбросить, чтобы очистить старые журналы (значок в виде перечеркнутого круга справа от кнопки записи) (изобр. 4).
Изобр. 4
![]()
7. Воспроизведите ошибку, пока идет запись сетевых запросов.
8. Затем нажмите правой кнопкой мыши в любом месте в списке записанных сетевых запросов, выберите Сохранить все как HAR с содержимым и сохраните файл в папку на Ваш выбор (например, на рабочий стол).
9. На "Портале клиентов" IBKR откройте "Центр сообщений" и создайте тикет (или используйте старое обращение, если оно есть).
10. В тикете приложите сгенерированный .har-файл. Если служба поддержки IBKR сообщила Вам код тикета или имя сотрудника для обращения, укажите эту информацию в теле тикета.
11. Отправьте тикет.
Чтобы сгенерировать HAR-файл в Firefox:
1. Откройте Firefox и перейдите на страницу с ошибкой.
2. Нажмите F12 на клавиатуре. Либо щелкните по иконке меню (три параллельные горизонтальные линии в правом верхнем углу окна браузера) и выберите Веб-разработка > Сеть.
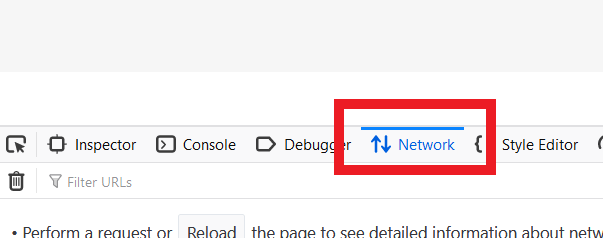
3. Сбоку или снизу экрана откроется панель инструментов разработчика. Откройте вкладку Сеть [Network] (изобр. 5).
Изобр. 5
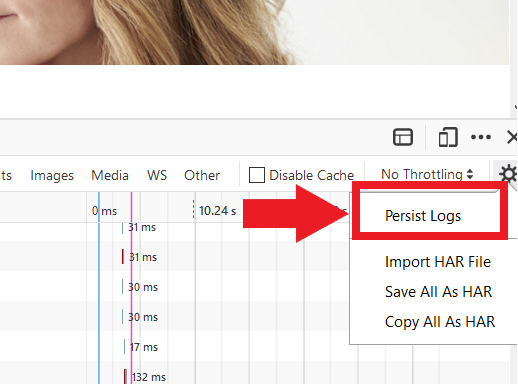
4. Установите флажок в поле Непрерывные логи [Persist logs] (изобр. 6).
Изобр. 6
5. Воспроизведите ошибку. Запись сетевых запросов начнется автоматически.
6. Затем нажмите правой кнопкой мыши в любом месте в списке записанных сетевых запросов и выберите Сохранить все как HAR.
7. Сохраните файл на компьютер (например, на рабочий стол).
8. На "Портале клиентов" IBKR откройте "Центр сообщений" и создайте тикет (или используйте старое обращение, если оно есть).
9. В тикете приложите сгенерированный .har-файл. Если служба поддержки IBKR сообщила Вам код тикета или имя сотрудника для обращения, укажите эту информацию в теле тикета.
10. Отправьте тикет.
Чтобы сгенерировать HAR-файл в Microsoft Edge:
1. Откройте Edge и перейдите на страницу с ошибкой.
2. Нажмите F12 на клавиатуре. Либо щелкните по иконке меню (три горизонтальные точки в правом верхнем углу окна браузера) и выберите Другие инструменты > Средства разработчика.
3. Откройте вкладку Сеть [Network] (изобр. 10).
Изобр. 10
.png)
4. Воспроизведите ошибку, пока идет запись сетевых запросов.
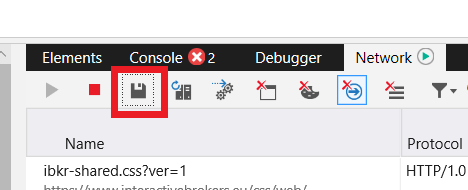
5. Затем нажмите на иконку дискеты (Экспортировать как HAR) или нажмите CTRL+S (изобр. 11).
Изобр. 11
6. Введите имя файла и выберите, куда хотите его сохранить (например, на рабочий стол). Нажмите Сохранить.
7. На "Портале клиентов" IBKR откройте "Центр сообщений" и создайте тикет (или используйте старое обращение, если оно есть).
8. В тикете приложите сгенерированный .har-файл. Если служба поддержки IBKR сообщила Вам код тикета или имя сотрудника для обращения, укажите эту информацию в теле тикета.
9. Отправьте тикет.
Чтобы сгенерировать HAR-файл в Safari:
Примечание. Перед генерацией HAR-файла убедитесь, что в меню Safari отображается вкладка "Разработка" (Develop). Если вкладка не отображается, нажмите на меню Safari, откройте "Настройки" (Preferences), нажмите "Дополнения" (Advanced) и установите флажок в поле "Показывать меню "Разработка" в строке меню" (Show Develop menu in menu bar).
1. Щелкните по вкладке Разработка и выберите Показать веб-инспектор или нажмите CMD+ALT+I.
2. Откройте вкладку Сеть [Network] (изобр. 12).
Изобр. 12
3. Установите флажок в поле Сохранить журнал [Preserve log] (изобр. 13).
Изобр. 13
.png)
4. Щелкните по иконке экспорта (или нажмите CMD+S), введите имя файла, выберите место на компьютере (например, рабочий стол) и сохраните .har-файл.
5. На "Портале клиентов" IBKR откройте "Центр сообщений" и создайте тикет (или используйте старое обращение, если оно есть).
6. В тикете приложите сгенерированный архив. Если служба поддержки IBKR сообщила Вам код тикета или имя сотрудника для обращения, укажите эту информацию в теле тикета.
7. Отправьте тикет.
Криптовалютные продукты, доступные в IBKR
Overview:
Ниже приведен список криптовалютных продуктов, доступных в IBKR*. Если в списке нет продукта, который Вы ищете, воспользуйтесь поиском по базе данных IBKR на нашем сайте. Выберите раздел поддержки и затем тип своего счета (для частных лиц или для организаций). Здесь Вы можете выполнить простой поиск, указав название или символ продукта, расширенный поиск с помощью фильтров или поиск по конкретному типу продукта.
Криптовалюта
- BTC – Bitcoin
- ETH – Ethereum
- LTC – Litecoin
- BCH – Bitcoin Cash
Акции/ETF
США
- GBTC (PINK) – Grayscale Bitcoin Investment Trust
- BCHG (PINK) – Grayscale Bitcoin Cash Trust
- ETCG (PINK) – Grayscale Ethereum Classic Trust
- ETHE (PINK) – Grayscale Ethereum Trust
- GDLC (PINK) – Grayscale Digital Large Cap Fund
- LTCN (PINK) – Grayscale Litecoin Trust
Другие страны
- BITCOINXB (SFB) – Bitcoin Tracker One
- COINETH (SFB) – XBT Provider Ethereum
- COINETHE (SFB) – XBT Provider Ethereum
Индексы
- NYXBT (NYSE) – NYSE Bitcoin Index
- GXBT (Cboe) – The Gemini Bitcoin Trace Price Index (с июня 2019 новые контракты для торговли не предлагаются)
- BRR (CME) – CME Bitcoin Reference Rate Index
- BRTI (CME) – CME Bitcoin Real Time Index
Фьючерсы
- GXBT (Cboe/CFE) – The Gemini Bitcoin Trace Price Futures (с июня 2019 новые контракты для торговли не предлагаются)
- BRR (CME) – CME Bitcoin Reference Rate Futures
- ETHUSDRR (CME) – CME Ether Dollar Reference Rate Futures
- BAKKT (ICECRYPTO) – Bakkt Bitcoin Futures
*Часть вышеперечисленных продуктов может быть недоступна клиентам IBKR, находящимся в определенных юрисдикциях.
Вернуться к оглавлению: Bitcoin и другие криптовалютные продукты в IBKR
Bitcoin и другие криптовалютные продукты в IBKR
Криптовалютные продукты, доступные в IBKR
http://ibkr.info/ru/article/3060
Рыночные данные о криптовалютных продуктах
http://ibkr.info/ru/article/3061
Торговля фьючерсами на Bitcoin через IBKR
http://ibkr.info/ru/article/3049
Страница с информацией о фьючерсах на Bitcoin
https://www.interactivebrokers.co.uk/ru/?f=29302
Маржинальные требования IBKR
https://www.interactivebrokers.com/ru/index.php?f=27244
Как добавить еще одного пользователя для аутентификации с помощью IBKR Mobile (IB Key) – iOS
Overview:
В этой статье указано, как добавить еще одного пользователя в разделе аутентификации в приложении IBKR Mobile для устройств на iOS.
Требования:
- На устройстве iOS должно быть установлено приложение IBKR Mobile и активирована аутентификация через IBKR Mobile (IB Key).
- Дополнительная информация об установке и активации на устройствах iOS доступна в статье KB2278.
Инструкции:
1. Откройте приложение IBKR Mobile на своем устройстве iOS.
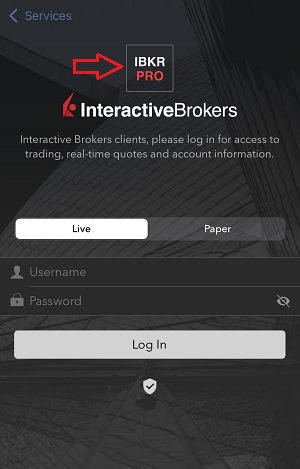
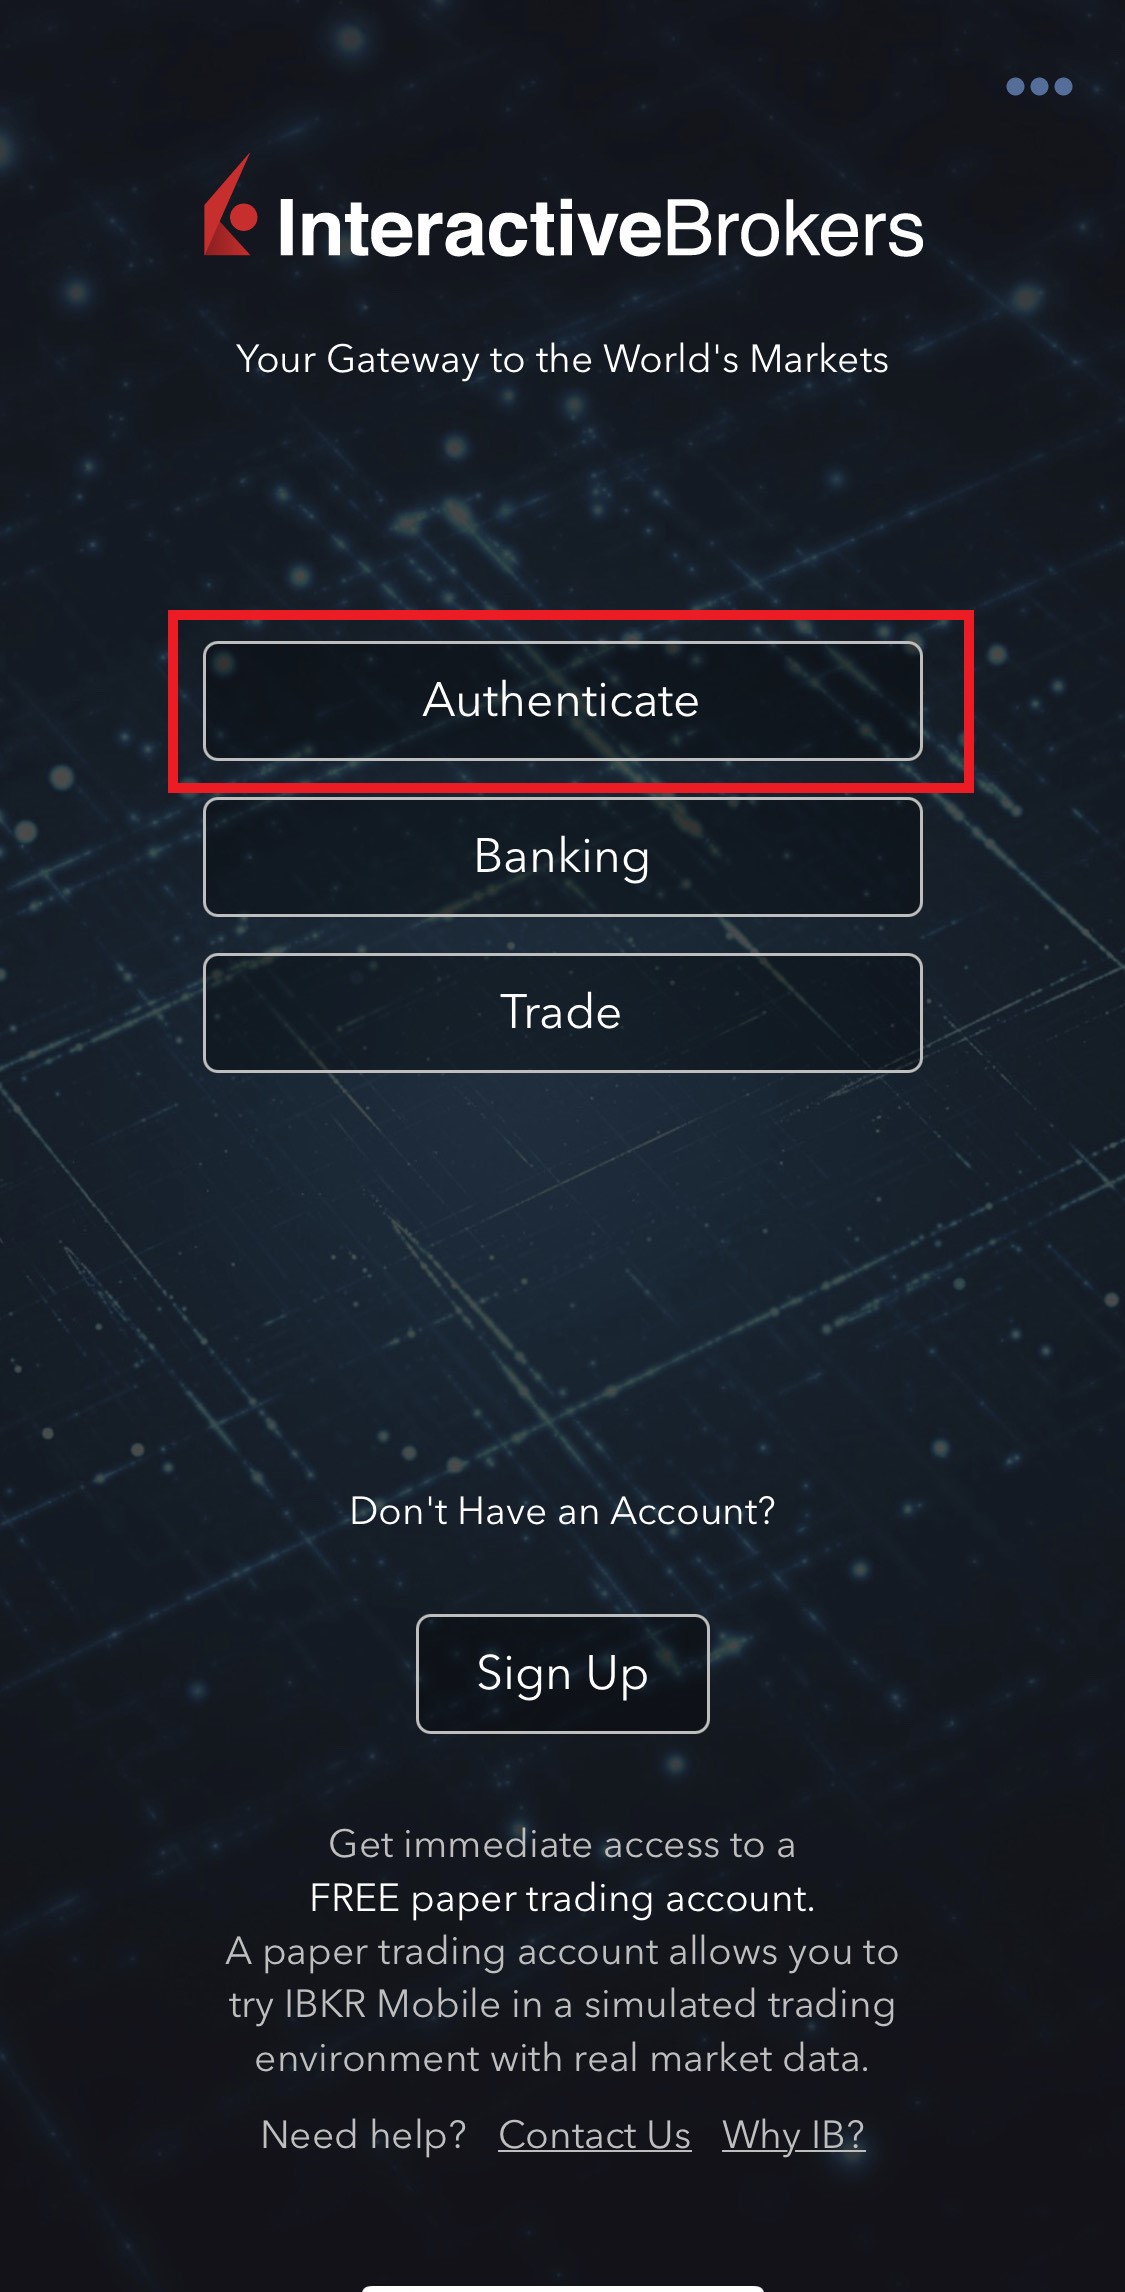
1.a. Если после запуска приложения откроется окно входа (изобр. 1), нажмите на Услуги (Services) в левом верхнем углу (отмечено красной стрелкой) и перейдите к шагу 2.
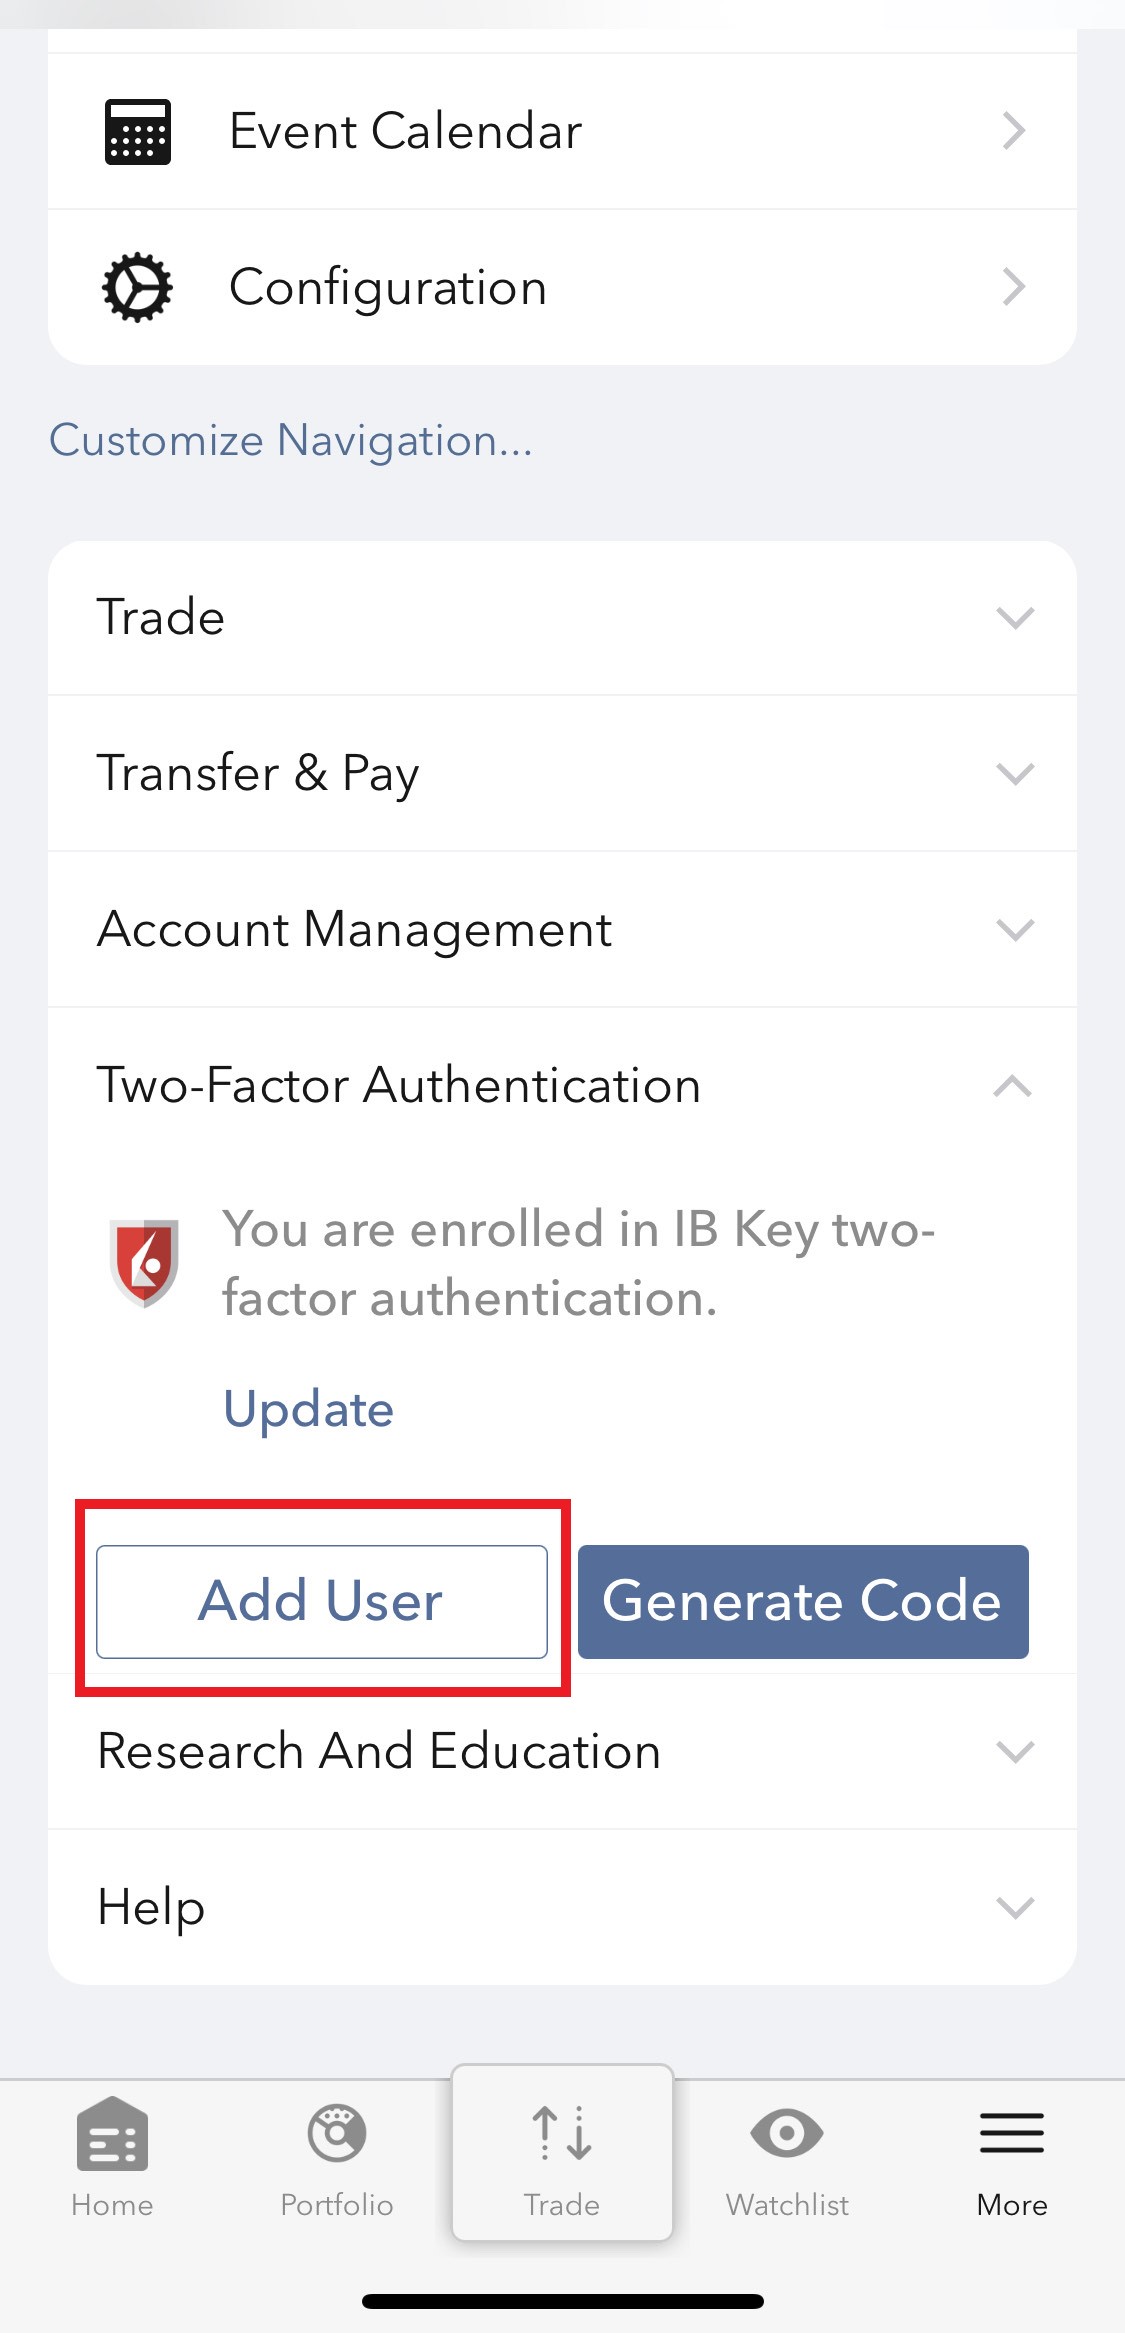
1.b. Если после запуска приложения откроется главная страница, портфель, списки наблюдения или другая страница, нажмите на вкладку Больше в правом нижнем углу (изобр. 2). Выберите Двухфакторная аутентификация (Two-Factor Authentication) (изобр. 3), а затем Добавить пользователя (Add User) (изобр. 4) и перейдите к шагу 3.
Изобр. 1. Изобр. 2. Изобр. 3.
(1).jpeg)
.jpeg)
.jpeg)
Изобр. 4.
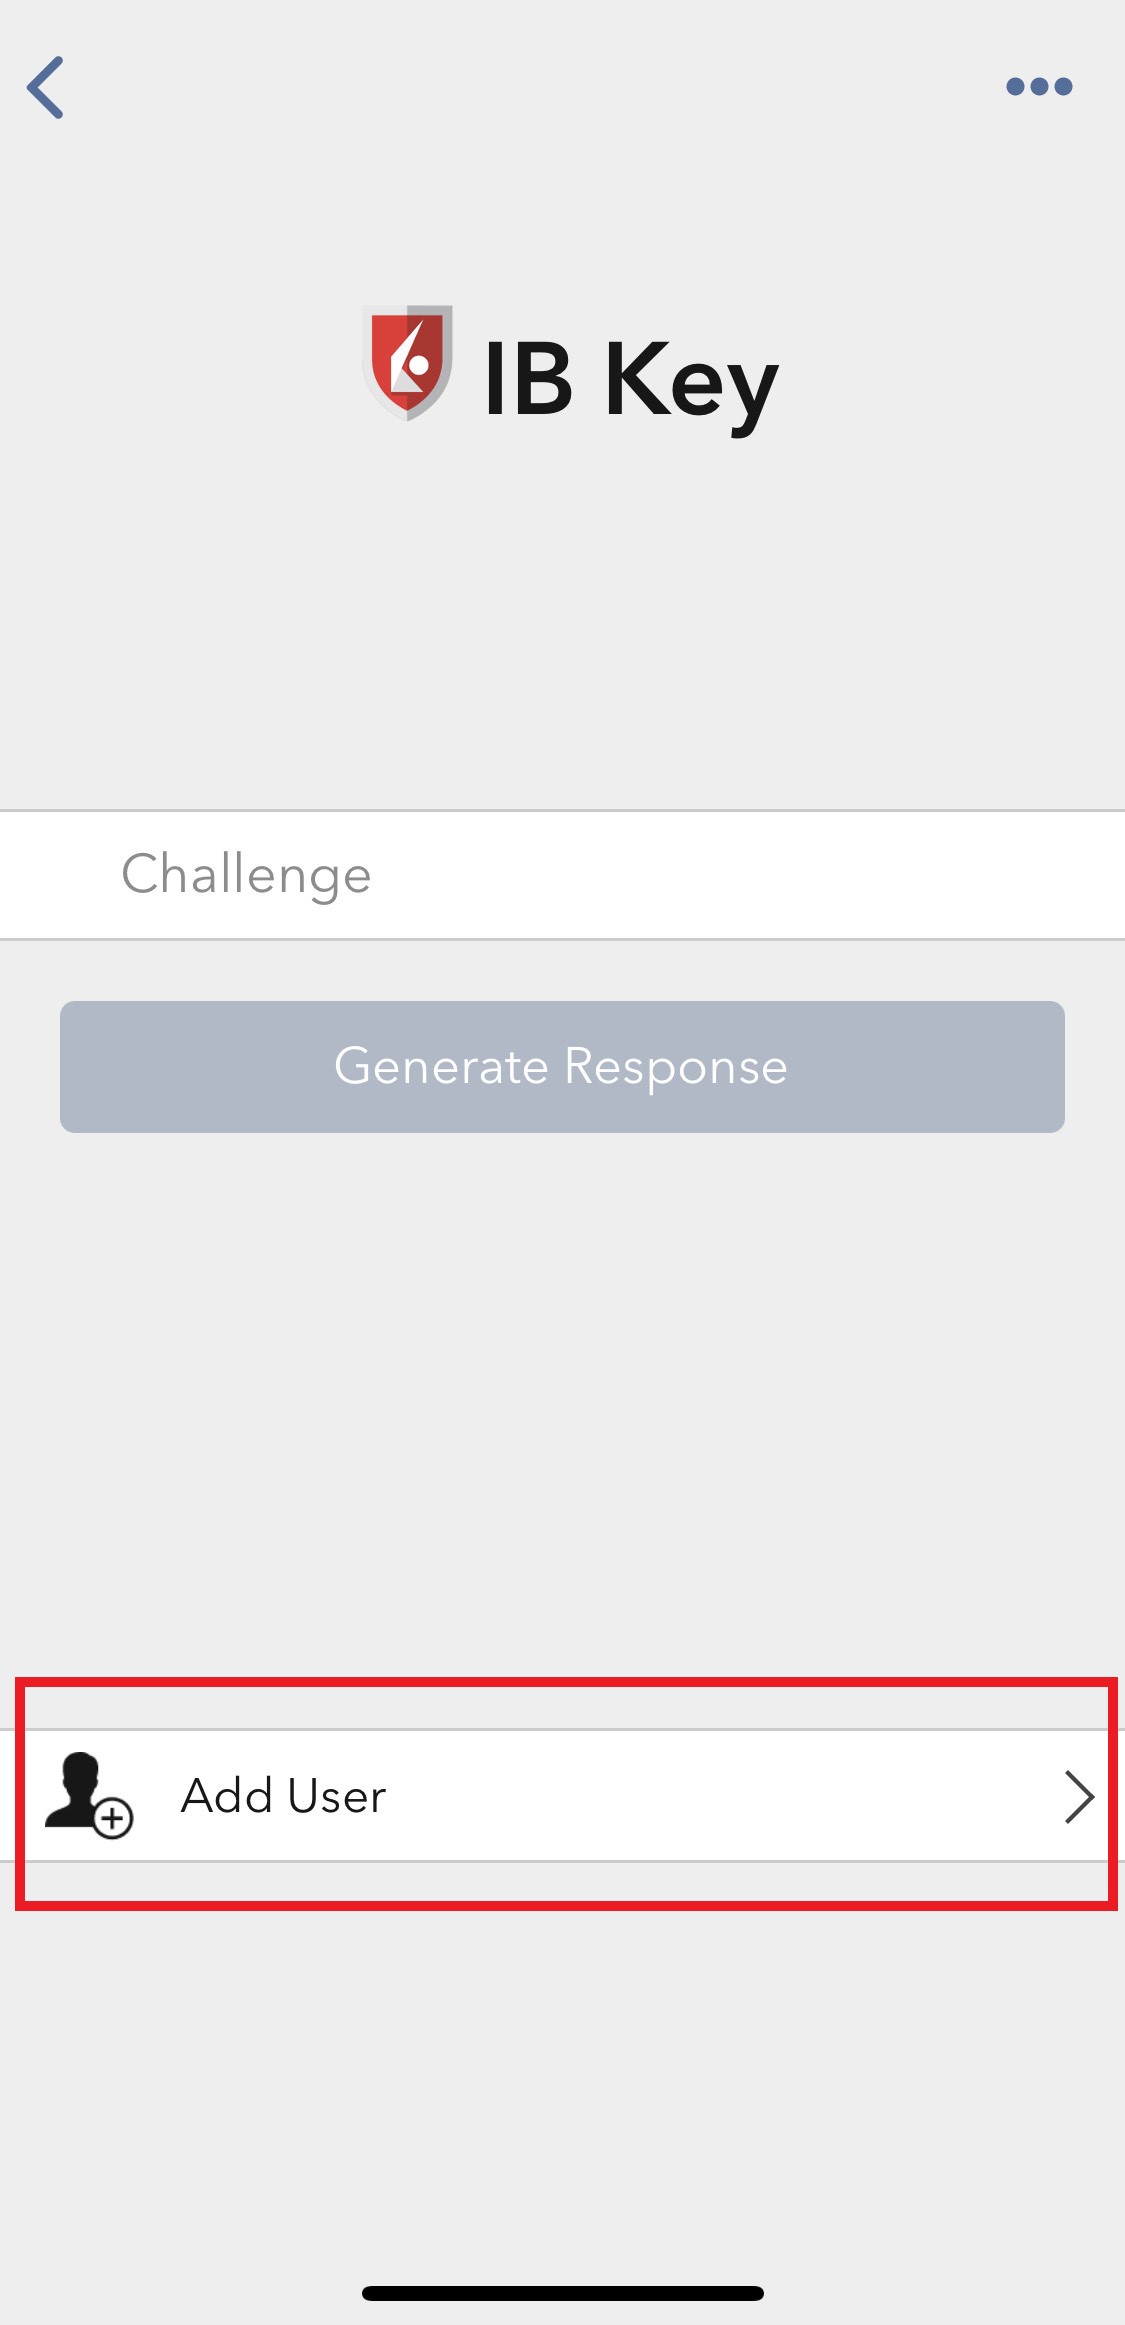
2. Выберите Аутентификация (Authenticate) (изобр. 5), а затем Добавить пользователя (Add User) (изобр. 6).
Изобр. 5 Изобр. 6
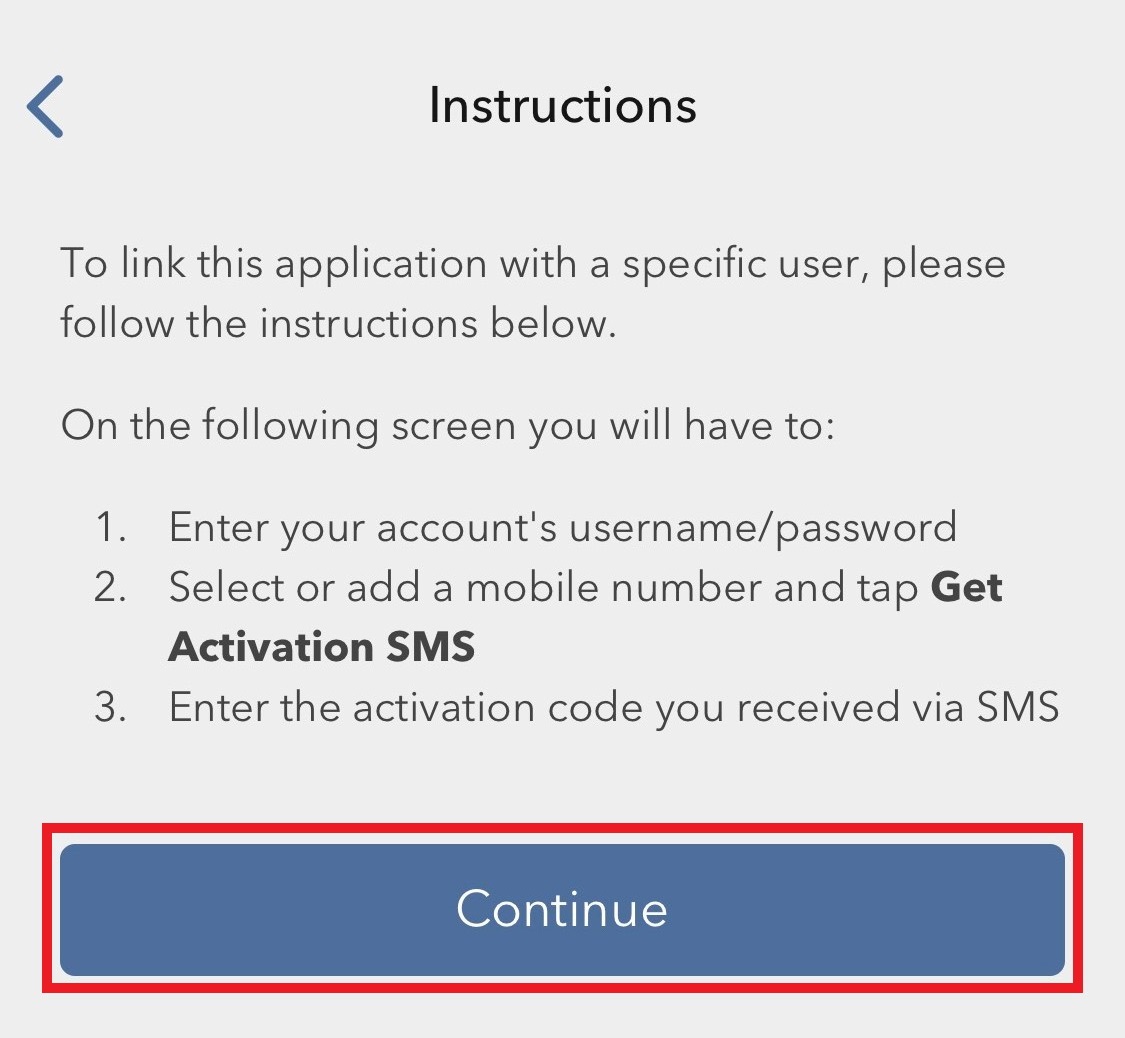
3. Прочитайте инструкции и нажмите Далее (Continue) (изобр. 7).
Изобр. 7
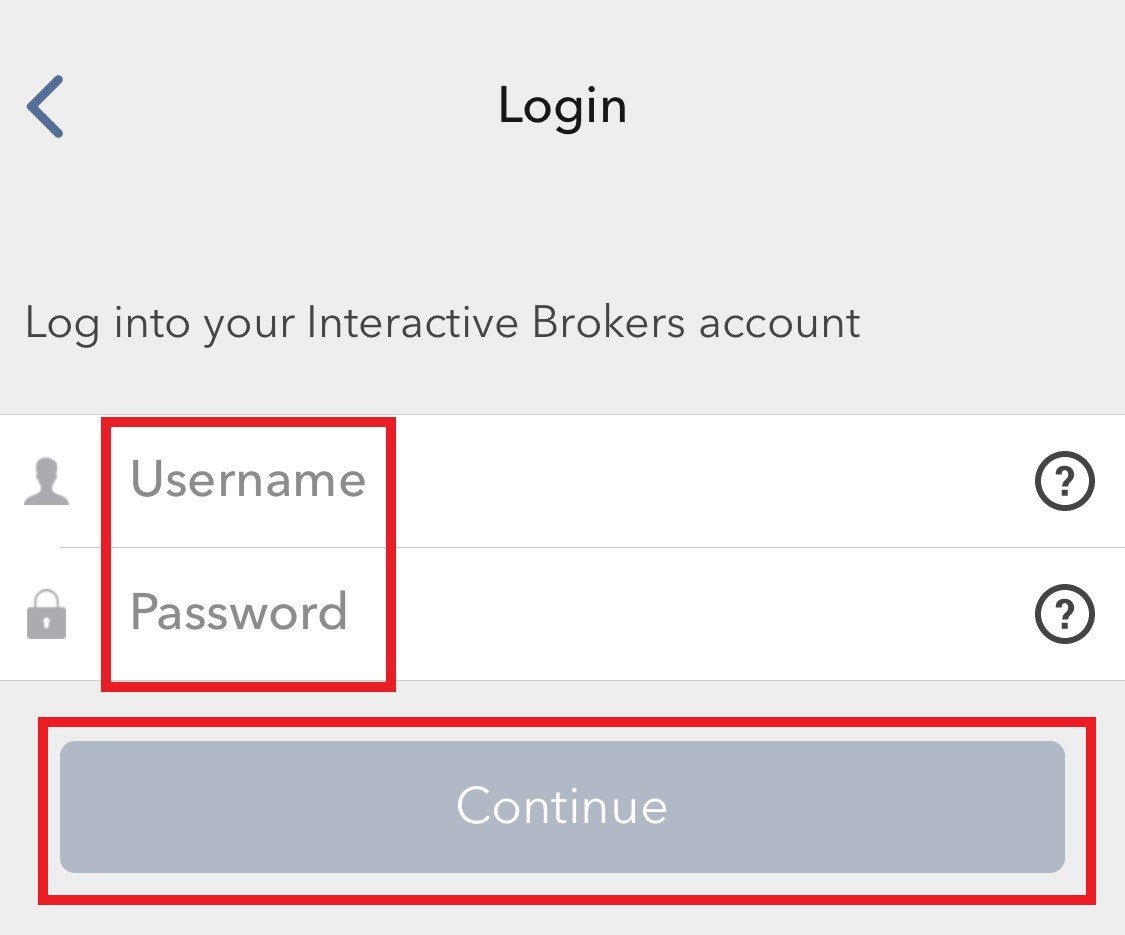
3. Введите свои имя пользователя и пароль и нажмите Далее (Continue) (изобр. 8).
Изобр. 8.
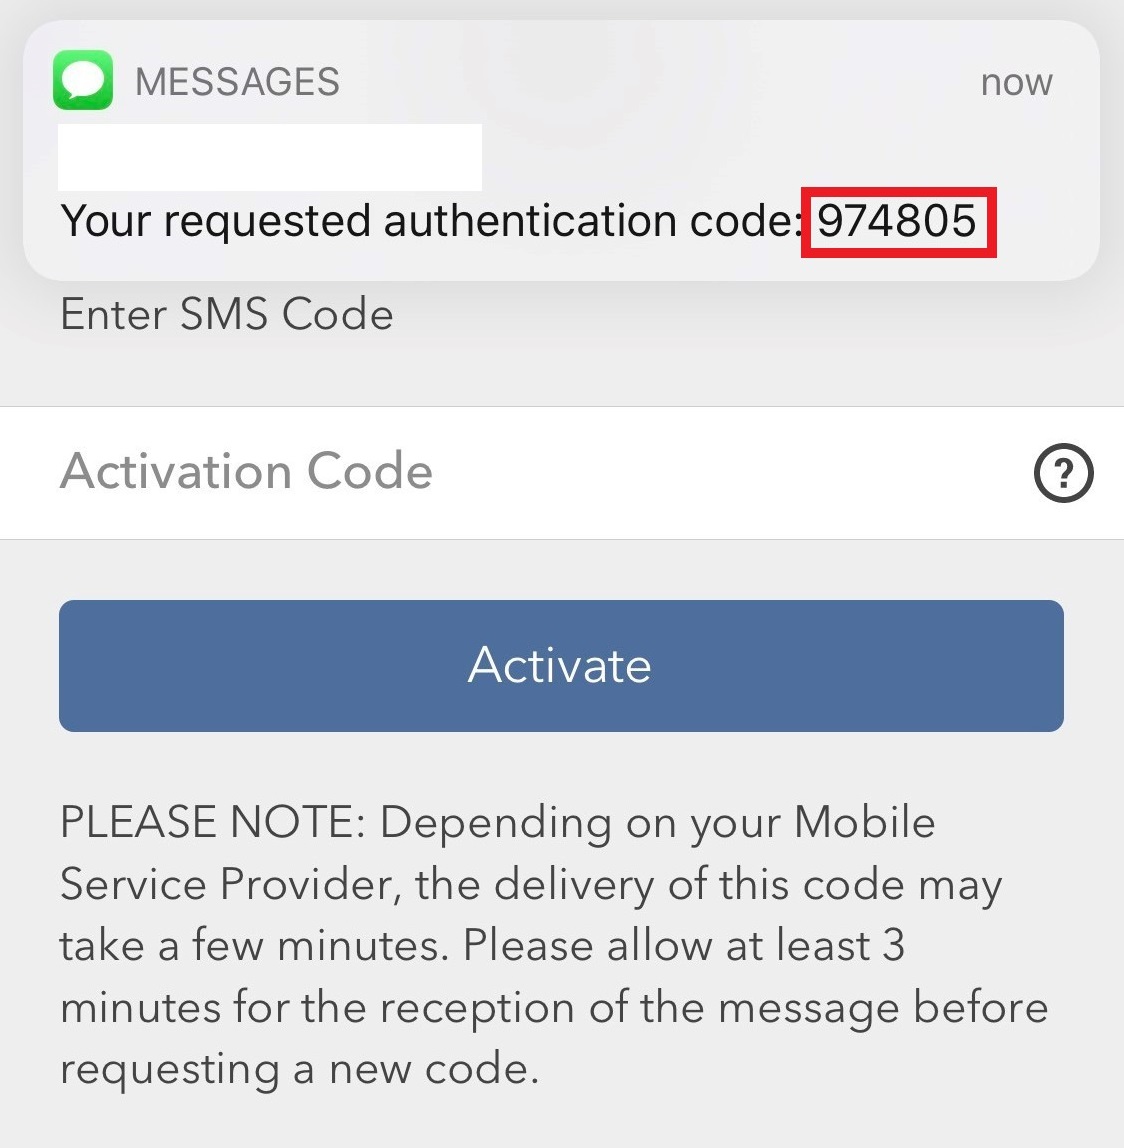
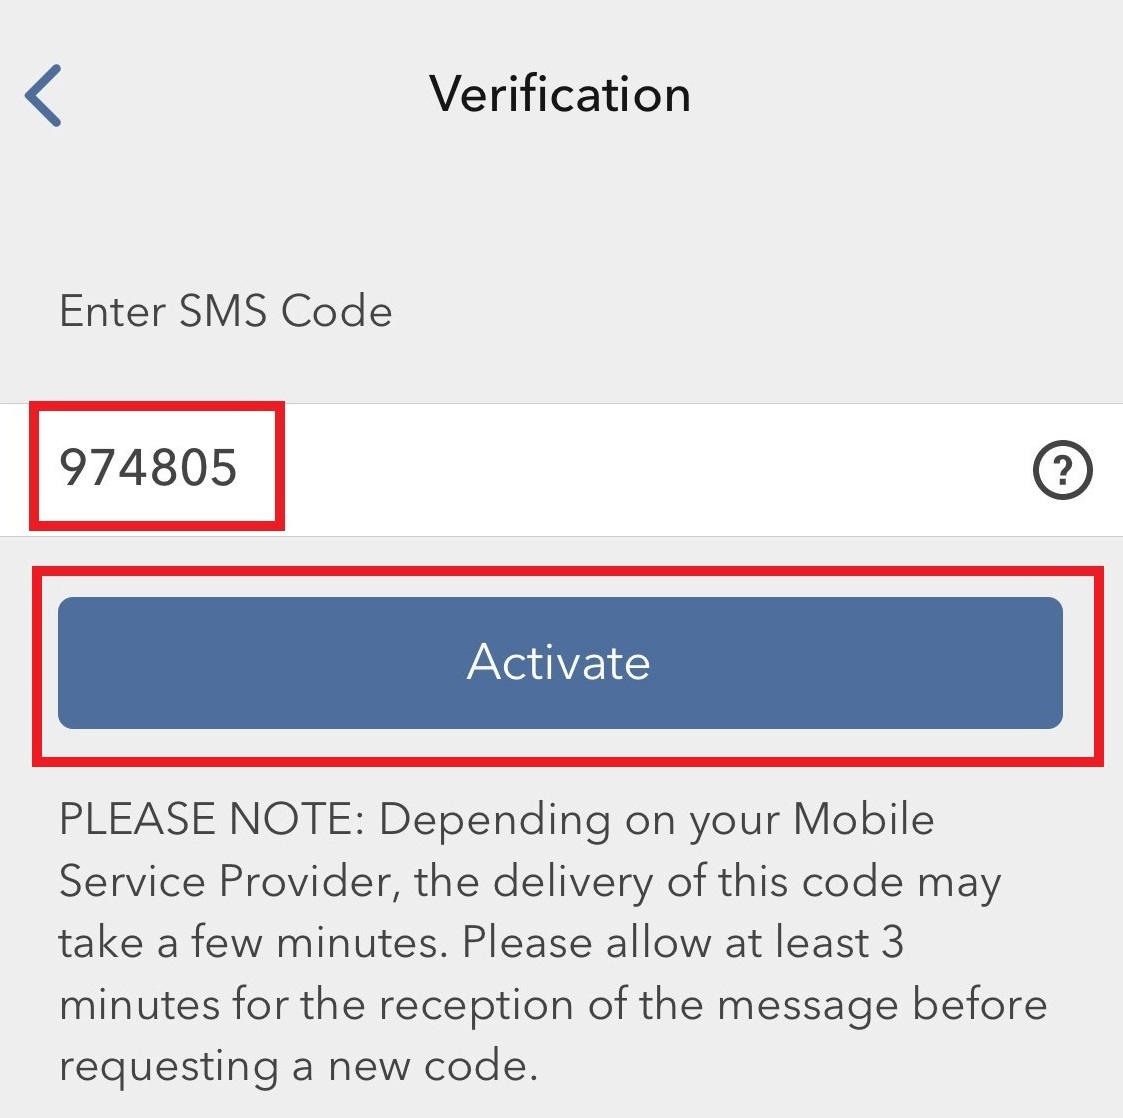
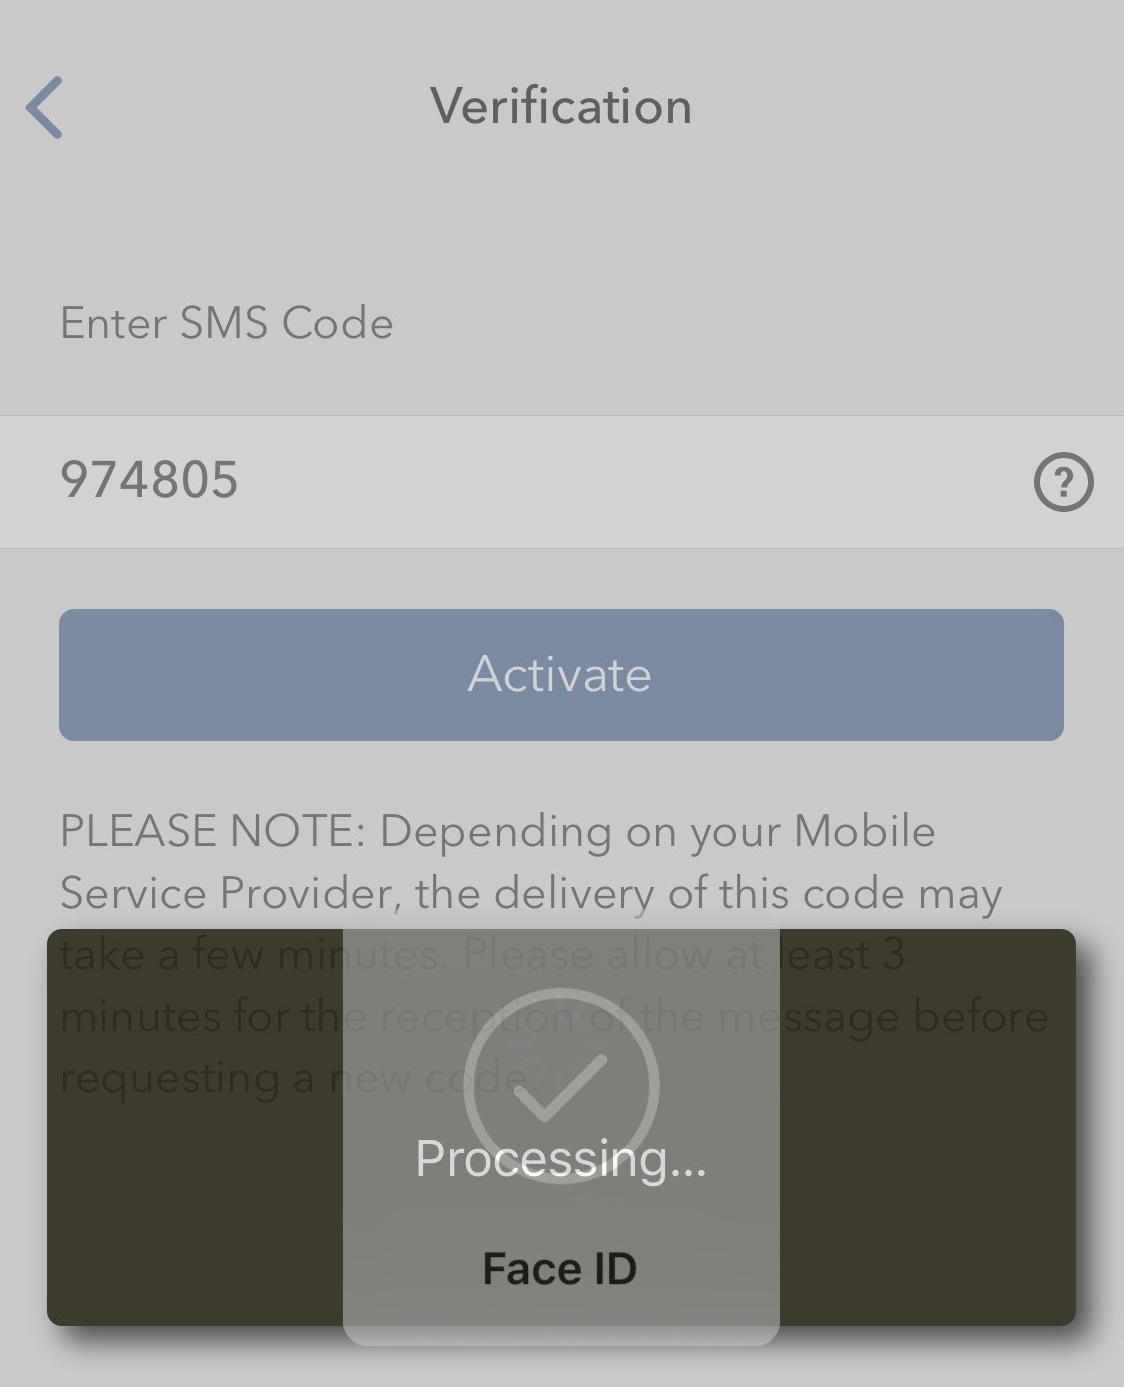
4. На Ваш телефон будет отправлено SMS-сообщение с кодом (изобр. 9). Введите полученный код в поле "Код активации" и нажмите Активировать (Activate) (изобр. 10).
Изобр. 9. Изобр. 10.
5. В зависимости от настроек Вас попросят авторизоваться с помощью пароля, отпечатка пальца или Face ID (изобр. 11).
Изобр. 11.
6. При успешной аутентификации высветится подтверждение. Для завершения нажмите Готово (Done) (изобр. 12).
Изобр. 12
.jpeg)
Как настроить доставку и уведомления о сообщениях от службы поддержки
Чтобы настроить Ваши предпочтения в "Центре сообщений":
1. Войдите на Портал клиентов
2. Откройте меню пользователя (значок силуэта в правом верхнем углу) и выберите Безопасный центр сообщений.
3. Нажмите на значок Предпочтения (изображение шестеренки) рядом с кнопкой "Создать".
4. Откроется окно предпочтений
5. В выпадающих меню выберите основной и вторичный язык сообщений
6. В разделе Безопасная отправка сообщений выберите желаемые способы доставки.
7. Нажмите СОХРАНИТЬ.
Обращаем Ваше внимание, что из соображений безопасности получение полных сообщений по электронной почте или СМС невозможно. Информация, предоставляемая по электронной почте или SMS, является суммарной.
Подробнее о настройке "Центра сообщений" можно узнать в руководстве по "Порталу клиентов".