スマートフォンを利用してIBKRにドキュメントを送信する方法
概観:
インタラクティブ・ブローカーズでは、お客様がスキャナを利用できない場合にドキュメントのコピーを受付けています。スマートフォンで必要ドキュメントの写真を撮ってお送りください。
こちらでは、以下のスマートフォンのOSで、写真を撮ってメールで送信する方法をご説明致します:
スマートフォンで写真を撮ってメールで送信する方法をすでにご存知の方は、こちらの「メールの送信先および件名に含める内容」をご覧ください。
iOS
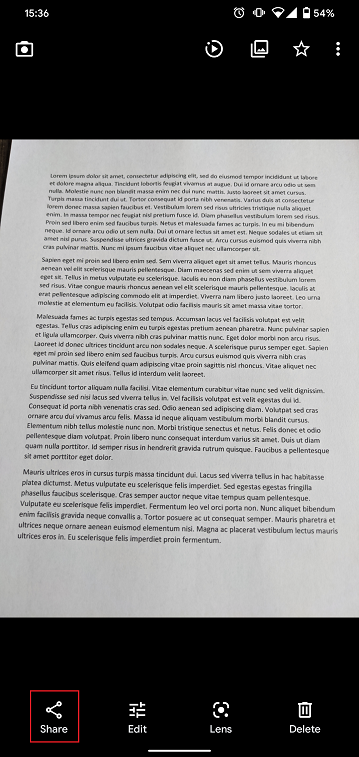
1. スマートフォン画面の下から上にスワイプして、カメラのアイコンをタップしてください。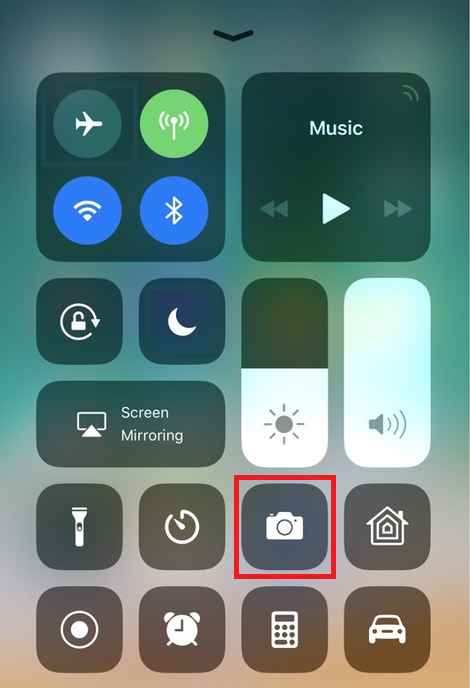
カメラのアイコンがない場合には、ホーム画面のカメラアプリのアイコンをタップしてください。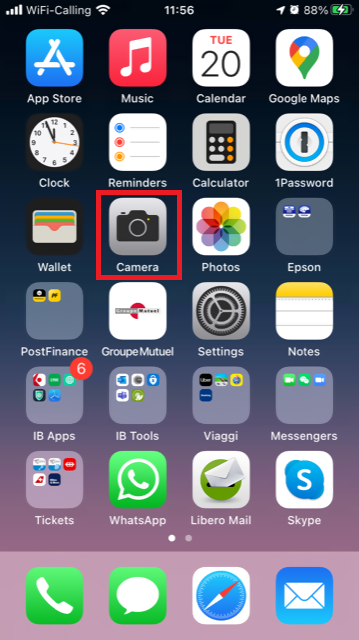
通常はこの時点でリアカメラが有効化されています。フロントカメラが有効化されている場合には、切り替えボタンをタップしてください。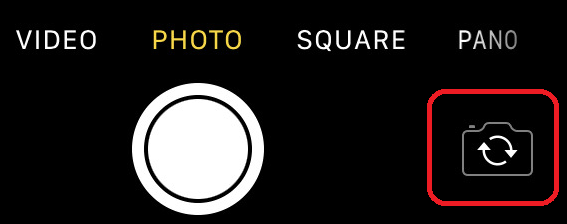
2. ドキュメントにiPhoneをかざし、必要な部分またはページを枠内に入れます。
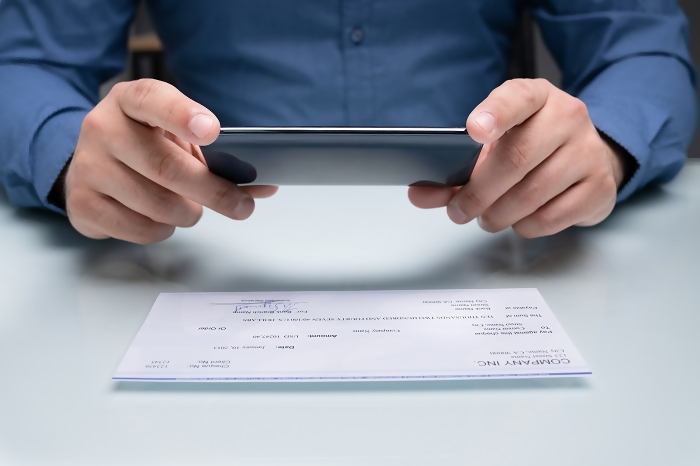
3. 光が十分に当たっていて、ポジションのせいでドキュメントに影ができないようにしてください。 スマートフォンが震えないように、手でしっかり持ってください。シャッターボタンをタップして写真を撮ります。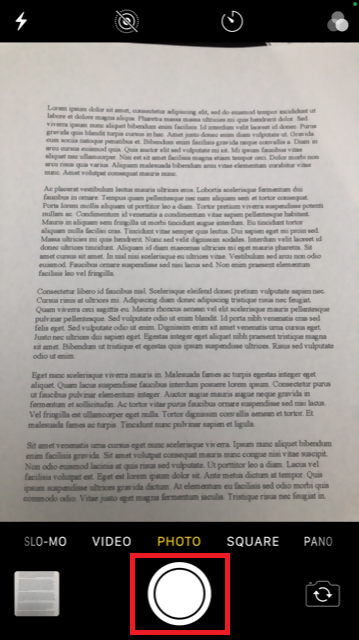
4. 左下のサムネイルイメージをタップして、写真にアクセスしてください。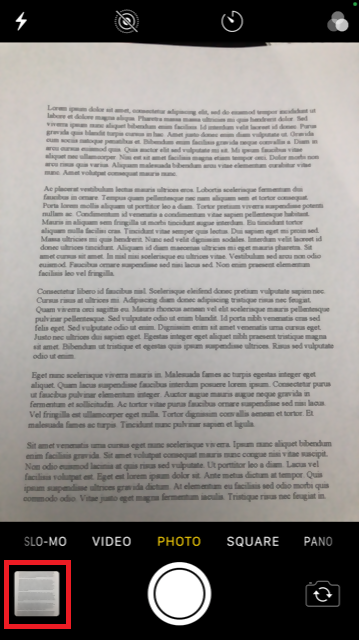
5. 写真がはっきりしていて、ドキュメントが読めることを確認してください。詳細を見る場合には、2本の指で写真を拡大して確認してください。

良く見えない場合や、光が十分でない場合には、前の手順を繰り返して、はっきりとした写真を撮ってください。
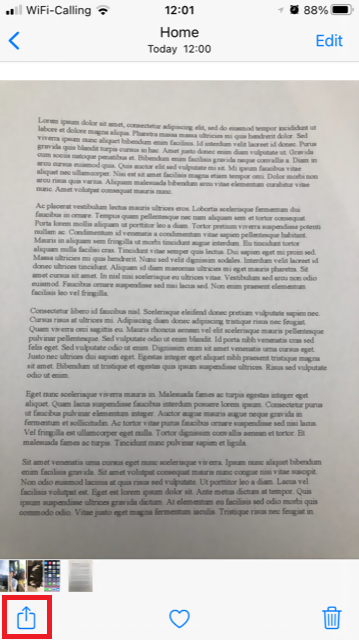
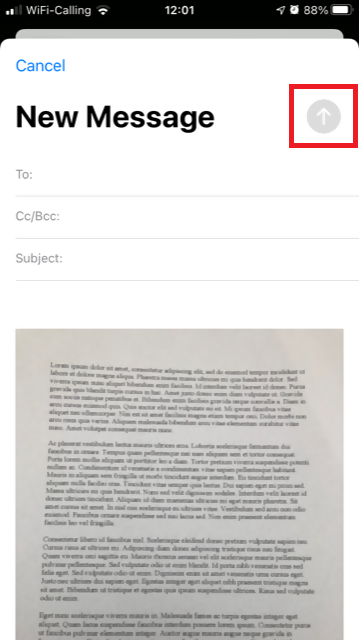
6. 画面の左下にある共有アイコンをタップしてください。
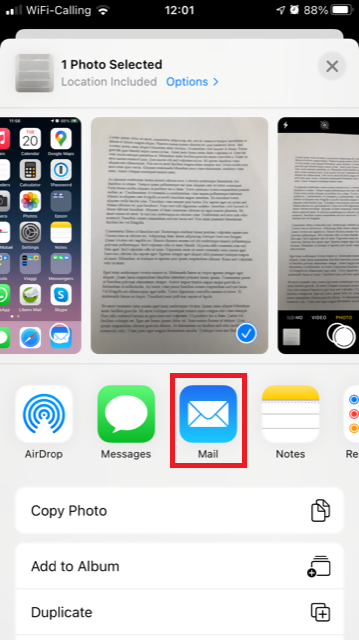
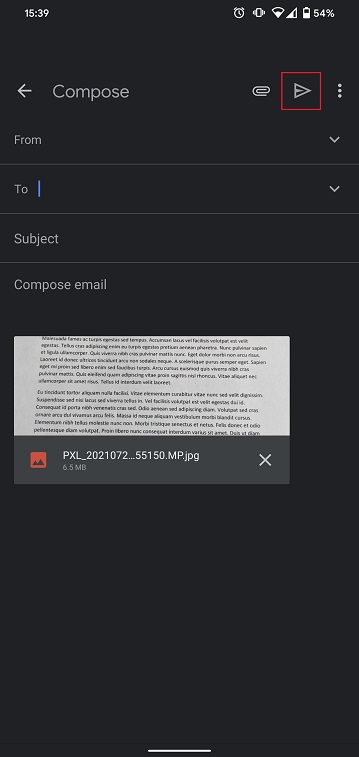
7. メールアイコンをタップしてください。
注意事項: メールの送信にはこの機能が設定されている必要があります。この手順を使い慣れていない場合には、メールプロバイダーにお問合せください。
8. メールの送信先:と件名:欄の表示の仕方は、こちらをご参照ください。メールが完了したら、右上の上向きの矢印をタップして送信してください。
アンドロイド
1. アプリのリストを開いて、カメラアプリを起動するか、ホーム画面から起動してください。スマートフォンのモデル、ブランド、または設定によってアプリの名前が異なることがあります。

通常はこの時点でリアカメラが有効化されています。フロントカメラが有効化されている場合には、切り替えボタンをタップしてください。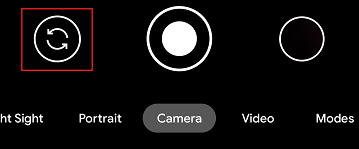
2. ドキュメントにスマートフォンをかざし、必要な部分またはページを枠内に入れます。
3. 光が十分に当たっていて、ポジションのせいでドキュメントに影ができないようにしてください。 スマートフォンが震えないように、手でしっかり持ってください。シャッターボタンをタップして写真を撮ります。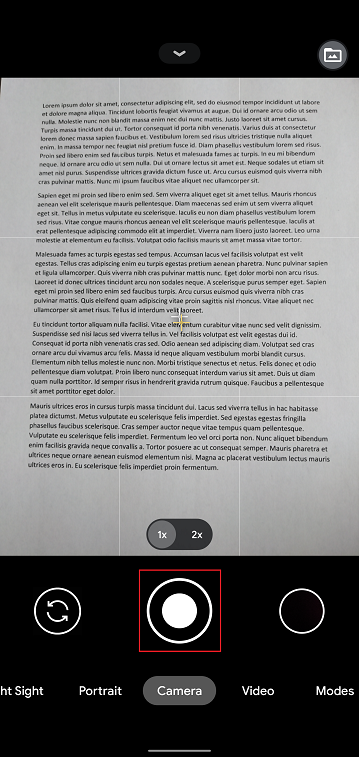
4. 写真がはっきりしていて、ドキュメントが読めることを確認してください。詳細を見る場合には、2本の指で写真を拡大して確認してください。
良く見えない場合や、光が十分でない場合には、前の手順を繰り返して、はっきりとした写真を撮ってください。
5. 画面の右下にある、黒丸のアイコンをタップしてください。
6. 画面の左下にある共有アイコンをタップしてください。
7. ここで表示される共有メニューから、スマートフォンに設定されているメールクライアントのアイコンをタップしてください。下記の例ではGmailですが、お客様の設定により別の名前のことがあります。
.png)
注意事項: メールの送信にはこの機能が設定されている必要があります。この手順を使い慣れていない場合には、メールプロバイダーにお問合せください。
8. メールの送信先と件名欄の表示の仕方は、こちらをご参照ください。メールが完了したら、右上の飛行機の矢印をタップして送信してください。
メールの送信先および件名に含める内容
メールの作成にあたっては、下記のインストラクションをご参照ください:
1. 送信先:の欄に以下を入力してください:
- ヨーロッパ以外の国に居住される方は、newaccounts@interactivebrokers.comをご利用ください。
- ヨーロッパに居住される方は、newaccounts.uk@interactivebrokers.co.ukをご利用ください。
2. 件名:の欄には、下記をすべて入力してください:
- お客様の口座番号(通常はxが数字で、Uxxxxxxxのフォーマットになります)またはユーザー名。
- ドキュメントの送信目的。以下の名前付け規則を使用してください:
- PoRes:居住地住所を証明する書類
- PID:本人確認書類
取引プラットフォームにログインできない場合のトラブルシューティング
a. 口座が承認されているかご確認ください。 承認の済んでない口座や日ごとの締切時間以降に承認された口座はクライアント・ポータルにはアクセスすることができますが、取引プラットフォームにはアクセスできません(締切時間以降に承認された場合には、翌日からアクセスできるようになります)。
b. 口座が開設されているかご確認ください。お客様によって解約されている口座や、残高がないために弊社が解約した口座は取引プラットフォームへのアクセスがなくなります。アクティビティ・ステートメントや税金関連ステートメント入手のため、クライアント・ポータルへは継続してアクセスすることができます。クライアント・ポータルには口座が開設していた時と同じログイン情報でアクセスできます。セキュリティデバイスの使用は必要ありません。
c. ペーパー口座にログインされようとしている場合には、ライブ口座用のログイン情報が入力されていないことをご確認ください。このログイン情報は、ログイン画面のドロップダウンメニューにペーパー口座が選択されている場合のみご利用可能です。
a. テンポラリー・パスコードをご利用の場合、アルファベットはすべて大文字で入力する必要があります
b. セキュリティカードや電子的なデバイスをご利用の場合、文字の間にスペースは入れないでください
ログイン情報に関連するリクエストは、セキュリティ上の理由により口座名義人の口頭によるご本人様確認が必要となるため、すべてお電話のみで承っております。 お客様の地域のクライアントサービスセンターのいずれかにお問い合わせください。
a. インターネットの接続が切れていないことをご確認ください。(別のウェブサイトを試してみてください)。 インターネットに接続ができない場合には、ご利用のインターネット・サービス・プロバイダーにお問い合わせください。
b. TWSの接続をブロックするファイアーウォールを使用されているかご確認ください。使用されている場合にはファイアーウォールの設定を変更してアクセスを許可してください。*
c. ポート4000/4001がブロックされています。 このポートはホテルやカフェなど公共の場所ではブロックされていることがよくありますが、TCPプロトコールの受信と送信に必要になります。 またご利用のコンピューターがルーターに接続されている場合には、ルーターのポートも開く必要があります。*
セキュリティデバイスを一時的にお手元にお持ちでない場合、お客様の地域のクライアントサービスセンターまでお電話にてお取合せください。ご本人様確認ができ次第、一時的なパスコードをお渡し致します。
テンポラリー・パスコードはセキュリティデバイスがランダムに作成するコードの代わりとなる、英数字からなるコードで変化しません。これを利用して2日間はクライアント・ポータルと取引プラットフォームに通常通りアクセスすることができます。 代替品の受取りに時間かかる場合にはより高いセキュリティが必要になりますので、テンポラリー・パスコードを使用してクライアント・ポータルにログインし、オンライン・セキュリティーカードを印刷していただきますようお薦め致します。こちらはセキュリティデバイスの代わりとして3週間有効となります。
テンポラリー・パスコードやオンライン・セキュリティカードの有効期限が切れた時点、またはその前にセキュリティデバイスがお手元に戻った場合には、クライアント・ポータルにログインしてセキュリティデバイスを再有効化してください。
セキュリティデバイスの紛失や故障の場合には、お電話にてお客様の地域のクライアントサービスセンターにご連絡いただき、交換品および/または暫定的なアクセスのリクエストをしてください。お住まいの国や地域によっては代替品の郵送に3日から14日ほどかかる場合がありますので、この間のアクセスにはオンライン・セキュリティカードを使用してください。カードはテンポラリー・パスコードでクライアント・ポータルにアクセスできるようになり次第、印刷するか、イメージとしてコンピューターに保存してください。
テンポラリー・パスコードではクライアント・ポータルと取引プラットフォームの両方に2日間アクセスすることができます。 2日以降は取引プラットフォームへのアクセスはできなくなります。クライアント・ポータルへはそれ以降も10日間のアクセスすることができますが、 ご利用いただける機能はオンライン・セキュリティー・コード・カードの印刷または保存のみになります。
テンポラリー・パスコードを使用したクライアント・ポータルへのアクセスが継続している場合には、オンライン・セキュリティカードを印刷か保存してください。オンライン・セキュリティカードを使用して、クライアント・ポータルと取引プラットフォームの両方に21日間アクセスすることができます。クライアント・ポータルにログインできない場合には、お客様の地域のクライアントサービスセンターまでお電話にてご連絡ください。
オンライン・セキュリティカードではクライアント・ポータルと取引プラットフォームの両方に21日間アクセスすることができます。この間にセキュリティデバイスが一時的にお手元にない場合にはこちらをまた入手していただくか、代替品をリクエストしてください。
オンライン・セキュリティ・コードカードを使用してログインできない場合には、お客様の地域のクライアントサービスセンターまでお電話にてご連絡ください。この際にご利用のセキュリティデバイスの状況をご説明ください。
セキュリティデバイスはお口座に登録されている住所に発送致しますが、客様のお住まいの場所によって米国内の場合は2日間、その他の国の場合には2週間ほどかかります。セキュリティデバイスは手動で有効化されなくても、一定の時間をおいて自動的に有効化されるように設定されています。 自動的に有効化され、口座へのアクセスに問題がある場合には、ibkr.com/supportをご確認いただき、テクニカルアシスタントセンターまでご連絡ください。
テンポラリー・パスコードを使用したクライアント・ポータルへのアクセスが継続している場合には、オンライン・セキュリティカードを印刷か保存してください。オンライン・セキュリティカードを使用して、クライアント・ポータルと取引プラットフォームの両方に21日間アクセスすることができます。
クライアント・ポータルにログインできない場合には、お客様の地域のクライアントサービスセンターまでお電話にてご連絡ください。
二段階ログイン認証用のセキュリティデバイスをお受取りになりましたら、有効化の詳細はデバイスが入っていた封筒に同封されていますのでごちらをご確認ください。ご自身で有効化されない場合には、お客様のお住まいの場所にもよりますが、カードは2-3週間で自動的に有効化されます。
How to verify your identity using your Secure Login Device
概観:
Some tasks in Client Portal will ask you to verify your identity by using the Challenge Code/Response String method in order to proceed further.
This article will guide you in completing these tasks with the following Secure Login Devices:
-----------------------------------------------------------------------------------------------------------------------------------------------------------
Verify your identity with IB Key (iOS)
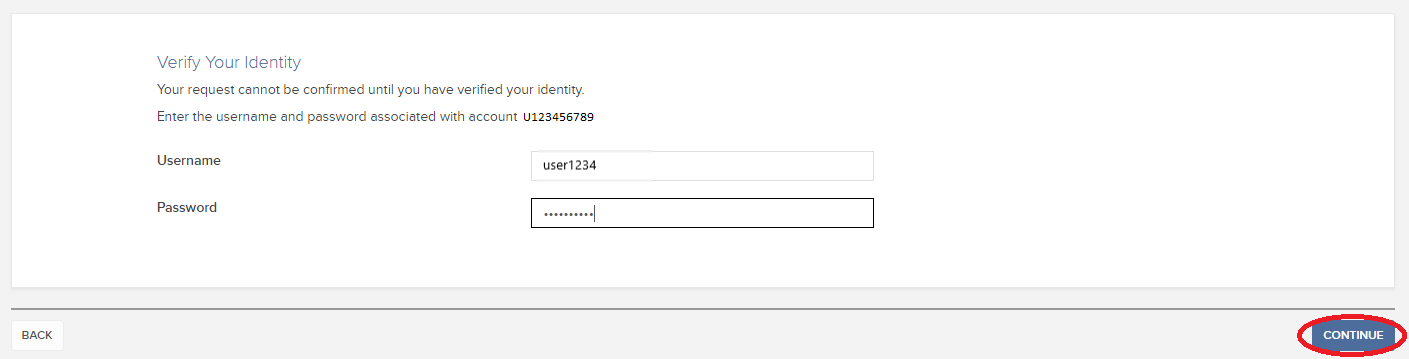
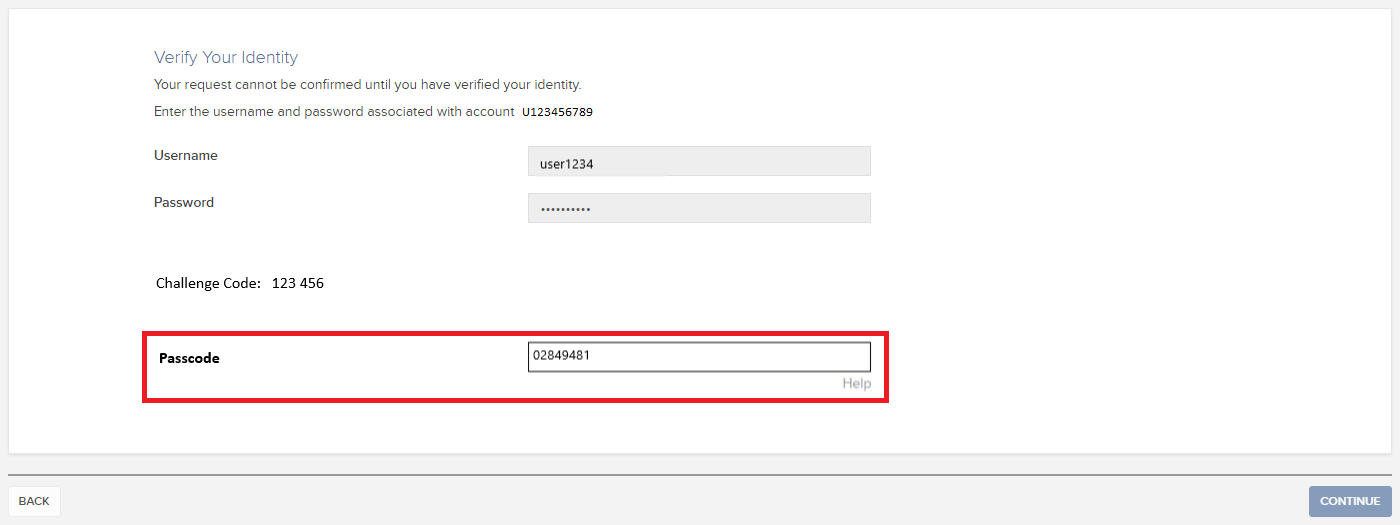
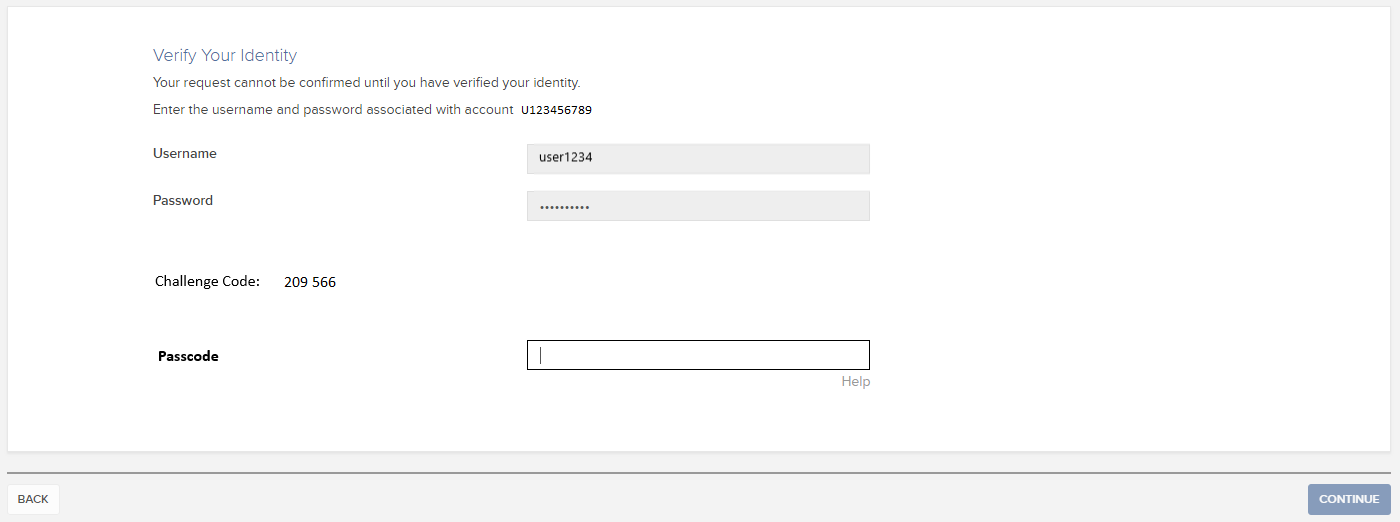
1. When you initiate a task that requires a verification, you will be prompted to enter Username and Password. Fill out the information and click on Continue (Figure 1).
Figure 1.
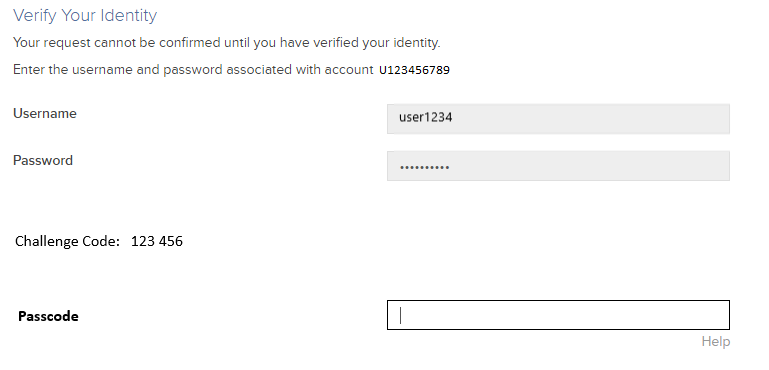
2. A Challenge Code will be displayed, along with a passcode field to enter a response (Figure 2). You will enter this Challenge Code onto your phone.
Figure 2.
3. Launch IBKR Mobile on your iOS smartphone, and...
3.a. If the app opens with the home screen (Figure 3), select Authenticate then proceed with step 4.
3.b. If the app opens with the login screen (Figure 4), tap Services on the top left (red arrow), select Authenticate (Figure 3) and proceed with step 4.
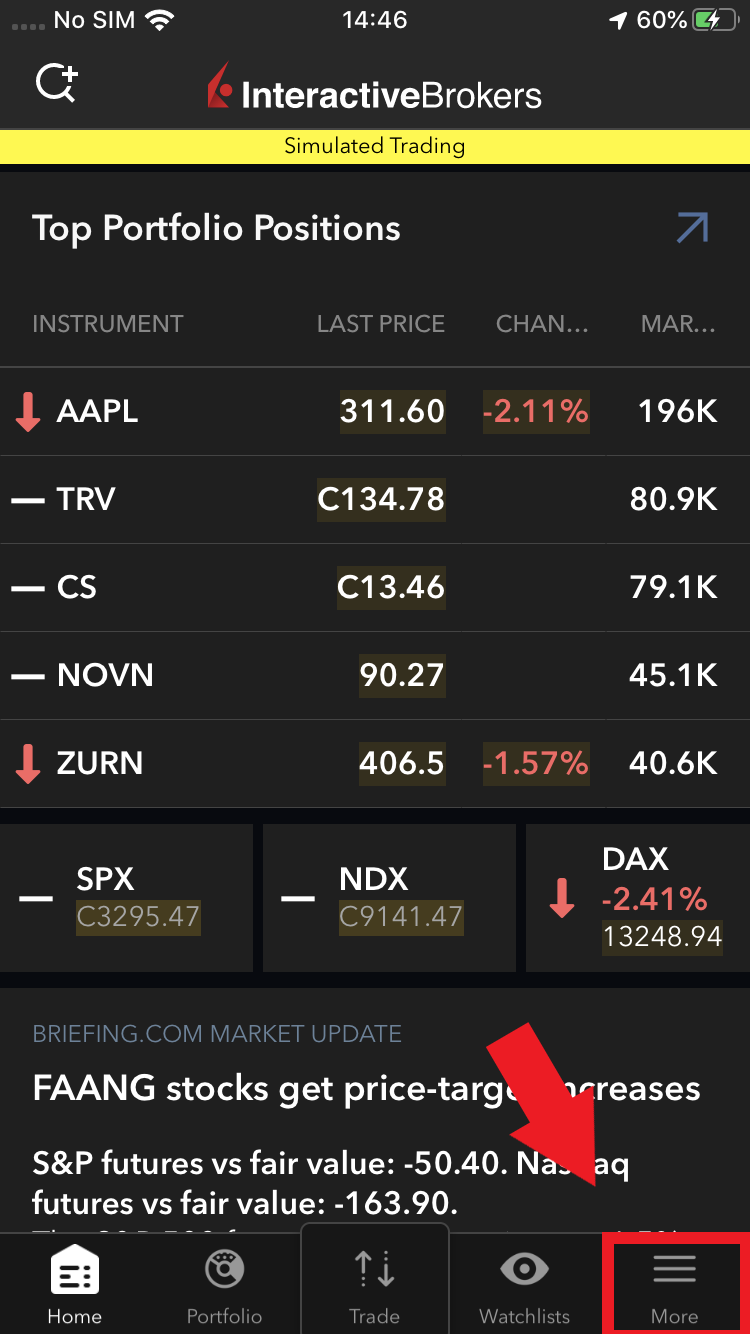
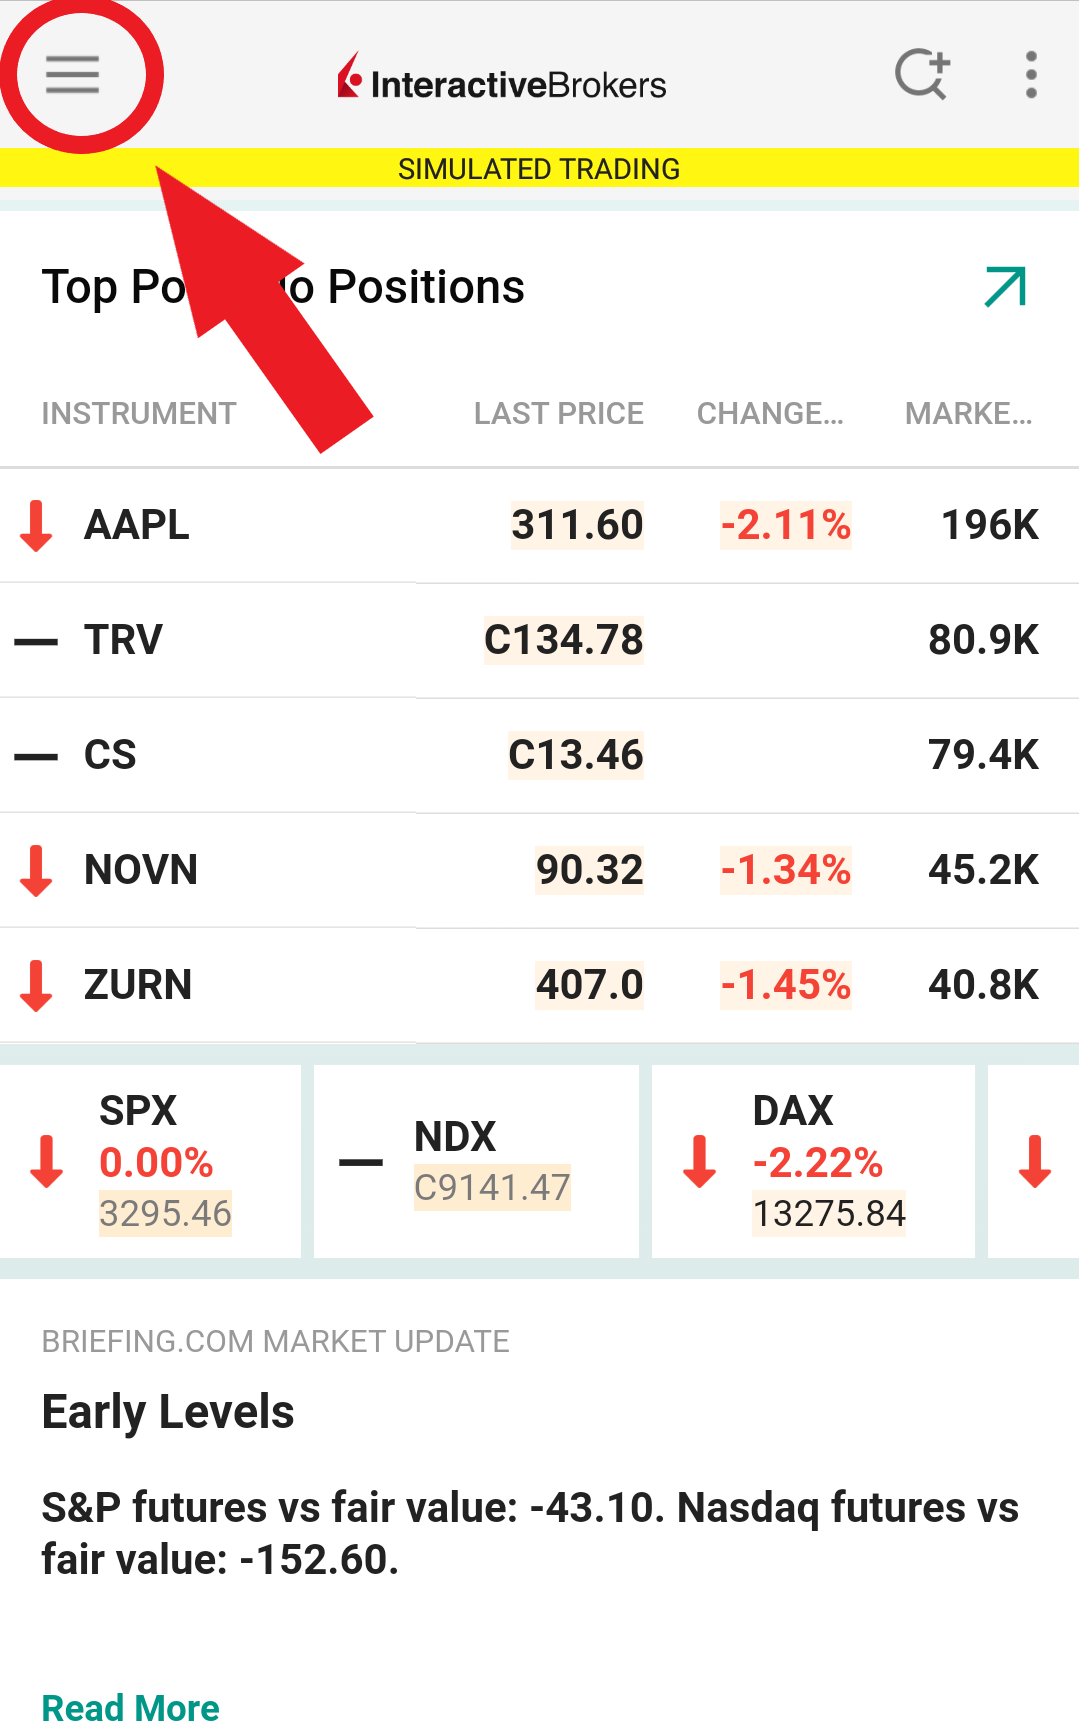
3.c. If the app opens with your Home Page, Portfolio, Watchlists, or similar (Figure 5), tap More on the bottom-right (red arrow). Then tap Two-Factor Authentication (Figure 6), tap Generate Code (Figure 7) and proceed with step 4.
Figure 3. Figure 4.
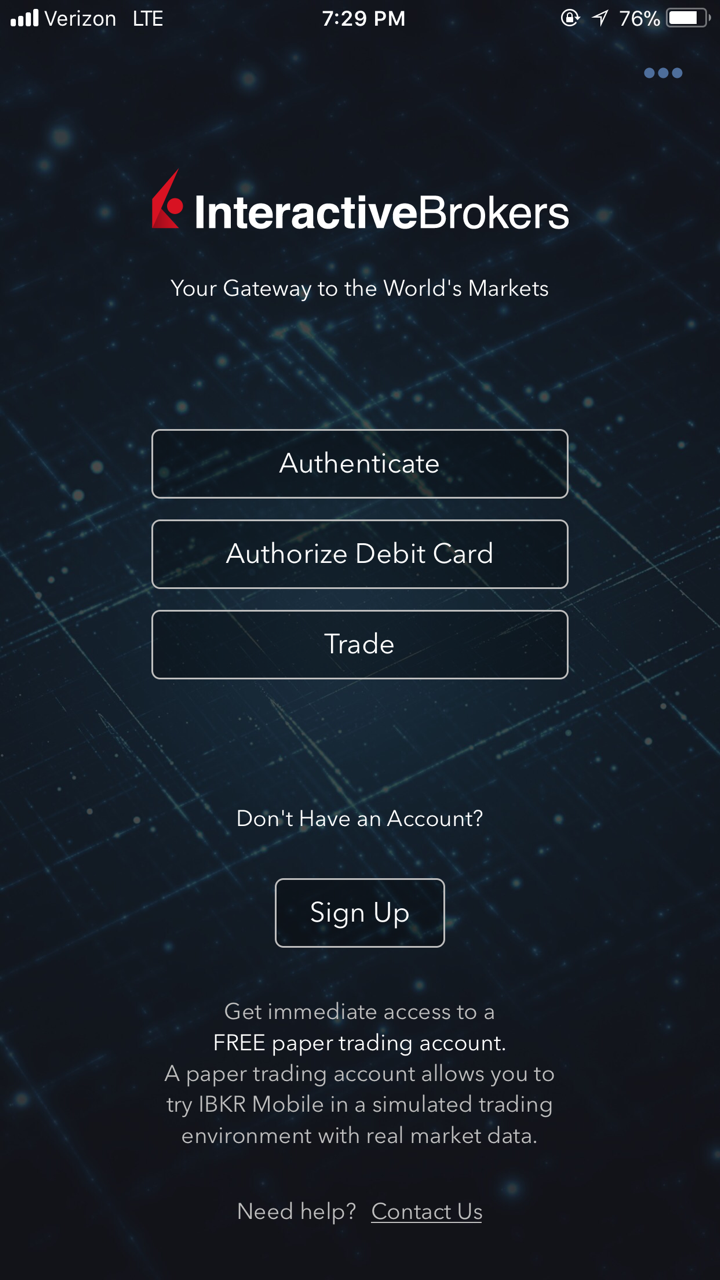
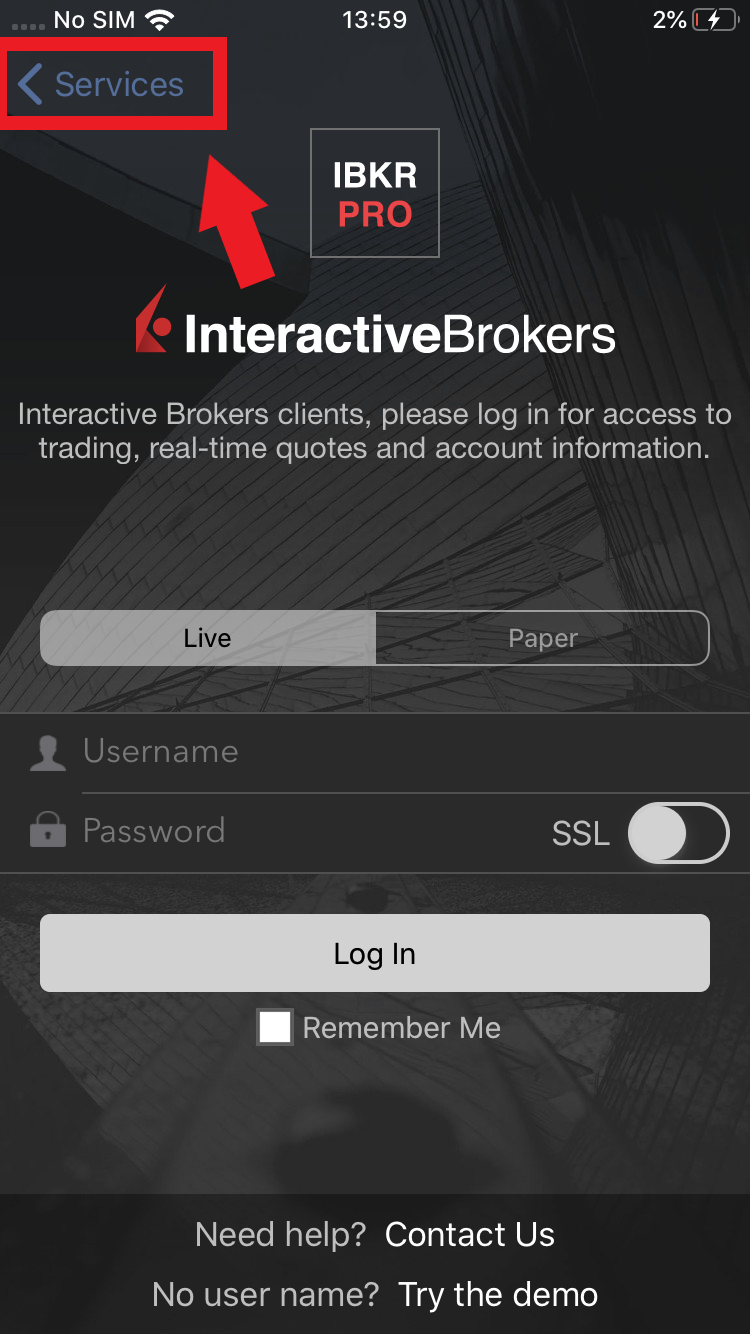
Figure 5. Figure 6. Figure 7.
.jpeg)
.jpeg)
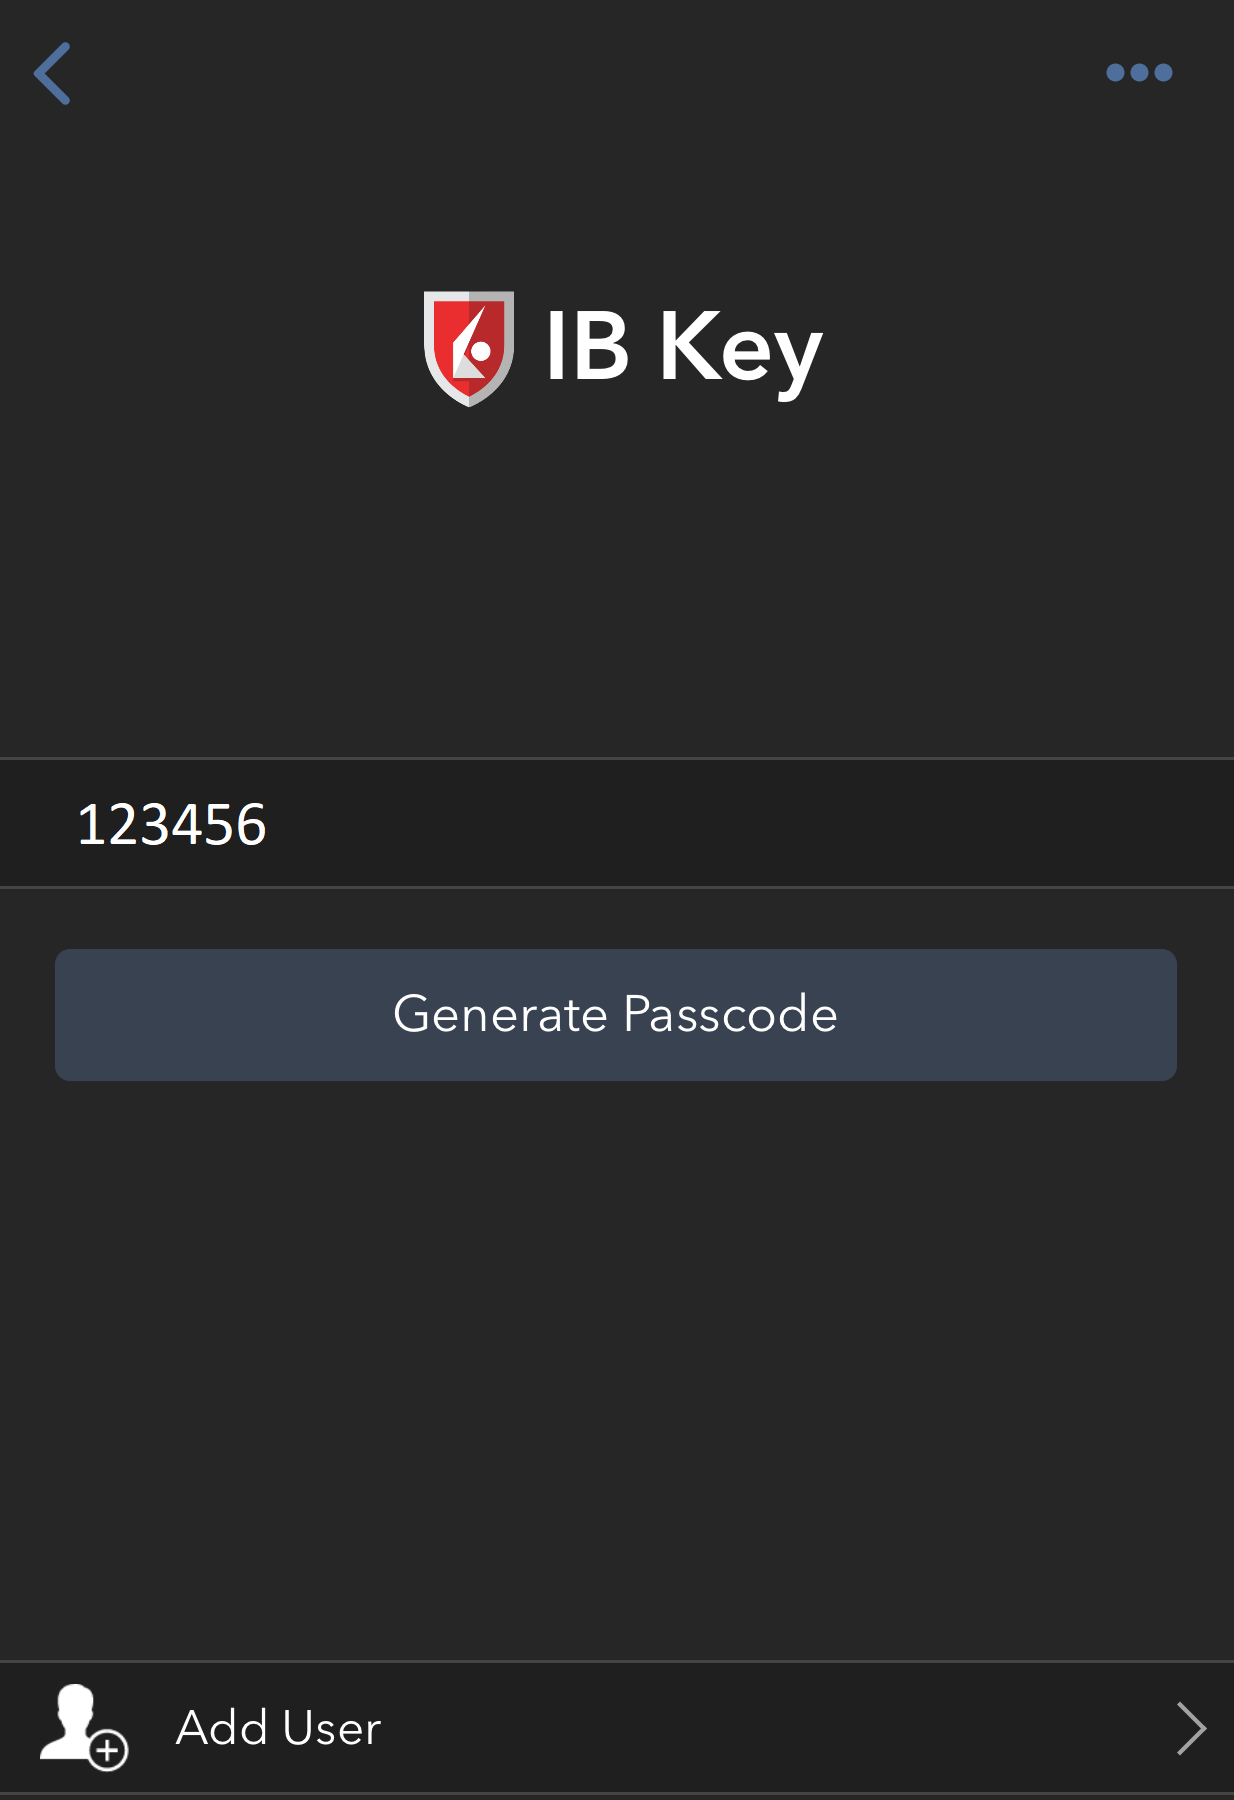
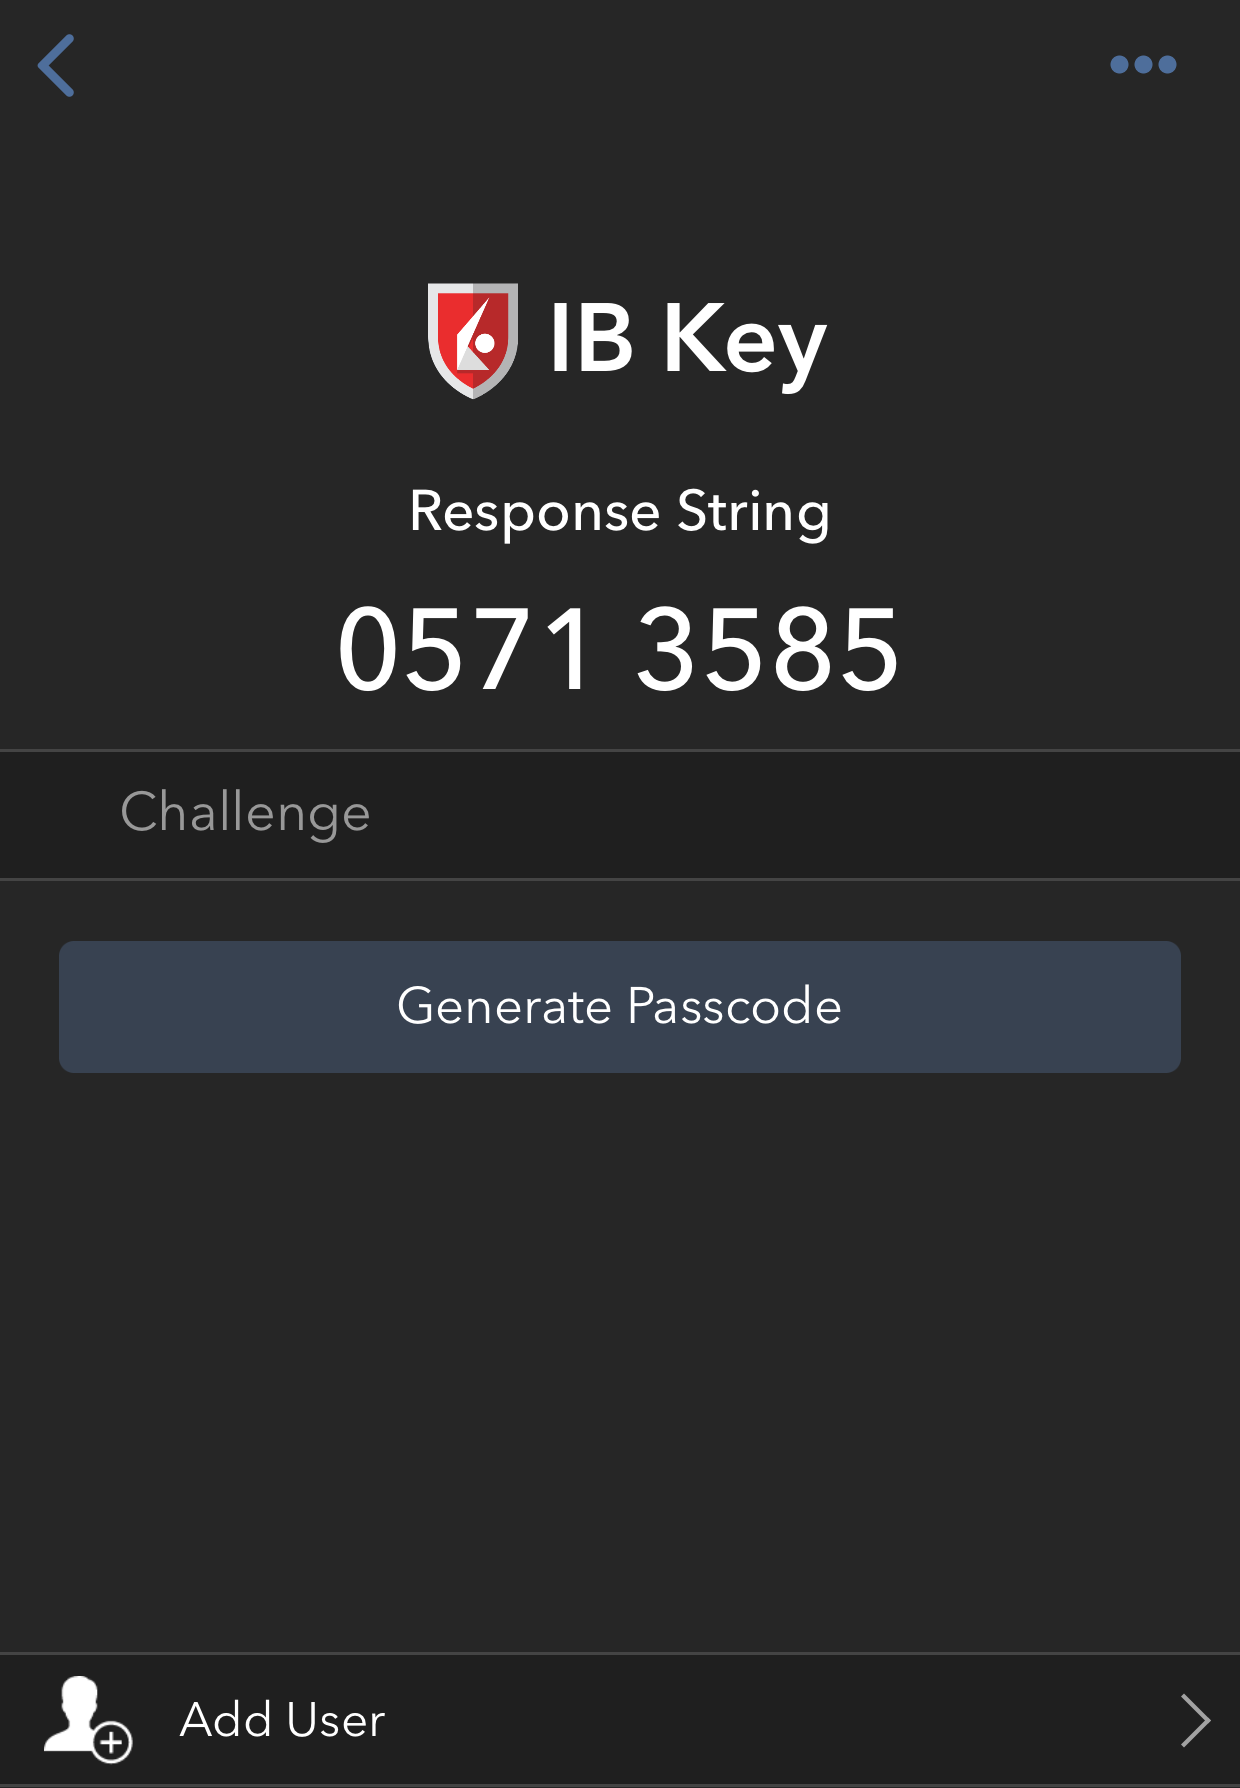
4. Type the Challenge Code from Client Portal (see step 2.) into the corresponding field and select Generate Passcode (Figure 8).
Figure 8.
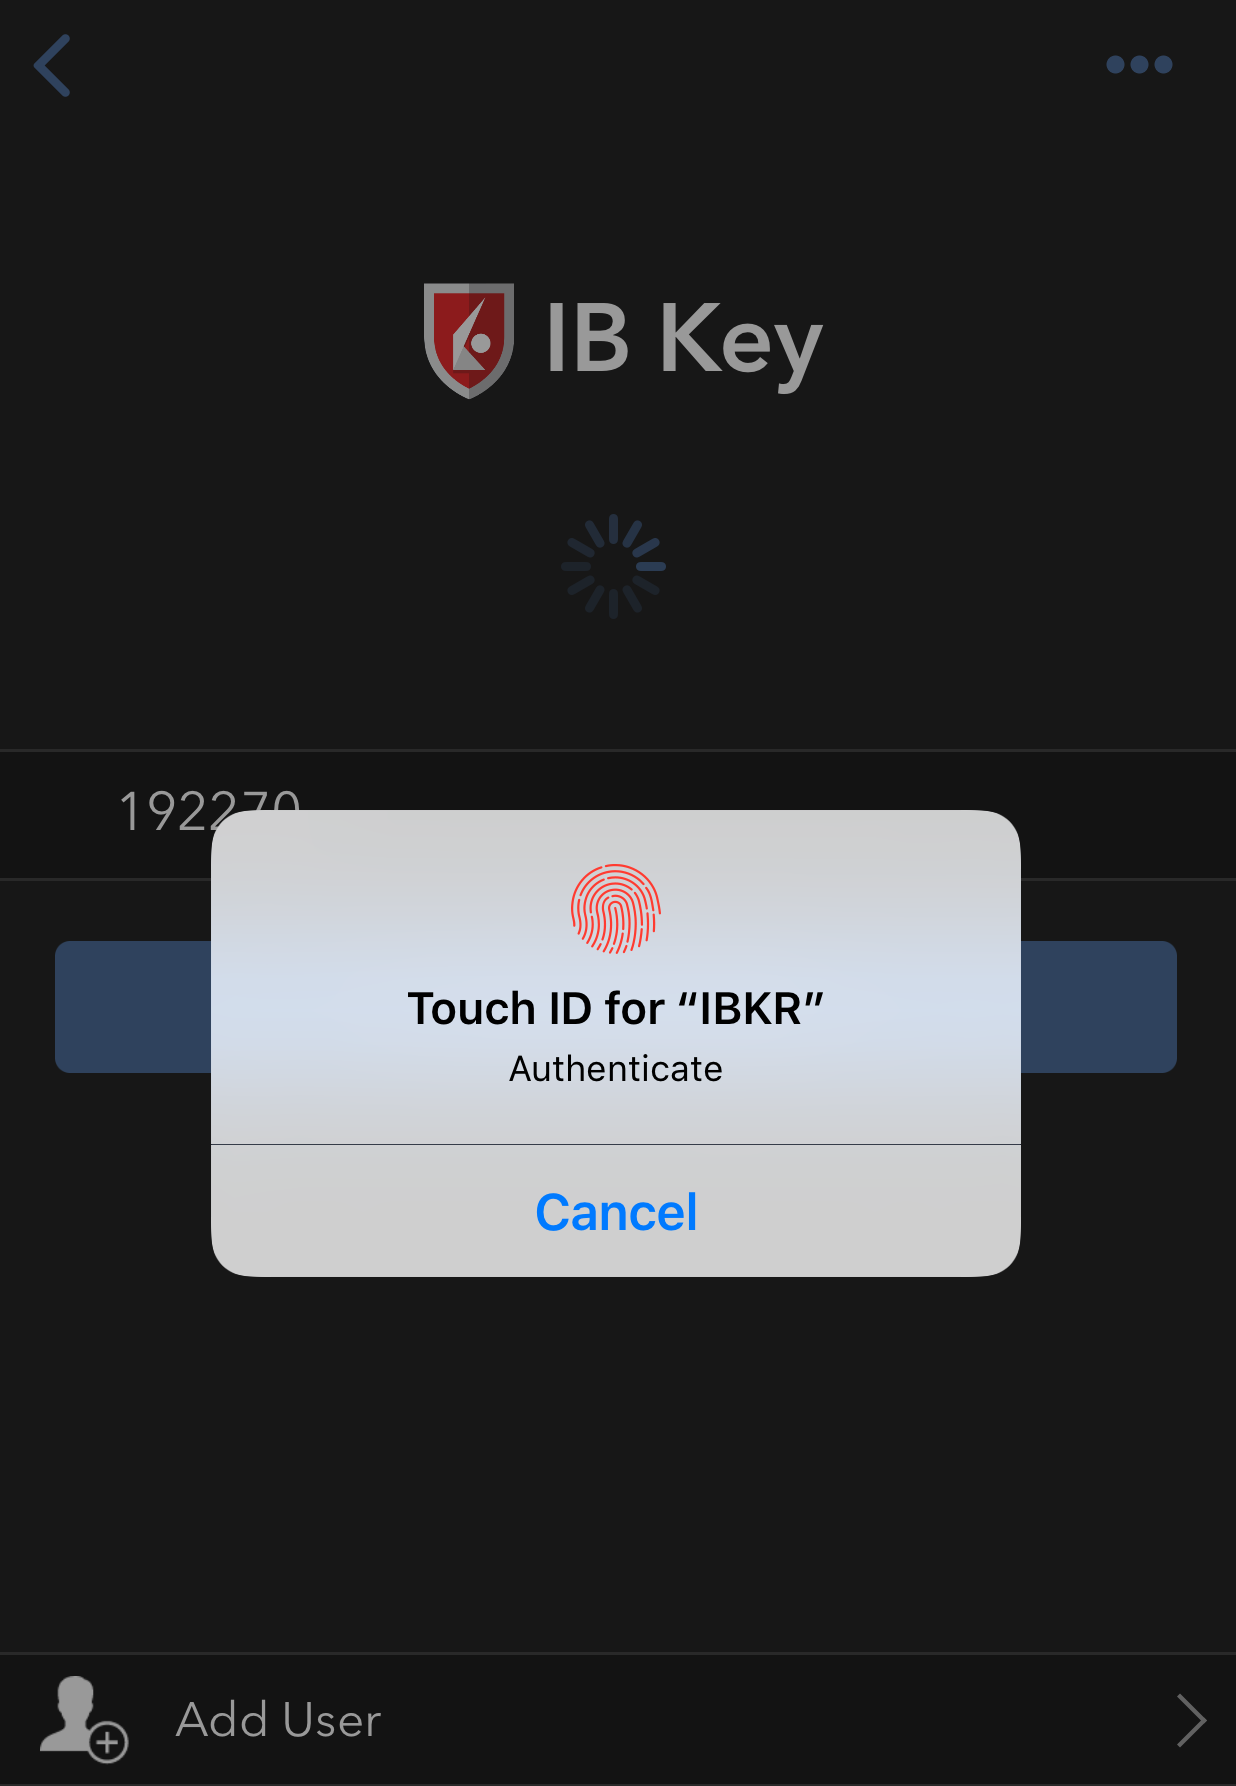
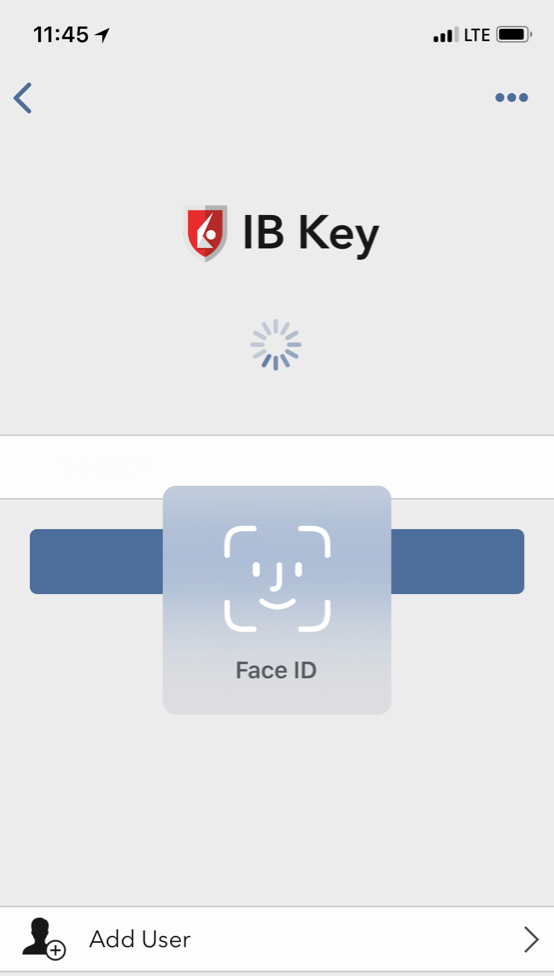
5. Use Touch ID or Face ID for two-factor authentication.
If Touch ID has not been activated, IB Key will prompt you to enter your smartphone's passcode. A response string will then be generated (Figure 9).
5.1 If you use Touch ID, place your registered finger on the Home Button (Figure 9). A response string will then be generated (Figure 10).
Figure 9. Figure 10.
5.2 If you use Face ID, look at your iOS smartphone screen (Figure 11). A response string will then be generated (Figure 12).
Figure 11. Figure 12.
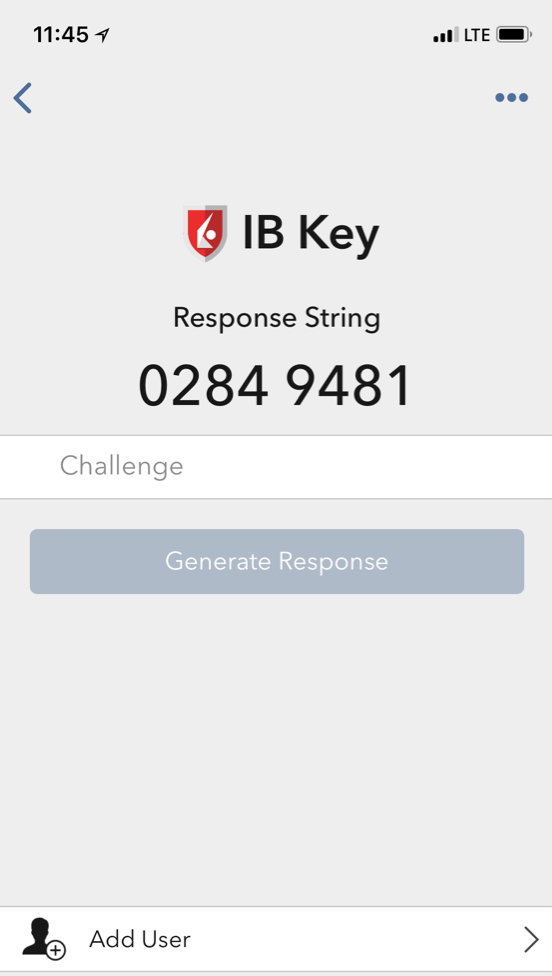
6. Enter the response string from IB Key into the passcode field of Client Portal and click Continue (Figure 13).
Figure 13.
-----------------------------------------------------------------------------------------------------------------------------------------------------------
Verify your identity with IB Key (Android)
1. When you initiate a task that requires a verification, you will be prompted to enter Username and Password. Fill out the information and click on Continue (Figure 1A).
Figure 1A.
2. A Challenge Code will be displayed, along with a passcode field to enter a response (Figure 2A). You will enter this Challenge Code onto your phone.
Figure 2A.
3. Launch IBKR Mobile on your Android smartphone, and...
3.a. If the app opens with the home screen (Figure 3A), select Authenticate then proceed with step 4.
3.b. If the app opens with the login screen (Figure 4A), tap Services on the top left (red arrow), select Authenticate (Figure 3A) and proceed with step 4.
3.c. If the app opens with your Home Page, Portfolio, Watchlists, or similar (Figure 5A), tap More on the bottom-right (red arrow). Then tap Two-Factor Authentication (Figure 6A), followed by Generate Response (Figure 7A), and proceed with step 4.
Figure 3A. Figure 4A.
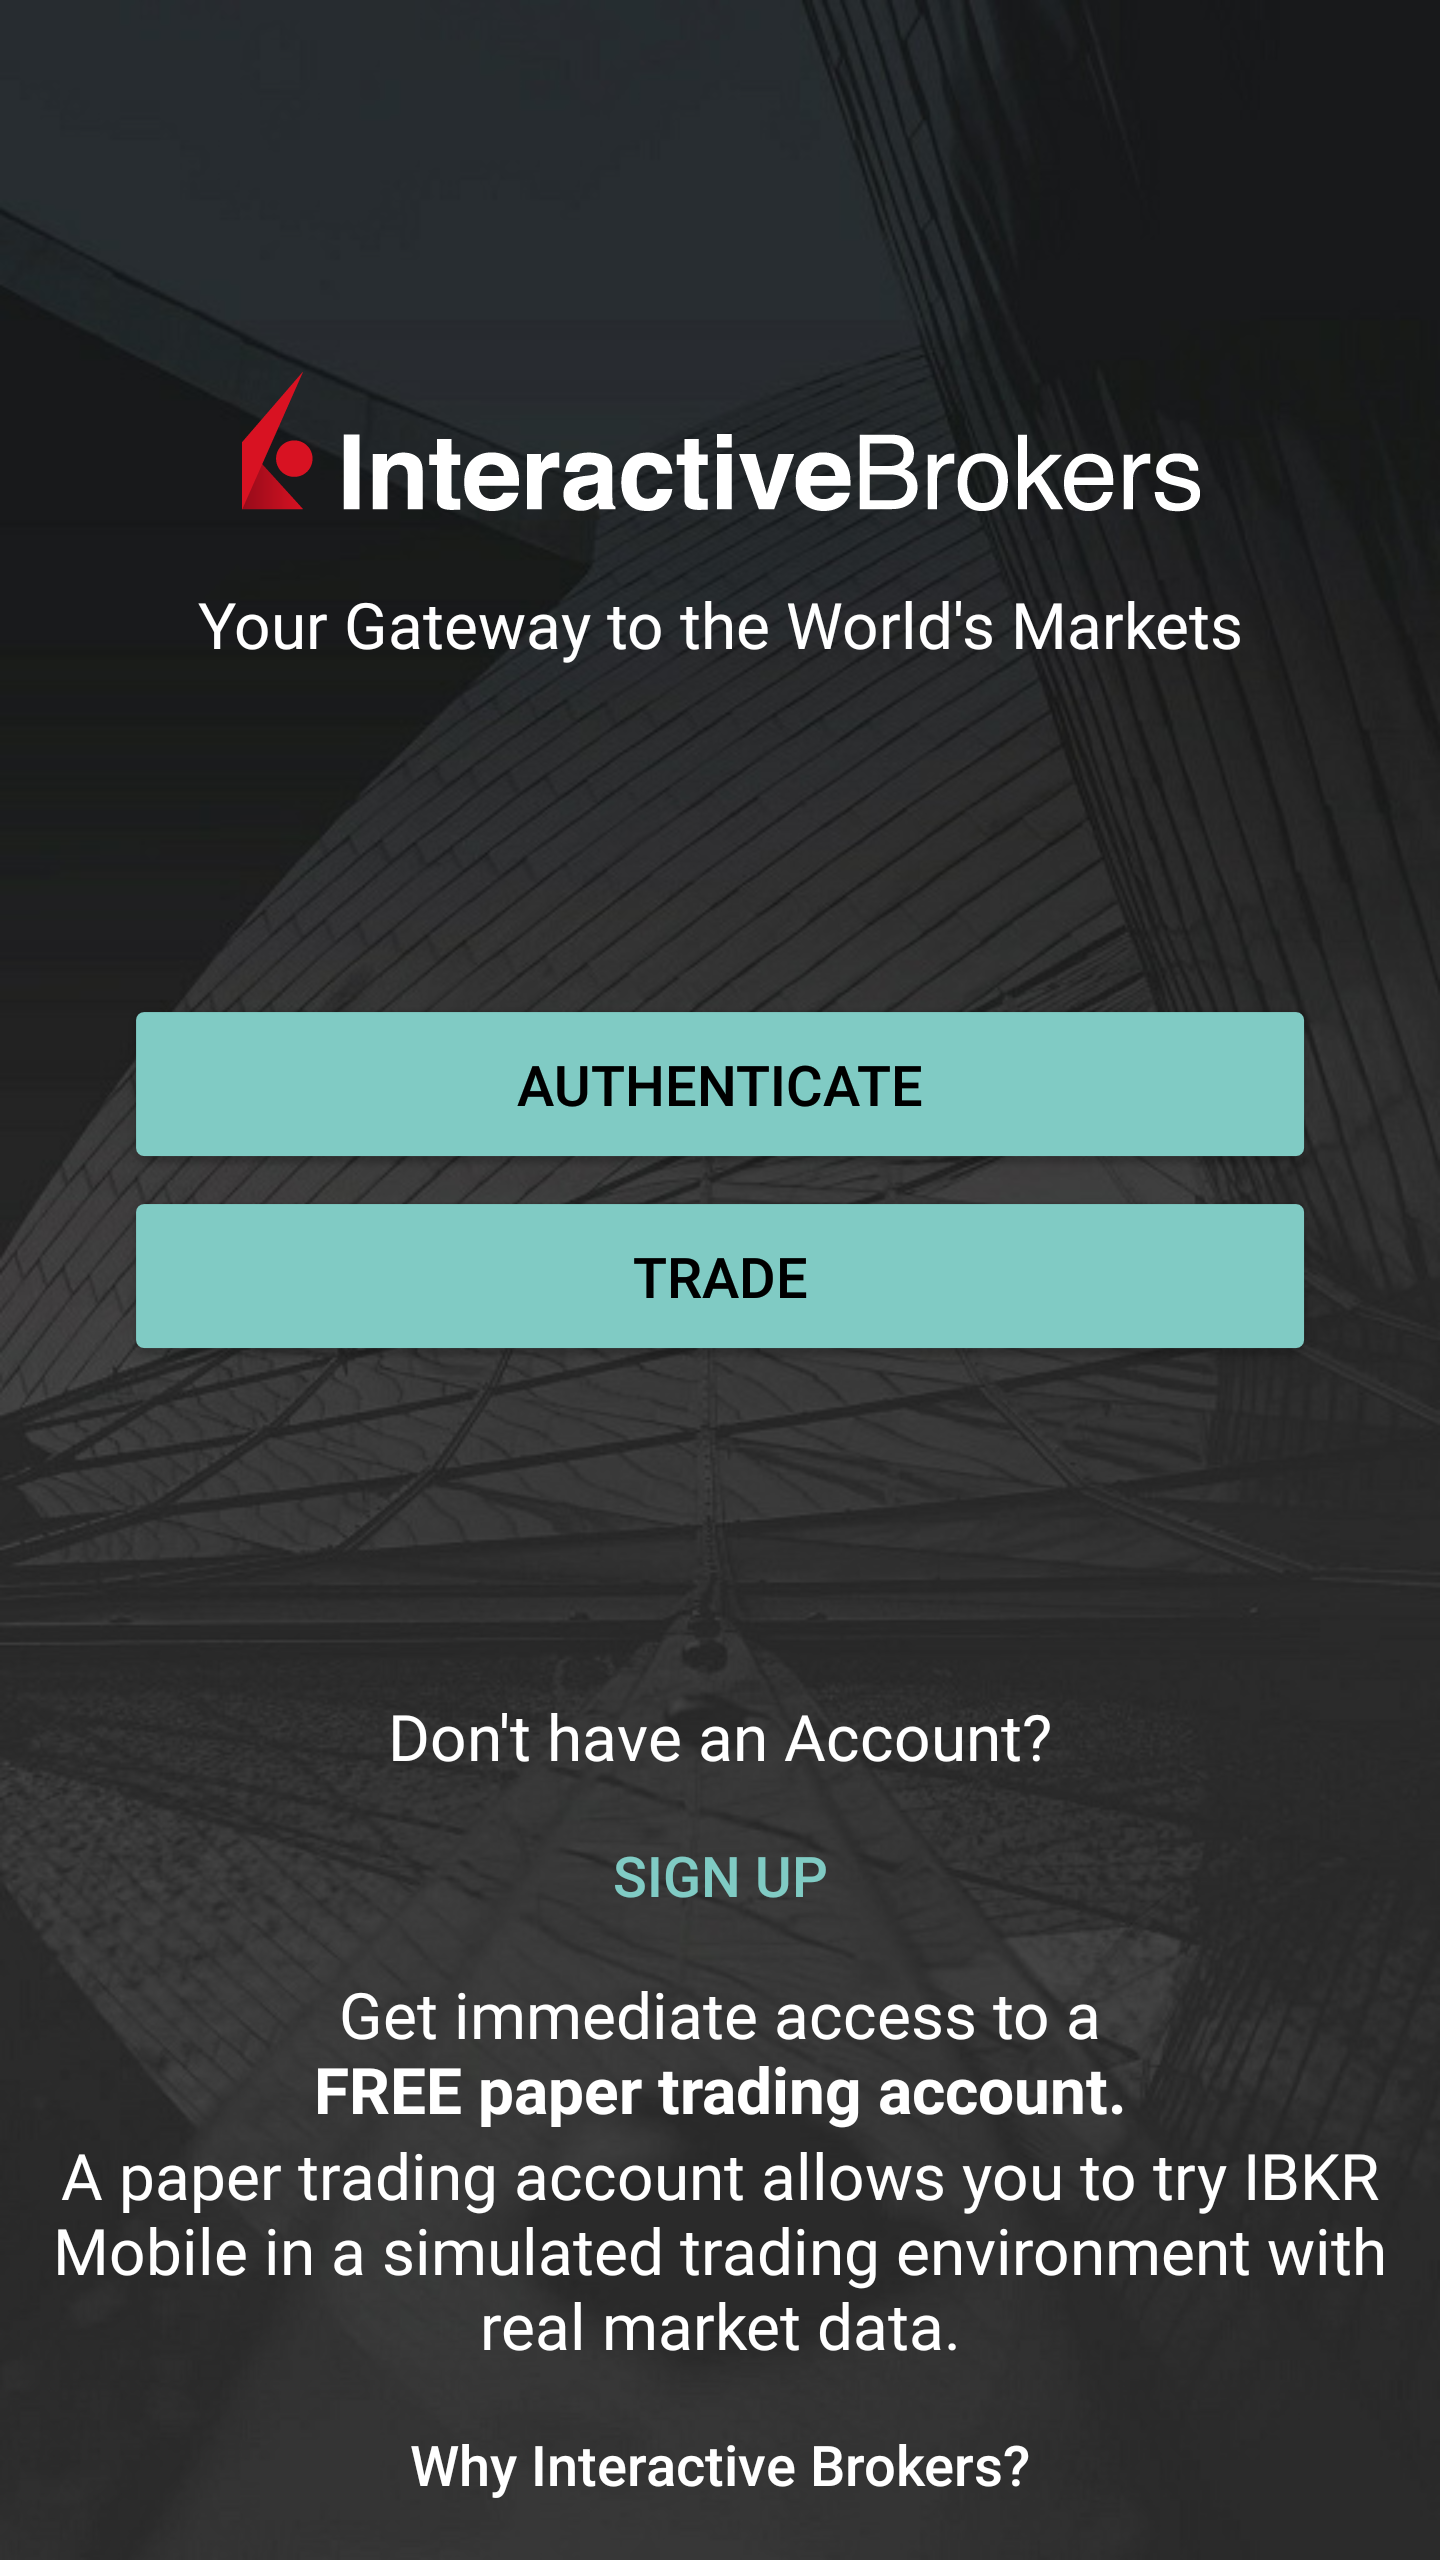
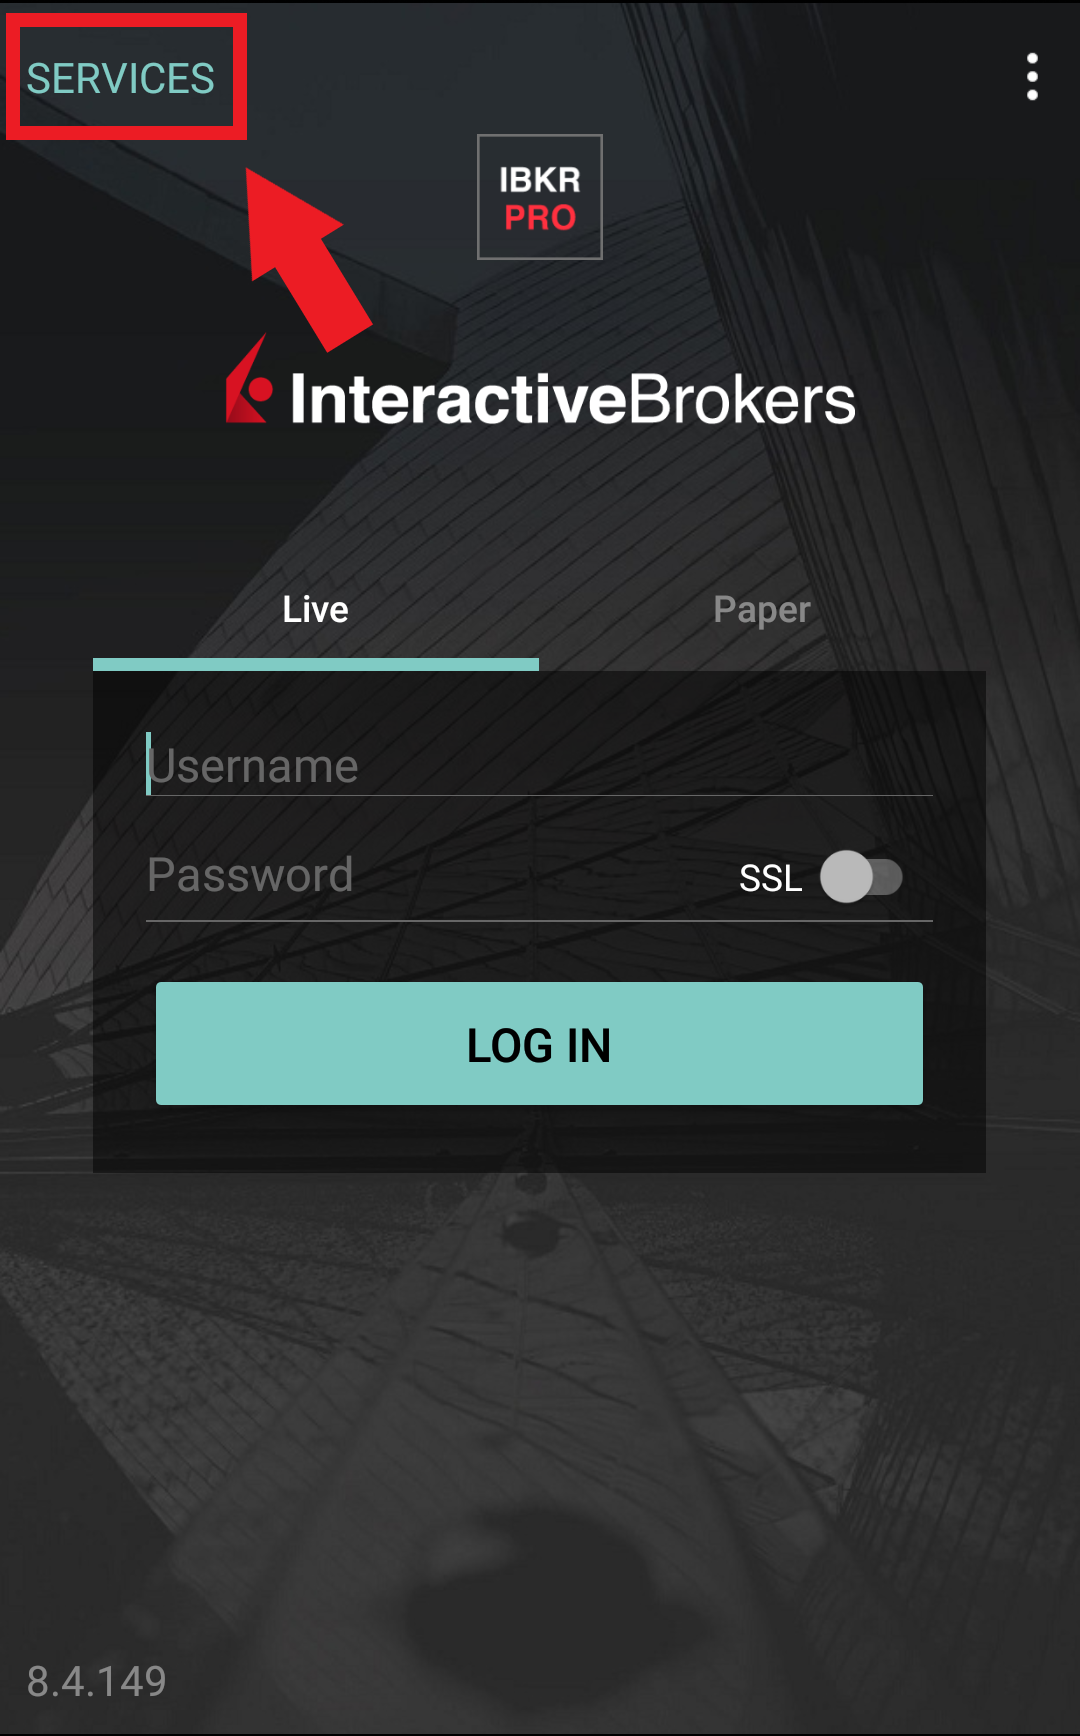
Figure 5A. Figure 6A. Figure 7A.
.jpeg)
.jpeg)
4. Type the PIN that you determined during the IB Key registration process and the Challenge Code from Client Portal into the corresponding fields, then select Generate Passcode. A response string will then be generated (Figure 8A).
Figure 8A.
.png)
5. Enter the response string from IB Key into the passcode field of Client Portal and click Continue (Figure 9A).
Figure 9A.

-----------------------------------------------------------------------------------------------------------------------------------------------------------
Verify your identity with Digital Security Card+ (DSC+)
1. When you initiate a task that requires a verification, you will be prompted to enter Username and Password. Fill out the information and click on Continue (Figure 1B).
Figure 1B.
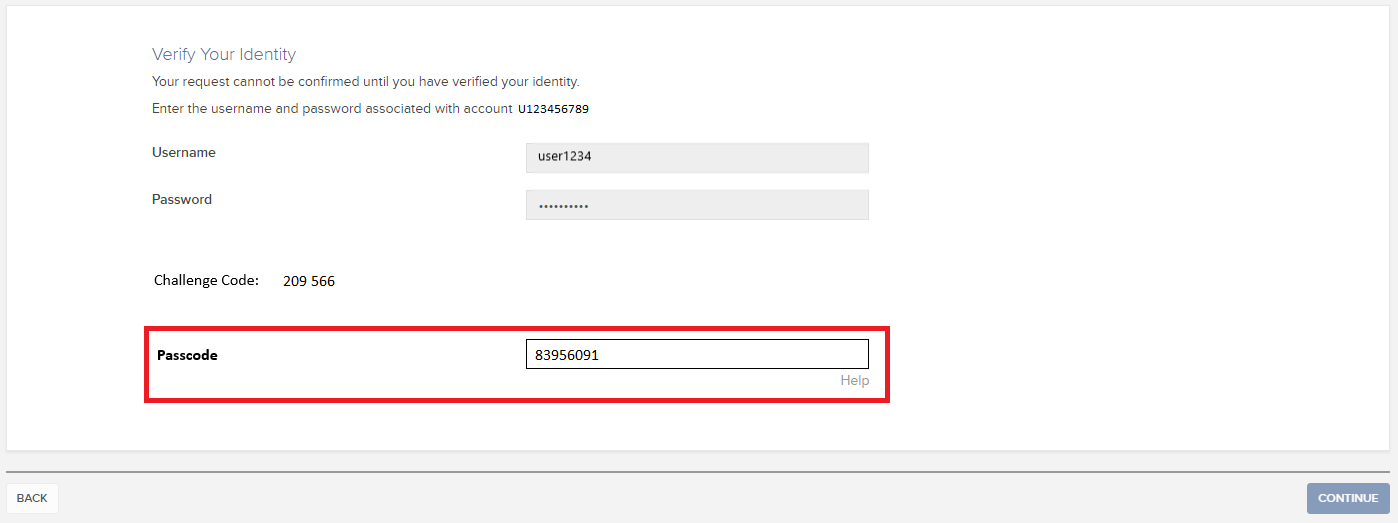
2. A Challenge Code will be displayed, along with a passcode field to enter a response (Figure 2B). You will enter this Challenge Code onto your DSC+.
Figure 2B.
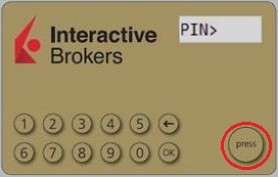
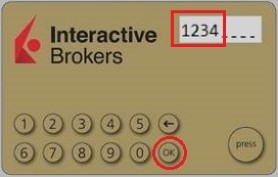
3. Turn on your DSC+ using the “press” button until 'PIN>' is displayed (Figure 3B). Enter the 4-digit PIN code you specified at the time you requested the device, then confirm with the “OK” button (Figure 4B).
Figure 3B. Figure 4B.
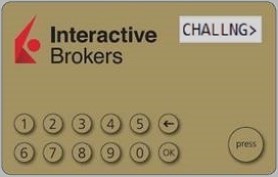
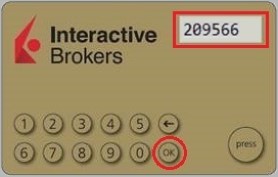
4. When 'CHALLNG>' is displayed (Figure 5B), enter the 6-digit Challenge Code from the Client Portal screen into the DSC+, then confirm with the "OK" button (Figure 6B).
Figure 5B. Figure 6B.
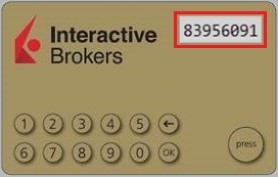
5. A response code will appear (Figure 7B).
Figure 7B.
6. Enter the response string from your DSC+ into the passcode field of Client Portal and click Continue (Figure 8B).
Figure 8B.
オンライン・セキュリティ・コード・カードの入手方法
概観:
オンライン・セキュリティー・コード・カードを利用すると、口座と取引プラットフォームに21日間アクセスすることができます。こちらは以下の場合にご利用いただく一時的なソリューションです:
A. パーマネント・セキュリティデバイスを一時的にご利用いただいておらず、再度利用できるのをお待ちの場合。
B. パーマネント・セキュリティデバイスを紛失の上で交換品をリクエストされている、または郵送されてくるまでに口座へのアクセスを継続されたい場合。
Background:
上記に該当するような場合には、IBKRクライアントサービスにご連絡の上、KB70に記載される手順に従ってテンポラリーコードを取得してください。テンポラリーアクセスの延長は以下のように行ってください:
有効化の手順
1. ブラウザーを開いてibkr.comに進んでください
2. ログインをクリックしてください。

3. ログイン情報を入力してログインをクリックしてください。身元確認用にIBKRクライアントサービスより取得されたテンポラリーコードをご入力の上、再度 ログインをクリックしてください
.png)
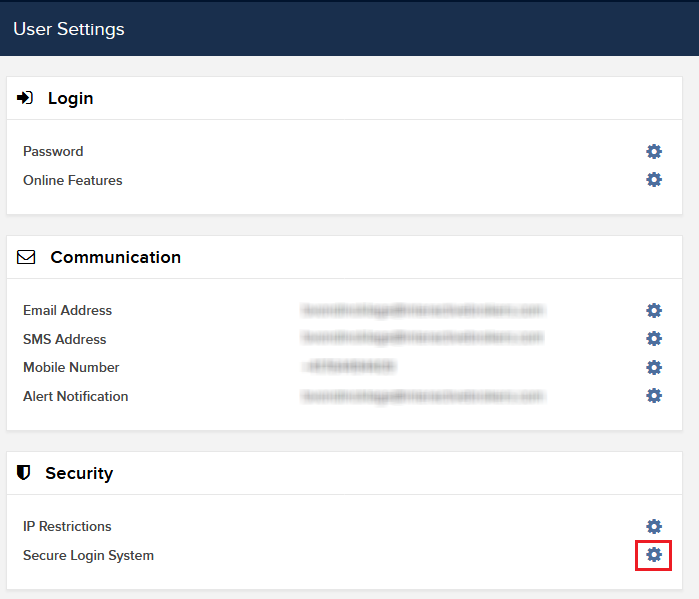
4. メニューより設定をクリックしてから、ユーザー設定をクリックしてください。この後、セキュリティボックス内にあるホイール(設定)アイコンをクリックしてください。これはセキュア・ログイン・システム1の横にあるものです
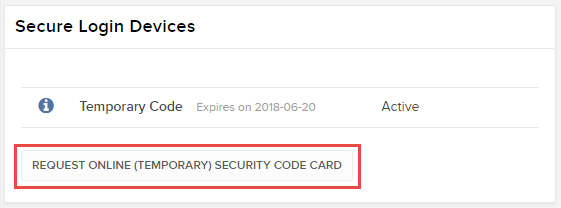
5. 現在お客様のユーザーに有効化されているセキュリティー・デバイスがすべてリストされます。リストの下にあるオンライン(テンポラリー)セキュリティーコードカードをリクエストするをクリックしてください
6. オンライン・セキュリティカードが表示されます。印刷2をクリックしてください
(1).png)
7. カードが読めるように印刷されていることをご確認されてから「続ける」 をクリックしてください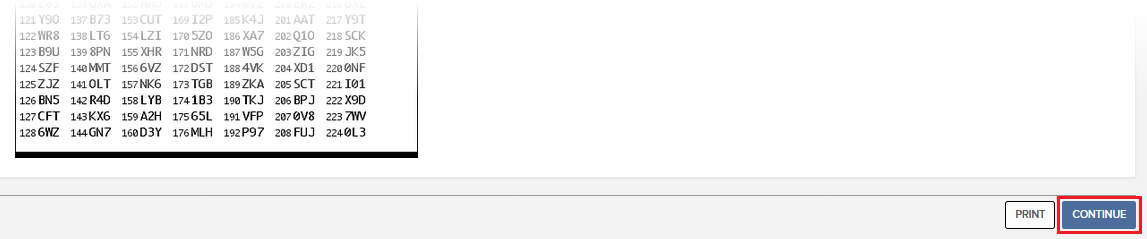
8. 有効化の画面にふたつのインデックス番号が表示されます。ひとつめの番号をカードで探し、これに該当する3桁のコードをカードの値の欄に入力してください。この後ふたつめの番号を同じように探し、スペースは入れずに3桁のコードを入力してください。「続ける」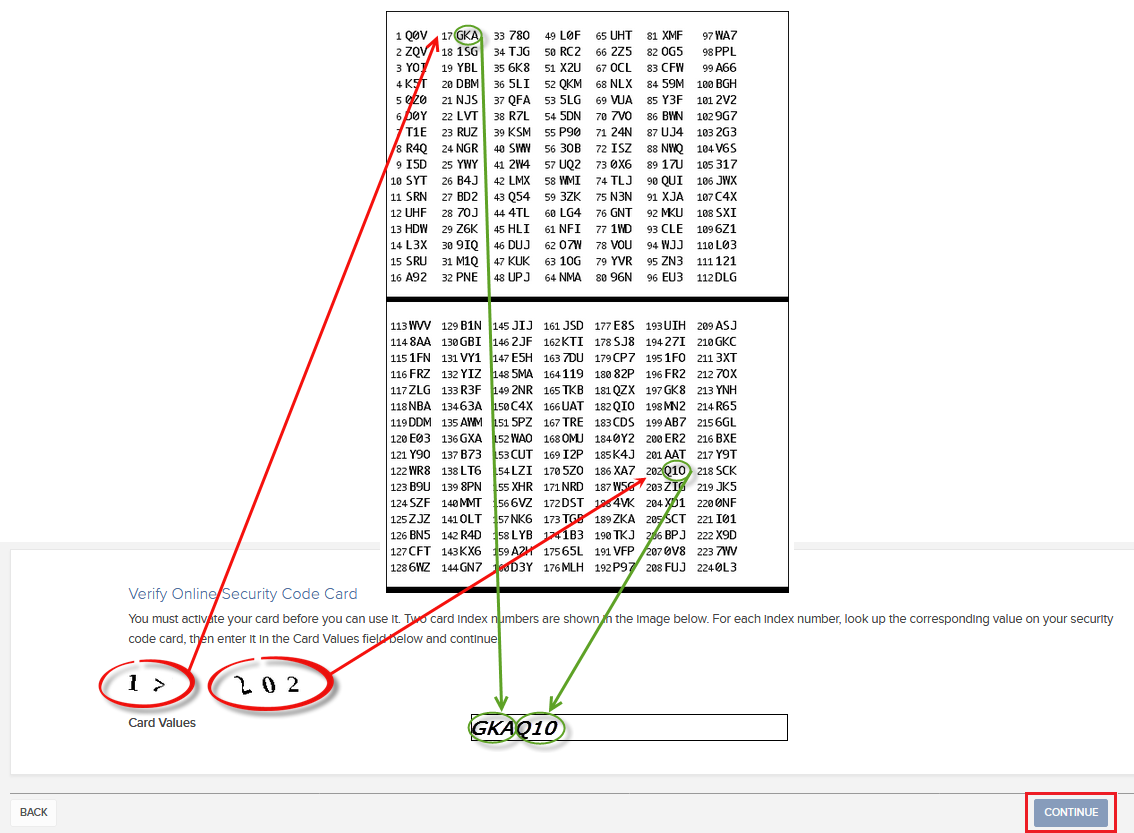 をクリックしてください。
9. カードの有効期限といっしょに確認メッセージが表示されます。 OKをクリックして作業を終了してください.png)
留意点
1. クラシック・アカウント・マネジメントをご利用の場合には、上にあるメニューより口座管理 > セキュリティ > セキュア・ログイン・システム > キュリティデバイスとお進みください
2. デバイスに接続されているプリンターがない場合にはカードのイメージの上で右クリックをして、画像ファイルとして保存してください。この場合には有効化画面に進んだ時点で警告メッセージが表示されることがあります。
続けるをクリックして警告メッセージを承認する前に、画像ファイルがデバイスに保存されていることをご確認ください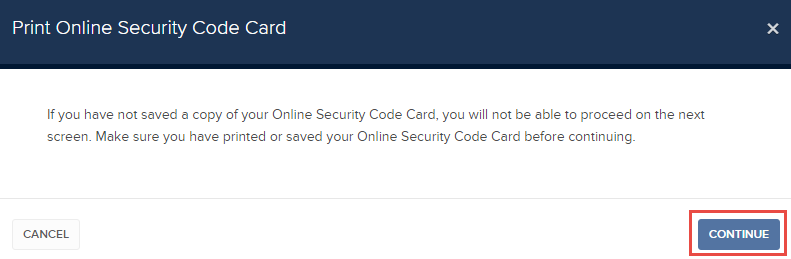
参考文献
- セキュア・ログインシステムの概要はKB1131をご覧ください
- デジタル・セキュリティー・カード+の交換リクエスト方法に関する詳細はKB1943をご覧ください
- セキュリティデバイスに関する詳細はKB2636をご覧ください
- 2人以上のユーザーで同じセキュア・ログイン・デバイスを使用する際のインストラクションはKB2481をご覧ください
- セキュア・ログイン・システムに戻る場合のインストラクションはKB2545をご覧ください
- IBKRにセキュリティデバイスをご返却いただく際のインストラクションはKB975をご覧ください
- IBKRモバイル経由でのIB Key認証の有効化手順はKB2260をご覧ください
- マルチプル・ツーファクター認証システムに関する詳細はKB2895をご覧ください
- セキュリティデバイスにかかる費用に関する詳細はKB1861をご覧ください
- テンポラリー・パスコードの有効性に関する詳細はKB69をご覧ください
How to send documents to IBKR using your smartphone
概観:
Interactive Brokers allows you to send us a copy of a document even if you do not currently have access to a scanner. You can take a picture of the requested document with your smartphone.
Below you will find the instructions on how to take a picture and send it per email to Interactive Brokers with the following smartphone operating systems:
If you already know how to take and send pictures per email using your smartphone, please click HERE - Where to send the email to and what to include in the subject.
iOS
1. Swipe up from the bottom of your smartphone screen and tap the camera icon.
If you do not have the Camera icon, you can tap the Camera app icon from the home screen of your iPhone.
Normally your phone should now activate the rear camera. If it activates the front one, tap the camera switch button.
2. Place your iPhone above the document and frame the desired portion or page of the document.
3. Make sure to have uniform, sufficient lighting and not to cast any shadow on the document due to your position. Hold the smartphone firmly with your hand/s and avoid shaking. Tap on the shutter button to take the photo.
4. Tap the thumbnail image in the lower left-hand corner to access the picture you have just taken.
5. Make sure that the picture is clear and the document is well legible. You can enlarge the picture and see it in detail by swiping apart two fingers on the picture itself.
If the picture does not present a good quality or lighting, please repeat the previous steps in order to take a sharper one.
6. Tap the share icon in the lower left-hand corner of the screen.
7. Tap the Mail icon.
Note: to send emails your phone has to be configured for that. Please contact your email provider if you are not familiar with this procedure.
8. Please see HERE how to populate the To: and Subject: fields of your email. Once the email is ready, tap the up arrow icon on the top right to send it.
Android
1. Open your applications list and start the Camera app. Alternatively start it from your Home screen. Depending on your phone model, maker or setup, the app might be called differently.
Normally your phone should now activate the rear camera. If it activates the front one, tap the camera switch button.
2. Place your Android above the document and frame the desired portion or page of the document.
3. Make sure to have uniform, sufficient lighting and not to cast any shadow on the document due to your position. Hold the smartphone firmly with your hand/s and avoid shaking. Tap on the shutter button to take the photo.
4. Make sure that the picture is clear and the document is well legible. You can enlarge the picture and see it in detail by swiping apart two fingers on the picture itself.
If the picture does not present a good quality or lighting, please repeat the previous steps in order to take a sharper one.
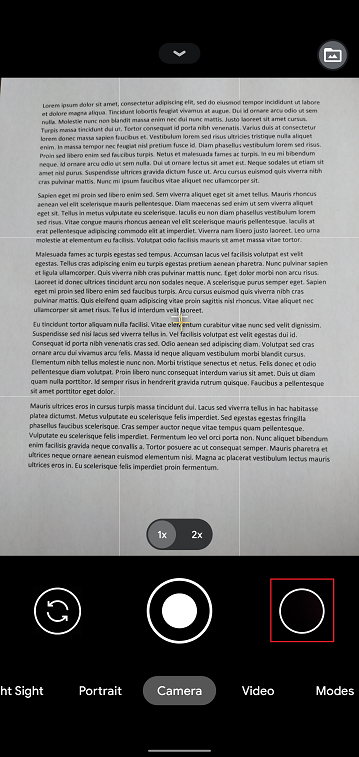
5. Tap the empty circle icon in the lower right-hand corner of the screen.
6. Tap the share icon in the lower left-hand corner of the screen.
7. In the sharing menu that will be displayed now tap the icon of the email client set up on your phone. In the example picture below, it is called Gmail but the name may vary according to your specific setup.
Note: to send emails your phone has to be configured for that. Please contact your email provider if you are not familiar with this procedure.
8. Please see HERE how to populate the To and Subject fields of your email. Once the email is ready, tap the airplane icon on the top right to send it.
WHERE TO SEND THE EMAIL AND WHAT TO INCLUDE IN THE SUBJECT
The email has to be created observing the below instructions:
1. In the field To: type:
- newaccounts@interactivebrokers.com if you are a resident of a non-European country
- newaccounts.uk@interactivebrokers.co.uk if you are a European resident
2. The Subject: field must contain all of the below:
- Your account number (it usually has the format Uxxxxxxx, where x are numbers) or your username
- The purpose of sending the document. Please use the below convention:
- PoRes for a proof of residential address
- PID for a proof of identity
How to obtain an Online Security Code Card
概観:
The Online Security Code Card provides you temporary access to your account and trading platform for a duration of 21 days. This is an ad-interim solution usually needed in those cases:
A. You are temporarily away from your permanent security device and you are waiting to regain access to it.
B. You have lost your permanent security device and you want to either request a replacement or maintain access to your account while waiting for the delivery to happen.
Background:
For the cases mentioned above, we assume you have already notified IBKR Client Services and obtained a Temporary Code, as explained in KB70. You can now extend the duration of your temporary access as follows:
Activation procedure
1. Open your browser and go to the web page ibkr.com
2. Click on Login
3. Enter your credentials and click on Login. Enter the Temporary Code you received from IBKR Client Services to complete the authentication and click again on Login
4. From the left side menu, click on Settings > User Settings. Then, within the Security box, click on the wheel(Configure) icon next to Secure Login System1.png)
5. The system will list all the security devices currently active for your user. Below the list, click on the button Request Online (Temporary) Security Code Card
6. Your Online Security Card will be displayed. Click on Print2
7. Please make sure the card has been printed correctly in all its parts and it is clearly readable. Then click on Continue
8. Two index numbers will appear on the activation screen. Locate the first index number on your card and enter the correspondent three digits code into the Card Values field. Then repeat the same operation for the second index number, leaving no spaces between the codes. Then click on Continue
9. You will see a confirmation message stating the expiration date of the card. Click on OK to finalize the procedure
Notes
1. If you use the Classic Account Management, click on the top menu Manage Account > Security > Secure Login System > Security Device
2. Should you not have a printer connected to your device, you can right-click directly on the card image and save it as an image file. In this case, upon proceeding to the activation screen, you may receive a warning message.
Please make sure that the image file has been successfully stored on your device and that it is readable before you acknowledge the warning message by clicking on Continue
References
- See KB1131 for an overview of the Secure Login System
- See KB1943 for instructions on requesting a replacement Digital Security Card+
- See KB2636 for information and procedures related to Security Devices
- See KB2481 for instructions about sharing the Security Login Device between two or more users
- See KB2545 for instructions on how to opt back in to the Secure Login System
- See KB975 for instructions on how to return your security device to IBKR
- See KB2260 for instructions on activating the IB Key authentication via IBKR Mobile
- See KB2895 for information about Multiple Two-Factor Authentication System (M2FS)
- See KB1861 for information about charges or expenses associated with the security devices
- See KB69 for information about Temporary passcode validity
Troubleshooting Trading Platform Login Failures
Click on the link below which best describes your situation:
a. Confirm whether your account has been approved. Accounts which have not been approved or which have been approved after the daily cut-off time are provided access solely to Client Portal and not the trading platform (access will be provided next day if approved after daily cut-off time)
b. Confirm whether your account remains open. Accounts which have been closed, either by customer action or by IBKR due to no balance, no longer have access to the trading platform but continue to have access to Client Portal in order to obtain activity and tax statements. Access to Client Portal is provided using the same User Name and password combination which existed when the account was open and do not require the use of the security device.
c. If you are attempting to log into your paper trading account, make sure that you are not using the user name and password combination from your live account. This combination is possible only if paper account is selected in the drop down menu of the login window.
a. If operating with a temporary passcode, note that alpha characters are case sensitive and are required to be input in upper case format
b. If operating a security card or electronic device, note that there are no spaces between characters
For security purposes, all requests for assistance with a user name and/or password must be initiated via telephone and require prior verification of the account holder’s identity. Requests are to be directed to one of the regional Client Services.
a. Confirm that your Internet connection is active (test by accessing another website). If you are unable to establish an Internet connection you will need to contact your Internet Service Provider for assistance.
b. Confirm whether you are operating under a firewall which is blocking the TWS connection. If so, the firewall would need to be re-configured in order to provide access.*
c. Ports 4000/4001 are being blocked. These ports are often blocked from public connections such as hotels, cafes, etc. and required to be open to accommodate Inbound/Outbound TCP protocol. In addition, if you have a router connected to your computer, these ports must be open on the router.*
*Please click here to check your connectivity status: IBKR Dedicated Connectivity Test Page.
If you are temporarily without possession of your security device, interim access may be provided by contacting your regional Client Services via telephone where, once your identity has been verified, you will be provided with a temporary passcode.
The temporary passcode is a static alpha-numeric code which replaces the randomly generated code provided through your security device and which will provide full access to Client Portal and the trading platforms for 2 days. Should a longer period of permanent device replacement be necessary, and to obtain enhanced protection, it is recommended that you use the temporary passcode to log into Client Portal and print out the online security code card which will operate as a replacement to your security device for up to 3 weeks.
After the expiration of the temporary passcode or online security code card, or if you regain possession of your security device beforehand, you will need to log into Client Portal and select the menu option to re-activate your security device.
In the case of a lost or damaged security device, you will need to contact our Client Services to arrange for a replacement and to provide for interim access. As the time frame for shipping a replacement device may range from 3 to 14 days depending upon your country of residence, interim access is provided via an online security code card. This card may be retrieved for printing or saving as an image to your computer once a temporary passcode has been provided for Client Portal access.
The temporary passcode is intended to provide full access to both Client Portal and the trading platforms for a period of 2 days. After 2 days, the temporary passcode may no longer be used to access the trading platforms but may be used to access Client Portal for an additional period of 10 days. The Client Portal access, however, is limited solely for the purpose of printing or saving the online security code card.
If your window of access to Client Portal using the temporary passcode remains, you may print or save the online security code card through which full access to both Client Portal and the trading platforms is provided for a period of 21 days. If you are unable to log into Client Portal, you will need to contact your regional Client Services for assistance.
The online security code card is intended to provide full access to both Client Portal and the trading platforms for a period of 21 days. This time frame, while limited, is intended to provide sufficient opportunity for the account holder to either regain possession of a temporarily unavailable security device or request and receive a replacement device.
If you are unable to log in using the online security code card, you will need to contact your regional Client Services for assistance and to provide information as to the status of your permanent security device.
Depending upon your location, the physical security device should be delivered to the address of record on your account within 2 days in the case of US residents and within 2 weeks for all other accounts. It’s important to note that the permanent devices are set to automatically activate after a set time frame if not yet manually activated by the account holder. If this is the case and you encounter difficulties logging into your account, please contact our Technical Assistance Center from one of the numbers listed on ibkr.com/support.
If your window of access to Client Portal using the temporary passcode remains, you may print or save the online security code card through which full access to both Client Portal and the trading platforms is provided for a period of 21 days.
If you are unable to log into Client Portal, you will need to contact your regional Client Services for assistance.
You have received your new two-factor security device. Detailed instructions on its activation are in the envelope in which the device came. Alternatively, the card will auto-activate in 2-3 weeks, depending on your geographical location.