盈透證券歡迎您
Overview:
現在您的賬戶已完成入金并獲批,您可以開始交易了。以下信息可以幫助您入門。
- 您的資金
- 設置您的賬戶以進行交易
- 如何交易
- 在全球範圍進行交易
- 拓展您IB經驗的五個要點
1. 您的資金
存款&取款基本信息。所有轉賬都通過您的賬戶管理進行管理
存款
首先,通過您的賬戶管理 > 資金 > 資金轉賬 > 轉賬類型:“存款”創建一個存款通知(如何創建存款通知)。第二步,通知您的銀行進行電匯轉賬,在存款通知中提供詳細銀行信息。
取款
通過您的賬戶管理 > 資金 > 資金轉賬 > 轉賬類型:“取款”創建一個取款指令(如何創建取款指令)
如果您通知要進行超出取款限額的取款,則會被視為異常取款,我們因此將需要匹配銀行賬戶持有人和IB賬戶。如果目的地銀行賬戶已被用作存款,那麼取款將會被處理;否則,您必須聯繫客戶服務并提供所需文件。
錯誤排查
存款:我的銀行發出了資金,但我沒有看到資金記入我的IB賬戶。可能的原因:
a) 資金轉賬需要1至4個工作日。
b) 存款通知缺失。您必須通過賬戶管理創建存款通知并向客戶服務發送一條咨詢單。
c) 修改詳情缺失。轉賬詳情中缺失您的姓名和IB賬戶號碼。您必須聯繫您的銀行索取完整的修改詳情。
d) IB發起的ACH存款7個工作日內限額為10萬美元。如果您開立的是初始要求為11萬美元的投資組合保證金賬戶,最好選擇電匯存款以減少您第一筆交易的等待時間。如果選擇ACH,會需要等待近2周時間,或者可以選擇臨時升級至RegT。
取款:我已經請求了取款,但我沒有看到資金記入我的銀行賬戶。可能的原因:
a) 資金轉賬需要1至4個工作日。
b) 被拒。超出最大取款限額。請檢查您賬戶的現金餘額。注意,出於監管要求,存入資金時會有三天置存期,之後才可以被取出。
c) 您的銀行退回了資金。可能是因為接收銀行賬戶與匯款銀行賬戶名稱不匹配。
2. 設置您的賬戶以進行交易
現金與保證金賬戶的區別:如果您選擇快速申請,默認您的賬戶類型為配備美國股票許可的現金賬戶。如果您想使用槓桿并以保證金交易,參見此處如何升級為RegT保證金賬戶
交易許可
為了能夠交易特定國家的某一特定資產類別,您需要通過賬戶管理獲得該資產類別的交易許可。請注意,交易許可是免費的。但您可能需要簽署當地監管部門所要求的風險披露。如何請求交易許可
市場數據
如果想獲取某一特定產品/交易所的實時市場數據,您需要訂閱交易所收費的市場數據包。如何訂閱市場數據
市場數據助手會幫助您選擇正確的數據包。請觀看該視頻,其解釋了市場數據助手是如何工作的。
客戶可以通過從未訂閱的代碼行點擊免費延時數據按鈕選擇接收免費的延時市場數據。
顧問賬戶
請閱讀用戶指南顧問入門指南。在這裡,您可以看到如何向您的顧問賬戶創建其他使用者以及如何授予其訪問權限等等。
3. 如何交易
如果想學習如何使用我們的交易平台,您可以訪問交易者大學。在這裡您可以找到我們以10種語言提供的實時與錄製網研會以及有關交易平台的課程與文檔。
交易者工作站(TWS)
要求更高級交易工具的交易者可以使用我們做市商設計的交易者工作站(TWS)。TWS有著便於操作的電子表格式界面,可優化您的交易速度和效率,支持60多種定單類型,配備可適應任何交易風格的特定任務交易工具,并可實時監控賬戶餘額與活動。試試兩種不同模式:
魔方TWS:直觀可用性, 簡便的交易准入,定單管理,自選列表與圖表全部在一個窗口呈現。
標準模式TWS:為需要更高級工具與算法的交易者提供高級定單管理。
基本描述與信息 / 快速入門指南 / 用戶指南
互動課程:TWS基礎 / TWS設置 / 魔方TWS
如何下單交易:標準模式TWS視頻 / 魔方TWS視頻
交易工具:基本描述與信息 / 用戶指南
要求:如何安裝適用於Windows的Java / 如何安裝適用於MAC的Java / 需打開端口4000和4001
登錄TWS / 下載TWS
網絡交易者(WebTrader)
偏好乾淨簡潔界面的交易者可以使用我們基於HTML的網絡交易者。網絡交易者便於查看市場數據、提交定單以及監控您的賬戶與執行。從各瀏覽器使用最新版本網絡交易者
快速入門指南 / 網絡交易者用戶指南
簡介:網絡交易者視頻
如何下單交易:網絡交易者視頻
登錄網絡交易者
移動交易者(MobileTrader)
我們的移動解決方案可供您隨時隨地用您的IB賬戶進行交易。IB TWS iOS版和IB TWS BlackBerry版是為這些型號定制設計的,而通用的移動交易者支持大多數其他職能手機。
基本描述與信息
定單類型 可用定單類型與描述 / 視頻 / 課程 / 用戶指南
模擬交易 基本描述與信息 / 如何獲得模擬交易賬戶
一旦您的模擬交易賬戶創建成功,您便可用模擬交易賬戶分享您真實賬戶的市場數據:賬戶管理 > 管理賬戶 > 設置 > 模擬交易
4. 在全球範圍進行交易
IB賬戶為多幣種賬戶。您的賬戶可以同時持有不同的貨幣,可供您從一個賬戶交易全球範圍內的多種產品。
基礎貨幣
您的基礎貨幣決定了您報表的轉換貨幣以及用於確定保證金要求的貨幣。基礎貨幣在您開立賬戶時決定。客戶隨時可通過賬戶管理改變其基礎貨幣。
我們不會自動將貨幣轉換為您的基礎貨幣
貨幣轉換必須由客戶手動完成。在該視頻中,您可以學習如何進行貨幣轉換。
要開倉以您賬戶所不持有之貨幣計價的頭寸,您可以有以下兩種選擇:
A) 貨幣轉換。
B) IB保證金貸款。(對現金賬戶不可用)
請查看該課程,其解釋了外匯交易方法。
5. 拓展您IB經驗的五個要點
1. 合約搜索
在這裡,您會找到我們的所有產品、代碼與說明。
2. IB知識庫
IB知識庫包含了一系列術語、指導性文章、錯誤排查技巧以及指南,旨在幫助IB客戶管理其IB賬戶。只需在搜索按鈕輸入您想要了解的內容,您便會得到答案。
3. 賬戶管理
我們的交易平台可供您訪問市場,賬戶管理則可供您訪問自己的IB賬戶。使用賬戶管理可管理賬戶相關任務,如存入或取出資金、查看您的報表、修改市場數據與新聞訂閱、更改交易許可并驗證或更改您的個人信息。
登錄賬戶管理 / 賬戶管理快速入門指南 / 賬戶管理用戶指南
4. 安全登錄系統
為向您提供最高級別的在線安全,盈透證券推出了安全登錄系統(SLS),通過安全登錄系統訪問賬戶需要進行雙因素驗證。雙因素驗證旨在于登錄時採用兩項安全因素確認您的身份:1) 您的用戶名與密碼組合;和2) 生成隨機、一次性安全代碼的安全設備。因為登錄賬戶需要既知曉您的用戶名/密碼又持有實物安全設備,所以參加安全登錄系統基本上可以杜絕除您以外的其他任何人訪問您賬戶的可能性。
如何激活您的安全設備 / 如何獲取安全代碼卡 / 如何退還安全設備
如果忘記密碼或丟失安全代碼卡,請聯繫我們獲取即時幫助。
5. 報表與報告
我們的報表與報告方便查看和進行自定義,覆蓋了您盈透賬戶的方方面面。如何查看活動報表
IBKR Mobile Companion App for Apple Watch
Overview:
Interactive Brokers takes our intuitive and ergonomic mobile trading platform to the next level by providing you a companion app for the Apple Watch.
Background:
The companion app is designed to display information when a user has logged in to the IBKR Mobile app on their iPhone. It will work in both the Live Trading and Read Only Modes but does not support active trading. This companion app is only available for informational purpose only.
Table of contents
What does the app do?
At 'glance view' the app will display the following information; Amount of FYI Notification, Account Number, Daily P&L, Net Liquidation Value, Number of Open Orders, Number of Trades Executed, Excess Liquidity and number of Positions you currently own. It will also display the time when it has fetched the information from your iPhone.
Example:
.jpg)
Requirements
- Must have iPhone 5s or greater, using iOS 11 or later.
- Must have the IBKR Mobile app installed on your iPhone (version 11 or greater)
- Must have your Apple Watch paired to your iPhone (refer to: Set up your Apple Watch for directions)
- Must have watchOS 5 running on your Apple Watch.
Important: The Apple Watch applications are only 'companion' apps. This means they are not installed directly on the watch itself, but rather are a function of an application already installed on your iPhone.
How is the app installed?
1. Install the latest version of the IBKR Mobile app on your iPhone.
2. Pair your Apple Watch to your phone.
3. Launch the Watch app on your phone.
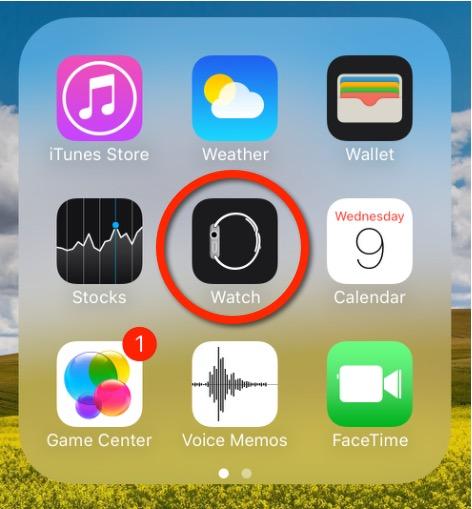
4. Scroll down on the main screen until you see your list of apps, locate the IBKR Mobile app and Tap on it.
.jpg)
5. Enable Show App on Apple Watch by swiping the slider to the right (green).
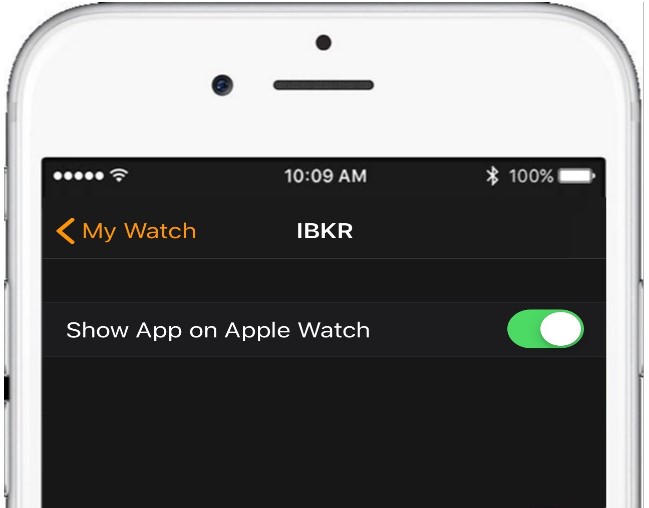
6. After the top slider is set to green, you will see a text informing you that the app is being installed. At this stage the phone is sending the application to your watch per Bluetooth. This might take a short moment (approximately 30-60 seconds.) Once completed the companion app has been installed.
Note: Once enabled it will take 24 hours before P&L shows up on the watch after activation.
How do I confirm the app is installed?
On your Apple Watch click on the crown to access your Home Screen, you should now see an icon for the IBKR Mobile App.

How to start multiple TWS sessions on a Mac
Background:
By default macOS does not allow the user to run multiple sessions of the same application. The following workaround can overcome this limitation in case you need to run the Trader Workstation for more than one user.
-
In case running different versions of the TWS is suitable to your needs, please follow the instructions on Procedure 1
-
In case you need multiple sessions of the same TWS version, please follow the instructions on Procedure 2
Procedure 1
1) Open the web page ibkr.com
2) Navigate to the menu Technology > TWS Software.
3) First download and install one of the auto-updating TWS versions (TWS LATEST or TWS according to your preference).
4) Once you have completed the installation, download and install one of the offline versions (OFFLINE TWS LATEST or OFFLINE TWS according to your preference).
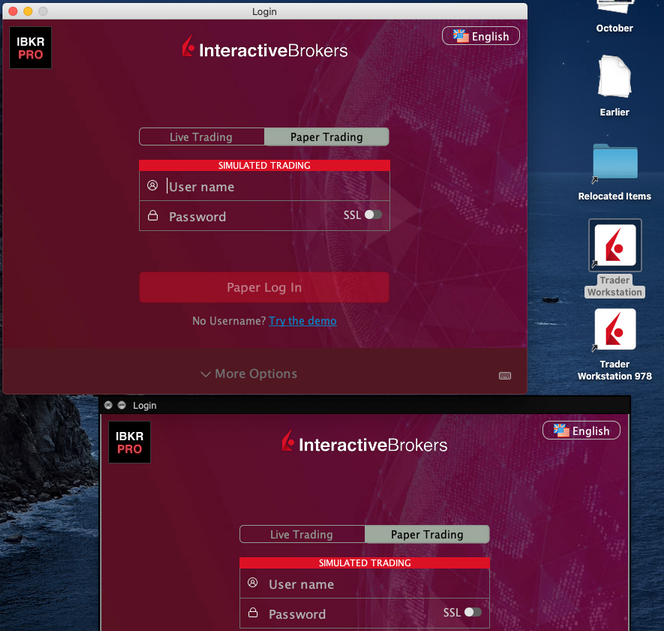
5) You will then see on your Desktop two different Trader Workstation icons. You can use the first shortcut to start the first TWS session and the second one to start the additional one (see Figure 1.). Note: the link containing the version number in the name is the OFFLINE version. This will be a version that needs periodical manual updates.
Figure 1.
Procedure 2
1) Launch the first session of the Trader Workstation using the TWS icon present on your Desktop. If you still do not have any Trader Workstation icon, please go to the web page ibkr.com and click on the menu Technology > TWS Software. Then download and install one of the TWS versions displayed.
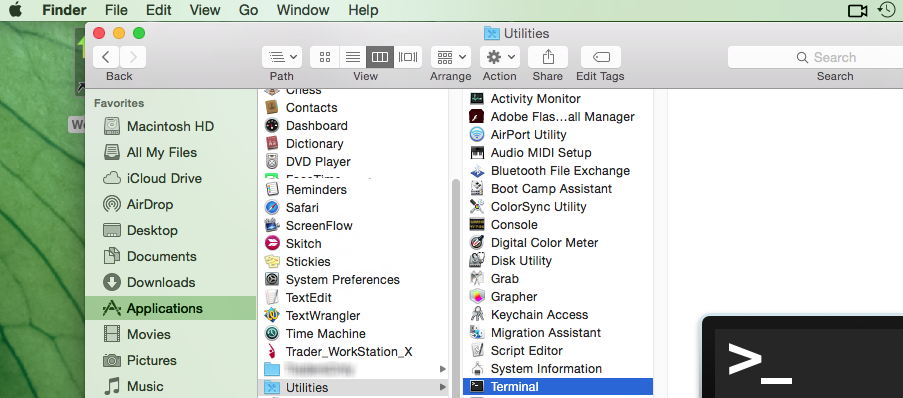
2) Open the Finder and click on Applications on the left side menu. Then select Utilities and then launch Terminal (see Figure 2.).
Figure 2.
3) The Terminal will appear on the screen and will point to the home folder of your current macOS user. Then enter the commands listed below (see Figure 3.) on your Terminal. After each one, press ENTER on your keyboard.
cd Applications
cd Trader\ Workstation
open -n Trader\ Workstation.app
Figure 3.
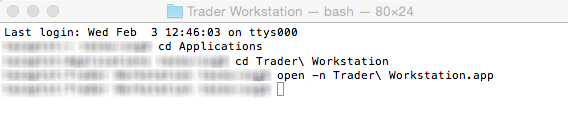
4) The login window for your second TWS session will then appear on your Desktop. You can now close the Terminal.
Note: the procedure above presumes that the TWS executable is located in the following path: users/yourusername/home/Applications/Trader Workstation/Trader Workstation.app
If at the time you installed the TWS, you selected to install it for all the users of your system, then the TWS executable will be located here:
/Applications/Trader Workstation/Trader Workstation.app
and therefore you would need to issue the following commands in the Terminal:
cd /Applications
open -n Trader\ Workstation.app
How to overcome the warning message "The signature of the file is corrupt or invalid"
Overview:
This article describes how to overcome the warning message which you might receive when you download the Trader Workstation or IB Gateway installation packages.
Background:
Since a Microsoft update has modified the signature validation mechanisms, the Trader Workstation and IB Gateway installation packages might be reported as having an invalid or corrupt signature, although their signature is indeed intact and absolutely valid.
If you are using Microsoft Edge as browser please follow all the steps below. If you are using any other browser start directly from point 3.
1. As soon as the installation package has been completely downloaded, you will notice on the bar at the bottom of your browser frame the warning message "The signature of the file tws-... is corrupt or invalid". Please click on the button View Downloads to open the DOWNLOADS panel. ![]()
2. Right click on the filename and select Run anyway.
.png)
3. Once the installer has been launched, the SmartScreen filter will display an additional warning message. Click on the link More Info.
(1).png)
4. Now click the button Run Anyway to allow the file execution. The installation will then start.

How to install Java on a Linux computer
Overview:
This article will walk you through the process of installing the official Oracle Java platform on your Linux machine.
Background:
There are many Linux distributions available and many of them come with one or more Java platform/s pre-installed. In the vast majority of the cases the Java platform which comes pre-installed on a Linux machine is not the official Oracle Java, but another one such as OpenJKD or IBM Java.
The Trader Workstation has been developed on the official Oracle Java platform and shows the most stable behavior and the best performances when run by the official Oracle Java process. Therefore we recommend to all the Linux users, who want to run the Trader Workstation, to install the official Oracle Java platform and set it as the preferred Java environment to be used by the operating system.
For the purpose of this guide, we will divide the Linux distributions nowadays available into three big families:
- APT based Linux distributions (Ubuntu, Mint) - those distributions use the Advanced Packaging Tool to fetch and install software packages in a semi-automatic way, resolving and taking care of dependencies.
- RPM based Linux distributions (Suse, OpenSUSE, Red Hat, CentOS, Fedora, Oracle Linux) - those distributions allow the installation of software packages (.rpm files), which contain the binary files to be installed on the system and an integrated dependency checker script. The .rpm packages allow a simplified and smooth installation of software without requiring a deep knowledge of the system.
- Other Linux distributions - those distributions may or may not use a specific package manager but all of them allow the installation of software using the source code package (.tar.gz) through a series of command to be issued on the Terminal.
How to install the official Oracle Java on APT based Linux distributions
The most simple way to install Java on Ubuntu or Mint is using the webupd8 repository. This method will install the latest version of JDK 8 and the JRE 8 browser plugin. The supported versions are: Ubuntu 15.04, 14.10, 14.04, 12.04 - Linux Mint 17.1, 17, 13
For details, please refer to: http://www.webupd8.org/2012/09/install-oracle-java-8-in-ubuntu-via-ppa.html
a. On your Linux machine, open the "Terminal". If you need help with accessing and using the Terminal, please refer to: https://help.ubuntu.com/community/UsingTheTerminal
b. Become root, by typing su on the Terminal and entering the super user password. Instead of becoming root, you can choose to use the sudo feature (which gives your user the root privileges for a single command). If you want to use sudo, just add sudo before each one of the commands you will enter in the Terminal. You will be requested to enter the sudo password.
c. Add the webupd8 repository by tiping add-apt-repository ppa:webupd8team/java Follow the instructions on the screen. You should be asked to press [ENTER] to continue. Once done, the repository will be added.
d. Type the command apt-get update
e. Enter the command: apt-get install oracle-java8-installer The process will download and install automatically the required packages along with their dependencies. Once the command has completed, the Oracle Java platform will be ready to be used.
Should you prefer to have control of all the phases of the installation, instead of relying on the APT facility, please refer to the instructions on this page: http://www.wikihow.com/Install-Oracle-Java-JRE-on-Ubuntu-Linux
How to install the official Oracle Java on RPM based Linux distributions
a. On your Linux machine, open the "Terminal". If you need help with accessing and using the Terminal, please refer to: https://help.ubuntu.com/community/UsingTheTerminal
b. Become root, by typing su on the Terminal and entering the super user password. Instead of becoming root, you can choose to use the sudo feature (which gives your user the root privileges for single commands). If you want to use sudo, just add sudo before each one of the commands you will enter in the Terminal. You will be requested to enter the sudo password.
c. Create the folder /usr/java by issuing the command mkdir /usr/java. If the directory already exists you will see a message indicating that. In this case you can proceed directly to point d.
d. Go to the page https://www.java.com/en/download/linux_manual.jsp
e. If you have a 32 bit system, download the file "Linux RPM" . If you have a 64 bit system, download the file "Linux64 RPM". In either case, please instruct your browser to save the file in the folder /usr/java or move the file to that foder once it has been downloaded.
f. Go back to the Terminal and move to the /usr/java folder by typing cd /usr/java
g. List the content of the folder by typing the command ls -la You should see the file you downloaded. It will be called jre-XuYY-linux-ARCH.rpm (where X is the Java family, YY the update number and ARCH will be i586 for 32 bit installer and x64 for 64 bit installer)
h. Launch this command to perform the installation: rpm -ivh jre-XuYY-linux-ARCH.rpm Obviously you need to use the real file name, for example jre-8u65-linux-x64.rpm
Once the installation has been performed, the Oracle Java should be ready to be used. Usually a system restart is not required on Linux machines. In case you see warning or error message/s during the installation, please check their content and search the Internet for possible solutions. Most of the time the warning/error messages maight refer to missing dependencies (this means that another package needs to be installed before you can install Java) or to unsufficient privileges (this means that you are launching the command with a regular user instead of "root"). If you cannot find the proper course of actions to overcome the issue, please refer to the support documentation or forums for your current Linux distribution.
How to install the official Oracle Java on other Linux distributions
If your Linux distribution does not support RPM or APT package managers, the installation of Oracle Java can be performed manually in this way:
a. On your Linux machine, open the "Terminal".
b. Become root, by typing su on the Terminal and entering the super user password. Instead of becoming root, you can choose to use the sudo feature (which gives your user the root privileges for single commands). If you want to use sudo, just add sudo before each one of the commands you will enter in the Terminal. You will be then required to enter the sudo password.
c. Create the folder /usr/java by issuing the command mkdir /usr/java. If the directory already exists you will see a message indicating that. In this case you can proceed directly to point d.
d. Go to the page https://www.java.com/en/download/linux_manual.jsp
e. If you have a 32 bit system, download the file "Linux" . If you have a 64 bit system, download the file "Linux x64". In either case, please instruct your browser to save the file in the folder /usr/java or move the file to that foder once it has been downloaded.
f. Go back to the Terminal and move to the /usr/java folder by typing cd /usr/java
g. List the content of the folder by typing the command ls -la You should see the file you downloaded. It will be called jre-XuYY-linux-ARCH.tar.gz (where X is the Java family, YY the update number and ARCH will be i586 for 32 bit installer and x64 for 64 bit installer)
h. Launch this command to perform the installation: tar zxvf jre-XuYY-linux-ARCH.tar.gz Obviously you need to use the real file name, for example jre-8u65-linux-x64.tar.gz
i. Once done, enter command ls -la You will see the folder /usr/java/jre1.X.0_YY (where X is the Java family, YY the update number)
l. The Java executables are now present in the folder /usr/java/jre1.X.0_YY/bin
m. Now check which is the symbolic link used by the system to access the java executables by entering the commands:
which java - you will receive an output similar to this: /usr/bin/java From now on we will refer to this path as javasympath.
which javac - you will receive an output similar to this: /usr/bin/java From now on we will refer to this path as javacsympath.
which javaws - you will receive an output similar to this: /usr/bin/java From now on we will refer to this path as javawssympath.
Unless your are launching the java applications using the full path (for example /usr/java/jre1.X.0_YY/bin/java ...), you would need to tell your system which java executables should be used when a generic java command is issued. In order to to this, you can either update your alternatives files (if your system supports them) or the symbolic links. Here below you can see the instructions, according to your system:
- If your system uses the alternatives files:
n. Issue the following commands, paying attention to make the necessary substitutions .
update-alternatives --install javasympath java /usr/java/jre1.X.0_YY/bin/java 1
update-alternatives --install javacsympath javac /usr/java/jre1.X.0_YY/bin/javac 1
update-alternatives --install javawssympath javaws /usr/java/jre1.X.0_YY/bin/javaws 1
- If your system does not use the alternatives files:
n. Issue the following commands, paying attention to make the necessary substitutions .
ln -sf /usr/java/jre1.X.0_YY/bin/java javasympath
ln -sf /usr/java/jre1.X.0_YY/bin/javac javacsympath
ln -sf /usr/java/jre1.X.0_YY/bin/javaws javawssympath
How to fix the error: "Library dbcapi.dll cannot be loaded"
Background:
TWS users may receive the following error message upon configuring TWS to use the eSignal data feed:

This error may appear for the following reasons:
Issue A - You are not using the 32 bit version of TWS and/or eSignal:
The 32-bit versions of both TWS and eSignal have to be installed for the integration to work. In the section below you will find the instructions for installing the 32-bit TWS. Should you need assistance with the installation of the 32-bit eSignal, we suggest you to contact the eSignal customer support.
Issue B - There is an incompatibility with the file C:\Jts\dbcapi.dll:
To use 32-bit eSignal version 12, an incompatibility with the C:\Jts\dbcapi.dll file must be fixed. This involves copying a file from the eSignal installation and renaming it to dbcapi.dll.
Note: On certain systems you will need to apply the fixes for both issue A and B. If you applied the fix for issue A (or if you are already sure you are using the 32 bit version of both platforms) and you are still receiving the error message, then please apply as well the fix for issue B.
Instructions to resolve issue A
Installing 32-bit TWS
Please open the page http://www.ibkr.com in your browser and perform the steps below:
1) Click on the Log In button at the top right corner of the page.
2) Click on Download Trader Workstation: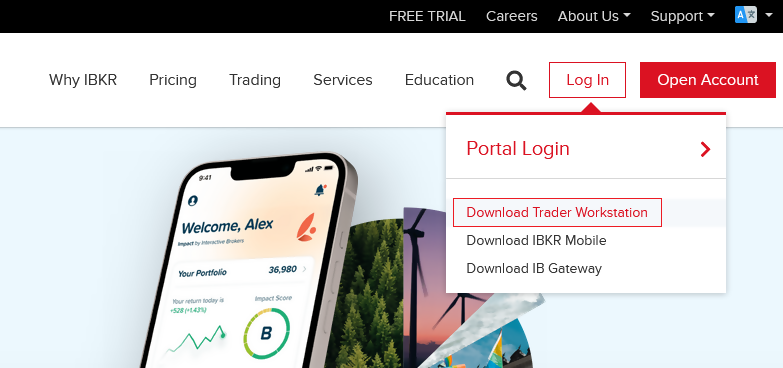
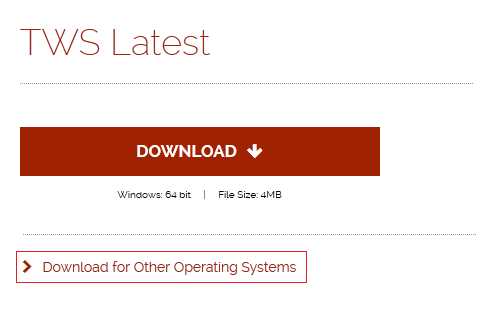
3) Click on the red button TWS Latest:

4) On the next page, click on the link Download for Other Operating Systems:
5) Click on the item Windows 32-bit:

6) Make sure that the description under the DOWNLOAD button has changed to "Windows: 32 bit". Click now on DOWNLOAD:

7) Launch the downloaded file. The Trader Workstation installation will start. At this point, you may see the warning message "Trader Workstation latest is already installed...". Ignore this warning and click on the button Next > to continue the installation:
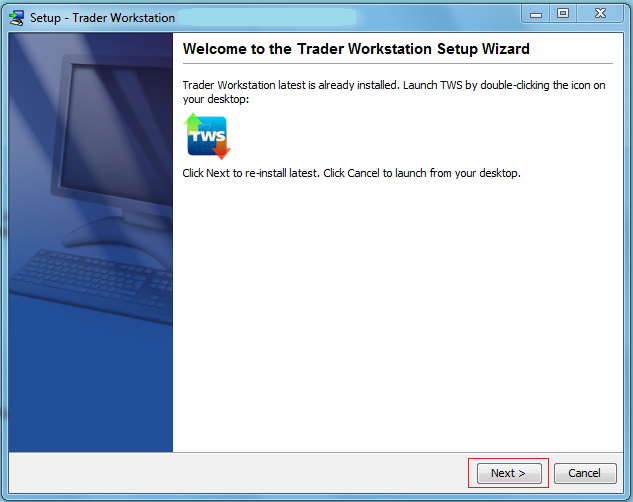
8) Your "Trader Workstation" Desktop icon will be automatically updated. You can now launch the 32-bit Trader Workstation by a double click on that icon.
If you have launched the 32-bit TWS and the 32 bit version of eSignal but you still receive the same error message, please follow as well the instructions below.
Instructions to resolve issue B
Replacing dbcapi.dll for compatibility between 32-bit TWS and 32-bit eSignal 12
To correct an incompatibility with the dbcapi.dll file, we will replace that file with another version of it taken from the eSignal installation folder. Please follow the steps below to perform the substitution:
1) Navigate to C:\Jts and rename the file dbcapi.dll to dbcapi_old.dll
2) Navigate to the directory where 32-bit eSignal 12 is installed (most commonly C:\Program Files (x86)\Common Files\Interactive Data\DM).
3) Copy dbcapi_vc8.dll from that directory into the C:\Jts directory.
4) Move to the C:\Jts directory.
5) Right click on the dbcapi_vc8.dll file (now in the C:\Jts directory) and select rename. Type dbcapi.dll as the new filename.
.jpg)
6) TWS is now ready to accept the eSignal data feed.
How to install the TWS API Components on Mac / Unix
NOTE: If you have already agreed to the API License Agreement please start at Step 3 below.
Instructions
- Click directly on the button below to access the API software download page

- This will direct you to Interactive Brokers API License Agreement, please review it
- Once you have clicked "I Agree", refer to the Mac / Unix section to download the API Software version of your preference
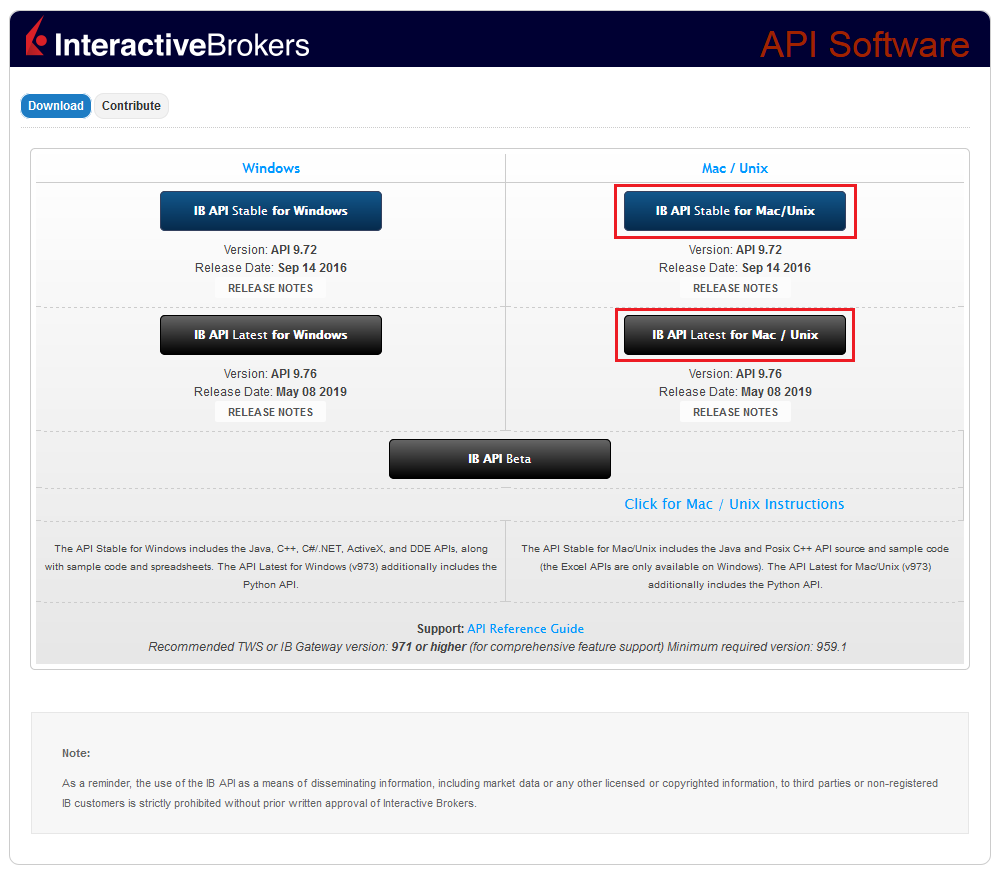
- This will download twsapi_macunix.n.m.zip to your computer
(where n and m are the major and minor version numbers respectively) - Open Terminal (Ctrl+Alt+T on most distributions)
(On Mac press Command+Space to launch Spotlight, then type terminal and press Return) -
Navigate to the directory where the installer has been downloaded (normally it should be the Download folder within your home folder) and confirm the file is present
$ cd ~/Downloads
$ ls
- Unzip the contents the installer into your home folder with the following command (if prompted, enter your password):
$ sudo unzip twsapi_macunix.n.m.zip -d $HOME/

- To access the sample and source files, navigate to the IBJts directory and confirm the subfolders samples and source are present
$ cd ~/IBJts
$ ls

Legacy Instructions - API Version ≤ 9.71
Note: IB only offers API Version 9.72+. In the event you already have an existing legacy version and need to install it, please refer to the directions below:
- locate the file twsapi_macunix.n.m.jar on your computer
(where n and m are the major and minor version numbers respectively.) - Open Terminal (Ctrl+Alt+T on most distributions)
(On Mac press Command+Space to launch Spotlight, then type terminal and press Return) - Navigate to the directory where the .jar file has been located (normally it should be the Download folder within your home folder) and confirm it is present
$ cd ~/Downloads
$ ls - Extract the contents of the .jar file into your home folder
$ jar xf twsapi_macunix.n.m.jar -d $ HOME/ - To access the sample and source files, navigate to the IBJts directory and confirm the subfolders samples and source are present
$ cd ~/IBJts
$ ls
How to install MobileTWS on BlackBerry OS10
Background:
Currently, Interactive Brokers does not offer a native IBKR Mobile app for the Blackberry 10 Operating System. Due to a recent partnership between Amazon and Blackberry, clients who own a Blackberry device running Blackberry 10 OS can install the Android version of the IBKR Mobile app directly from the Amazon Store.
Blackberry 10 OS Devices:
- Q5, Z3, Leap, Classic, Passport, Q10, Z10, Z30, P'9982, P'9983
*Please notice that these devices have limited hardware capabilities and this could negatively affect the performance of the IBKR Mobile app.
Installation
You can download the IBKR Mobile app on your Blackberry phone directly from the Amazon Appstore.
How to install IBKR Mobile from the Amazon App Store:
- On your Blackberry phone open the Amazon App Store
 app.
app. -
Enter your Amazon e-mail and password, and tap Sign in.
(If you don't have an Amazon account, tap Create a new Amazon account.)

-
Tap on the search bar at the top, type IBKR Mobile then tap Search.

-
Tap on IBKR Mobile from the search results and install.

5. Once installed, tap on the IBKR Mobile app from one of your home screens to launch it

Welcome to Interactive Brokers
Overview:
Now that your account is funded and approved you can start trading. The information below will help you getting
started as a new customer of Interactive Brokers.
- Your Money
- Configure your account to trade
- How to trade
- Trade all over the World
- Five points to enrich your IB experience
1. Your Money
Deposits & Withdrawals General Info. All transactions are administered through your secure Account Management
Deposits
First, you create a deposit notification through your Account Management > Funding > Fund Transfers > Transaction Type: “Deposit” How to create a deposit notification. The second step is to instruct your Bank to do the wire transfer with the bank details provided in your Deposit Notification.
Withdrawals
Create a withdrawal instruction via your secure Account Management > Funding > Fund Transfers > Transaction Type: "Withdrawals" How to create a withdrawal instruction
If you instruct a withdrawal over the Withdrawal limits, it will be considered an exceptional withdrawal and we will therefore need to match bank account holder and IB account. If destination bank account has been used for a deposit, withdrawal will be processed; otherwise, you must contact customer service and provide the documents needed.
Troubleshooting
Deposits: My bank sent the money but I do not see it credited into my IB account. Possible reasons:
a) A fund transfer takes 1-4 business days
b) A Deposit Notification is missing. You have to create it via your Account Management and send a ticket to Customer Service
c) Amending details are missing. Your name or IB account number is missing in the transfer details. You have to contact your bank and ask for the full amending details.
d) ACH initiated by IB is limited to 100k USD in a 7 business period. If you opened a Portfolio Margin account where the initial requirement is 110k, a wire deposit might be the better deposit option to reduce wait time for your first trade. If selecting ACH a wait time of almost 2 weeks or a temporary downgrade to RegT can be possible solutions.
Withdrawals: I have requested a withdrawal but I do not see the money credited to my bank account. Possible reasons:
a) A fund transfer takes 1-4 business days
b) Rejected. Over the max it can be withdrawn. Please check your account cash balance. Note that for regulatory requirements, when the funds are deposited, there is a 3 day holding period before they can be withdrawn.
c) Your bank returned the funds. Probably because receiving bank account and remitting bank account names do not match.
2. Configure your account to trade
Difference between Cash and Margin accounts: If you have chosen the FastTrack application, by default your account type is a cash account with US stock permission. If you would like to get leverage and trade on margin, here how to upgrade to a RegT Margin account
Trading Permissions
In order to be able to trade a particular asset class in a particular country, you need to get the trading permission for it via your Account Management. Please note that trading permissions are free. You might however be asked to sign risk
disclosures required by local regulatory authorities. How to Request Trading Permissions
Market Data
If you want to have market data in real-time for a particular product/exchange, you need to subscribe to a market data package charged by the exchange. How to subscribe to Market data
The Market data assistant will help you choose the right package. Please watch this Video explaining how it works.
Customers have the option to receive delayed market data for free by clicking the Free Delayed Data button from a non-subscribed ticker row.
Advisor Accounts
Have a look at the user guide getting started as advisors. Here you see how to create additional users to your advisor account and grant them access and much more.
3. How to trade
The Trader's University is the place to go when you want to learn how to use our Platforms. Here you will find our webinars, live and recorded in 10 languages and tours and documentation about our various Trading Platforms.
Trader Workstation (TWS)
Traders who require more sophisticated trading tools can use our market maker-designed Trader Workstation (TWS), which optimizes your trading speed and efficiency with an easy-to-use spreadsheet interface, support for more than 60 order types, task-specific trading tools for all trading styles, and real-time account balance and activity monitoring. Try the two models
TWS Mosaic: for intuitive usability, easy trading access, order management, watchlist, charts all in one window or
TWS Classic: the Advanced Order Management for traders who need more advanced tools and algos.
General Description and Information / Quick start guide / Usersguide
Interactive Tours: TWS Basics / TWS configuration / TWS Mosaic
How to place a trade: Video Classic TWS / Video Mosaic
Trading tools: General Description and Information / Users guide
Requirements: How to install Java for Windows / How to install Java for MAC / Port 4000 and 4001 needs to be open
Login TWS / Download TWS
WebTrader
Traders who prefer a clean and simple interface can use our HTML-based WebTrader, which makes it easy to view market data, submit orders, and monitor your account and executions. Use the latest WebTrader from every browser
Quick Start Guide / WebTrader User's Guide
Introduction: Video WebTrader
How to place a Trade: Video WebTrader
Login WebTrader
MobileTrader
Our mobile solutions allow you to trade your IB account on the go. The mobileTWS for iOS and the mobileTWS for BlackBerry are custom-designed for these popular models, while the generic MobileTrader supports most other Smart phones.
General Description and Information
Order Types Order Types available and Description / Videos / Tour / Users guide
Paper Trading General Description and Information / How to get a Paper Trading Account
Once your paper account is created, you can share the market data of your real account with your paper trading account: Account Management > Manage Account > Settings > Paper trading
4. Trade all over the World
IB accounts are multi-currency accounts. Your account can hold different currencies at the same time, this allows you to trade multiple products around the world from a single account.
Base Currency
Your base currency determines the currency of translation for your statements and the currency used for determining margin requirements. Base currency is determined when you open an account. Customers may change their base currency at any time through Account Management.
We do not automatically convert currencies into your Base currency
Currency conversions must be done manually by the customer. In this video you can learn how to do a currency conversion.
In order to open a position denominated in a currency that you do not have in your account, you have two possibilities:
A) Currency conversion.
B) IB Margin Loan. (Not available for Cash Accounts)
Please see this course explaining the mechanics of a foreign transaction.
5. Five points to enrich your IB experience
1. Contract Search
Here you will find all our products, symbols and specifications.
2. IB Knowledge Base
The Knowledge Base is a repository of glossary terms, how-to articles, troubleshooting tips and guidelines designed to assist IB customers with the management of their IB accounts. Just enter in the search button what you are looking for and you will get the answer.
3. Account Management
As our trading platforms give you access to the markets, the Account Management grants you access to your IB account. Use Account Management to manage account-related tasks such as depositing or withdrawing funds, viewing your statements, modifying market data and news subscriptions, changing your trading permissions, and verifying or changing your personal information.
Log In Account Management / AM Quick Start Guide / AM Users Guide
4. Secure Login System
To provide you with the highest level of online security, Interactive Brokers has implemented a Secure Login System (SLS) through which access to your account is subject to two-factor authentication. Two-factor authentication serves to confirm your identity at the point of login using two security factors: 1) Something you know (your username and password combination); and 2) Something you have (an IB issued security device which generates a random, single-use security code). As both knowledge of your username/password and physical possession of the security device are required to login to your account, participation in the Secure Login System virtually eliminates the possibility of anyone other than you accessing your account.
How to Activate your Security Device / How to Obtain a Security Code Card / How to return Security device
In case you forgot your password or lost your security code card, please call us for immediate assistance.
5. Statements and Reports
Easy to view and customize, our statements and reports cover all aspects of your Interactive Brokers account. How to view an Activity Statement
When and how should I increase the memory allocation for TWS?
Overview:
Java Virtual Machine memory allocation
The Trader Workstation is a Java-based application. As any other Java applications, it executes within a Java virtual machine (JVM) which manages the interactions between the program and the underlying Operating System (OS).
The memory (RAM) which is allocated by the operating system to the JVM constitutes the heap space. That is the area where all the class instances and arrays needed by the application are allocated. The heap space is created when the JVM is started and it is dynamically freed-up by the Garbage Collector (GC), the Java memory manager. When the need arises, the Garbage Collector is invoked to free up the heap space by unloading Java classes and other code structures no longer used by the application.
If the heap space is undersized, the Garbage Collector may not be able reclaim memory at the needed pace or may have to be called too often, draining the processor (CPU) resources. When this happens, the application may slow down, be unresponsive or even crash completely.
To ensure a smooth TWS run, it is therefore sometimes necessary to change the memory allocation, according to the layout complexity and the needs of the application itself.
Background:
In which case I should change the TWS memory allocation?
If your TWS layout contains a considerable number of elements (Analytical/Trading Tools, Chart windows, News panels, Watchlists, Layout tabs...) and your platform is slow or poorly responsive, you may want to increase the memory allocation in order to achieve better performances. If your TWS freezes or crashes, we also recommend increasing the heap space as the first corrective action to attempt.
How much memory should I allocate to TWS?
In general we recommend to start with a conservative memory allocation and test the TWS performances with that set up. If the performances improvement is less noticeable then expected or not yet satisfactory, you can switch gradually to higher values until you find the best fit for your platform.
Please consider the following:
Considering the above, we suggest to initially reserve 1.5 GB of system RAM the TWS, as explained in the guide below.
This amount of free memory is usually available on any modern computer and should be a good fit for most of the cases. Should you still notice slowness, freezing or crashes during the TWS execution, you can raise the value to 1792.
In any case, we do not recommend to set the value above 2048 since this will produce an unnecessary overhead and may thus even decrease the overall performances of the application.
How can I change the memory allocation for the TWS?
Please follow one of the links below for the instructions, according to the Operating System and TWS release you are using
Any Operating System
B.1 Your Operating System is Windows
B.2 Your Operating System is Mac OS
A. TWS version 972 and higher
The steps below are valid for all Operating Systems
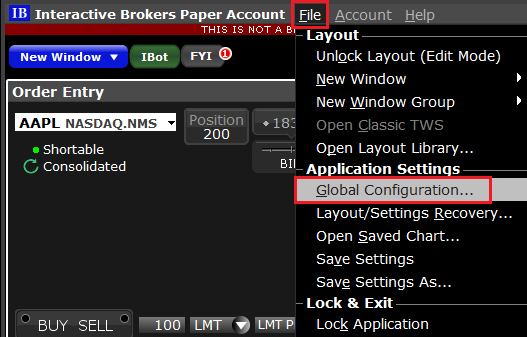
1) In the TWS, click on the top menu File (or Edit if you are using Classic TWS) and select Global Configuration...
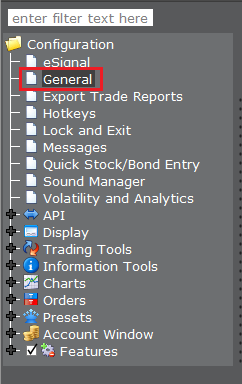
2) On the left side menu of the Global Configuration panel, click on General
3) In the panel on the right side, in the Memory Allocation field, replace the existing value with 1536(1).png)
4) Click on Apply and then on OK
5) Shut down the TWS
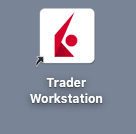
6) Launch the TWS with a double click on the Desktop shortcut Trader Workstation (Should you receive an error message, please see Note 3.

B. TWS versions previous to 972
B.1 Your Operating System is Windows
1) Close TWS in case it is running
2) On your keyboard, press WIN+R (the WIN key is the key with the windows flag located on the left side of tour keyboard, between the keys CTRL and ALT)

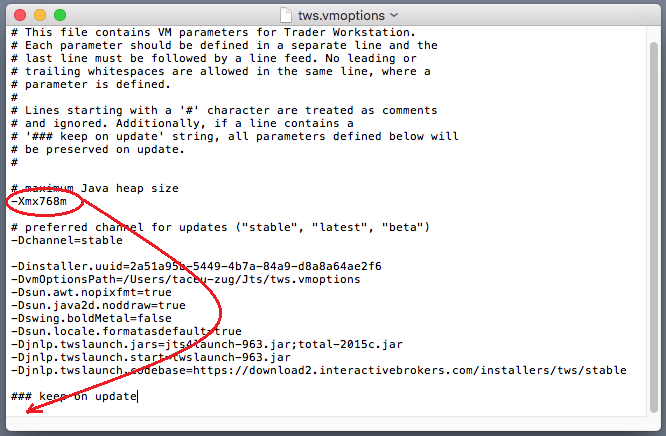
3) Type C:\Jts\tws.vmoptions and Click OK
.png)
4) Should the system ask you which program to use to open the file, select Notepad and click OK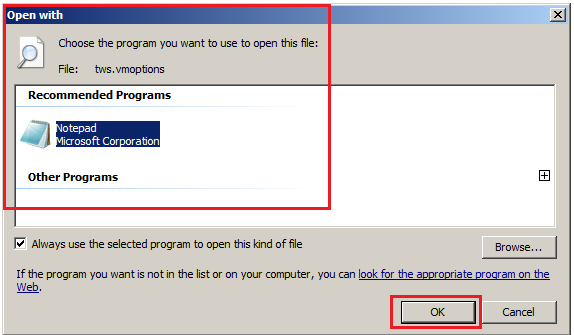
5) Cut the line -Xmx768m and paste it below the line ### Keep on update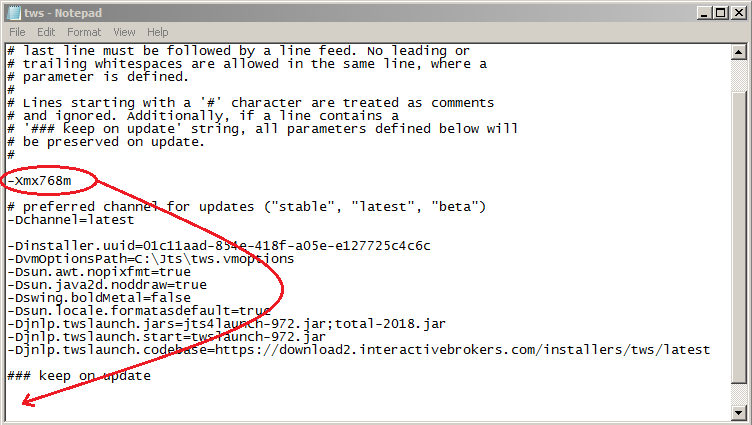
6) Change then the value of the parameter Xmx from 768 to 1536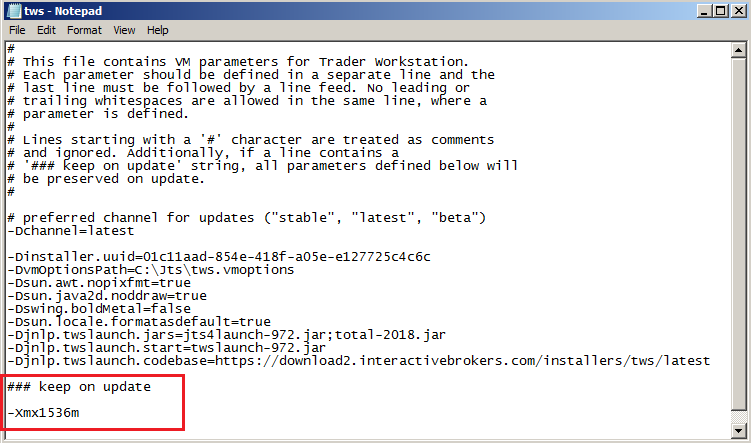
7) Save the changes by clicking on the top menu File --> Save 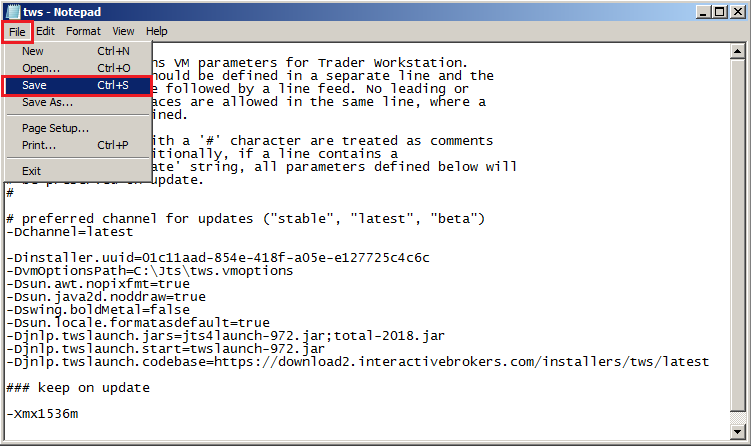
8) Close the file clicking on the X icon on the right side of the toolbar
9) Launch the TWS with a double click on the Desktop shortcut Trader Workstation (Should you receive an error message, please see Note 3.
B.2 Your Operating System is Mac OS
1) Close the TWS if it is running
2) Use the Spotlight search (the magnifier glass on the top right of your Desktop) to find the file tws.vmoptions
Normally the file is located within the Jts folder (a subfolder of your home folder)
.png)
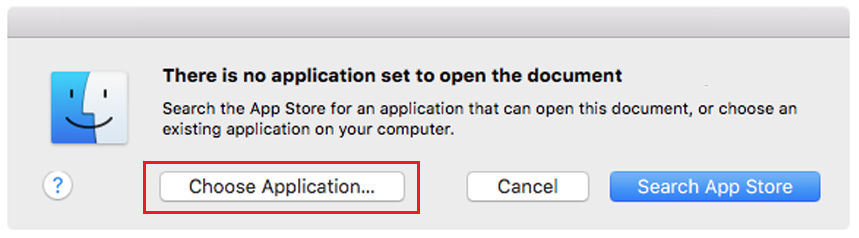
3) On the Spotlight results panel, click on tws.vmoptions to open it. Should the system ask you how to open this file, click Choose Application... select a text editor (TextEdit, Smultron, TextWrangler...) of your choice and click Open
.png)
4) Locate the line -Xmx768m. Cut it and paste it below the line ### Keep on update
6) Modify the value 768 in to 1536

7) Save and close the file
8) Launch the TWS with a double click on the Desktop shortcut Trader Workstation (Should you receive an error message, please see Note 3.
Notes
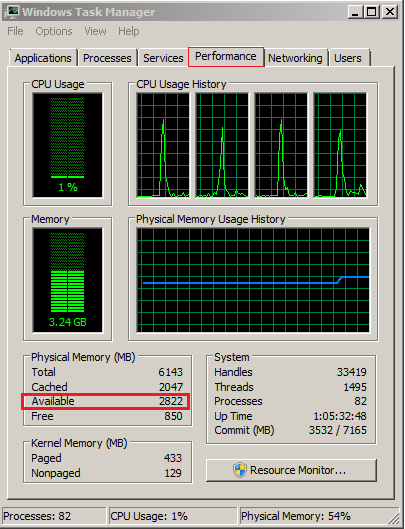
1. Available system RAM
In order to check the amount of available system RAM on your computer, you can:
- on Windows: use the key combination CTRL+SHIFT+ESC to start the Task Manager, click on the tab Performance and look for the "Available" Physical Memory. This will tell you the amount of unoccupied RAM in MB (1024 MB = 1GB)
- on Mac OS: Open Finder, go to Application --> Utilities and open Terminal. In the terminal type the command:
sudo purge
and press Enter. The system may ask you to enter your Mac user password. Enter the password. Once the command has completed, type the following command:
top -l 1| grep PhysMem
The "unused" value will tell you the amount of unoccupied RAM in MB (1024M = 1GB)
.png)
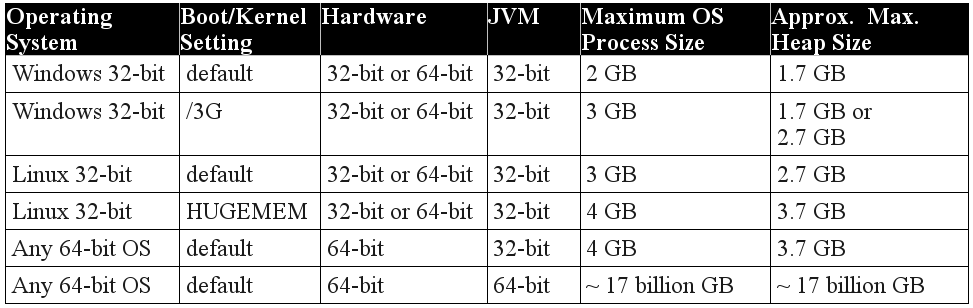
2. Limitations of 32-bit Operating Systems
Please notice that 32-bit Operating Systems can normally only address a maximum of 2 GB of RAM per process (see table below for details). Because of this OS architecture limitation, if you have a 32-bit OS, the maximum memory allocation for the TWS must not exceed 2048 Mb.
3. Error: "Could not create the Java Virtual Machine"
This error may be displayed upon TWS startup if you set the memory allocation to a value higher than the available RAM of your system or if you set it higher than 2048 on a 32-bit Opertaing System. To overcome the error, you would need to decrease the memory allocation to a lower value using this procedure