No estoy recibiendo mensajes de texto (SMS) de IBKR en mi móvil
Background:
Una vez que su número de móvil haya sido verificado en Client Portal, debería poder recibir inmediatamente mensajes de texto (SMS) de IBKR directamente en su móvil. El siguiente artículo proporciona instrucciones básicas para la solución de problemas en caso de que no pueda recibir estos mensajes.
1. Active la autenticación con IBKR Mobile (IB Key) como dispositivo de seguridad en dos factores
Para no depender de cuestiones relacionadas con el proveedor de servicios de telefonía o inalámbricos, y para tener una entrega estable, le recomendamos activar la autenticación con IBKR Mobile (IB Key) en su smartphone.
La autenticación mediante su smartphone con la IB Key proporcionada por la aplicación IBKR Mobile sirve como dispositivo de seguridad en dos factores, lo que elimina la necesidad de recibir códigos de autenticación por SMS cuando inicie sesión en su cuenta de IBKR.
Nuestra aplicación IBKR Mobile se encuentra actualmente disponible en smartphones con sistema operativo Android o iOS. Las instrucciones de instalación, activación y manejo se encuentran en el siguiente enlace:
2. Reinicie su móvil:
Apague su dispositivo por completo y vuélvalo a encender. Normalmente, esto debería ser suficiente para que comience a recibir mensajes de texto.
Tenga en cuenta que, en algunos casos como la itinerancia de datos fuera de la cobertura de su proveedor telefónico (cuando se encuentre en el extranjero), es posible que no reciba todos los mensajes.
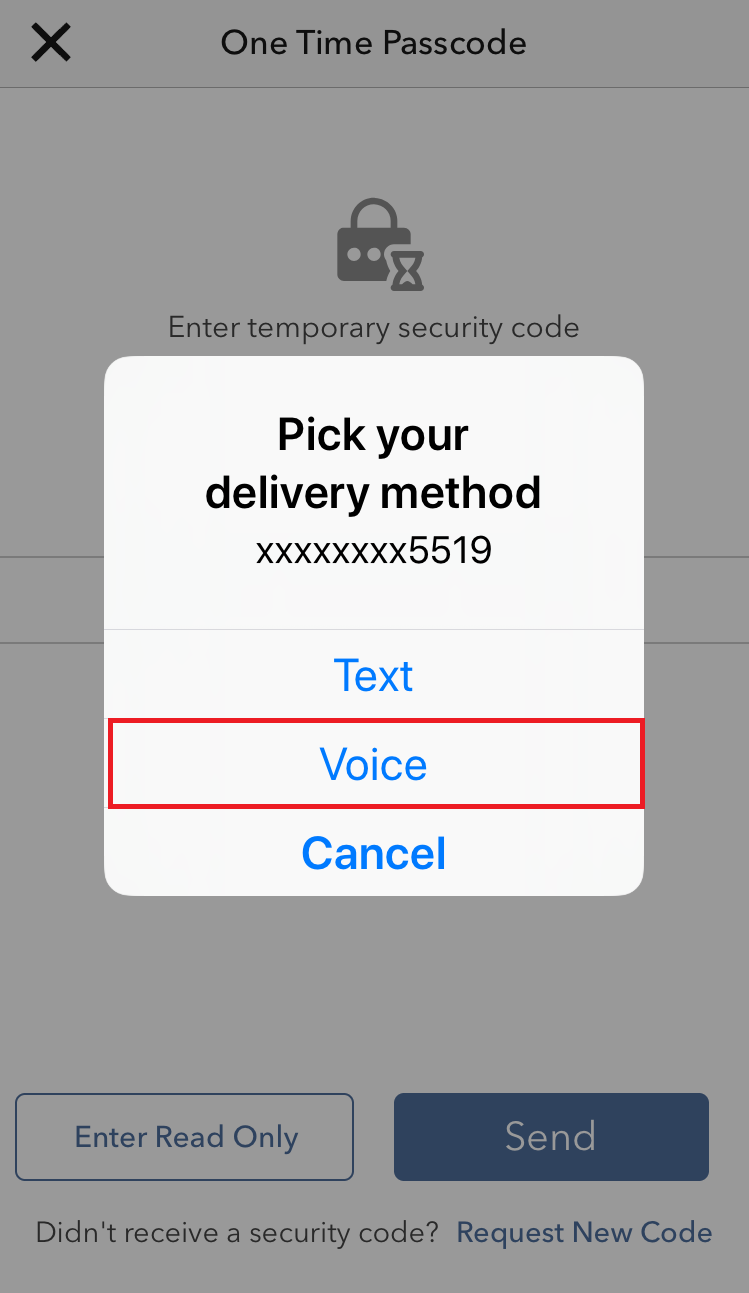
3. Utilice la rellamada de voz
Si no recibe su código de autenticación para inicio de sesión luego de reiniciar su móvil, podrá seleccionar "Voz". Recibirá su código de autenticación de acceso mediante una rellamada automática. Para obtener más instrucciones sobre cómo utilizar la rellamada de voz, consulte el artículo IBKB 3396.
4. Compruebe si su proveedor telefónico está bloqueando los SMS de IBKR
Algunos proveedores automáticamente bloquean los mensajes de texto de IBKR debido a que se reconocen incorrectamente como correo basura o contenido no deseado. De acuerdo con su región, estos son los servicios que puede contactar para comprobar si existe un filtro de SMS en su número de teléfono:
En EE. UU.:
- Todos los proveedores: registro de Federal Trade Commission
- T-Mobile: la configuración para el bloqueo de mensajes se encuentra disponible en la página web de T-Mobile o directamente en la aplicación de T-Mobile
En India:
- Todos los proveedores: Telecom Regulatory Authority of India
En China:
- Llame a su proveedor de servicios telefónicos directamente para comprobar si están bloqueando mensajes de IBKR.
Referencias:
- Cómo conectarse con la autenticación por SMS
- Resumen del sistema de acceso seguro
- Información y procedimientos relacionados con dispositivos de seguridad
- Método de autenticación con IBKR Mobile
Cómo utilizar las rellamadas para recibir códigos de autenticación de acceso
Background:
Si tiene los mensajes de texto (SMS) activados como el método de autenticación en dos factores, puede utilizar las rellamadas para recibir códigos de autenticación para el acceso. El siguiente artículo proporciona instrucciones paso a paso para conseguir esto.
Cómo realizar una rellamada
Podrá seleccionar Voz si no recibe su código de autenticación de acceso. Recibirá su código de autenticación de acceso mediante una rellamada automática. Siga las instrucciones a continuación, dependiendo de la plataforma a la cuál esté intentando conectarse.
Client Portal
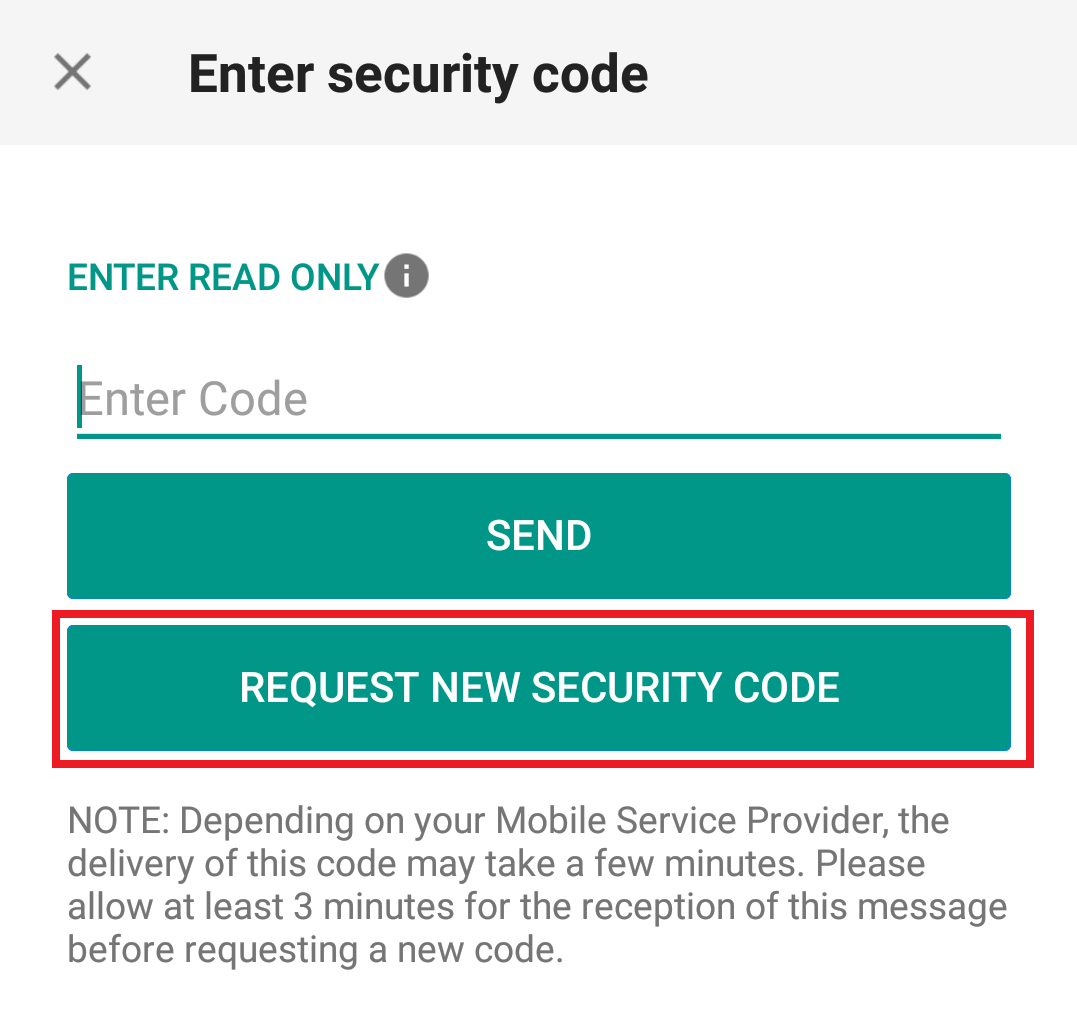
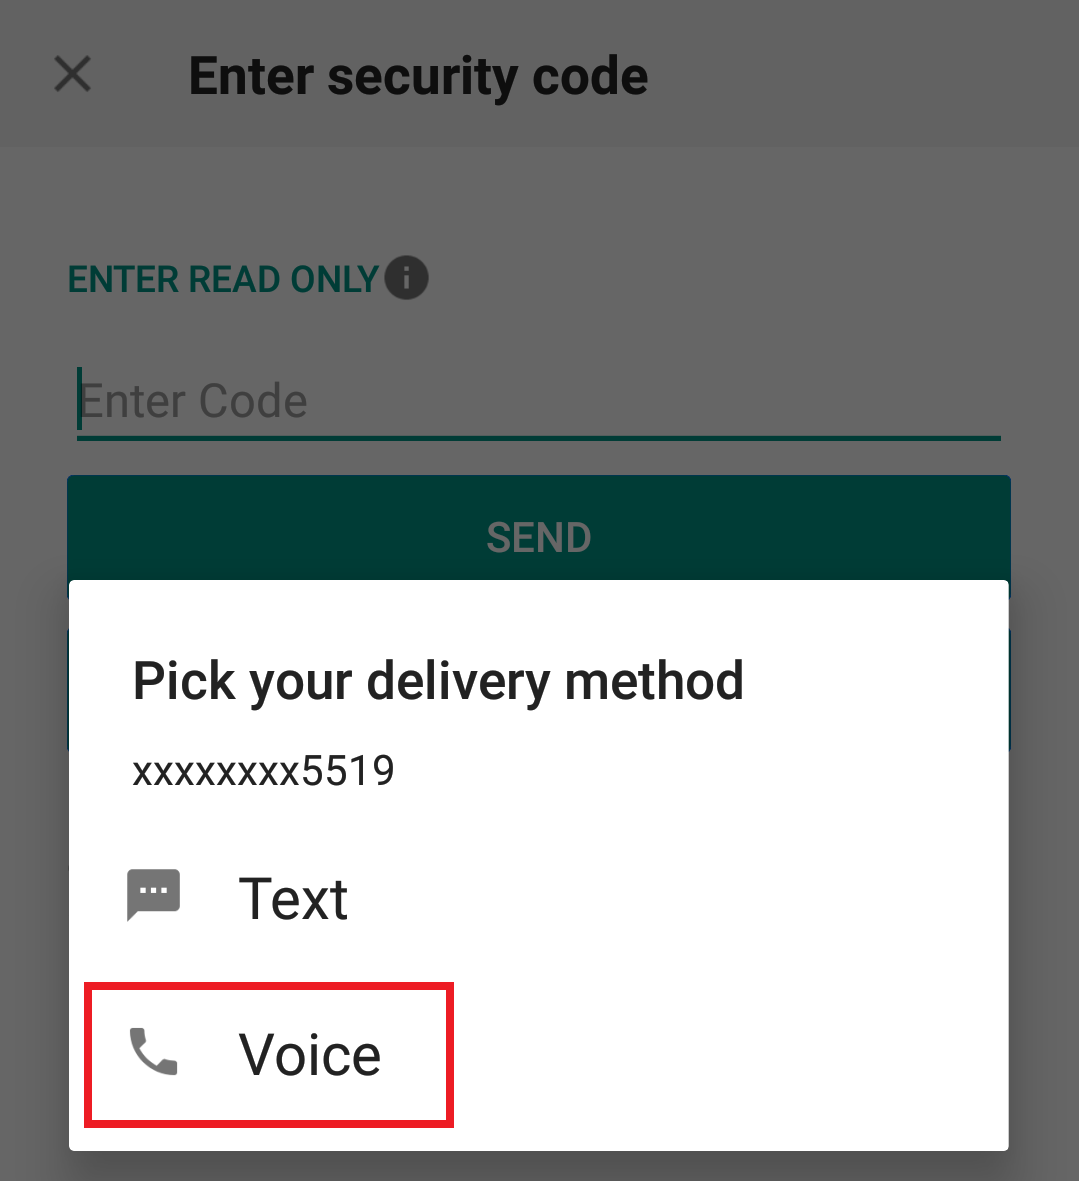
1. Haga clic en "¿No ha recibido un código de seguridad?"
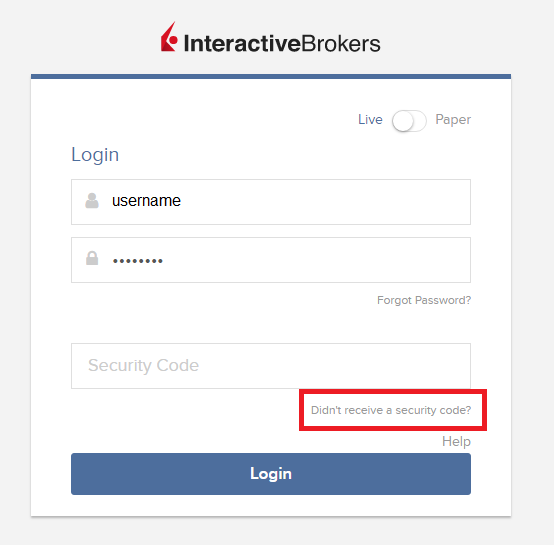
2. De las dos opciones, seleccione "Voz" y espere la rellamada.
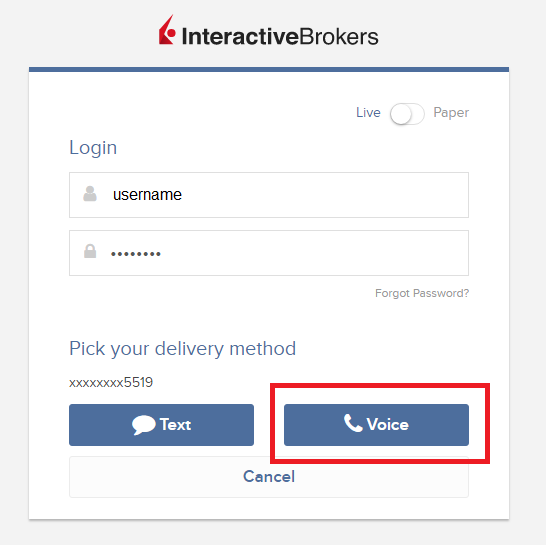
3. Luego de seleccionar Voz, debería recibir la rellamada dentro de un minuto. Espere la rellamada y esté listo para escribir el código que se le proporcionará.
TWS
1. Haga clic en "Solicitar nuevo código de seguridad"
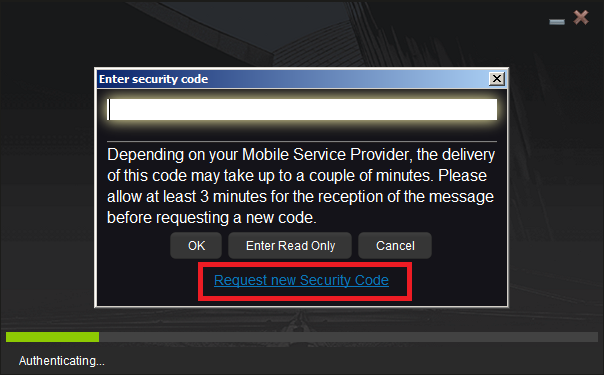
2. Para las dos nuevas opciones, seleccione "Voz" y haga clic en Aceptar. Luego, espere la rellamada

3. Luego de seleccionar Voz, debería recibir la rellamada dentro de un minuto. Espere la rellamada y esté listo para escribir el código que se le proporcionará.
Nota: las rellamadas para TWS solo están disponibles en las versiones ÚLTIMA y BETA.
IBKR Mobile - iOS
1. Haga clic en "Solicitar nuevo código"
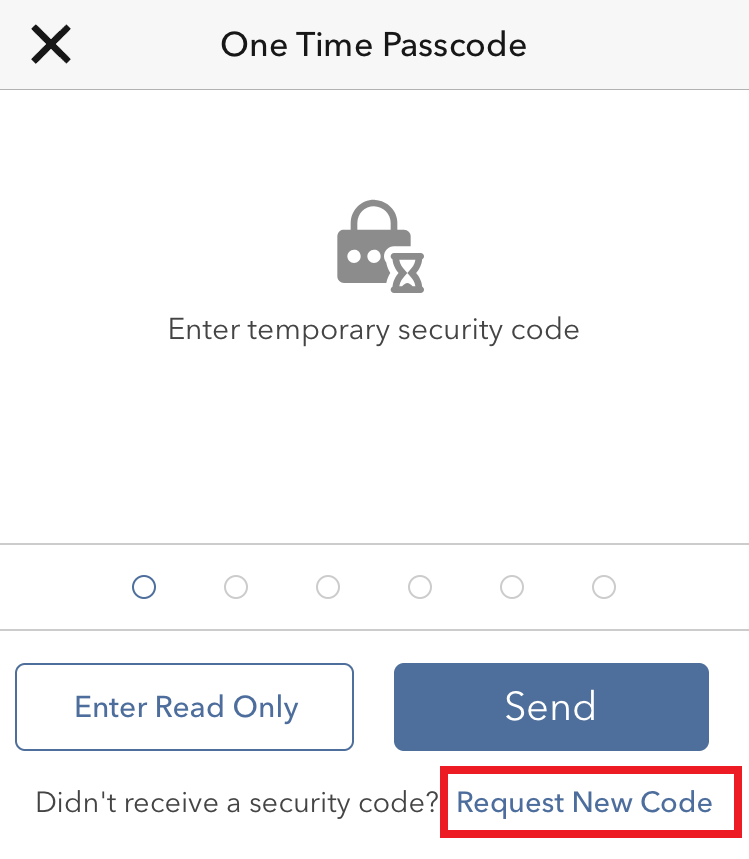
2. De las dos opciones, seleccione "Voz" y espere la rellamada.
3. Luego de seleccionar Voz, debería recibir la rellamada dentro de un minuto. Espere la rellamada y esté listo para escribir el código que se le proporcionará.
IBKR Mobile - Android
1. Haga clic en "Solicitar nuevo código de seguridad"
2. De las dos opciones, seleccione "Voz" y espere la rellamada.
3. Luego de seleccionar Voz, debería recibir la rellamada dentro de un minuto. Espere la rellamada y esté listo para escribir el código que se le proporcionará.
Referencias:
- Cómo conectarse con la autenticación por SMS
- Resumen del sistema de acceso seguro
- Información y procedimientos relacionados con dispositivos de seguridad
- Método de autenticación de IBKR Mobile
Cómo compartir un dispositivo de seguridad
Overview:
IBKR les permite a los clientes individuales mantener varios nombres de usuario dentro de una sola cuenta o entre cuentas distintas bajo su control. Las personas que no deseen mantener varios dispositivos de seguridad físicos pueden elegir consolidar y compartir un solo dispositivo entre sus usuarios. Los requisitos previos y el procedimiento para compartir los dispositivos se detalla a continuación.
Nota: los clientes que utilicen la autenticación a través de IBKR Mobile (IB Key) no deberán utilizar el procedimiento actual para compartir dispositivos, debido a que la IB Key permite que varios usuarios se activen directamente desde la aplicación de IBKR Mobile en sí (opción del menú: Autenticar -> Añadir usuario).
Background:
Requisitos previos
La posibilidad de compartir un dispositivo de seguridad físico se concederá solamente si se cumplen TODAS las condiciones a continuación:
a) Los usuarios participantes pertenecen a la misma entidad o a distintas entidades pero con la misma información de identificación (fecha de nacimiento, ciudadanía, país de residencia legal, tipo y número de documento de identificación o número de seguro social para ciudadanos y residentes estadounidenses).
b) Los usuarios participantes NO tienen un dispositivo de seguridad temporario (código temporario, tarjeta de código de seguridad en línea) asignado.
c) El dispositivo físico que ofrece el nivel más alto de protección debe compartirse. En caso de que todos los dispositivos ofrezcan el mismo nivel de protección, cualquiera de ellos podrá ser elegible. Puede comprobar el nivel de seguridad de su dispositivo en el cuadro a continuación:
|
Nivel de seguridad |
Nombre del dispositivo |
Imagen del dispositivo |
| Más alto | Tarjeta de seguridad digital+ (TSD+) |  |
| Más bajo | Tarjeta de código de seguridad (tarjeta SLS) | 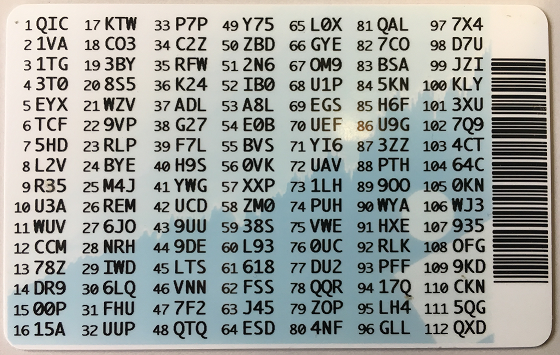 |
Procedimiento:
1. De entre los posibles candidatos, identifique el dispositivo que ofrezca el nivel más alto de protección y el usuario al cual pertenece el dispositivo. Denominaremos a ese usuario el propietario del dispositivo
2. Inicie sesión en su página de Client Portal con el usuario solicitante (NO el propietario del dispositivo)
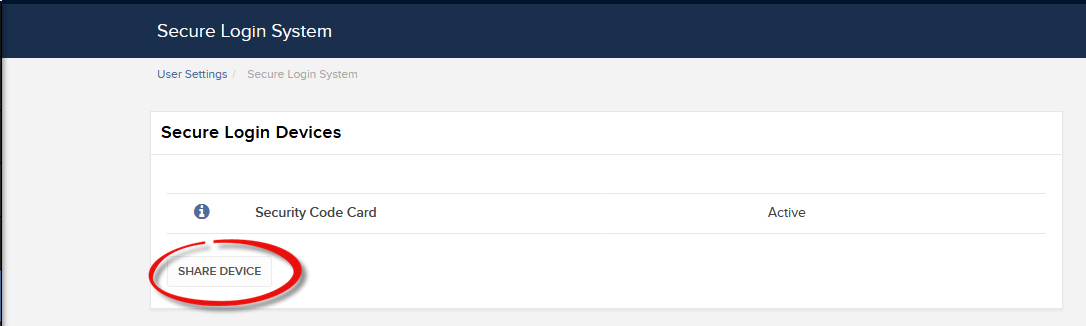
3. Haga clic en el icono del menú que se encuentra en la esquina superior izquierda; seleccione Configuración y luego Ajustes de usuario
(1).png)
4. Haga clic en el engranaje (Configuración) cerca de Sistema de conexión segura

5a. En caso de que su usuario no tenga un dispositivo activo, el sistema mostrará el menú de registro para SLS. Seleccione "Ya tengo acceso a un dispositivo de acceso seguro bajo un nombre de usuario distinto" y haga clic en Continuar
.png)
5b. En cualquier otro caso, el sistema mostrará la lista de dispositivos. Haga clic en Compartir dispositivo para continuar
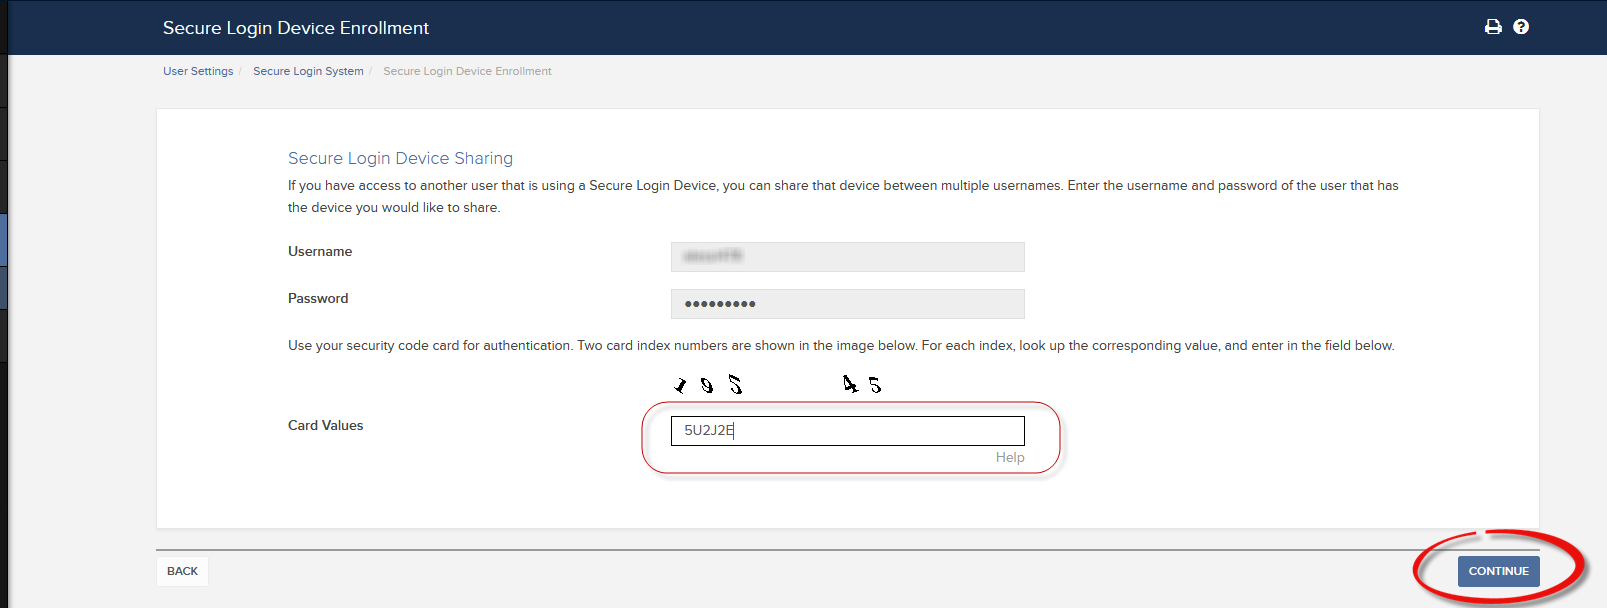
6. Ingrese las credenciales del propietario del dispositivo que identificó en el punto 1. y haga clic en Continuar.
.png)
7. De acuerdo con el dispositivo SLS a punto de ser compartido, el sistema mostrará un elemento de seguridad (un código de desafío o números de índice). Opere el dispositivo SLS y, utilizando el elemento de seguridad proporcionado por el sistema, genere un código de respuesta. Ingrese el código de respuesta en el campo correspondiente y haga clic en Continuar.
8. Una vez que haya revisado la información ingresada y que esta sea correcta, haga clic en Continuar.
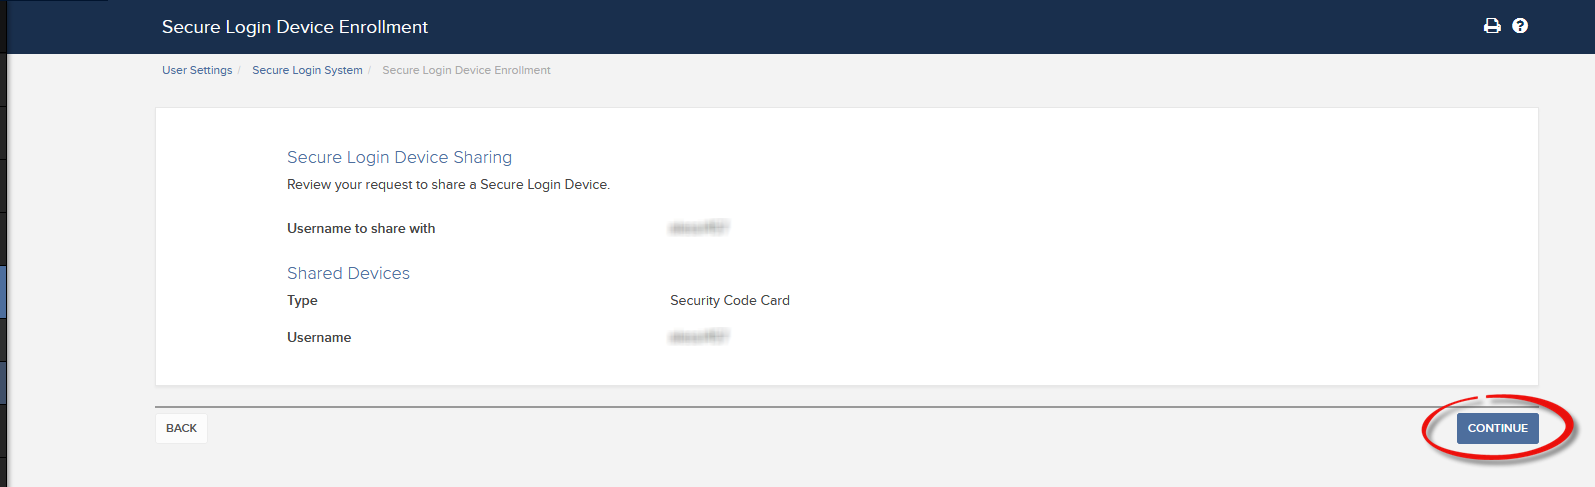
9. El sistema mostrará el estado de su solicitud (consulte la nota a. para obtener más información). Haga clic en Aceptar para finalizar el procedimiento.
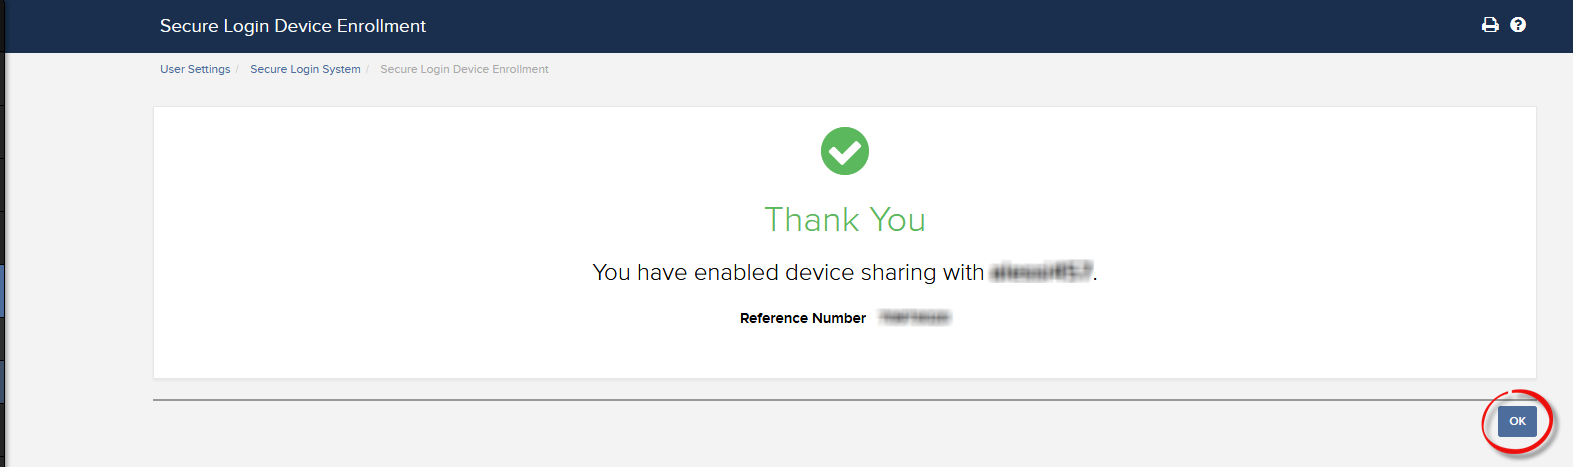
a. En la gran mayoría de los casos, su solicitud para compartir se aprobará, procesará e implementará automática e inmediatamente. En caso de que se requiera la aprobación de nuestro departamento de cumplimiento, su solicitud permanecerá en estado pendiente hasta que se haya completado este paso.
b. Una vez que la solicitud para compartir se haya procesado, podrá mantener los dispositivos innecesarios en un lugar seguro. En el futuro, podrá decidir cancelar el dispositivo compartido y reactivar esos dispositivos en su lugar. Si no tiene la necesidad de almacenarlos, puede devolvérnoslos (solo para TSD+) siguiendo las instrucciones que aparecen en esta página:
c. A continuación podrá ver los mensajes de error más comunes y sus causas:
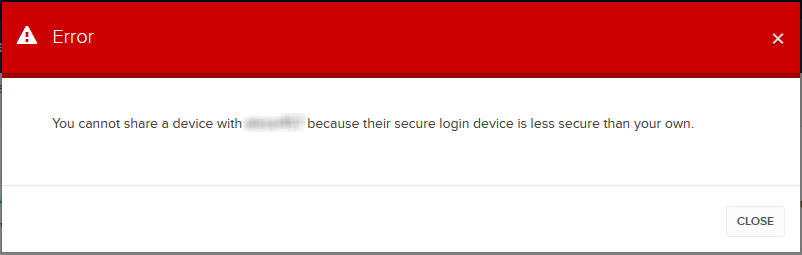
- Dispositivo menos seguro: este error aparece si configura el token menos seguro como el que va a compartir. Identifique el dispositivo más seguro y compártalo.
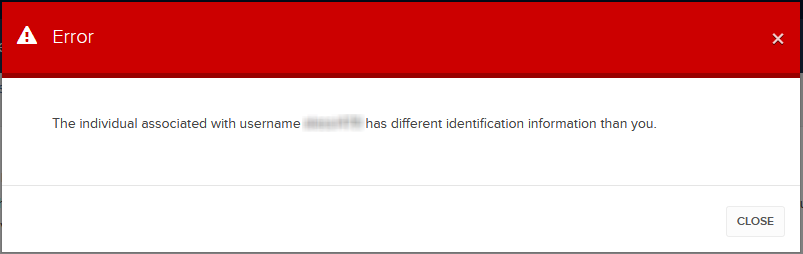
- Información de identificación distinta:
este error aparece si la información de identificación de las entidades o personas con las cuales se comparte no coinciden. Si los usuarios pertenecen a distintas entidades o personas, tenga en cuenta que NO será posible compartir el token por diseño.
Si los usuarios pertenecen a la misma entidad o persona, la inconsistencia podría deberse, por ejemplo, a un documento de identificación o registro vencido. En este caso, puede contactar con atención al cliente para corregir la información.
Referencias:
- Resumen del sistema de acceso seguro: KB1131 o ibkr.com/sls
- Sistema de autenticación múltiple en dos factores (M2FS): KB2895
- Cómo compartir el dispositivo de acceso seguro entre dos o más usuarios: KB2481
- Cómo dejar de usar el sistema de acceso seguro: KB2545
- Consideraciones acerca de la seguridad luego de dejar de usar el sistema SLS: KB1198
- ¿Existen cargos o costes relacionados con los dispositivos de seguridad? KB1861
- Cómo solucionar errores de conexión con Client Portal: KB1132
- Cómo solucionar errores de conexión con las plataformas de negociación: KB1133
How to generate a ".har" file
Background:
When troubleshooting a non-trivial website issue, it is sometimes necessary for our Client Services team to obtain additional information about your browser communication. You may be asked record and provide a .har file. This file contains additional information about the network requests that are sent and received by your browser. Your browser can generate such file by recording content, timeline and status of HTTP/HTTPS requests and responses while the issue occurs.
In this article we explain how to generate a .har file. Please click on the browser that you use in the list below:
To generate the HAR file for Google Chrome:
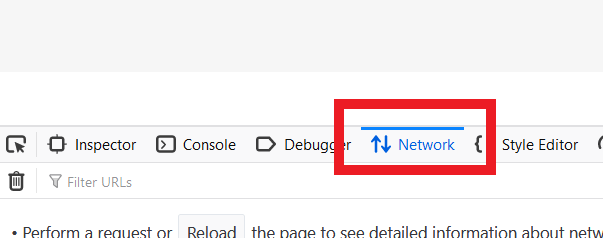
1. Open Google Chrome and go to the page where the issue is occurring.
2. Press CRTL +SHIFT + I on your keyboard. Alternatively, click on the Chrome menu icon (three vertical dots at the top-right of your browser window) and select More Tools > Developer Tools
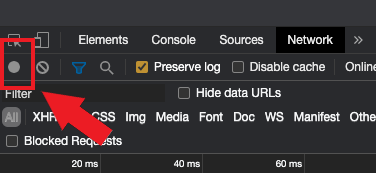
3. The Developers Tools opens as a docked panel at the side or bottom of Chrome. Select the tab Network (Figure 1.)
Figure 1.
.png)
4. Look for a round Record button in the upper left corner of the Developer Tools toolbar and make sure it is red. If it is grey, click it once to start recording or just press CTRL+E (Figure 2.)
Figure 2.
5. Activate the checkbox Preserve log (Figure 3.)
Figure 3.
.png)
6. Click the Clear button to clear out any existing logs. The Clear button has a stop icon and is located on the right of the Record button (Figure 4.)
Figure 4.
![]()
7. Reproduce the issue you are experiencing while the network requests are being recorded.
8. Once you have reproduced the issue, right-click anywhere on the list of recorded network requests, select Save all as HAR with Content, and save the file to a location of your preference on your computer (e.g. on your Desktop).
9. From the IBKR Client Portal, go to the Message Center and create a new Web Ticket (or use an existing one when applicable)
10. Within the Web Ticket, attach the .har file previously generated. In case the IBKR Client Services has provided you with a reference ticker number or representative name, please add this information to the ticket body.
11. Submit the Web Ticket
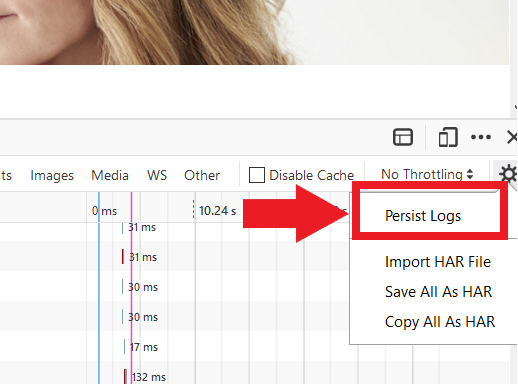
To generate the HAR file for Firefox:
1. Open Firefox and go to the page where the issue is occurring
2. Press F12 on your keyboard. Alternatively click the Firefox menu icon (three horizontal parallel lines at the top-right of your browser window), then select Web Developer > Network
3. The Developers Network Tools opens as a docked panel at the side or bottom of Firefox. Select the tab Network (Figure 5.)
Figure 5.
4. Activate the checkbox Persists logs (Figure 6.)
Figure 6.
5. Reproduce the issue you are experiencing. The recording of the network request starts automatically.
6. Once you have reproduced the issue, right-click anywhere on the list of recorded requests and select Save All As HAR
7. Save the file to a location of your preference on your computer (e.g. on your Desktop)
8. From the IBKR Client Portal, go to the Message Center and create a Web Ticket (or use an existing one when applicable)
9. Within the Web Ticket, attach the .har file previously generated. In case the IBKR Client Services has provided you with a reference ticker number or representative name, please add this information to the ticket body
10. Submit the Web Ticket
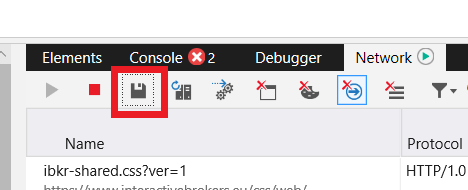
To generate the HAR file for Microsoft Edge:
1. Open Edge and go to the page where the issue is occurring.
2. Press F12 on your keyboard. Alternatively click the Edge menu icon (three horizontal dots at the top-right of your browser window), then select More Tools > Developers Tools
3. Click the Network tab (Figure 10.)
Figure 10.
.png)
4. Reproduce the issue that you were experiencing before, while the network requests are being recorded.
5. Once done click the floppy disk icon (Export as HAR) or press CTRL+S (Figure 11.)
Figure 11.
6. Provide a filename and a location of your preference on your computer (e.g. on the Desktop). Then click the Save button
7. From the IBKR Client Portal, go to the "Message Center" and create a Web Ticket (or use an existing one when applicable)
8. Within the Web Ticket, attach the .har file previously generated. In case the IBKR Client Services has provided you with a reference ticker number or representative name, please add this information to the ticket body.
9. Submit the Web Ticket
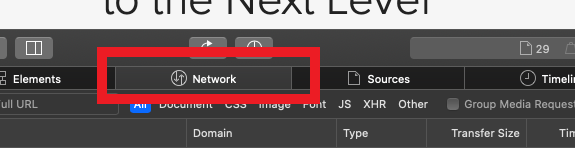
To generate the HAR file for Safari:
Note: Before generating the HAR file, make sure you can see the Develop menu in Safari. If you do not see this menu, click on the menu Safari, choose Preferences, go to the tab Advanced and activate the checkbox next to Show Develop menu in menu bar
1. Open the Develop menu and select Show Web Inspector or press CMD+ALT+I
2. Click the Network tab (Figure 12.)
Figure 12.
3. Activate the checkbox Preserve log (Figure 13.)
Figure 13.
.png)
4. Click on the icon Export (or press CMD+S), provide a filename and a location of your preference on your computer (e.g. on the Desktop) and save the .har file
5. From the IBKR Client Portal, go to the "Message Center" and create a Web Ticket (or use an existing one when applicable)
6. Within the Web Ticket, attach the web archive file previously generated. In case the IBKR Client Services has provided you with a reference ticker number or representative name, please add this information to the ticket body.
7. Submit the Web Ticket
How to use Voice callback for receiving login authentication codes
Background:
If you have SMS enabled as two-factor authentication method, you may use Voice callback to receive your login authentication codes. This article will provide you steps on how to select voice callback when logging in to our platforms.
How to use Voice callback
You may select Voice if you do not receive your login authentication code. You will then receive your login authentication code via an automated callback. Follow the instructions below, depending on which platform you are trying to login to.
Client Portal
1. Click on "Didn't receive a security code?"
2. From the two options, select "Voice" and wait for the callback.
3. After selecting Voice, you should receive the callback within a minute. Please wait for the callback and be ready to write down the code that will be provided over the callback.
TWS
1. Click on "Request new Security Code"
2. From the two options, select "Voice" and click on OK. Then wait for the callback.
3. After selecting Voice, you should receive the callback within a minute. Please wait for the callback and be ready to write down the code that will be provided over the callback.
Note: Voice callback for the TWS is only available in the LATEST and BETA version.
IBKR Mobile - iOS
1. Click on "Request New Code"
2. From the two options, select "Voice" and wait for the callback.
3. After selecting Voice, you should receive the callback within a minute. Please wait for the callback and be ready to write down the code that will be provided over the callback.
IBKR Mobile - Android
1. Click on "Request New Security Code"
2. From the two options, select "Voice" and wait for the callback.
3. After selecting Voice, you should receive the callback within a minute. Please wait for the callback and be ready to write down the code that will be provided over the callback.
References:
- How to login using SMS authentication
- Overview of Secure Login System
- Information and procedures related to Security Devices
- IBKR Mobile Authentication
IBKR Mobile Authentication (IB Key) Use Without Notifications
In case your smartphone is unable to receive IBKR Mobile notifications, you can still complete the login process using the IBKR Mobile Authentication (IB Key) Challenge/Response method, described on the following pages (according to your device operating system):
The same information applies to you if your phone has no Internet connectivity (you are in roaming, out of coverage, without an active mobile data plan, etc.)
If your smartphone is unable to receive IBKR Mobile notifications despite having Internet connectivity, we recommend you to perform the steps outlined in the IBKR Knowledge Base.
TWS / IB Gateway and their interaction with Proxy servers
Table of contents
Configuration instructions
- Can the TWS / IB Gateway operate through a Proxy server, and how?
- If I use a SOCKS Proxy server, do I need to configure the TWS / IB Gateway?
- If I use a SOCKS Proxy server, do I need to configure the client machines where TWS / IB Gateway runs?
- If I use a Web (HTTP) Proxy server, do I need to configure the TWS / IB Gateway?
- What alternatives do I have in case I cannot implement a proxy solution on my network?
Common issues
Technical Background
Configuration instructions
1. Can the TWS / IB Gateway operate through a Proxy?
Upon start-up and during the run-time, the TWS / IB Gateway must establish and maintain direct network connections to our gateways and market data servers1. Such connections are created from random local TCP ports (above 1024) and are directed to TCP ports 4000 and TCP 4001. Since those are not HTTP connections, they cannot be serviced by a Web (HTTP) Proxy. They can only be serviced by a SOCKS Proxy.
From within the TWS interface, you can access several external services, such as IBKR Client Portal, Statements, Contract details, Bond Search, etc. Those services, being web-based, can be accessed through a Web (HTTP) Proxy (see section 6 for details and configuration) or through a SOCKS Proxy (see sections 4. and 5. for details and configuration).
2. If I use a SOCKS Proxy server, do I need to configure the TWS / IB Gateway?
The TWS / IB Gateway does not contemplate an option for SOCKS proxy forwarding. Therefore, it does not have a place where an explicit SOCKS Proxy host/port can be configured. This does not mean that the TWS / IB Gateway cannot work with a Proxy. It simply means that the TWS / IB Gateway is unaware of the underlying SOCKS proxy setup (proxy-agnostic).
Important Note: While it is impossible for us to determine whether a Proxy is enabled on your network, we assure you that all IBKR platforms, including the TWS, do not impact nor influence your network configuration.
3. If I use a SOCKS Proxy server, do I need to configure the client machines where TWS / IB Gateway runs?
The connections started by the TWS / IB Gateway can be redirected to a SOCKS (Application) Proxy through a specific client machine setup. We mention some of them below. Please note that the final decision is yours and none of the below suggestions can be recommended by us as best adapted to your setup and requirements.
3a. Using a Proxy Client software installed on the client machine where TWS / IB Gateway is running
With this setup, the Proxy client will intercept the connections (not only HTTP but for other ports as well) initiated by the TWS / IB Gateway and redirect them to a SOCKS proxy server. The typical benefits of a transparent proxy include a standard enterprise configuration where all clients routed to the Internet will always be filtered and protected no matter what the end users do, or change, on their machines and the added benefit of reduction in typical user’s client-proxy configuration troubleshooting.
3b. Using a so-called Proxifier
This configuration is very similar to the one at point 5a with the only difference that the Proxifier software can be set to redirect to a Proxy all the requests started by a specific process (e.g., C:\Jts\tws.exe; C:\JTS\ibgateway\XYZ\ibgateway.exe), hence instating a process level packet forwarding instead of a port level forwarding. This setup allows handling environments where different proxy servers are used for different applications or where you would like to address a specific application requirement without modifying/disrupting the connectivity schema for other software installed. The advantage of this solution is minimal maintenance since the connectivity schema is bound to the process and not to the hosts/ports.
3c. Using specific network routing on a client machine
With this setup, you can modify the client machine standard network routes, adding new ones in order to forward packets with specific destinations (e.g., Order routing and Market Data servers1) to a different gateway.
This gateway will then be in charge of routing those requests to the destination hosts. This solution has as well the benefit of not modifying/disrupting the connectivity schema for other software installed but usually requires more maintenance on the gateway and on the client machine in case the IP of the destination servers are changed or in case new servers are added.
4. If I use a Web (HTTP) Proxy server, do I need to configure the TWS / IB Gateway?
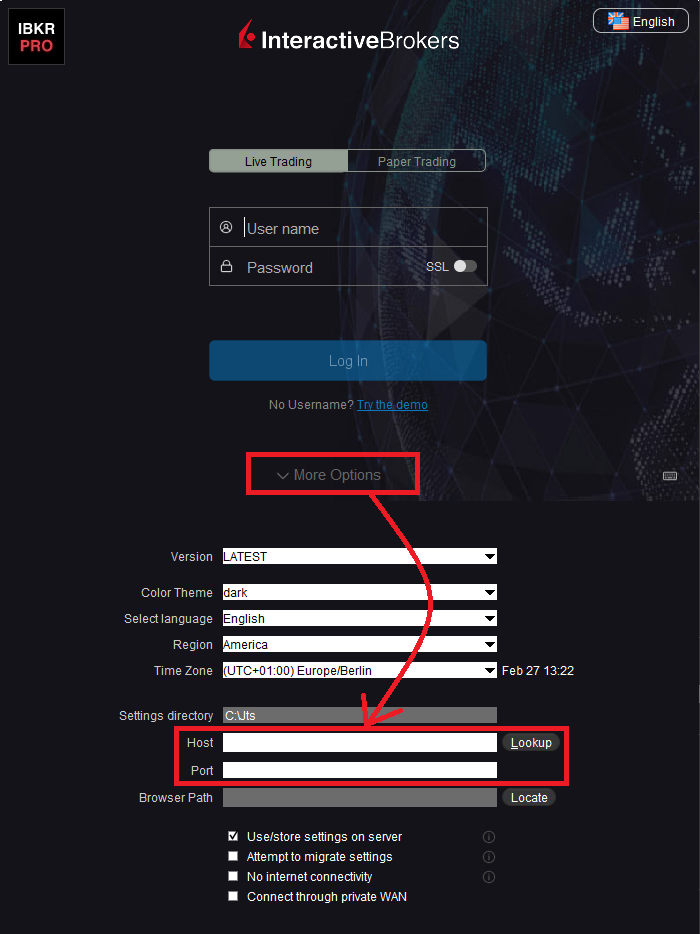
If the Workstations on your local network access the Web content through a Web (HTTP) Proxy, you need to specify the Web Proxy IP Address and port. To do this, click More Options at the bottom of the TWS Login Screen, and enter your Proxy server details in the fields Host and Port (see Figure 1 below). The same fields are present in the IB Gateway Login Screen.
Figure 1.
The Web Proxy you set there will ONLY be used to fetch the web content accessible from within the TWS (e.g., Client Portal, Statements, Product Details, etc.)
5. What alternatives do I have in case I cannot implement a proxy solution on my network?
In this case, you might orient yourself towards a different type of access to the IBKR infrastructure, which includes a special connection type and a FIX/CTCI engine setup. This setup would, on the other hand, have different requirements in terms of commissions2.
Common Issues
6. What happens if the proxy configuration on your computer is wrong or outdated?
Occasionally, third-party software, even if already uninstalled, may leave behind a SOCKS proxy configuration on your computer. This may also happen if your computer has been infected with malware. In such cases, the proxy server, although configured, is non-existent or not accessible on the network. In such scenarios, the TWS will show an error message (e.g., No Internet Connectivity) and/or start the "Connection attempt #" loop upon login. The same will happen if the Proxy server exists, but has not been correctly configured on the client machines.
6a. How can I correct the proxy configuration if wrong?
When applicable, we recommend you always consult the IT / Networking team of your company first and ask for guidance.
If you are autonomously managing your network, please follow the instructions below according to the Operating System of your machine/s:
Windows
W.1 Press CTRL+S to open the Windows search
W.2 Type Proxy Settings and press Enter
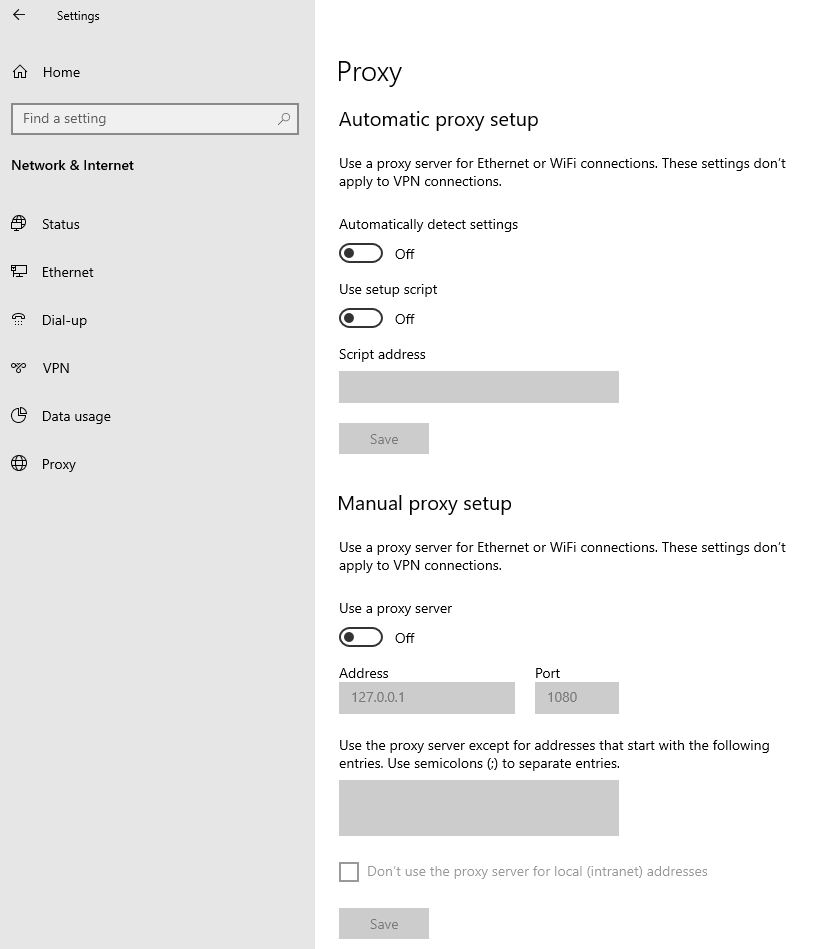
W.3 If no Proxy is present on your network, make sure the switch "Use a proxy server" is deactivated (see Figure 2 below). If a Proxy server is active on your network, make sure the Address (or hostname) and Port are correctly defined.
Figure 2.
Mac
M.1 Click on the Apple icon at the top left corner of the screen and select System Preferences
M.2 Click on Network
M.3 Select the Network connection you are using to access the Internet (e.g. Wi-Fi) and click on it
M.4 Click on the Advanced button and then on the Proxies tab
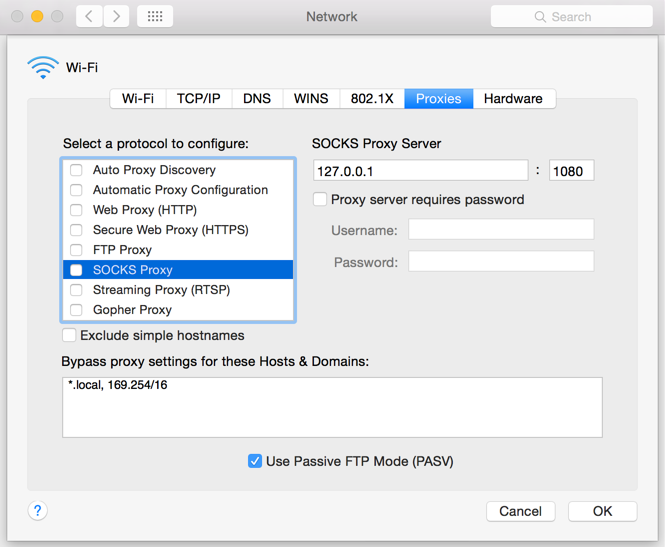
5. If no proxy is present on your network, make sure all the checkboxes (SOCKS Proxy, Web Proxy, Secure Web Proxy) are deactivated (see Figure 3 below). If a Proxy is present on your network, ensure the Protocol, Address (or hostname) and Port are correct.
Figure 3.
7. You are using Public proxies and proxy chains to hide your presence or identity
There are public proxy and proxy chain services purposed to disguise or hide the identity and the activity of the subscriber or to bypass regional restrictions. One of the most famous services is the "Tor" network.
While those services may not necessarily be used for criminal purposes, they render subscriber traceability very difficult when not impossible. Since IBKR is obliged by the financial industry regulators to maintain records of trading activities and trade initiators, we do not allow our clients to reach our systems while using an anonymizing service. If you are using such a service, your TWS connection attempts will be automatically rejected by our gateways.
Technical Background
A proxy server usually acts as a gateway and as a barrier between your local network and the Internet. The proxy listens for outgoing connection requests from the internal workstation/s and forwards them to the desired target host or service on the Internet. When the target replies to such requests, the proxy routes the incoming responses back to the internal workstation/s that initiated the process.
Being the proxy, the only machine of your network actually accessing the Internet, it prevents the other machines and the internal segment of your network (LAN) from being accessible by external actors and hence from being exposed to threats and intrusion attempts.
Additionally, a proxy server can offer a variety of other services, such as web content caching and filtering.
9. Which types of Proxy servers are commonly used and where?
Proxy servers are commonly found within enterprise-grade networks. In the vast majority of cases, proxies are not used by individuals since private broadband connections are established through consumer-grade routers that already offer built-in proxy/firewall solutions. An exception is represented by public proxy or proxy chains discussed in detail in the section You are using Public proxies and proxy chains to hide your presence or identity
There are two main types of Proxy servers:
The HTTP (Hypertext Transfer Protocol) defines the rules and the standards for fetching Web content from a Web server and rendering such content on your Web Browser.
A Web Proxy handles only the routing of HTTP requests and HTTP responses. Those requests are transparently generated and sent by your browser whenever you access a Web page. Such requests are normally sent using specific ports (TCP 80 and TCP 443). Hence a Web Proxy usually listens for outgoing HTTP requests coming from your internal network (LAN) only on the TCP ports mentioned above.
SOCKS (Socket Secure) Proxies are designed to handle any type of traffic (not only HTTP/S traffic), generated by any protocol or program (including Trader Workstation).
Notes
1. More information about the servers accessed by the TWS is available in IBKB2816.
2. For an overview of the different special connection options and related requirements, please click here.
For an overview of the FIX infrastructure, please click here.
How to fix the "Cannot create ... file" error during TWS installation on MacOS
Background:
The filesystem permissions are controlled by your machines operating system. One of their functions is to secure your files, preventing unauthorized access or undesired modifications to the system and to your personal data.
Some software on your computer may modify or override the permissions assigned by the operating system. Under certain circumstances, this prevents the TWS installer from accessing the folder where the application core files have to be created (/users/youruser/home/Applications). In such cases, the TWS installation usually displays the error "Cannot create ... file. Shall I try again?"
In this article we explain how to reset the filesystem permission of the "Applications" folder located under your user home folder in order to allow a smooth run of the TWS installation.
Procedure:
1. On your keyboard, press ⌘CMD + ⇧Shift +H to open your home folder
Figure 1

2. Select the folder "Applications" within your home folder and press ⌘CMD + I to open the Info panel
Figure 2

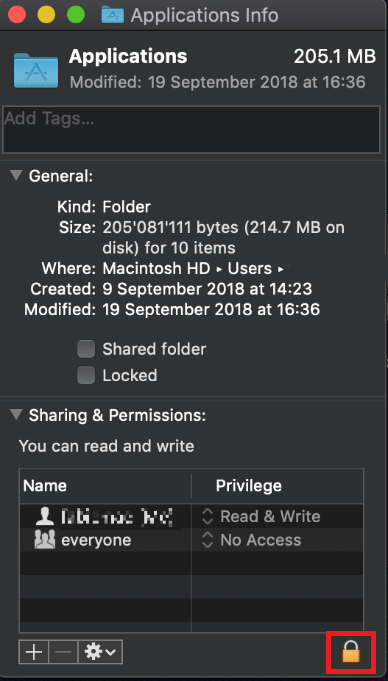
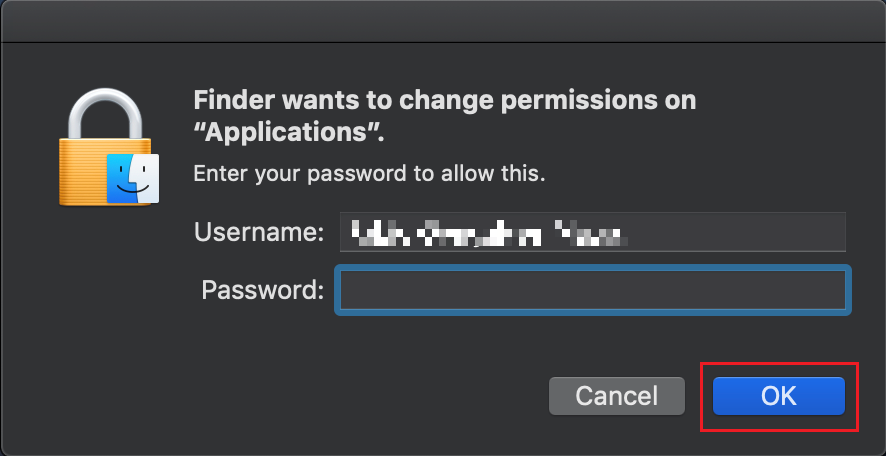
2. At the bottom right of the panel, click on the padlock
Figure 3
3. To unlock the permissions panel, enter your MacOS credentials and click OK
Figure 4
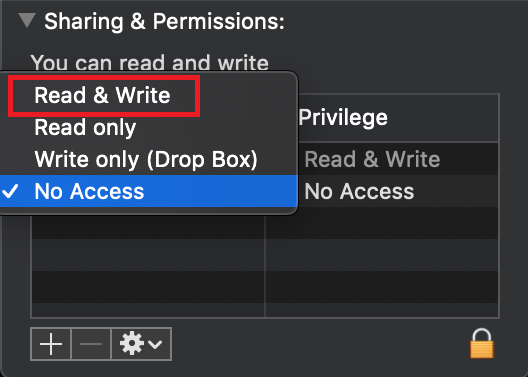
4. In the line correspondent to "everyone", click on "No Access" (Figure 5) and then select "Read & Write" (Figure 6)
Figure 5 Figure 6
.png)
5. Click on the icon bellow the permissions panel and select “Apply to enclosed items..."
Figure 7
.png)
6. Now run the TWS installer and click on Next> until you complete the installation
Figure 8
.png)
7. Once the installation has completed successfully, repeat the previous steps from 1. to 5. setting back the permissions of “everyone” to “Read Only” to revert your changes to the initial status
I am not receiving text messages (SMS) from IBKR on my mobile phone
Background:
Once your mobile phone number has been verified in the Client Portal, you should immediately be able to receive text messages (SMS) from IBKR directly to your mobile phone. This article will provide you with basic troubleshooting steps in case you are unable to receive such messages.
1. Activate the IBKR Mobile Authentication (IB Key) as 2-Factor security device
In order to be independent of wireless/phone carrier-related issues and have a steady delivery of all IBKR messages we recommend to activate the IBKR Mobile Authentication (IB Key) on your smartphone.
The smartphone authentication with IB Key provided by our IBKR Mobile app serves as a 2-Factor security device, thereby eliminating the need to receive authentication codes via SMS when logging in to your IBKR account.
Our IBKR Mobile app is currently supported on smartphones running either Android or iOS operating system. The installation, activation, and operating instructions can be found here:
2. Restart your phone:
Power your device down completely and turn it back on. Usually this should be sufficient for text messages to start coming through.
Please note that in some cases, such as roaming outside of your carrier's coverage (when abroad) you might not receive all messages.
3. Use Voice callback
If you do not receive your login authentication code after restarting your phone, you may select 'Voice' instead. You will then receive your login authentication code via an automated callback. Further instructions on how to use Voice callback can be found in IBKB 3396.
4. Check whether your phone carrier is blocking the SMS from IBKR
Some phone carriers automatically block IBKR text messages, as they are wrongly recognized as spam or undesirable content. According to your region, those are the services you can contact to check if a SMS filter is in place for your phone number:
In the US:
- All carriers: Federal Trade Commission Registry
- T-Mobile: Message Blocking settings are available on T-Mobile web site or directly on the T-Mobile app
In India:
- All carriers: Telecom Regulatory Authority of India
In China:
- Call your phone carrier directly to check whether they are blocking IBKR messages
References:
- How to login using SMS authentication
- Overview of Secure Login System
- Information and procedures related to Security Devices
- IBKR Mobile Authentication
Documentación de puertos y hosts de IBKR
Background:
TWS se conecta a los servidores de IBKR a través de los puertos 4000 y 4001, en caso de utilizar SSL, y no se ejecutará en otros puertos. En caso de utilizar servidores proxy, han de ser transparentes y disponer de los puertos de entrada y salida abiertos con el fin de que TWS pueda funcionar adecuadamente.
A continuación figura una lista con todas las puertas de enlace junto con los host de destino correspondientes que TWS podría utilizar al utilizar nuestros servicios. Debe garantizar el acceso de dichos host.
La manera más fácil de comprobar si su conexión necesita una configuración especial o si se ha configurado correctamente es a través de la página de prueba dedicada de IBKR, en la que se ofrece una test dinámico de sus conexiones de red a nuestros servidores de negociación y datos de mercado. En caso de mostrarse un mensaje de conexión con éxito ('Success'), no es necesario tomar ninguna medida. En caso de mostrarse un mensaje de error ('Failure'), le recomendamos añadir una excepción para el servidor secundario en su configuración de red o revisar sus cambios.
Nota: en caso de que su red utilice un navegador proxy, la página puede mostrar falsos positivos. En este caso, o si no sabe cuál es la configuración de su red, contacte con sus administradores de red, que pueden realizar pruebas ping o telnet para los hosts indicados a continuación para confirmar el cumplimiento con los requisitos de conectividad.
Especificaciones:
|
CLIENT PORTAL Y PÁGINA WEB |
||||
|
REGIÓN/PRODUCTO |
SERVIDOR (HOST) |
PUERTOS1 |
||
|
PÁGINA WEB IBKR – AMÉRICA |
443 |
|||
|
PÁGINA WEB IBKR – Canadá |
443 |
|||
|
PÁGINA WEB IBKR – Reino Unido |
443 |
|||
|
PÁGINA WEB IBKR – INDIA2 |
443 |
|||
|
PÁGINA WEB IBKR – JAPÓN2 |
443 |
|||
|
PÁGINA WEB IBKR – HONG KONG2 |
www.interactivebrokers.com.hk | 443 | ||
|
PÁGINA WEB IBKR – CHINA2 |
www.ibkr.com.cn | 443 | ||
|
PÁGINA WEB IBKR - AUSTRALIA |
www.interactivebrokers.com.au | 443 | ||
|
CLIENT PORTAL – ESTE |
443 |
|||
|
CLIENT PORTAL – CENTRO |
443 |
|||
1: Comunicación estándar: TCP Port 80 | Comunicación SSL: TCP Port 443.
2: Este host de servidor de IB no admite solicitudes de ping.
Aviso importante:el hecho de acceder a Client Portal a través de una red corporativa cuya conexión a Internet se facilita a través de un equipo de equilibro de carga puede dar lugar a mensajes de error sobre sesiones inválidas o caducadas, o puede que el contenido web no se muestre en su totalidad durante o después del inicio de sesión. El equilibrador de carga distribuye sus conexiones salientes en dos o más interfaces de red para equilibrar la carga de funcionamiento de la red. En consecuencia, sus solicitudes HTTP llegan a nuestros sistemas a través de diferentes direcciones de IP, lo que provoca la invalidación de su sesión de Client Portal. En este caso, solicite a su administrador de red o departamento informático que configuren su ordenador/dispositivo con el fin de omitir el equilibrador de carga. De este modo su sesión permanecerá activa y continuará siendo válida.
|
TWS ESCRITORIO |
|||
|
REGIÓN/HERRAMIENTA |
PRIMARIA/RESERVA |
SERVIDOR (HOST) |
PUERTOS |
|
|
PRIMARIA |
|
|
|
RESERVA |
|||
|
|
PRIMARIA |
|
|
|
RESERVA |
|||
|
|
PRIMARIA |
|
|
|
RESERVA |
|||
|
TWS ASIA |
PRIMARIA |
4000 / 4001 |
|
|
RESERVA |
|||
|
TWS ASIA - CHINA3 |
PRIMARIA |
4000 / 4001 |
|
|
RESERVA |
mcgw1_hb1.ibllc.com.cn | ||
| TWS AUTOACTUALIZACIÓN | PRIMARIA | 443 | |
|
RISK NAVIGATOR |
PRIMARIA |
443 |
|
|
AJUSTES DE TWS EN LA NUBE |
PRIMARIA |
443 |
|
|
IB CAM |
PRIMARIA |
4000 / 4001 |
|
|
INFORMES DE DIAGNÓSTICOS |
PRIMARIA |
443 |
|
3: Portal dedicado a los clientes con cuentas asignadas al servidor de Hong Kong, pero se conectan físicamente en China continental.