Fusión de IB TWS y IB Key en IBKR Mobile
RESUMEN
La migración para su usuario depende del uso actual de las aplicaciones:
1. Su teléfono inteligente solo se utiliza para negociar (IB TWS instalada) - Haga clic aquí
2. Su teléfono inteligente solo se utiliza para autenticación (IB Key instalada) - Haga clic aquí
3. Su teléfono inteligente se utiliza para negociación y autenticación (IB TWS y IB Key instaladas) - Haga clic aquí
4. Su teléfono inteligente se utiliza para transacciones de tarjeta de débito (IB Key instalada) - Haga clic aquí
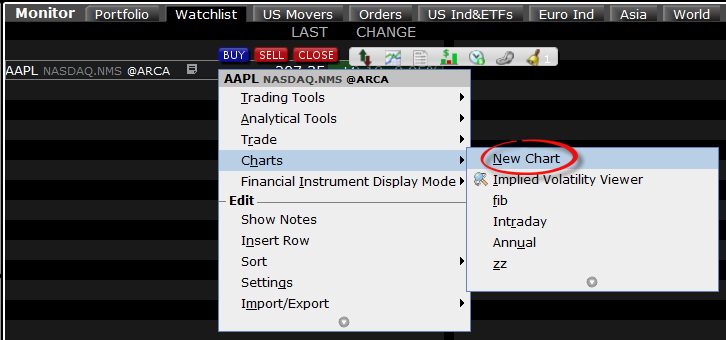
Usted es usuario de IB TWS
Ha negociado desde su teléfono inteligente con la IB TWS y no ha utilizado la IB Key.
1. Tras el primer uso de la aplicación, verá la siguiente pantalla de Inicio.
La Figura 1 es la pantalla de Inicio de IBKR Mobile para dispositivos iOS. La Figura 2 es la versión para dispositivos Android.
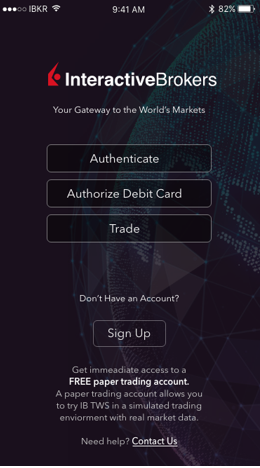
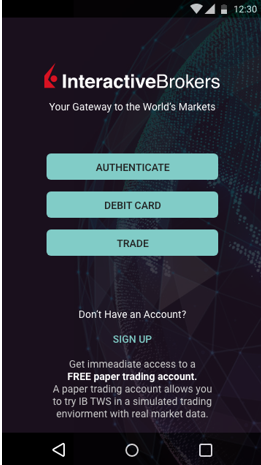
Figura 1 Figura 2
2. Pulse en el botón Negociación (Trade).
3. El resto de la experiencia de la aplicación es idéntico a lo que ya ha utilizado en el pasado.
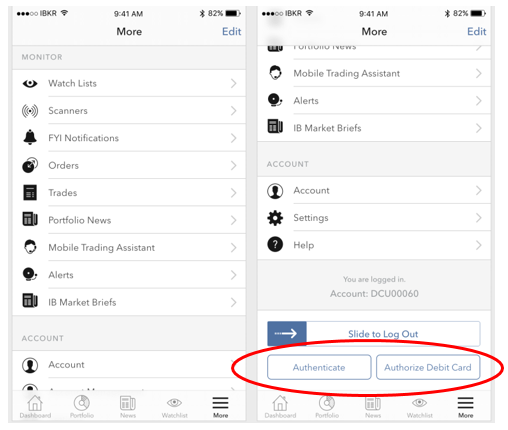
Acceso a las otras funciones desde la pantalla de negociación
Si desea acceder a las otras funciones de IBKR Mobile, como el módulo de Autenticación o
funciones de tarjeta de débito:
Para iOS (Figura 3)
1. Abra el menú ‘Más’ (esquina inferior derecha de la pantalla).
2. Baje al fondo de esta pantalla
Para Android (Figura 4)
1. Abra el menú de la aplicación
2. Baje a la sección inferior: ajustes de aplicación
.png)
Figura 3 Figura 4
Usted es usuario de IB Key
Activación
1. Lance la IBKR Mobile y pulse en Autenticación.
2. La aplicación detectará la instalación de la IB Key y sugerirá un curso de acción; o bien una
migración automática (Figura 5) o bien una actualización y después una migración automática.
También puede elegir hacer la migración de forma manual en otro momento.
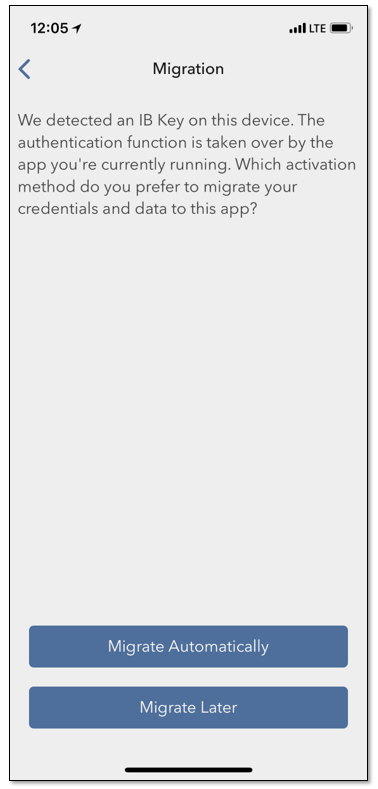
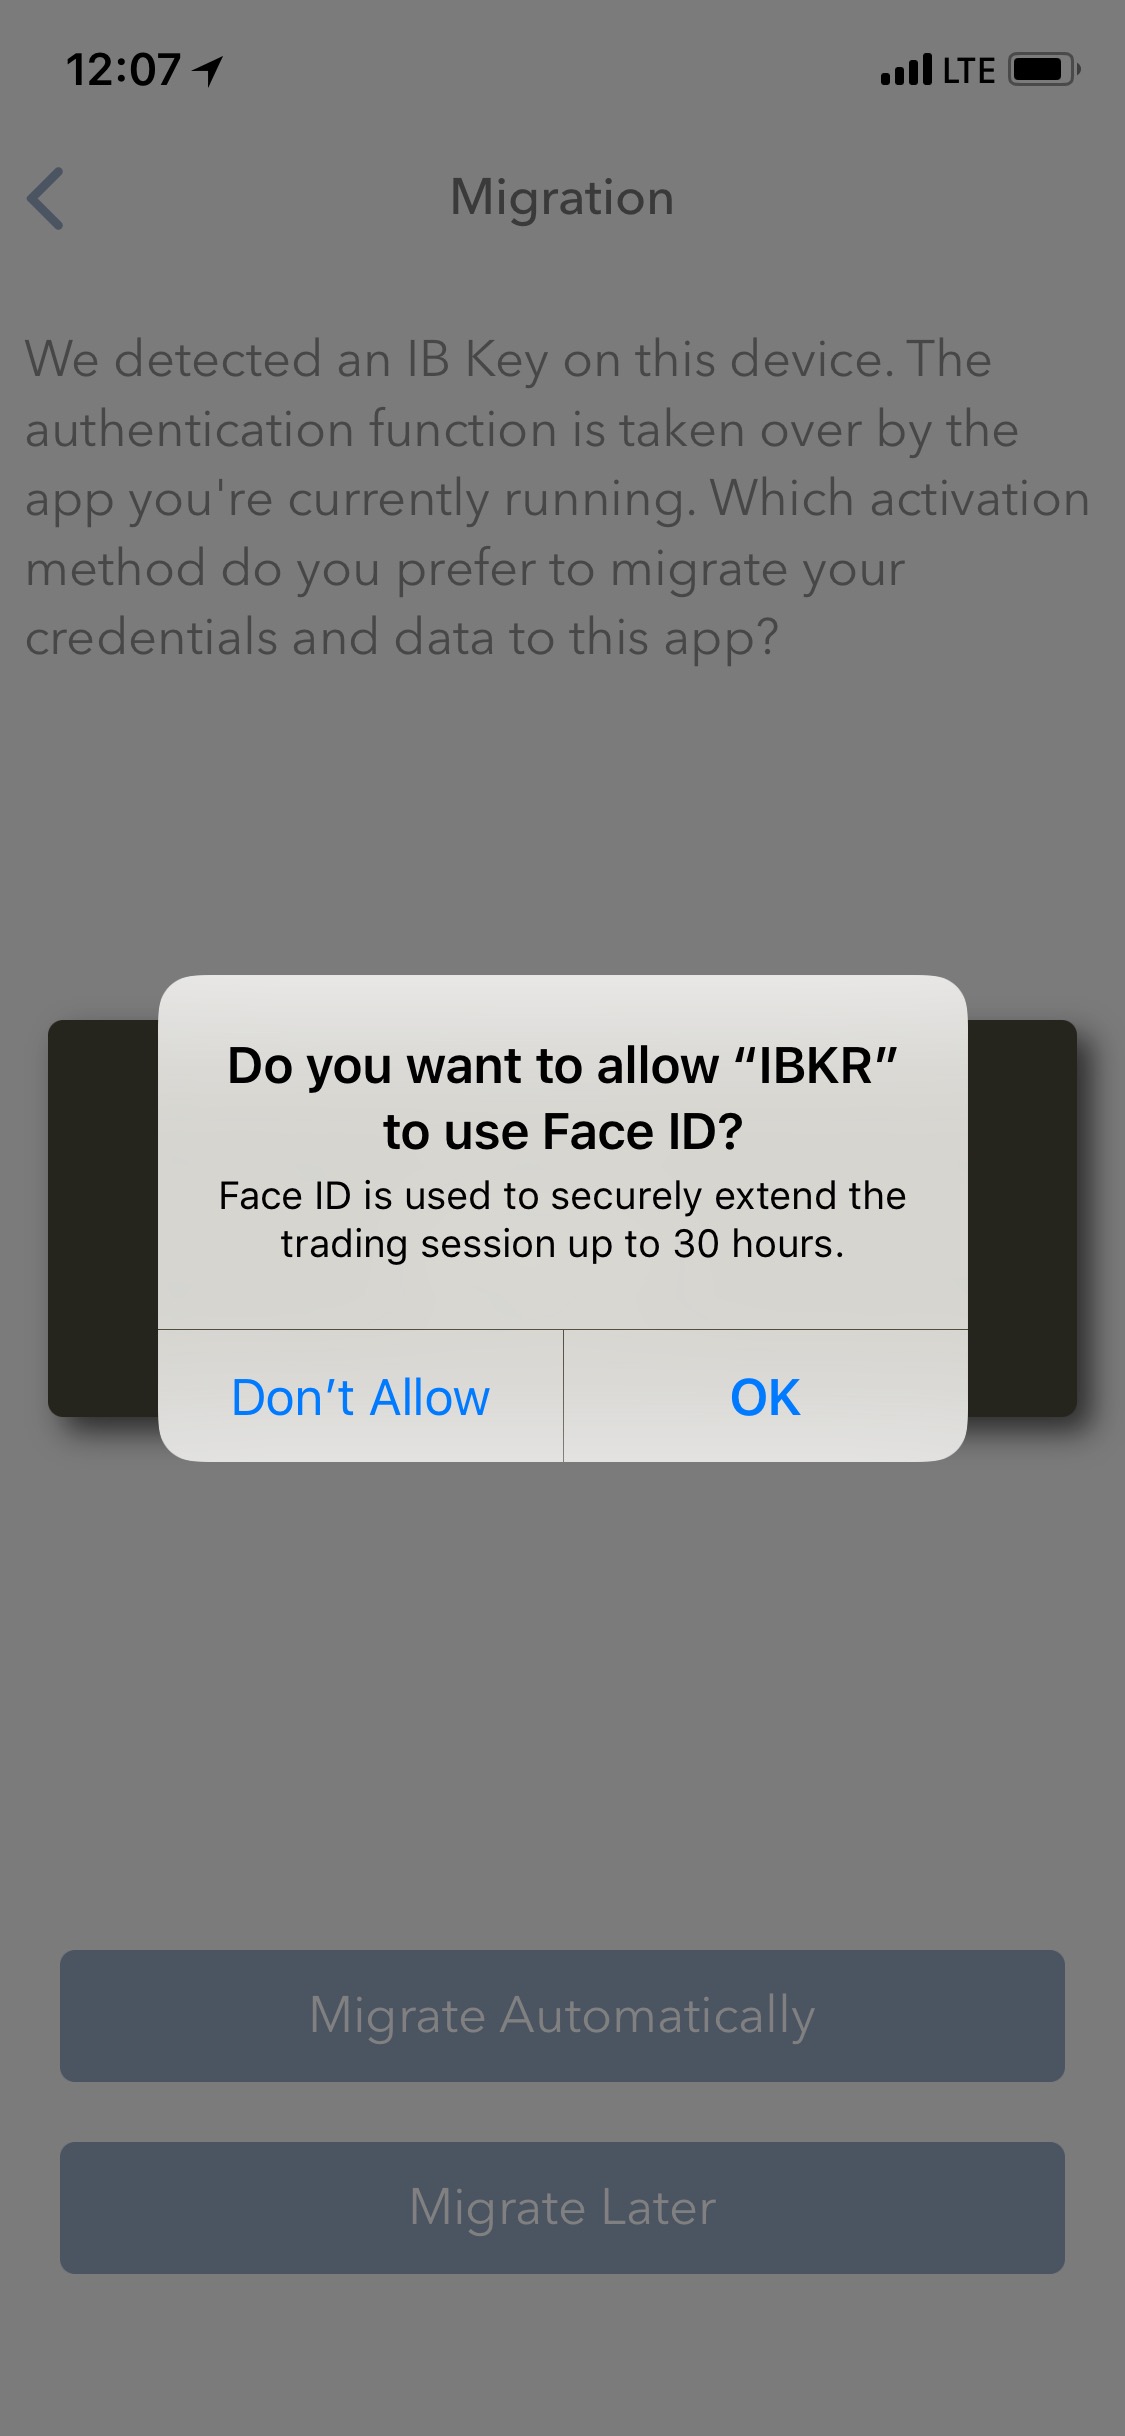
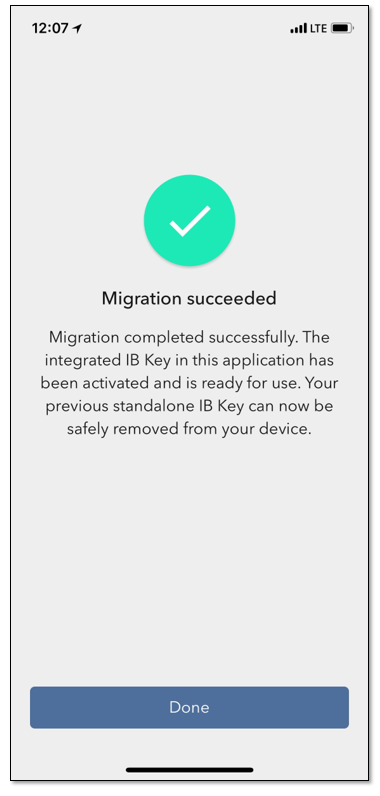
Figura 5 Figura 6 Figura 7
Una vez completada la migración, si ejecuta la aplicación IB Key independiente, con la que se ha
autenticado en el pasado, verá la siguiente pantalla (Figura 8).
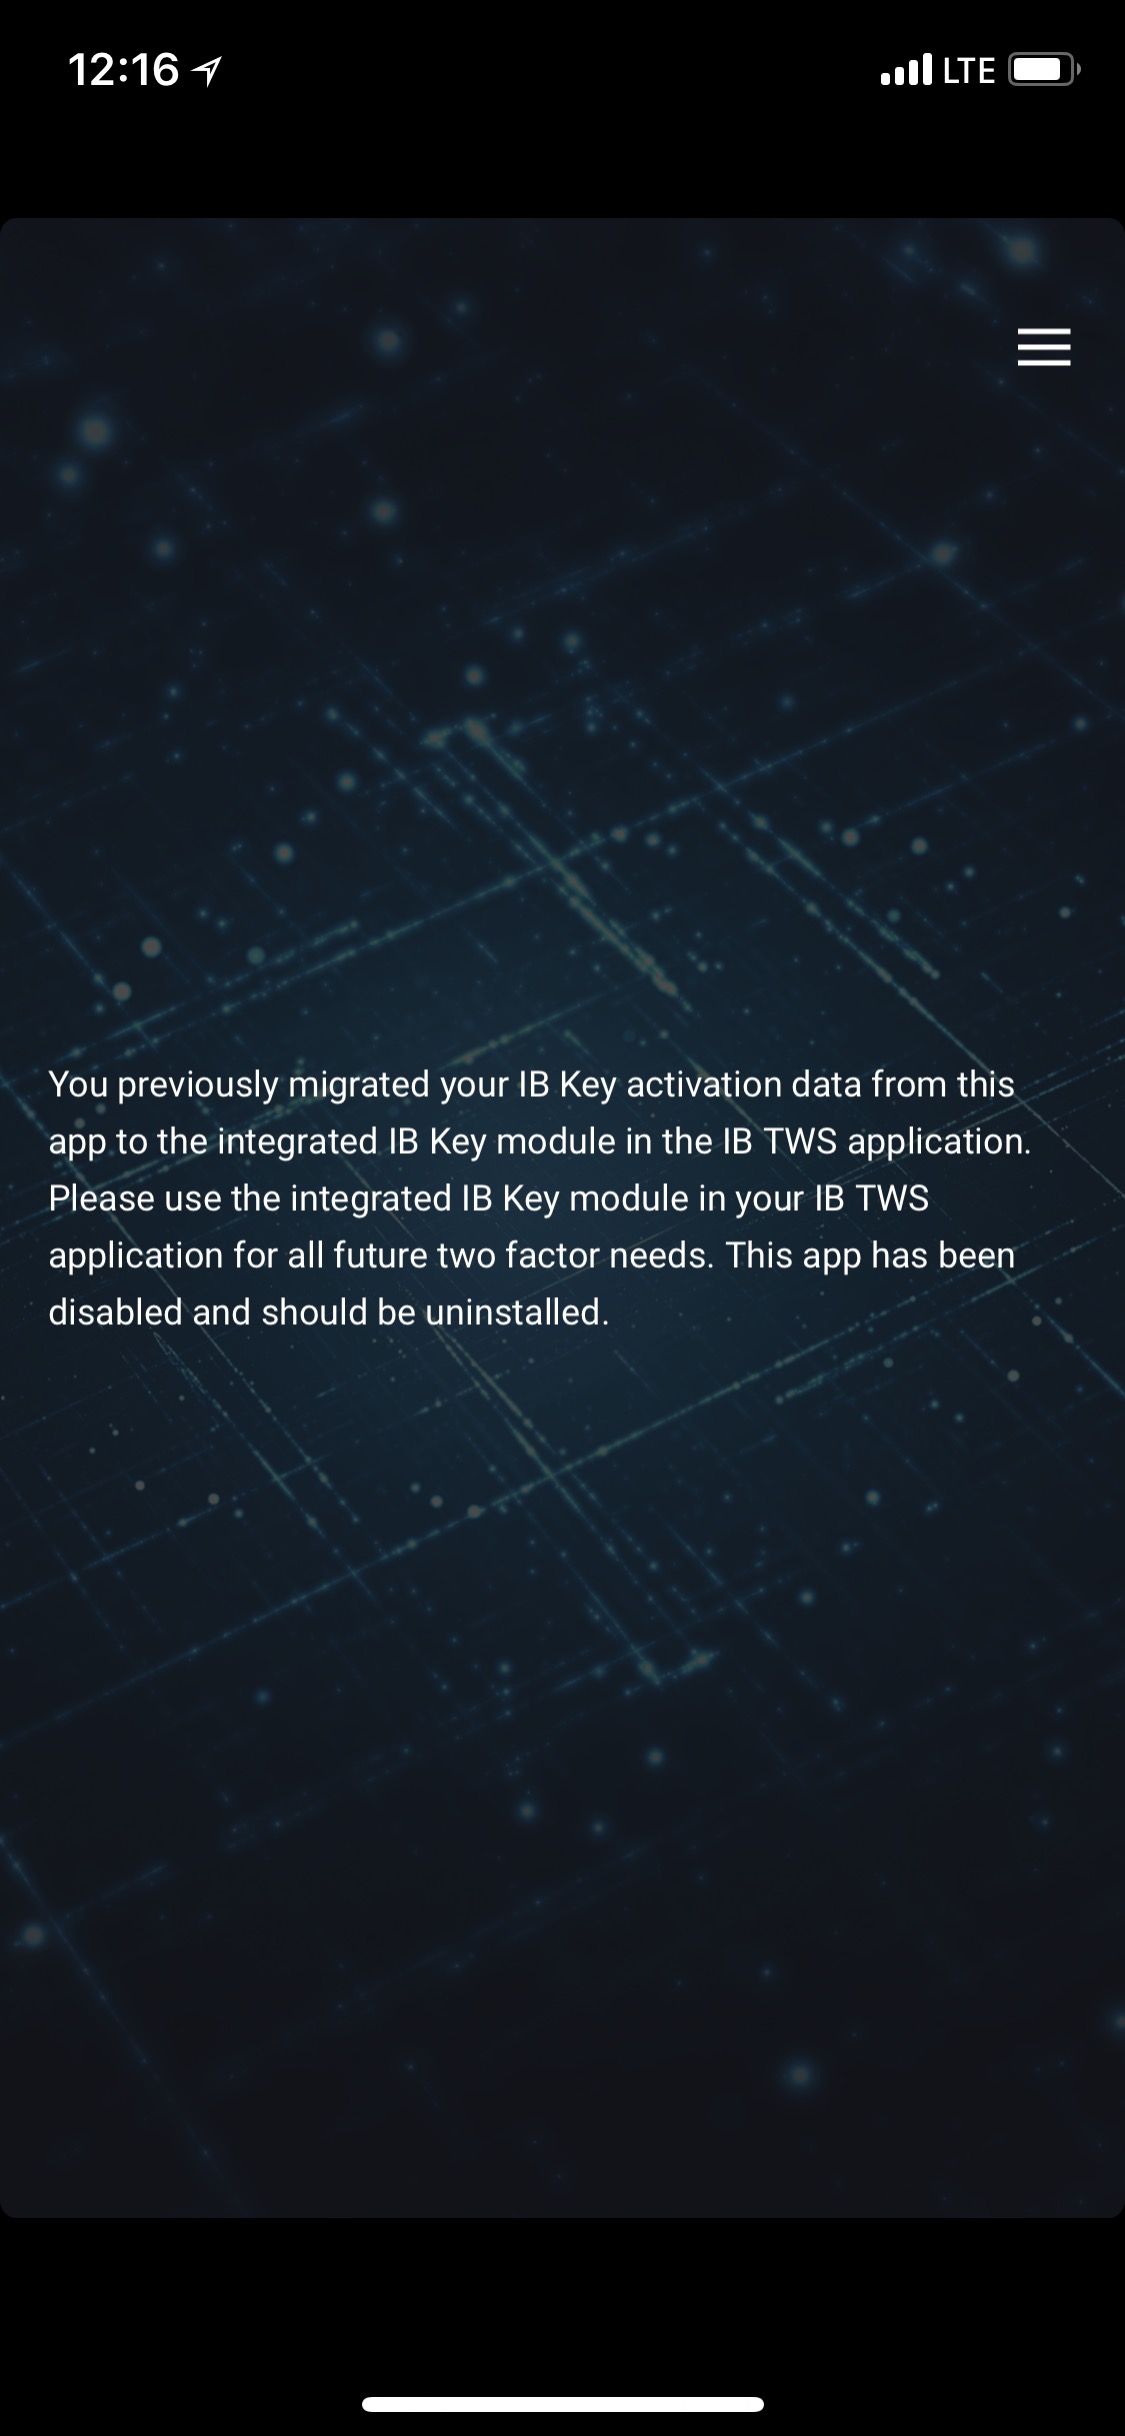
Figura 8
Operación diaria
A. Nada cambia en la experiencia diaria de conexión si usted tiene conexión a Internet - se utilizará
el proceso de autenticación ininterrumpida:
1. Introduzca sus credenciales en los campos correspondientes (en TWS, Gestión de Cuenta, WebTrader o
IBKR Mobile). Haga clic en Conexión (Login).
2. El sistema le enviará una notificación a la pantalla de su teléfono; púlsela.
3. Según su dispositivo, presente su cara a la cámara o la huella en el sensor (iOS) o
introduzca su código PIN (Android). El sistema procederá automáticamente con la conexión.
B. Si no tiene conexión a Internet, utilizará el IBKR Mobile en modo desafío-respuesta:
1. Introduzca sus credenciales en los campos correspondientes (en TWS, Gestión de Cuenta, WebTrader o
IBKR Mobile). Haga clic en ‘Conexión (Login)'.
2. Haga clic en el enlace que indica “No he recibido una notificación”.
3. Lance la IBKR Mobile y pulse en ‘Autenticación’.
4. En el campo Desafío de su aplicación del teléfono inteligente introduzca los valores que se muestren en la pantalla de Conexión. Pulse el botón ‘Generar’.
5. Introduzca los valores mostrados por su teléfono inteligente en el campo Cadena de respuesta en la Conexión. Haga clic en ‘Conexión’.
Usted es usuario tanto de la IB TWS como de la IB Key
1. Por favor, complete primero el procedimiento para la activación del módulo de Autenticación de la aplicación móvil IBKR (Haga clic aquí).
2. Conéctese a la pantalla de negociación pulsando en el botón Negociación (Trade) en la pantalla Inicio en su nueva aplicación móvil IBKR (Haga clic aquí).
Usted utiliza una tarjeta de débito IB
1. Por favor, complete primero el procedimiento para la activación del módulo de Autenticación de la aplicación móvil IBKR (Haga clic aquí).
2. En la pantalla de Inicio de la IBKR Mobile pulse en el botón Tarjeta de débito. El resto de la experiencia
es idéntico a lo que ya ha utilizado en el pasado.
Why is my chart delayed, showing question marks or only partially populated?
Background:
What are SMART Charts and how are they generated?
The SMART charting mechanism analyzes and compares the market data coming from all venues a given contract is traded on and graphically displays the most favorable quotes.
When all the data streams are live, the data points are available for all sources and for each time point, thus they can be fully compared. The resulting SMART chart will be up to date and fully populated, moreover it will constantly and automatically update1.
The comparison between non synchronized market data streams (some live and some delayed) is just partially possible, since the delayed feeds are lacking data points for the last 15 or 20 minutes. Therefore, within that time frame, the SMART chart will usually display a series of yellow question marks to indicate unavailability of source data. In this case the SMART Chart will not update automatically.
When the lack of data points is more extensive or when the Exchange does not distribute delayed data for a given contract, the correspondent SMART Chart may be completely blank.
What should I do to obtain a fully populated, up-to-date chart?
If your trading method is based on SMART charts, you would need to activate the live market data subscriptions for all the marketplaces your financial instruments are traded on2. For additional details, please see KB1201
If your trading method does not require SMART charts, you can decide to use Direct chart routing as a workaround.
A Directed Chart will allow you to graphically represent the market data coming from a single, specific Exchange. When possible, we suggest to select the primary marketplace for the product for this purpose, since this is usually the one offering the highest liquidity and trade volume, hence normally providing the most favorable quotes. If you have subscribed the market data for that venue, the resulting Directed Chart will be fully populated, up to date and it will update automatically1.
How do I set up a Directed Chart?
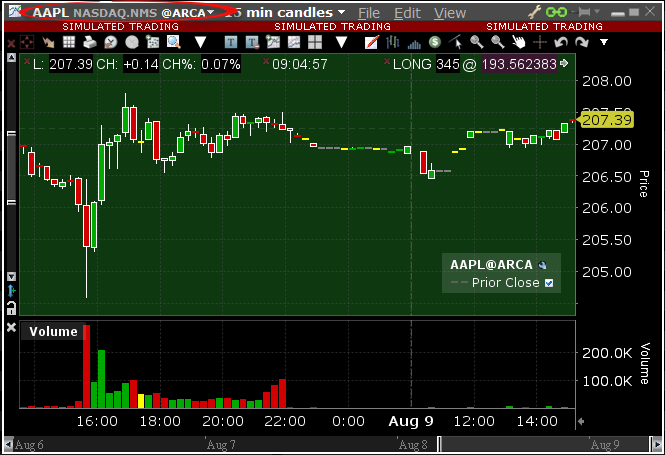
1. Within a watchlist, type the contract symbol and press Enter on your keyboard.
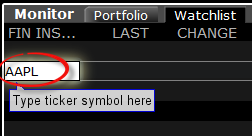
2. When then contract selection menu appears, select the item Stock (Directed). If you do not see this item, click on the small down arrow at the bottom of the menu to reveal the hidden menu items.
.png)
3. The Exchange selection screen will appear. You can now select the main Exchange for the product or the Exchange for which you have an active live market data subscription. Once done, click OK.

4. Within your watchlist you will see a newly created Directed Ticker line. It will contain the contract symbol and, preceded by the @ sign, the Exchange you selected at the previous step. Right click on that directed ticker line and select Chart > New Chart
5. The chart will be shown. On the left side of the toolbar, after the contract symbol, you will see the Exchange you selected preceeded by a @ sign, indicating that this is a Directed Chart.
1. In order for the chart to update automatically, the checkbox "Keep chart up to date" has to be activated in the Chart Parameters panel. The panel is reachable directly within the chart window, from the top menu Edit.
2. Alternative streaming quotes for EU equities are available to clients with non-professional or non-commercial market data subscriber status. The complimentary real-time streaming Best Bid and Offer and last sale quotes on European Equities will be aggregated from exchanges such as Cboe Europe, Gettex, Tradegate and Turquoise. The data will display in the SMART quote line and can be used to generate a chart as well. Users who would like to receive the full EBBO (European Best Bid and Offer) will need to subscribe to the individual exchange subscriptions.
Informes de cálculos de tarifa de exposición
INTRODUCCIÓN
Nuestro sistema de Gestión de Cuenta le permite configurar y gestionar su cuenta IB desde una sola ventana, incluido nuestro informe de cálculos de tarifas de exposición. Los cálculos de tarifa de exposición se generan diariamente y están disponibles dentro de Gestión de Cuenta antes de la apertura del mercado de acciones estadounidense. Este informe permite a los usuarios ver los cambios en las pérdidas y ganancias (PyG) de sus posiciones si el precio de cada una de sus posiciones aumenta o decrece según porcentajes predeterminados.
ACCESO A INFORMES
Para acceder/generar un informe de cálculos de tarifas de exposición
1) Desde la página de Inicio de Gestión de Cuenta, haga clic en las opciones de menú Informes y, luego, Otros informes. 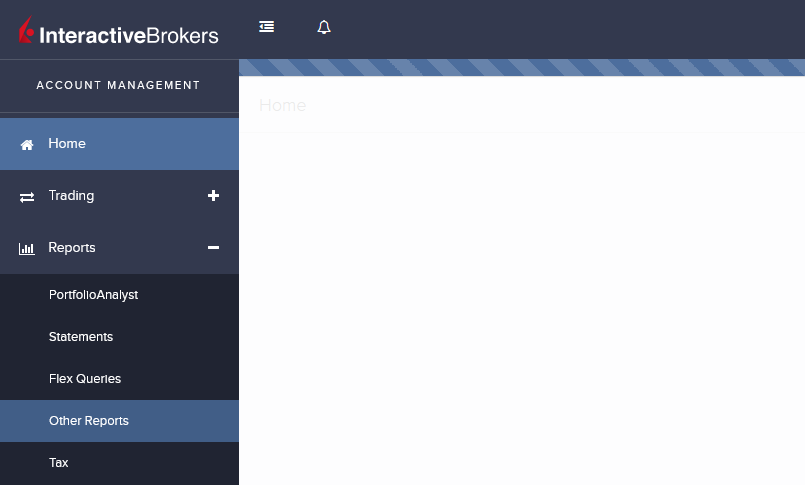
2) La siguiente pantalla aparecerá.
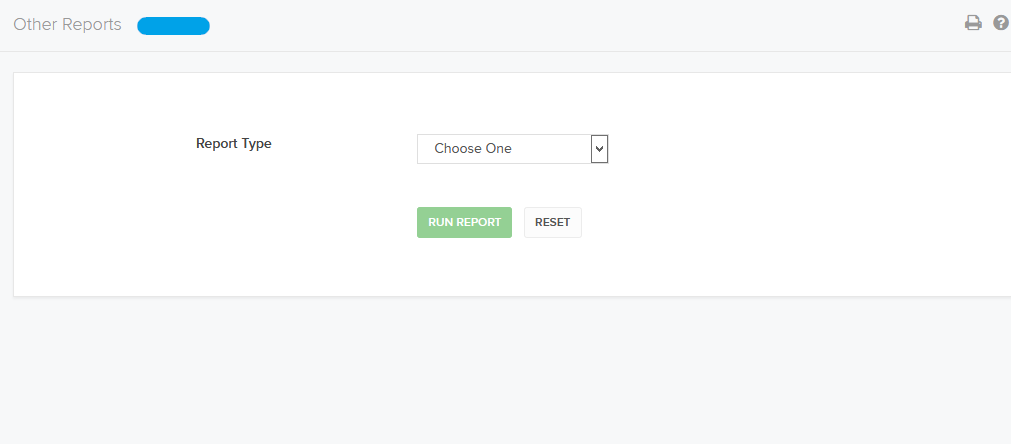
3) Seleccione los Cálculos de tarifa de exposición desde el desplegable Tipo de informe. Aparecerán los ajustes de los cálculos de tarifa de exposición.

4) En el campo Fecha, seleccione la fecha para el informe
5) Haga clic para ejecutar informe
RESUMEN DE INFORME
Los informes de resúmenes de tarifa de exposición reflejan la exposición promedio y la tarifa de exposición correspondiente para cada sector1 y un hiperenlace para ver nuestro informe de sensibilidad para la tarifa de exposición correlacionada.
Resumen de sector detallado
Al hacer clic en el hiperenlace asociado con cada sector1 se verá un resumen detallado, que permite a los usuarios ver el cambio en las PyG de sus posiciones si el precio del ETF/índice correspondiente aumenta/decrece según una cantidad determinada. Para el ejemplo de acciones e índices de acciones, suponemos que SPX baja en un 30%, 20% y 10% y el independiente aumenta un 10% y 20%. Los resultados están basados en modelos de precios teóricos y tienen en cuenta los cambios coincidentes en volatilidad y otras variables que afectan a los precios derivados.
El informe muestra:
- El valor de liquidación neto (NLV) de su cuenta, con base en posiciones del cierre del día previo.
- Exposición promedio para el sector
- Tarifa de exposición correspondiente
- La liquidez de todas las posiciones en la cuenta con las PyG en la divisa base.
Para utilizar el informe, haga clic en el botón que corresponde con el cambio de precio de subida o bajada que usted quiere ver (+/- 10%, 20% o +30%). Las PyG de cada posición se actualizan según el porcentaje seleccionado.
Las siguientes figuras muestran un ejemplo de un resumen detallado del sector de la acción, con -30% seleccionado.
1 Las cuentas pueden tener una exposición promedio y una tarifa de exposición correspondiente para más de un sector.
Informe de sensibilidad para la tarifa de exposición correlacionada
Para cada contrato en la cartera, calculamos un estimado de la tarifa de exposición si la posición de un solo contrato se modifica. Suponemos que los contratos se compran o venden, no se transfieren. El cambio de posición no es editable y, en algunos casos, podría requerir que la cuenta cambiara la dirección de su posición, por ejemplo, de una posición corta a una posición larga.
Para información adicional sobre la tarifa de exposición, consulte el artículo KB3114
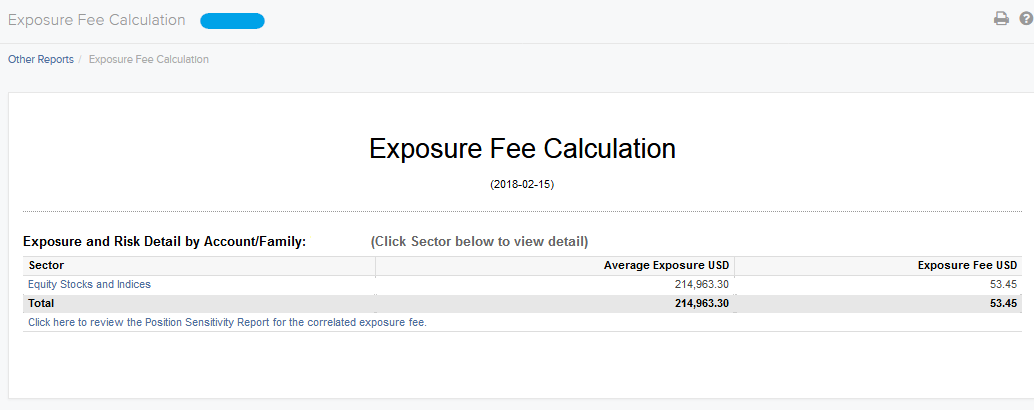
Exposure Fee Calculation Reports
INTRODUCTION
Our Account Management system lets you configure and manage your account from a single window, including our Exposure Fee Calculations report. The Exposure Fee Calculations is generated daily and made available within Account Management prior to the U.S. equity market open. This report allows users to view the change in Profit and Loss (PnL) of your positions if the price of each of your positions declines and increases by predetermined percentages.
REPORT ACCESS
To access/generate an Exposure Fee Calculations Report
1) From the Account Management Home Page, click on the Reports and then Other Reports menu options.
2) The following screen will appear.
3) Select Exposure Fee Calculations from the Report Type drop-down. Exposure Fee Calculations settings appear
4) In the Date field,select the date for the report
5) Click Run Report
REPORT OVERVIEW
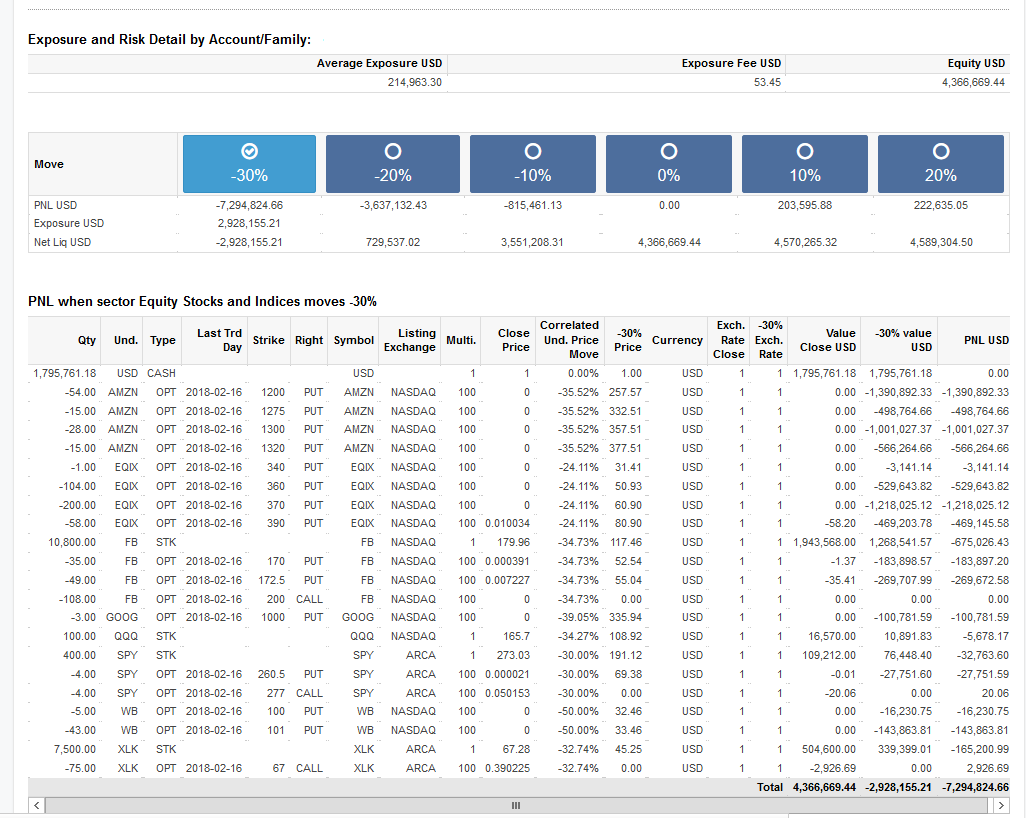
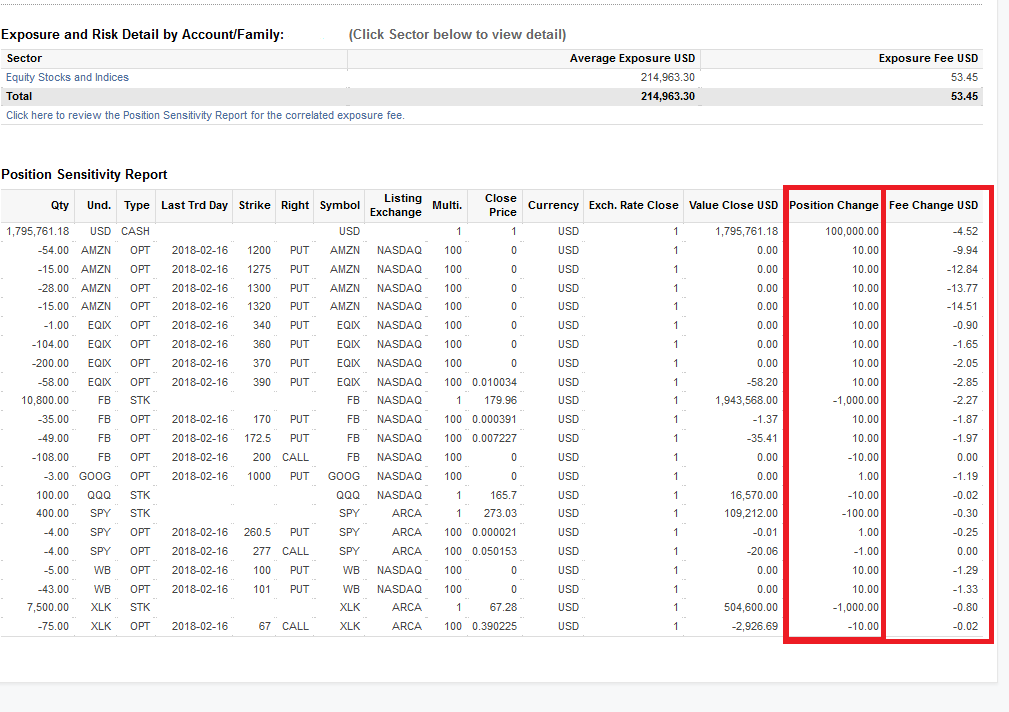
The Exposure Fee Summary Reports reflects the Average Exposure and the corresponding Exposure Fee for each Sector1 and a hyper-link to view our Sensitivity Report for the Correlated Exposure Fee
Detailed Sector Summary
Clicking on the hyper-link associated with each sector1 will populate a detailed summary, which allows users to see the change in the PNL of your positions if the price of the corresponding ETF/Index increases / declines by a pre-determined amount. For the example of Equity Stocks and Indices we are assuming SPX declines by 30%, 20% and 10% and independent increases by 10% and 20% The results are based on theoretical pricing models and take into account coincidental changes in volatility and other variables that affect derivative prices
The report shows:
- The Net Liquidation Value (NLV) of your account based on positions from the previous day’s close
- Average Exposure for the sector
- Corresponding Exposure Fee
- Equity of all positions in the account with PNL in base currency
To use the report, click the radio button that corresponds to the up or down price change you want to see (+/- 10%, 20% or +30%). The PNL for each position is updated by the selected percentage
The following are figure shows an example of a Detailed Summary of the Equity Sector, with -30% selected
1 Accounts may have Average Exposure and a corresponded Exposure Fee for more than 1 Sector
Sensitivity Report for the Correlated Exposure Fee
For every contract in the portfolio we compute an estimate of the exposure fee if the position of a single contract is modified. We assume that contracts are bought or sold, as opposed to transferred in/out. The position change is not editable and in some cases may actually require the account to reverse the direction of their position, for example from a short position to long position.
For additional information regarding the Exposure Fee, please see KB3114
Cryptocurrency Products Offered by IBKR
Overview:
Below is a list of many of the Cryptocurrency products offered by IBKR*. If you don't see the product you are looking for, you can search the IBKR contract database through the Contract Search tool available on our website. Select the Support menu followed by your account type (Individual or Institution). Here you can do a Simple search by entering the product name or symbol, an Advanced search which allows you add filters to the search, or a search by specific product type.
Cryptocurrency
- BTC- Bitcoin
- ETH- Ethereum
- LTC- Litecoin
- BCH- Bitcoin Cash
Stocks/ETFs
US
- GBTC (PINK)- Grayscale Bitcoin Investment Trust
- BCHG (PINK)- Grayscale Bitcoin Cash Trust
- ETCG (PINK)- Grayscale Ethereum Classic Trust
- ETHE (PINK)- Grayscale Ethereum Trust
- GDLC (PINK)- Grayscale Digital Large Cap Fund
- LTCN (PINK)- Grayscale Litecoin Trust
Non-US
- BITCOINXB (SFB)- Bitcoin Tracker One
- COINETH (SFB)- XBT Provider Ethereum
- COINETHE (SFB)- XBT Provider Ethereum
Indices
- NYXBT (NYSE)- NYSE Bitcoin Index
- GXBT (Cboe)- The Gemini Bitcoin Trace Price Index (No new contracts offered for trading as of June 2019)
- BRR (CME)- CME Bitcoin Reference Rate Index
- BRTI (CME)- CME Bitcoin Real Time Index
Futures
- GXBT (Cboe/CFE)- The Gemini Bitcoin Trace Price Futures (No new contracts offered for trading as of June 2019)
- BRR (CME)- CME Bitcoin Reference Rate Futures
- ETHUSDRR (CME) – CME Ether Dollar Reference Rate Futures
- BAKKT (ICECRYPTO)- Bakkt Bitcoin Futures
*Some or all of the above products may not be available to IBKR clients located in certain jurisdictions.
Back to Table of Contents: Bitcoin and Other Cryptocurrency Products @ IBKR
Bitcoin and Other Cryptocurrency Products @ IBKR
Cryptocurrency Products Offered by IBKR
Cryptocurrency Products Market Data
Trading Bitcoin Futures with IBKR
Bitcoin Futures Product Page
https://www.interactivebrokers.com/en/index.php?f=25379
IBKR Margin Requirements
https://www.interactivebrokers.com/en/index.php?f=24176
How to update the US Social Security Number (SSN) or Individual Taxpayer Identification Number (ITIN) on your account
Background:
If you have been informed or believe that your account profile contains an incorrect US SSN/ITIN, you may simply log into your Account Management to update this information. Depending on your taxpayer status, you can update your US SSN/ITIN by modifying one of the following documents:
1) IRS Form W9 (if you are a US tax resident and/or US citizen holding a US SSN/ITIN)
2) IRS Form W-8BEN (if you are a Non-US tax resident holding a US SSN/ITIN)
Please note, if your SSN/ITIN has already been verified with the IRS you will be unable to update the information. If however the IRS has not yet verified the ID, you will have the ability to update through Account Management.
How to Modify Your W9/W8
1) To submit this information change request, first login to Account Management
2) Click on the Settings section followed by Account Settings
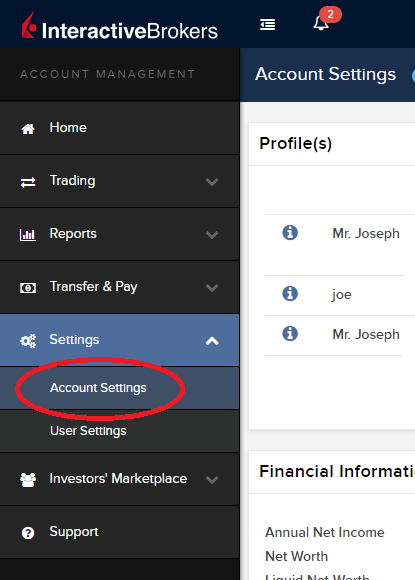
3) Find the Profile(s) section. Locate the User you wish to update and click on the Info button (the "i" icon) to the left of the User's name
.png)
4) Scroll down to the bottom where you will see the words Tax Forms. Next to it will be a link with the current tax form we have for the account. Click on this tax form to open it
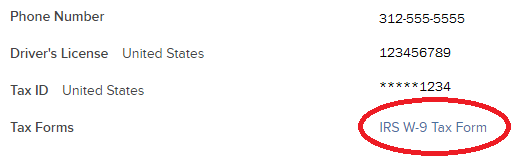
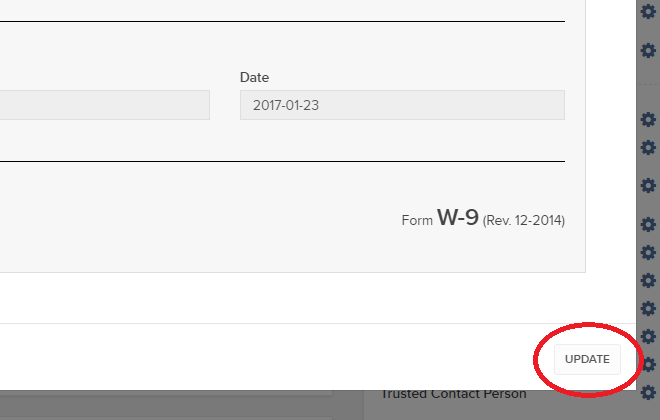
5) Review the form. If your US SSN/ITIN is incorrect, click on the UPDATE button at the bottom of the page
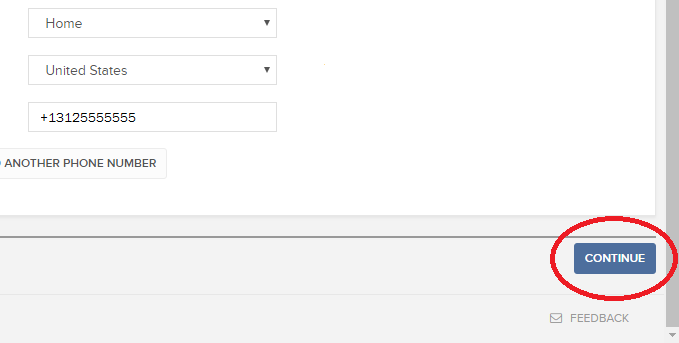
6) Make the requisite changes and click the CONTINUE button to submit your request.
7) If supporting documentation is required to approve your information change request, you will receive a message. Otherwise, your information change request should be approved within 24-48 hours.
How to adjust font size in TWS
Background:
By default, Trader Workstation (TWS) is designed to display in a font size and style which can be read comfortably for the average user across various screen sizes and resolutions. With the advent of new technologies, there has been an exponential push to make monitors with higher display sizes and your layout may need to be further adjusted manually. This document serves to explain how to manually adjust the font size for TWS.
Procedure
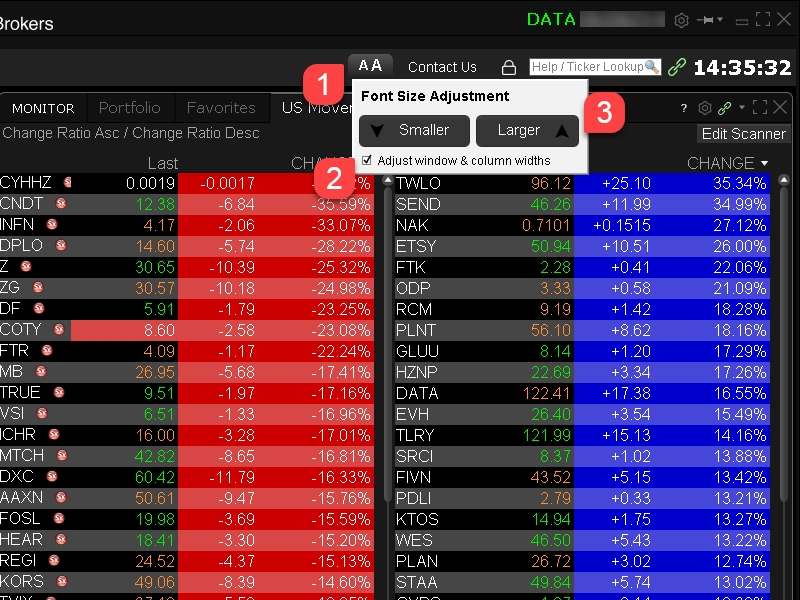
To adjust font size throughout TWS:
- From the Anchor window, click the Font Size Adjustment icon.

- Check the button Adjust window & column widths to ensure all windows will resize automatically to keep the same font:window ratio. (If unchecked, only font size will change but window size will remain the same).
- Click the button Smaller or Larger until the font size is correct.
Notice that the font size will change immediately as you click the button. - Click the Font Size Adjustment icon when done.
Note: It is possible that currently not all windows will be adjusted in the same way.
How to check and solve connectivity issues affecting the Trader Workstation (TWS)
Background:
The Trader Workstation (TWS) software needs to connect to our gateways and market data servers in order to work properly. Connectivity issues affecting your local network or your Internet Service Provider network may negatively affect the TWS functionality. In this article we will indicate how to test your connectivity using an automated connectivity test web page.
How to test the connectivity using the automated "IB Connectivity Test" web page?
1) Launch the Firefox browser and open this link with that browser: http://www.interactivebrokers.com/cgi-bin/conn_test.pl
Note: due to browser specific constraints, the above connectivity test link will only produce consistent results on the Mozilla Firefox browser. If you do not have Firefox, you can download and install it form here.
2) Please wait until all the tests have been completed and results have been displayed. If you see "Success" as outcome for all tests, your connectivity to IB Servers is reliable at the present moment. No additional connectivity troubleshooting or configuration should be needed.
3) If you see "Fail" as outcome for one or more test/s, please click on the link "Fail" itself in order to display the "IB Network Troubleshooting Guide". That section will help you conduct some manual tests to identify the cause of the failure.
Note for Corporative environments and Proxy server users: the automated "Connectivity Test" page may return misleading results in case your machine is accessing the Internet through a Proxy server. This usually happens if you are connected to a company network. If this is your case, we kindly ask you to contact your Network Administrator or your IT Team and ask them to perform a manual connectivity tests towards the destination servers indicated in the table on the top of the IB automated "Connectivity Test" web page itself. The manual connectivity test should be conducted using destination TCP ports 4000 and 4001. Should they prefer to have the server list in another format or should they need to set up the firewall / IP Management rules, you can forward them this page.
Le damos la bienvenida a Interactive Brokers
Overview:
Ahora que su cuenta ya ha sido aprobada y ha recibido fondos, puede empezar a negociar. La información siguiente le ayudará a empezar como nuevo cliente de Interactive Brokers.
- Su dinero
- Configurar su cuenta para operar
- Cómo operar
- Operar en todo el mundo
- Cinco puntos para enriquecer su experiencia IB
1. Su dinero
Información general sobre depósitos y retiradas. Todas las transacciones se administran a través de Gestión de Cuenta
Depósitos
Primero, cree una notificación de depósito a través de Gestión de Cuenta > Financiación > Transferencias de fondos > Tipo de transacción: “Depósito” Cómo crear una notificación de depósito. El segundo paso es indicar a su banco que realice la transferencia con los datos bancarios proporcionados en su notificación de depósito.
Retiradas
Cree una instrucción de retirada a través de Gestión de Cuenta > Financiación > Transferencias de fondos > Tipo de transacción: "Retiradas" Cómo crear una instrucción de retirada
Si indica una retirada que esté por encima de los límites de retirada, se considerará una retirada excepcional y, por lo tanto, tendremos que comprobar al titular de la cuenta bancaria con la cuenta IB. Si la cuenta bancaria de destino se ha utilizado para un depósito, la retirada se procesará; de lo contrario, deberá contactar con atención al cliente y proporcionar los documentos necesarios.
Solución de problemas
Depósitos: Mi banco envió el dinero, pero no lo veo acreditado en mi cuenta IB. Razones posibles:
a) Una transferencia de fondos lleva entre 1 y 4 días hábiles.
b) Falta una notificación de depósito. Debe crearla en Gestión de Cuenta y enviar un tique a Atención al Cliente.
c) Corregir los detalles que faltan. En los detalles de transferencia falta su nombre o su número de cuenta IB. Debe contactar con su banco y pedir los detalles de corrección completos.
d) Una ACH iniciada por IB está limitada a 100k USD durante un período de 7 días hábiles. Si abrió una cuenta Margen de Cartera en la que el requisito inicial fuera 110k, un depósito por giro puede ser la mejor opción de depósito para reducir el tiempo de espera para su primera operación. Si selecciona ACH, un tiempo de espera de casi 2 semanas o una reducción temporal a cuenta RegT podrían ser soluciones posibles.
Retiradas: He solicitado una retirada, pero no veo mi dinero acreditado en mi cuenta bancaria. Posibles razones:
a) Una transferencia de fondos lleva 1-4 días hábiles.
b) Rechazada. Por encima del máximo que puede retirarse. Por favor, compruebe el saldo de su cuenta bancaria. Tenga en cuenta que, debido a requisitos normativos, cuando los fondos se depositan hay un período de retención de 3 días antes de que puedan retirarse.
c) Su banco ha devuelto los fondos. Posiblemente porque los nombres de la cuenta bancaria receptora y la cuenta bancaria remitente no coinciden.
2. Configurar su cuenta para operar
Diferencia entre cuentas de Efectivo y de Margen: si ha elegido la solicitud FastTrack, de forma predeterminada su tipo de cuenta será una cuenta de efectivo con permisos para acciones estadounidenses. Si quiere apalancamiento y operar con margen, aquí puede ver cómo convertirse a una cuenta Margen RegT.
Permisos de negociación
Para poder operar en una clase de activos concreta en un país concreto, necesita obtener los permisos de negociación para ello a través de Gestión de Cuenta. Tenga en cuenta que los permisos de negociación son gratuitos; sin embargo, es posible que se le pida que firme declaraciones de riesgo requeridas por las autoridades normativas locales. Cómo solicitar permisos de negociación
Datos de mercado
Si quiere datos de mercado en tiempo real para un mercado/producto concreto, deberá suscribirse a un paquete de datos de mercado cobrado por el mercado. Cómo suscribirse a datos de mercado
El asistente a datos de mercado le ayudará a elegir el paquete adecuado. Puede ver este vídeo que explica cómo funciona.
Los clientes tienen la opción de recibir datos de mercado diferidos de forma gratuita si hacen clic en el botón datos de mercado gratuitos desde una fila de ticker no suscrito.
Cuentas de asesor
Eche un vistazo a la guía de usuario Cómo empezar como asesor. Aquí verá cómo crear usuarios adicionales para su cuenta de asesor y otorgarles acceso y mucho más.
3. Cómo operar
La Academia para Operadores es el mejor lugar para aprender a utilizar nuestras plataformas. Aquí encontrará nuestros seminarios web, en directo y grabados en 10 idiomas, visitas rápidas y documentación sobre varias plataformas de negociación.
Trader Workstation (TWS)
Los operadores bursátiles que requieran herramientas de negociación más sofisticadas pueden utilizar nuestra Trader Workstation (TWS) con diseño de creador de mercado, que optimiza su velocidad y eficacia en la negociación con una interfaz tipo hoja de cálculo fácil de utilizar, ofreciendo más de 50 tipos de órdenes, herramientas de negociación específicas para todos los estilos de negociación, un saldo de cuenta en tiempo real y seguimiento de su actividad. Pruebe los dos modelos:
TWS Mosaico: para una usabilidad intuitiva, un acceso de negociación sencillo, gestión de órdenes, listas de seguimiento y gráficos desde una sola ventana o
TWS Clásica: la Gestión de Órdenes Avanzada para operadores que necesitan herramientas y algoritmos más avanzados.
Descripción general e Información / Guía de inicio rápido / Guía de usuario
Visitas interactivas: TWS Basics / Configuración de TWS / TWS Mosaico
Cómo introducir una operación: Vídeo TWS Clásica / Vídeo Mosaico
Herramientas de negociación: Descripción general e información / Guía de usuario
Requisitos: Cómo instalar Java para Windows / Cómo instalar Java para MAC / Los puertos 4000 y 4001 deben estar abiertos
Conexión a TWS / Descargar TWS
WebTrader
Los operadores que prefieran una interfaz sencilla pueden utilizar nuestra WebTrader, basada en HTML, que facilita el ver datos de mercado, enviar órdenes y monitorizar su cuenta y sus ejecuciones. Utilice el WebTrader más actual de cada navegador
Guía de inicio rápido / Guía de usuario de WebTrader
Introducción: Vídeo WebTrader
Cómo introducir una operación: Vídeo WebTrader
Conexión a WebTrader
MobileTrader
Nuestras soluciones móviles le permiten operar con su cuenta IB desde cualquier lugar. La mobileTWS para iOS y la mobileTWS para BlackBerry están diseñadas para estos populares modelos, mientras que la genérica MobileTrader es compatible con la mayoría de otros teléfonos inteligentes.
Descripción general e información
Tipos de órdenes Tipos de órdenes disponibles y descripción / Vídeos / Visitas / Guía de usuario
Negociación simulada Descripción general e información / Cómo obtener una cuenta de negociación simulada
Una vez creada su cuenta de negociación simulada, podrá compartir los datos de mercado de su cuenta real con su cuenta de negociación simulada: Gestión de Cuenta > Gestionar Cuenta > Ajustes > Negociación simulada
4. Operar en todo el mundo
Las cuentas de IB son cuentas en multidivisas. Su cuenta puede mantener varias divisas al mismo tiempo; esto le permite operar en múltiples productos de todo el mundo desde una sola cuenta.
Divisa base
Su divisa base determina la divisa de conversión de sus extractos y la divisa utilizada para determinar requisitos de margen. La divisa base se determina cuando usted abre una cuenta. Los clientes pueden cambiar su divisa base en cualquier momento desde Gestión de Cuenta.
No convertimos automáticamente las divisas a su divisa base
Las conversiones de divisas deben ser realizadas manualmente por el cliente. En este vídeo puede ver cómo realizar una conversión de divisas.
Para abrir una posición denominada en una divisa que no tiene en su cuenta, tiene dos posibilidades:
A) Conversión de divisas.
B) Préstamo de margen IB. (No disponible para cuentas en efectivo)
Consulte este curso, que explica el funcionamiento de una transacción extranjera.
5. Cinco puntos para enriquecer su experiencia IB
1. Búsqueda de contratos
Aquí encontrará todos nuestros productos, símbolos y especificaciones.
2. Fondos de Información IB
Los Fondos de Información de IB son un conjunto de elementos diseñados para ayudar a los clientes de IB a gestionar sus cuentas e incluyen glosarios, artículos explicativos, consejos de resolución de problemas y directrices generales. Simplemente introduzca en el campo de búsqueda lo que le interesa y encontrará su respuesta.
3. Gestión de Cuenta
Del mismo modo que nuestras plataformas de negociación le dan acceso a los mercados, Gestión de Cuenta le otorga acceso a su cuenta IB. Utilice Gestión de Cuenta para gestionar tareas relacionadas con su cuenta, como el depósito o la retirada de fondos, consultar extractos, modificar suscripciones a datos de mercado y noticias, cambiar sus permisos de negociación y verificar o cambiar su información personal.
Conexión a Gestión de Cuenta / Guía rápida de GC / Guía de Usuarios GC
4. Sistema de Acceso Seguro
Para proporcionarle el mayor nivel de seguridad en línea, Interactive Brokers ha implementado un Sistema de Acceso Seguro (SAS) a través del cual el acceso a su cuenta está sujeto a una autentificación en dos factores. Esta autentificación sirve para confirmar su identidad en el momento de conexión mediante dos factores de seguridad: 1) Algo que usted conoce (la combinación de su nombre de usuario y contraseña); y 2) Algo que usted posee (un dispositivo de seguridad enviado por IB que genera un código de seguridad aleatorio y de un solo uso). Como tanto el saber su combinación nombre de usuario/contraseña como la posesión física del dispositivo de seguridad son necesarios para conectarse a su cuenta, la participación en el Sistema de Acceso Seguro elimina virtualmente la posibilidad de que alguien que no sea usted acceda a su cuenta.
Cómo activar su dispositivo de seguridad / Cómo obtener una tarjeta de código de seguridad / Cómo devolver su dispositivo de seguridad
En caso de que haya olvidado su contraseña y haya perdido su tarjeta de código de seguridad, llámenos para le ayudemos de inmediato.
5. Extractos e informes
Fáciles de ver y de personalizar, nuestros extractos e informes cubren todos los aspectos de su cuenta Interactive Brokers. Cómo ver un extracto de actividad