How to set up sFTP for using Certificate Authentication on Linux
These instructions apply to users who are receiving their statements via sFTP. If you elected to receive your statements via sFTP, you would first need to generate an RSA Key pair.
There are many Linux distributions and there are multiple methods to access the IBKR sFTP server. sFTP clients such as Filezilla can be used. In this article we explain how to realize the connection to the IBKR FTP server using Ubuntu Linux and Filezilla.
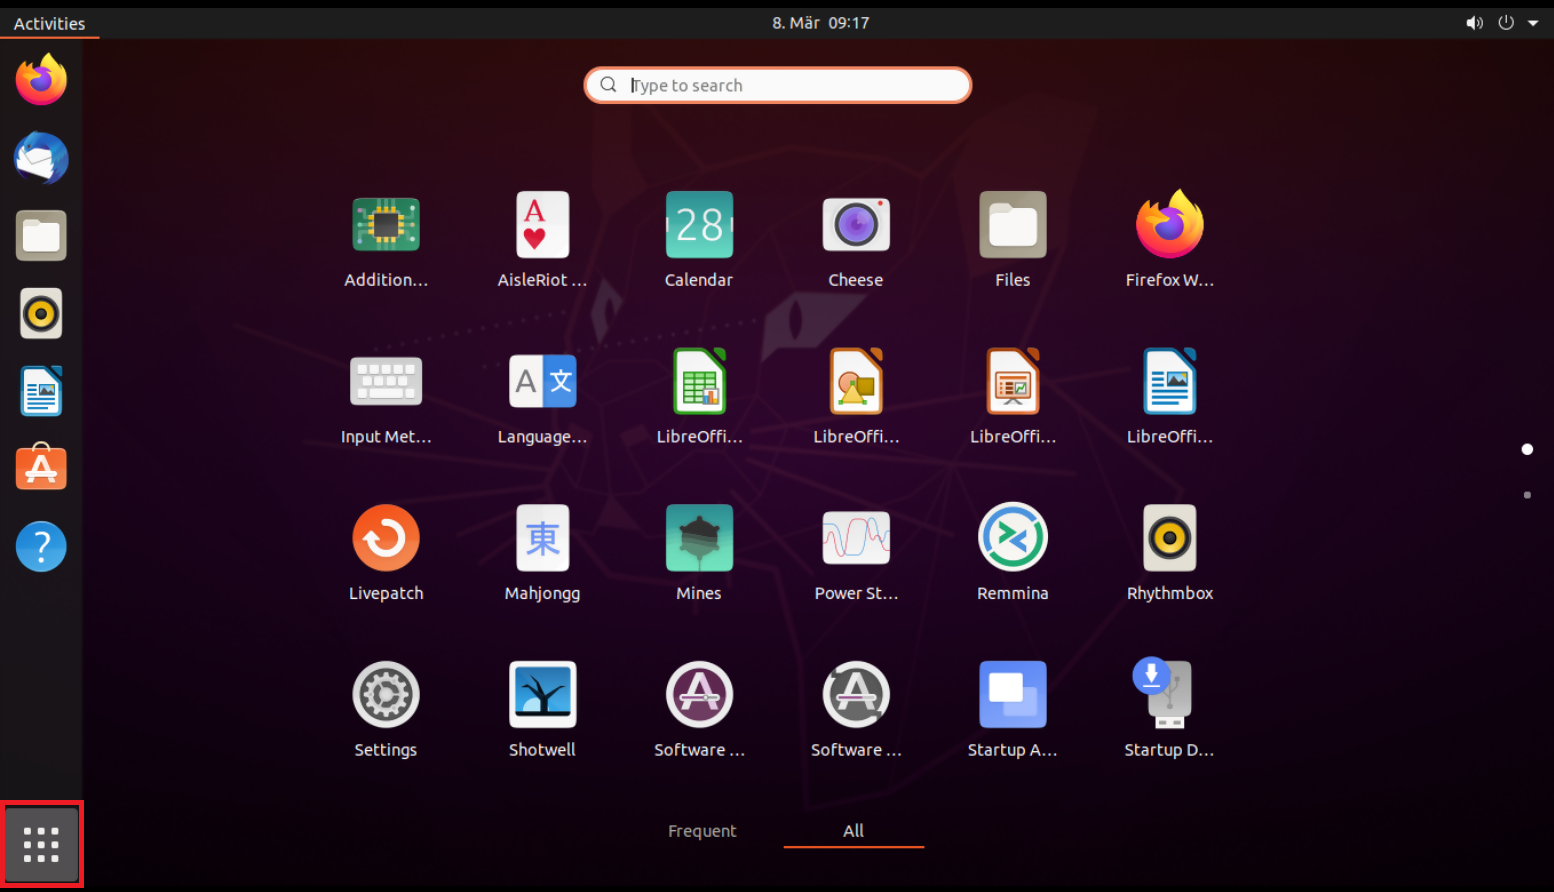
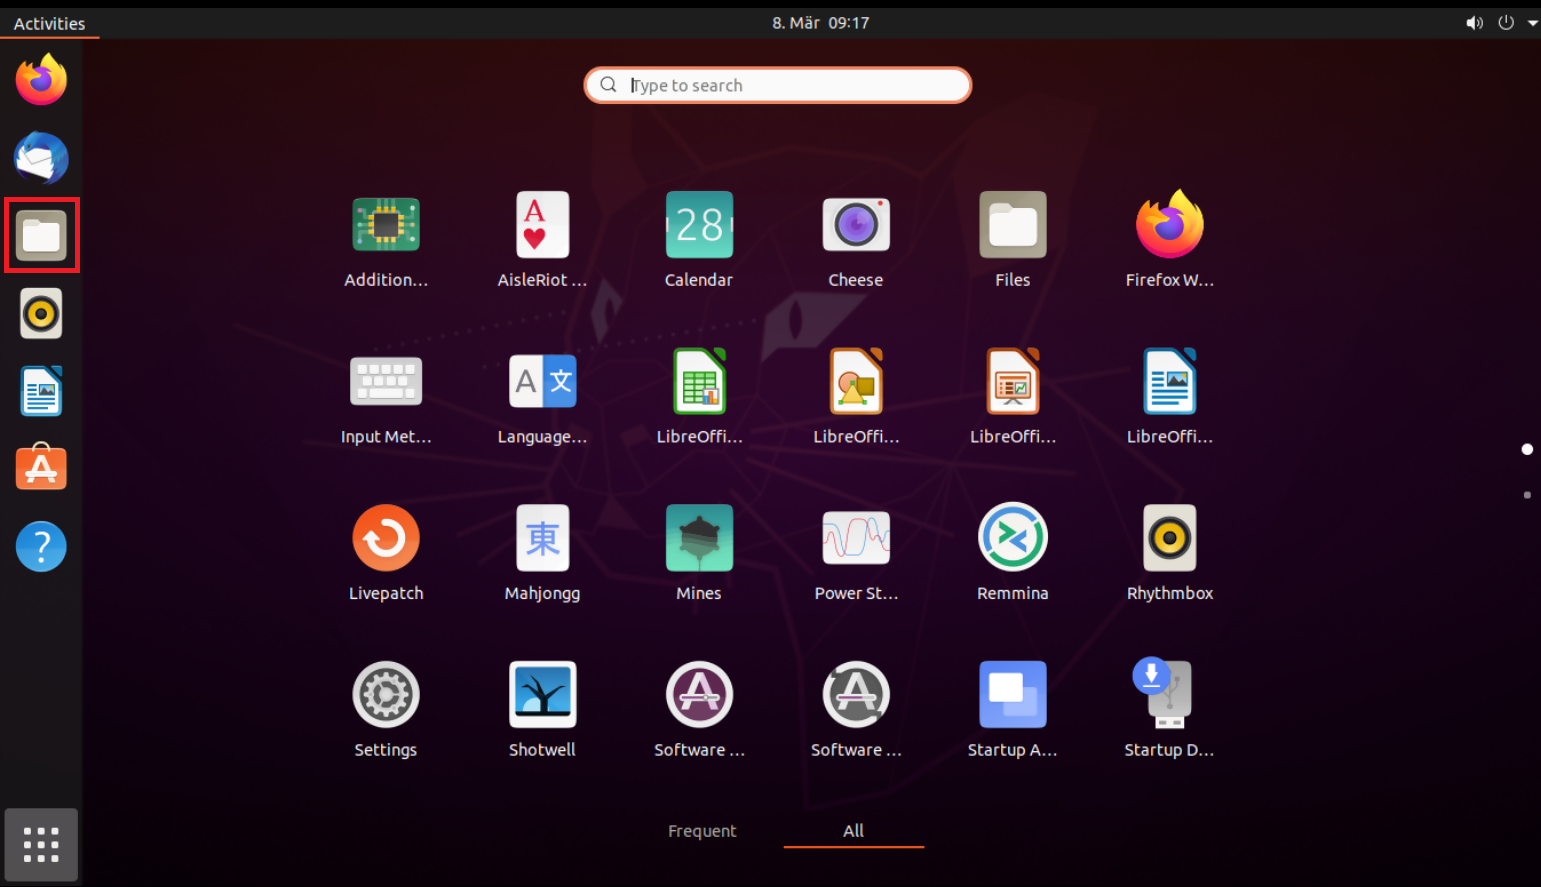
1. On your Linux machine, click on the Applications icon in the bottom left corner of you screen.
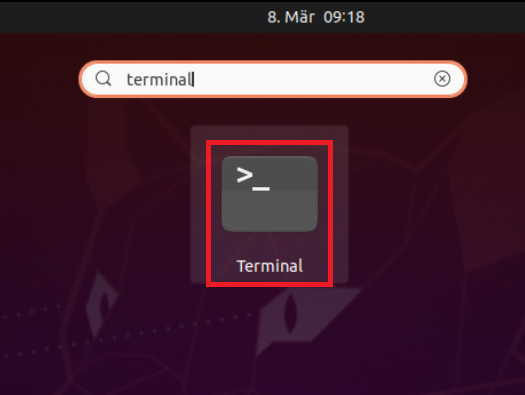
2. In the search box, type terminal and then click on the Terminal icon in the search results.
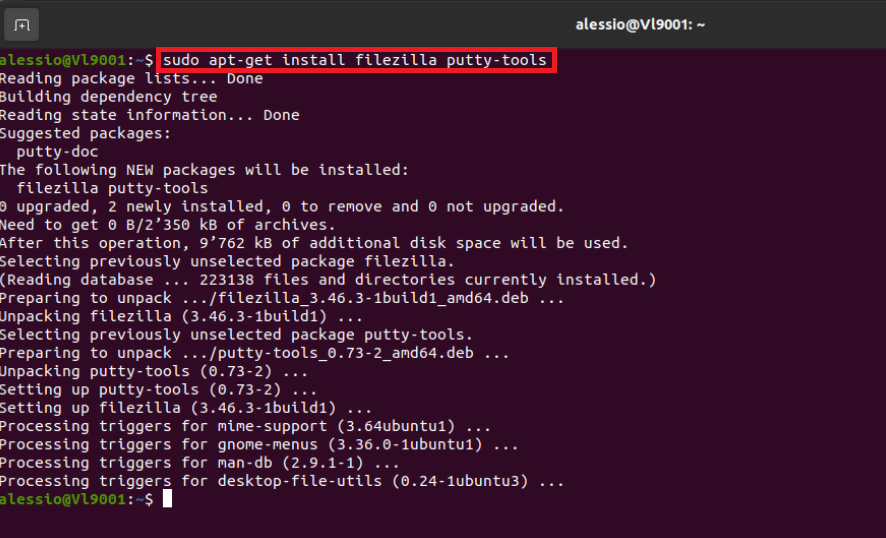
3. In the Terminal window, type sudo apt-get install filezilla putty-tools in order to install the required software. Enter your sudo password when requested.
4. Once the software installation is complete, type puttygen -t rsa -b 2048 -o privatekey.ppk in order to generate the RSA Key pair.
You will be asked to enter a passphrase and type it again to confirm.
PLEASE NOTE: Keeping a secure copy of this password is essential. Any loss of this password will require the whole process to be repeated.

5. Type puttygen -L privatekey.ppk -o public.key in order to export the public part of the Key pair to the file public.key

7. In the search box, type FileZilla and then click on the FileZilla icon in the search results.

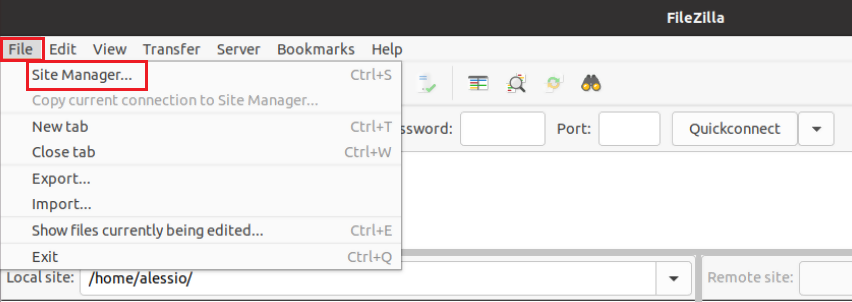
8. Click on the FileZilla top menu File -> Site Manager...
9. In the Site Manager window, click on the button New site to create a new connection.
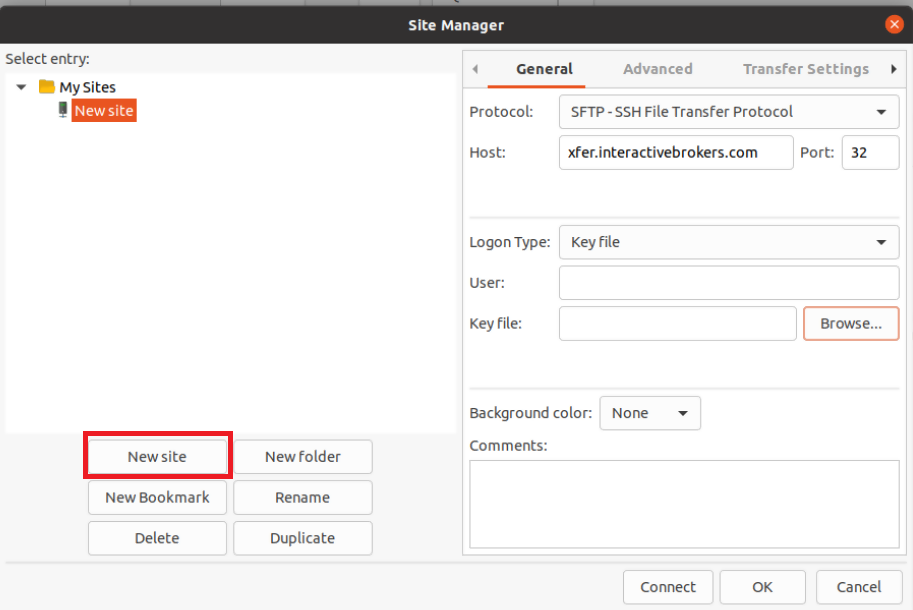
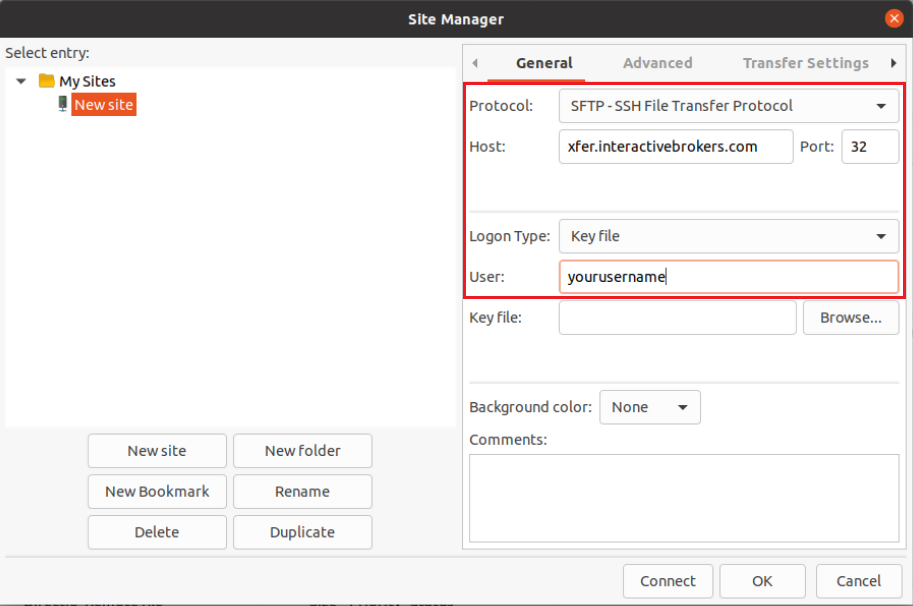
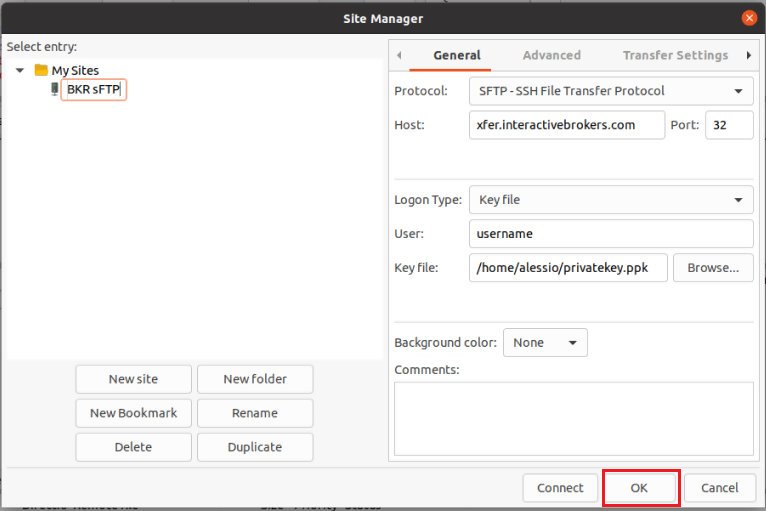
10. In the right panel (called General):
- Select SFTP - SSH File Transfer Protocol as Protocol
- Enter xfer.interactivebrokers.com in the Host field
- Enter 32 in the Port field
- Select Key file as Logon Type
- Enter the username provided to you by Interactive Brokers in the User field
11. Click on Browse next to the Key file field.
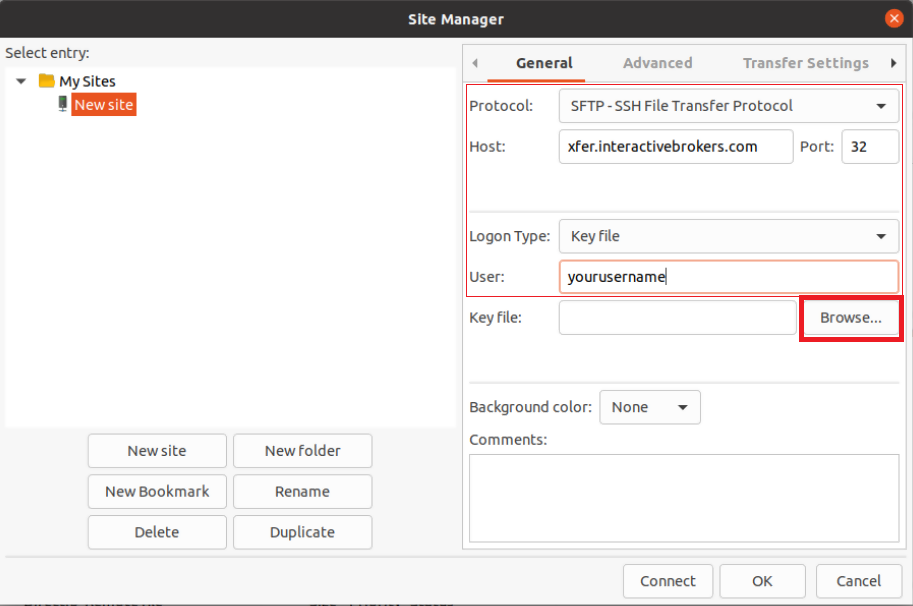
12. Move to the folder where your Key pair was created (normally your user folder: /users/yourusername/). Select the file privatekey.ppk and click on the Open button. This will set it as the Key file in your connection parameters.

13. Click on Rename and select a name of your preference for this connection (e.g. IBKR sFTP). Press Enter to confirm the name.
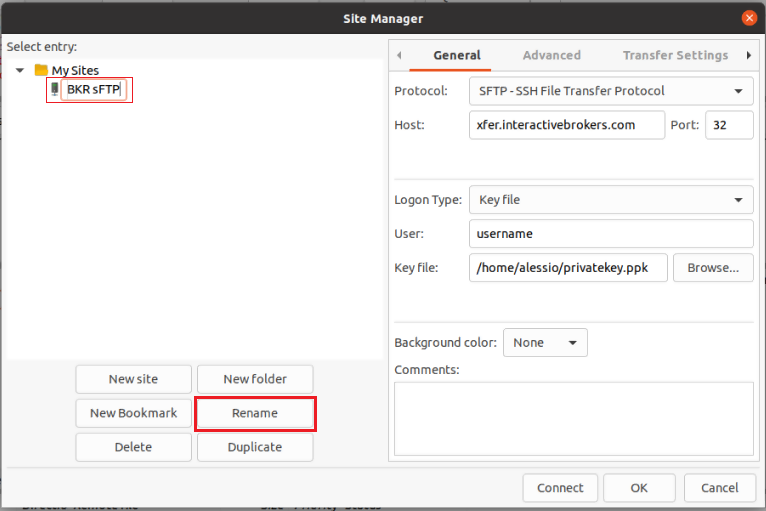
14. Click on OK to save your connection parameters.
15. Click on the folder icon on the left hand toolbar of your Desktop. This will launch the File application.
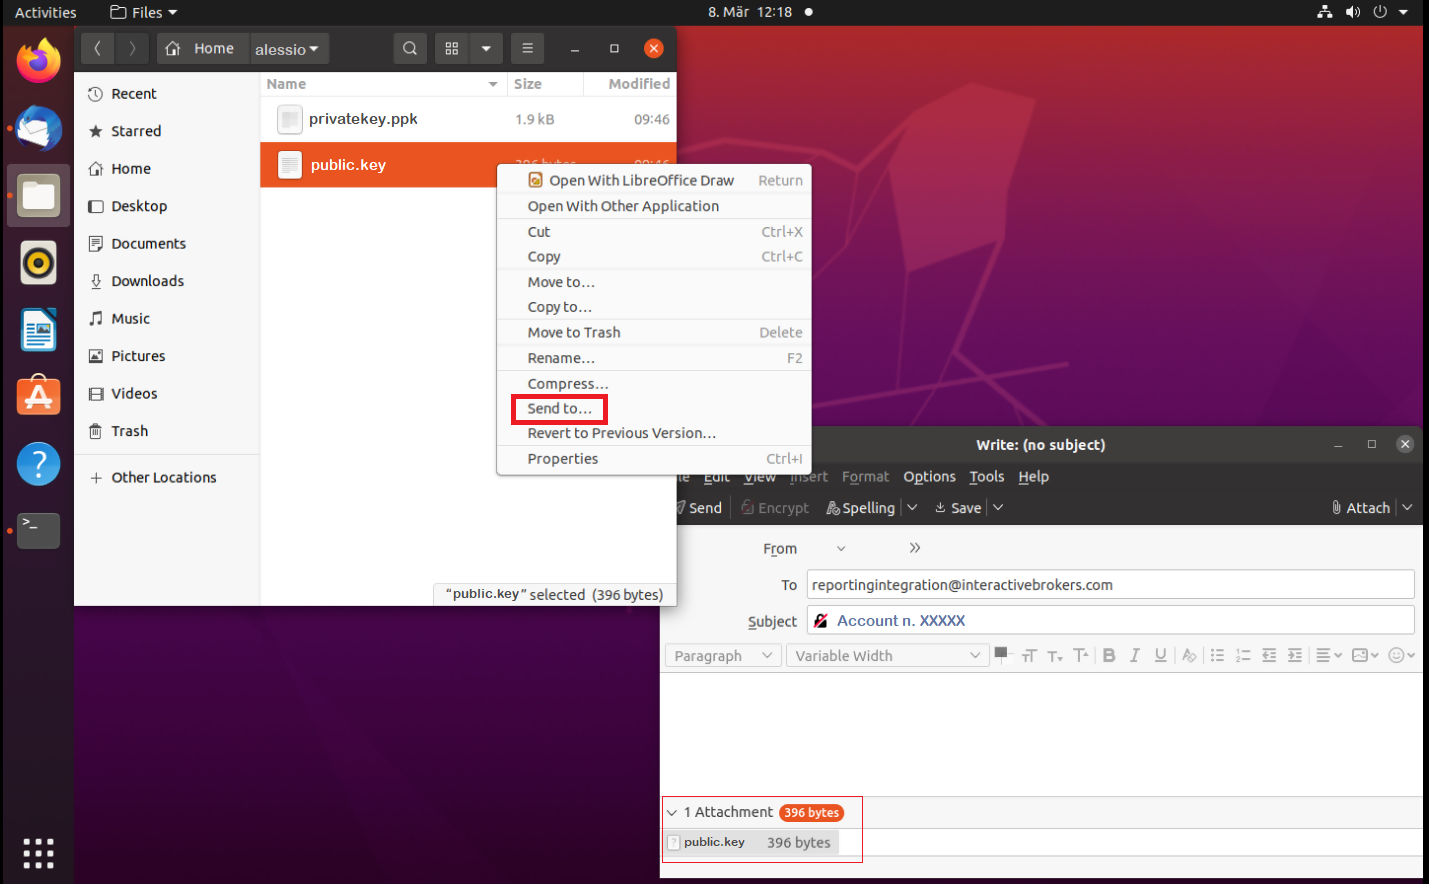
16. Move to the folder where you saved your Key pair (normally your user folder: /users/yourusername/). Right click on the file public.key and select Send to...
The file will be attached to an empty email. Send the email to the Reporting Integration Team, as per IBKB3842.
Important Note: do NOT send us your private key. Send us only your public one
Once IBKR has configured the parameters for your connection on our servers, you will be notified. After that, you will be able to access your sFTP repository by using the Site connection you have created in FileZilla. In case you have not yet set up a Site connection, please follow the steps from 6. to 14. which are a prerequisite to the below steps:
1. Click on the Applications icon in the bottom left corner of you screen.

2. In the search box, type FileZilla and then click on the FileZilla icon in the search results.
3. On the FileZilla top toolbar, click the down arrow icon and select the Site connection you previously created (e.g. IBKR sFTP)

4. FileZilla will now establish a connection to our sFTP Server and show the files present in your repository.
Common issues and solutions
A. The Login Credentials Provided are Incorrect
-
Ensure the correct login details are being used to connect to the sFTP server. The username and password you are entering should match the ones you have received from the Reporting Integration Team.
-
Confirm you have configured your sFTP Client to use the Private Key file for the logon authentication (see steps 9. and 10. of the above procedure.)
B. Server Refused Our Key
-
Try accessing the sFTP server using a different Client (CyberDuck, ect.)
-
Ensure the Private Key file being used to Authenticate the server login attempt is related to the Public Key you originally sent to the Reporting Integration Team.
-
Should the above checks be unable to resolve the issue, please generate a new RSA Public/Private Key pair and send only the Public part to the Reporting Integration Team, as per IBKB3842.
C. Connection Timed Out
-
In case you have an antivirus or a security software installed on your machine, make sure it is not blocking the FTP connection attempt. Normally, security software allows to set up exceptions for specific connections in order to whitelist them.
-
Verify that the public IP Address of the machine running the sFTP client, is the same you have originally provided to the Reporting Integration Team for being whitelisted. You can discover your public IP Address by searching the Internet for “what is my IP”. If your current IP Address is not the same you provided to us, please send it to our Reporting Integration Team for being whitelisted.
-
Ask your network administrator/s to confirm that your firewall allows both incoming and outgoing traffic from/to xfer.interactivebrokers.com on port TCP 32.
-
Should the above steps be unable to resolve the issue, please generate a new RSA Public/Private Key pair and send only the new Public part to our Reporting Integration Team, as per IBKB3842.
References
KB3968 - Generate a key pair using GPG for Windows
KB4205 - Generate a key pair using GPG Suite on macOS
KB4108 - Decrypt your Reports using GPG for Windows
KB4210 - Decrypting Reports using your PGP Key pair on macOS
KB4407 - Generate RSA Key Pair on Windows
KB3968 - Generate a key pair using GPG for Windows
KB4205 - Generate a key pair using GPG Suite on macOS
KB4108 - Decrypt your Reports using GPG for Windows
KB4210 - Decrypting Reports using your PGP Key pair on macOS
KB4407 - Generate RSA Key Pair on Windows
KB4578 - How to Access your Reports using FTP on Windows
KB4580 - How to Access your Reports using FTP on MacOS
KB4409 - How to set up sFTP for using Certificate Authentication on Windows
KB4410 - How to set up sFTP for using Certificate Authentication on macOS
KB4411 - How to backup your public/private Key pair
KB4323 - How to transfer your public/private key pair from one computer to another
KB4410 - How to set up sFTP for using Certificate Authentication on macOS
KB4411 - How to backup your public/private Key pair
KB4323 - How to transfer your public/private key pair from one computer to another
Cryptocurrency Trading at Interactive Brokers Hong Kong
How do I trade cryptocurrency with Interactive Brokers HK?
Before you can trade cryptocurrencies, you need to log into Client Portal and request Cryptocurrency trading permissions. To add the trading permissions:
- Login into Client Portal and selecting the User menu (head and shoulders icon in the top right corner) followed by Settings
- Under Account Settings find the Trading section and click on Trading Permissions.
- Select Cryptocurrency permissions and complete the steps on screen.
Please note, you must be a “Professional” Investor in order to be eligible for Cryptocurrency trading permissions.
Once trading permissions are approved you will be able to trade Bitcoin (BTC) or Ethereum (ETH) in the same way that you trade other products via your Interactive Brokers HK account. Search for the symbol and open it in Quote Details or add it to your Watchlist. Select the symbol to trade, then complete the available parameters to create and then submit the order.
What cryptocurrencies can I trade with Interactive Brokers HK?
Interactive Brokers HK currently offers trading in Bitcoin (BTC) and Ethereum (ETH).
Where are my cryptocurrency assets held?
Cryptocurrency trading through Interactive Brokers Hong Kong is powered by OSL Digital Securities, the world's first Type 1 and 7 Securities and Futures Commission (SFC)-licensed digital asset brokerage and trading platform for professional investors. Interactive Brokers HK customer positions will be maintained 100% in wallets in cold storage with OSL Digital Securities.
What are the trading hours for crypto trading?
IBHK supports cryptocurrency opening and closing trades from Sunday at 3 AM EST through Friday at 4PM EST.
Only closing trades (sells) are supported from Friday at 4 PM EST through Sunday at 3 AM EST.
Who is eligible to trade cryptocurrency with Interactive Brokers HK?
You must be a Professional Investor in order to qualify for Cryptocurrency trading. Eligible clients include individuals with over HKD 8 million in investable assets or institutions with assets greater than HKD 40 million who are residents of Hong Kong.
Are there added spreads or markups for cryptocurrency trades? What are the commissions on crypto trades?
No, there are no added spreads or markups. Cryptocurrency trading on Interactive Brokers’ platform has a low commission of just 0.20% to 0.30% of trade value depending on monthly trade volume with a USD 2.25 minimum per order.
A monthly custody fee of 8 basis points will also be charged on the average daily value of cryptocurrency held in your account.
What order types can I use for cryptocurrency orders?
You can trade cryptocurrencies only using Market or Limit orders. Market orders can be submitted in cash value only (e.g. $10000 worth of BTC). Limit orders can be submitted in either trade value or quantity terms, but the entered trade value will be converted to quantity and transmitted to OSL in quantity terms.
Are cryptocurrency positions marginable?
No, cryptocurrency positions are not marginable.
Can I deposit Bitcoin into/withdraw Bitcoin from my Interactive Brokers HK account?
No, deposits and withdrawals in Bitcoin/Ethereum are not supported.
Are there limits on the amount of cryptocurrency that can be traded/held in my Interactive Brokers HK account?
Cryptocurrency trading is limited to the lesser of 10% of the account’s total equity or USD 1 million.
Can I short-sell cryptocurrencies in my Interactive Brokers HK account?
No, IBHK does not support the short-selling of cryptocurrencies.
How long does it take for cryptocurrency trades to settle at Interactive Brokers HK?
Cryptocurrency trades settle in real time.
What is the minimum order size for cryptocurrency trades at Interactive Brokers HK?
The minimum order size for cryptocurrency trades at Interactive Brokers HK is USD 10.
What times-in-force can I use when trading cryptocurrencies with Interactive Brokers HK?
Times-in-force for BUY limit orders:
- IOC: Immediate or cancel
- Minutes: Order is canceled if not filled within five (5) minutes.
Times-in-force for SELL orders:
- IOC: Immediate or cancel
- Minutes: Order is canceled if not filled within five (5) minutes.
- Day: Order is canceled if not filled by the end of the trading day.
- GTC: Good til Canceled
So lädt man ein diagnostisches Bündel von einer IBKR-Plattform hoch
Übersicht:
Bei manchen unterstützungstechnischen Fragen müssen diagnostische Dateien und Logdateien zusammen mit Screenshots hochgeladen werden. Diese Informationen helfen unserem Team bei der Untersuchung und Lösung des Problems.
In diesem Artikel wird ausführlich beschrieben, wie Sie bei Interactive Brokers diagnostische Dateien und Logdateien auf verschiedenen Plattformen hochladen können.
Hinweis: Das diagnostische Bündel-Repository wird von IBKR tagsüber nicht fortlaufend kontrolliert. Sollten Sie sich ohne vorherige Anweisung von Interactive Brokers spontan dazu entscheiden, ein diagnostisches Bündel hochzuladen, melden Sie sich bitte telefonisch bei unserem Kundendienst oder erstellen Sie ein Ticket über das Nachrichtencenter. Anderenfalls bleibt Ihre Fehlermeldung unbeachtet.
Bitte klicken Sie je nach der Plattform, die Sie verwenden, unten auf den passenden Link:
-
IBKR Mobile (Android)
-
IBKR Mobile (iOS)
1. Melden Sie sich bei TWS an und versuchen Sie, das aufgetretene Problem zu replizieren.
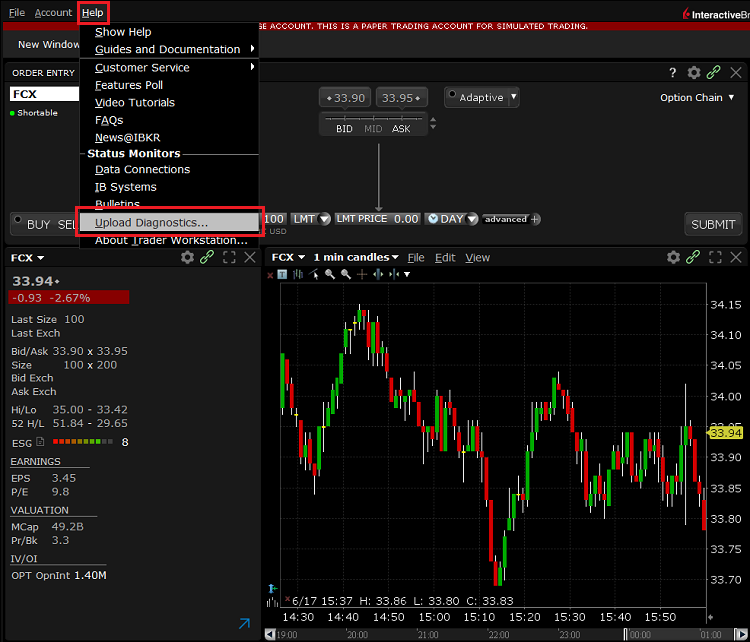
2. Drücken Sie oben links auf ,Hilfe' und wählen Sie ,Diagnostik hochladen' aus. Alternativ können Sie je nach Betriebssystem die folgenden Tastaturkombinationen verwenden
- Bei Windows- und Linux-Betriebystemen: Drücken Sie Ctrl+Alt+Q
- Bei Mac: Drücken Sie Cmd+Option+H
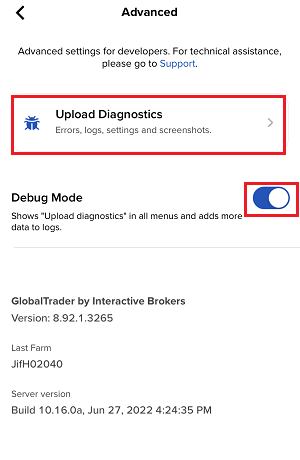
3. Das Fenster ‚Diagnostik hochladen' wird angezeigt. Sie können den Grund für das Hochladen der Diagnostik in das Textfeld eingeben
4. Wenn Sie von einem Interactive Brokers-Mitarbeiter gebeten werden, Logdateien vorheriger Tage bereitzustellen oder beim Hochladen der Diagnostik bestimmte Optionen auszuwählen, klicken sie auf das Dropdownmenü in der rechten oberen Ecke, wählen Sie ‚Erweiterte Ansicht’ aus und markieren Sie die entsprechenden Checkboxen, die unten links erscheinen.
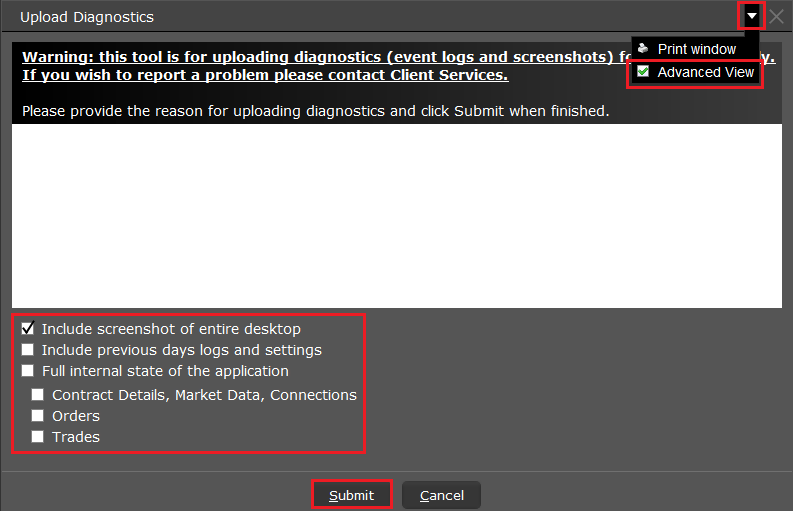
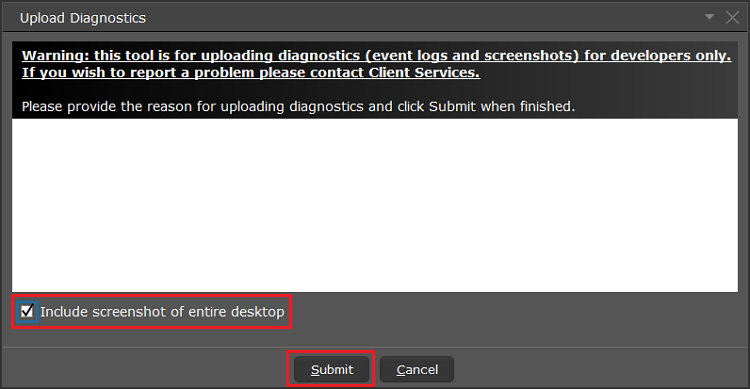
5. Vergewissern Sie sich, dass die Checkbox ‚Screenshots des gesamten Desktops hinzufügen‘ aktiviert ist und klicken Sie auf ‚Abschicken‘
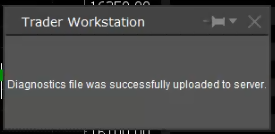
6. Bitte stoppen Sie alle Aktivitäten auf Ihrem Computer bis Sie unten das Dialogfenster sehen, wodurch bestätigt wird, dass die Diagnostik erfolgreich hochgeladen wurde.
A) Wenn Sie sich auf dem Anmeldeschirm befinden:
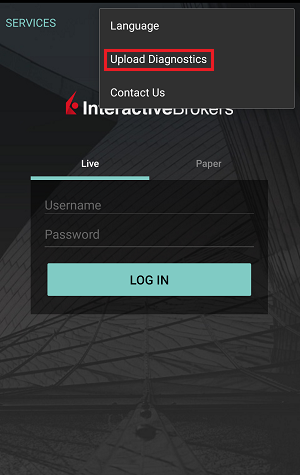
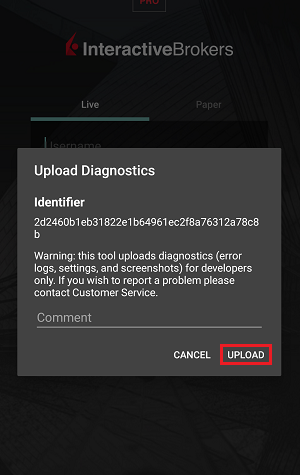
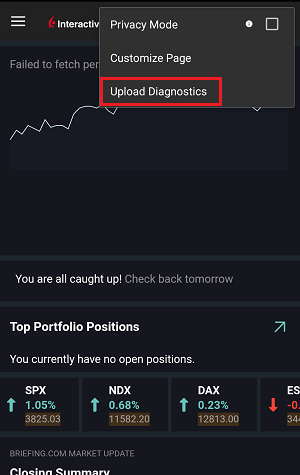
1. Tippen Sie auf das Symbol mit den drei Punkten in der rechten oberen Ecke und wählen Sie ‚Diagnostik hochladen‘ aus
2. Fügen Sie Ihren Benutzernamen in das Eingabefeld ein und tippen Sie auf ‚Hochladen‘
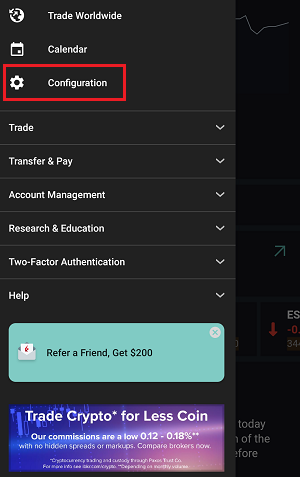
1. Tippen Sie auf das Symbol mit den drei Punkten in der linken oberen Ecke und wählen Sie Menü aus
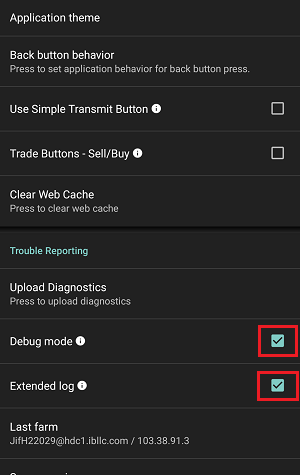
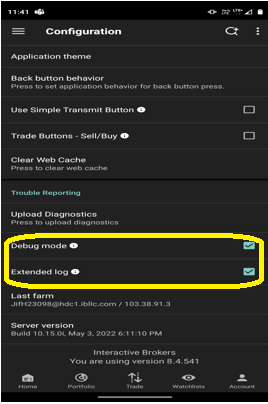
2. Tippen Sie auf ,Konfigurieren’> ,Störungsmeldung’> und aktivieren Sie die Checkbox neben ‘Debugmodus’
3. Wenn ein Interactive Brokers-Mitarbeiter Sie darum bittet, aktivieren Sie bitte auch die Checkbox neben ‚Erweitertes Log'
5. Tippen Sie auf das Symbol mit den drei Punkten in der rechten oberen Ecke des Bildschirms und wählen Sie ‚Diagnostik hochladen‘ aus‘
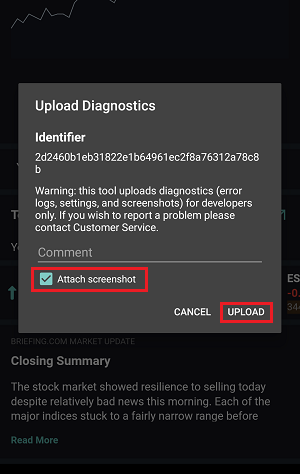
6. Geben Sie Ihre Anmerkungen im Eingabefeld ein und aktivieren Sie die Checkbox neben ,Screenshot anhängen’. Tippen Sie dann auf ,Hochladen’
A) Wenn Sie sich auf dem Anmeldeschirm befinden:
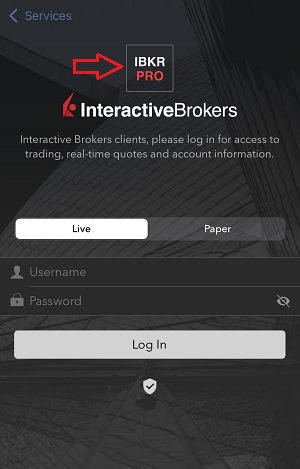
1. Tippen Sie drei Mal in schneller Folge auf das IBKR-Logo, um das Testmenü zu öffnen
2. Aktivieren Sie unter Konfigurieren den Umschalt-Button neben ,Debugmodus’
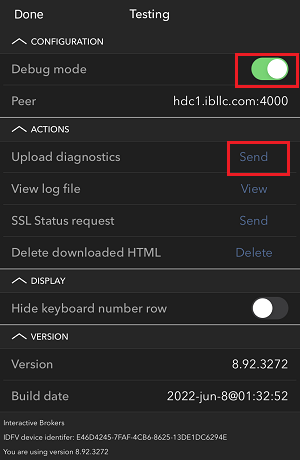
3. Tippen Sie auf ,Abschicken’ neben ,Diagnostik hochladen’
4. Geben Sie Ihren Benutzernamen in das Eingabefeld ein und tippen Sie auf ‚OK‘
1. Ziehen Sie Screenshots heran, die das aufgetretene Problem direkt auf Ihrem Handy visualisieren (gleichzeitig auf die Buttons ‚An‘ + ‚Lautstärke erhöhen‘ drücken)
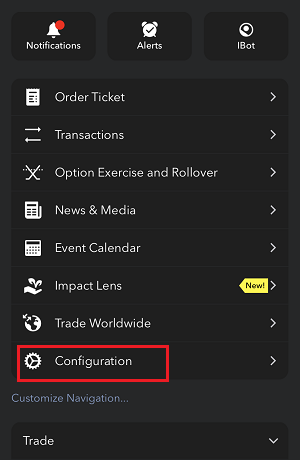
2. Tippen Sie auf die Option ‚Mehr‘ in der rechten unteren Ecke des Bildschirms.
3. Tippen Sie auf ‚Konfigurieren’ und erweitern Sie den Abschnitt ‚Störungsmeldung’
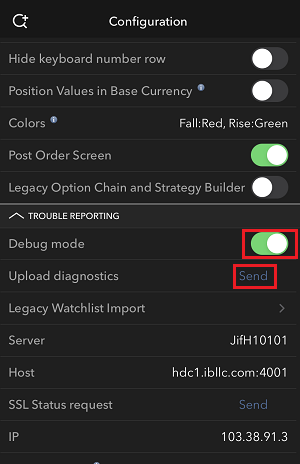
4. Aktivieren Sie den Umschalt-Button neben ‚Debugmodus’ und neben ‚Diagnostik hochladen’, tippen Sie auf ‚Abschicken’
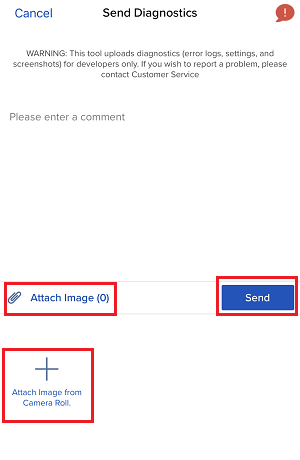
5. Die Seite ‚Diagnostik abschicken’ wird angezeigt. Geben Sie Ihre Anmerkungen im Eingabefeld ein
6. Tippen Sie auf den Button ‚Bild anhängen', um Screenshots des Problems, das Sie in Ihrer Kamerarolle gespeichert haben, anzuhängen
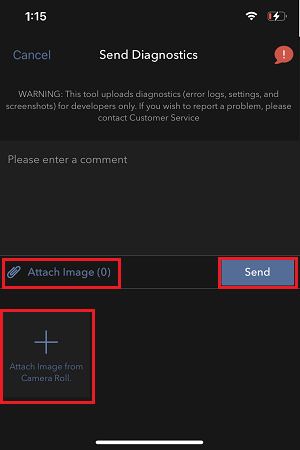
7. Tippen Sie auf ‚Abschicken’
1. Melden Sie sich bei der App an
2. Tippen Sie auf das Benutzersymbol oben links und wählen Sie ‚Einstellungen' aus

3. Tippen Sie auf die Option ‚Erweitern’ und aktivieren Sie den Umschalt-Button neben ‚Debugmodus’
4. Wenn ein Interactive Brokers-Mitarbeiter Sie darum bittet, aktivieren Sie bitte auch die Checkbox neben ‚Erweitertes Log'
5. Ein Dialogfeld ‘Diagnostik hochladen’ wird angezeigt. Geben Sie Ihre Anmerkungen in das Feld ein und tippen Sie auf ‚Hochladen’
Note: Wenn Sie uns Screenshots von IMPACT oder IBKR GlobalTrader für Android schicken möchten, müssen Sie diese einem Webticket des Nachrichtencenters anhängen, wie bereits in IBKB1071erklärt
1. Melden Sie sich bei der App an
2. Ziehen Sie Screenshots heran, die das aufgetretene Problem direkt auf Ihrem Handy visualisieren (gleichzeitig auf die Buttons An + Lautstärke erhöhen drücken)
3. Tippen Sie nun auf das Benutzersymbol oben links und wählen Sie ‚Einstellungen' aus
4. Tippen Sie auf ‚Erweitert’
5. Aktivieren Sie den Umschalt-Button neben ‘Debugmodus’ und tippen Sie auf ‚Diagnostik hochladen’
6. Der Bildschirm ‚Diagnostik abschicken’ wird angezeigt
7. Geben Sie Ihre Anmerkungen in das Feld ein und tippen Sie auf ‚Bild hinzufügen‘, um den/die Screenshot/s, den/die Sie auf der Kamerarolle gespeichert haben, hinzuzufügen
8.. Tippen Sie auf ‚Abschicken'
Eine diagnostische Ablaufverfolgung für Client Portal kann mittels der Schritte in IBKB3512 nachverfolgt werden
How to Access Your Reports Using FTP on Windows
Übersicht:
This tutorial assumes you received reports via email or via FTP that were encrypted with the public key you sent to IBKR. If you need guidance to set up the encrypted statement delivery, please refer to this article, which is a prerequisite to the instructions below.
There are multiple methods to access the IBKR FTP server. FTP clients such as Filezilla can be used or you could as well launch the command ftp ftp2.interactivebrokers.com from the Command Prompt or use the Windows Explorer. In this article, we explain how to realize the connection to the IBKR FTP server using Windows Explorer.
Important Note: You will not be able to connect using your browser.
Once you are connected to the IBKR FTP Server, you will have both read and write access to your folder. The retention policy for the files is 100 days - IBKR will automatically purge files after that.
To access your reports using Windows File Explorer:
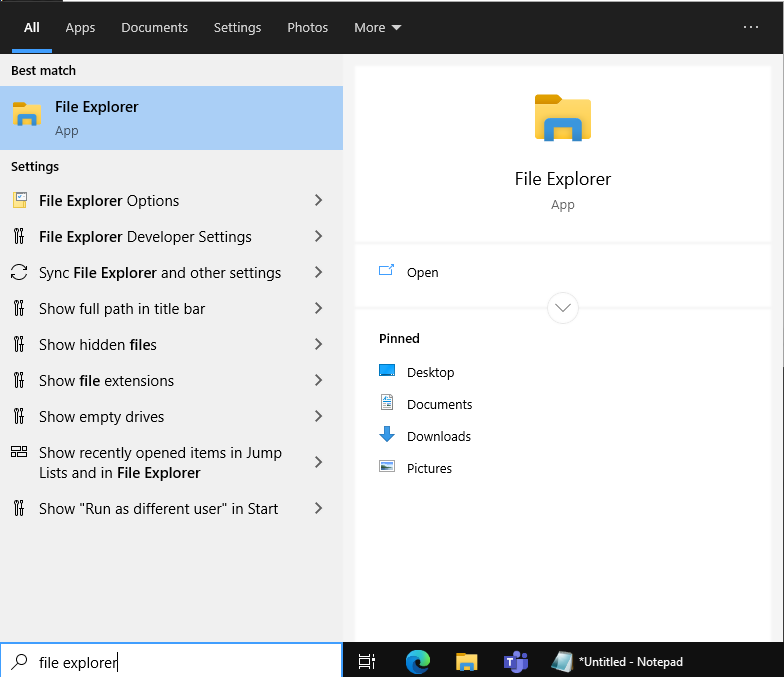
1. Open the Windows File Explorer by either pressing Windows Key + E on the keyboard. Alternatively, you can type File Explorer into the Windows search box and click on Open
2. In the File Explorer window, type the FTP address, ftp://ftp2.interactivebrokers.com, into the file path at the top of the window and hit Enter.
.png)
3. A window prompting your for credentials will appear. Enter the FTP username and password IBKR provided you with into the correspondent fields and click Log On.
.png)
4. You now have direct access to your FTP folder. Documents and files contained in your FTP folder can now be decrypted using your PGP key, as described in IBKB4108.
.png)
Common issues and solutions
A. Could not log in to the FTP server with the username and password specified
Ensure the correct login details are being used to connect to the FTP server. The username and password you are entering should match the ones you have received from the Reporting Integration Team.
B. Connection Timed Out
-
Enable the Passive (PASV) mode for FTP connections. press Windows Key + S, type Internet Options and open the panel. Move to the Advanced tab and activate the option Use Passive FTP (for firewall and DSL modem compatibility). The passive mode is more firewall-friendly then the active one, since all the connections are initiated from the Client side. If you are using a specific FTP Client, check its connection settings or advanced settings in order to find and enable the Passive (PASV) mode switch.
-
In case you have an antivirus or a security software installed on your machine, make sure it is not blocking the FTP connection attempt. Normally, security software allows to set up exceptions for specific connections in order to whitelist them.
-
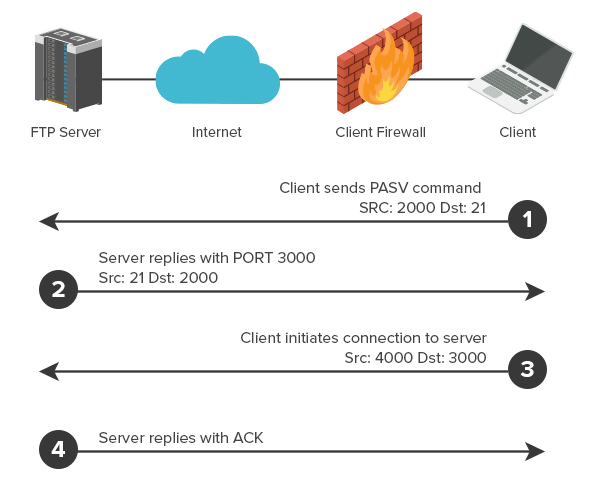
Should the above steps be unable to resolve the issue, ask your network administrator/s to confirm that your firewall allows traffic from/to ftp2.interactivebrokers.com. Note: Your network administrator should consider that every time your FTP Client attempts connecting to our FTP server with Passive mode, it establishes two connections: a command channel (outbound, from random TCP port above 1024 to TCP port 21) and a data channel (outbound, from a random TCP port above 1024 to the TCP port above 1024 which was negotiated through the command channel). Both connections are initiated by the Client side. In the picture below, you can find an example of this connections schema. Please notice that the ports 2000, 3000, 4000 are examples of randomly selected ports and may very well not correspond to the ones used within your specific FTP connection attempt.
References
KB3968 - Generate a key pair using GPG for Windows
KB4205 - Generate a key pair using GPG Suite on macOS
KB4108 - Decrypt your Reports using GPG for Windows
KB4210 - Decrypting Reports using your PGP Key pair on macOS
KB4407 - Generate RSA Key Pair on Windows
KB4580 - How to Access your Reports using FTP on MacOS
KB4409 - How to set up sFTP for using Certificate Authentication on Windows
KB4410 - How to set up sFTP for using Certificate Authentication on macOS
KB4411 - How to backup your public/private Key pair
KB4323 - How to transfer your public/private key pair from one computer to another
KB4409 - How to set up sFTP for using Certificate Authentication on Windows
KB4410 - How to set up sFTP for using Certificate Authentication on macOS
KB4411 - How to backup your public/private Key pair
KB4323 - How to transfer your public/private key pair from one computer to another
So erstellt man eine ".har"-Datei
Background:
Bei der Behebung von nicht-trivialen Websiteproblemen benötigt unser Kundenteam gelegentlich zusätzliche Informationen über die Browserkommunikation. Es ist nicht auszuschließen, dass Sie einmal gebeten werden, eine .har -Datei zu erstellen und bereitzustellen. Eine solche Datei enthält zusätzliche Informationen über die Netzwerkanfragen, die von Ihrem Browser gesendet und empfangen werden. Die entsprechende Datei wird von Ihrem Browser bei der Speicherung des Inhalts, des Zeitrahmens und des Status der HTTP/HTTPS-Anfragen zum Zeitpunkt des Fehlerauftritts erstellt.
In diesem Artikel erläutern wir, wie Sie eine .har-Datei erstellen können. Bitte klicken Sie auf der Liste unten auf den von Ihnen verwendeten Browser:
So erstellen Sie die HAR-Datei in Google Chrome:
1. Öffnen Sie Google Chrome und wechseln Sie zu der Seite, wo das Problem auftritt.
2. Drücken Sie auf Ihrer Tastatur auf CRTL +SHIFT + I. Klicken Sie als Alternative auf das Chrome-Menüsymbol (drei vertikale Punkte oben rechts im Browserfenster) und wählen Sie Mehr Tools > Entwickler-Tools aus.
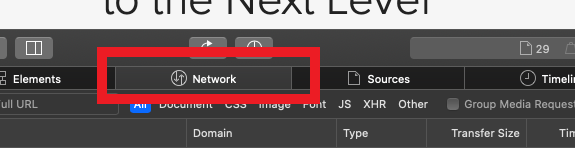
3. Durch Entwickler-Tools wird ein angedocktes Panel an der Seite oder am unteren Rand von Chrome geöffnet. Wählen Sie den Reiter Network (Abbildung 1.) aus.
Abbildung 1.
.png)
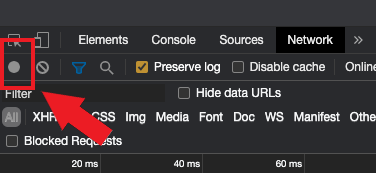
4. Suchen Sie den runden Button Aufzeichnen in der oberen linken Ecke der Symbolleiste der Entwicklertools und vergewissern Sie sich, dass er aktiviert ist. Wenn er grau ist, drücken Sie einmal darauf, um die Aufzeichnung zu starten oder drücken Sie auf CTRL+E (Abbildung 2.)
Abbildung 2.
5. Markieren Sie das Ankreuzfeld Log aufbewahren (Abbildung 3.)
Abbildung 3.
.png)
6. Klicken Sie auf den Button Löschen, um alle vorhandenen Logs zu löschen. Der Button Löschen hat ein Stopp-Symbol und befindet sich rechts neben dem Button Aufzeichnen (Abbildung 4.)
Abbildung 4.
![]()
7. Replizieren Sie das Problem, das während der Aufzeichnung der Netzwerkanfragen auftritt.
8. Wenn Sie das Problem repliziert haben, klicken Sie mit der rechten Maustaste auf eine beliebige Stelle in der Liste der aufgezeichneten Netzwerkanfragen, wählen Sie Alle als HAR mit Inhalt speichern aus, und speichern Sie die Datei an einem beliebigen Ort auf Ihrem Computer (z.B. auf Ihrem Desktop).
9. Wechseln Sie vom IBKR-Kundenportal zum Nachrichtencenter; erstellen Sie ein neues Webticket (oder verwenden Sie ein bereits vorhandenes Ticket).
10. Hängen Sie die zuvor erstellte .har-Datei an das Webticket an. Falls der IBKR-Kundendienst Ihnen eine Ticketnummer als Referenz oder den Namen eines Sachbearbeiters mitgeteilt hat, fügen Sie diese Informationen bitte dem Ticket hinzu.
11. Webticket absenden
So erstellen Sie die HAR-Datei in Firefox :
1. Öffnen Sie Firefox und wechseln Sie zu der Seite, wo das Problem auftritt.
2. Drücken Sie auf Ihrer Tastatur auf F12. Klicken Sie als Alternative auf das Firefox-Menüsymbol (drei horizontale parallele Linien oben rechts im Browserfenster) und wählen Sie Web Entwickler > Netzwerk
aus.
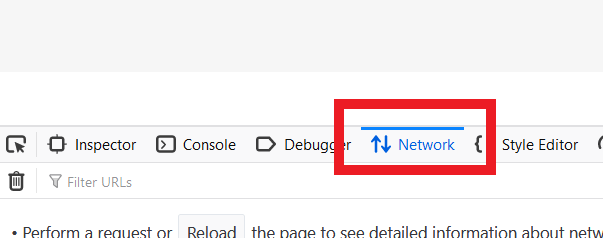
3. Durch Entwickler-Netzwerk-Tools wird ein angedocktes Panel an der Seite oder am unteren Rand von Firefox geöffnet. Wählen Sie den Reiter Netzwerk (Abbildung 5.) aus.
Abbildung 5.
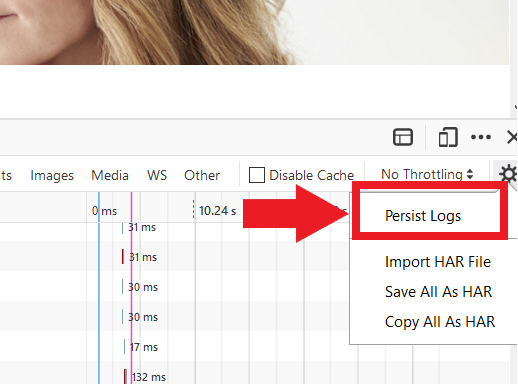
4. Markieren Sie das Ankreuzfeld Persist-Logs (Abbildung 6.)
Abbildung 6.
5. Replizieren Sie das bei Ihnen auftretende Problem. Die Aufzeichnung der Netzwerkanfrage startet automatisch.
6. Wenn Sie das Problem repliziert haben, klicken Sie mit der rechten Maustaste auf eine beliebige Stelle in der Liste der aufgezeichneten Netzwerkanfragen und wählen Sie Alle als HAR speichern aus.
7. Speichern Sie die Datei an einem beliebigen Ort auf Ihrem Computer (z.B. auf Ihrem Desktop).
8. Wechseln Sie vom IBKR-Kundenportal zum Nachrichtencenter; erstellen Sie ein neues Webticket (oder verwenden Sie ein bereits vorhandenes Ticket).
9. Hängen Sie die zuvor erstellte .har-Datei an das Webticket an. Falls der IBKR-Kundendienst Ihnen eine Ticketnummer als Referenz oder den Namen eines Sachbearbeiters mitgeteilt hat, fügen Sie diese Informationen bitte dem Ticket hinzu.
10. Webticket absenden
So erstellen Sie die HAR-Datei in Microsoft Edge:
1. Öffnen Sie Edge und wechseln Sie zu der Seite, wo das Problem auftritt.
2. Drücken Sie auf Ihrer Tastatur auf F12. Klicken Sie als Alternative auf das Edge-Menüsymbol (drei vertikale Punkte oben rechts im Browserfenster) und wählen Sie Mehr Tools > Entwickler-Tools aus.
3. Wählen Sie den Reiter Netzwerk aus (Abbildung 10.)
Abbildung 10.
.png)
4. Replizieren Sie das vorher aufgetretene Problem während der Aufzeichnung der Netzwerkanfragen.
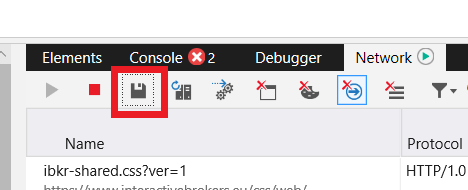
5. Klicken Sie anschließend auf das Diskettensymbol (Als HAR exportieren) oder drücken Sie auf CTRL+S (Abbildung 11.)
.
Abbildung 11.
6. Geben Sie einen Dateinamen und einen beliebigen Ort auf Ihrem Computer an (z.B. auf Ihrem Desktop). Klicken Sie dann auf den Button Speichern.
7. Wechseln Sie vom IBKR-Kundenportal zum „Nachrichtencenter"; erstellen Sie ein Webticket (oder verwenden Sie ein bereits vorhandenes Ticket).
8. Hängen Sie die zuvor erstellte .har-Datei an das Webticket an. Falls der IBKR-Kundendienst Ihnen eine Ticketnummer als Referenz oder den Namen eines Sachbearbeiters mitgeteilt hat, fügen Sie diese Informationen bitte dem Ticket hinzu.
9. Webticket absenden
So erstellen Sie die HAR-Datei in Safari:
Wichtig: Bevor Sie die HAR-Datei erstellen, vergewissern Sie sich, dass Sie das Menü Entwickeln in Safari sehen können. Wenn Sie dieses Menü nicht sehen, klicken Sie auf das Menü Safari, wählen Sie Präferenzen aus, wechseln Sie zum Reiter Fortgeschritten und markieren Sie das Ankreuzfeld neben Menü Entwickeln in der Menüleiste anzeigen.
1. Öffnen Sie das Menü Entwickeln und wählen Sie Webinspektor anzeigen aus oder drücken Sie auf CMD+ALT+I.
2. Klicken Sie auf den Reiter Netzwerk (Abbildung 12.).
Abbildung 12.
3. Markieren Sie das Ankreuzfeld Log aufbewahren (Abbildung 13.)
.
Abbildung 13.
.png)
4. Klicken Sie auf das Symbol Export (oder drücken Sie auf CMD+S); geben Sie einen Dateinamen und einen Ort Ihrer Wahl auf Ihrem Computer an (z.B. auf Ihrem Desktop) und speichern Sie die .har-Datei.
5. Wechseln sie vom IBKR-Kundenportal zum „Nachrichtencenter"; erstellen Sie ein Webticket (oder verwenden Sie ein bereits vorhandenes Ticket).
6. Hängen Sie die zuvor erstellte Archivdatei an das Webticket an. Falls der IBKR-Kundendienst Ihnen eine Ticketnummer als Referenz oder den Namen eines Sachbearbeiters mitgeteilt hat, fügen Sie diese Informationen bitte dem Ticket hinzu.
7. Webticket absenden
How to Upload a Diagnostic Bundle from an IBKR Platform
Übersicht:
Some support related issues require diagnostics files and logs to be uploaded along with screenshots. The information will help our team to investigate and resolve the issue that you are experiencing.
This article will help you with detailed steps on how to upload diagnostics files and logs from various Interactive Brokers’ trading platforms.
Note: IBKR does not monitor the diagnostic bundle repository throughout the day. Should you spontaneously decide to upload a diagnostic bundle, without being instructed by Interactive Brokers, please inform our Client Services via Message Center ticket or phone call otherwise your error report will go unnoticed.
Please click on one of the links below, according to the platform you are using:
-
IBKR Mobile (Android)
-
IBKR Mobile (iOS)
1. Log in to TWS and try to replicate the issue that you are experiencing
2. Press ‘Help’ at the top left corner and select ‘Upload Diagnostics’. Alternatively, depending on your Operating System, you can use the following keyboard combinations
- For Windows and Linux Operating system: Press Ctrl+Alt+Q
- For Mac: Press Cmd+Option+H
3. The ‘Upload Diagnostics’ window will appear. You may enter the reason for uploading diagnostics in the text box
4. If an Interactive Brokers representative has instructed you to include previous days logs or select specific options when uploading diagnostics, click the dropdown on the right top corner, select ‘Advanced View’ and tick the correspondent checkboxes which will appear on the bottom left part
5. Make sure the checkbox ‘Include screenshot of entire desktop’ is enabled and press ‘Submit’
6. Do not perform any action/activity on your computer until you see the below pop-up, confirming that the diagnostics have been successfully uploaded
A) If you are at the login Screen:
1. Tap the three dots icon in the right top corner and select ‘Upload Diagnostics’
2. Add your username in the comment section and tap ‘Upload’
1. Tap the three lines icon in the top left corner to open the menu
2. Tap ‘Configuration’> ‘Trouble Reporting’> enable the check box next to ‘Debug mode’
3. If requested by an Interactive Brokers representative, enable the check box next to ‘Extended Log’ as well
5. Tap the three dots icon in the top right corner of the screen and select ‘Upload Diagnostics’
6. Enter your comments in comment section and enable the checkbox next to ‘Attach Screenshot’. Then tap ‘Upload’
A) If you are at the login Screen:
1. Tap five times in a quick sequence on the IBKR logo to open the testing menu
2. Under Configuration, enable the toggle button next to ‘Debug mode’
3. Tap ‘Send’ next to ‘Upload diagnostics’
4. Enter your username in the comments section and tap ‘OK’
1. Capture screenshots displaying the issue you are experiencing directly on the phone (pressing together the physical buttons Power + Volume Up)
2. Tap the option ‘More’ in the right bottom corner of the screen
3. Tap ‘Configuration’ and expand the section ‘Trouble Reporting’
4. Enable the toggle button next to ‘Debug mode’ and, next to ‘Upload diagnostics’, tap ‘Send’
5. The ‘Send Diagnostics’ page will appear. Enter your comments in comment section
6. Tap the ‘Attach Image’ button to attach screenshots of the issue that you have previously saved in your camera roll
7. Tap ‘Send’
1. Log in to the app
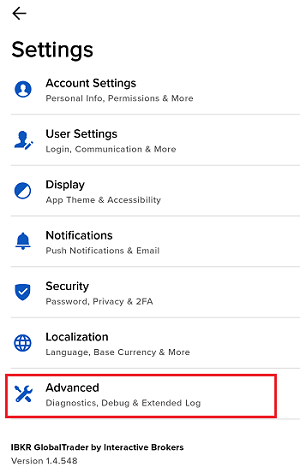
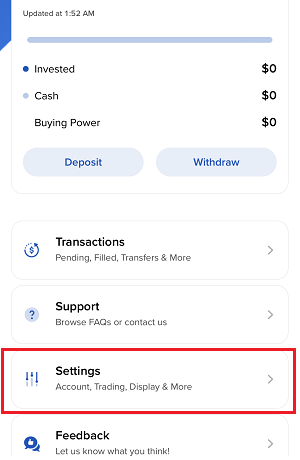
2. Tap the User icon in the top left corner and select ‘Settings’
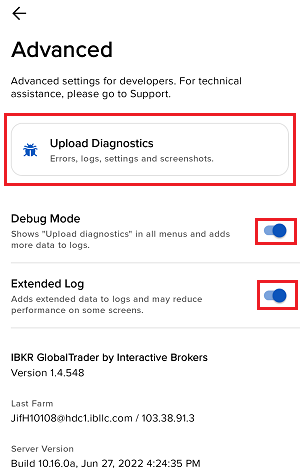
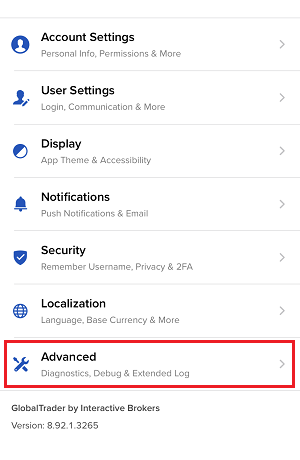
3. Tap the option ‘Advanced’ and enable the toggle button next to ‘Debug mode’
4. If requested by an Interactive Brokers representative, enable as well the toggle button next to ‘Extended Log’
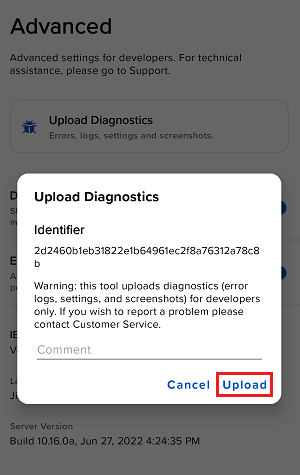
5. You will see an ‘Upload Diagnostics’ pop-up. Enter your comments in the field and tap ‘Upload’
Note: If you need to send us screenshots of IMPACT or IBKR GlobalTrader for Android, you would have to attach them to a Message Center web ticket, as explained in IBKB1071
1. Log in to the app
2. Capture one or more screenshots displaying the issue you are experiencing directly on the phone (pressing the physical buttons Power + Volume Up simultaneously)
3. Now tap the User icon in the top left corner and select ‘Settings’
4. Tap ‘Advanced’
5. Enable the toggle button next to ‘Debug mode’ and tap ‘Upload Diagnostics’
6. The ‘Send Diagnostics’ screen will appear
7. Enter your comments in the field and tap ‘Attach Image’ to attach the screenshot/s you previously saved in your camera roll
8. Tap ‘Send’
A diagnostic trace for Client Portal can be captured following the steps on IBKB3512
Kryptowährungsprodukte Angebot von IBKR
Übersicht:
Untenstehend finden Sie eine Liste mit vielen Kryptowährungsprodukten, die von IBKR angeboten werden*. Falls Sie das Produkt nicht finden, an welchem Sie interessiert sind, können Sie über unsere Webseite in der IBKR Kontraktdatenbank über das Kontraktsuchetool suchen. Klicken Sie auf das Supportmenü, gefolgt von Ihrem Kontotypen (Individual oder Institution). Hier können Sie eine einfache Suche über den Produktenahmen oder das Symbol, eine fortgeschrittene Suche durch Hinzufügung von Filtern, oder eine Suche nach einem bestimmten Produkttypen durchführen.
Kryptowährungen
- BTC- Bitcoin
- ETH- Ethereum
- LTC- Litecoin
- BCH- Bitcoin Cash
Aktien/ETFs
US
- GBTC (PINK)- Grayscale Bitcoin Investment Trust
- BCHG (PINK)- Grayscale Bitcoin Cash Trust
- ETCG (PINK)- Grayscale Ethereum Classic Trust
- ETHE (PINK)- Grayscale Ethereum Trust
- GDLC (PINK)- Grayscale Digital Large Cap Fund
- LTCN (PINK)- Grayscale Litecoin Trust
Nicht-US
- BITCOINXB (SFB)- Bitcoin Tracker One
- COINETH (SFB)- XBT Provider Ethereum
- COINETHE (SFB)- XBT Provider Ethereum
Indizes
- NYXBT (NYSE)- NYSE Bitcoin Index
- GXBT (Cboe)- The Gemini Bitcoin Trace Price Index (Ab Juni 2019 werden keine neuen Kontrakte zum Handel angeboten)
- BRR (CME)- CME Bitcoin Reference Rate Index
- BRTI (CME)- CME Bitcoin Real Time Index
Futures
- GXBT (Cboe/CFE)- The Gemini Bitcoin Trace Price Futures (Ab Juni 2019 werden keine neuen Kontrakte zum Handel angeboten)
- BRR (CME)- CME Bitcoin Reference Rate Futures
- ETHUSDRR (CME) – CME Ether Dollar Reference Rate Futures
- BAKKT (ICECRYPTO)- Bakkt Bitcoin Futures
*Es gibt Länder, in denen manche oder alle der oben genannten Produkte nicht zur Verfügung stehen.
Zurück zum Inhaltsverzeichnis: Bitcoin und andere Kryptowährungsprodukte @ IBKR
Bitcoin und andere Kryptowährungsprodukte @ IBKR
Kryptowährungsprodukteangebot bei IBKR
http://ibkr.info/de/article/3060
Kryptowährung Marktdaten
http://ibkr.info/de/article/3061
Bitcoin Futurehandel mit IBKR
http://ibkr.info/de/article/3049
Bitcoin Future Produkteliste
https://www.interactivebrokers.co.uk/de/index.php?f=29299
IBKR Marginanforderungen
https://www.interactivebrokers.co.uk/de/index.php?f=27241
iOS: Hinzufügen eines Benutzers zu einer bereits aktivierten IBKR-Mobile-Authentifizierung
Übersicht:
Dieser Artikel beschreibt, wie man in der IBKR-Mobile-App für iOS einen Benutzer zur Authentifizierungsfunktion hinzufügt.
Anforderungen:
- IBKR Mobile muss auf Ihrem iOS-Gerät installiert und die Authentifizierung via IBKR Mobile (IB Key) muss bereits aktiviert sein.
- Weitere Informationen zum Installations- und Aktivierungsvorgang auf iOS-Geräten finden Sie im Artikel KB2278.
Anleitung:
1. Öffnen Sie IBKR Mobile auf Ihrem iOS-Gerät.
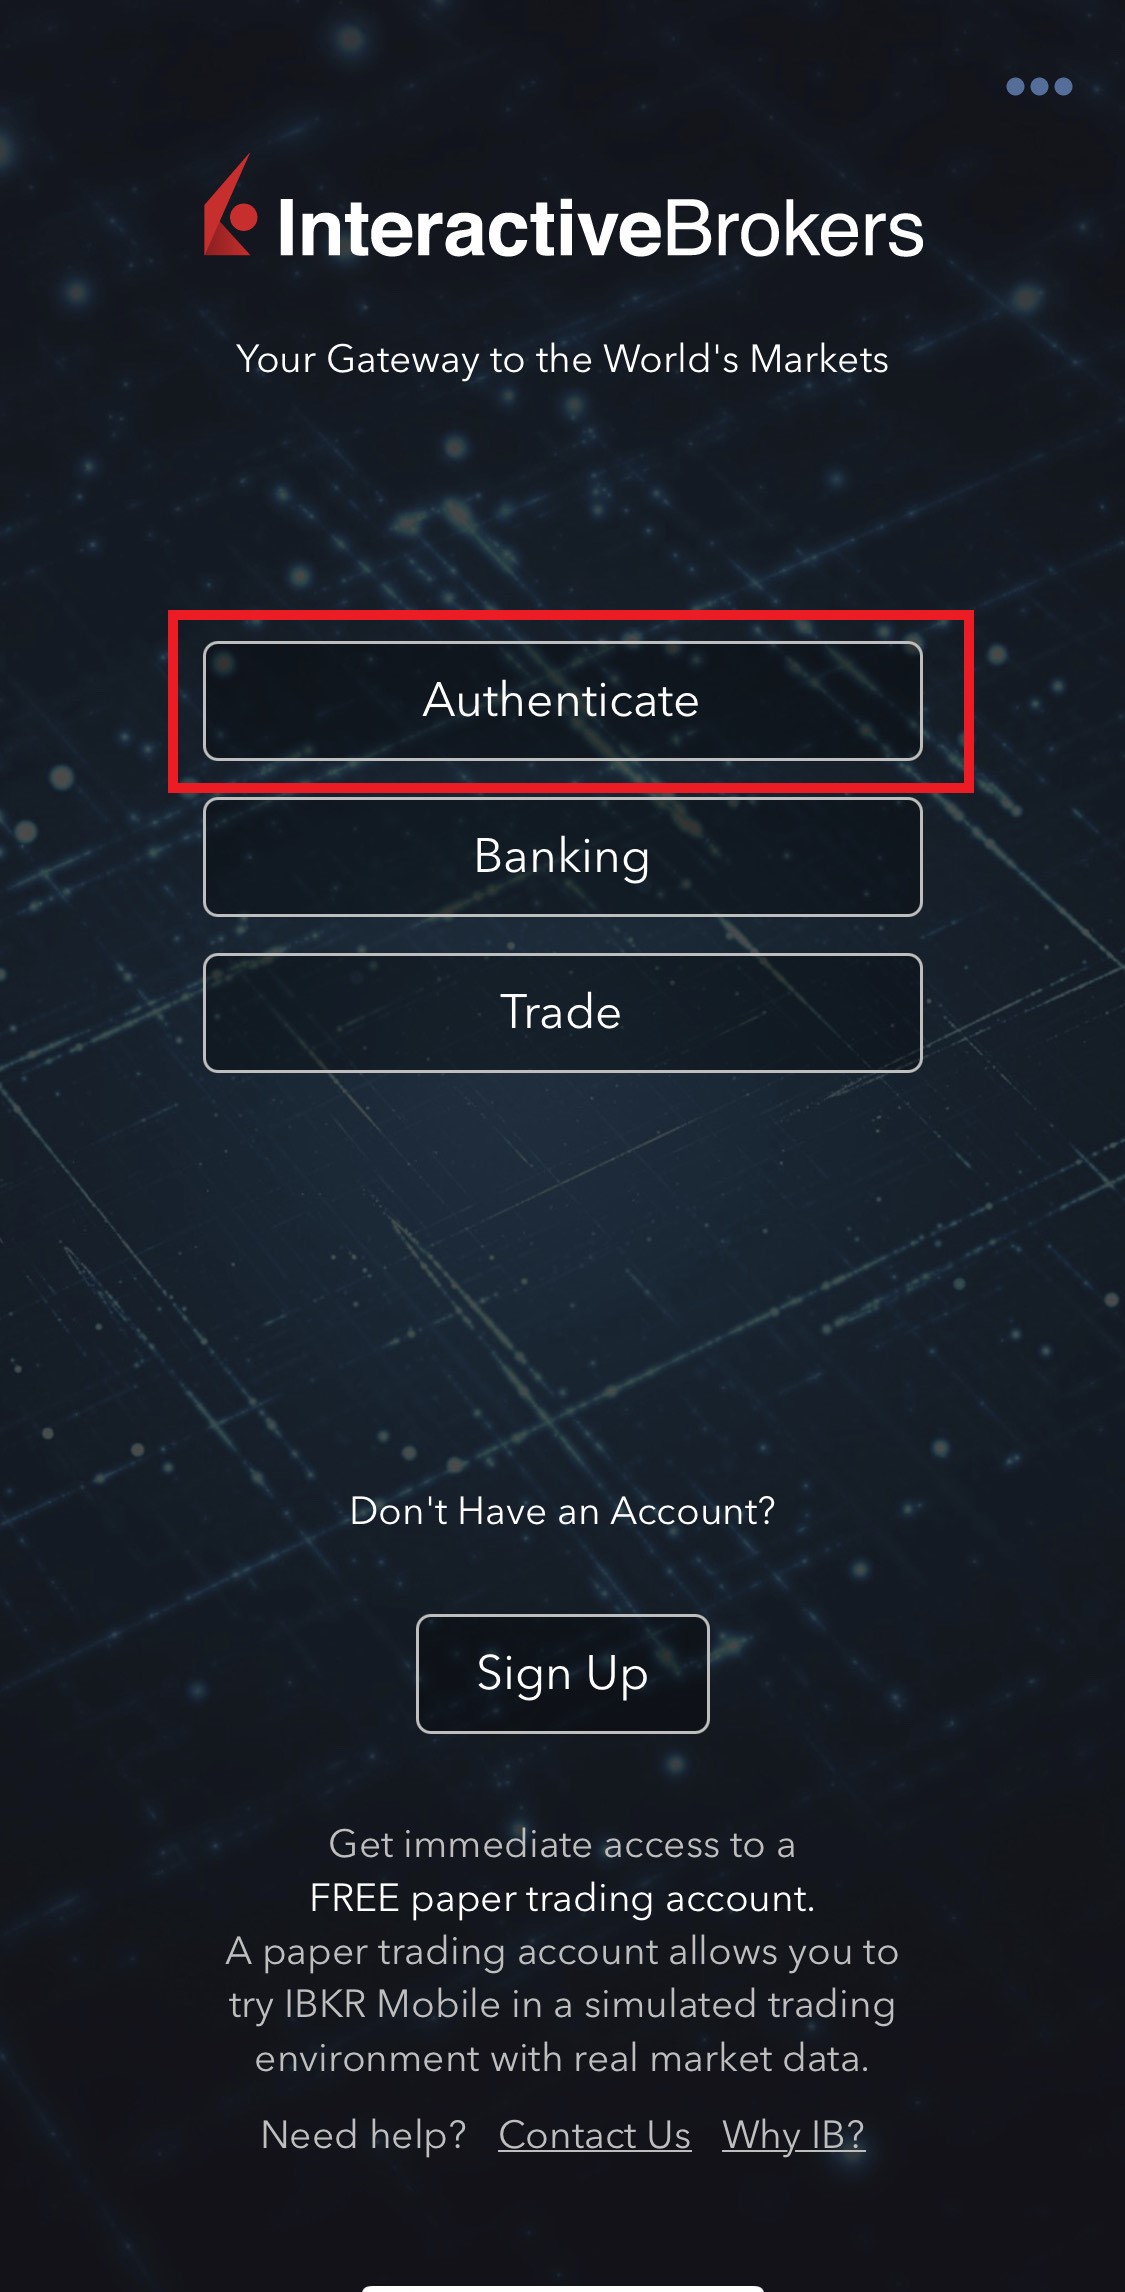
1a. Wenn nach dem Öffnen der App das Login-Fenster erscheint (Abbildung 1), tippen Sie oben links auf Services (roter Pfeil) und gehen Sie zu Schritt 2.
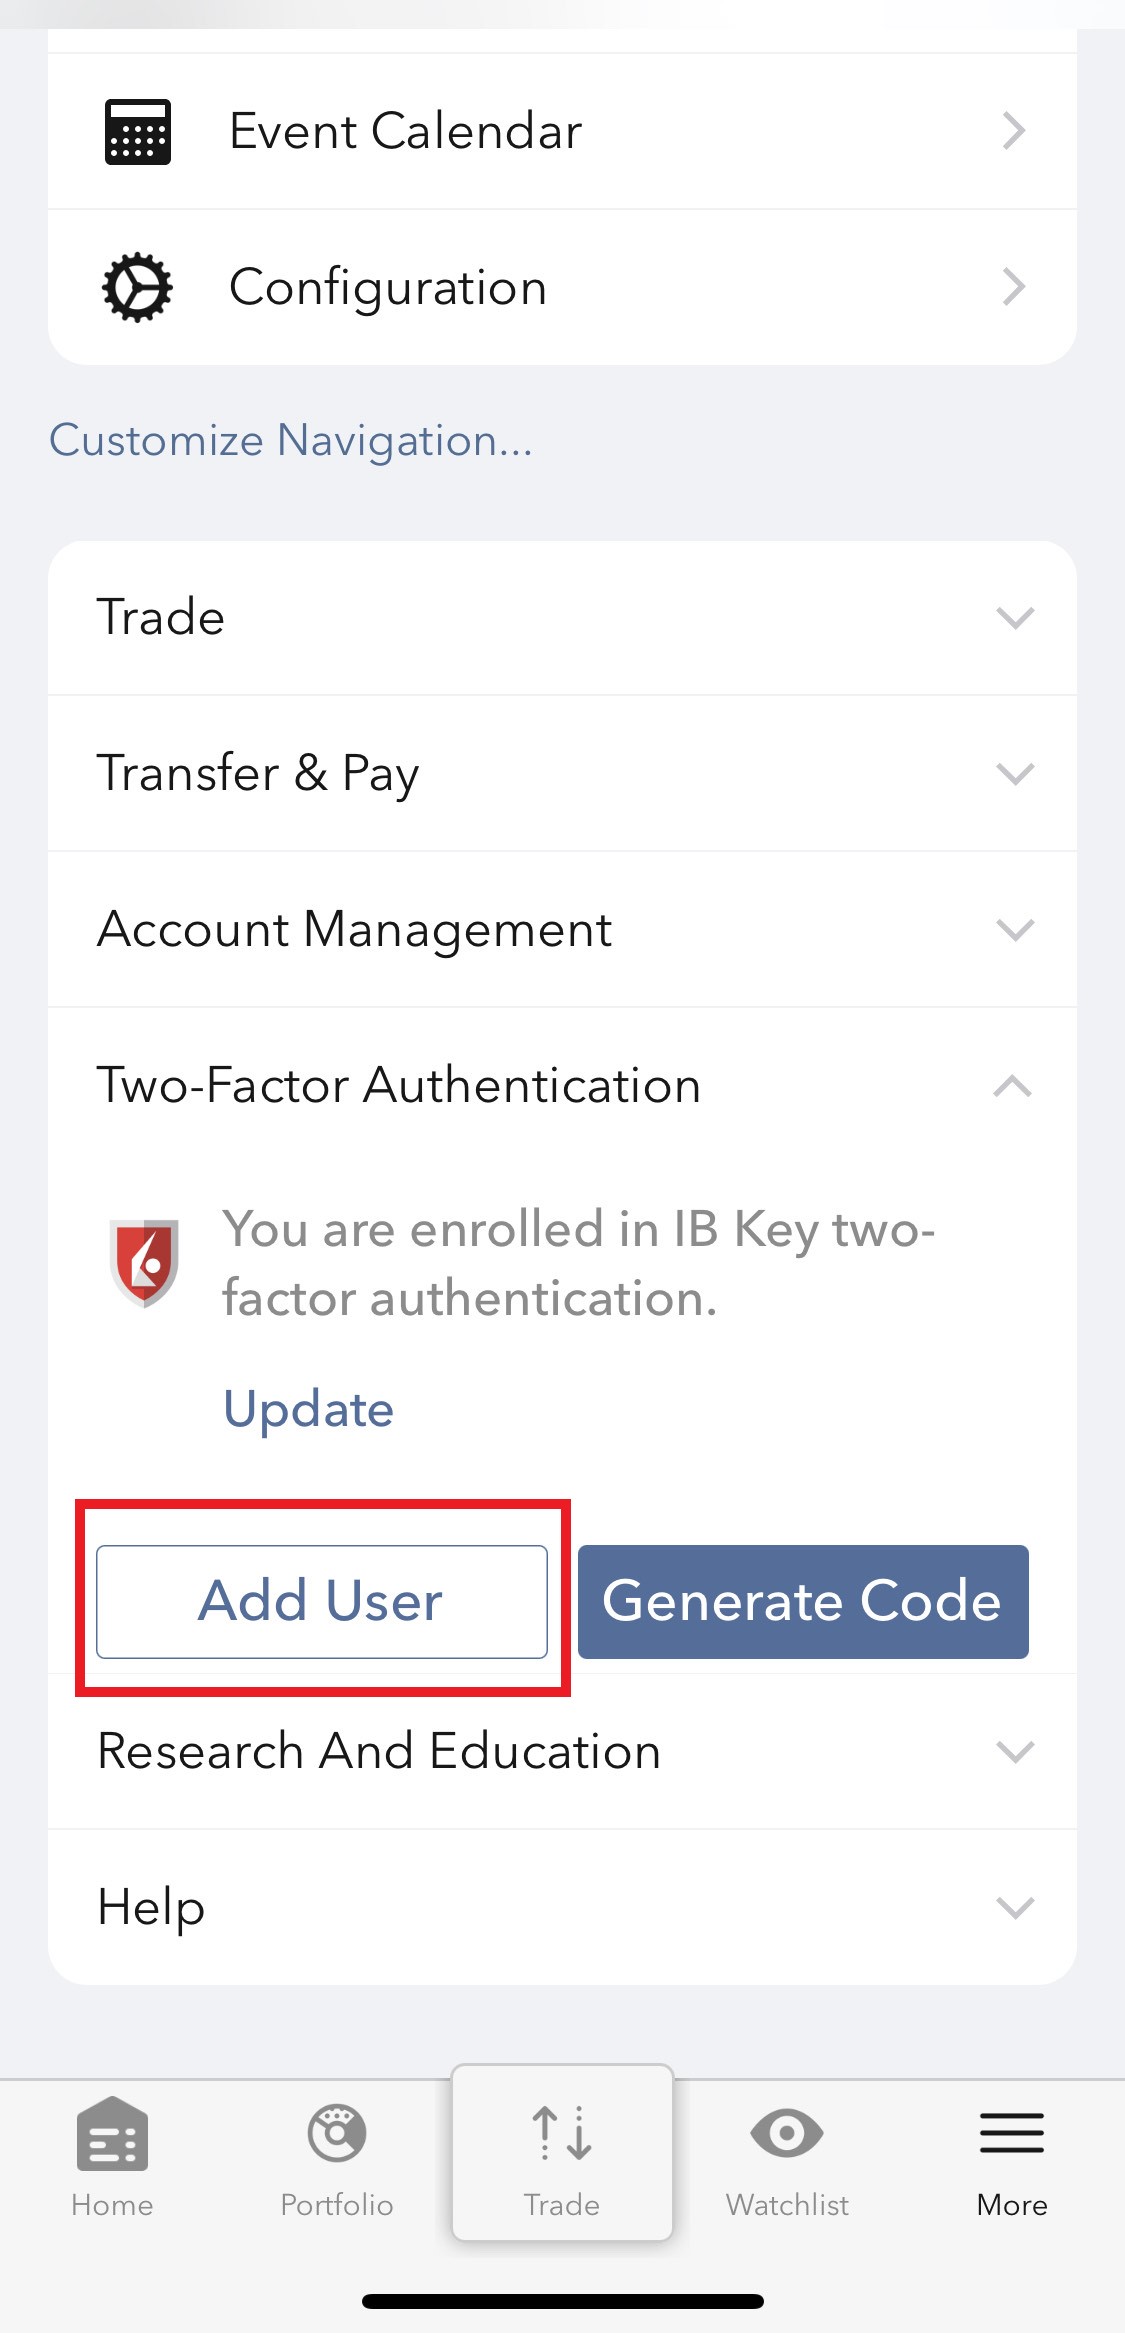
1b. Wenn Sie beim Öffnen der App zu Ihrer Startseite, Portfolio, Watchlisten oder Ähnlichem gelangen, tippen Sie unten rechts auf Mehr (Abbildung 2). Tippen Sie danach auf Zwei-Faktor-Authentifizierung (Abbildung 3), gefolgt von Benutzer hinzufügen (Abbildung 4) und fahren Sie mit Schritt 3 fort.
Abbildung 1. Abbildung 2. Abbildung 3.
(1).jpeg)
.jpeg)
.jpeg)
Abbildung 4.
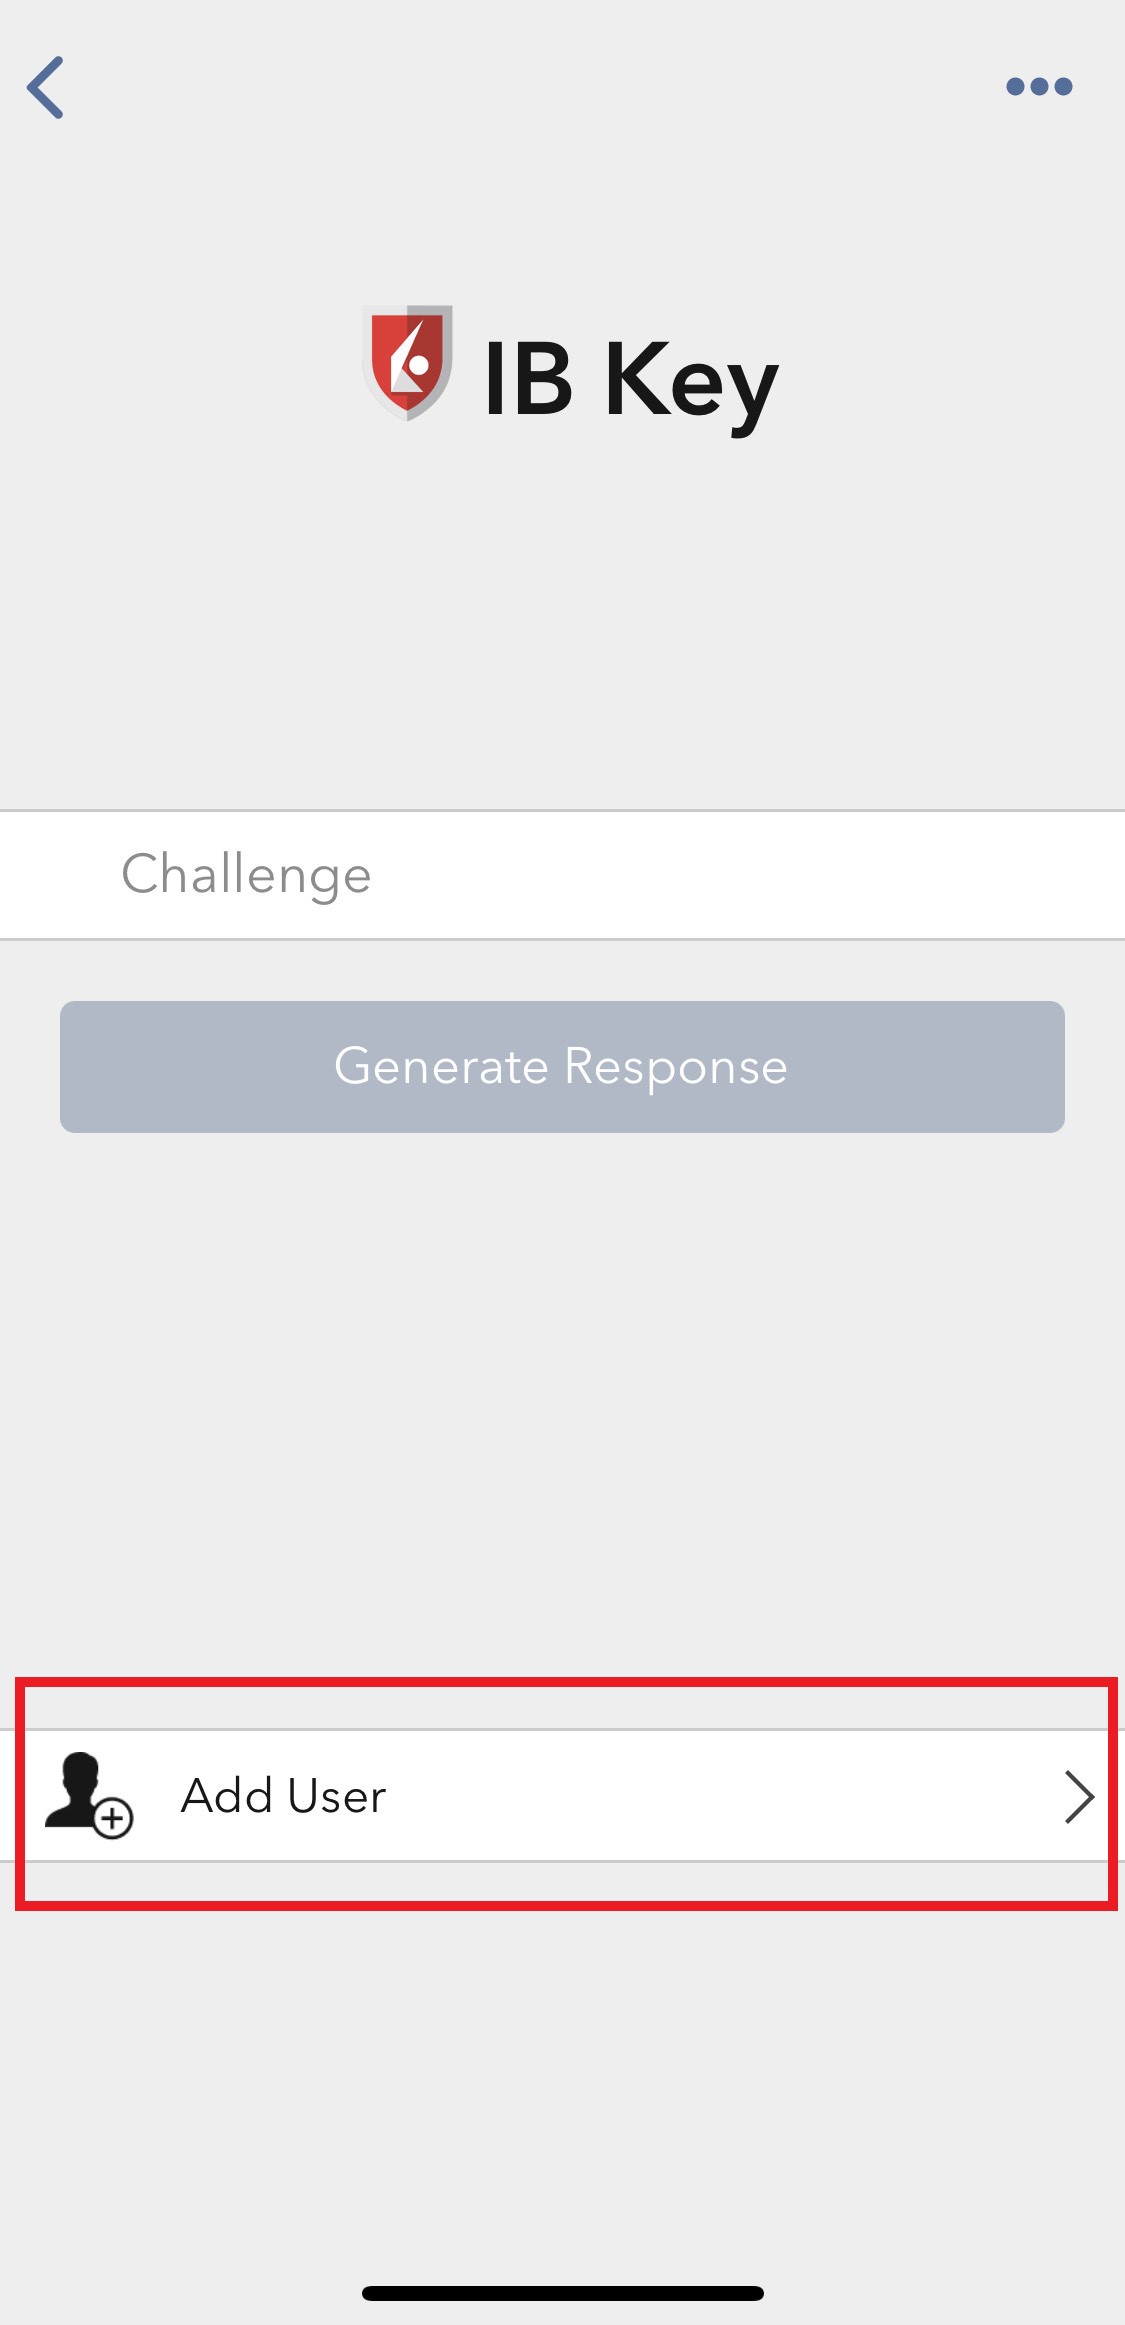
2. Tippen Sie auf Authentifizieren (Abbildung 5) und danach auf Benutzer hinzufügen (Abbildung 6).
Abbildung 5. Abbildung 6.
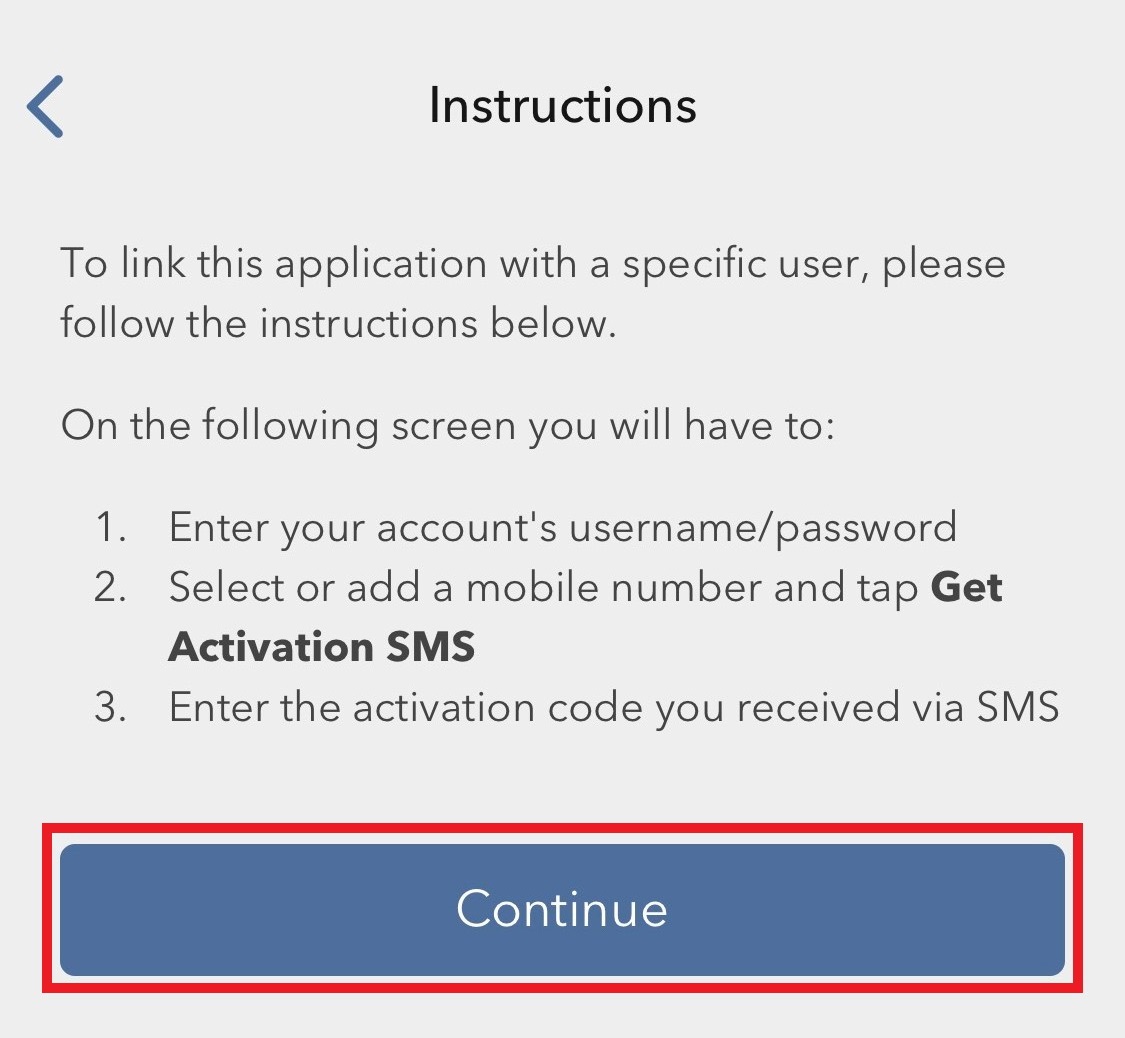
3. Lesen Sie sich die Anweisungen durch und tippen Sie danach auf Weiter (Abbildung 7).
Abbildung 7.
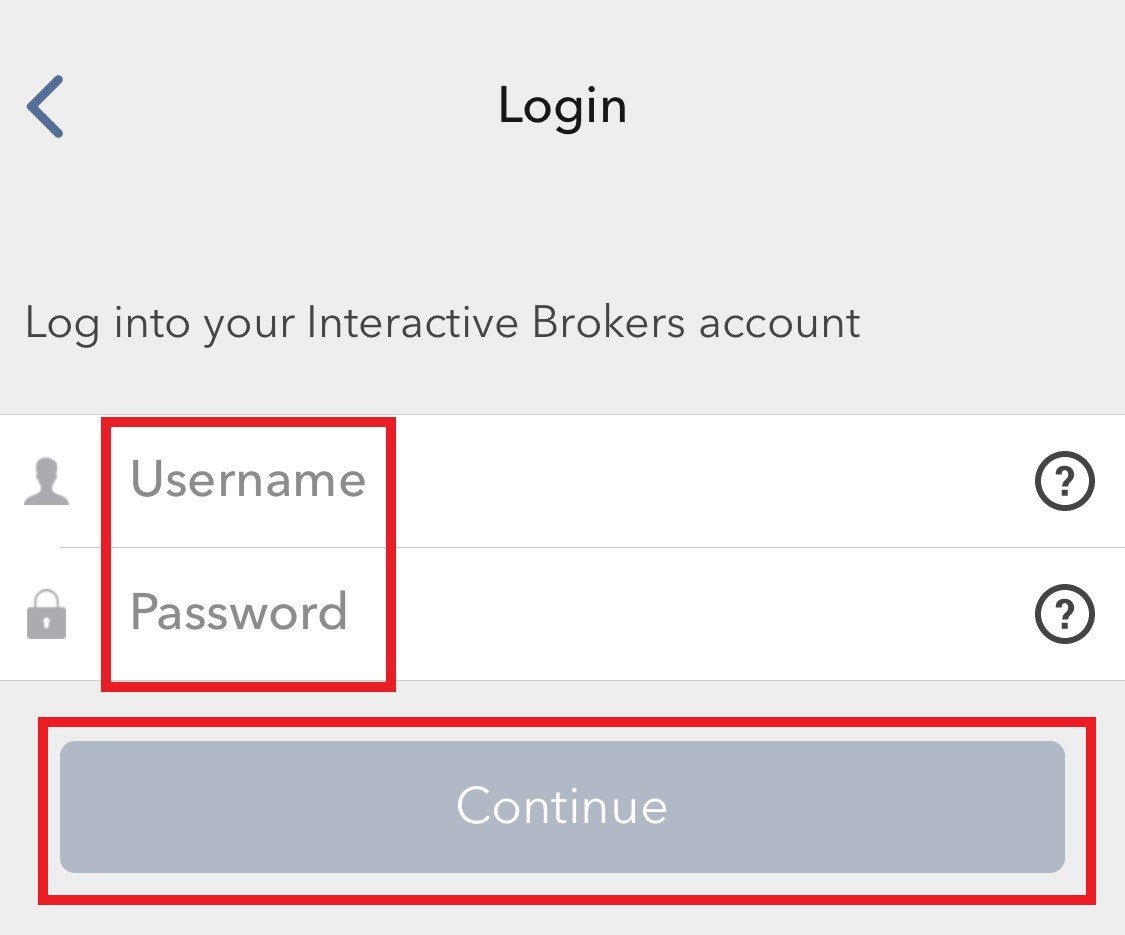
3. Geben Sie Ihren Benutzernamen und Ihr Passwort ein und tippen Sie danach auf Weiter (Abbildung 8).
Abbildung 8.
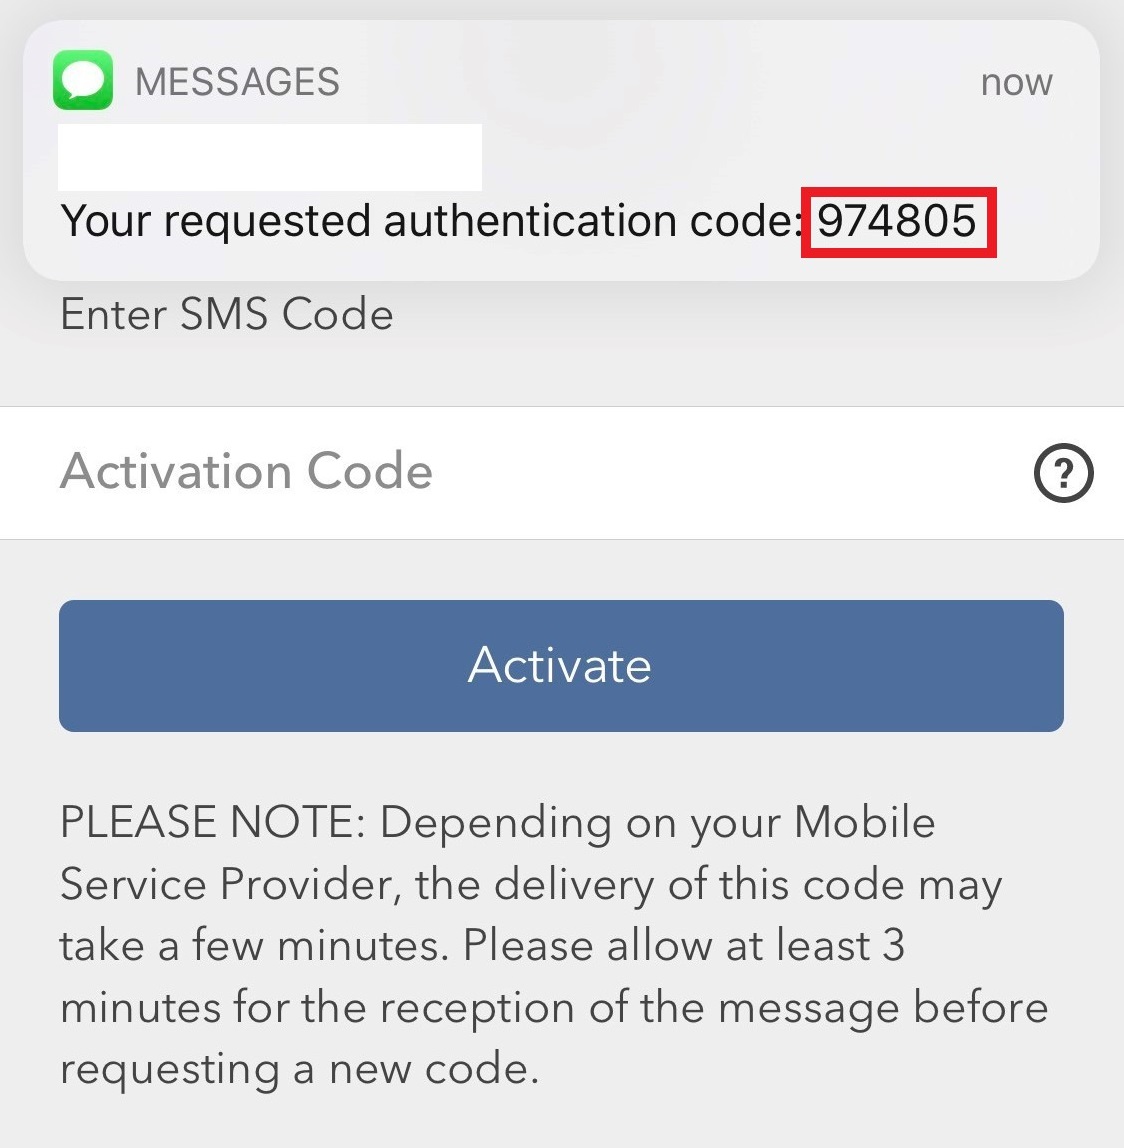
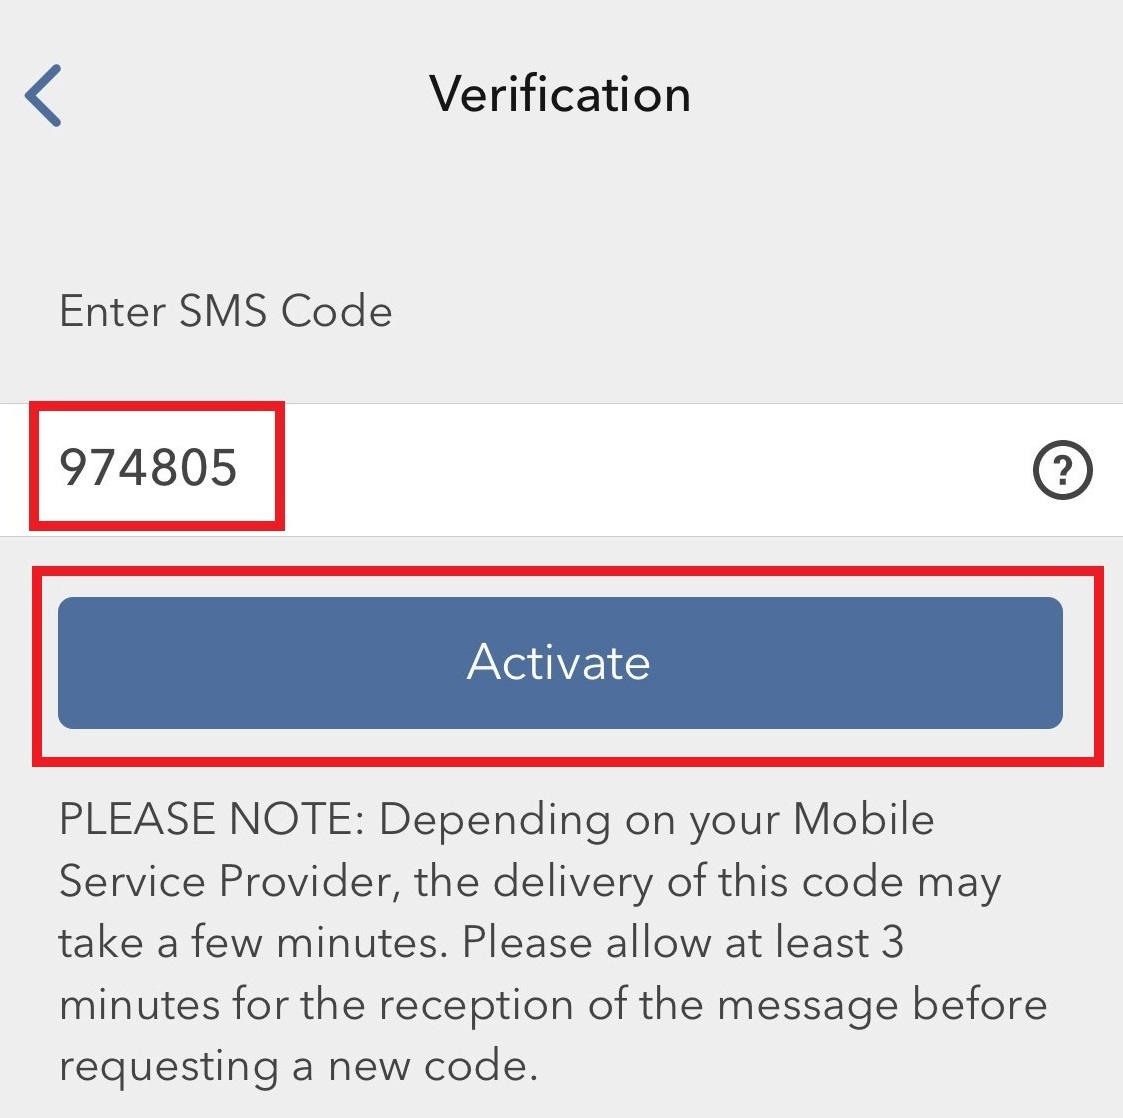
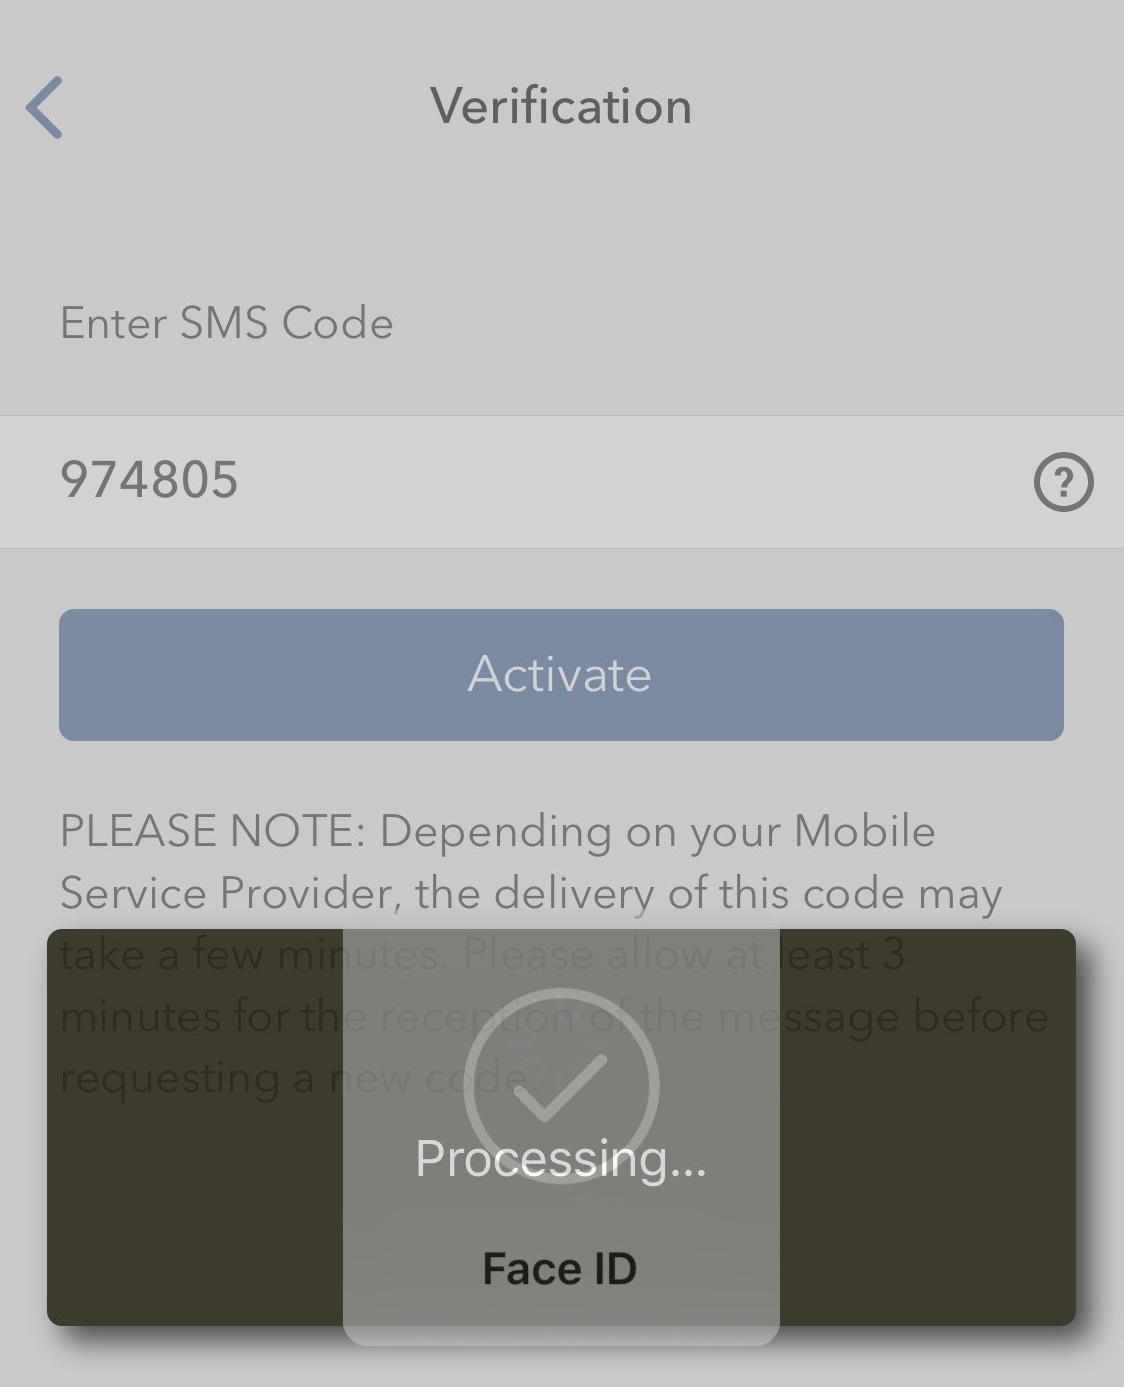
4. Ein Authentifizierungscode wird per SMS an die Mobiltelefonnummer gesendet, die für Ihr Konto hinterlegt ist (Abbildung 9). Geben Sie diesen Authentifizierungscode im Feld Aktivierungscode ein und tippen Sie auf Aktivieren (Abbildung 10).
Abbildung 9. Abbildung 10.
5. Je nach Sicherheitseinstellungen Ihres Smartphones werden Sie dazu aufgefordert, Ihre PIN, Touch ID oder Face ID zu verwenden (Abbildung 11).
Abbildung 11.
6. Falls die Aktivierung erfolgreich war, erscheint eine Bestätigung auf dem Bildschirm. Tippen Sie auf Fertig, um den Vorgang abzuschließen (Abbildung 12).
Abbildung 12.
.jpeg)
Einrichtung der Mitteilungszustellung und Benachrichtigungen vom Kundenservice
Einrichtung Ihrer Präferenzen im Mitteilungscenter:
1. Loggen Sie sich ins Client Portal ein.
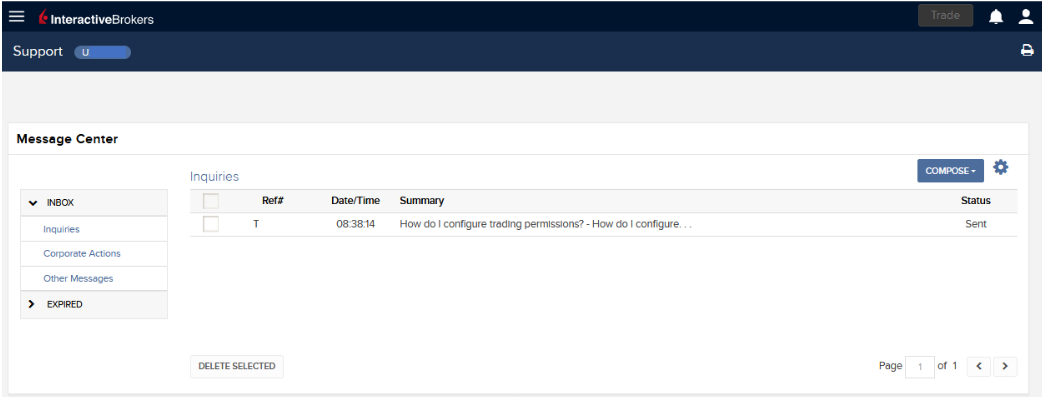
2. Klicken Sie auf das Menü Benutzer (Symbol eines Kopfes mit Schultern oben rechts) gefolgt von Sicheres Mitteilungscenter.
3. Klicken Sie auf das Symbol für Präferenzen (Schraubenschlüssel) neben der Schaltfläche „Erstellen“.
4. Das Fenster für Mitteilungspräferenzen erscheint.
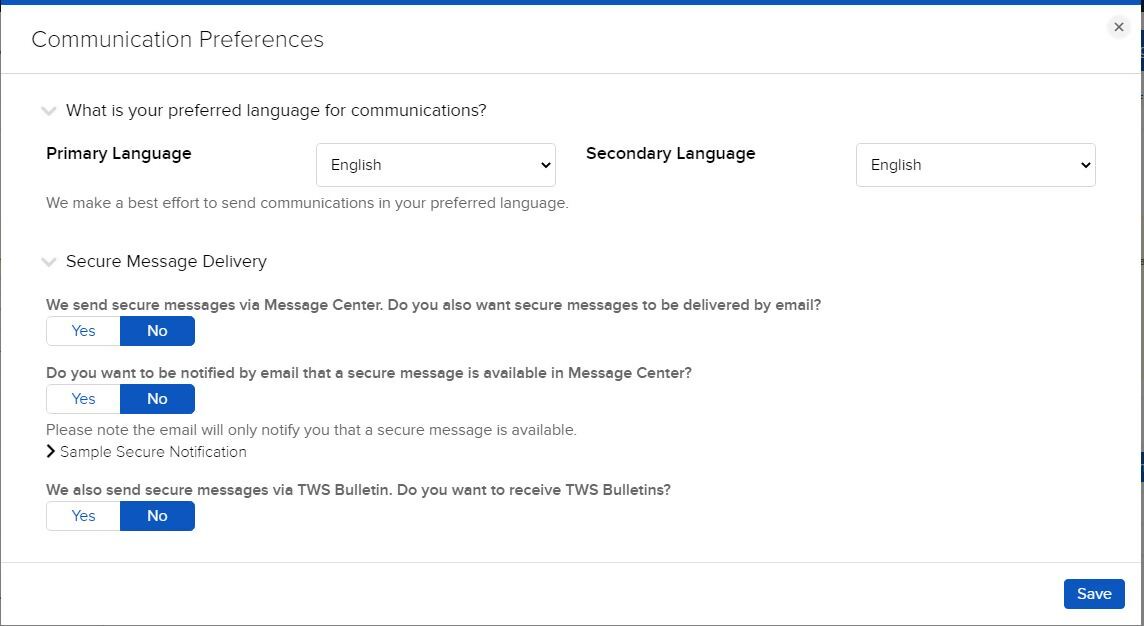
5. Wählen Sie die Drop-down-Menüs eine bevorzugte Erst- und Zweitsprache für Mitteilungen aus.
6. Wählen Sie Ihre bevorzugten Zustelloptionen im Abschnitt Zustellung von sicheren Mitteilungen aus.
7. Klicken Sie auf SPEICHERN, um Ihre Änderungen zu speichern.
Bitte beachten Sie, dass es aus Sicherheitsgründen nicht möglich ist, die gesamte Mitteilung per E-Mail, SMS oder Textmitteilung zu erhalten. Es ist ausschließlich möglich, eine Zusammenfassung der Benachrichtigung per E-Mail, SMS oder Textmitteilung zu erhalten.
Sie erhalten weitere Informationen zu den Mitteilungscenter-Präferenzen im Benutzerhandbuch des Client Portals.