How to set up sFTP for using Certificate Authentication on Linux
These instructions apply to users who are receiving their statements via sFTP. If you elected to receive your statements via sFTP, you would first need to generate an RSA Key pair.
There are many Linux distributions and there are multiple methods to access the IBKR sFTP server. sFTP clients such as Filezilla can be used. In this article we explain how to realize the connection to the IBKR FTP server using Ubuntu Linux and Filezilla.
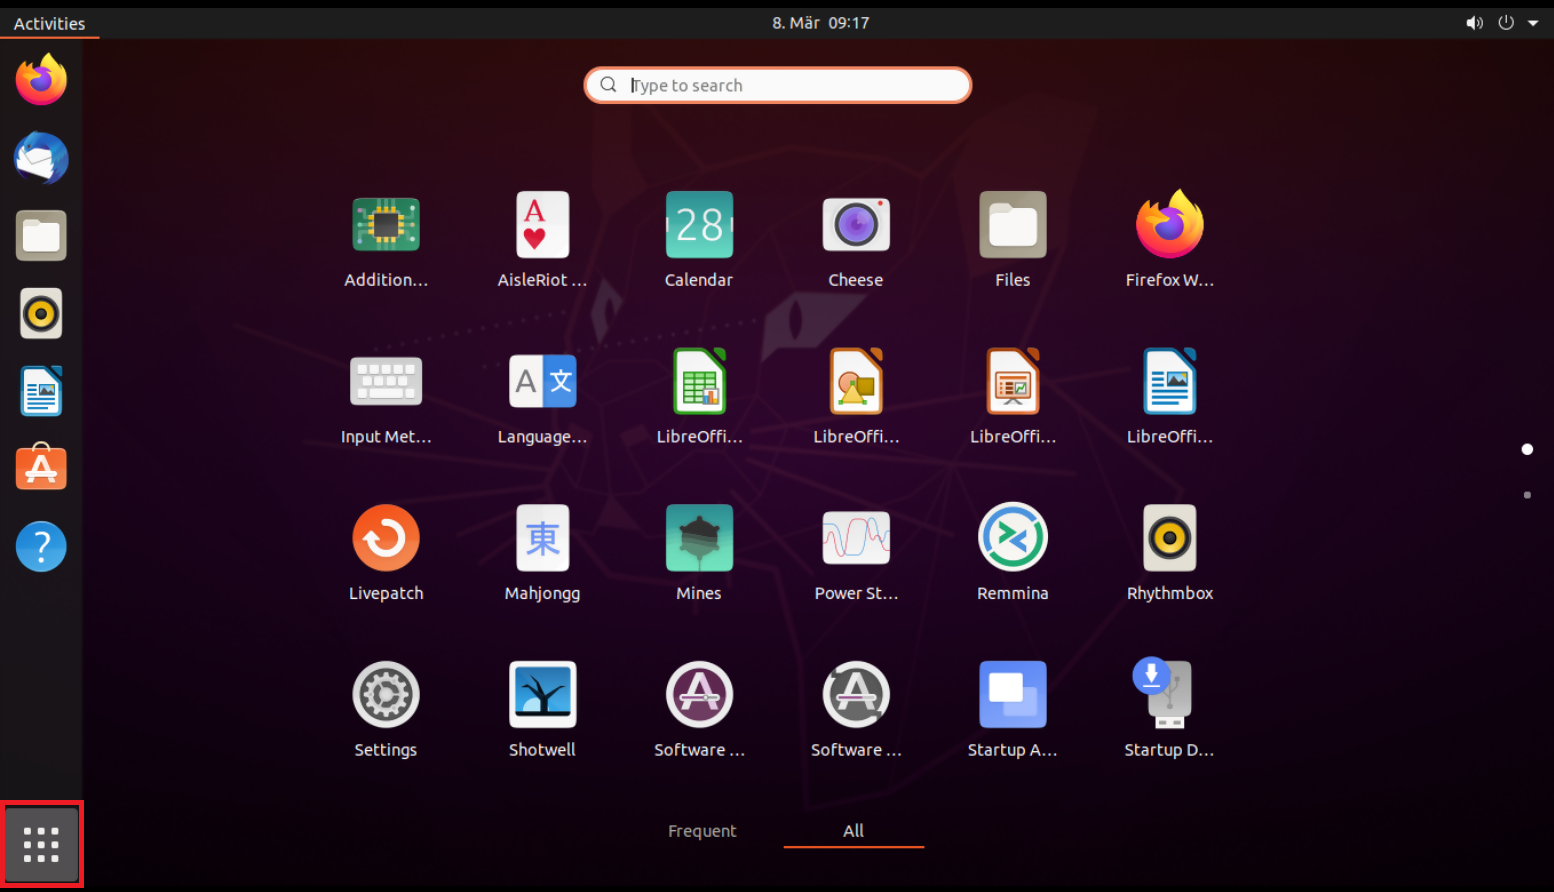
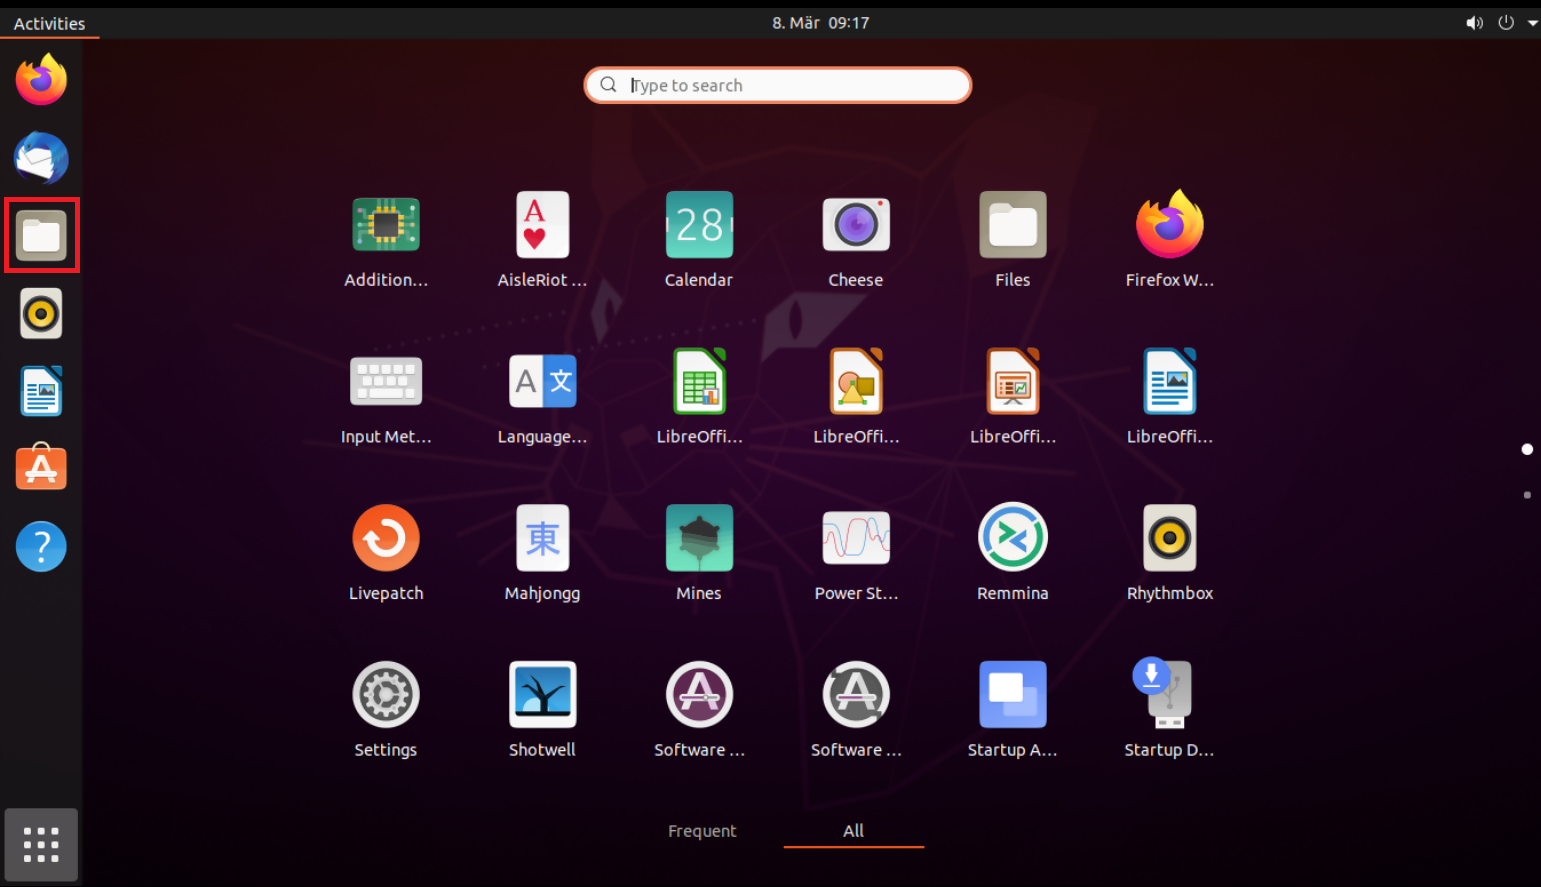
1. On your Linux machine, click on the Applications icon in the bottom left corner of you screen.
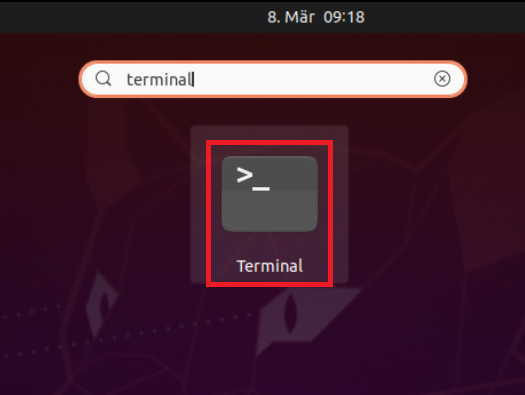
2. In the search box, type terminal and then click on the Terminal icon in the search results.
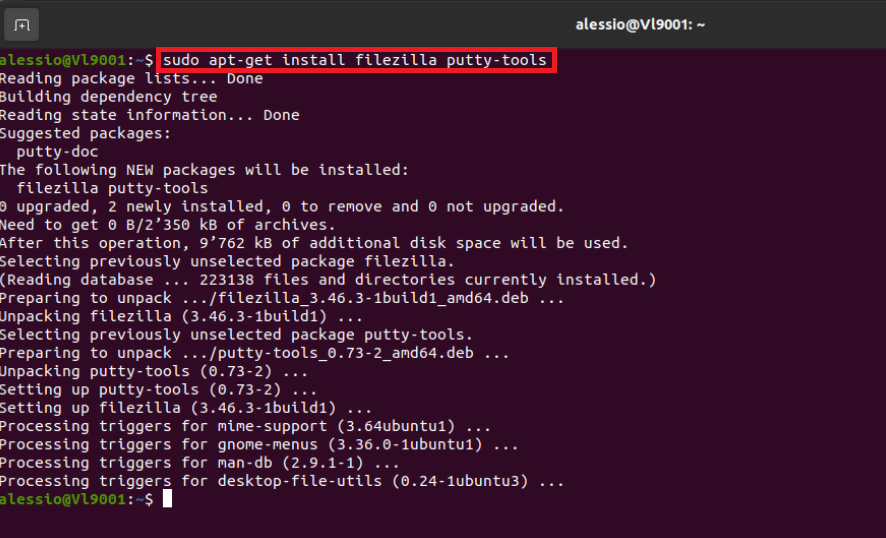
3. In the Terminal window, type sudo apt-get install filezilla putty-tools in order to install the required software. Enter your sudo password when requested.
4. Once the software installation is complete, type puttygen -t rsa -b 2048 -o privatekey.ppk in order to generate the RSA Key pair.
You will be asked to enter a passphrase and type it again to confirm.
PLEASE NOTE: Keeping a secure copy of this password is essential. Any loss of this password will require the whole process to be repeated.

5. Type puttygen -L privatekey.ppk -o public.key in order to export the public part of the Key pair to the file public.key

7. In the search box, type FileZilla and then click on the FileZilla icon in the search results.

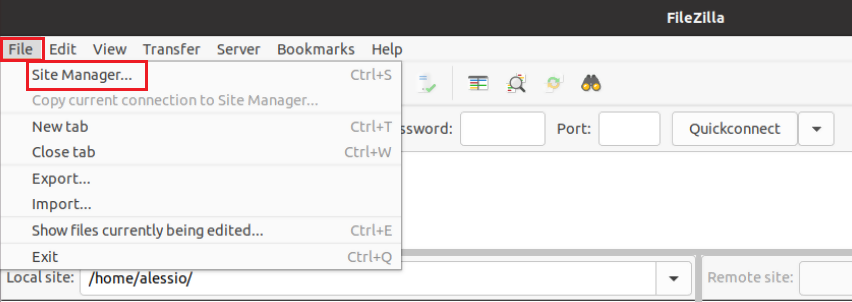
8. Click on the FileZilla top menu File -> Site Manager...
9. In the Site Manager window, click on the button New site to create a new connection.
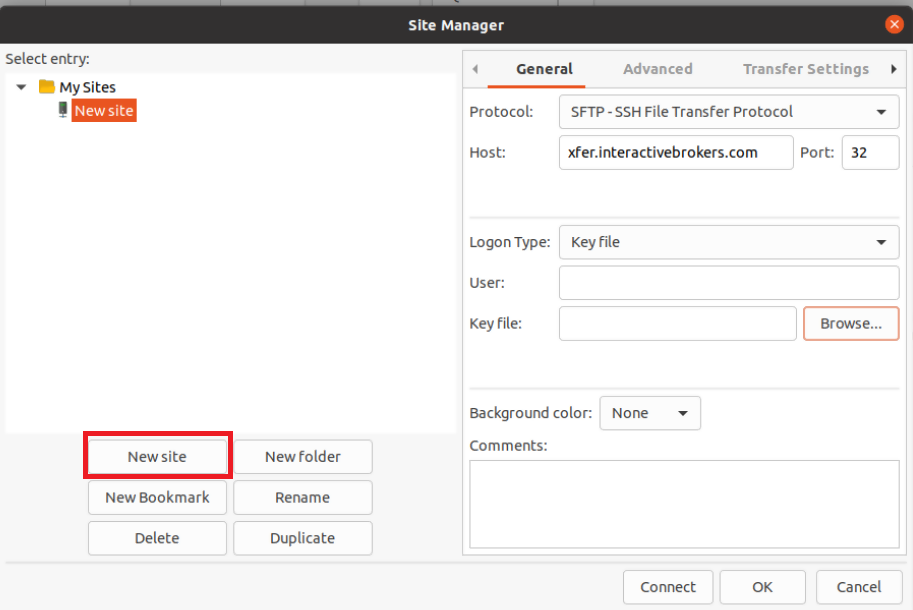
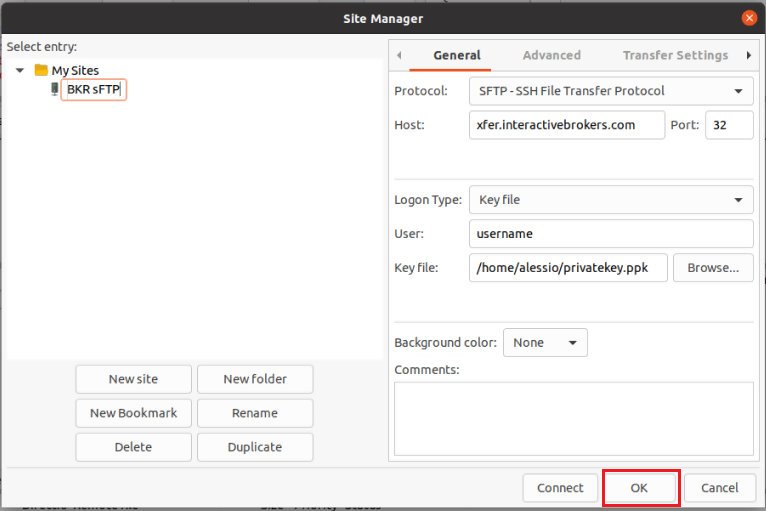
10. In the right panel (called General):
- Select SFTP - SSH File Transfer Protocol as Protocol
- Enter xfer.interactivebrokers.com in the Host field
- Enter 32 in the Port field
- Select Key file as Logon Type
- Enter the username provided to you by Interactive Brokers in the User field
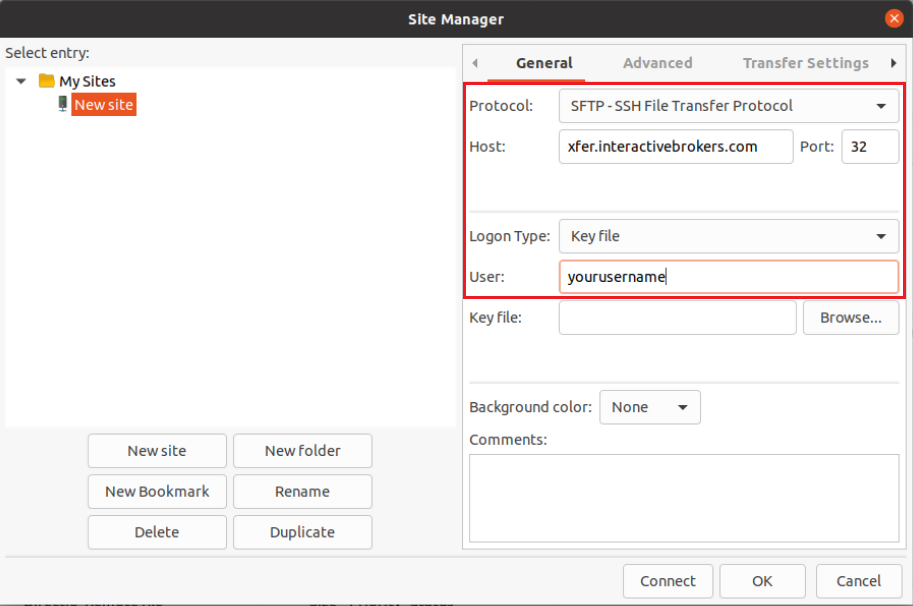
11. Click on Browse next to the Key file field.
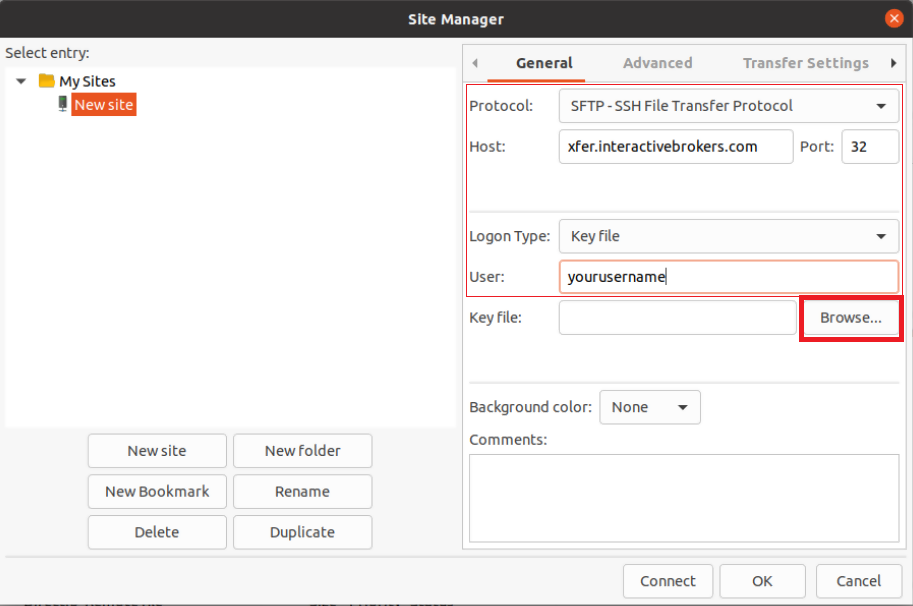
12. Move to the folder where your Key pair was created (normally your user folder: /users/yourusername/). Select the file privatekey.ppk and click on the Open button. This will set it as the Key file in your connection parameters.

13. Click on Rename and select a name of your preference for this connection (e.g. IBKR sFTP). Press Enter to confirm the name.
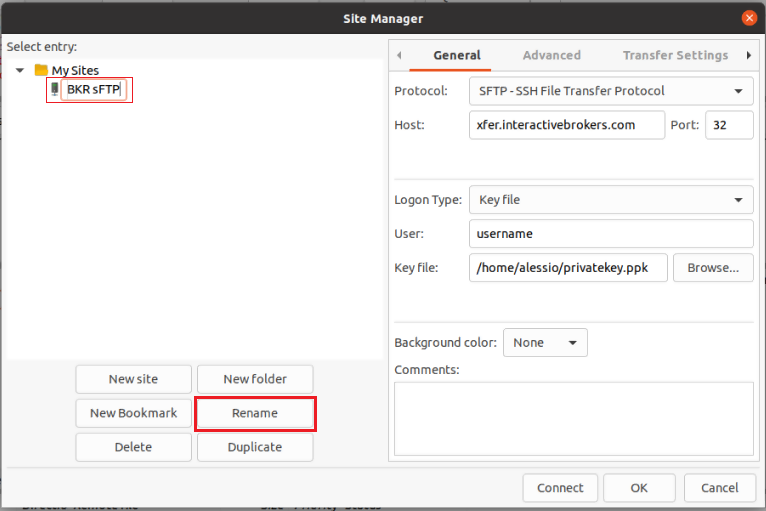
14. Click on OK to save your connection parameters.
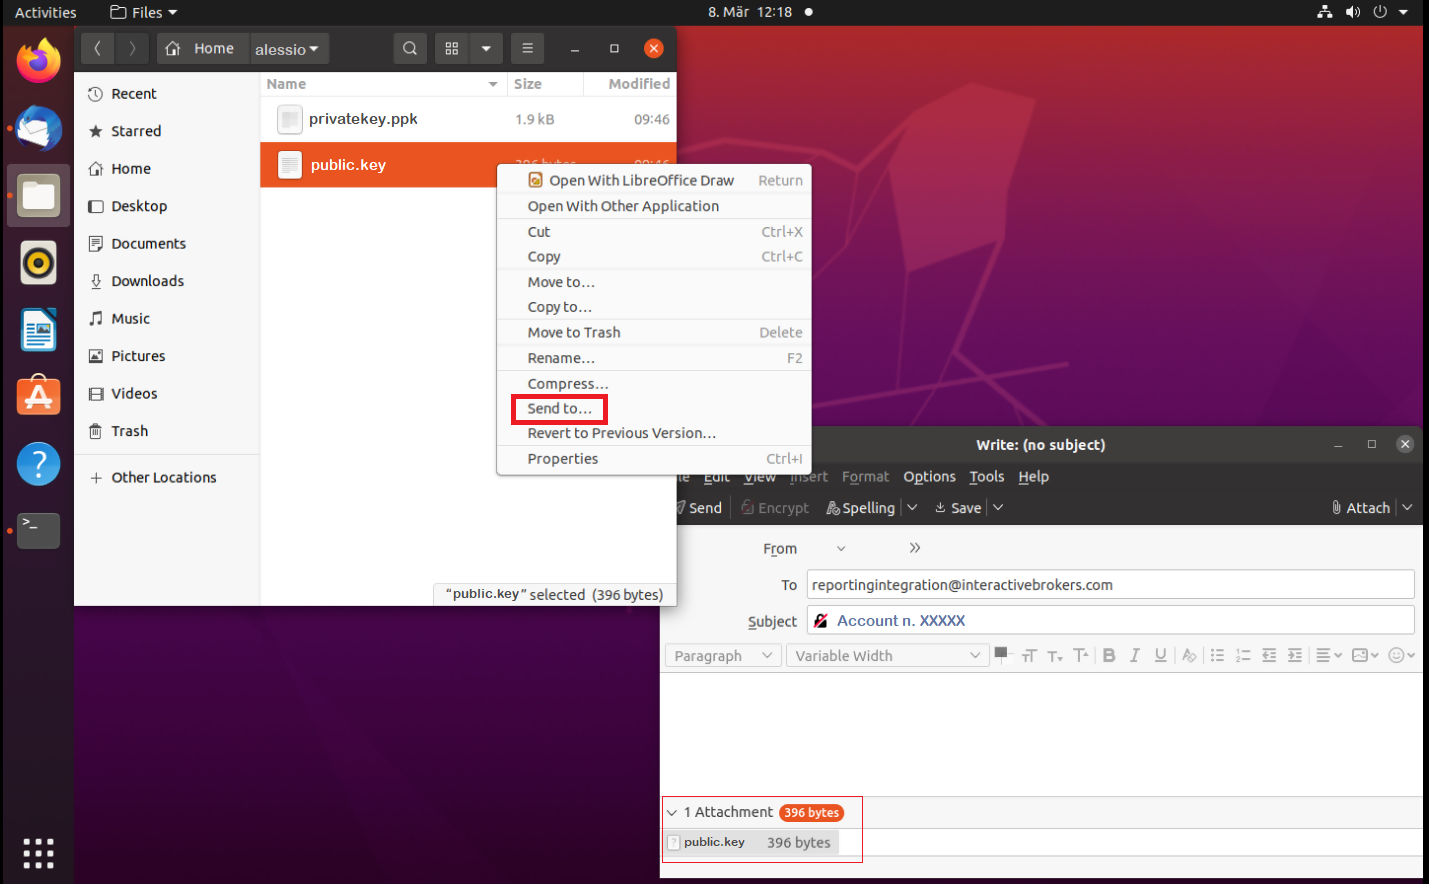
15. Click on the folder icon on the left hand toolbar of your Desktop. This will launch the File application.
16. Move to the folder where you saved your Key pair (normally your user folder: /users/yourusername/). Right click on the file public.key and select Send to...
The file will be attached to an empty email. Send the email to the Reporting Integration Team, as per IBKB3842.
Important Note: do NOT send us your private key. Send us only your public one
Once IBKR has configured the parameters for your connection on our servers, you will be notified. After that, you will be able to access your sFTP repository by using the Site connection you have created in FileZilla. In case you have not yet set up a Site connection, please follow the steps from 6. to 14. which are a prerequisite to the below steps:
1. Click on the Applications icon in the bottom left corner of you screen.

2. In the search box, type FileZilla and then click on the FileZilla icon in the search results.
3. On the FileZilla top toolbar, click the down arrow icon and select the Site connection you previously created (e.g. IBKR sFTP)

4. FileZilla will now establish a connection to our sFTP Server and show the files present in your repository.
Common issues and solutions
A. The Login Credentials Provided are Incorrect
-
Ensure the correct login details are being used to connect to the sFTP server. The username and password you are entering should match the ones you have received from the Reporting Integration Team.
-
Confirm you have configured your sFTP Client to use the Private Key file for the logon authentication (see steps 9. and 10. of the above procedure.)
B. Server Refused Our Key
-
Try accessing the sFTP server using a different Client (CyberDuck, ect.)
-
Ensure the Private Key file being used to Authenticate the server login attempt is related to the Public Key you originally sent to the Reporting Integration Team.
-
Should the above checks be unable to resolve the issue, please generate a new RSA Public/Private Key pair and send only the Public part to the Reporting Integration Team, as per IBKB3842.
C. Connection Timed Out
-
In case you have an antivirus or a security software installed on your machine, make sure it is not blocking the FTP connection attempt. Normally, security software allows to set up exceptions for specific connections in order to whitelist them.
-
Verify that the public IP Address of the machine running the sFTP client, is the same you have originally provided to the Reporting Integration Team for being whitelisted. You can discover your public IP Address by searching the Internet for “what is my IP”. If your current IP Address is not the same you provided to us, please send it to our Reporting Integration Team for being whitelisted.
-
Ask your network administrator/s to confirm that your firewall allows both incoming and outgoing traffic from/to xfer.interactivebrokers.com on port TCP 32.
-
Should the above steps be unable to resolve the issue, please generate a new RSA Public/Private Key pair and send only the new Public part to our Reporting Integration Team, as per IBKB3842.
References
KB3968 - Generate a key pair using GPG for Windows
KB4205 - Generate a key pair using GPG Suite on macOS
KB4108 - Decrypt your Reports using GPG for Windows
KB4210 - Decrypting Reports using your PGP Key pair on macOS
KB4407 - Generate RSA Key Pair on Windows
KB3968 - Generate a key pair using GPG for Windows
KB4205 - Generate a key pair using GPG Suite on macOS
KB4108 - Decrypt your Reports using GPG for Windows
KB4210 - Decrypting Reports using your PGP Key pair on macOS
KB4407 - Generate RSA Key Pair on Windows
KB4578 - How to Access your Reports using FTP on Windows
KB4580 - How to Access your Reports using FTP on MacOS
KB4409 - How to set up sFTP for using Certificate Authentication on Windows
KB4410 - How to set up sFTP for using Certificate Authentication on macOS
KB4411 - How to backup your public/private Key pair
KB4323 - How to transfer your public/private key pair from one computer to another
KB4410 - How to set up sFTP for using Certificate Authentication on macOS
KB4411 - How to backup your public/private Key pair
KB4323 - How to transfer your public/private key pair from one computer to another
Cryptocurrency Trading at Interactive Brokers Hong Kong
How do I trade cryptocurrency with Interactive Brokers HK?
Before you can trade cryptocurrencies, you need to log into Client Portal and request Cryptocurrency trading permissions. To add the trading permissions:
- Login into Client Portal and selecting the User menu (head and shoulders icon in the top right corner) followed by Settings
- Under Account Settings find the Trading section and click on Trading Permissions.
- Select Cryptocurrency permissions and complete the steps on screen.
Please note, you must be a “Professional” Investor in order to be eligible for Cryptocurrency trading permissions.
Once trading permissions are approved you will be able to trade Bitcoin (BTC) or Ethereum (ETH) in the same way that you trade other products via your Interactive Brokers HK account. Search for the symbol and open it in Quote Details or add it to your Watchlist. Select the symbol to trade, then complete the available parameters to create and then submit the order.
What cryptocurrencies can I trade with Interactive Brokers HK?
Interactive Brokers HK currently offers trading in Bitcoin (BTC) and Ethereum (ETH).
Where are my cryptocurrency assets held?
Cryptocurrency trading through Interactive Brokers Hong Kong is powered by OSL Digital Securities, the world's first Type 1 and 7 Securities and Futures Commission (SFC)-licensed digital asset brokerage and trading platform for professional investors. Interactive Brokers HK customer positions will be maintained 100% in wallets in cold storage with OSL Digital Securities.
What are the trading hours for crypto trading?
IBHK supports cryptocurrency opening and closing trades from Sunday at 3 AM EST through Friday at 4PM EST.
Only closing trades (sells) are supported from Friday at 4 PM EST through Sunday at 3 AM EST.
Who is eligible to trade cryptocurrency with Interactive Brokers HK?
You must be a Professional Investor in order to qualify for Cryptocurrency trading. Eligible clients include individuals with over HKD 8 million in investable assets or institutions with assets greater than HKD 40 million who are residents of Hong Kong.
Are there added spreads or markups for cryptocurrency trades? What are the commissions on crypto trades?
No, there are no added spreads or markups. Cryptocurrency trading on Interactive Brokers’ platform has a low commission of just 0.20% to 0.30% of trade value depending on monthly trade volume with a USD 2.25 minimum per order.
A monthly custody fee of 8 basis points will also be charged on the average daily value of cryptocurrency held in your account.
What order types can I use for cryptocurrency orders?
You can trade cryptocurrencies only using Market or Limit orders. Market orders can be submitted in cash value only (e.g. $10000 worth of BTC). Limit orders can be submitted in either trade value or quantity terms, but the entered trade value will be converted to quantity and transmitted to OSL in quantity terms.
Are cryptocurrency positions marginable?
No, cryptocurrency positions are not marginable.
Can I deposit Bitcoin into/withdraw Bitcoin from my Interactive Brokers HK account?
No, deposits and withdrawals in Bitcoin/Ethereum are not supported.
Are there limits on the amount of cryptocurrency that can be traded/held in my Interactive Brokers HK account?
Cryptocurrency trading is limited to the lesser of 10% of the account’s total equity or USD 1 million.
Can I short-sell cryptocurrencies in my Interactive Brokers HK account?
No, IBHK does not support the short-selling of cryptocurrencies.
How long does it take for cryptocurrency trades to settle at Interactive Brokers HK?
Cryptocurrency trades settle in real time.
What is the minimum order size for cryptocurrency trades at Interactive Brokers HK?
The minimum order size for cryptocurrency trades at Interactive Brokers HK is USD 10.
What times-in-force can I use when trading cryptocurrencies with Interactive Brokers HK?
Times-in-force for BUY limit orders:
- IOC: Immediate or cancel
- Minutes: Order is canceled if not filled within five (5) minutes.
Times-in-force for SELL orders:
- IOC: Immediate or cancel
- Minutes: Order is canceled if not filled within five (5) minutes.
- Day: Order is canceled if not filled by the end of the trading day.
- GTC: Good til Canceled
How to Access Your Reports Using FTP on Windows
Overview:
This tutorial assumes you received reports via email or via FTP that were encrypted with the public key you sent to IBKR. If you need guidance to set up the encrypted statement delivery, please refer to this article, which is a prerequisite to the instructions below.
There are multiple methods to access the IBKR FTP server. FTP clients such as Filezilla can be used or you could as well launch the command ftp ftp2.interactivebrokers.com from the Command Prompt or use the Windows Explorer. In this article, we explain how to realize the connection to the IBKR FTP server using Windows Explorer.
Important Note: You will not be able to connect using your browser.
Once you are connected to the IBKR FTP Server, you will have both read and write access to your folder. The retention policy for the files is 100 days - IBKR will automatically purge files after that.
To access your reports using Windows File Explorer:
1. Open the Windows File Explorer by either pressing Windows Key + E on the keyboard. Alternatively, you can type File Explorer into the Windows search box and click on Open
2. In the File Explorer window, type the FTP address, ftp://ftp2.interactivebrokers.com, into the file path at the top of the window and hit Enter.
.png)
3. A window prompting your for credentials will appear. Enter the FTP username and password IBKR provided you with into the correspondent fields and click Log On.
.png)
4. You now have direct access to your FTP folder. Documents and files contained in your FTP folder can now be decrypted using your PGP key, as described in IBKB4108.
.png)
Common issues and solutions
A. Could not log in to the FTP server with the username and password specified
Ensure the correct login details are being used to connect to the FTP server. The username and password you are entering should match the ones you have received from the Reporting Integration Team.
B. Connection Timed Out
-
Enable the Passive (PASV) mode for FTP connections. press Windows Key + S, type Internet Options and open the panel. Move to the Advanced tab and activate the option Use Passive FTP (for firewall and DSL modem compatibility). The passive mode is more firewall-friendly then the active one, since all the connections are initiated from the Client side. If you are using a specific FTP Client, check its connection settings or advanced settings in order to find and enable the Passive (PASV) mode switch.
-
In case you have an antivirus or a security software installed on your machine, make sure it is not blocking the FTP connection attempt. Normally, security software allows to set up exceptions for specific connections in order to whitelist them.
-
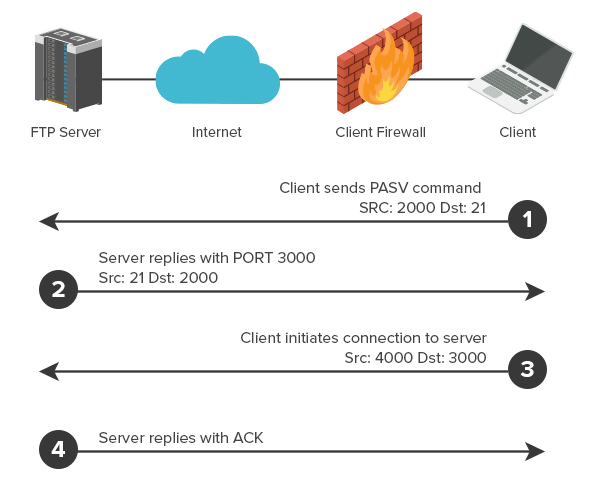
Should the above steps be unable to resolve the issue, ask your network administrator/s to confirm that your firewall allows traffic from/to ftp2.interactivebrokers.com. Note: Your network administrator should consider that every time your FTP Client attempts connecting to our FTP server with Passive mode, it establishes two connections: a command channel (outbound, from random TCP port above 1024 to TCP port 21) and a data channel (outbound, from a random TCP port above 1024 to the TCP port above 1024 which was negotiated through the command channel). Both connections are initiated by the Client side. In the picture below, you can find an example of this connections schema. Please notice that the ports 2000, 3000, 4000 are examples of randomly selected ports and may very well not correspond to the ones used within your specific FTP connection attempt.
References
KB3968 - Generate a key pair using GPG for Windows
KB4205 - Generate a key pair using GPG Suite on macOS
KB4108 - Decrypt your Reports using GPG for Windows
KB4210 - Decrypting Reports using your PGP Key pair on macOS
KB4407 - Generate RSA Key Pair on Windows
KB4580 - How to Access your Reports using FTP on MacOS
KB4409 - How to set up sFTP for using Certificate Authentication on Windows
KB4410 - How to set up sFTP for using Certificate Authentication on macOS
KB4411 - How to backup your public/private Key pair
KB4323 - How to transfer your public/private key pair from one computer to another
KB4409 - How to set up sFTP for using Certificate Authentication on Windows
KB4410 - How to set up sFTP for using Certificate Authentication on macOS
KB4411 - How to backup your public/private Key pair
KB4323 - How to transfer your public/private key pair from one computer to another
How to Upload a Diagnostic Bundle from an IBKR Platform
Overview:
Some support related issues require diagnostics files and logs to be uploaded along with screenshots. The information will help our team to investigate and resolve the issue that you are experiencing.
This article will help you with detailed steps on how to upload diagnostics files and logs from various Interactive Brokers’ trading platforms.
Note: IBKR does not monitor the diagnostic bundle repository throughout the day. Should you spontaneously decide to upload a diagnostic bundle, without being instructed by Interactive Brokers, please inform our Client Services via Message Center ticket or phone call otherwise your error report will go unnoticed.
Please click on one of the links below, according to the platform you are using:
-
IBKR Mobile (Android)
-
IBKR Mobile (iOS)
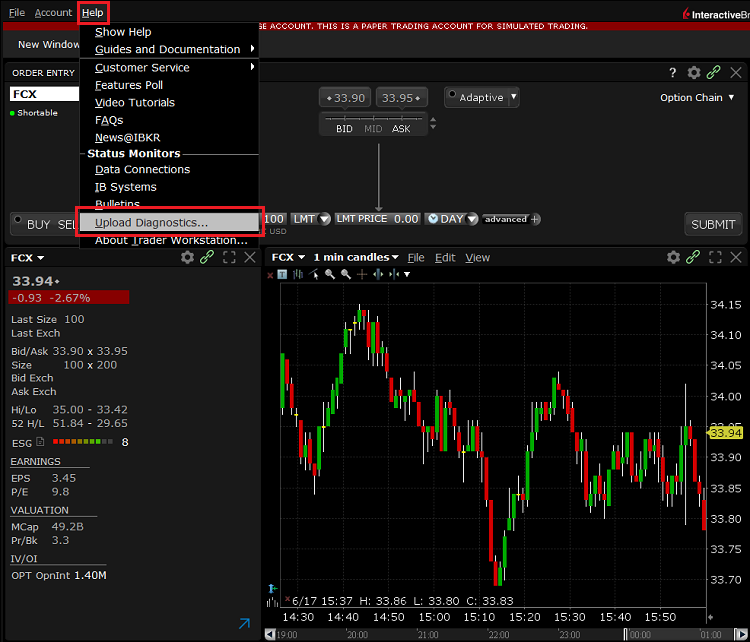
1. Log in to TWS and try to replicate the issue that you are experiencing
2. Press ‘Help’ at the top left corner and select ‘Upload Diagnostics’. Alternatively, depending on your Operating System, you can use the following keyboard combinations
- For Windows and Linux Operating system: Press Ctrl+Alt+Q
- For Mac: Press Cmd+Option+H
3. The ‘Upload Diagnostics’ window will appear. You may enter the reason for uploading diagnostics in the text box
4. If an Interactive Brokers representative has instructed you to include previous days logs or select specific options when uploading diagnostics, click the dropdown on the right top corner, select ‘Advanced View’ and tick the correspondent checkboxes which will appear on the bottom left part
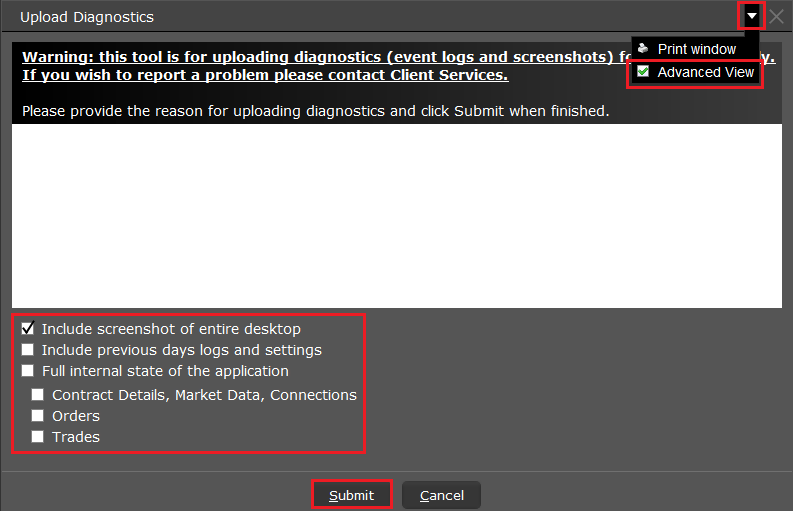
5. Make sure the checkbox ‘Include screenshot of entire desktop’ is enabled and press ‘Submit’
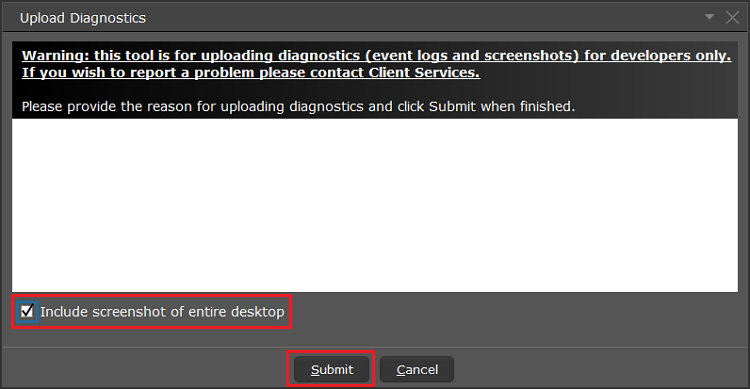
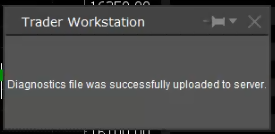
6. Do not perform any action/activity on your computer until you see the below pop-up, confirming that the diagnostics have been successfully uploaded
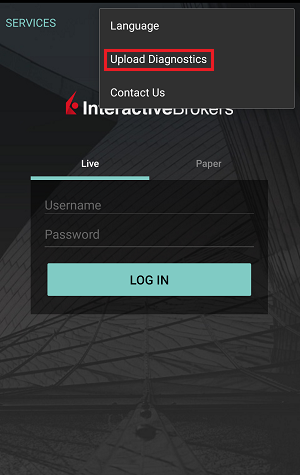
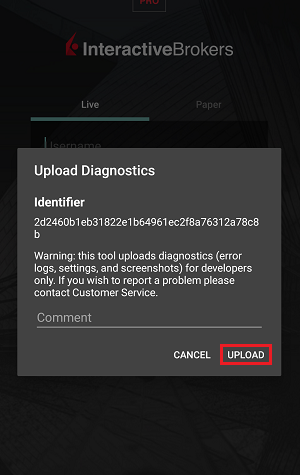
A) If you are at the login Screen:
1. Tap the three dots icon in the right top corner and select ‘Upload Diagnostics’
2. Add your username in the comment section and tap ‘Upload’
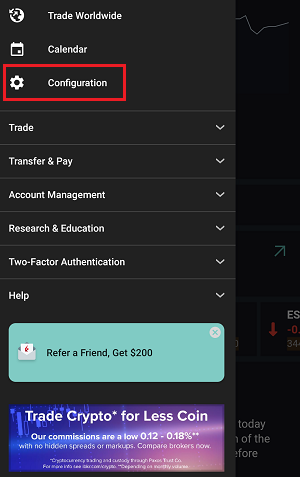
1. Tap the three lines icon in the top left corner to open the menu
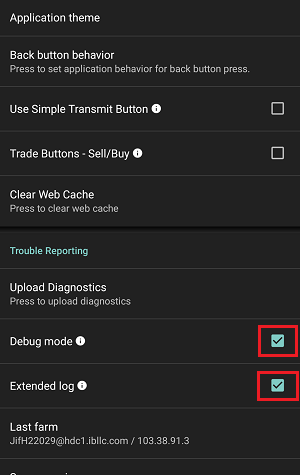
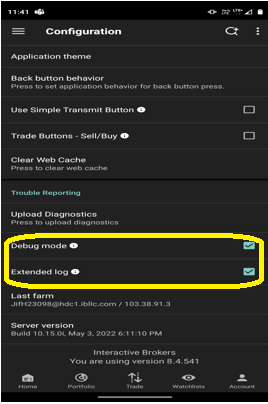
2. Tap ‘Configuration’> ‘Trouble Reporting’> enable the check box next to ‘Debug mode’
3. If requested by an Interactive Brokers representative, enable the check box next to ‘Extended Log’ as well
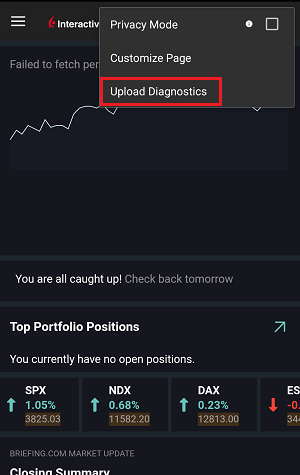
5. Tap the three dots icon in the top right corner of the screen and select ‘Upload Diagnostics’
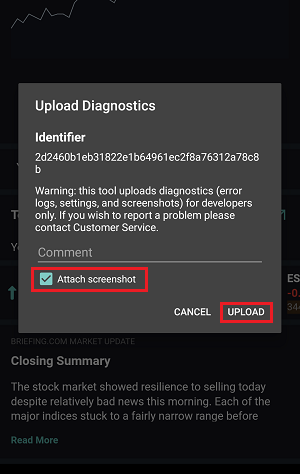
6. Enter your comments in comment section and enable the checkbox next to ‘Attach Screenshot’. Then tap ‘Upload’
A) If you are at the login Screen:
1. Tap five times in a quick sequence on the IBKR logo to open the testing menu
2. Under Configuration, enable the toggle button next to ‘Debug mode’
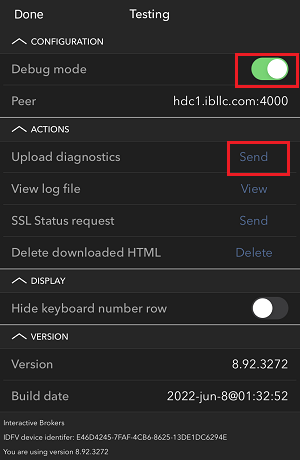
3. Tap ‘Send’ next to ‘Upload diagnostics’
4. Enter your username in the comments section and tap ‘OK’
1. Capture screenshots displaying the issue you are experiencing directly on the phone (pressing together the physical buttons Power + Volume Up)
2. Tap the option ‘More’ in the right bottom corner of the screen
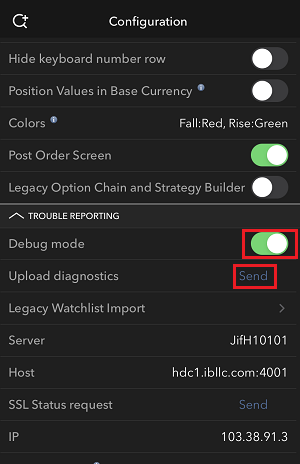
3. Tap ‘Configuration’ and expand the section ‘Trouble Reporting’
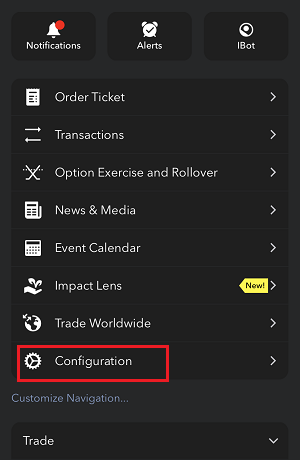
4. Enable the toggle button next to ‘Debug mode’ and, next to ‘Upload diagnostics’, tap ‘Send’
5. The ‘Send Diagnostics’ page will appear. Enter your comments in comment section
6. Tap the ‘Attach Image’ button to attach screenshots of the issue that you have previously saved in your camera roll
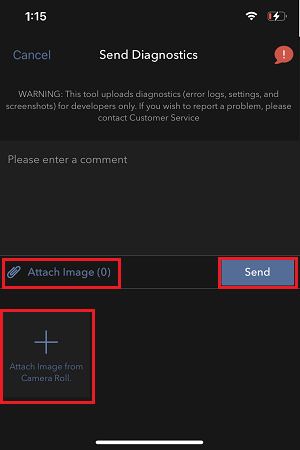
7. Tap ‘Send’
1. Log in to the app
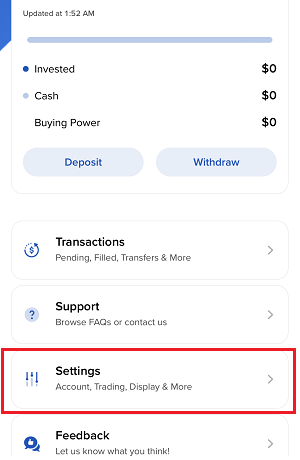
2. Tap the User icon in the top left corner and select ‘Settings’

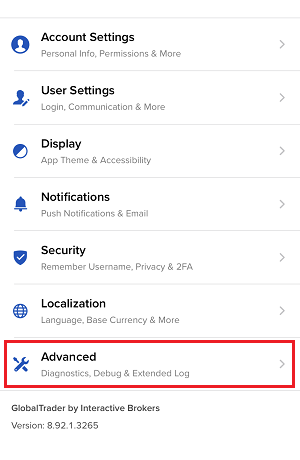
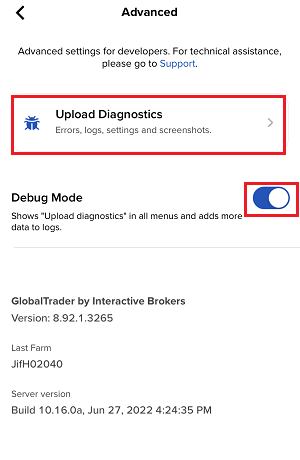
3. Tap the option ‘Advanced’ and enable the toggle button next to ‘Debug mode’
4. If requested by an Interactive Brokers representative, enable as well the toggle button next to ‘Extended Log’
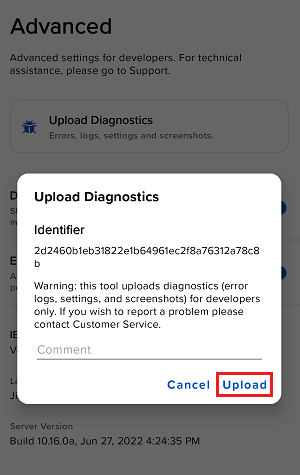
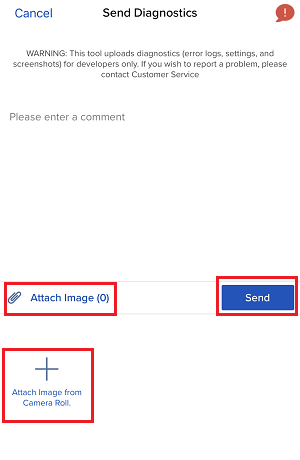
5. You will see an ‘Upload Diagnostics’ pop-up. Enter your comments in the field and tap ‘Upload’
Note: If you need to send us screenshots of IMPACT or IBKR GlobalTrader for Android, you would have to attach them to a Message Center web ticket, as explained in IBKB1071
1. Log in to the app
2. Capture one or more screenshots displaying the issue you are experiencing directly on the phone (pressing the physical buttons Power + Volume Up simultaneously)
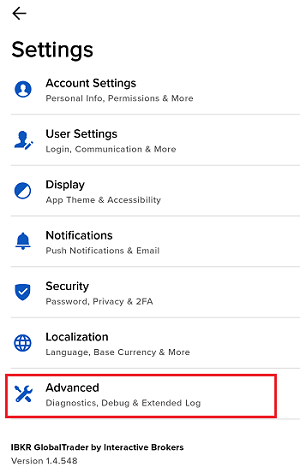
3. Now tap the User icon in the top left corner and select ‘Settings’
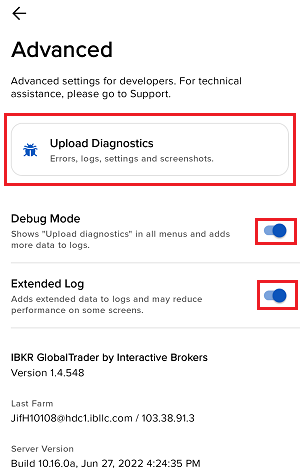
4. Tap ‘Advanced’
5. Enable the toggle button next to ‘Debug mode’ and tap ‘Upload Diagnostics’
6. The ‘Send Diagnostics’ screen will appear
7. Enter your comments in the field and tap ‘Attach Image’ to attach the screenshot/s you previously saved in your camera roll
8. Tap ‘Send’
A diagnostic trace for Client Portal can be captured following the steps on IBKB3512
I am unable to scan the QR Code in Client Portal. How can I add a User to IBKR Mobile Authentication (IB Key) for Android?
Requirements:
- The IBKR Mobile app must be installed and IBKR Mobile Authentication (IB Key) already activated on this Android device.
- For more information on the installation and activation on Android devices, please consult KB2277.
Instructions:
1) On your Android device, open the IBKR Mobile app.
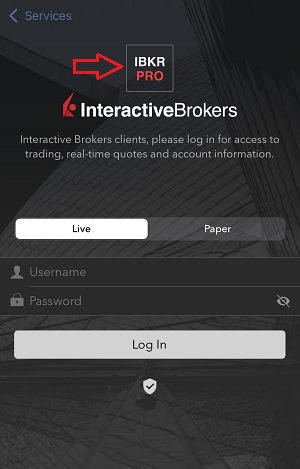
1.a) If the app opens with the login screen (Figure 1), tap on Services on the top-left corner (red arrow) and proceed with step 2)
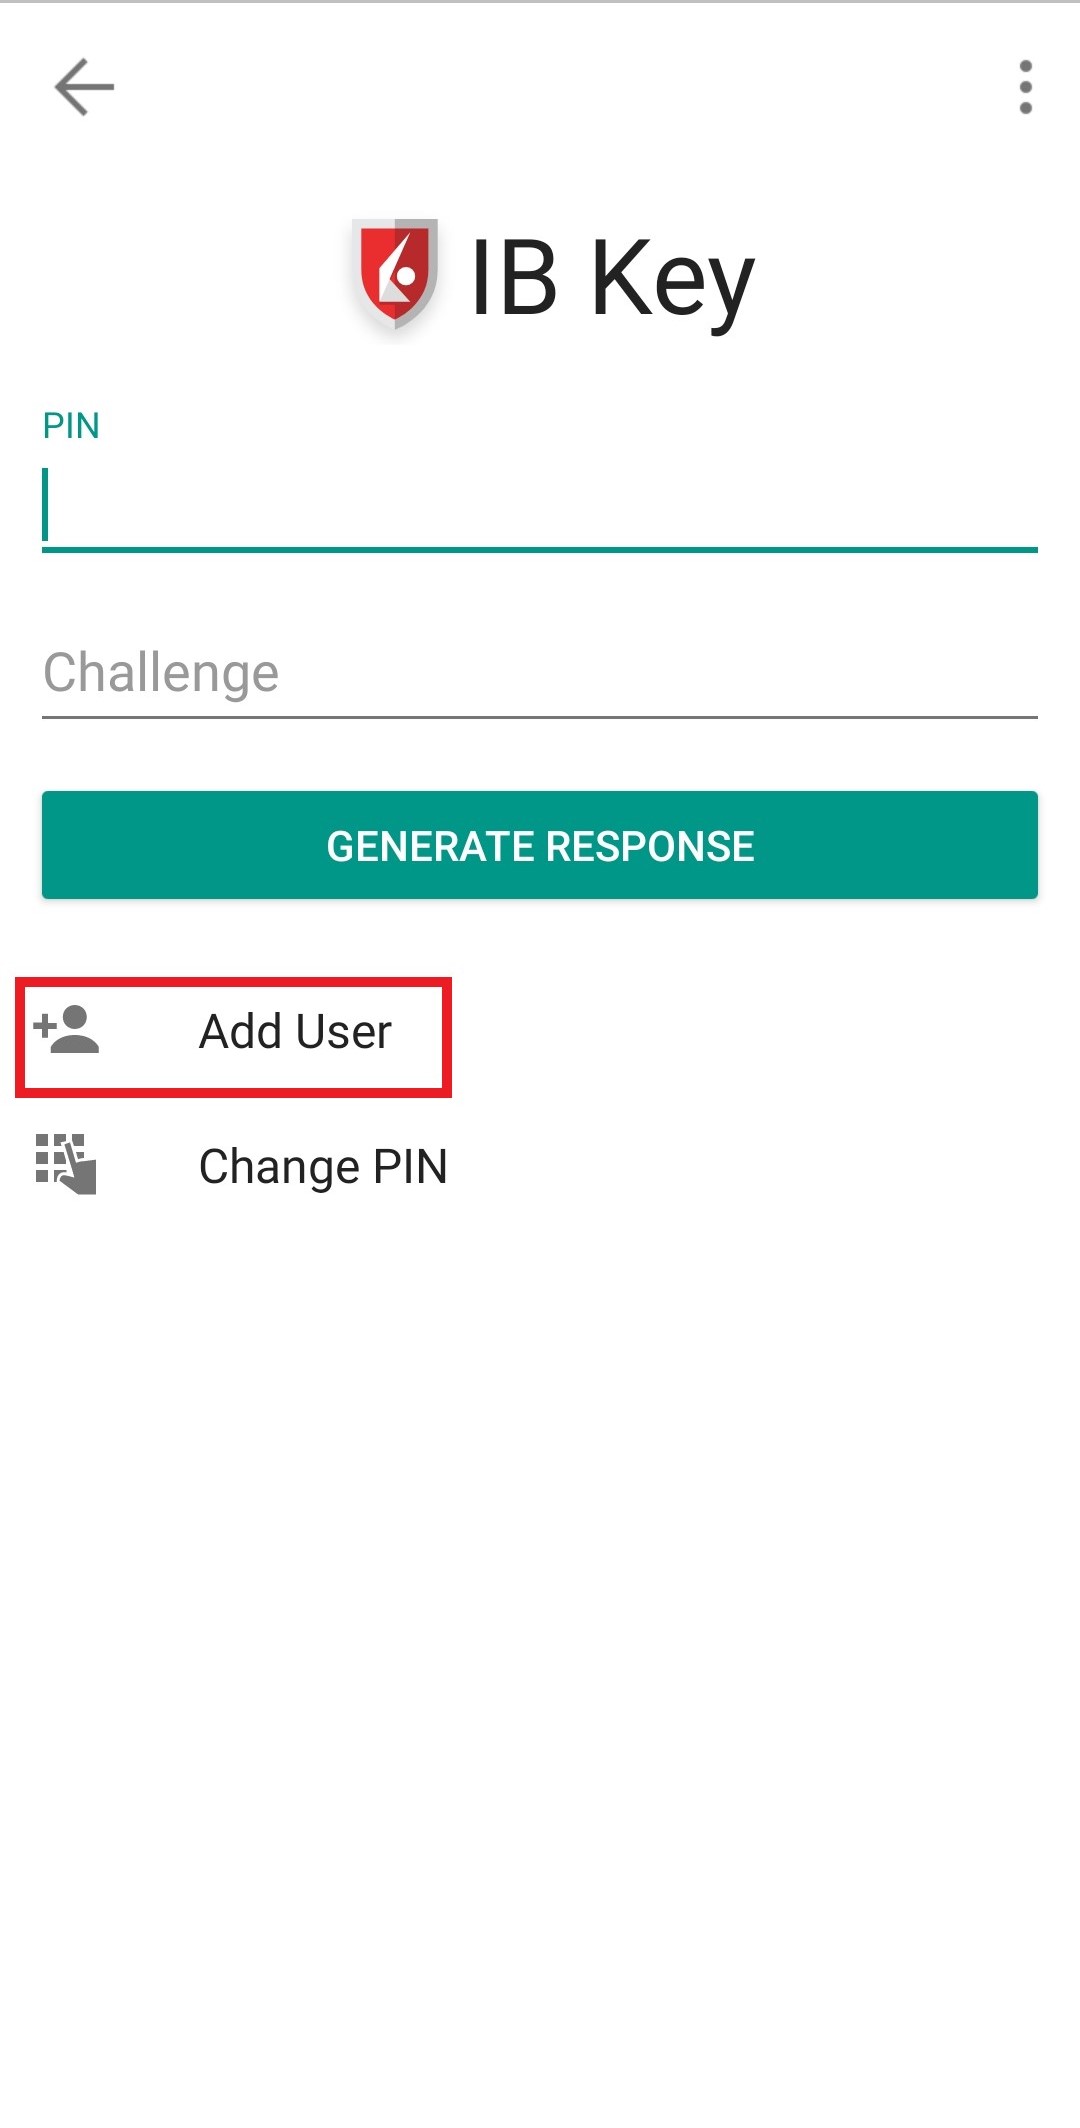
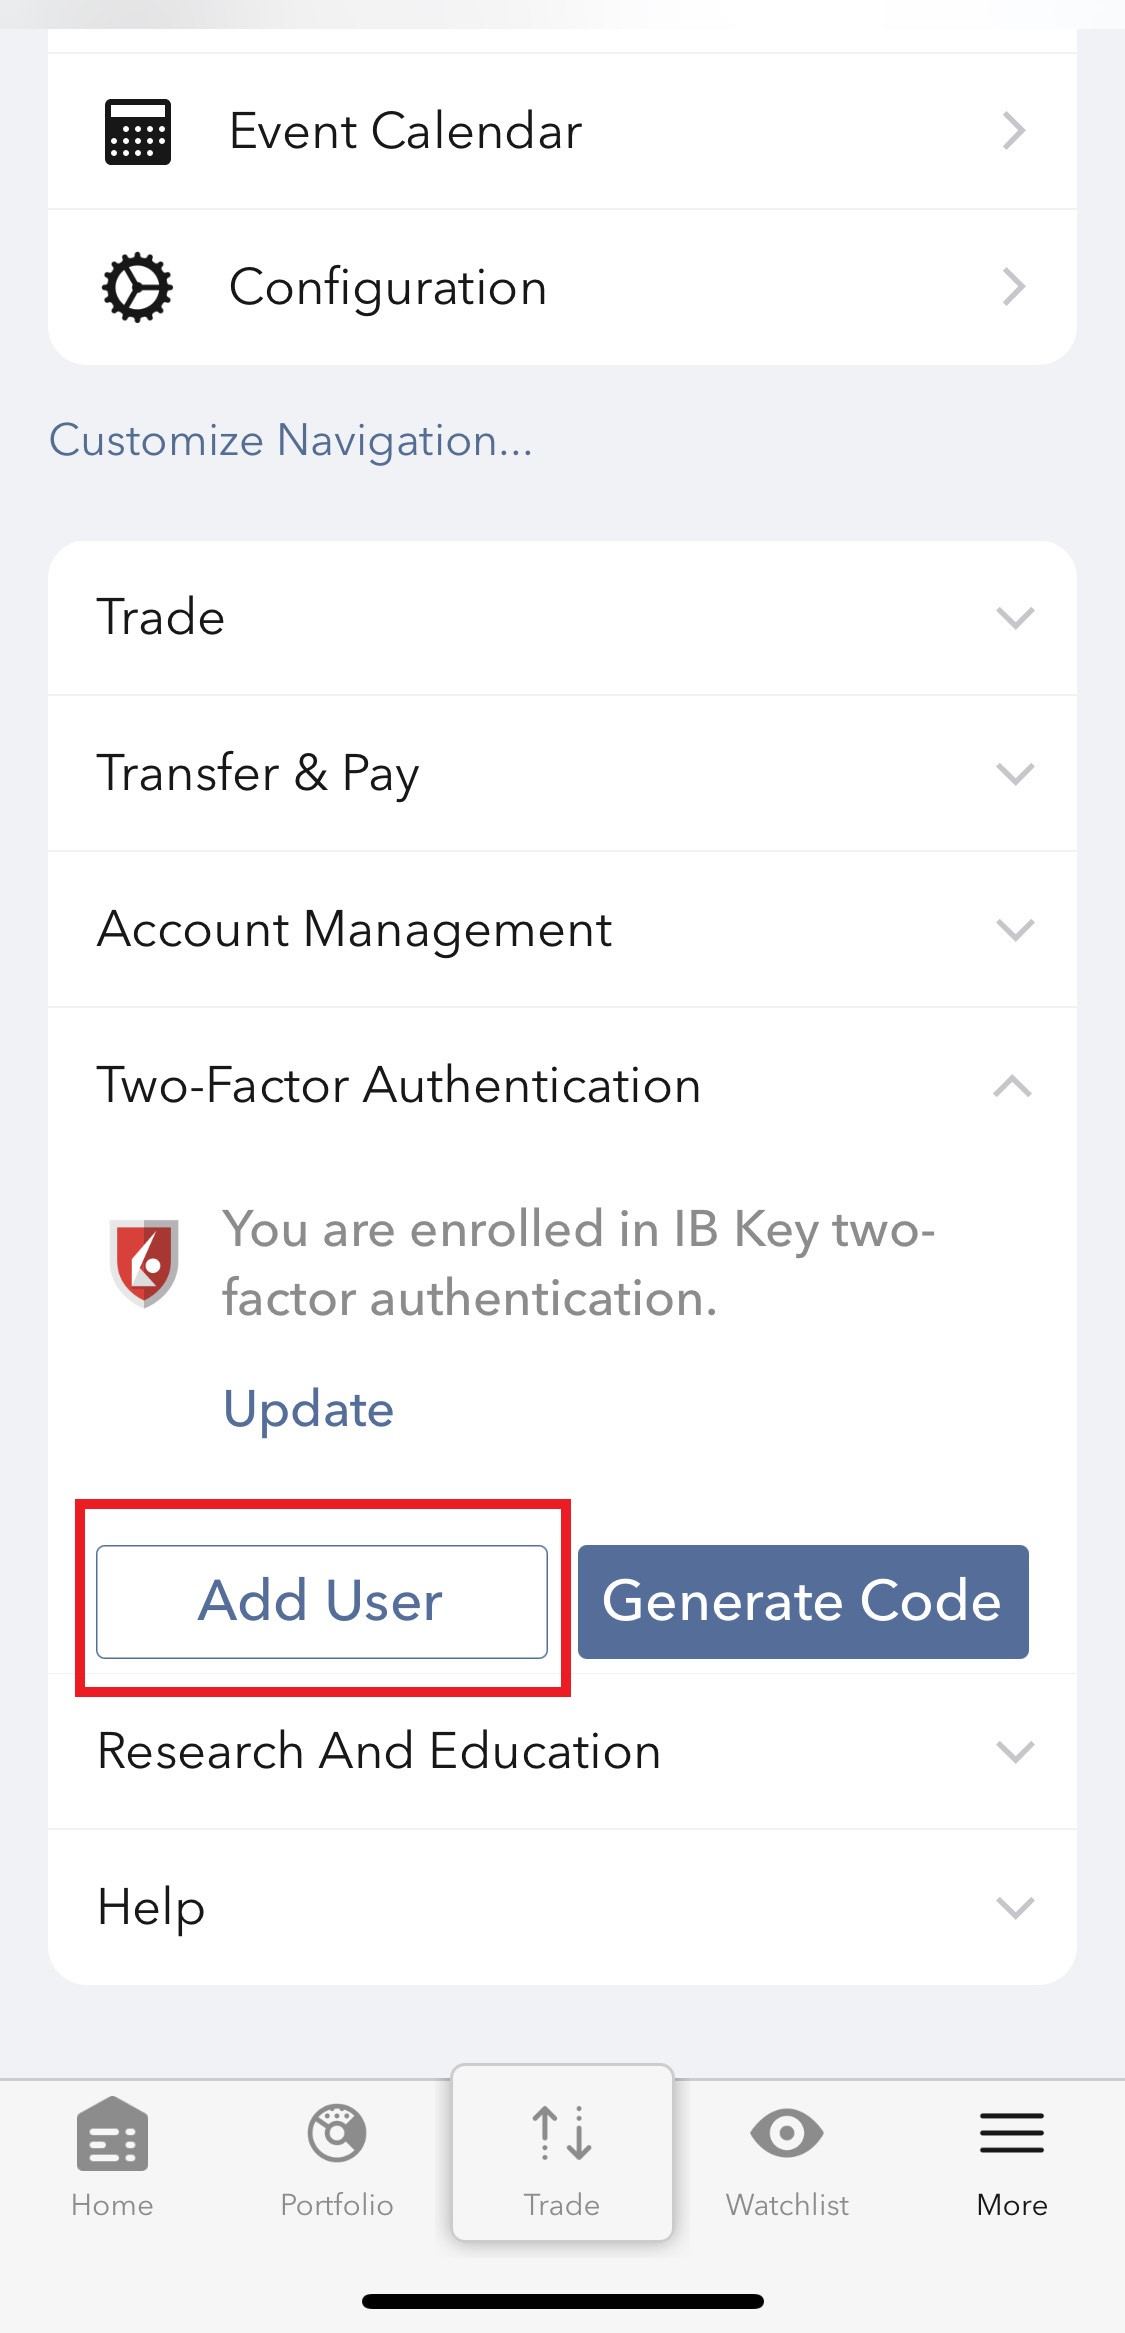
1.b) If the app opens with your Home Page, Portfolio, Watchlists, or similar, tap on More on the top-left corner (Figure 2). Then tap on Two-Factor Authentication (Figure 3), followed by Add User (Figure 4) and proceed with step 3)
Figure 1 Figure 2 Figure 3
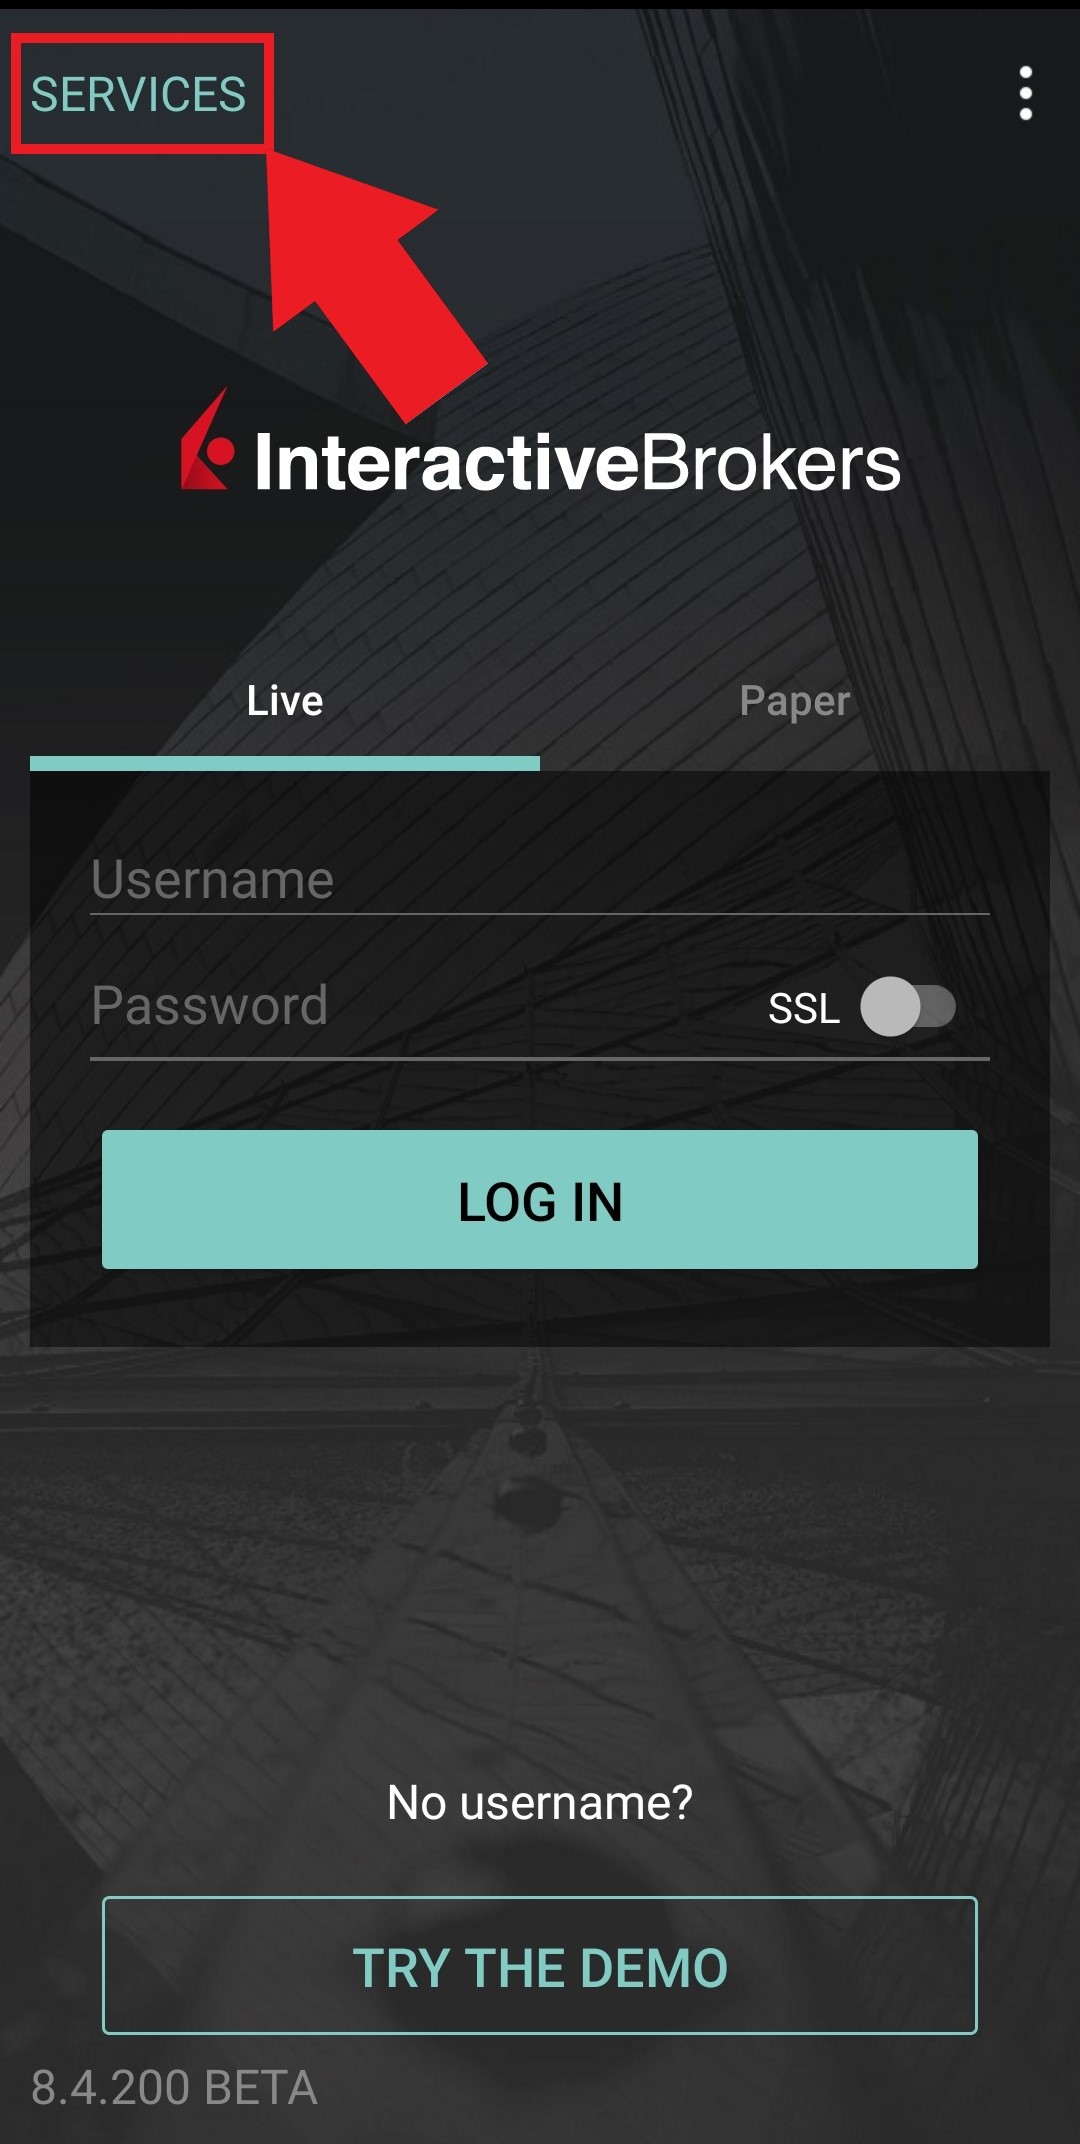

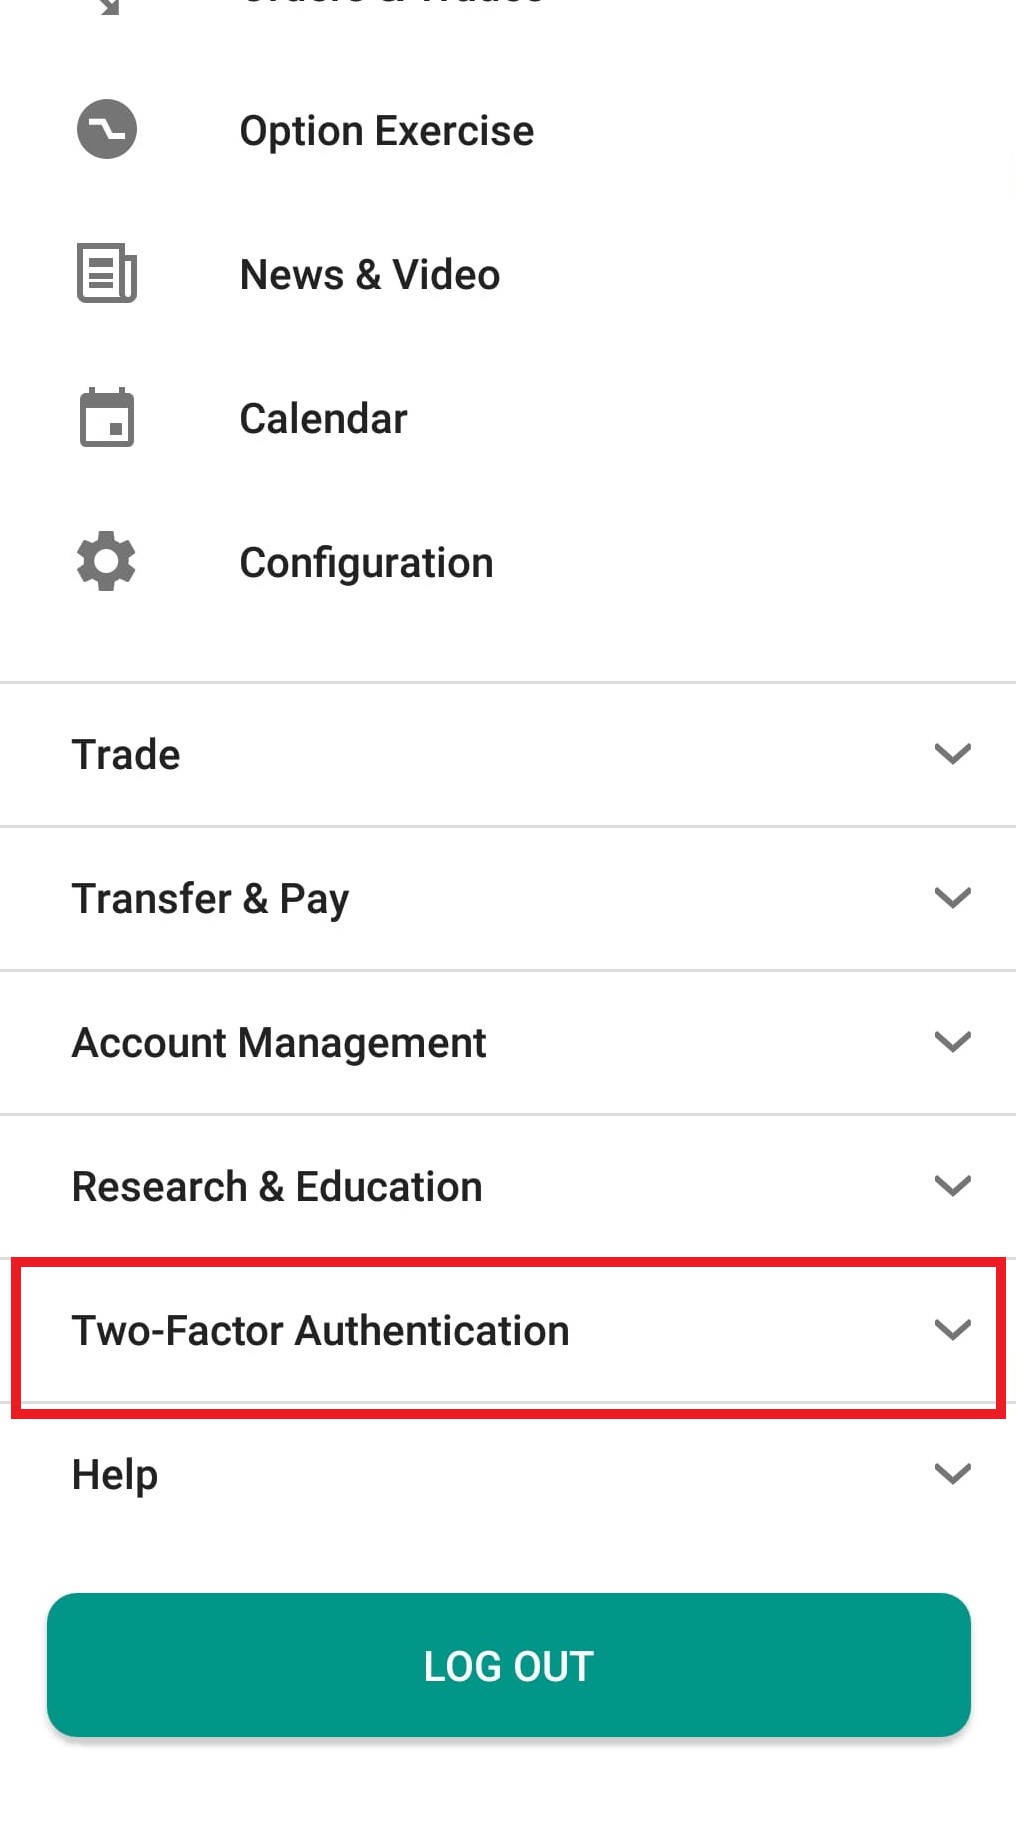
Figure 4

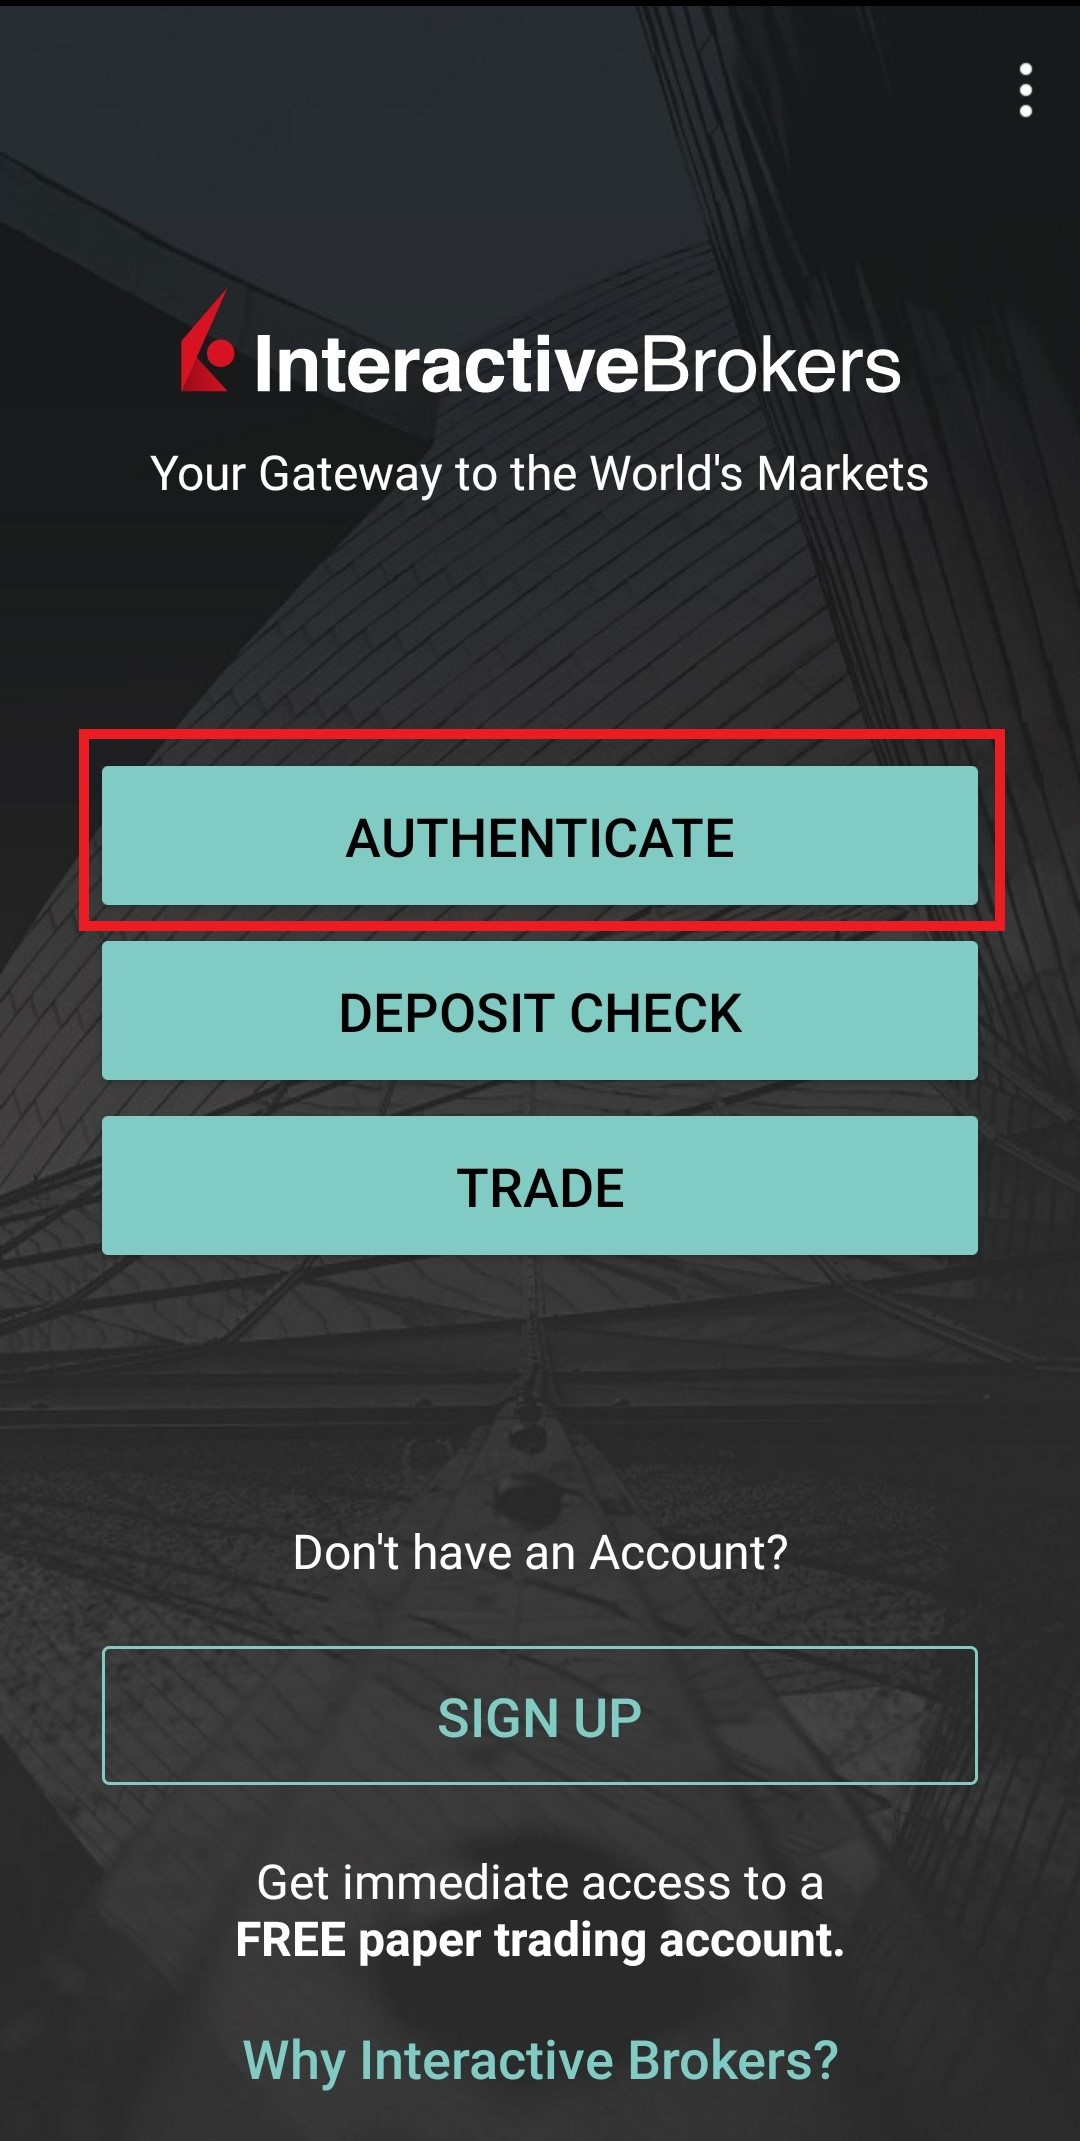
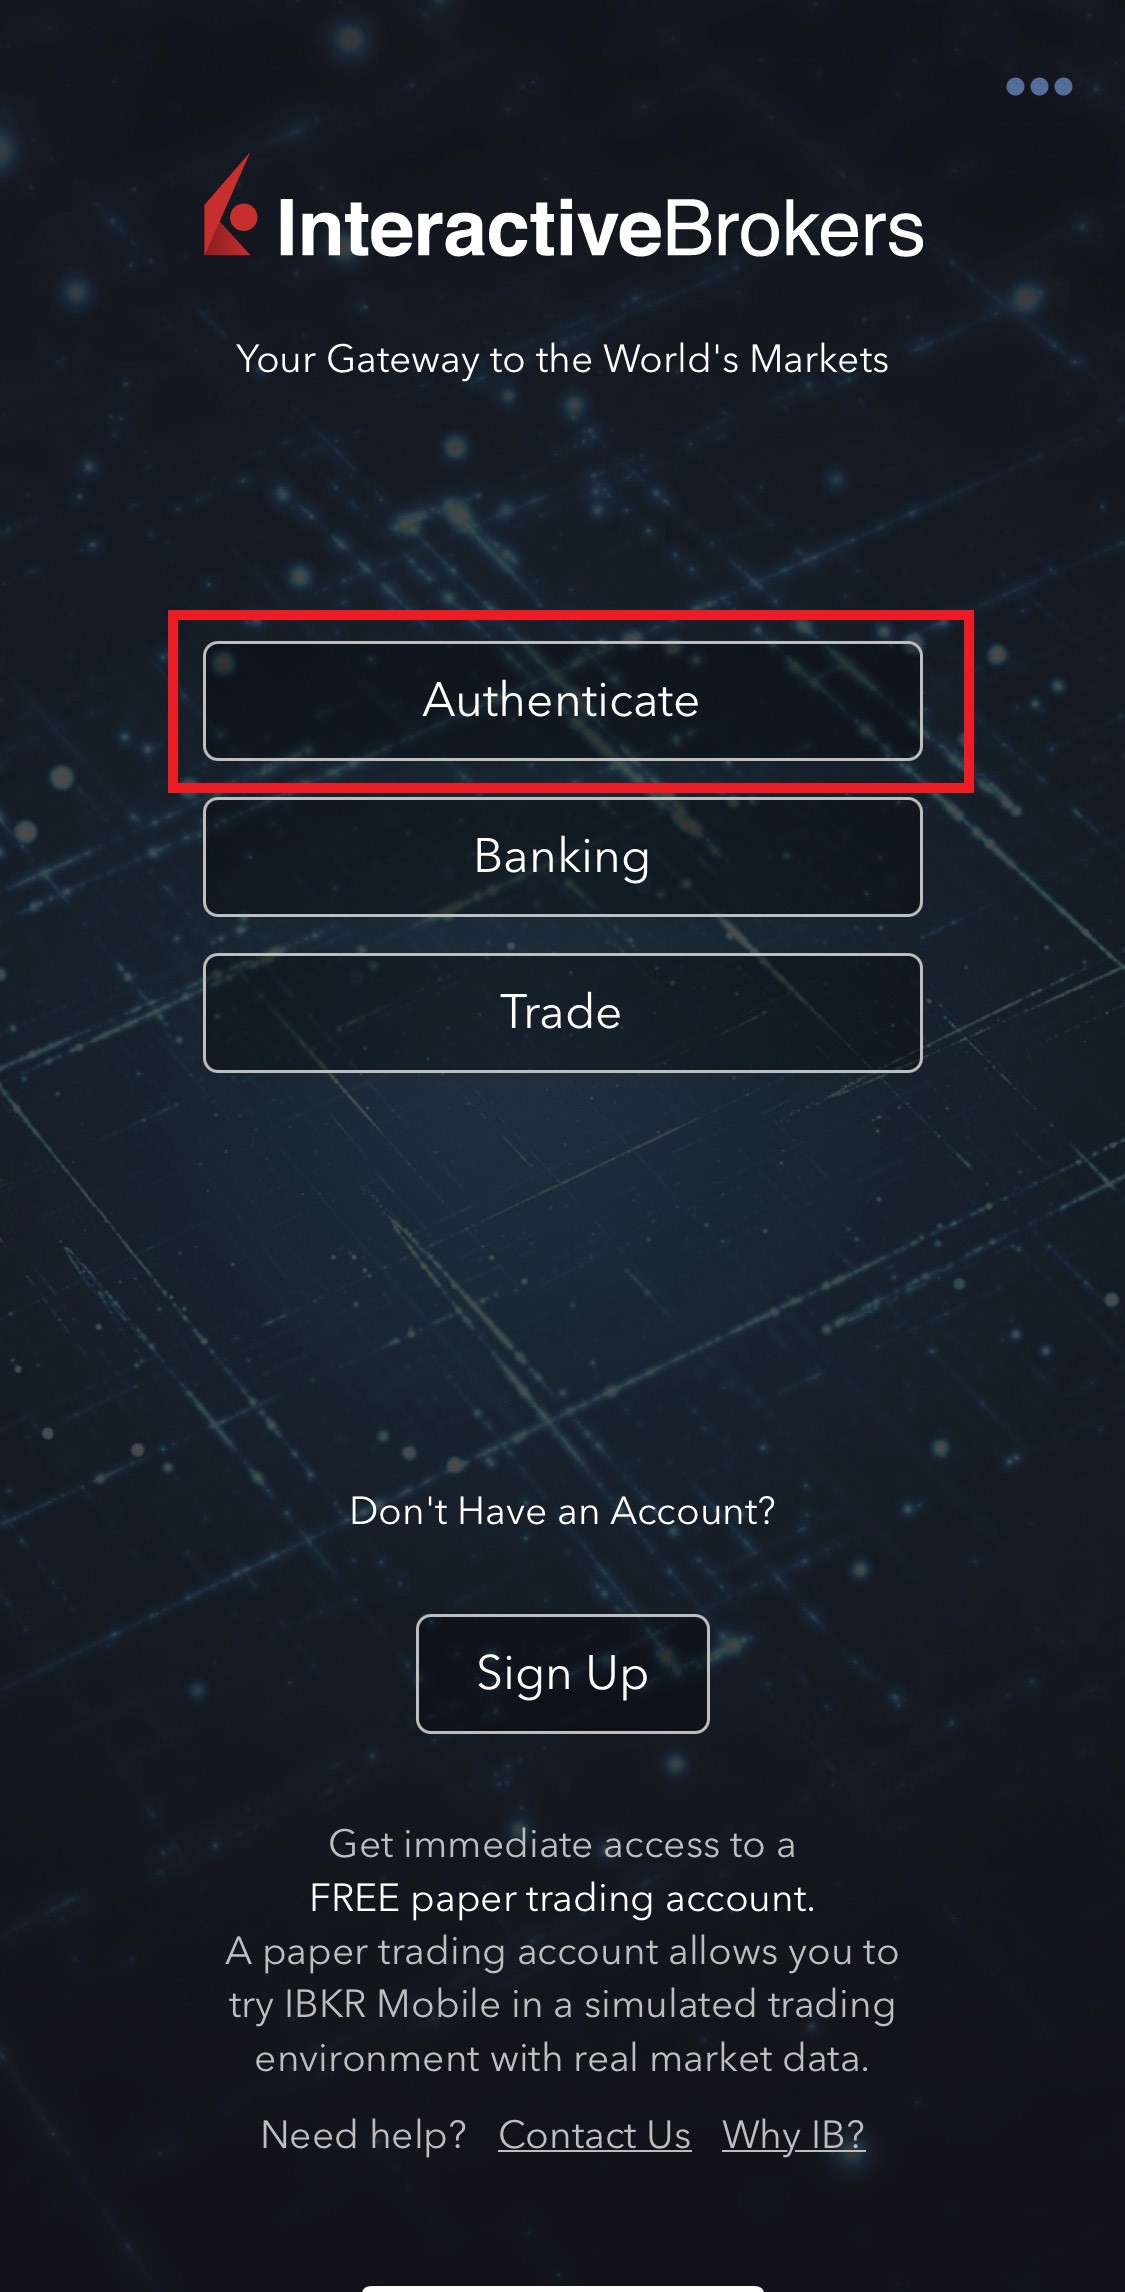
2) Tap on AUTHENTICATE (Figure 5) and then on Add User (Figure 6).
Figure 5 Figure 6


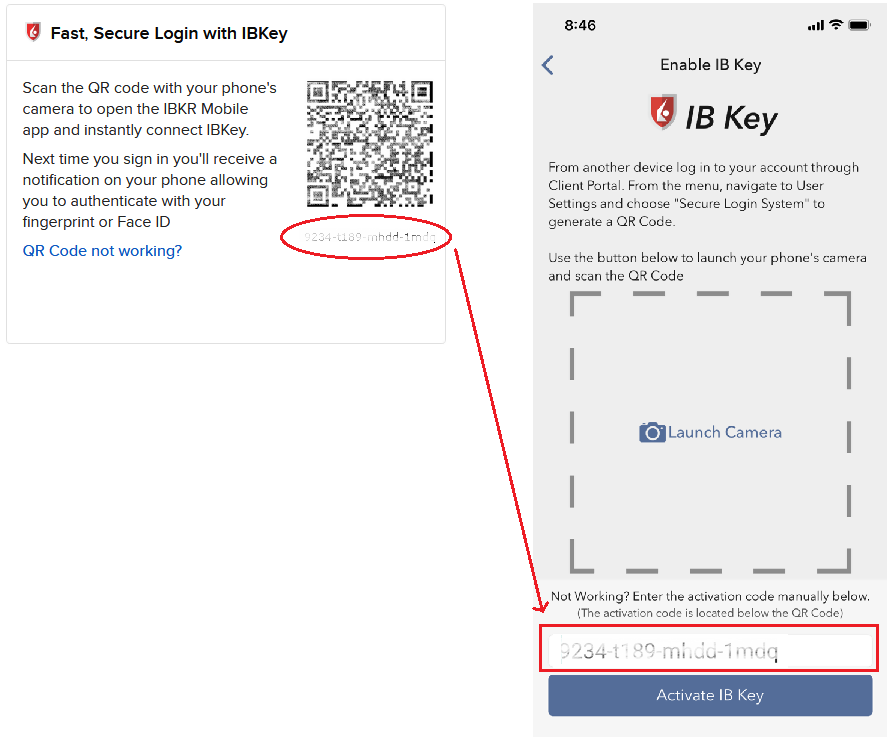
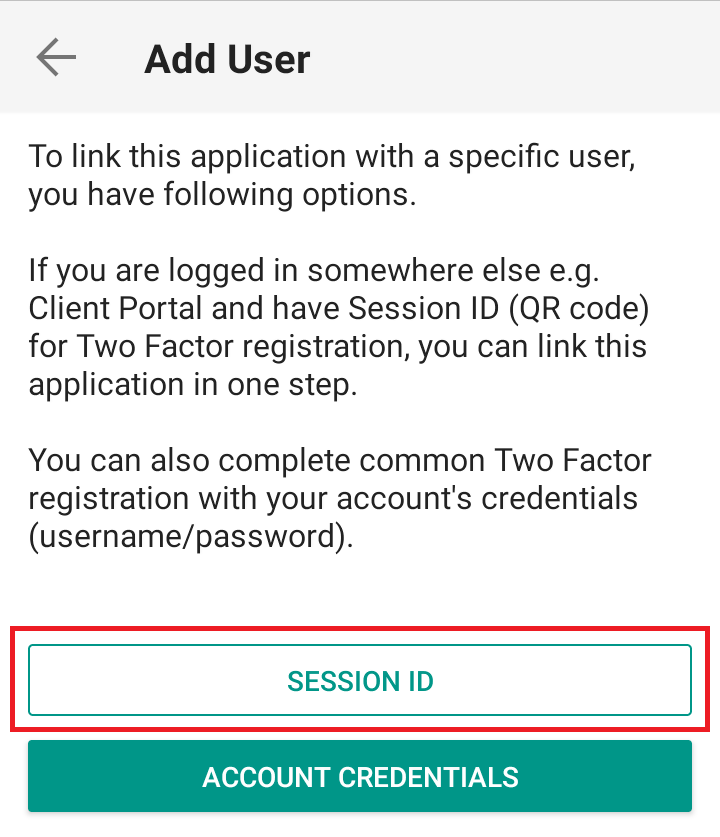
3) Read the instructions and then tap on SESSION ID (Figure 7).
Figure 7

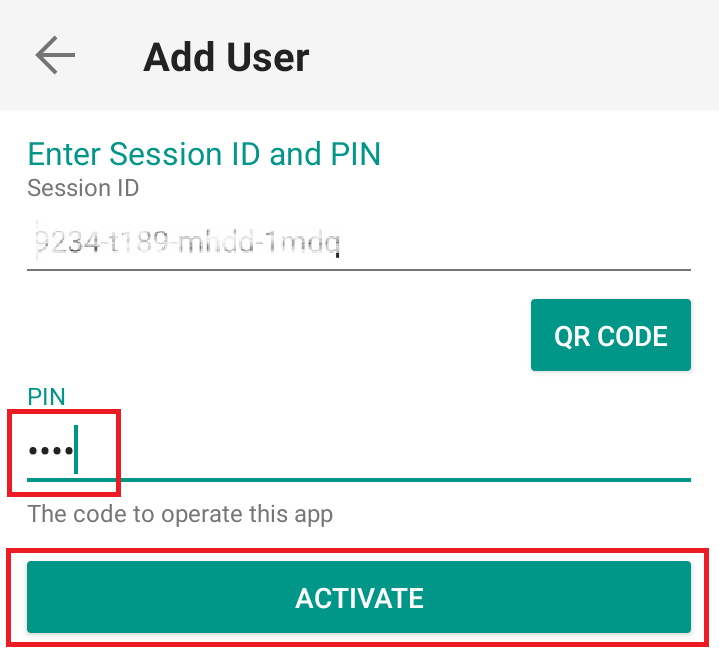
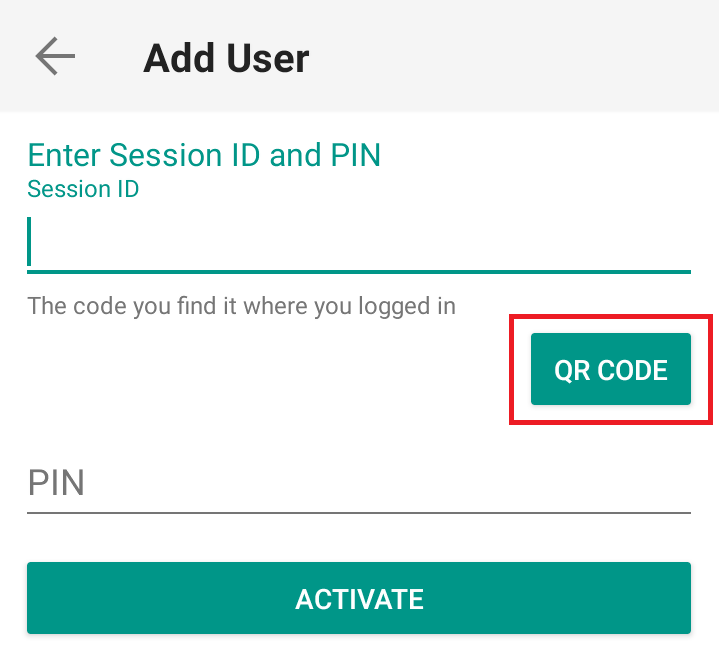
4) Type the alphanumeric string present below the QR code in the Session ID field (Figure 8).
Figure 8
.png)
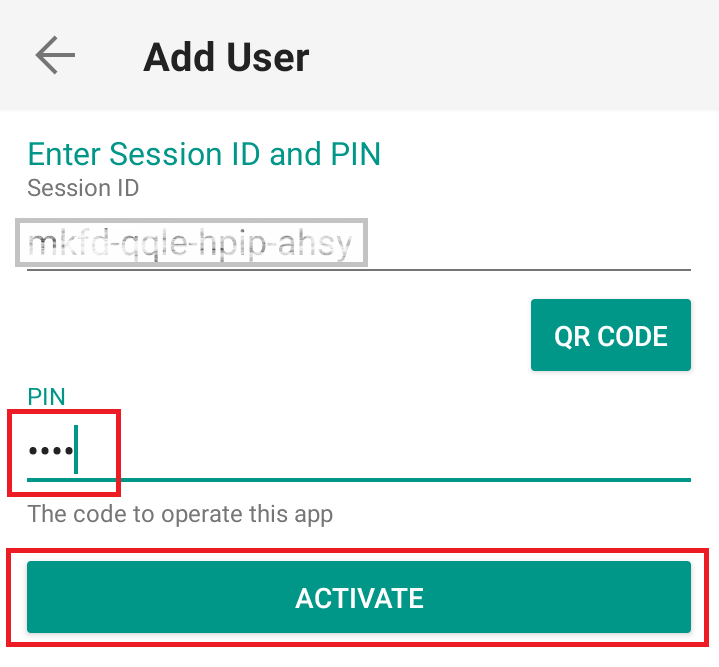
5) Provide your PIN then tap ACTIVATE (Figure 9).
Figure 9
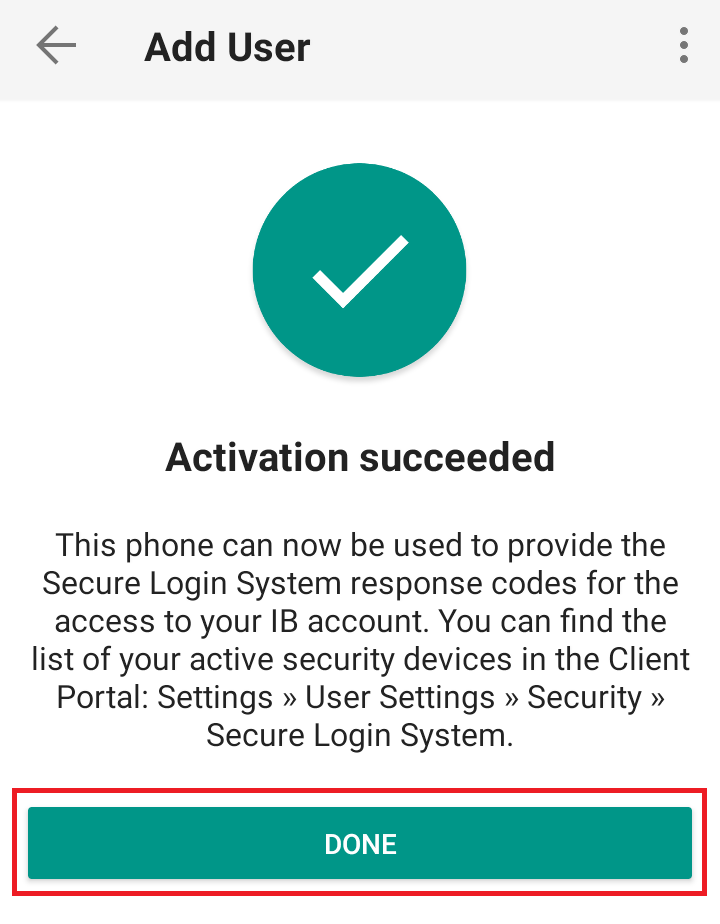
6) You will receive a message indicating the successful activation of IBKR Mobile Authentication (IB Key). Tap DONE to confirm (Figure 10).
Figure 10

Possible Issues and Solutions
- During the IBKR Mobile Authentication (IB Key) activation, I receive an error message "An error has occurred. Please try again."
Figure 11

This error message (Figure 11) may indicate you are attempting to activate the IBKR Mobile Authentication (IB Key) for a user which was already enrolled. Please try to log that user in to the Client Portal again. If you receive a notification on your smartphone once you have entered the credentials and you are able to complete the authentication once you tap on that notification, then the user was already enrolled and you no longer need to follow the steps on this article.
Alternatively, the error message may be displayed when the QR code shown in the Client Portal was already used to attempt an activation and is expired. In this case, please log out of the Client Portal and log back in to obtain a fresh QR code.
I am unable to scan the QR Code in Client Portal. How can I add a User to IBKR Mobile Authentication (IB Key) for iPhone?
Requirements:
- The IBKR Mobile app must be installed and IBKR Mobile Authentication (IB Key) already activated on this iOS device.
- For more information on the installation and activation on iOS devices, please refer to KB2278.
Instructions:
1) On your iOS device, open the IBKR Mobile app.
1.a) If the app opens with the login screen (Figure 1), tap on Services on the top-left corner (red arrow) and proceed with step 2)
1.b) If the app opens with your Home Page, Portfolio, Watchlists, or similar, tap on More on the bottom-right corner (Figure 2). Then tap on Two-Factor Authentication (Figure 3), followed by Add User (Figure 4) and proceed with step 3)
Figure 1 Figure 2 Figure 3


Figure 4

2) Tap on Authenticate (Figure 5) and then on Add User (Figure 6).
Figure 5 Figure 6


3) Tap Setup IB Key using QR code (Figure 7).
Figure 7

4) Type the alphanumeric string present below the QR code in the Activation Code field (Figure 8).
Figure 8
8) Tap Activate IB Key (Figure 9).
Figure 9
9) You will receive a message indicating the successful activation of IBKR Mobile Authentication (IB Key). Tap DONE to confirm (Figure 10).
Figure 10

Possible issues and solutions
- During the IBKR Mobile Authentication (IB Key) activation, I receive an error message "An error has occurred. Please try again."
Figure 11

This error message (Figure 11) may indicate you are attempting to activate the IBKR Mobile Authentication (IB Key) for a user which was already enrolled. Please try to log that user in to the Client Portal again. If you receive a notification on your smartphone once you have entered the credentials and you are able to complete the authentication once you tap on that notification, then the user was already enrolled and you no longer need to follow the steps on this article.
Alternatively, the error message may be displayed when the QR code shown in the Client Portal was already used to attempt an activation and is expired. In this case, please log out of the Client Portal and log back in to obtain a fresh QR code.
References:
- See KB2260 for instruction on how to activate and operate IBKR Mobile Authentication (IB Key).
- See KB2748 for instructions on how to recover IBKR Mobile Authentication (IB Key).
- See KB3236 for instructions on how to enable notifications for the IBKR Mobile app.
- See KB3234 for troubleshooting missing IBKR Mobile notifications.
- See KB3073 for instructions on how to migrate the IBKR Mobile Authentication (IB Key) to a new smartphone.
I want to add a User to IBKR Mobile Authentication (IB Key) for Android with the QR Code from Client Portal
Requirements:
- The IBKR Mobile app must be installed and IBKR Mobile Authentication (IB Key) already activated on this Android device.
- For more information on the installation and activation on Android devices, please consult the IBKR Knowledge Base.
Instructions:
1) On your Android device, open the IBKR Mobile app.
1.a) If the app opens with the login screen (Figure 1), tap on Services on the top-left corner (red arrow) and proceed with step 2)
1.b) If the app opens with your Home Page, Portfolio, Watchlists, or similar, tap on More on the top-left corner (Figure 2). Then tap on Two-Factor Authentication (Figure 3), followed by Add User (Figure 4) and proceed with step 3)
Figure 1 Figure 2 Figure 3

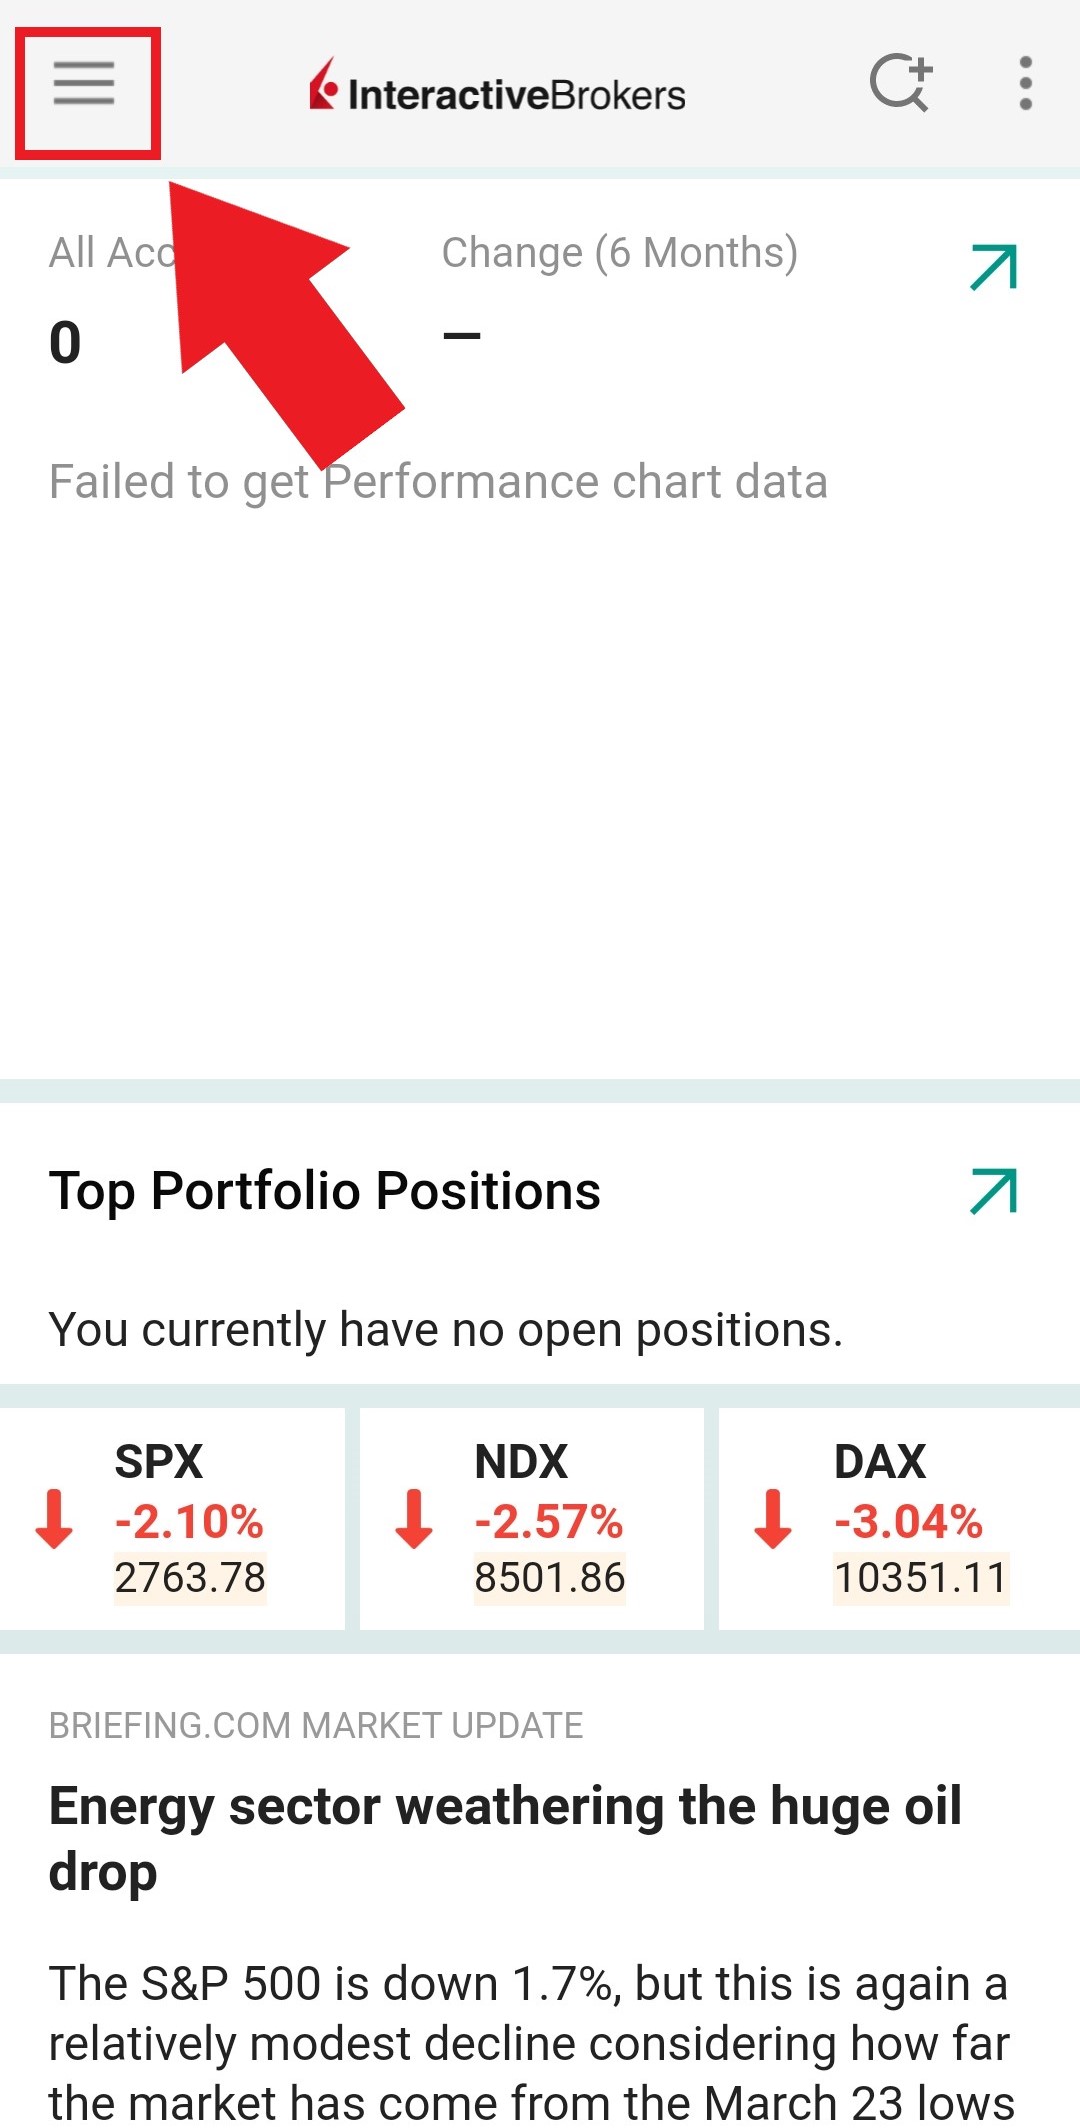

Figure 4
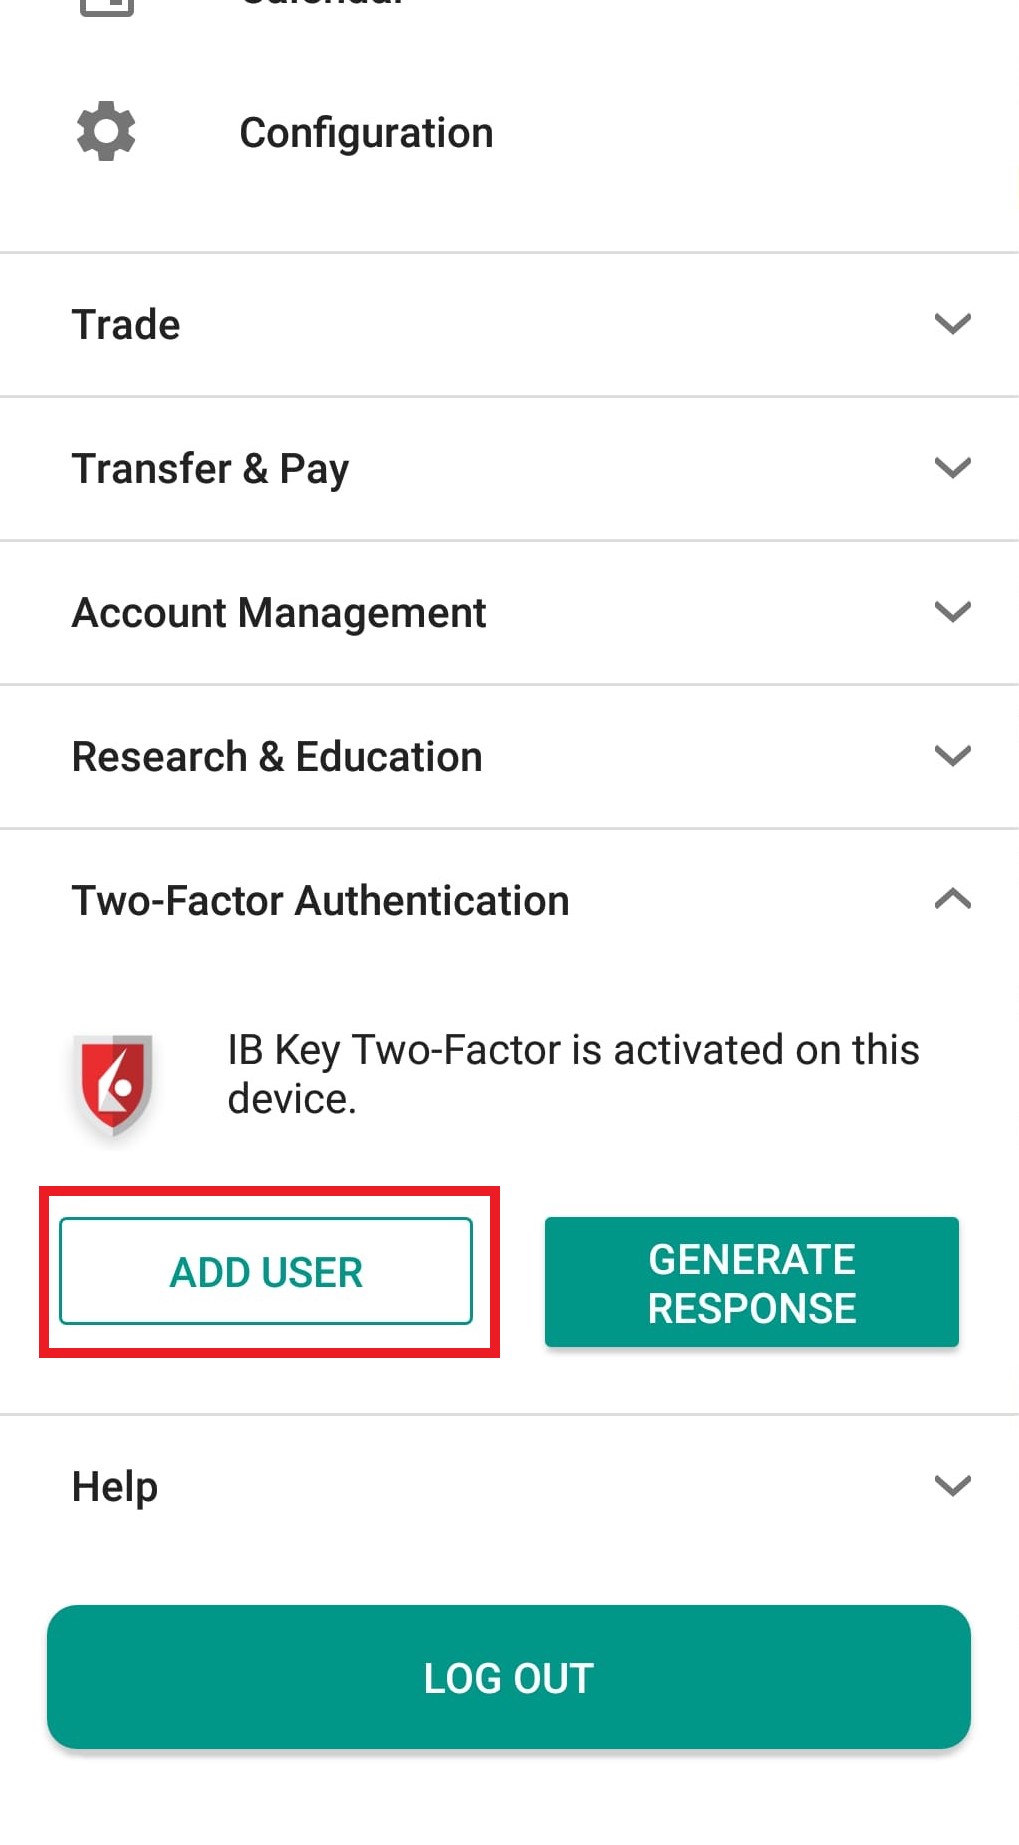
2) Tap on Authenticate (Figure 5) and then on Add User (Figure 6).
Figure 5 Figure 6
3) Read the instructions and then tap on SESSION ID (Figure 7).
Figure 7
4) Tap QR CODE (Figure 8).
Figure 8
5) Tap Allow if asked for permission to use the phone camera (Figure 9).
Figure 9

6) Point the lens of your smartphone camera towards the QR code (Figure 10). You don't need to "take a picture." When the code is in focus, it is automatically captured. If your phone does not seem to recognize the QR code try to move your phone closer or farther away to the QR code in order to gain focus. If your phone does not recognize the QR code, please see the section Possible Issues and solutions at the bottom of this article.
Figure 10
7) Provide your PIN then tap on ACTIVATE (Figure 11).
Figure 11
8) You will receive a message indicating the successful activation of IBKR Mobile Authentication (IB Key). Tap DONE to confirm (Figure 12).
Figure 12
Possible issues and solutions
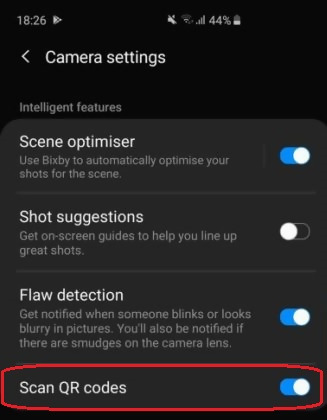
- My smartphone did not manage to read the QR code. What should I do?
Make sure you have activated the switch "Scan QR codes" from the Camera Settings of your smartphone (Figure 13).
Figure 13
- My phone activates the front camera. How can I switch to the rear one?
Usually there is a specific button in the camera view to switch from front to rear lenses (Figure 14).
Figure 14

- During the IBKR Mobile Authentication (IB Key) activation, I receive an error message "An error has occurred. Please try again."
Figure 15

This error message (Figure 15) may indicate you are attempting to activate the IBKR Mobile Authentication (IB Key) for a user which was already enrolled. Please try to log that user in to the Client Portal again. If you receive a notification on your smartphone once you have entered the credentials and you are able to complete the authentication once you tap on that notification, then the user was already enrolled and you no longer need to follow the steps on this article.
Alternatively, the error message may be displayed when the QR code shown in the Client Portal was already used to attempt an activation and is expired. In this case, please log out of the Client Portal and log back in to obtain a fresh QR code.
References:
- See KB2260 for instruction on how to activate and operate IBKR Mobile Authentication (IB Key).
- See KB2748 for instructions on how to recover IBKR Mobile Authentication (IB Key).
- See KB3236 for instructions on how to enable notifications for the IBKR Mobile app.
- See KB3234 for troubleshooting missing IBKR Mobile notifications.
- See KB3073 for instructions on how to migrate the IBKR Mobile Authentication (IB Key) to a new smartphone.
I want to add a User to IBKR Mobile Authentication (IB Key) for iPhone with the QR Code from Client Portal
Requirements:
- The IBKR Mobile app must be installed and IBKR Mobile Authentication (IB Key) already activated on this iOS device.
- For more information on the installation and activation on iOS devices, please refer to the IBKR Knowledge Base.
Instructions:
1) On your iOS device, open the IBKR Mobile app.
1.a) If the app opens with the login screen (Figure 1), tap on Services on the top-left corner (red arrow) and proceed with step 2)
1.b) If the app opens with your Home Page, Portfolio, Watchlists, or similar, tap on More on the bottom-right corner (Figure 2). Then tap on Two-Factor Authentication (Figure 3), followed by Add User (Figure 4) and proceed with step 3)
Figure 1 Figure 2 Figure 3
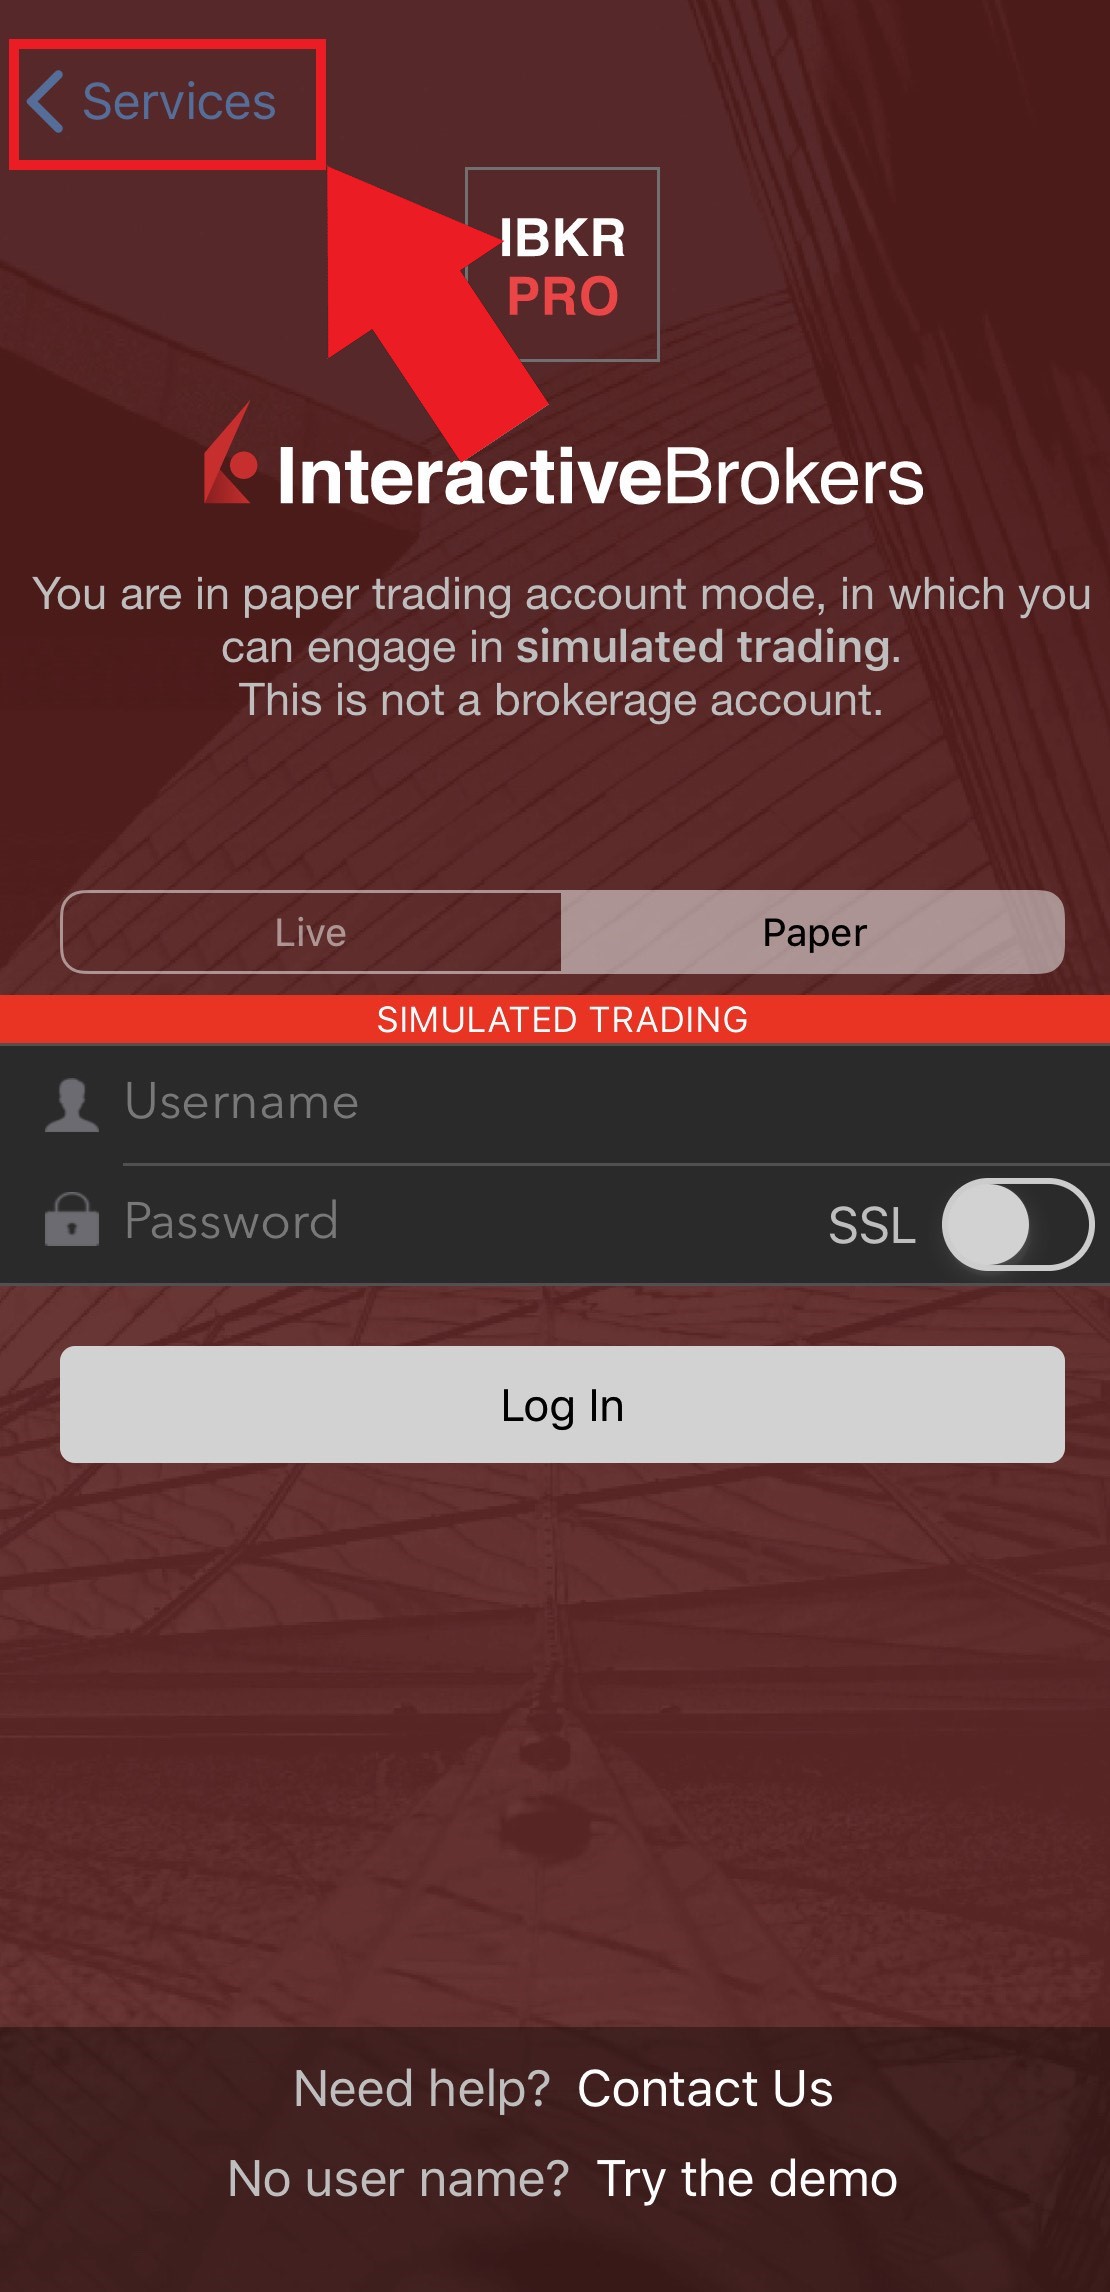
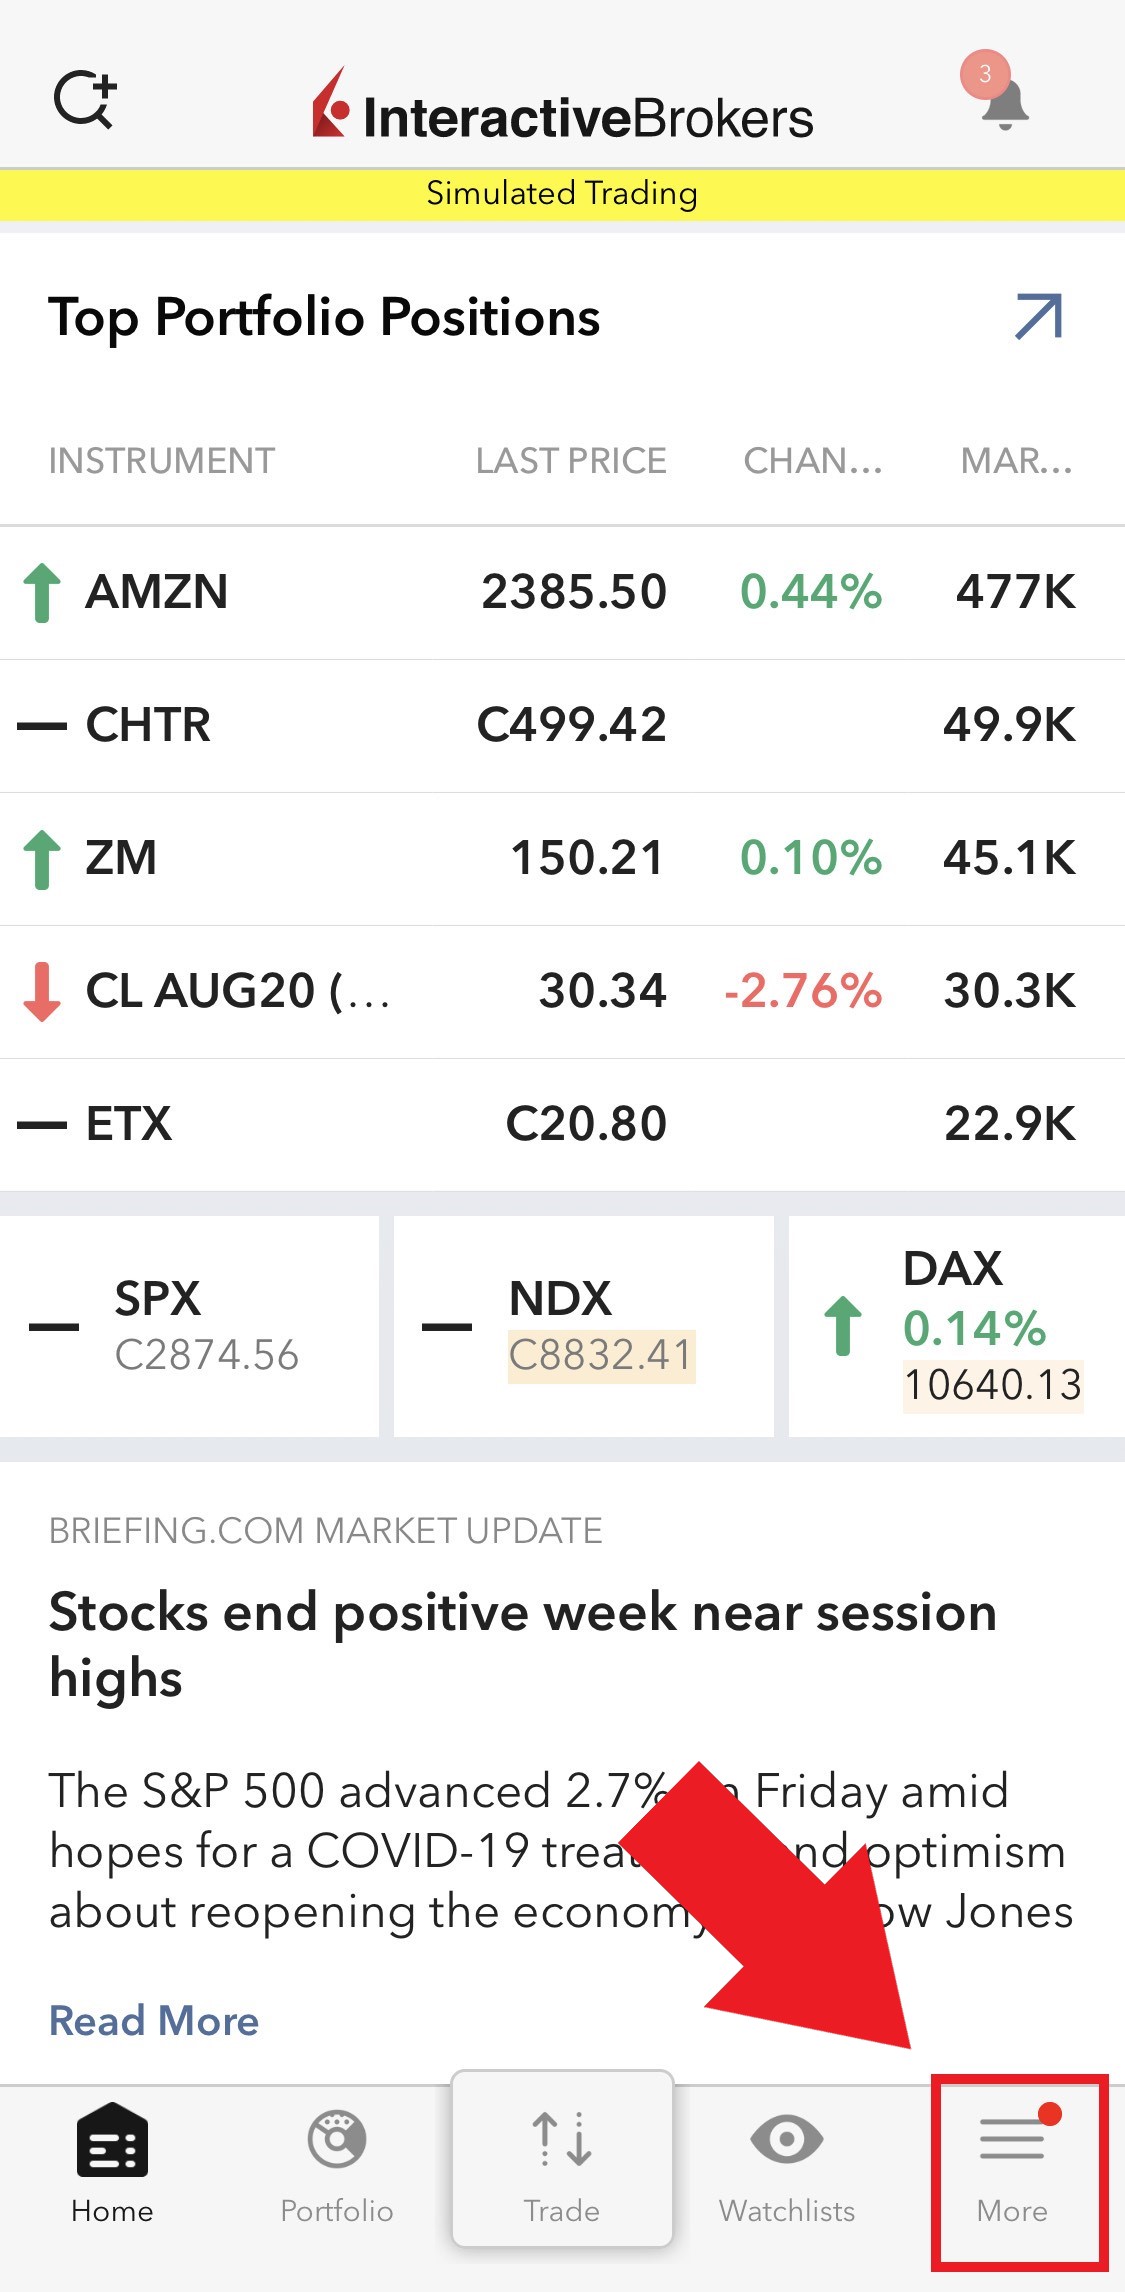

Figure 4
2) Tap on Authenticate (Figure 5) and then on Add User (Figure 6).
Figure 5 Figure 6
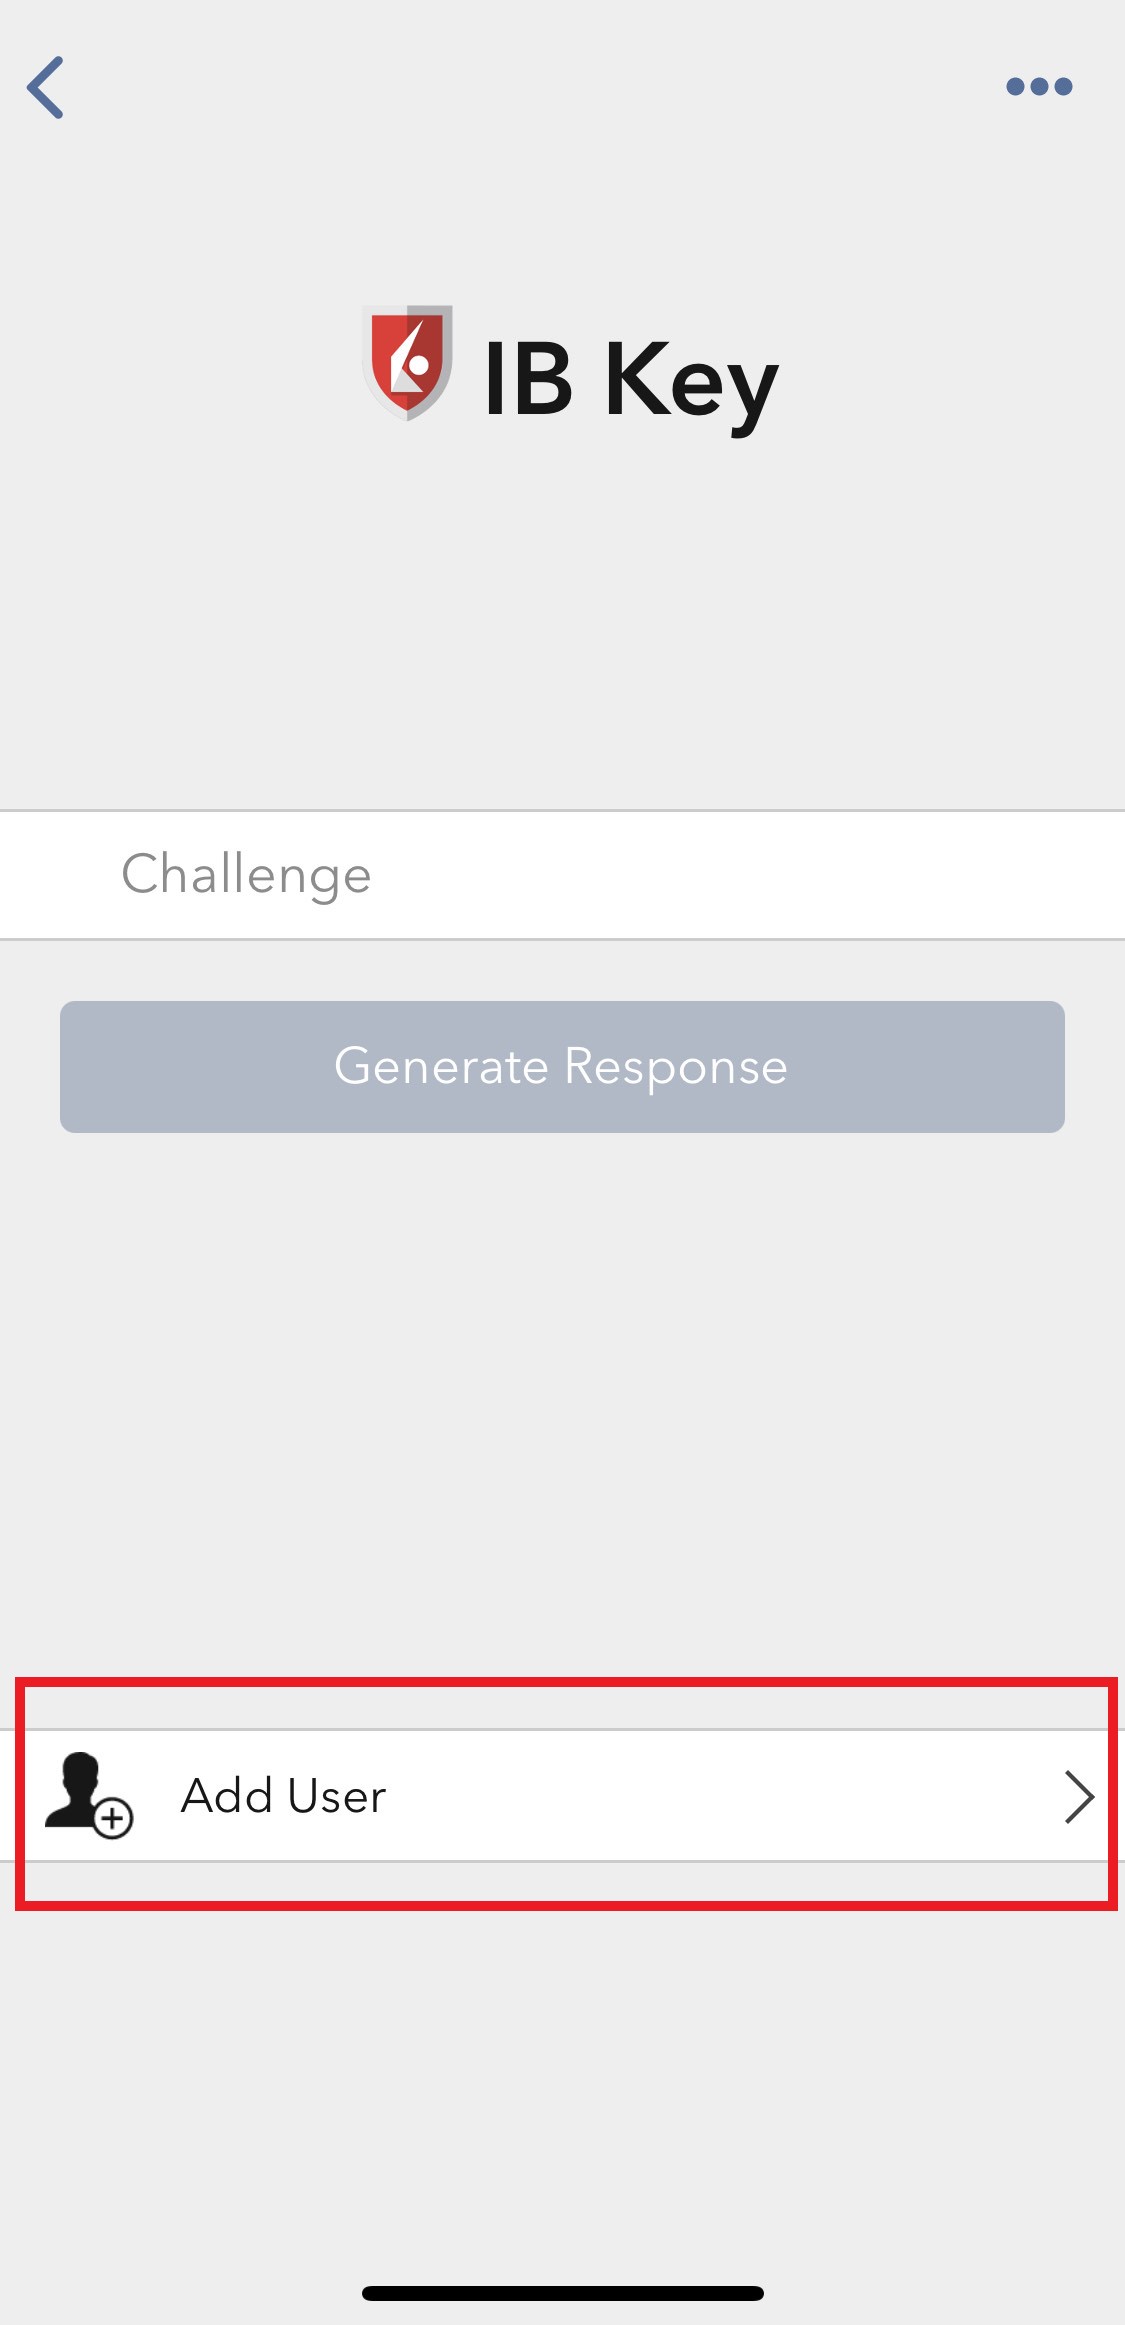
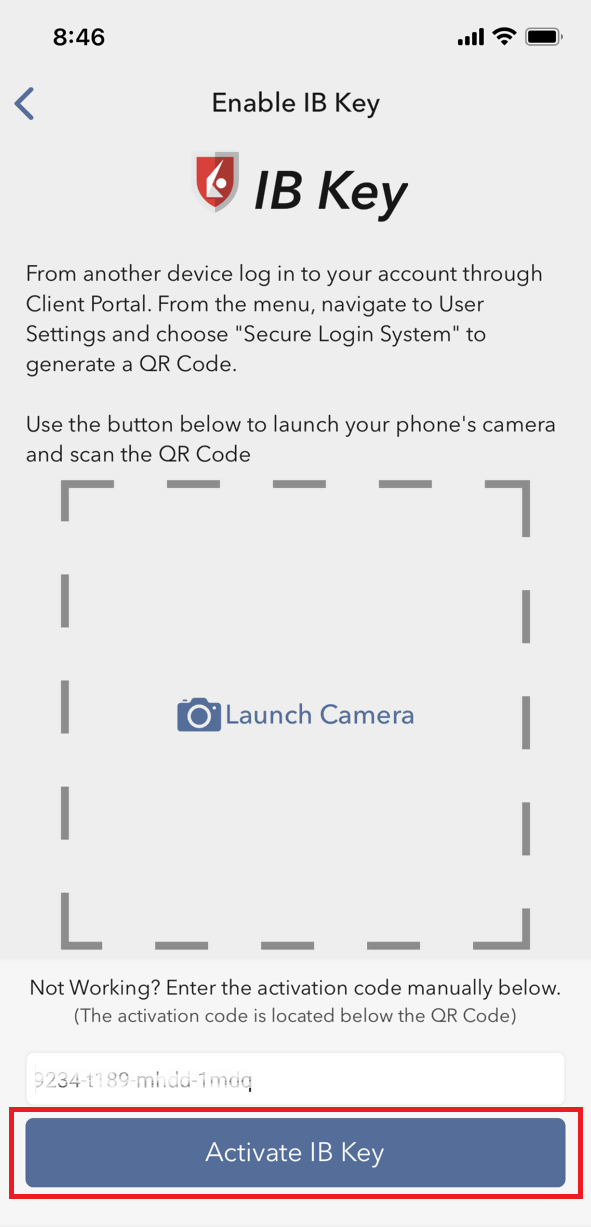
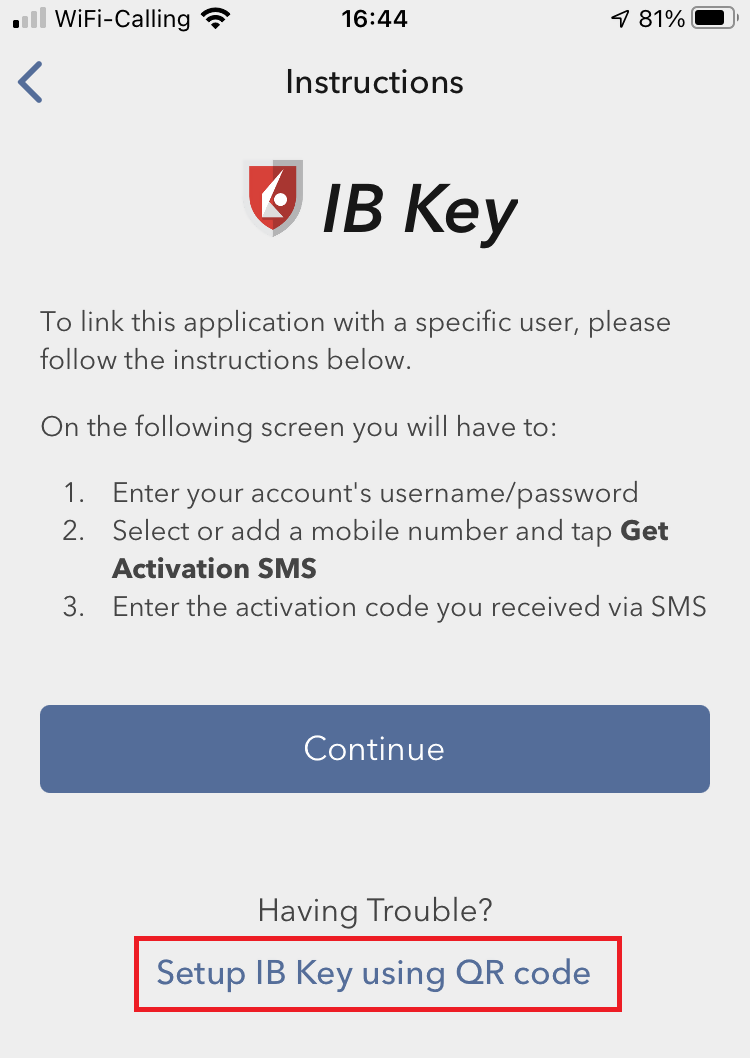
3) Tap Setup IB Key using QR code (Figure 7).
Figure 7
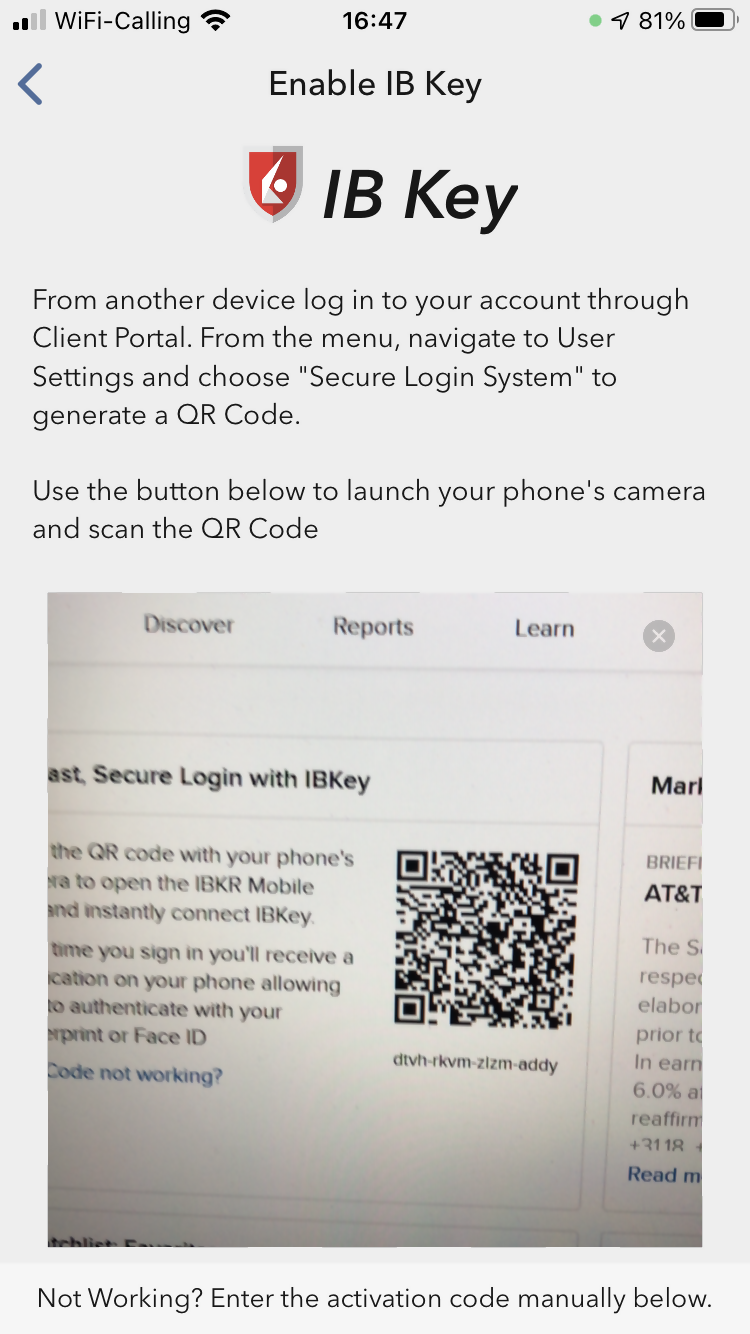
4) Tap Launch Camera (Figure 8).
Figure 8

5) Tap OK if you are asked for permission to use camera (Figure 9).
Figure 9

6) Point the lens of your smartphone camera towards the QR code (Figure 10). You don't need to "take a picture." When the code is in focus, it is automatically captured. If your phone does not seem to recognize the QR code try to move your phone closer or farther away to the QR code in order to gain focus. If your phone does not recognize the QR code, please see the section Possible Issues and solutions at the bottom of this article.
Figure 10
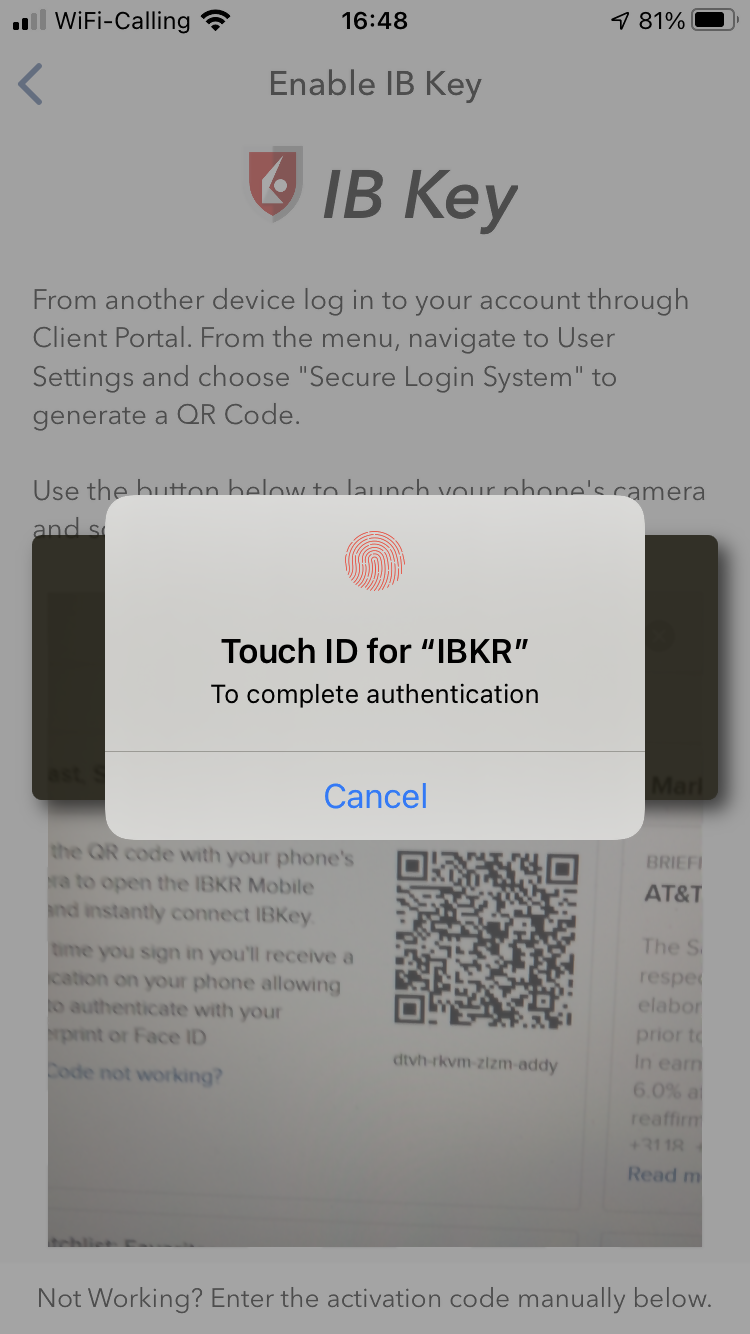
7) You will be asked to provide the security element you use to unlock your phone (FaceID, Fingerprint or Passcode). Please provide it (Figure 11).
Figure 11
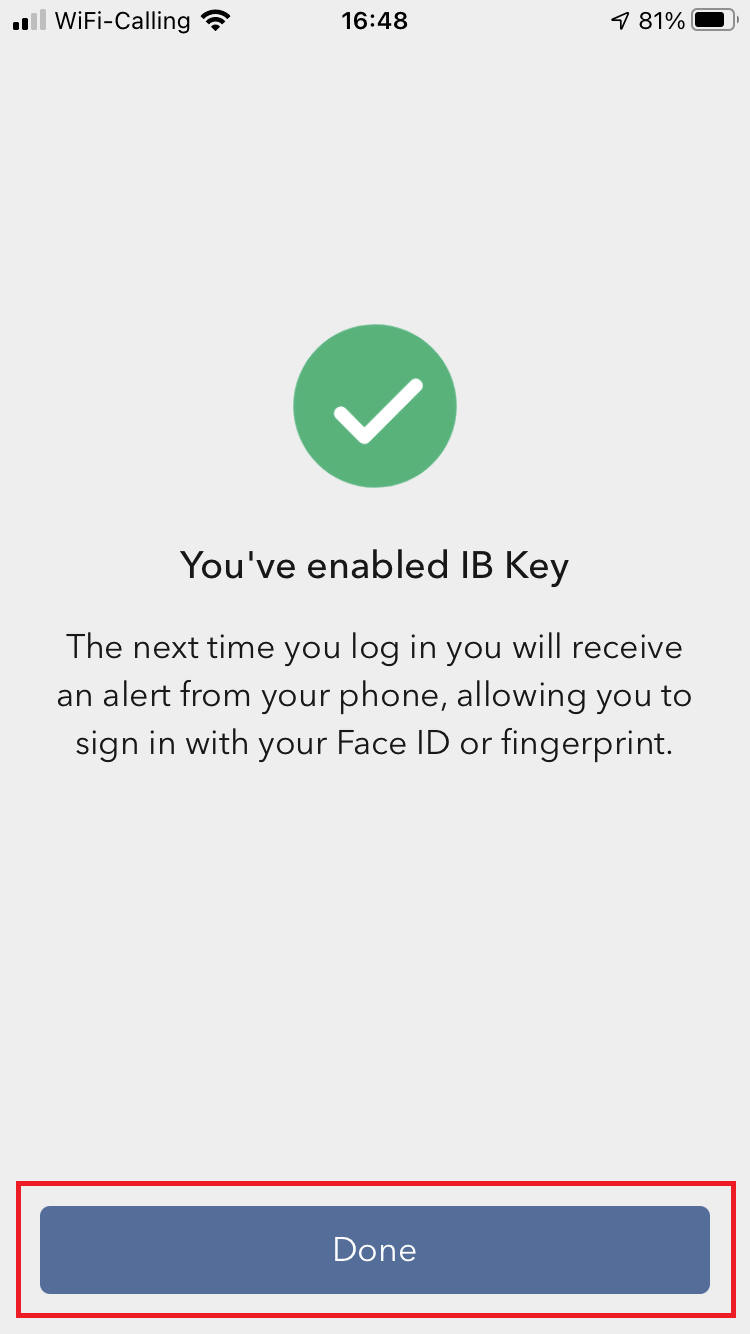
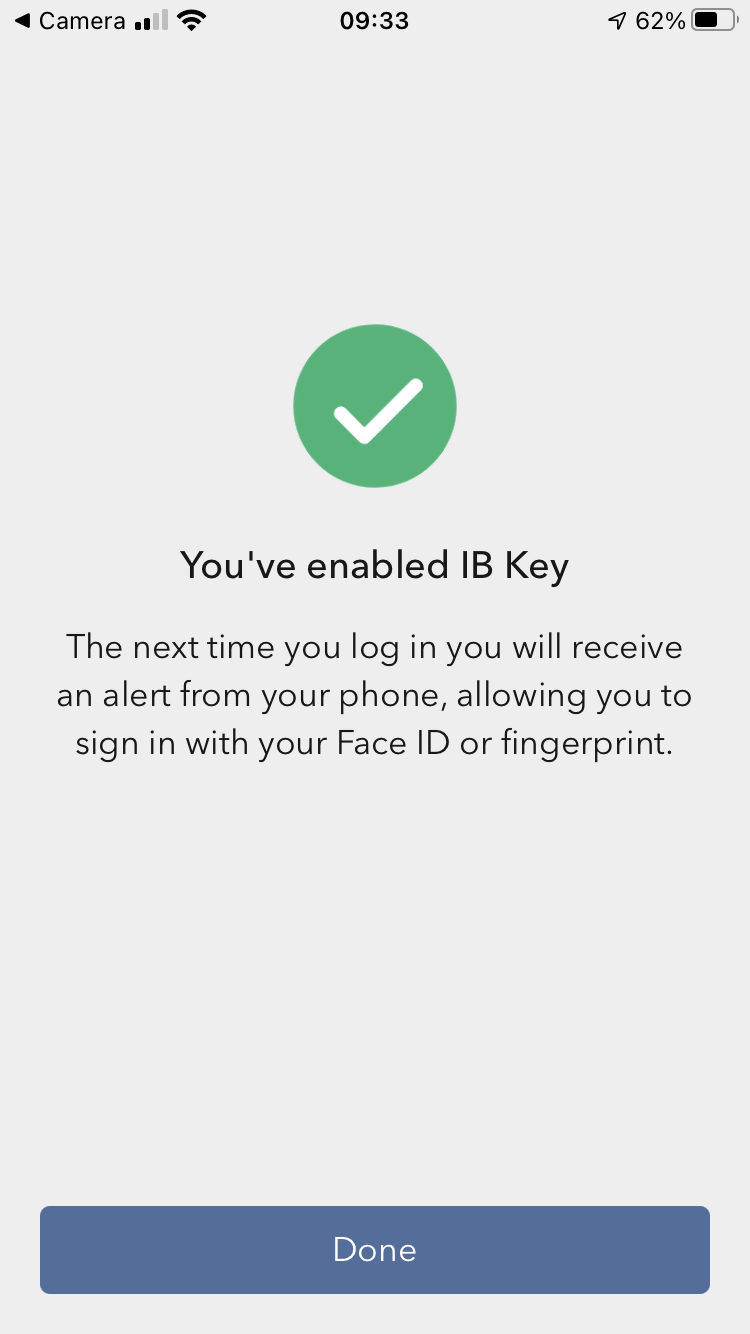
8) You will receive a message indicating the successful activation of IBKR Mobile Authentication (IB Key). Tap Done to confirm (Figure 12).
Figure 12
Possible issues and solutions
- My smartphone did not manage to read the QR code. What should I do?
Make sure you have activated the switch "Scan QR codes" from the Camera Settings of your smartphone (Figure 13).
Figure 13

- My phone activates the front camera. How can I switch to the rear one?
Usually there is a specific button in the camera view to switch from front to rear lenses (Figure 14).
Figure 14

- During the IBKR Mobile Authentication (IB Key) activation, I receive an error message "An error has occurred. Please try again."
Figure 15

This error message (Figure 15) may indicate you are attempting to activate the IBKR Mobile Authentication (IB Key) for a user which was already enrolled. Please try to log that user in to the Client Portal again. If you receive a notification on your smartphone once you have entered the credentials and you are able to complete the authentication once you tap on that notification, then the user was already enrolled and you no longer need to follow the steps on this article.
Alternatively, the error message may be displayed when the QR code shown in the Client Portal was already used to attempt an activation and is expired. In this case, please log out of the Client Portal and log back in to obtain a fresh QR code.
References:
- See KB2260 for instruction on how to activate and operate IBKR Mobile Authentication (IB Key).
- See KB2748 for instructions on how to recover IBKR Mobile Authentication (IB Key).
- See KB3236 for instructions on how to enable notifications for the IBKR Mobile app.
- See KB3234 for troubleshooting missing IBKR Mobile notifications.
- See KB3073 for instructions on how to migrate the IBKR Mobile Authentication (IB Key) to a new smartphone.
I want to activate IBKR Mobile Authentication (IB Key) for iPhone with the QR Code from Client Portal
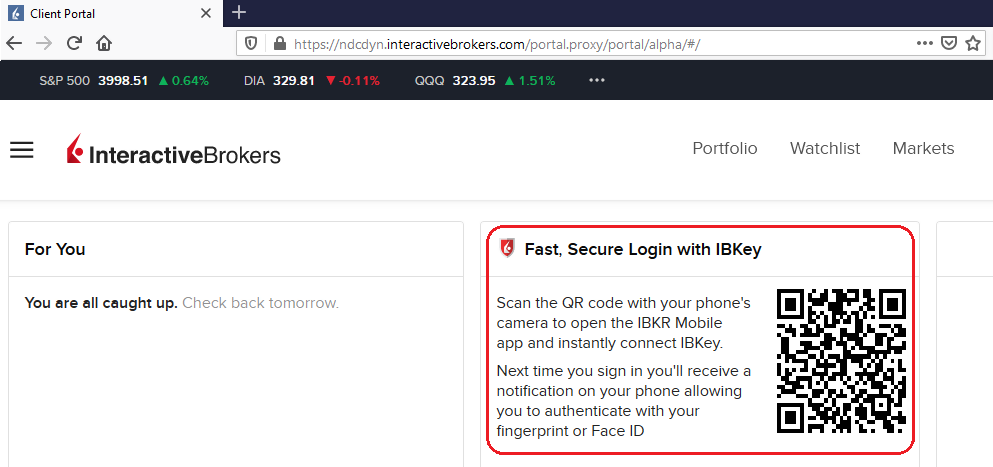
You may have seen a QR code when you logged into Client Portal. In this article we will cover the steps for activating IBKR Mobile Authentication (IB Key) using that code.
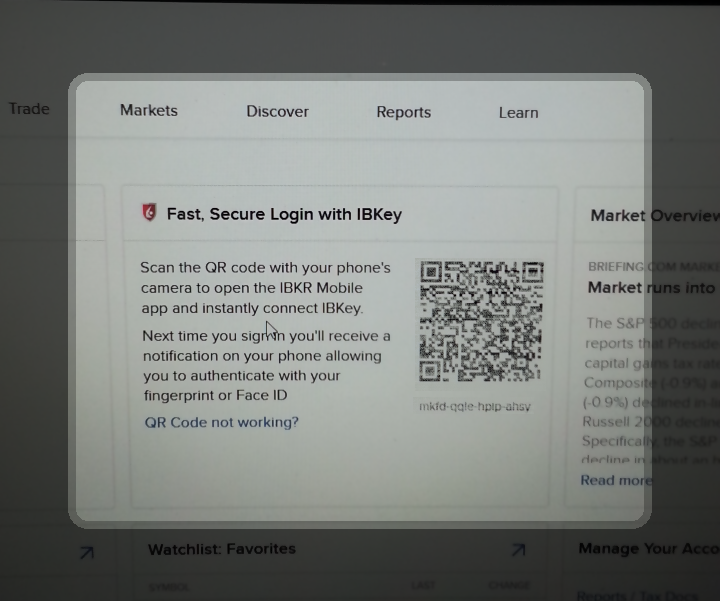
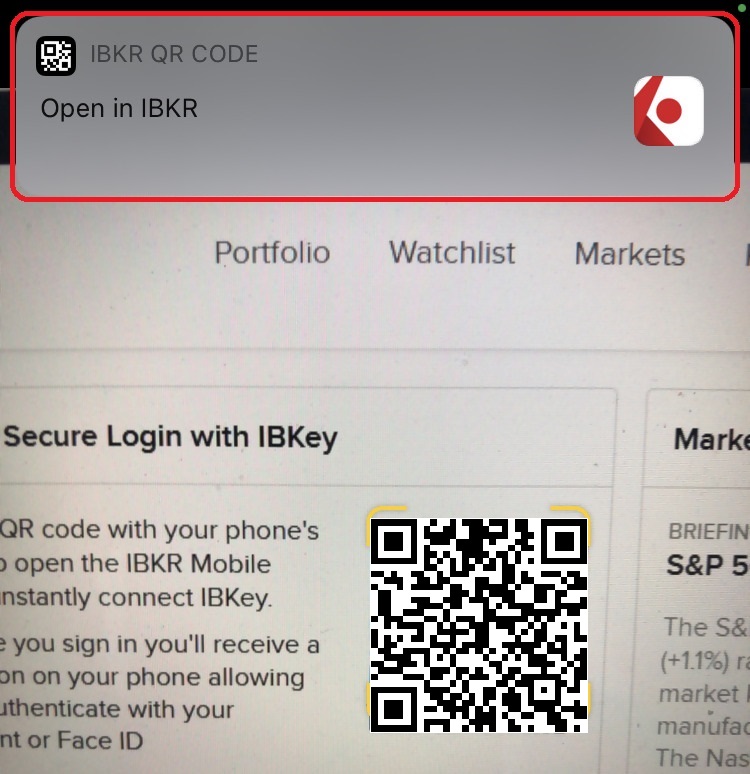
1) Log into Client Portal. You will see a banner recommending that you activate IBKR Mobile Authentication (IB Key) by scanning the accompanying QR Code:
Figure 1
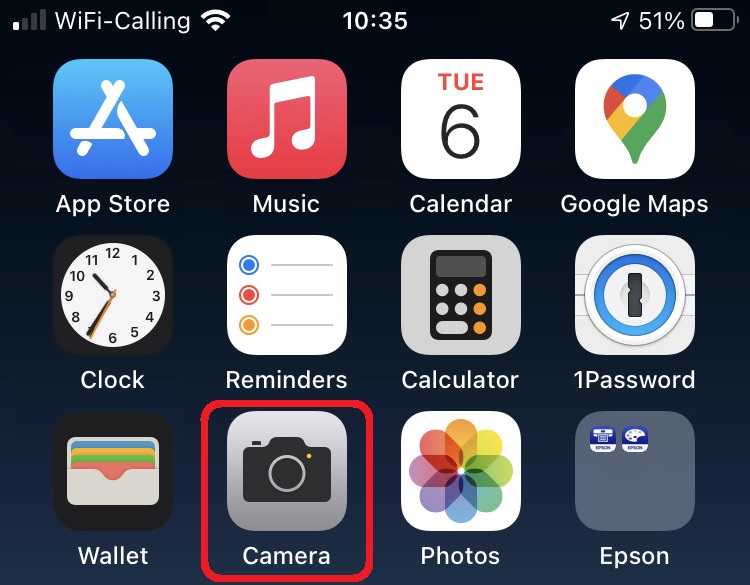
2) On your smartphone, launch the "Camera" app.
Figure 2
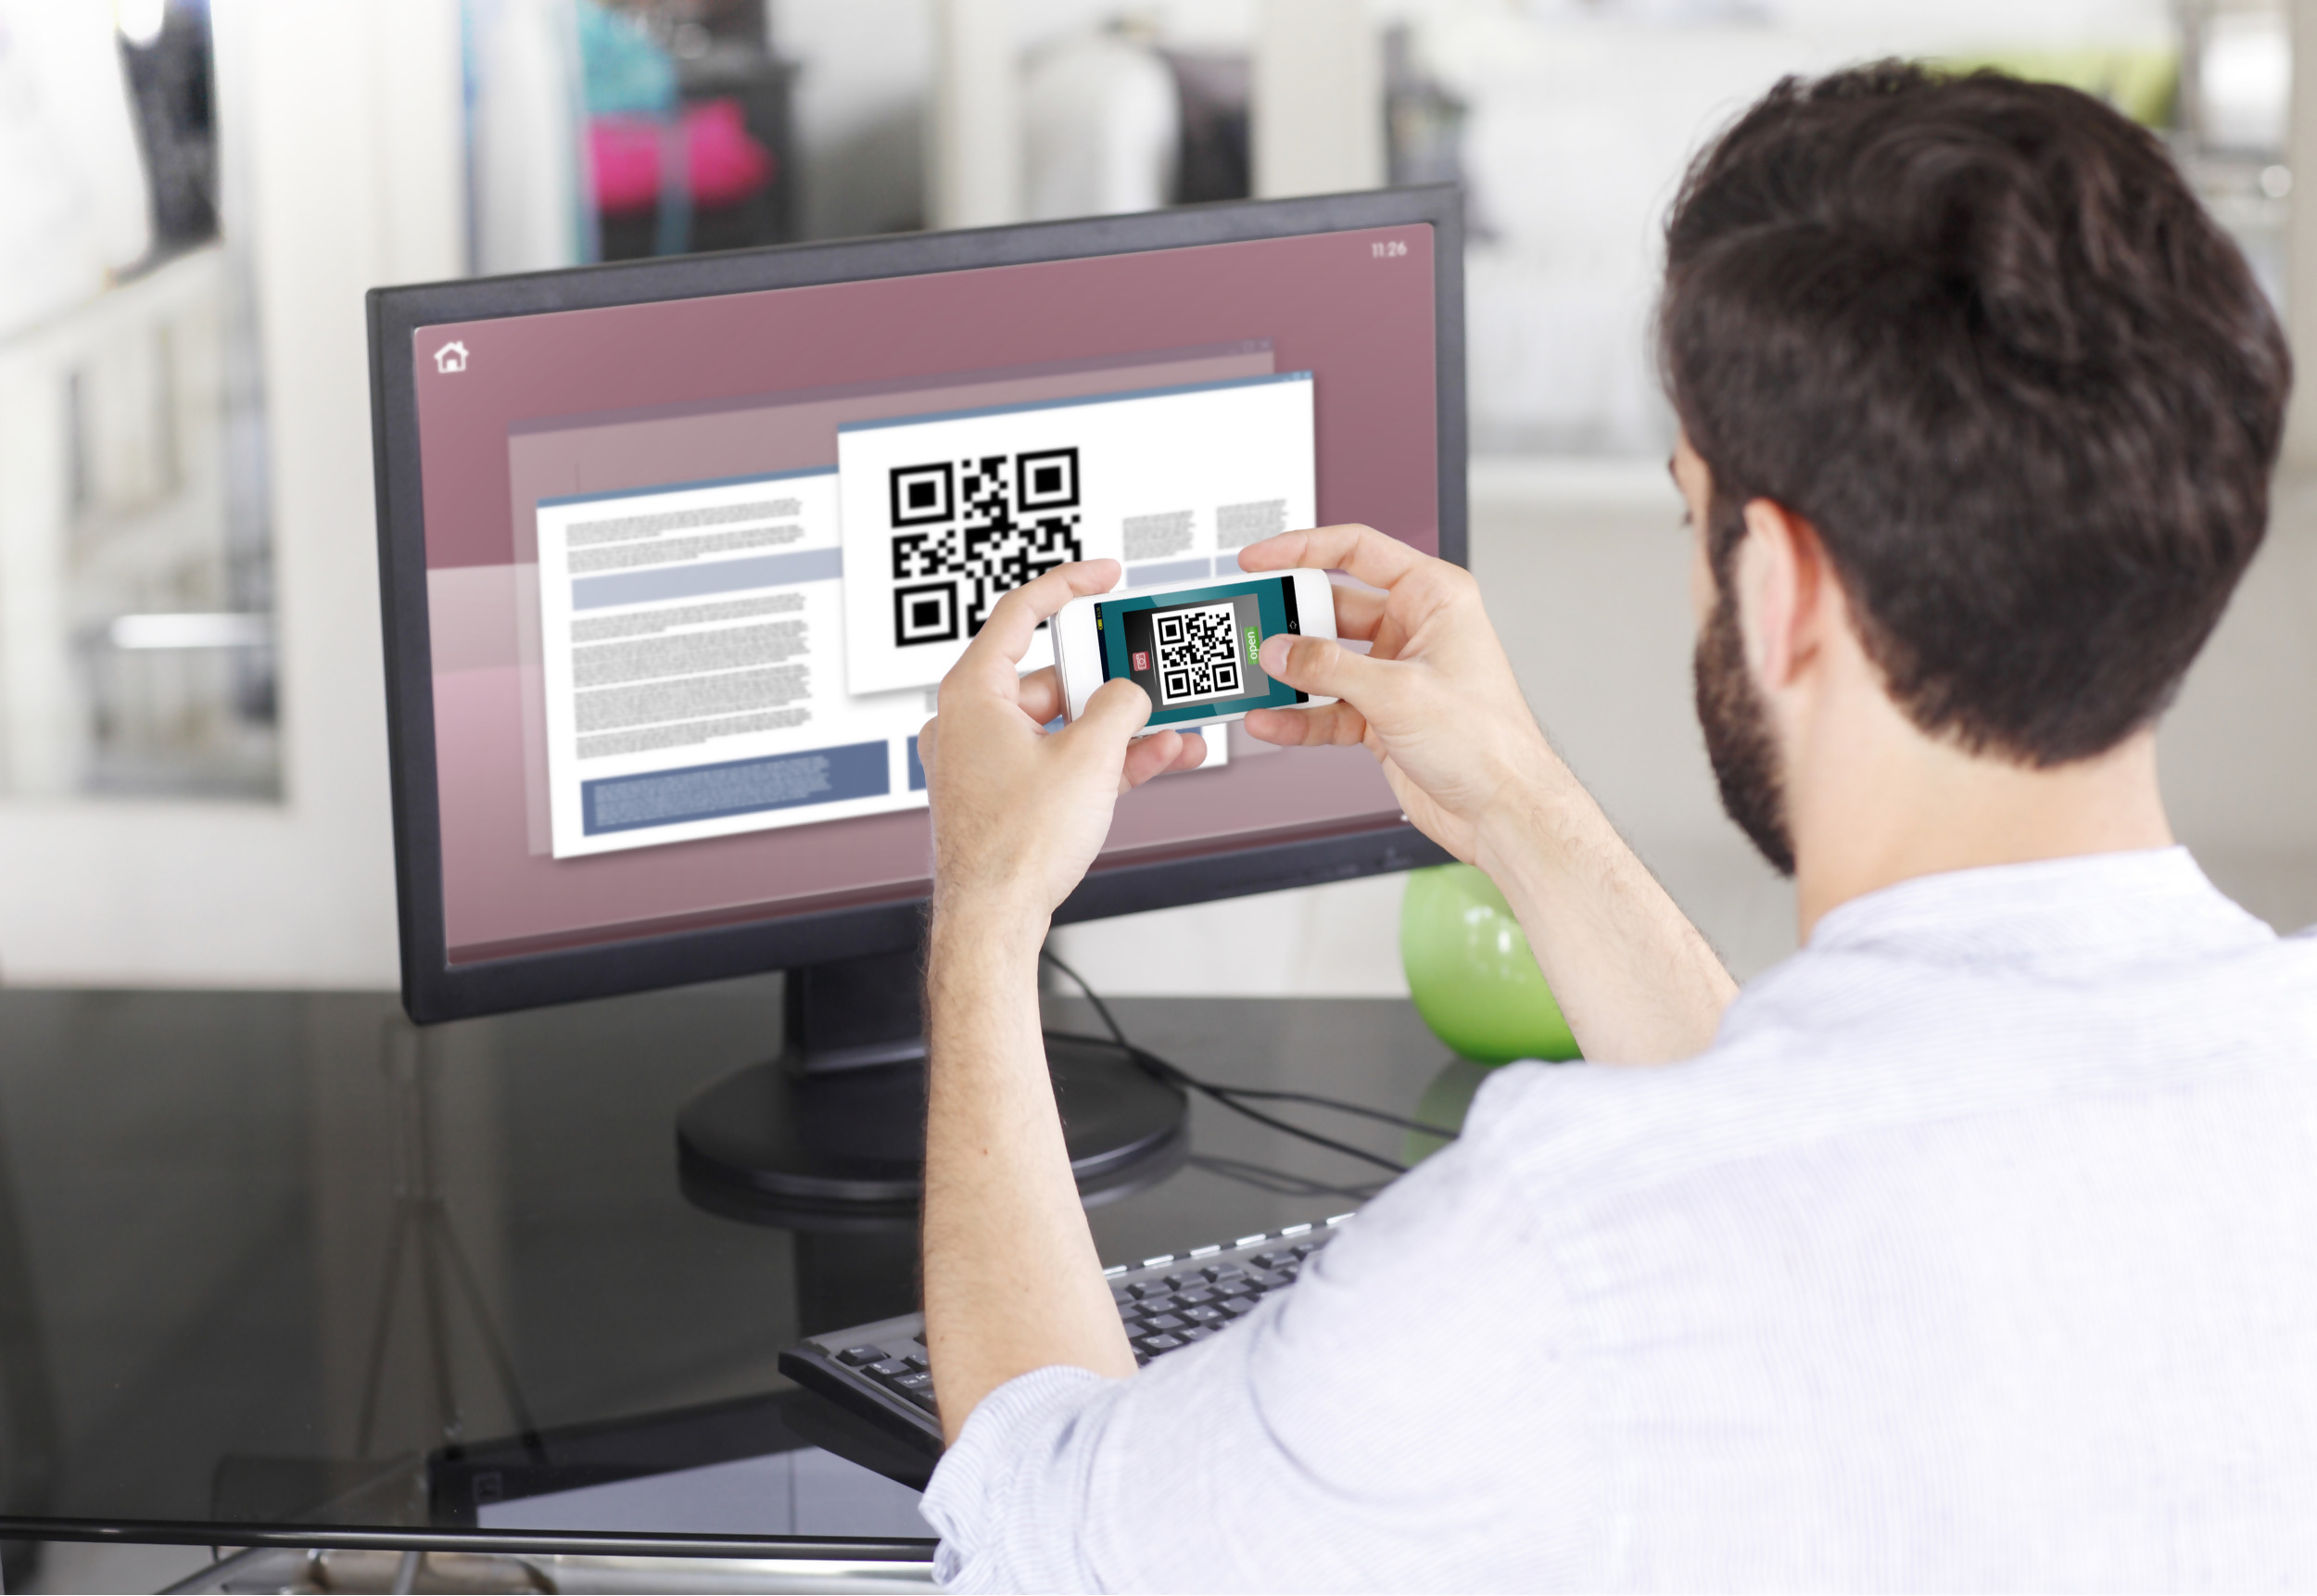
3) Point the lens of your smartphone camera towards the QR code. You don't need to "take a picture." When the code is in focus it is automatically captured. If your phone does not seem to recognize the QR code try to move your phone closer or farther away to the QR code in order to gain focus. If your phone does not recognize the QR code, please see the section Possible Issues and solutions at the bottom of this article.
Figure 3
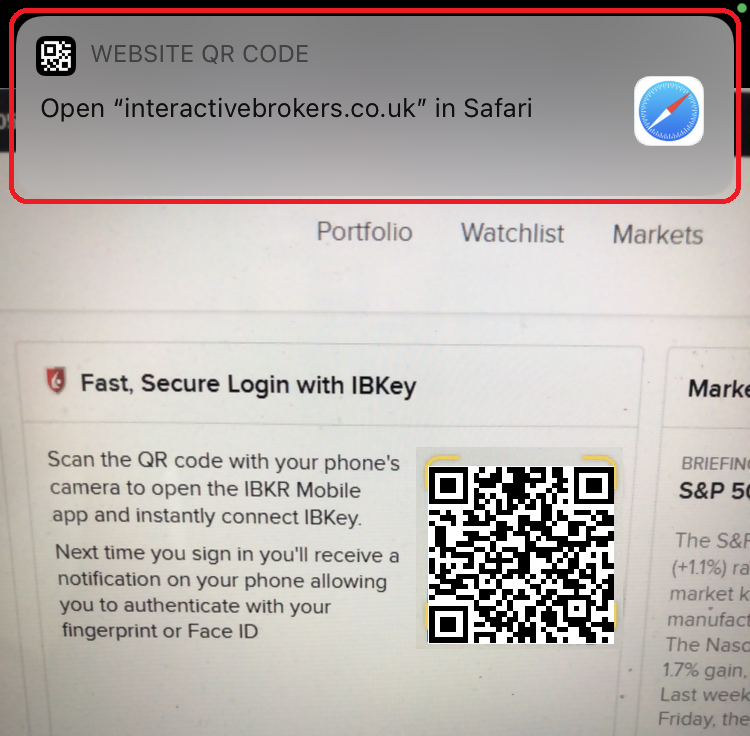
4) If your device was able to read the QR code successfully, you will see a banner on the top of your smartphone screen.
- If the banner asks you to open the IBKR web site on your smartphone browser (as in Figure 4.1), please proceed directly to next step, 5)
- If the banner asks you to open the IBKR Mobile app (as in Figure 4.2), please jump to step 8)
Figure 4.1 Figure 4.2
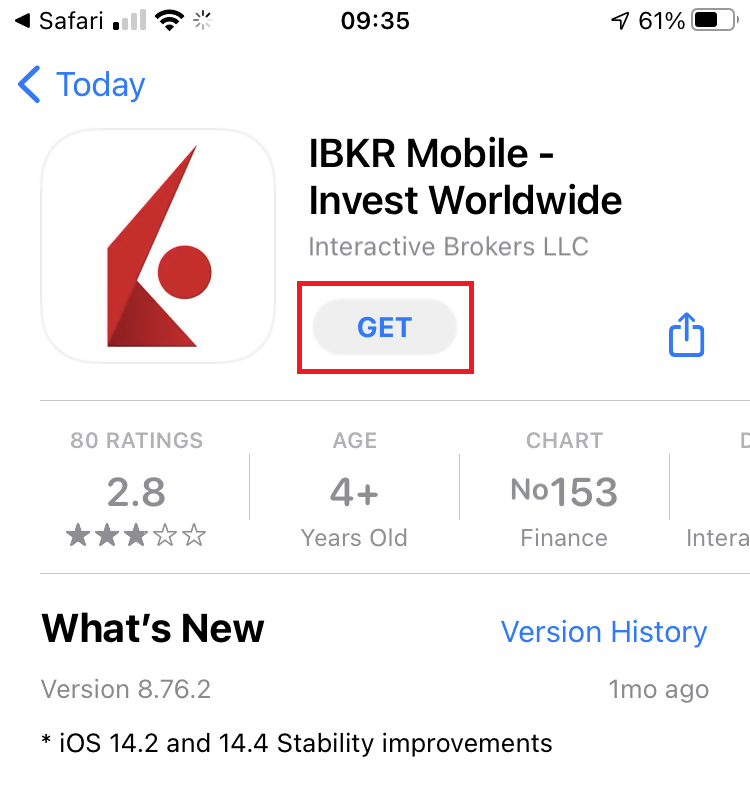
5) Tap on the banner on the top of your smartphone screen, asking you to open the IBKR Web site. You will be redirected to the AppStore.
Figure 5
6) Tap the download icon GET to install IBKR Mobile on your phone.
Figure 6
7) Once the installation is complete, do not launch the IBKR Mobile app. Open your camera and again focus on the QR code displayed in Client Portal.
Figure 7
8) Tap on the banner on the top of your screen, asking you to open the IBKR Mobile app.
Figure 8
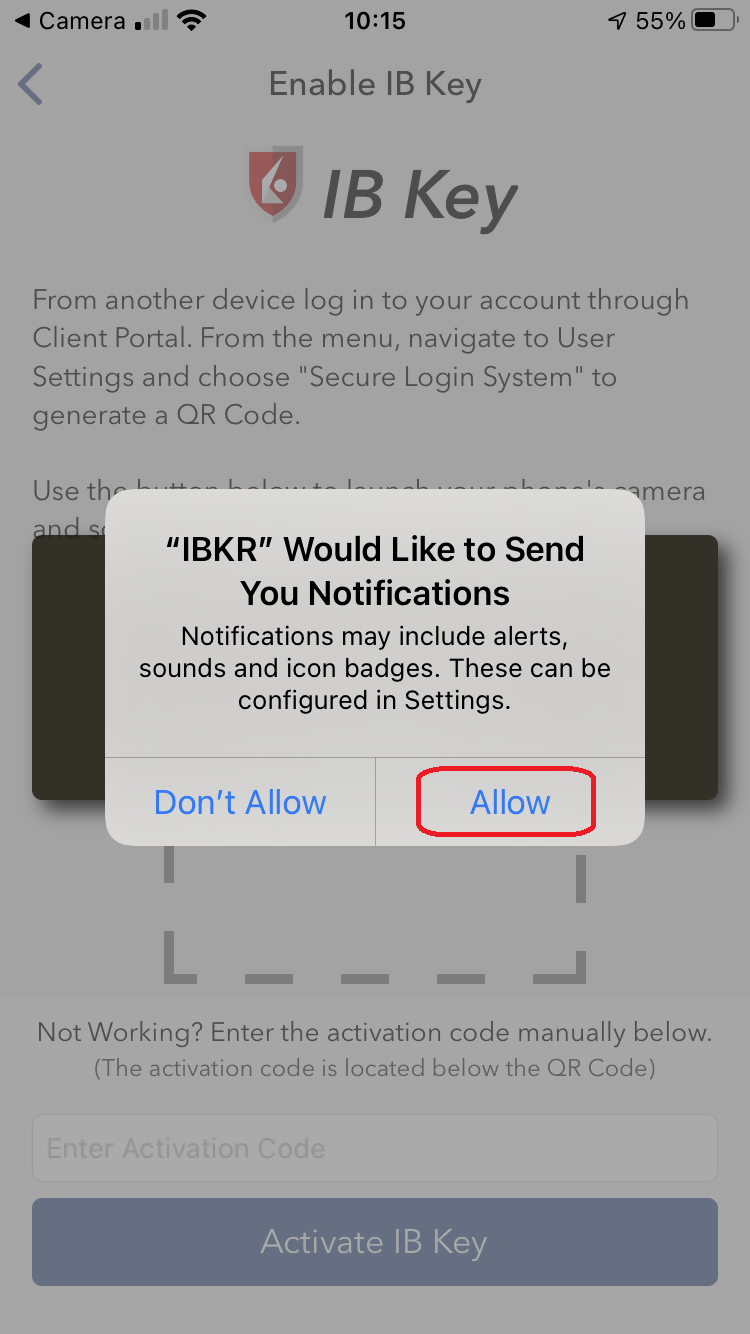
9) Tap Allow if asked whether to allow or disallow notifications for IBKR Mobile.
Figure 9
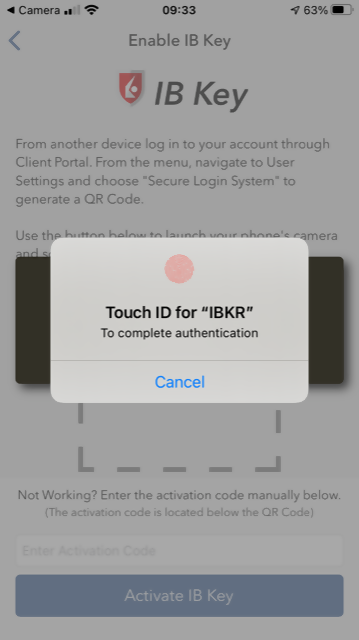
10) You will be asked to provide the security element you use to unlock your phone (FaceID, Fingerprint or Passcode).
Figure 10
11) You will receive a message confirming the successful activation of IBKR Mobile Authentication (IB Key). Tap Done to complete the procedure
Figure 11
Possible issues and solutions
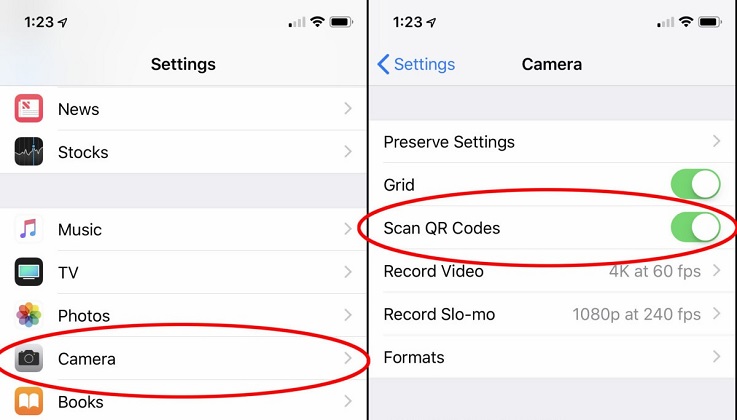
- My smartphone did not manage to read the QR code. What should I do?
Make sure you have activated the switch "Scan QR codes" from the Camera Settings of your smartphone.
Figure 12
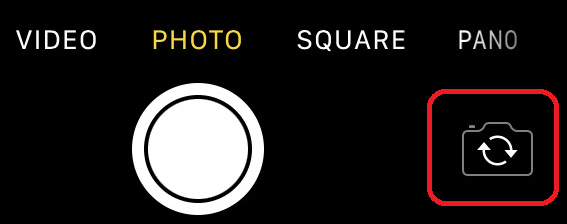
- My phone activates the front camera. How can I switch to the rear one?
Usually there is a specific button in the camera view to switch from front to rear lenses.
Figure 13
- During the IBKR Mobile Authentication (IB Key) activation, I receive an error message "An error has occurred. Please try again."
Figure 14
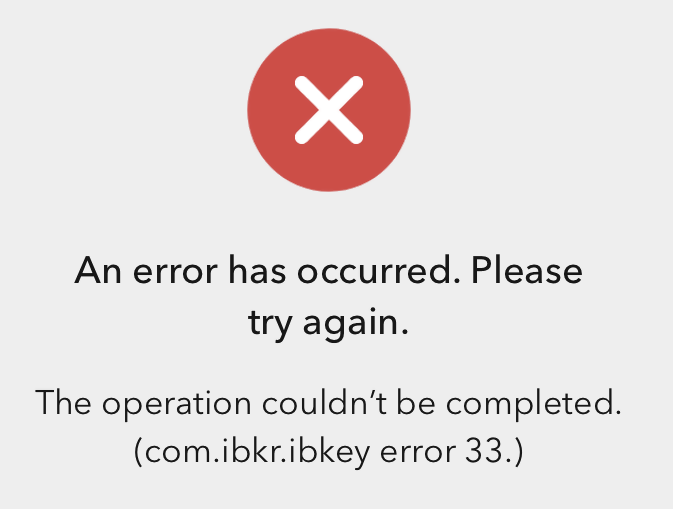
This error message may indicate you are attempting to activate an IBKR Mobile Authentication (IB key) instance that is already activated. Please try to log in to the Client Portal again. If you receive a notification on your smartphone once you have entered the credentials and you are able to complete the authentication once you tap on that notification, then your IBKR Mobile Authentication (IB Key) instance is already activated and you no longer need to follow the steps on this article.
Alternatively, the error message may be displayed when the QR code shown in the Client Portal was already used to attempt an activation and is expired. In this case, please log out of the Client Portal and log back in to obtain a fresh QR code.
References:
- See KB2260 for instruction on how to activate and operate IBKR Mobile Authentication (IB Key).
- See KB2748 for instructions on how to recover IBKR Mobile Authentication (IB Key).
- See KB3236 for instructions on how to enable notifications for the IBKR Mobile app.
- See KB3234 for troubleshooting missing IBKR Mobile notifications.
- See KB3073 for instructions on how to migrate the IBKR Mobile Authentication (IB Key) to a new smartphone.
How to generate a ".har" file
Background:
When troubleshooting a non-trivial website issue, it is sometimes necessary for our Client Services team to obtain additional information about your browser communication. You may be asked record and provide a .har file. This file contains additional information about the network requests that are sent and received by your browser. Your browser can generate such file by recording content, timeline and status of HTTP/HTTPS requests and responses while the issue occurs.
In this article we explain how to generate a .har file. Please click on the browser that you use in the list below:
To generate the HAR file for Google Chrome:
1. Open Google Chrome and go to the page where the issue is occurring.
2. Press CRTL +SHIFT + I on your keyboard. Alternatively, click on the Chrome menu icon (three vertical dots at the top-right of your browser window) and select More Tools > Developer Tools
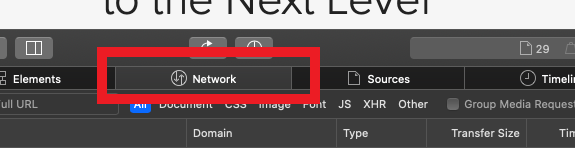
3. The Developers Tools opens as a docked panel at the side or bottom of Chrome. Select the tab Network (Figure 1.)
Figure 1.
.png)
4. Look for a round Record button in the upper left corner of the Developer Tools toolbar and make sure it is red. If it is grey, click it once to start recording or just press CTRL+E (Figure 2.)
Figure 2.
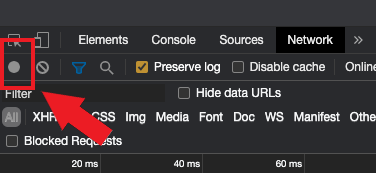
5. Activate the checkbox Preserve log (Figure 3.)
Figure 3.
.png)
6. Click the Clear button to clear out any existing logs. The Clear button has a stop icon and is located on the right of the Record button (Figure 4.)
Figure 4.
![]()
7. Reproduce the issue you are experiencing while the network requests are being recorded.
8. Once you have reproduced the issue, right-click anywhere on the list of recorded network requests, select Save all as HAR with Content, and save the file to a location of your preference on your computer (e.g. on your Desktop).
9. From the IBKR Client Portal, go to the Message Center and create a new Web Ticket (or use an existing one when applicable)
10. Within the Web Ticket, attach the .har file previously generated. In case the IBKR Client Services has provided you with a reference ticker number or representative name, please add this information to the ticket body.
11. Submit the Web Ticket
To generate the HAR file for Firefox:
1. Open Firefox and go to the page where the issue is occurring
2. Press F12 on your keyboard. Alternatively click the Firefox menu icon (three horizontal parallel lines at the top-right of your browser window), then select Web Developer > Network
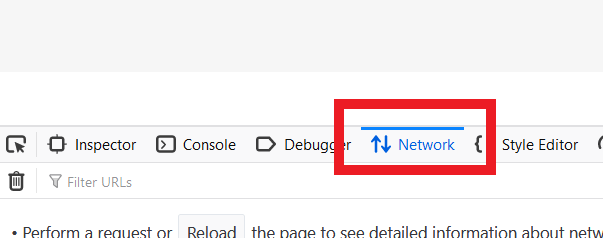
3. The Developers Network Tools opens as a docked panel at the side or bottom of Firefox. Select the tab Network (Figure 5.)
Figure 5.
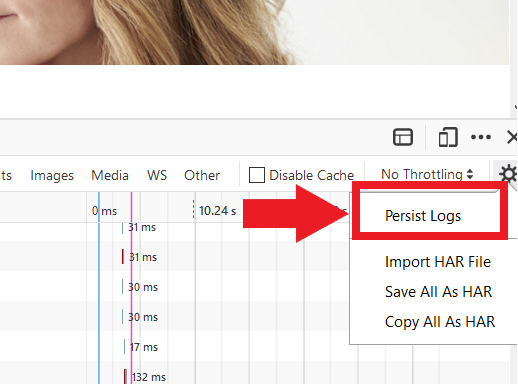
4. Activate the checkbox Persists logs (Figure 6.)
Figure 6.
5. Reproduce the issue you are experiencing. The recording of the network request starts automatically.
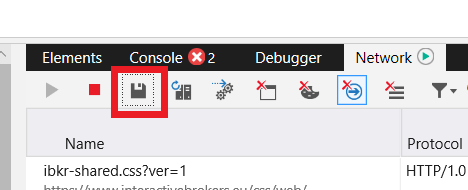
6. Once you have reproduced the issue, right-click anywhere on the list of recorded requests and select Save All As HAR
7. Save the file to a location of your preference on your computer (e.g. on your Desktop)
8. From the IBKR Client Portal, go to the Message Center and create a Web Ticket (or use an existing one when applicable)
9. Within the Web Ticket, attach the .har file previously generated. In case the IBKR Client Services has provided you with a reference ticker number or representative name, please add this information to the ticket body
10. Submit the Web Ticket
To generate the HAR file for Microsoft Edge:
1. Open Edge and go to the page where the issue is occurring.
2. Press F12 on your keyboard. Alternatively click the Edge menu icon (three horizontal dots at the top-right of your browser window), then select More Tools > Developers Tools
3. Click the Network tab (Figure 10.)
Figure 10.
.png)
4. Reproduce the issue that you were experiencing before, while the network requests are being recorded.
5. Once done click the floppy disk icon (Export as HAR) or press CTRL+S (Figure 11.)
Figure 11.
6. Provide a filename and a location of your preference on your computer (e.g. on the Desktop). Then click the Save button
7. From the IBKR Client Portal, go to the "Message Center" and create a Web Ticket (or use an existing one when applicable)
8. Within the Web Ticket, attach the .har file previously generated. In case the IBKR Client Services has provided you with a reference ticker number or representative name, please add this information to the ticket body.
9. Submit the Web Ticket
To generate the HAR file for Safari:
Note: Before generating the HAR file, make sure you can see the Develop menu in Safari. If you do not see this menu, click on the menu Safari, choose Preferences, go to the tab Advanced and activate the checkbox next to Show Develop menu in menu bar
1. Open the Develop menu and select Show Web Inspector or press CMD+ALT+I
2. Click the Network tab (Figure 12.)
Figure 12.
3. Activate the checkbox Preserve log (Figure 13.)
Figure 13.
.png)
4. Click on the icon Export (or press CMD+S), provide a filename and a location of your preference on your computer (e.g. on the Desktop) and save the .har file
5. From the IBKR Client Portal, go to the "Message Center" and create a Web Ticket (or use an existing one when applicable)
6. Within the Web Ticket, attach the web archive file previously generated. In case the IBKR Client Services has provided you with a reference ticker number or representative name, please add this information to the ticket body.
7. Submit the Web Ticket