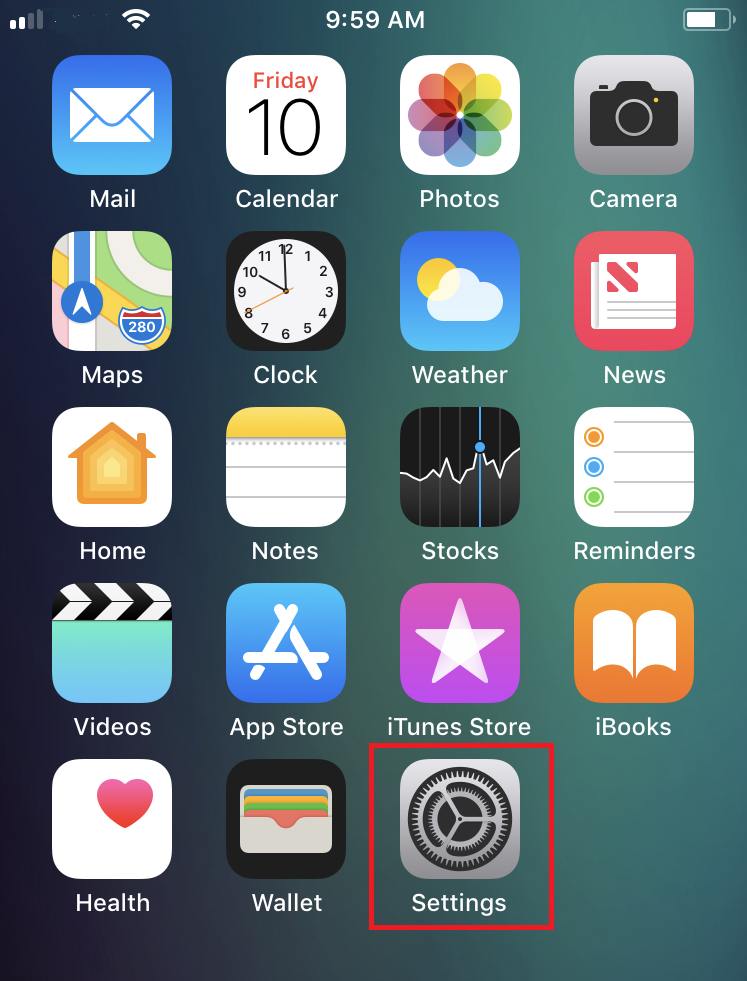
How to Add Another User to an Active IBKR Mobile Authentication (IB Key) for iPhone
Overview:
This page covers the steps required to add a user to the Authentication section in the IBKR Mobile app for iOS devices.
Requirements:
- The IBKR Mobile app must be installed and IBKR Mobile Authentication (IB Key) already activated on this iOS device.
- For more information on the installation and activation on iOS devices, please refer to KB2278.
Instructions:
1. On your iOS device, open the IBKR Mobile app.
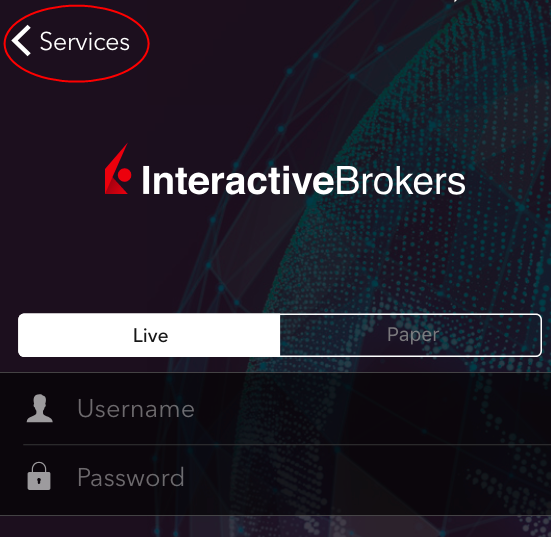
1.a. If the app opens with the login screen (Figure 1), tap on Services on the top-left corner (red arrow) and proceed with step 2.
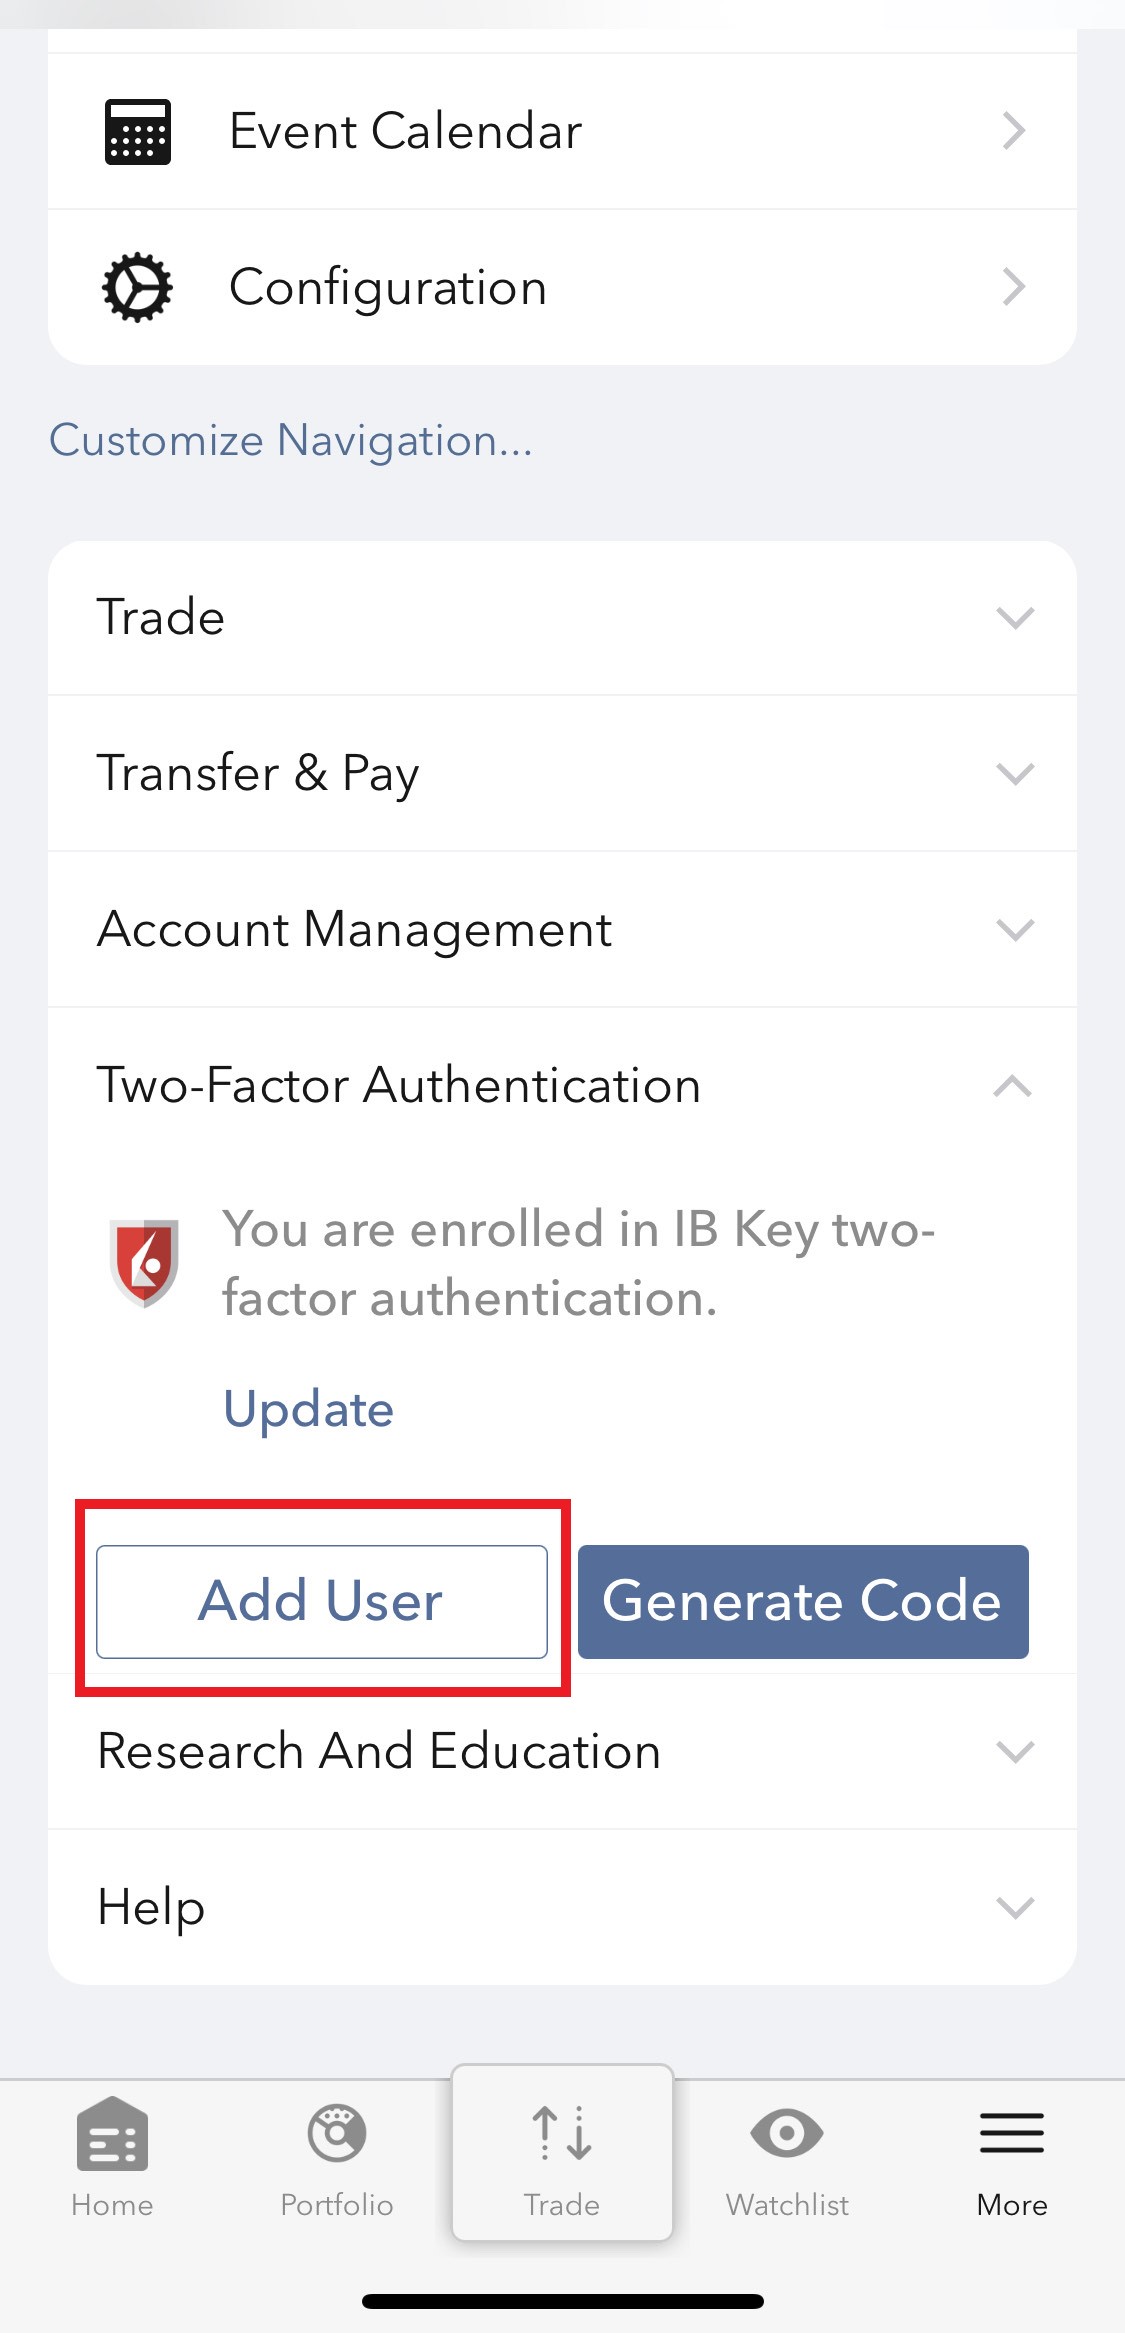
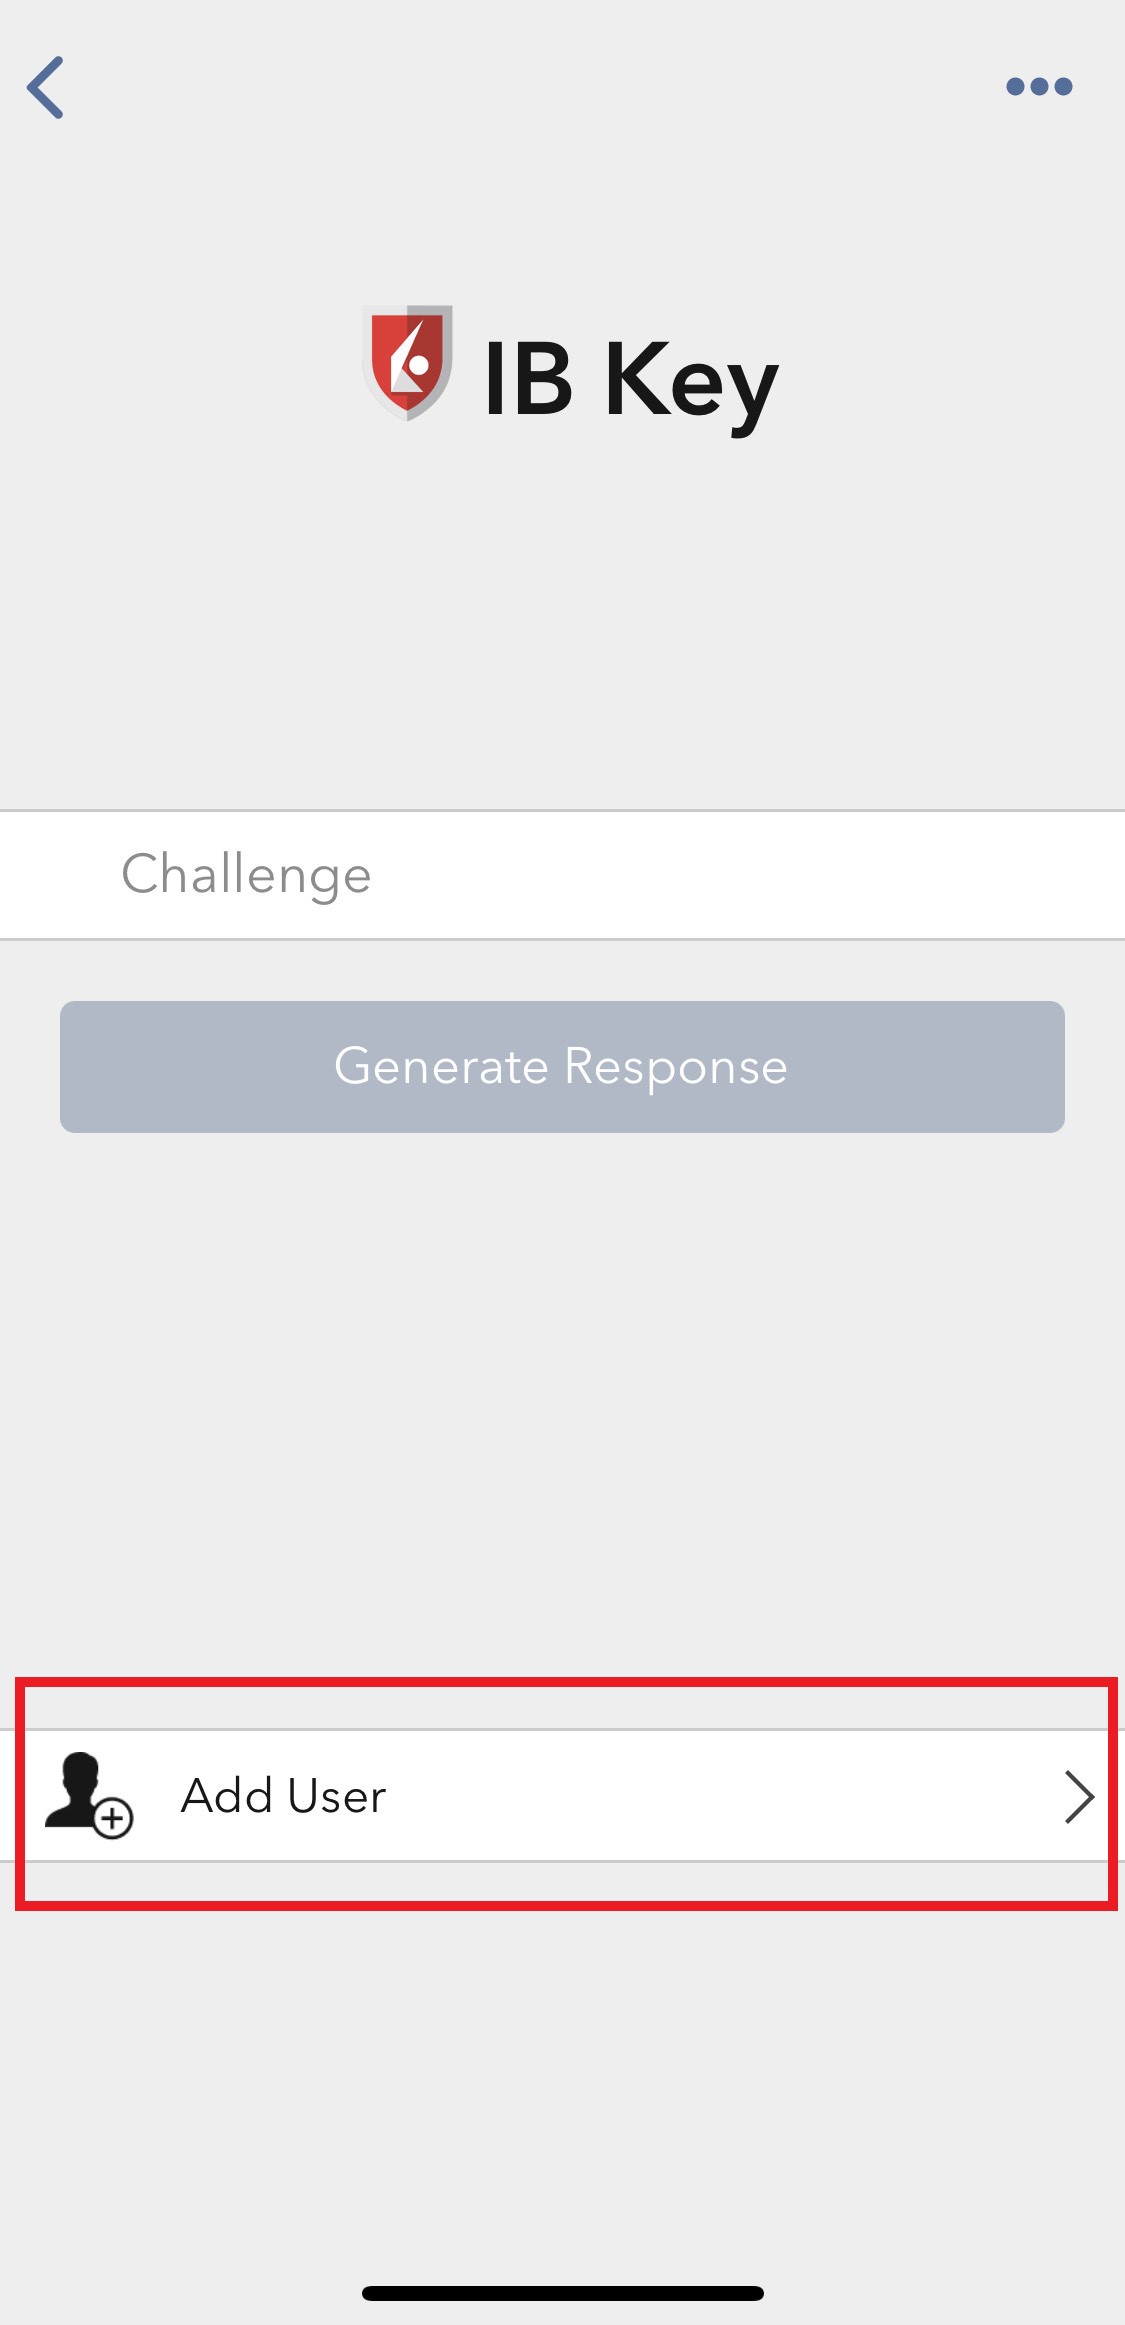
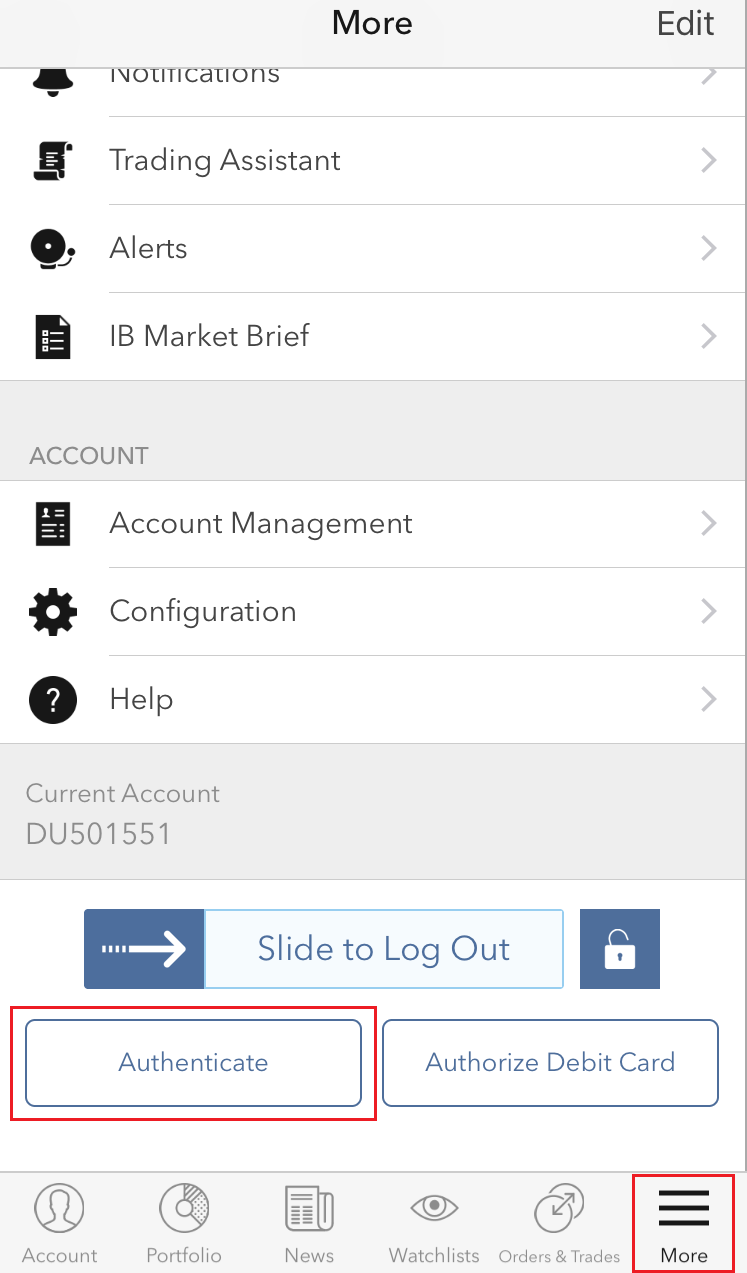
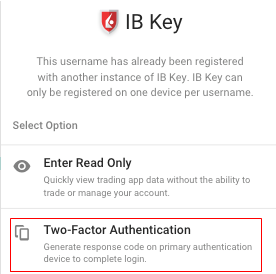
1.b. If the app opens with your Home Page, Portfolio, Watchlists, or similar, tap on More on the bottom-right corner (Figure 2). Then tap on Two-Factor Authentication (Figure 3), followed by Add User (Figure 4) and proceed with step 3.
Figure 1. Figure 2. Figure 3.
(1).jpeg)
.jpeg)
.jpeg)
Figure 4.
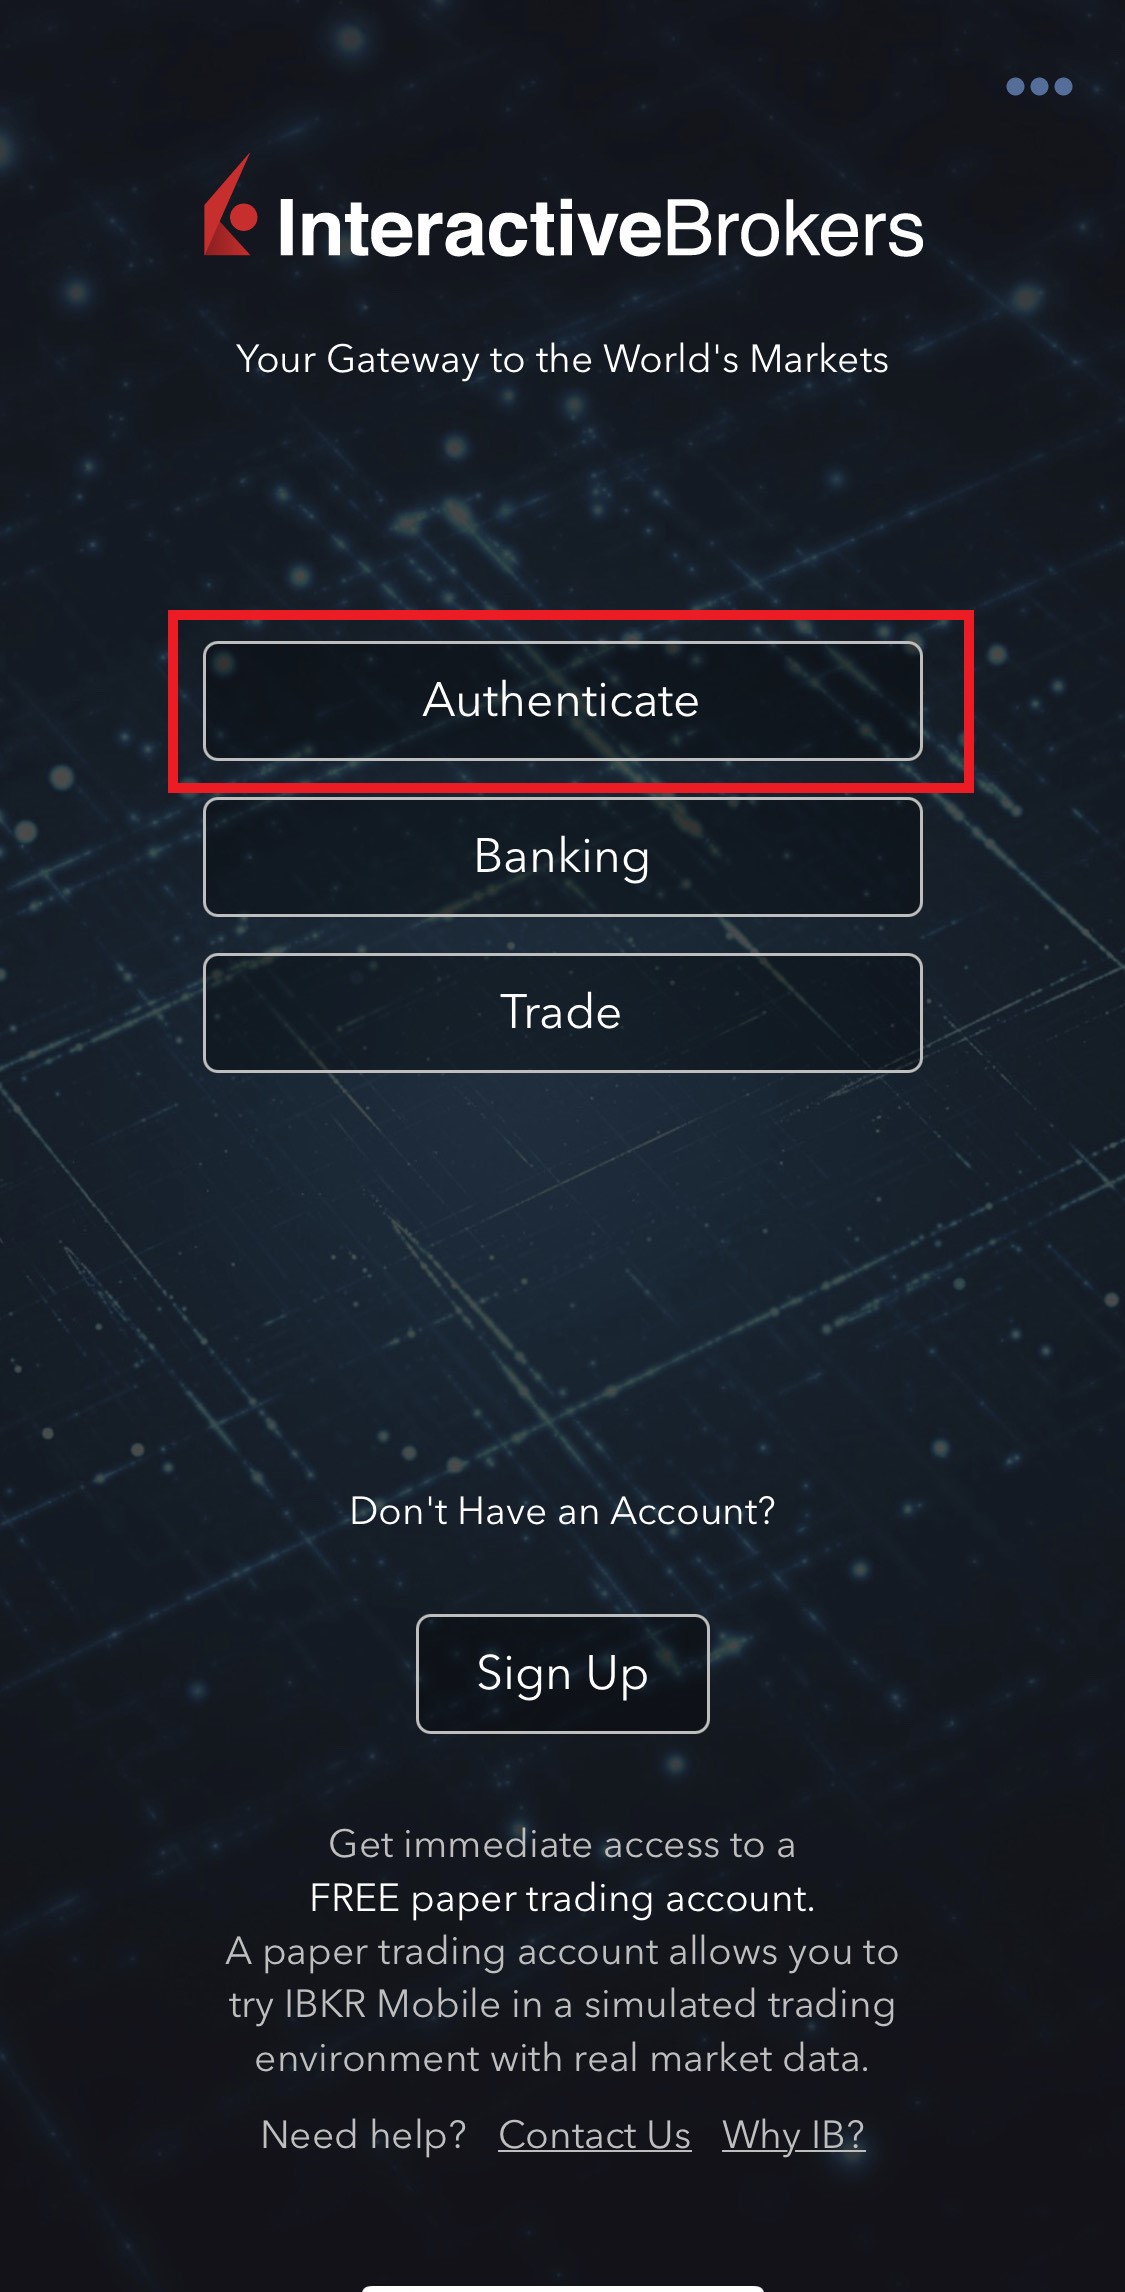
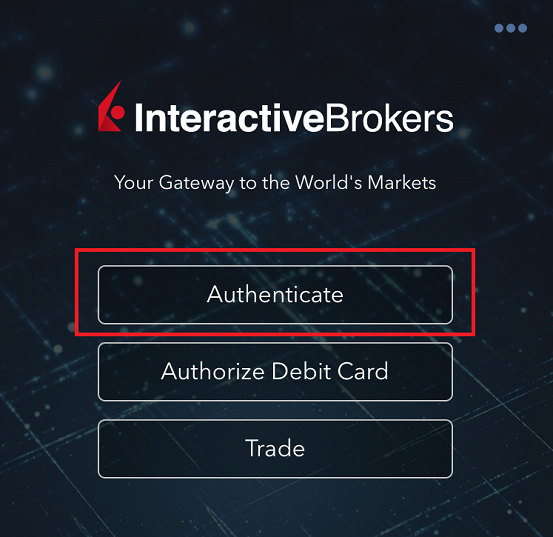
2. Tap on Authenticate (Figure 5) and then on Add User (Figure 6).
Figure 5. Figure 6.
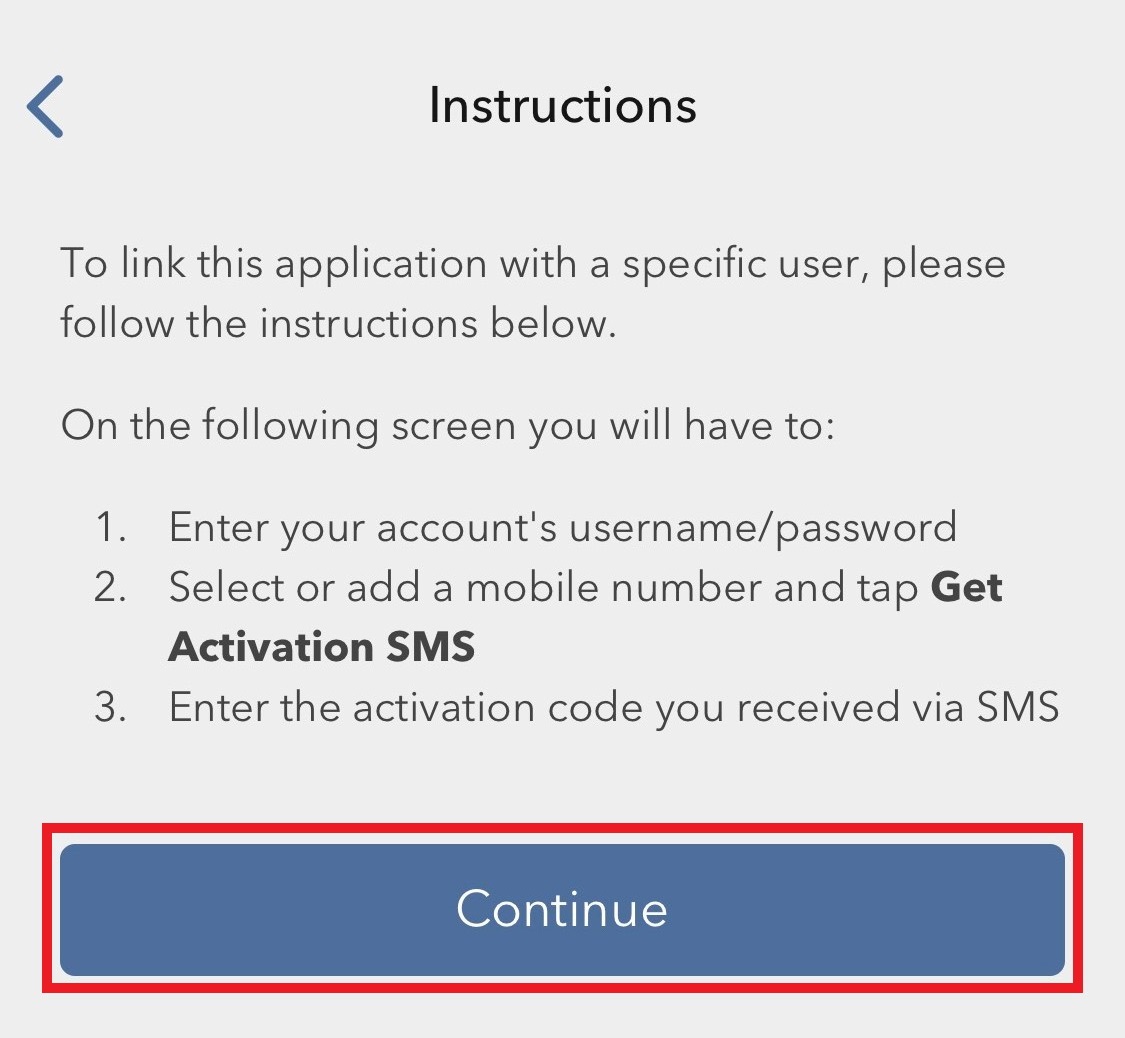
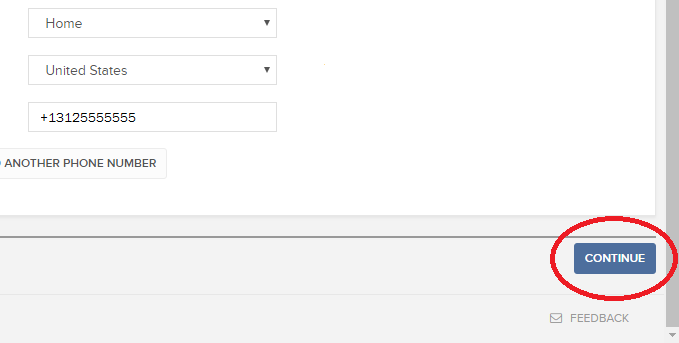
3. Read the instructions and then tap on Continue (Figure 7).
Figure 7.
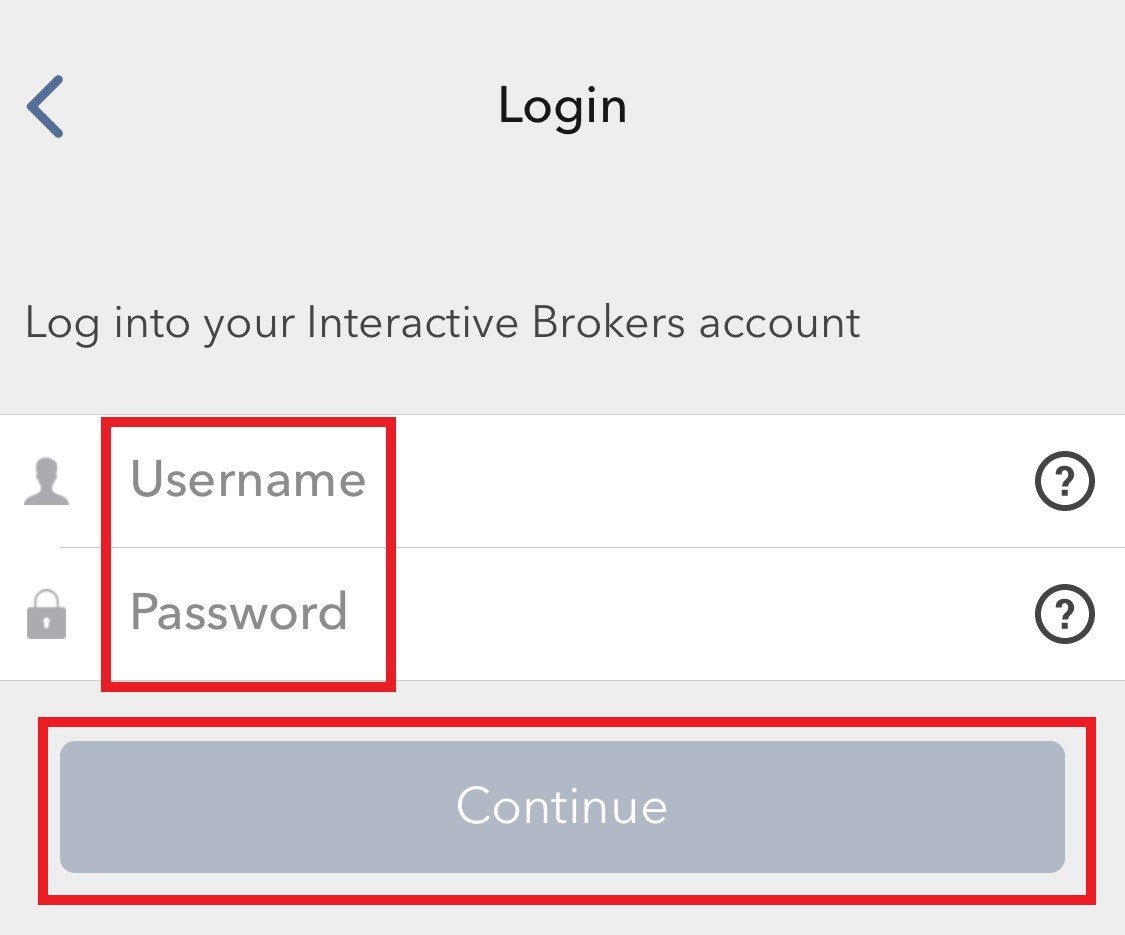
3. Enter your Username and Password, and then tap on Continue (Figure 8).
Figure 8.
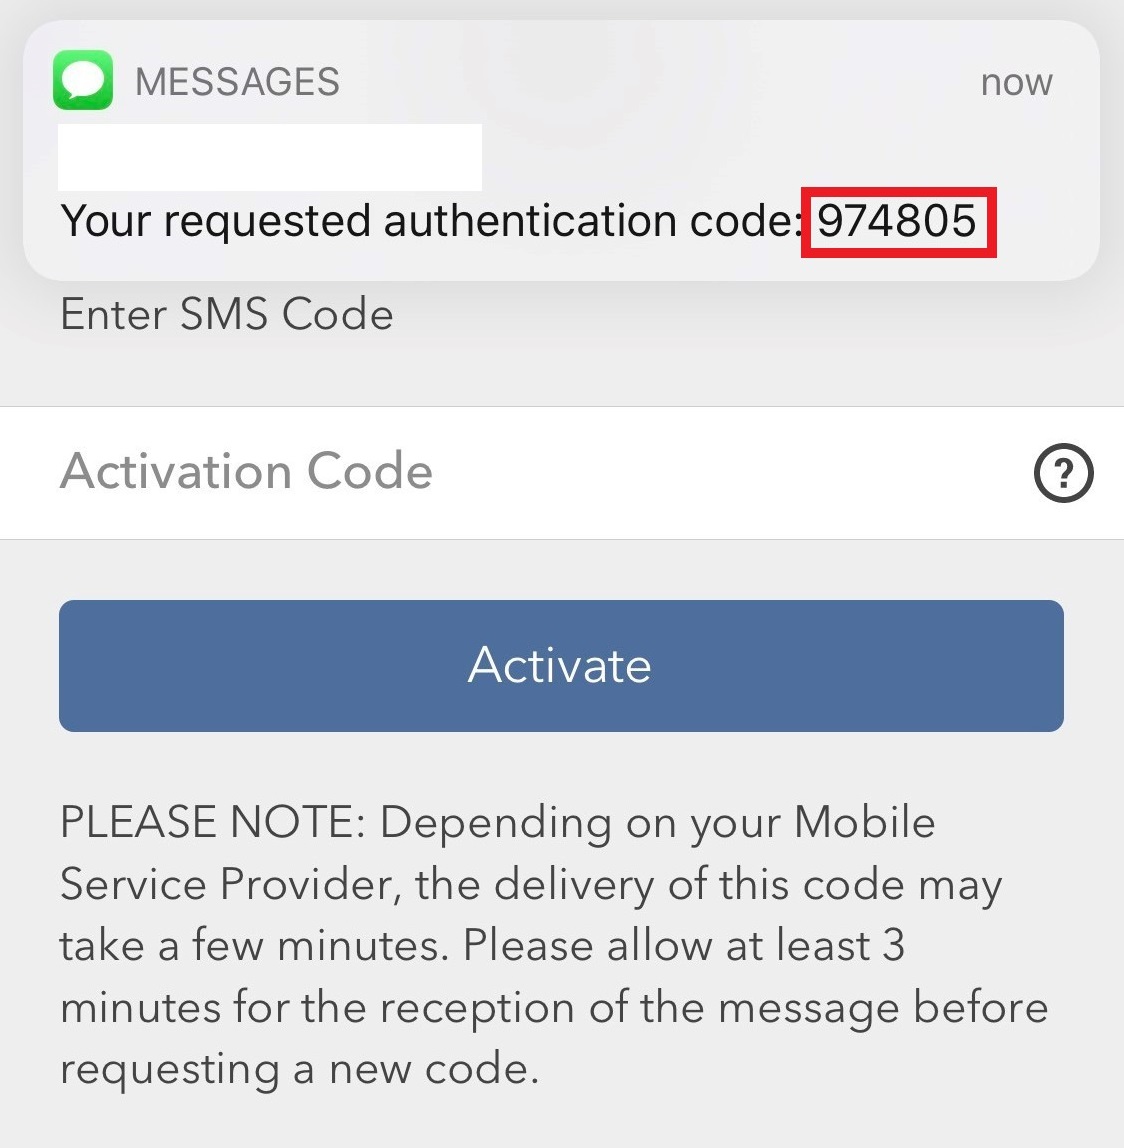
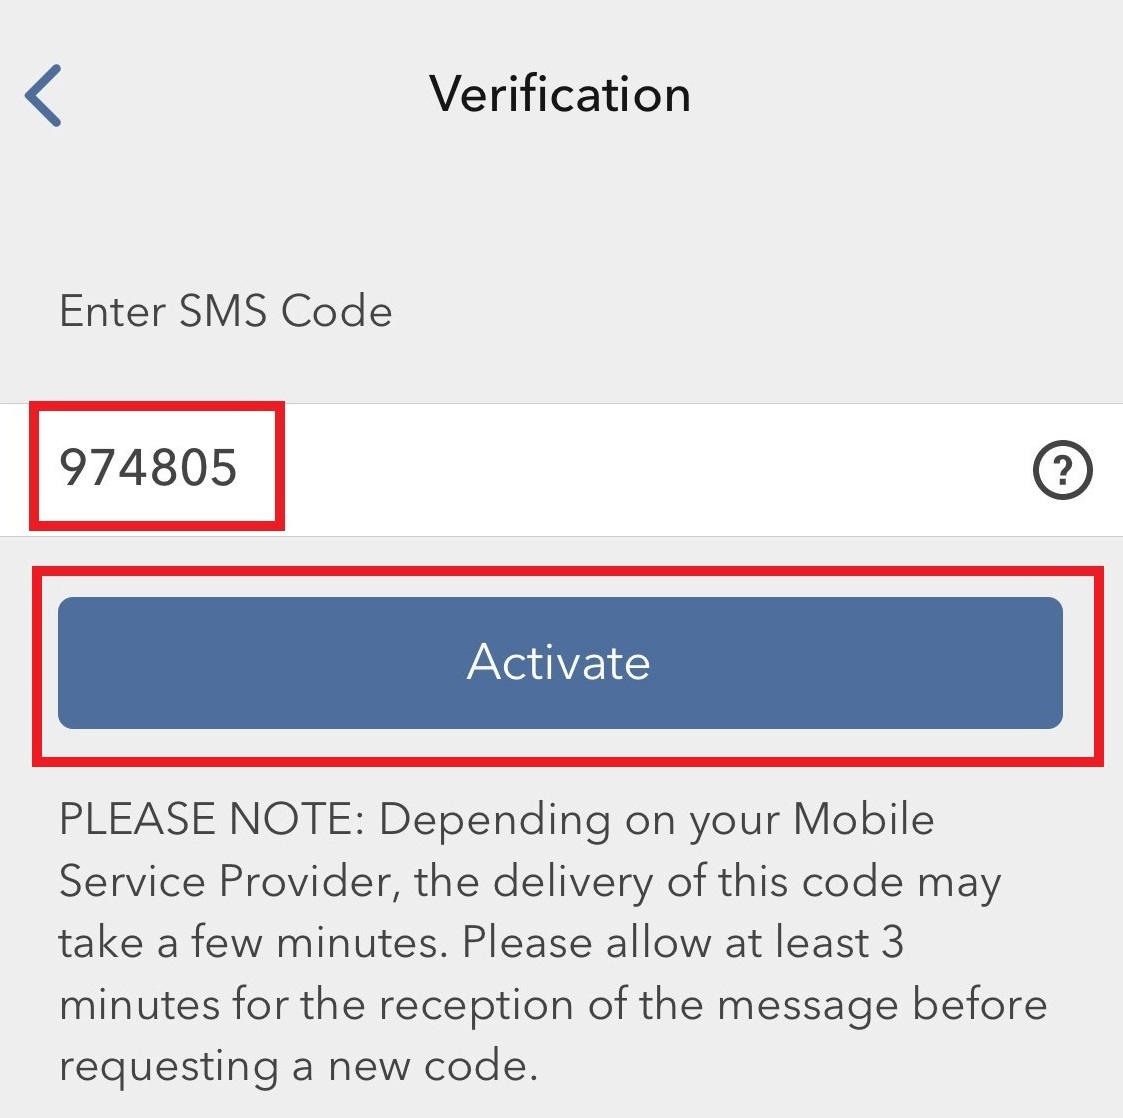
4. An Authentication Code will be sent via SMS to the mobile phone number listed on your account (Figure 9). Enter this Authentication Code in the Activation Code field and tap on Activate (Figure 10).
Figure 9. Figure 10.
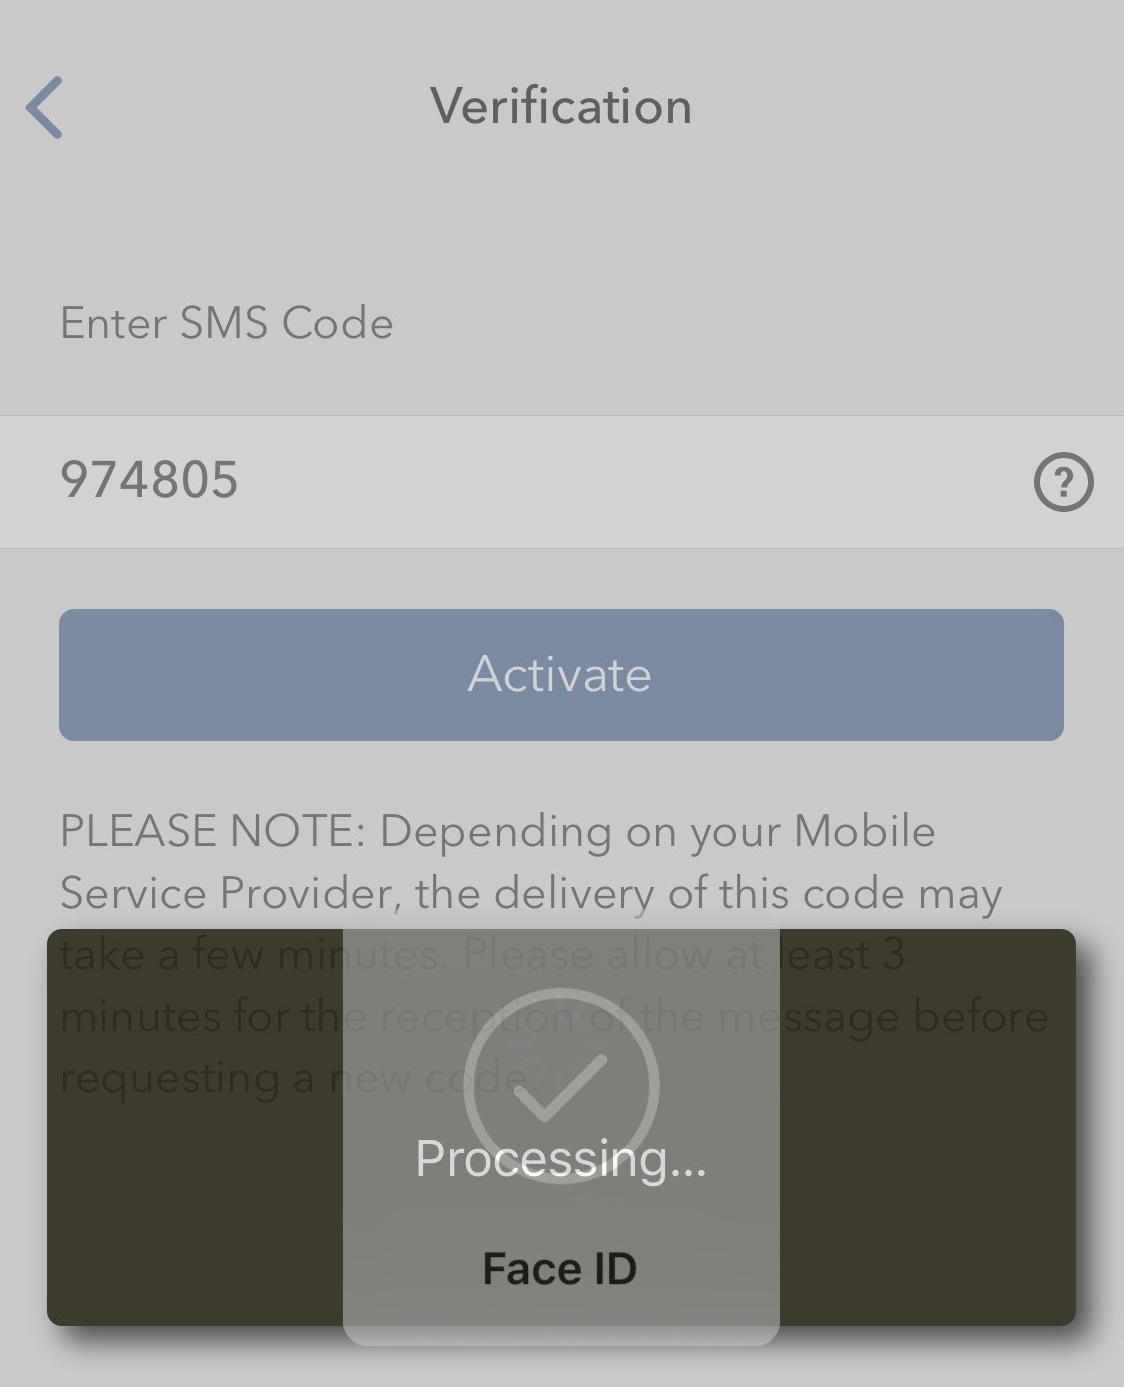
5. Depending on your smartphone's security settings, you will be asked to use your Passcode, Touch ID, or Face ID (Figure 11).
Figure 11.
6. If the activation has been successful, you will see a confirmation screen. Finally, tap on Done to complete the procedure (Figure 12).
Figure 12.
.jpeg)
How to fix the "Cannot create ... file" error during TWS installation on MacOS
Background:
The filesystem permissions are controlled by your machines operating system. One of their functions is to secure your files, preventing unauthorized access or undesired modifications to the system and to your personal data.
Some software on your computer may modify or override the permissions assigned by the operating system. Under certain circumstances, this prevents the TWS installer from accessing the folder where the application core files have to be created (/users/youruser/home/Applications). In such cases, the TWS installation usually displays the error "Cannot create ... file. Shall I try again?"
In this article we explain how to reset the filesystem permission of the "Applications" folder located under your user home folder in order to allow a smooth run of the TWS installation.
Procedure:
1. On your keyboard, press ⌘CMD + ⇧Shift +H to open your home folder
Figure 1

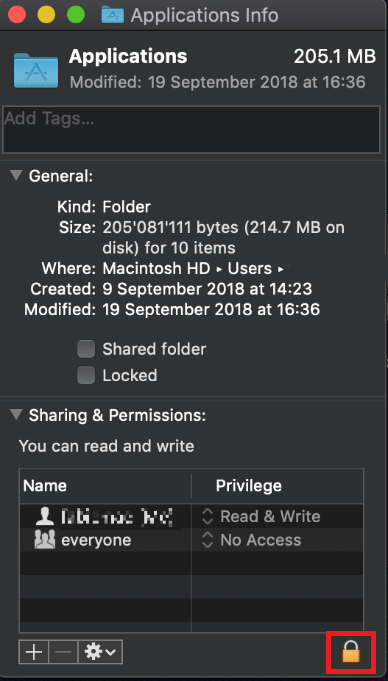
2. Select the folder "Applications" within your home folder and press ⌘CMD + I to open the Info panel
Figure 2

2. At the bottom right of the panel, click on the padlock
Figure 3
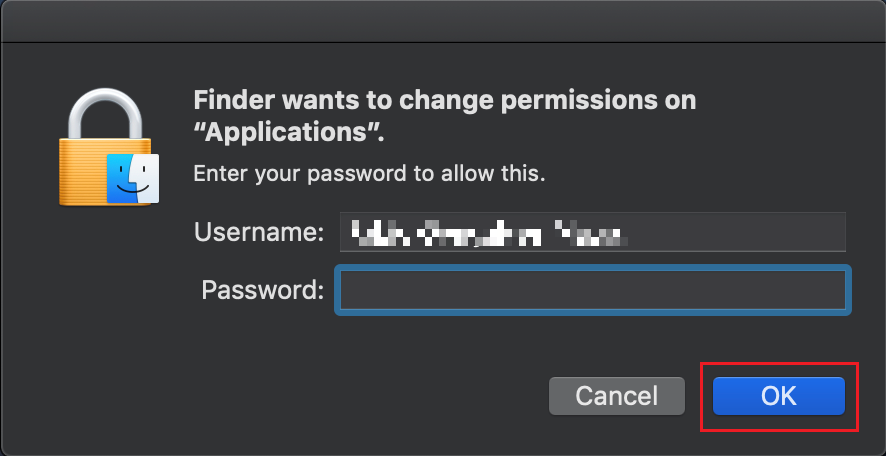
3. To unlock the permissions panel, enter your MacOS credentials and click OK
Figure 4
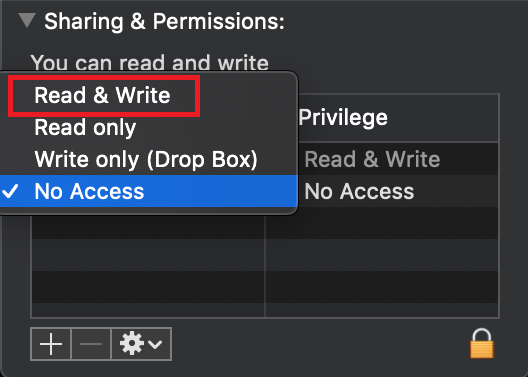
4. In the line correspondent to "everyone", click on "No Access" (Figure 5) and then select "Read & Write" (Figure 6)
Figure 5 Figure 6
.png)
5. Click on the icon bellow the permissions panel and select “Apply to enclosed items..."
Figure 7
.png)
6. Now run the TWS installer and click on Next> until you complete the installation
Figure 8
.png)
7. Once the installation has completed successfully, repeat the previous steps from 1. to 5. setting back the permissions of “everyone” to “Read Only” to revert your changes to the initial status
How to Log in to IBKR Mobile when IBKR Mobile Authentication (IB Key) is Enabled on Another Phone
Background:
This article is intended for clients who have activated the IBKR Mobile Authentication (IB Key) on their smartphone and possess as well an additional mobile device, on which they desire to trade.
Clients with this setup will be able to log in to the IBKR Mobile trading platform on their secondary device, using their smartphone to complete the Two-Factor Authentication step.
For the purposes of this article, we will use the following naming convention:
Authentication device: this is the smartphone on which you activated the IBKR Mobile Authentication (IB Key)
Trading device: this is where you want to use IBKR Mobile app for trading.
Procedure
Please click on one of the link below according to your phone operating system:
Apple iOS
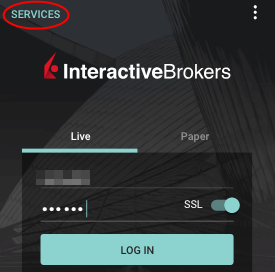
1. On your Trading device, launch the IBKR Mobile app. Enter your your credentials in the login screen and tap Log In
Figure 1
2. Tap Two-Factor Authentication (Figure 2). A Challenge code will be displayed (Figure 3)
Figure 2 Figure 3
.png)
3. On the Authentication device, launch the IBKR Mobile app
Figure 4
.png)
4a. If you are not automatically logged in, tap Services (Figure 5) on the top left, then tap Authenticate (Figure 6).
Figure 5 Figure 6
4b. If you are already logged in, tap on the More button on the bottom right. Then, scroll down and tap on Authenticate
Figure 7
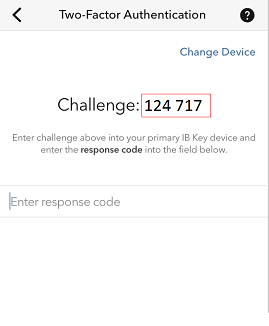
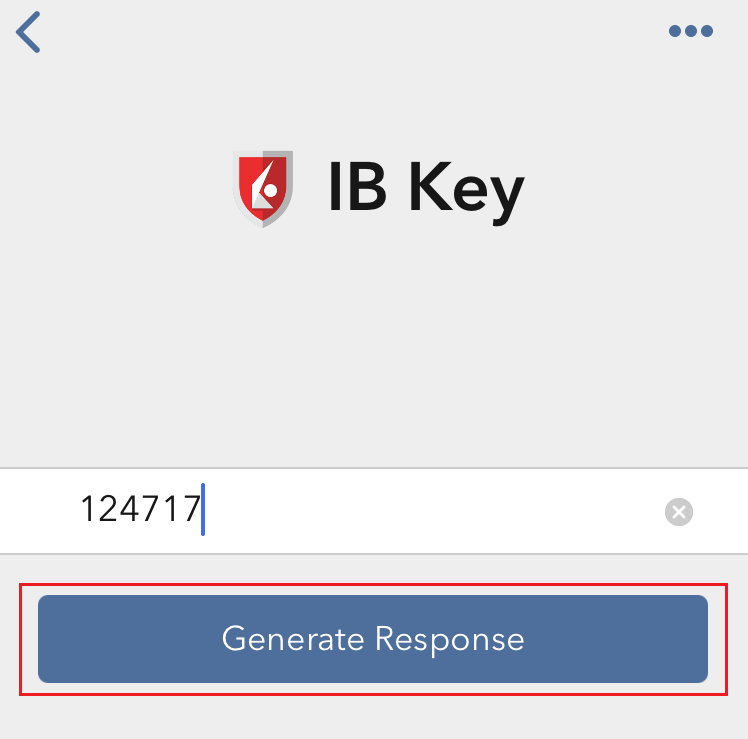
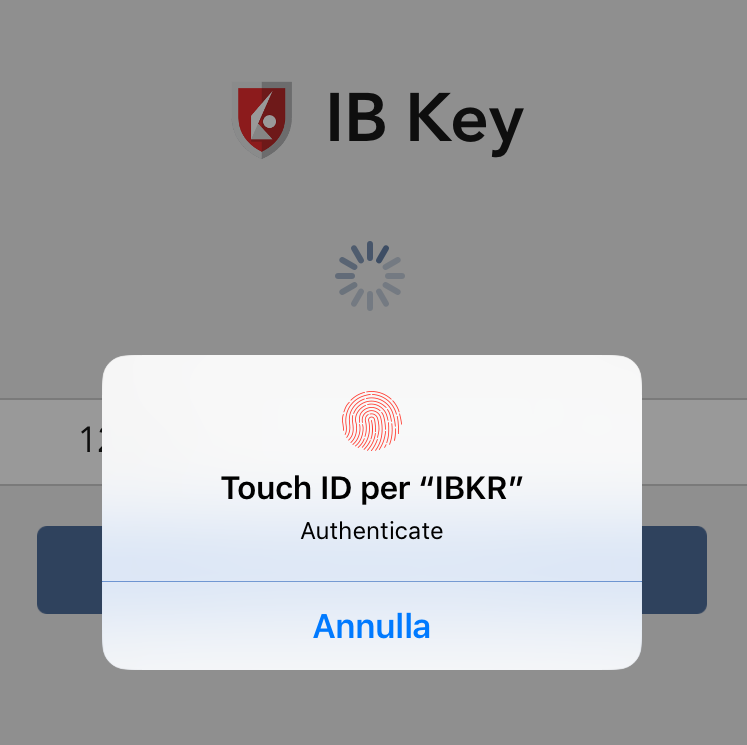
5. Enter the Challenge code you obtained at point 2. Then tap Generate Response (Figure 8). Once you have provided your security element (Figure 9), you will receive a Response String (Figure 10).
Figure 8 Figure 9 Figure 10
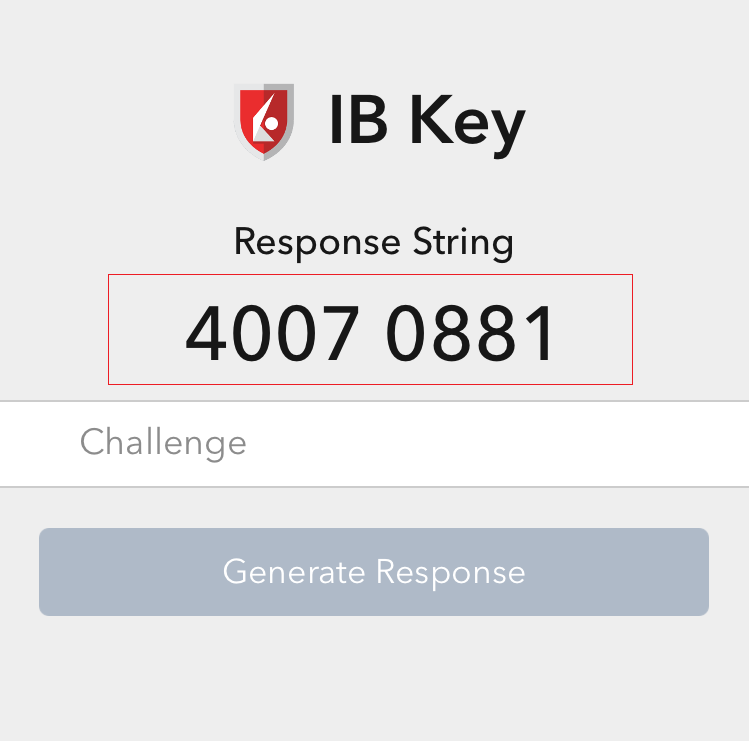
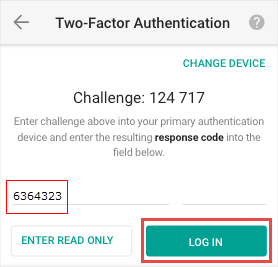
6. On your Trading device, enter the Response String into the "Enter response code" field and tap Send to finalize the authentication process.
Figure 11
.png)
Android
1. On your Trading device, launch the IBKR Mobile app. Enter your your credentials in the login screen and tap Log In
Figure 1
2. Tap on the option Two-Factor Authentication (Figure 2). You will see a Challenge code (Figure 3)
Figure 2 Figure 3
(1).png)
3. On the Authentication device, launch the IBKR Mobile app
Figure 4
4a. If you are not automatically logged in, tap Services (Figure 5) and then tap Authenticate (Figure 6).
Figure 5 Figure 6
.png)
4b. If you are already logged in, tap the Menu button (Figure 7), scroll down and tap Authenticate (Figure 8).
Figure 7 Figure 8
.png)
.png)
Figure 7 Figure 8
5. Enter your IBKR Mobile PIN and the Challenge code you obtained at point 2. Then tap Generate Response (Figure 9). A Response String will be displayed (Figure 10)
Figure 9 Figure 10
.png)
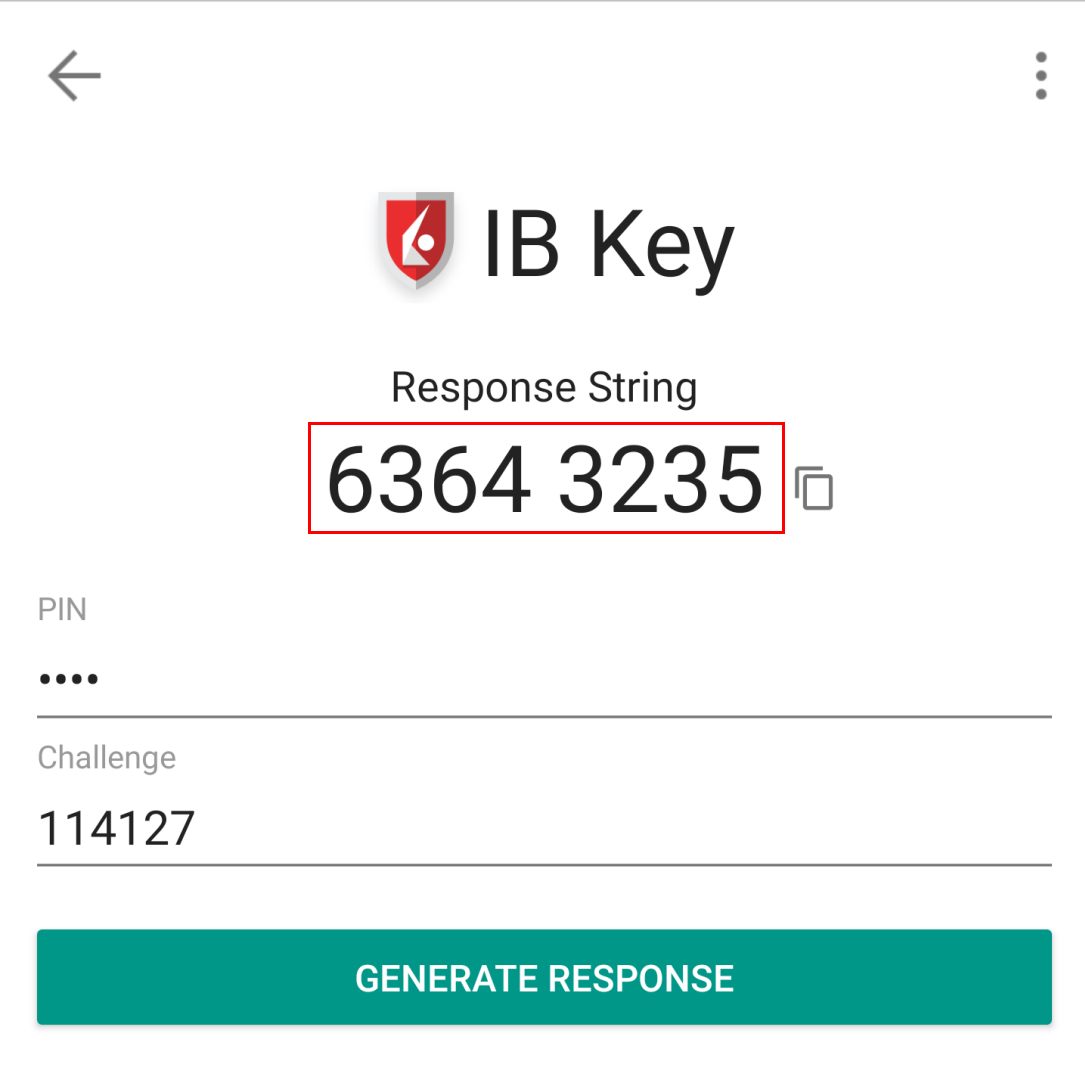
Figure 9 Figure 10
6. On your Trading device, enter the Response String in to the "Enter response code" field and then tap Log In to finalize the authentication process.
Figure 11
How do I enable the Notifications for the IBKR Mobile app
Overview:
What is a notification?
A push notification is a brief message which is sent ("pushed") from a back-end server to your device over the Internet. Apps developers use those attention-grabbing messages to quickly and effectively reach the recipients, even if they are not currently engaging with their application. Notifications can deliver information to users or advise them of a specific action they are invited or required to perform.
Background:
Why does the IBKR Mobile app use notifications?
The IBKR Mobile application uses notifications for informational purposes, as well as two-factor authentication. In the latter case, the user is invited to tap on the notification, which will automatically open the IBKR Mobile app and begin the authentication process.
This procedure explains how to manually enable notifications for the IBKR Mobile app. Please click the link below that matches your smartphone's operating system.
1. On your home screen, tap Settings (Figure 1), then Notifications (Figure 2) and finally IBKR (Figure 3)
Figure 1 Figure 2 Figure 3
(1).png)
(1).png)
2. In the IBKR app settings, you will see a number of different options. We recommend to set them in the following way (Figure 4):
-
Allow Notifications: enabled
-
Lock Screen, Notification Center, Banners: selected
-
Banner style: Persistent
-
Badges: enabled
-
Show Previews: Always
Figure 4
.png)
1. Go the Settings of your phone, then tap Apps & notifications1 (Figure 1) then IBKR Mobile (Figure 2) and finally App notifications (Figure 3)
Figure 1 Figure 2 Figure 3
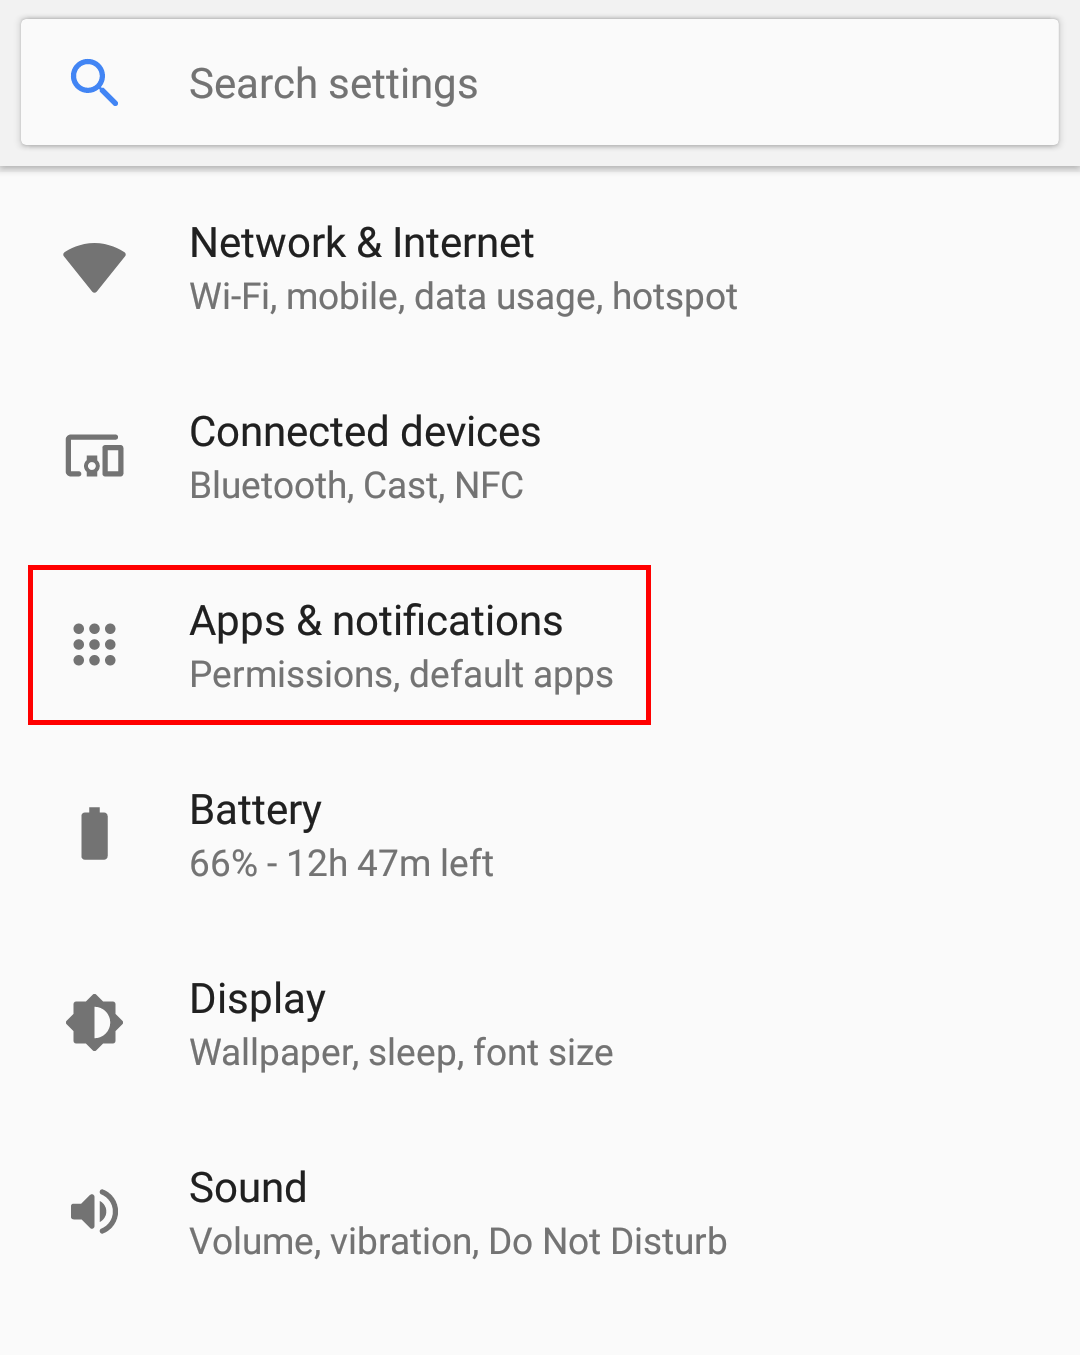
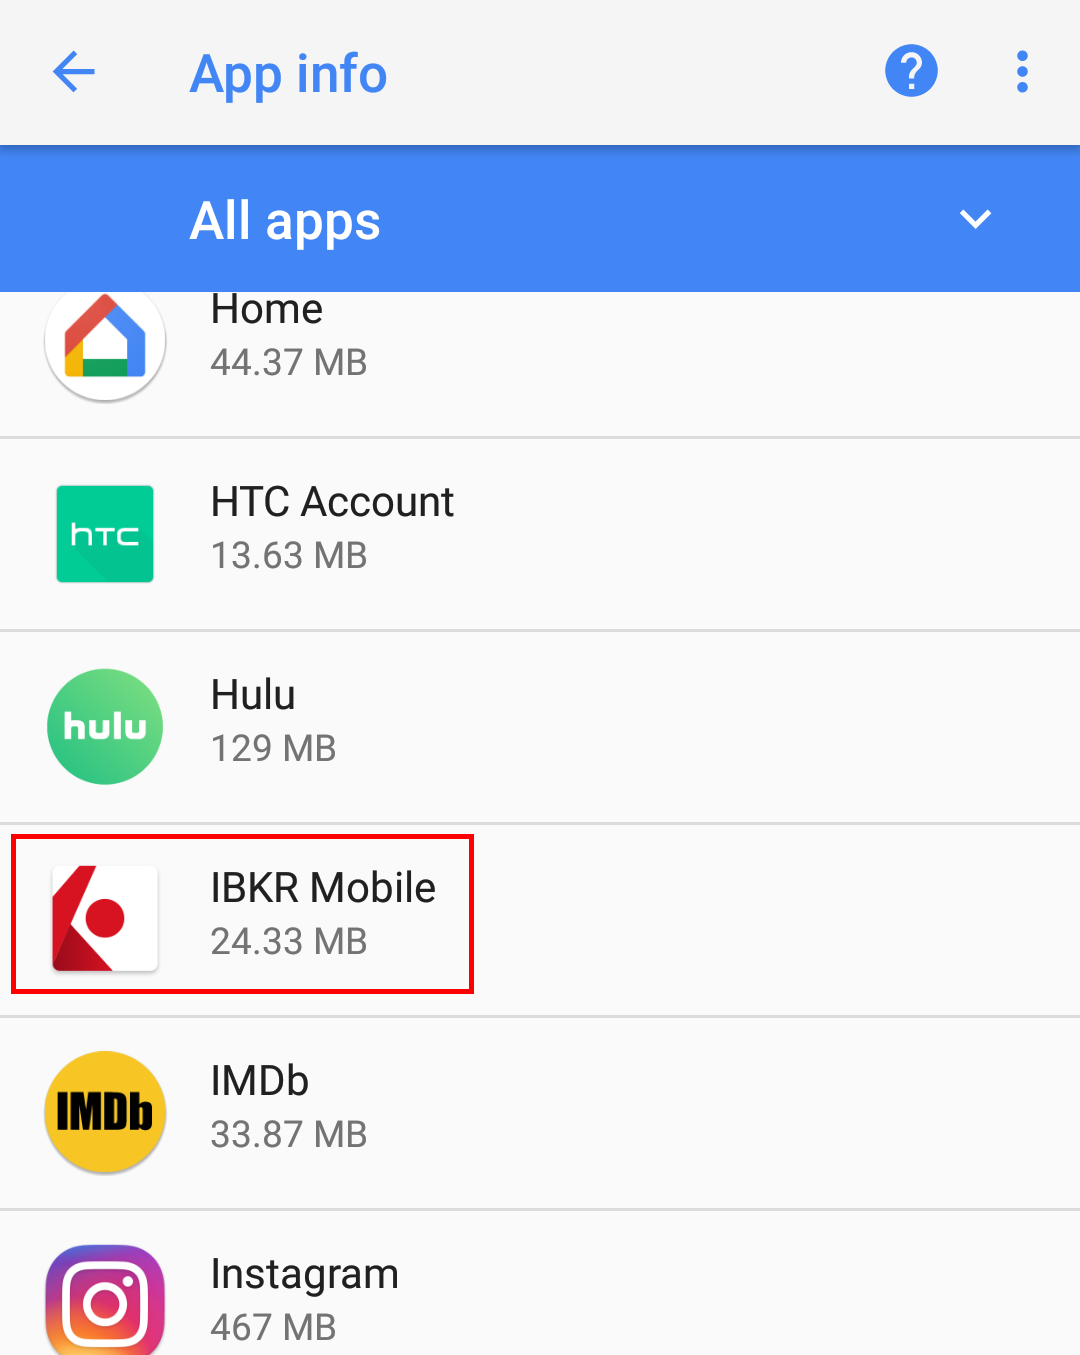
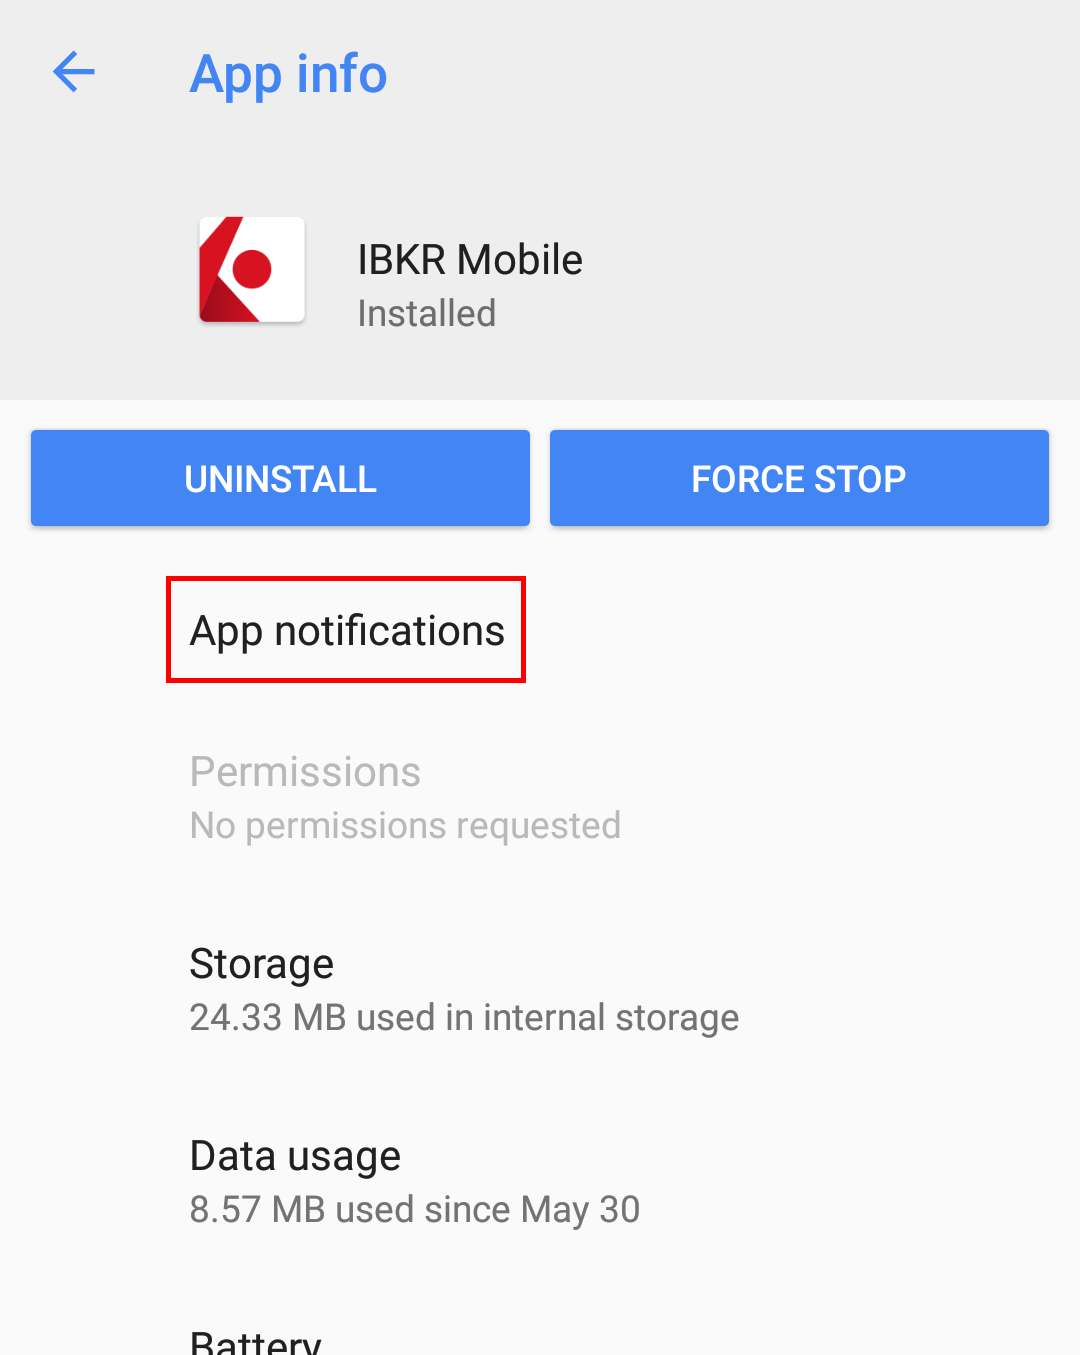
Figure 1 Figure 2 Figure 3
2. Ensure that notifications for this app are globally On and the switches Allow notification dots, Allow interruptions, On the lock screen are all enabled (Figure 4). According to your personal preference, you may want to enable as well the switch Override Do Not Disturb
Figure 4
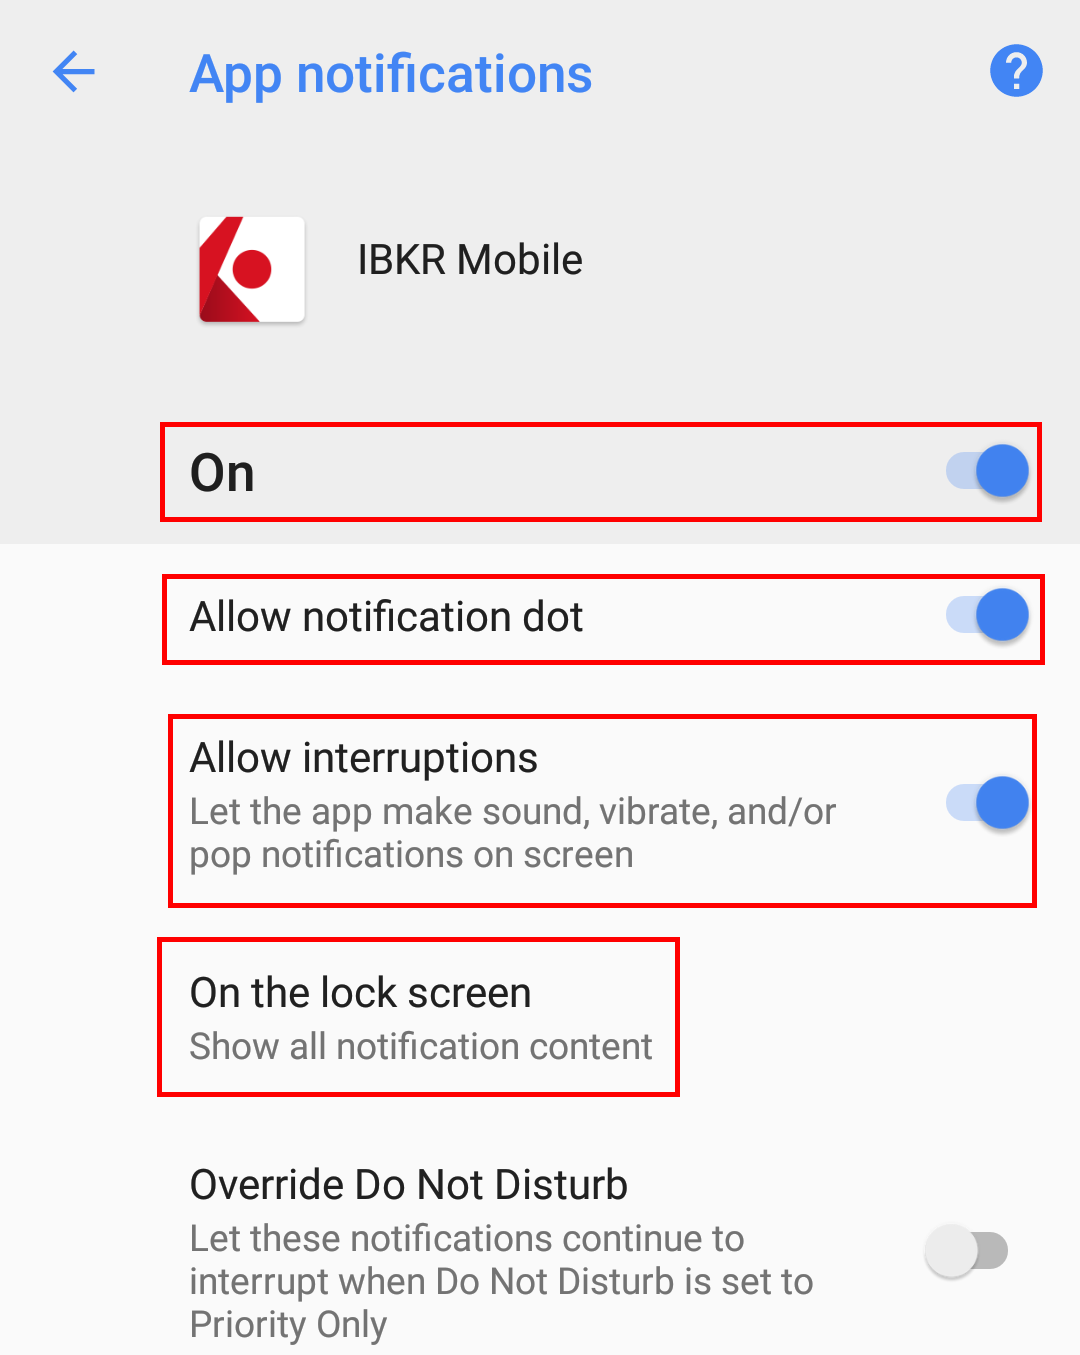
Figure 4
Please note that menu items labels and positions may vary according to your device vendor and software version.
1. The Apps & notifications item may be called Sound & notification on certain devices
References:
- See KB2260 for instruction on how to activate and operate IBKR Mobile Authentication
- See KB3234 for troubleshooting missing IBKR Mobile notifications
- See KB2748 for information about IBKR Mobile Authentication recovery
Why is my chart delayed, showing question marks or only partially populated?
Background:
What are SMART Charts and how are they generated?
The SMART charting mechanism analyzes and compares the market data coming from all venues a given contract is traded on and graphically displays the most favorable quotes.
When all the data streams are live, the data points are available for all sources and for each time point, thus they can be fully compared. The resulting SMART chart will be up to date and fully populated, moreover it will constantly and automatically update1.
The comparison between non synchronized market data streams (some live and some delayed) is just partially possible, since the delayed feeds are lacking data points for the last 15 or 20 minutes. Therefore, within that time frame, the SMART chart will usually display a series of yellow question marks to indicate unavailability of source data. In this case the SMART Chart will not update automatically.
When the lack of data points is more extensive or when the Exchange does not distribute delayed data for a given contract, the correspondent SMART Chart may be completely blank.
What should I do to obtain a fully populated, up-to-date chart?
If your trading method is based on SMART charts, you would need to activate the live market data subscriptions for all the marketplaces your financial instruments are traded on2. For additional details, please see KB1201
If your trading method does not require SMART charts, you can decide to use Direct chart routing as a workaround.
A Directed Chart will allow you to graphically represent the market data coming from a single, specific Exchange. When possible, we suggest to select the primary marketplace for the product for this purpose, since this is usually the one offering the highest liquidity and trade volume, hence normally providing the most favorable quotes. If you have subscribed the market data for that venue, the resulting Directed Chart will be fully populated, up to date and it will update automatically1.
How do I set up a Directed Chart?
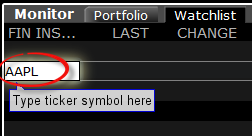
1. Within a watchlist, type the contract symbol and press Enter on your keyboard.
2. When then contract selection menu appears, select the item Stock (Directed). If you do not see this item, click on the small down arrow at the bottom of the menu to reveal the hidden menu items.
.png)
3. The Exchange selection screen will appear. You can now select the main Exchange for the product or the Exchange for which you have an active live market data subscription. Once done, click OK.

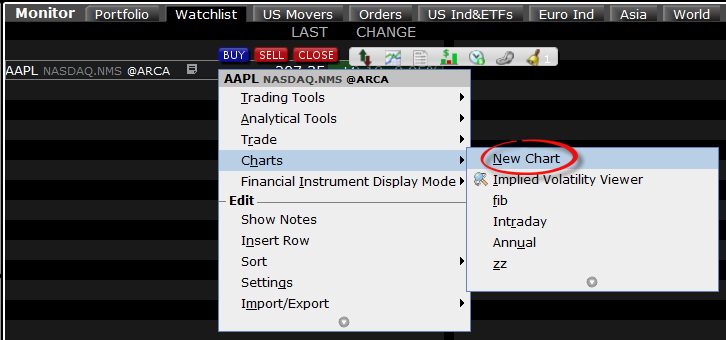
4. Within your watchlist you will see a newly created Directed Ticker line. It will contain the contract symbol and, preceded by the @ sign, the Exchange you selected at the previous step. Right click on that directed ticker line and select Chart > New Chart
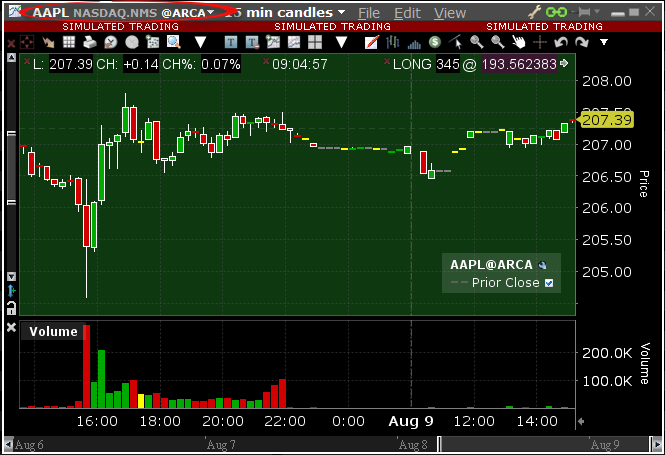
5. The chart will be shown. On the left side of the toolbar, after the contract symbol, you will see the Exchange you selected preceeded by a @ sign, indicating that this is a Directed Chart.
1. In order for the chart to update automatically, the checkbox "Keep chart up to date" has to be activated in the Chart Parameters panel. The panel is reachable directly within the chart window, from the top menu Edit.
2. Alternative streaming quotes for EU equities are available to clients with non-professional or non-commercial market data subscriber status. The complimentary real-time streaming Best Bid and Offer and last sale quotes on European Equities will be aggregated from exchanges such as Cboe Europe, Gettex, Tradegate and Turquoise. The data will display in the SMART quote line and can be used to generate a chart as well. Users who would like to receive the full EBBO (European Best Bid and Offer) will need to subscribe to the individual exchange subscriptions.
Exposure Fee Calculation Reports
INTRODUCTION
Our Account Management system lets you configure and manage your account from a single window, including our Exposure Fee Calculations report. The Exposure Fee Calculations is generated daily and made available within Account Management prior to the U.S. equity market open. This report allows users to view the change in Profit and Loss (PnL) of your positions if the price of each of your positions declines and increases by predetermined percentages.
REPORT ACCESS
To access/generate an Exposure Fee Calculations Report
1) From the Account Management Home Page, click on the Reports and then Other Reports menu options. 
2) The following screen will appear.
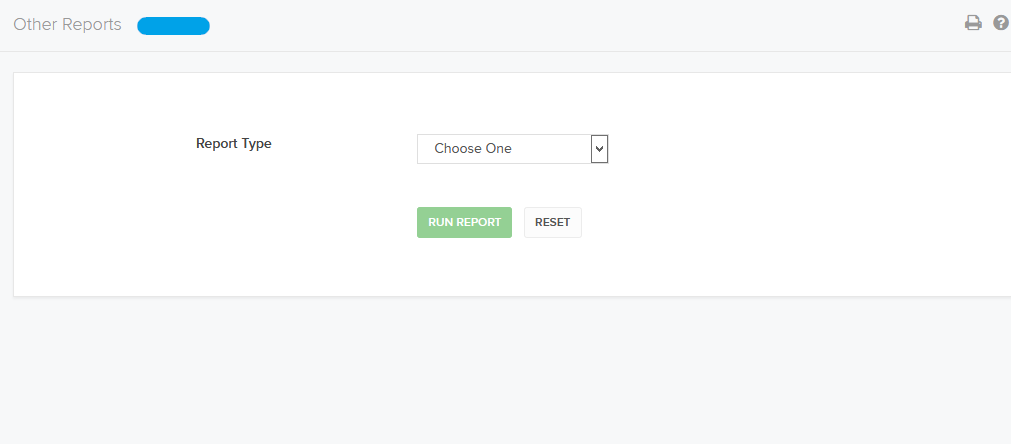
3) Select Exposure Fee Calculations from the Report Type drop-down. Exposure Fee Calculations settings appear

4) In the Date field,select the date for the report
5) Click Run Report
REPORT OVERVIEW
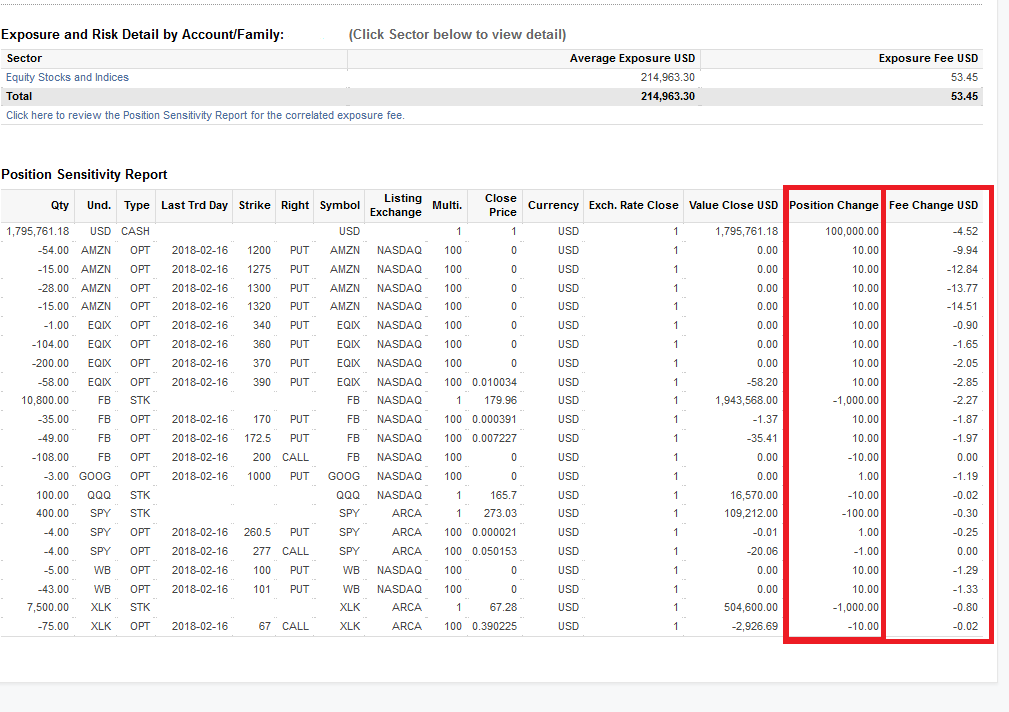
The Exposure Fee Summary Reports reflects the Average Exposure and the corresponding Exposure Fee for each Sector1 and a hyper-link to view our Sensitivity Report for the Correlated Exposure Fee
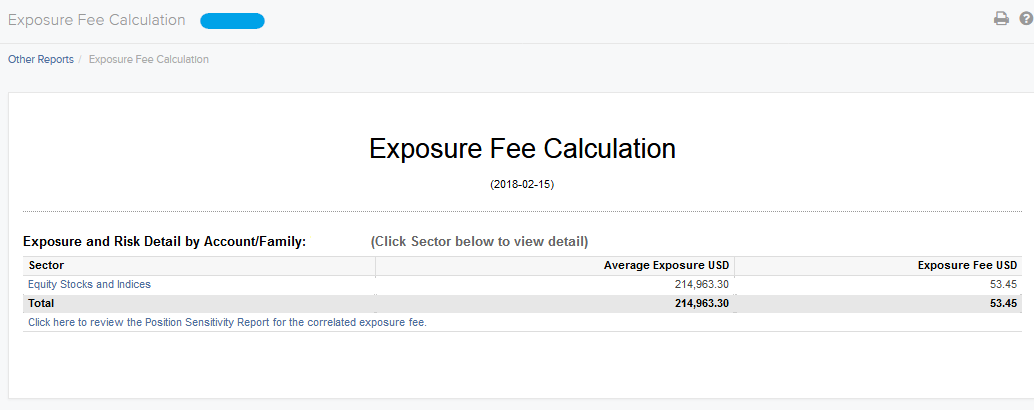
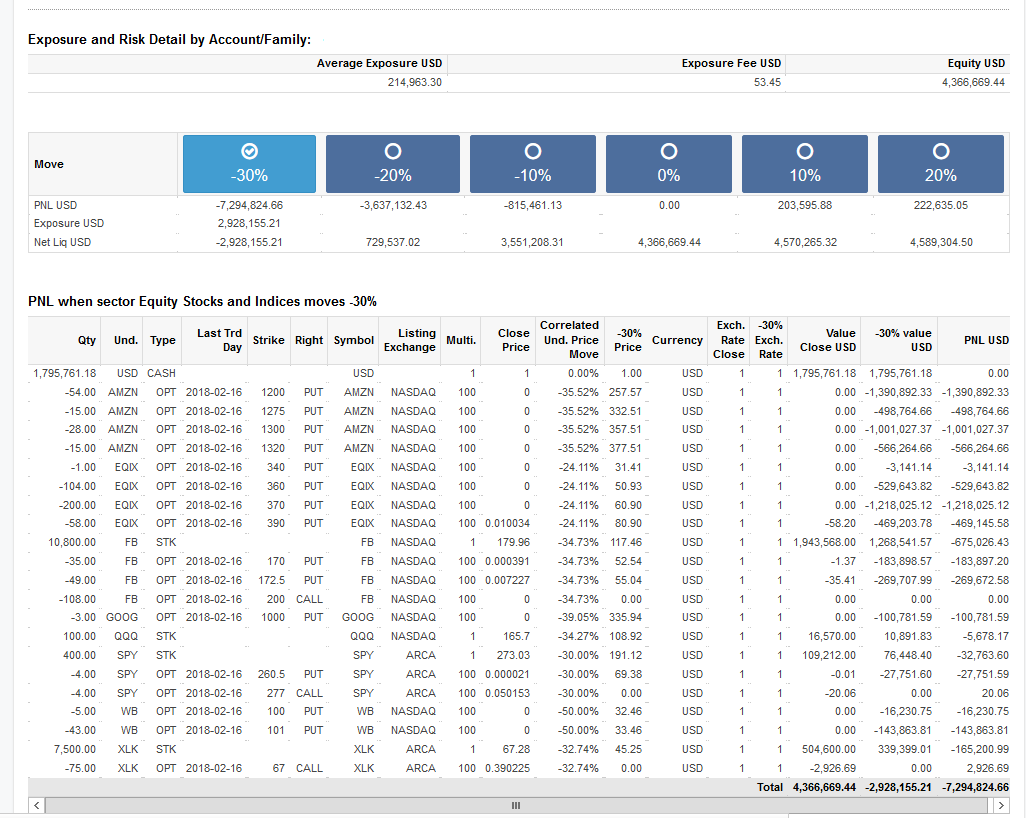
Detailed Sector Summary
Clicking on the hyper-link associated with each sector1 will populate a detailed summary, which allows users to see the change in the PNL of your positions if the price of the corresponding ETF/Index increases / declines by a pre-determined amount. For the example of Equity Stocks and Indices we are assuming SPX declines by 30%, 20% and 10% and independent increases by 10% and 20% The results are based on theoretical pricing models and take into account coincidental changes in volatility and other variables that affect derivative prices
The report shows:
- The Net Liquidation Value (NLV) of your account based on positions from the previous day’s close
- Average Exposure for the sector
- Corresponding Exposure Fee
- Equity of all positions in the account with PNL in base currency
To use the report, click the radio button that corresponds to the up or down price change you want to see (+/- 10%, 20% or +30%). The PNL for each position is updated by the selected percentage
The following are figure shows an example of a Detailed Summary of the Equity Sector, with -30% selected
1 Accounts may have Average Exposure and a corresponded Exposure Fee for more than 1 Sector
Sensitivity Report for the Correlated Exposure Fee
For every contract in the portfolio we compute an estimate of the exposure fee if the position of a single contract is modified. We assume that contracts are bought or sold, as opposed to transferred in/out. The position change is not editable and in some cases may actually require the account to reverse the direction of their position, for example from a short position to long position.
For additional information regarding the Exposure Fee, please see KB3114
Cryptocurrency Products Offered by IBKR
Overview:
Below is a list of many of the Cryptocurrency products offered by IBKR*. If you don't see the product you are looking for, you can search the IBKR contract database through the Contract Search tool available on our website. Select the Support menu followed by your account type (Individual or Institution). Here you can do a Simple search by entering the product name or symbol, an Advanced search which allows you add filters to the search, or a search by specific product type.
Cryptocurrency
- BTC- Bitcoin
- ETH- Ethereum
- LTC- Litecoin
- BCH- Bitcoin Cash
Stocks/ETFs
US
- GBTC (PINK)- Grayscale Bitcoin Investment Trust
- BCHG (PINK)- Grayscale Bitcoin Cash Trust
- ETCG (PINK)- Grayscale Ethereum Classic Trust
- ETHE (PINK)- Grayscale Ethereum Trust
- GDLC (PINK)- Grayscale Digital Large Cap Fund
- LTCN (PINK)- Grayscale Litecoin Trust
Non-US
- BITCOINXB (SFB)- Bitcoin Tracker One
- COINETH (SFB)- XBT Provider Ethereum
- COINETHE (SFB)- XBT Provider Ethereum
Indices
- NYXBT (NYSE)- NYSE Bitcoin Index
- GXBT (Cboe)- The Gemini Bitcoin Trace Price Index (No new contracts offered for trading as of June 2019)
- BRR (CME)- CME Bitcoin Reference Rate Index
- BRTI (CME)- CME Bitcoin Real Time Index
Futures
- GXBT (Cboe/CFE)- The Gemini Bitcoin Trace Price Futures (No new contracts offered for trading as of June 2019)
- BRR (CME)- CME Bitcoin Reference Rate Futures
- ETHUSDRR (CME) – CME Ether Dollar Reference Rate Futures
- BAKKT (ICECRYPTO)- Bakkt Bitcoin Futures
*Some or all of the above products may not be available to IBKR clients located in certain jurisdictions.
Back to Table of Contents: Bitcoin and Other Cryptocurrency Products @ IBKR
Bitcoin and Other Cryptocurrency Products @ IBKR
Cryptocurrency Products Offered by IBKR
Cryptocurrency Products Market Data
Trading Bitcoin Futures with IBKR
Bitcoin Futures Product Page
https://www.interactivebrokers.com/en/index.php?f=25379
IBKR Margin Requirements
https://www.interactivebrokers.com/en/index.php?f=24176
How to update the US Social Security Number (SSN) or Individual Taxpayer Identification Number (ITIN) on your account
Background:
If you have been informed or believe that your account profile contains an incorrect US SSN/ITIN, you may simply log into your Account Management to update this information. Depending on your taxpayer status, you can update your US SSN/ITIN by modifying one of the following documents:
1) IRS Form W9 (if you are a US tax resident and/or US citizen holding a US SSN/ITIN)
2) IRS Form W-8BEN (if you are a Non-US tax resident holding a US SSN/ITIN)
Please note, if your SSN/ITIN has already been verified with the IRS you will be unable to update the information. If however the IRS has not yet verified the ID, you will have the ability to update through Account Management.
How to Modify Your W9/W8
1) To submit this information change request, first login to Account Management
2) Click on the Settings section followed by Account Settings
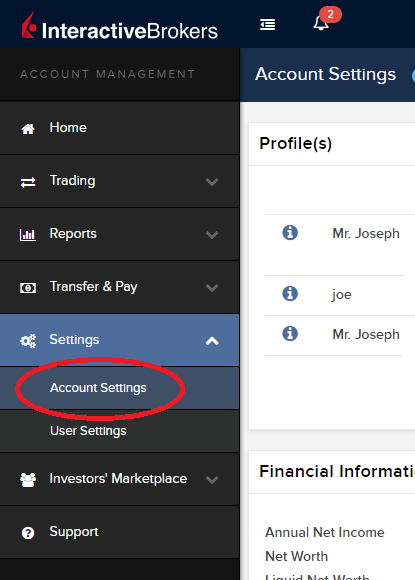
3) Find the Profile(s) section. Locate the User you wish to update and click on the Info button (the "i" icon) to the left of the User's name
.png)
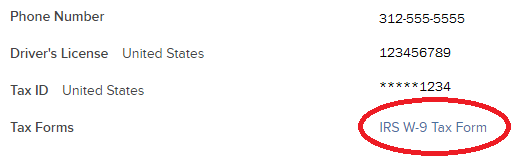
4) Scroll down to the bottom where you will see the words Tax Forms. Next to it will be a link with the current tax form we have for the account. Click on this tax form to open it
5) Review the form. If your US SSN/ITIN is incorrect, click on the UPDATE button at the bottom of the page
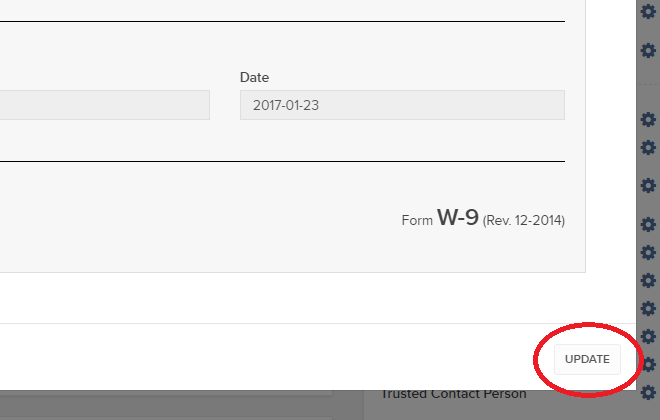
6) Make the requisite changes and click the CONTINUE button to submit your request.
7) If supporting documentation is required to approve your information change request, you will receive a message. Otherwise, your information change request should be approved within 24-48 hours.
How to adjust font size in TWS
Background:
By default, Trader Workstation (TWS) is designed to display in a font size and style which can be read comfortably for the average user across various screen sizes and resolutions. With the advent of new technologies, there has been an exponential push to make monitors with higher display sizes and your layout may need to be further adjusted manually. This document serves to explain how to manually adjust the font size for TWS.
Procedure
To adjust font size throughout TWS:
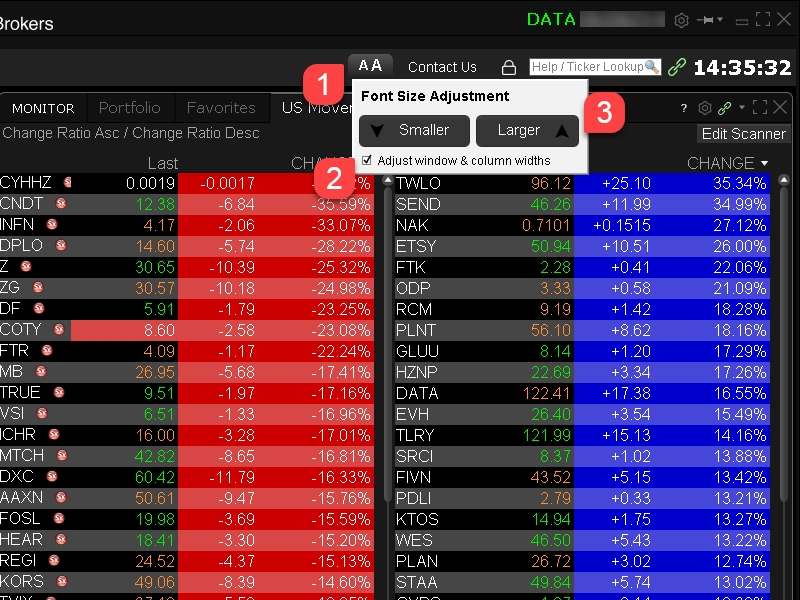
- From the Anchor window, click the Font Size Adjustment icon.

- Check the button Adjust window & column widths to ensure all windows will resize automatically to keep the same font:window ratio. (If unchecked, only font size will change but window size will remain the same).
- Click the button Smaller or Larger until the font size is correct.
Notice that the font size will change immediately as you click the button. - Click the Font Size Adjustment icon when done.
Note: It is possible that currently not all windows will be adjusted in the same way.