I want to activate IBKR Mobile Authentication (IB Key) for iPhone with the QR Code from Client Portal
You may have seen a QR code when you logged into Client Portal. In this article we will cover the steps for activating IBKR Mobile Authentication (IB Key) using that code.
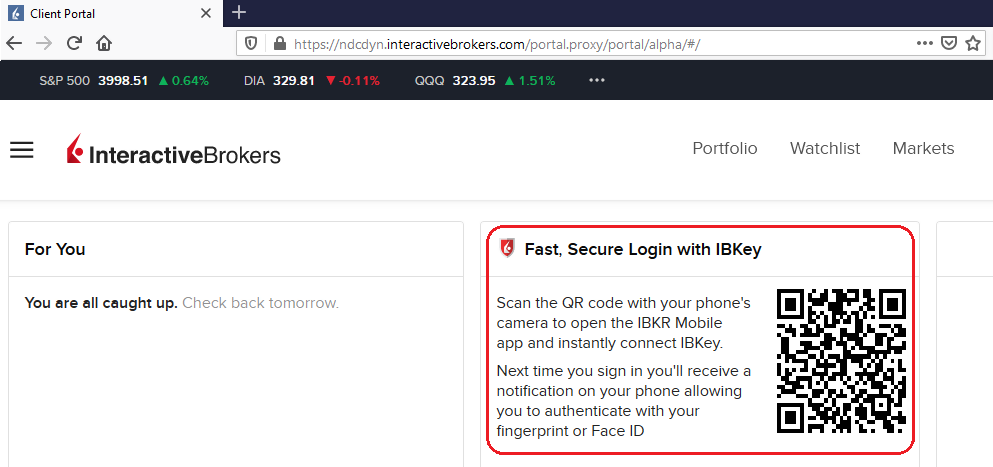
1) Log into Client Portal. You will see a banner recommending that you activate IBKR Mobile Authentication (IB Key) by scanning the accompanying QR Code:
Figure 1
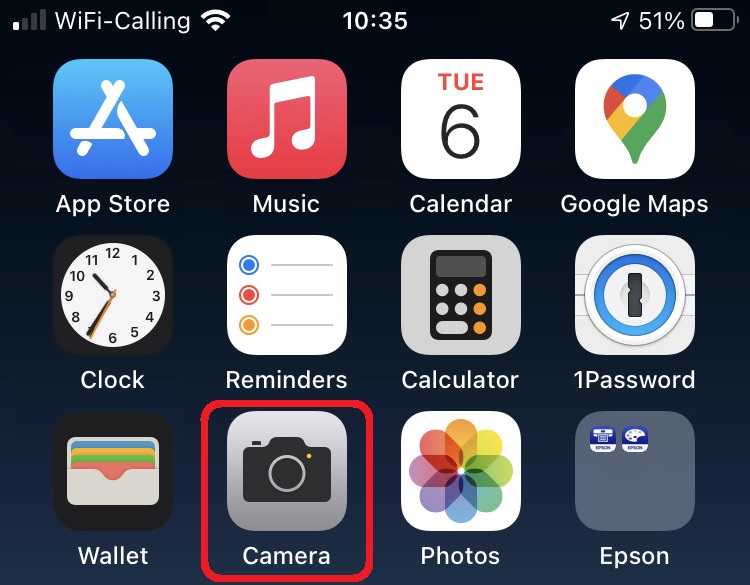
2) On your smartphone, launch the "Camera" app.
Figure 2
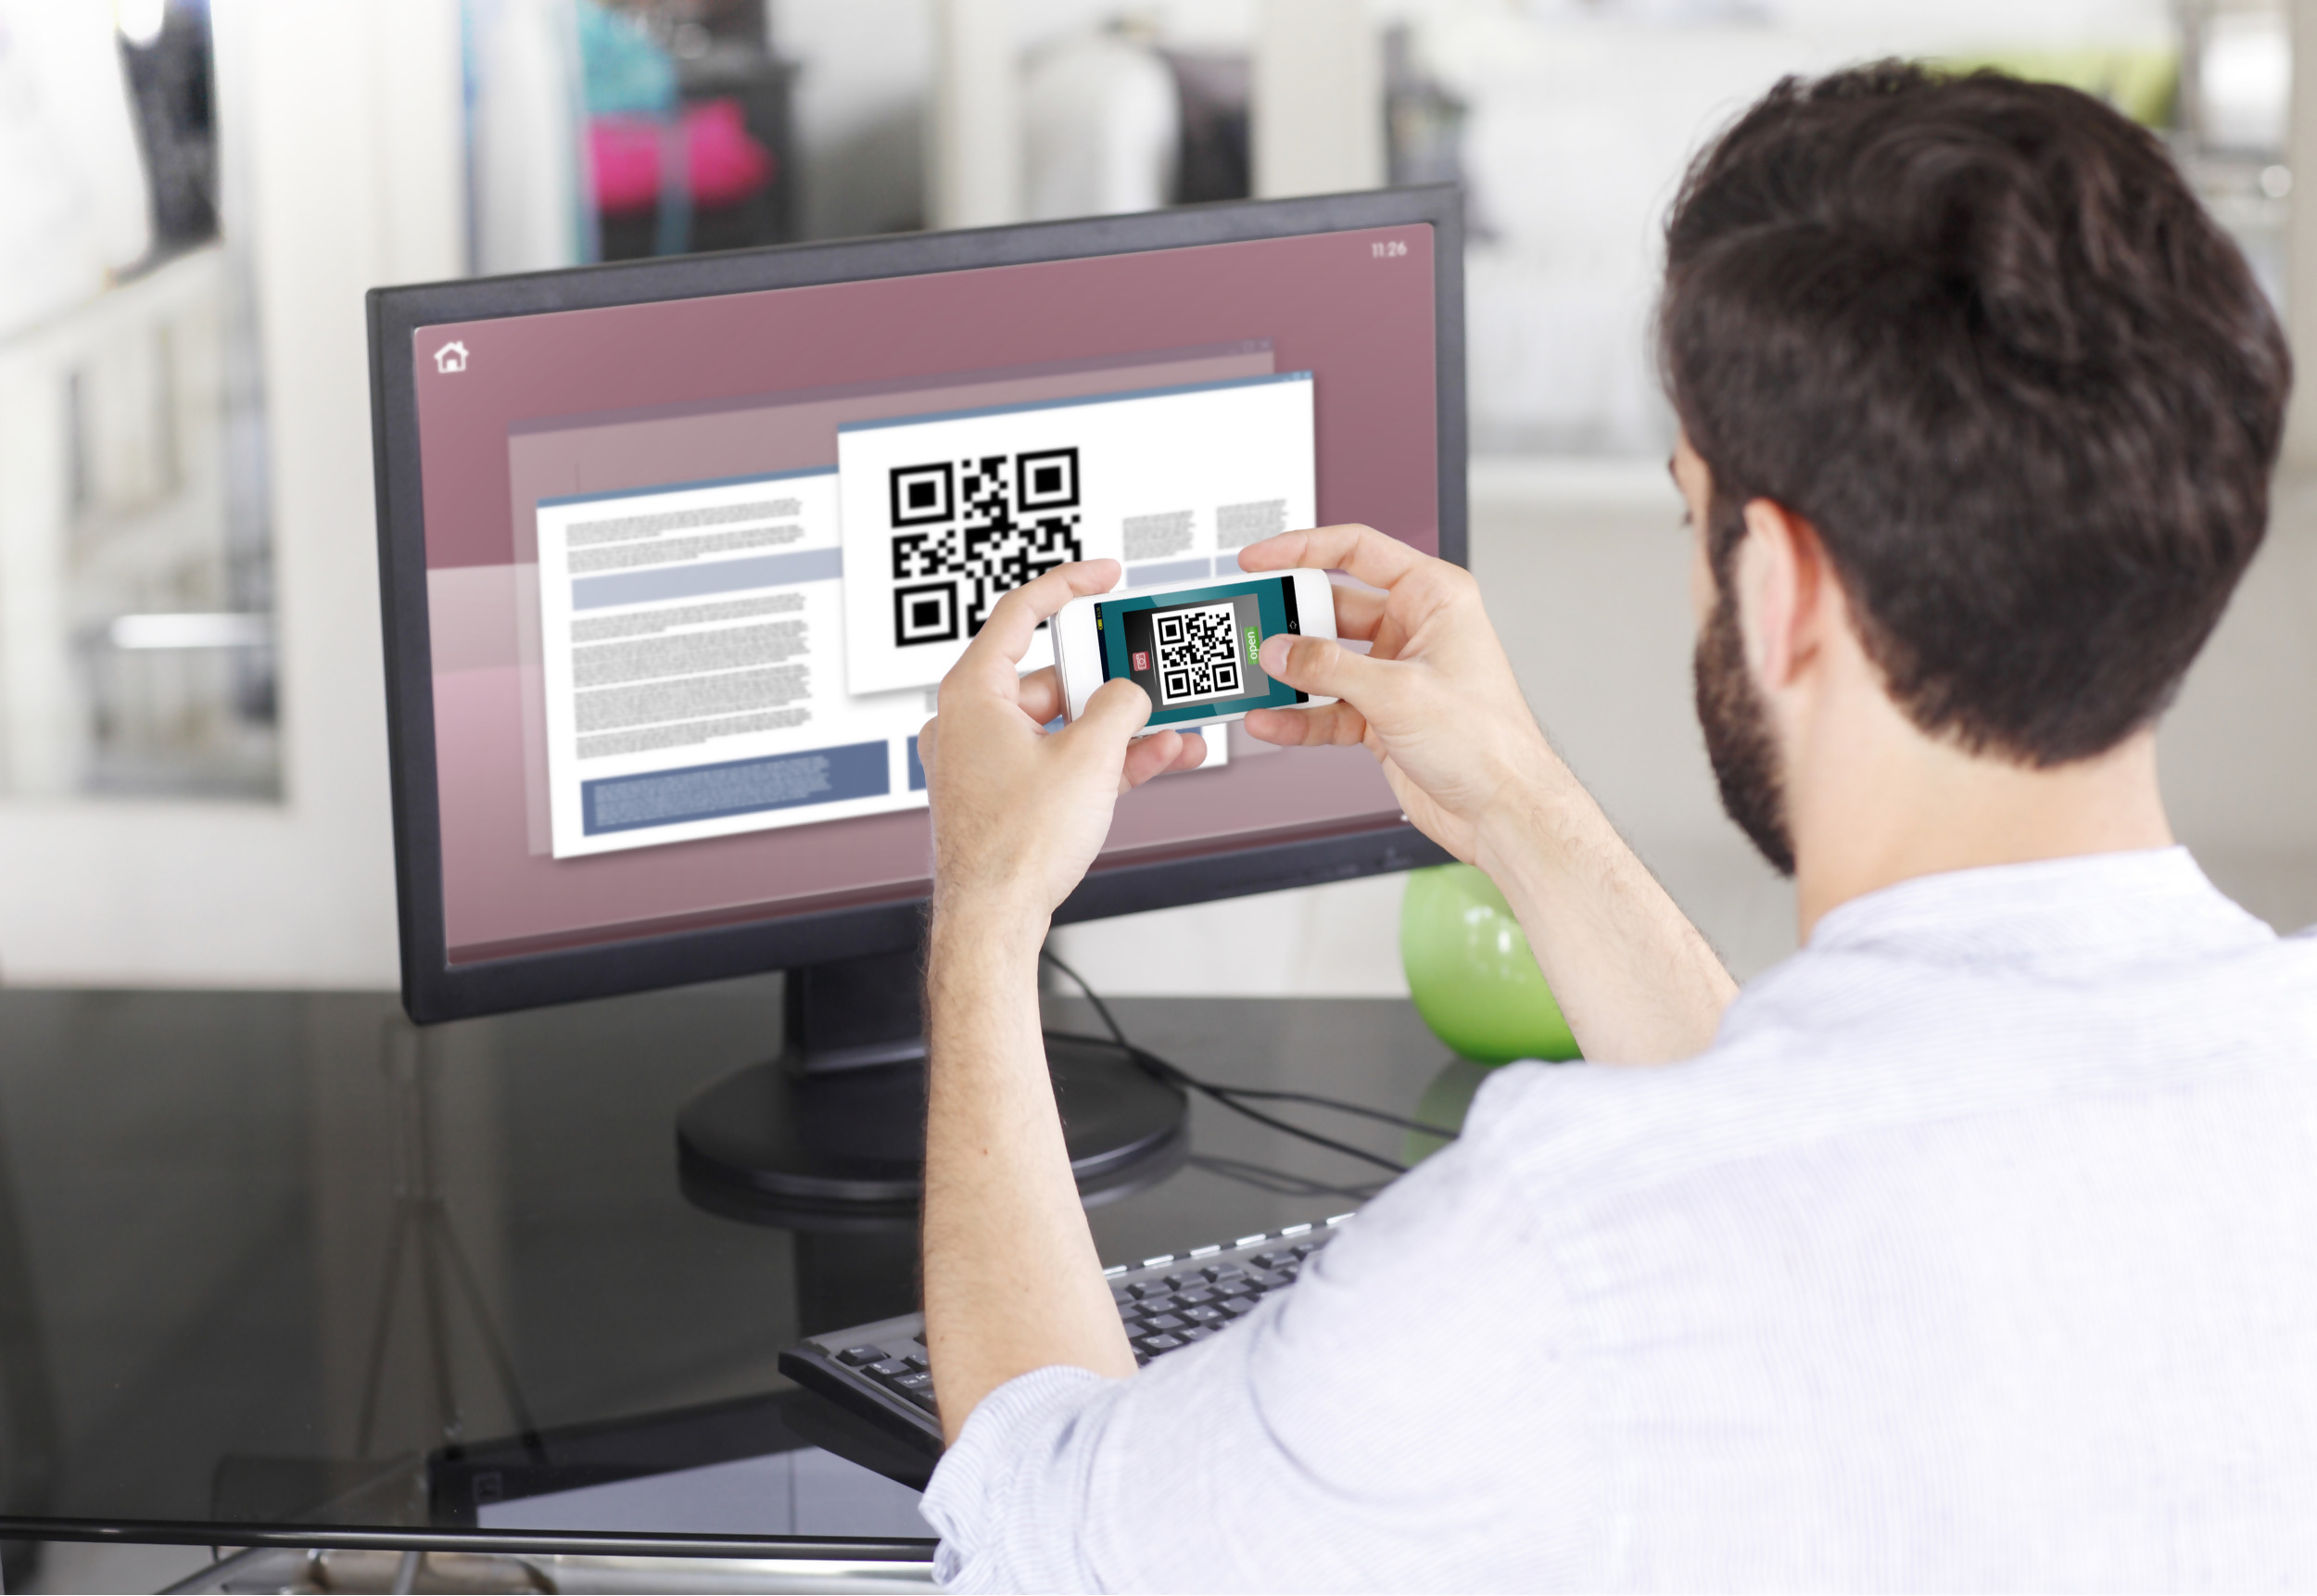
3) Point the lens of your smartphone camera towards the QR code. You don't need to "take a picture." When the code is in focus it is automatically captured. If your phone does not seem to recognize the QR code try to move your phone closer or farther away to the QR code in order to gain focus. If your phone does not recognize the QR code, please see the section Possible Issues and solutions at the bottom of this article.
Figure 3
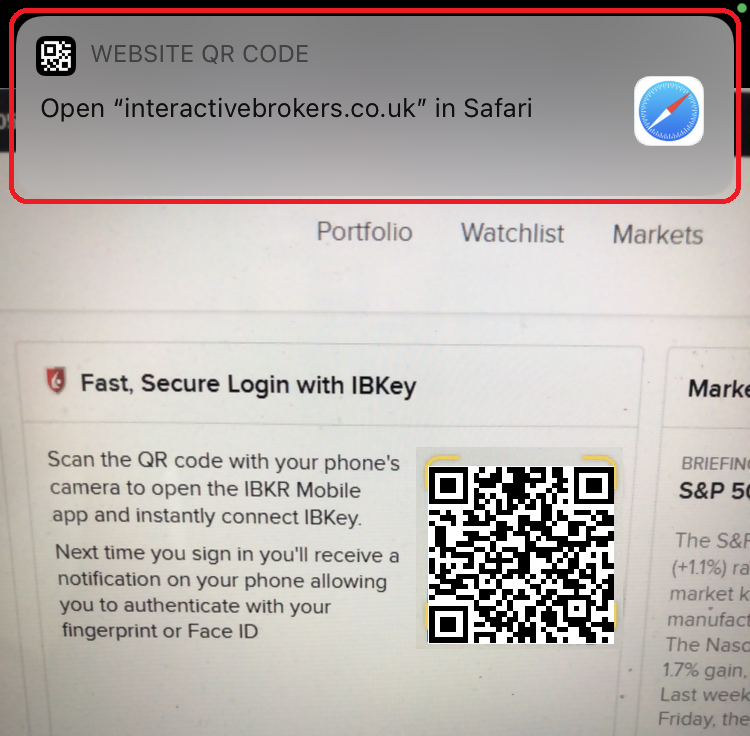
4) If your device was able to read the QR code successfully, you will see a banner on the top of your smartphone screen.
- If the banner asks you to open the IBKR web site on your smartphone browser (as in Figure 4.1), please proceed directly to next step, 5)
- If the banner asks you to open the IBKR Mobile app (as in Figure 4.2), please jump to step 8)
Figure 4.1 Figure 4.2
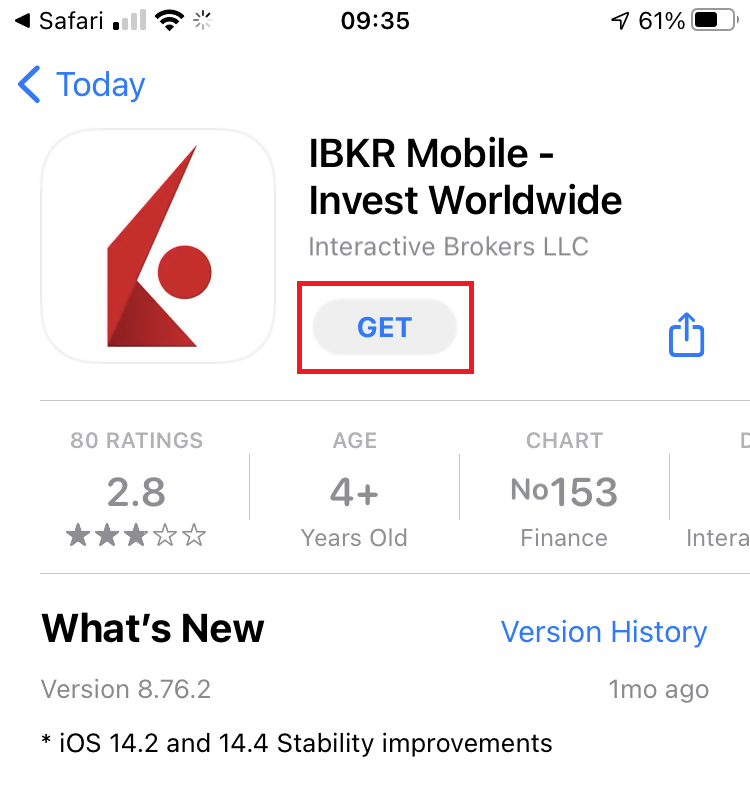
5) Tap on the banner on the top of your smartphone screen, asking you to open the IBKR Web site. You will be redirected to the AppStore.
Figure 5
6) Tap the download icon GET to install IBKR Mobile on your phone.
Figure 6
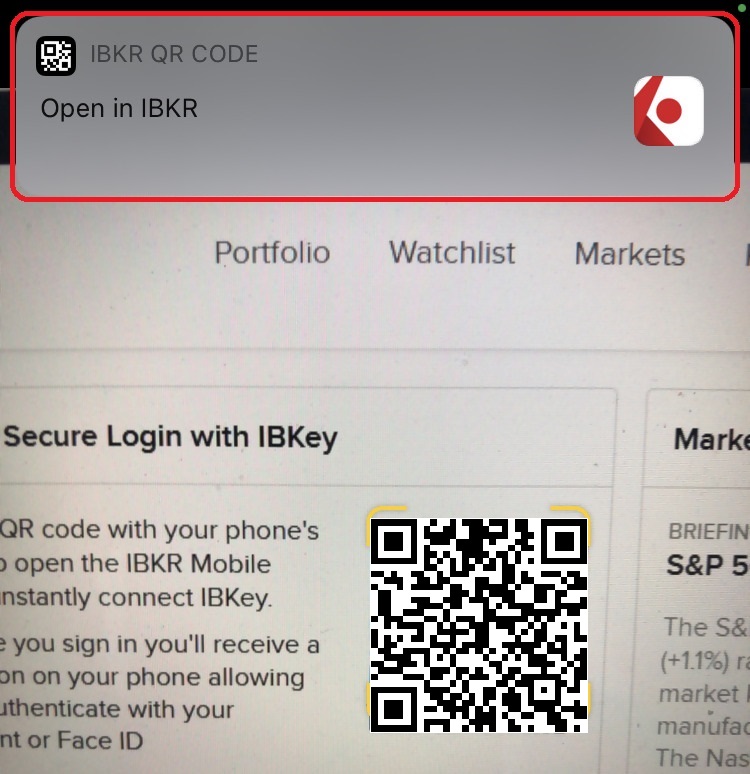
7) Once the installation is complete, do not launch the IBKR Mobile app. Open your camera and again focus on the QR code displayed in Client Portal.
Figure 7
8) Tap on the banner on the top of your screen, asking you to open the IBKR Mobile app.
Figure 8
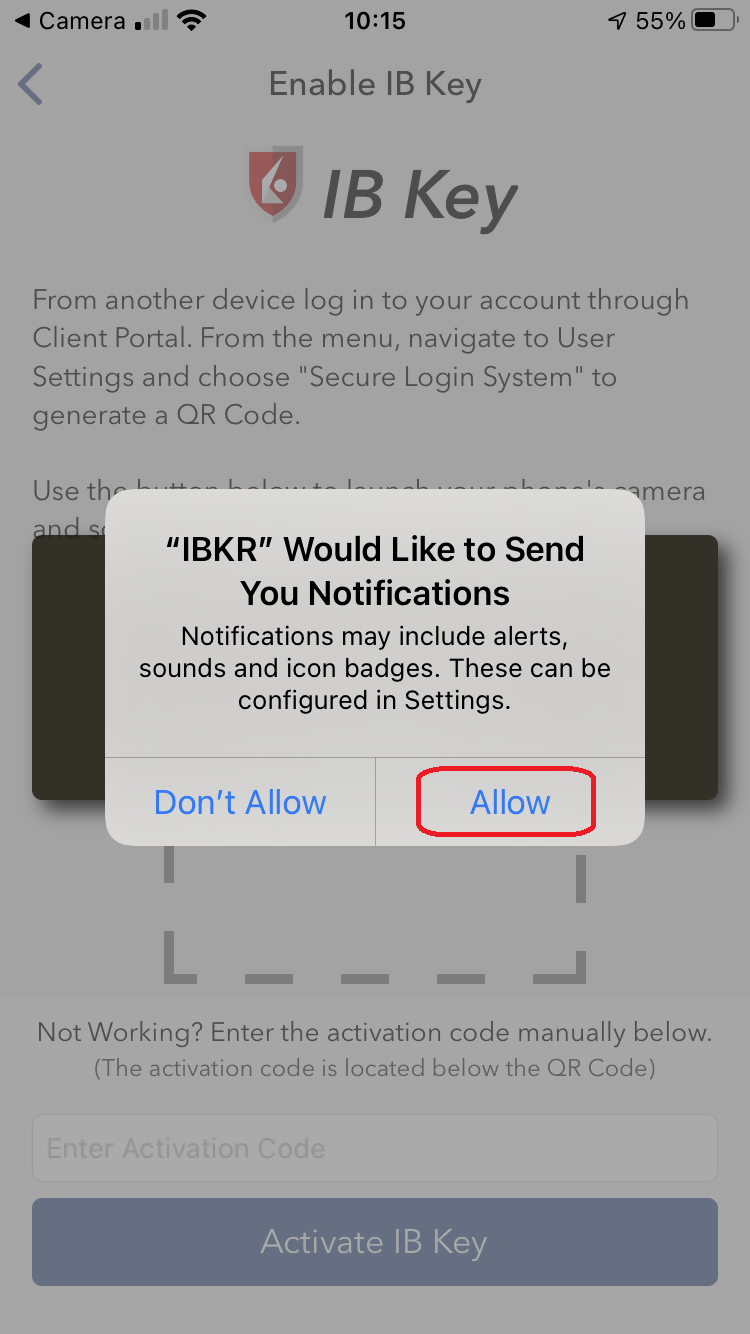
9) Tap Allow if asked whether to allow or disallow notifications for IBKR Mobile.
Figure 9
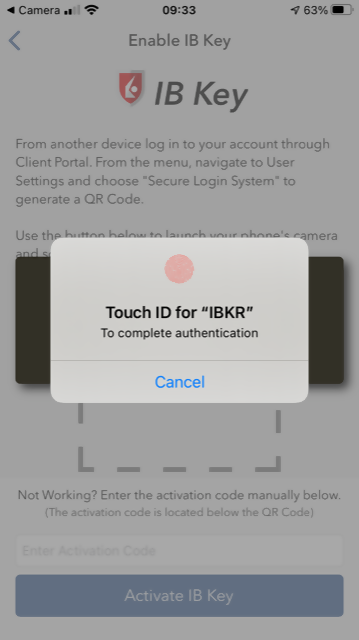
10) You will be asked to provide the security element you use to unlock your phone (FaceID, Fingerprint or Passcode).
Figure 10
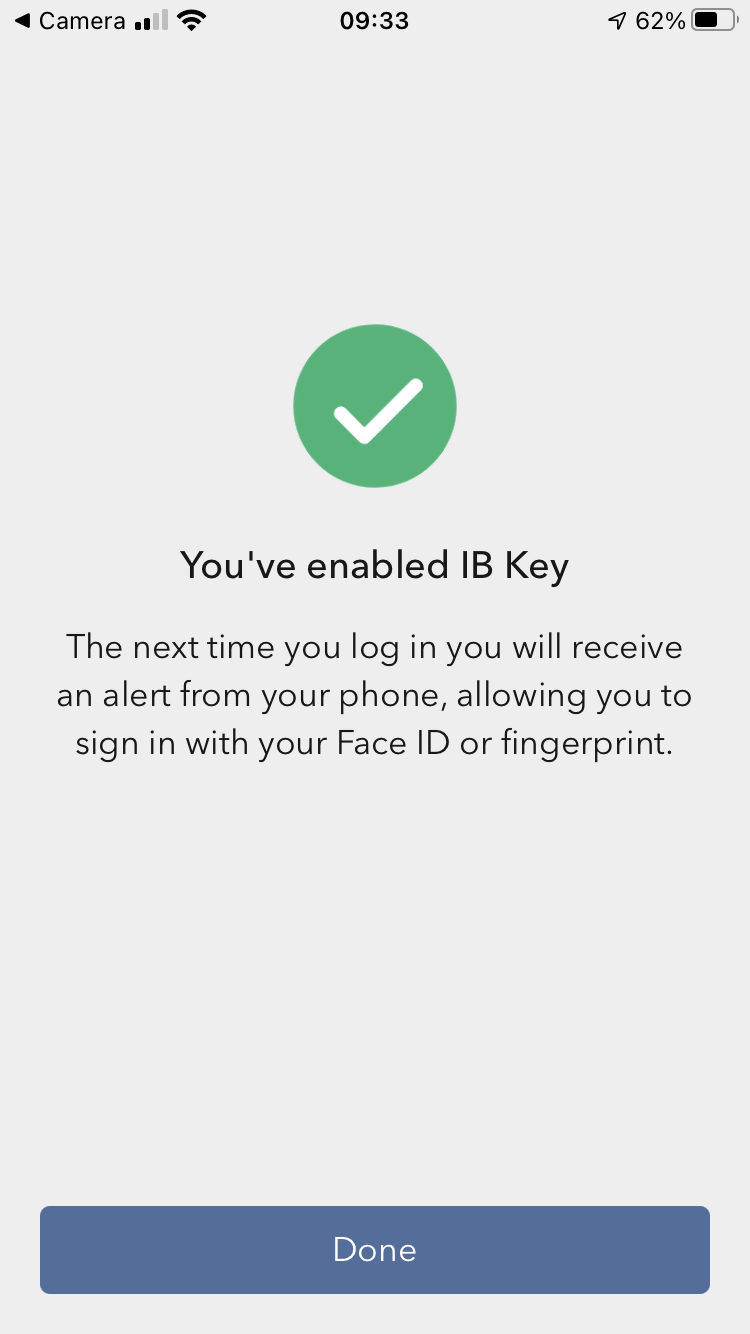
11) You will receive a message confirming the successful activation of IBKR Mobile Authentication (IB Key). Tap Done to complete the procedure
Figure 11
Possible issues and solutions
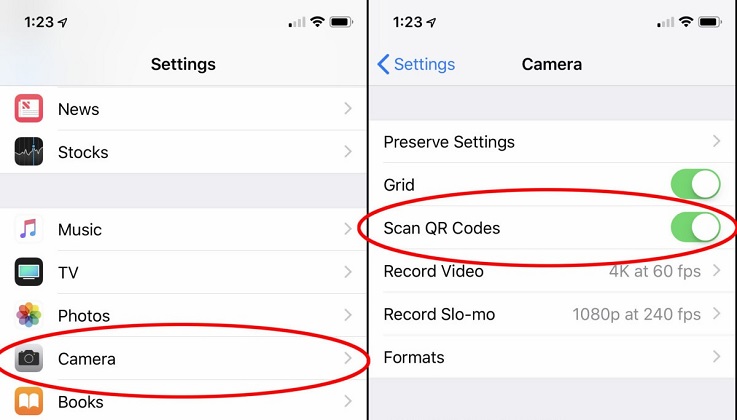
- My smartphone did not manage to read the QR code. What should I do?
Make sure you have activated the switch "Scan QR codes" from the Camera Settings of your smartphone.
Figure 12
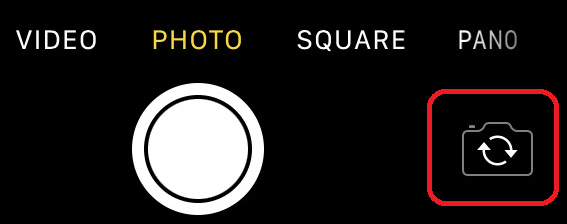
- My phone activates the front camera. How can I switch to the rear one?
Usually there is a specific button in the camera view to switch from front to rear lenses.
Figure 13
- During the IBKR Mobile Authentication (IB Key) activation, I receive an error message "An error has occurred. Please try again."
Figure 14
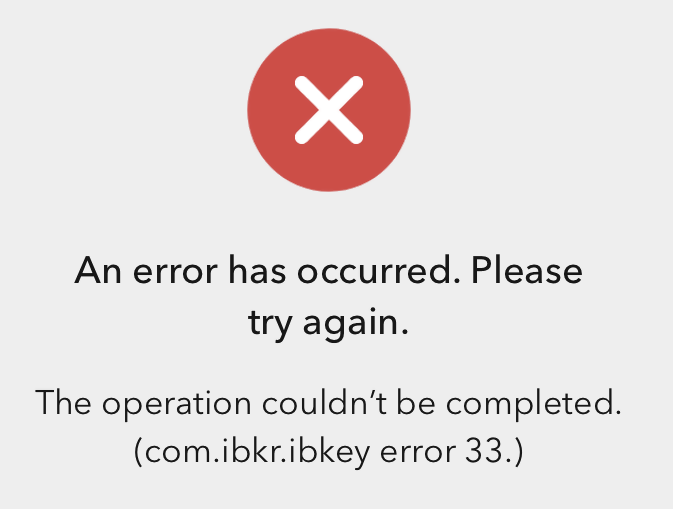
This error message may indicate you are attempting to activate an IBKR Mobile Authentication (IB key) instance that is already activated. Please try to log in to the Client Portal again. If you receive a notification on your smartphone once you have entered the credentials and you are able to complete the authentication once you tap on that notification, then your IBKR Mobile Authentication (IB Key) instance is already activated and you no longer need to follow the steps on this article.
Alternatively, the error message may be displayed when the QR code shown in the Client Portal was already used to attempt an activation and is expired. In this case, please log out of the Client Portal and log back in to obtain a fresh QR code.
References:
- See KB2260 for instruction on how to activate and operate IBKR Mobile Authentication (IB Key).
- See KB2748 for instructions on how to recover IBKR Mobile Authentication (IB Key).
- See KB3236 for instructions on how to enable notifications for the IBKR Mobile app.
- See KB3234 for troubleshooting missing IBKR Mobile notifications.
- See KB3073 for instructions on how to migrate the IBKR Mobile Authentication (IB Key) to a new smartphone.
Come riattivare l'opzione del Sistema di Accesso Sicuro
Overview:
I clienti che hanno effettuato di non optare per il programma del Sistema di Accesso Sicuro (SAS) si espongono ad alcuni rischi e sono dunque soggetti ad alcune restrizioni (ossia la possibilità trading con Pink Sheet e titoli OTCBB). Prendendo in considerazione questi fattori, assieme ai benefici della protezione garantita dal sistema SAS, potresti scegliere di riattivare l’opzione Sistema di Accesso Sicuro. Il seguente articolo fornisce delle istruzioni passo passo proprio per consentire questa scelta.
Background:
Ti ricordiamo che per poter modificare le impostazioni di sicurezza di un conto, l’utente principale deve accedere al Client Portal. Nel caso in cui al tuo utente non sia consentito cambiare le impostazioni di sicurezza, il sistema ti mostrerà una notifica e indicherà quale utente ha i diritti per tali modifiche.
Per poter riattivare l’opzione del Sistema di Accesso Sicuro, ti invitiamo a completare i seguenti passaggi:
1. Apri il tuo browser e vai alla pagina web ibkr.com.
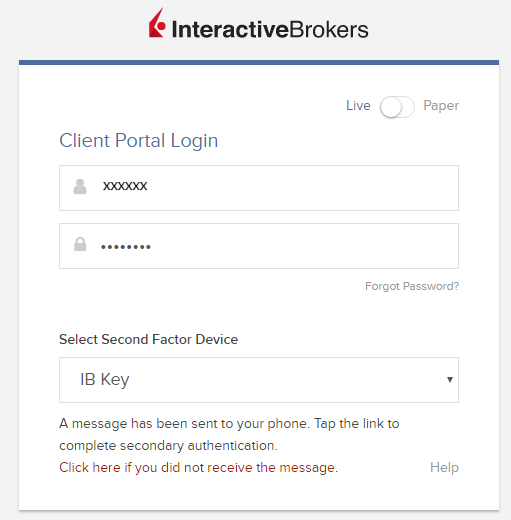
2. Clicca su Accedi > Accesso al Portale
(1).png)
3. Inserisci le tue credenziali e completa l’autenticazione utilizzando il tuo dispositivo di sicurezza.
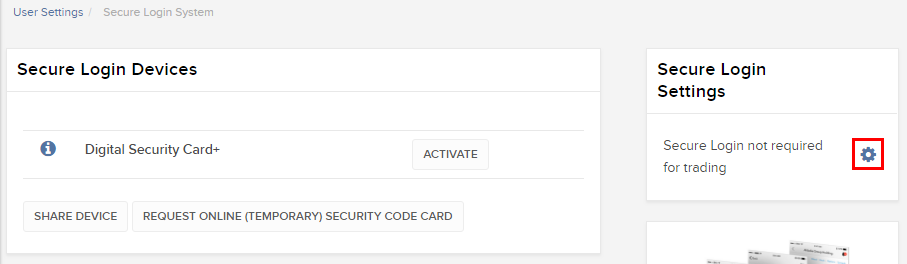
4. Sul lato sinistro del menu, clicca Impostazioni > Impostazioni Utente. Quindi nel riquadro Sicurezza, clicca sull’icona stile “ingranaggio” di Configura accanto a Sistema di Accesso Sicuro1
.png)
5. Vedrai un riquadro dal titolo “Impostazioni Accesso Sicuro”. All’interno del riquadro clicca sull’icona stile “ingranaggio” di Configura. Da qui arriva alle impostazioni per l’Accesso Sicuro non richiesto per trading.
6. Seleziona il bottone radio accanto a "Voglio usare sempre il mio dispositivo di Accesso Sicuro per l’accesso" e clicca su Continua
.png)
7. Riceverai una conferma sull’aggiornamento delle tue impostazioni. Clicca su OK per completare la procedura
.png)
Note
1. Se stai utilizzando la versione Classic del Client Portal clicca sul menu in alto Gestione Conto, poi Sicurezza>Sistema di Accesso Sicuro>Escludi SAS. Quindi seleziona il pulsante radio “Includi” sulla linea che corrisponde a quella del tuo utente.
Riferimenti
- Consulta l'articolo KB1131 per una panoramica sul Sistema di Accesso Sicuro
- Consulta l'articoloKB1943 per istruzioni su come richiedere la sostituzione della Digital Security Card+
- L'articolo KB2662 contiene una serie di link ad altri articoli sulle procedure legate ai dispositivi di sicurezza
- L'articolo KB2481 spiega come condividere il dispositivo di accesso sicuro con altri utenti
- L'articolo KB1962 spiega come restituire il proprio dispositivo di sicurezza a IBKR
- L'articolo KB2260 spiega come attivare il sistema di autenticazione IB Key tramite IBKR Mobile
- Consulta l'articolo KB2895 per sapere di più sul Sistema di autenticazione a due livelli multipla
- Consulta l'articolo KB1861 per sapere di più sui costi legati ai dispositivi di sicurezza
- Consulta l'articolo KB69 per sapere di più sulla durata dei codici di accesso temporanei
Come attivare le Notifiche per l'app IBKR Mobile
Overview:
Cos'è una notifica?
Una notifica push è un breve messaggio che viene inviato (in inglese “pushed”) da un server di tipo back-end verso il suo dispositivo attraverso Internet. Gli sviluppatori di app utilizzano questi messaggi per attirare in maniera rapida ed efficace l’attenzione degli utenti, anche se questi non stanno interagendo direttamente con l’applicazione in un dato momento. Le notifiche possono contenere informazioni dirette agli utenti oppure invitarli a compiere delle azioni specifiche oppure indicare la necessità di compiere alcune operazioni per rispettare determinati requisiti.
Background:
Perché l'app IBKR Mobile utilizza le notifiche?
L'applicazione IBKR Mobile utilizza le notifiche per inviare informazioni e per il sistema di autenticazione a due livelli. Nel caso dell'autenticazione a due livelli, l'utente viene invitato a toccare la notifica avviando così automaticamente l'applicazione IBKR Mobile e dando inizio al processo di autenticazione.
Questa procedura spiega come abilitare manualmente le notifiche per l'app IBKR Mobile. Ti invitiamo a cliccare sul link qui di seguito in base al sistema operativo del tuo smartphone.
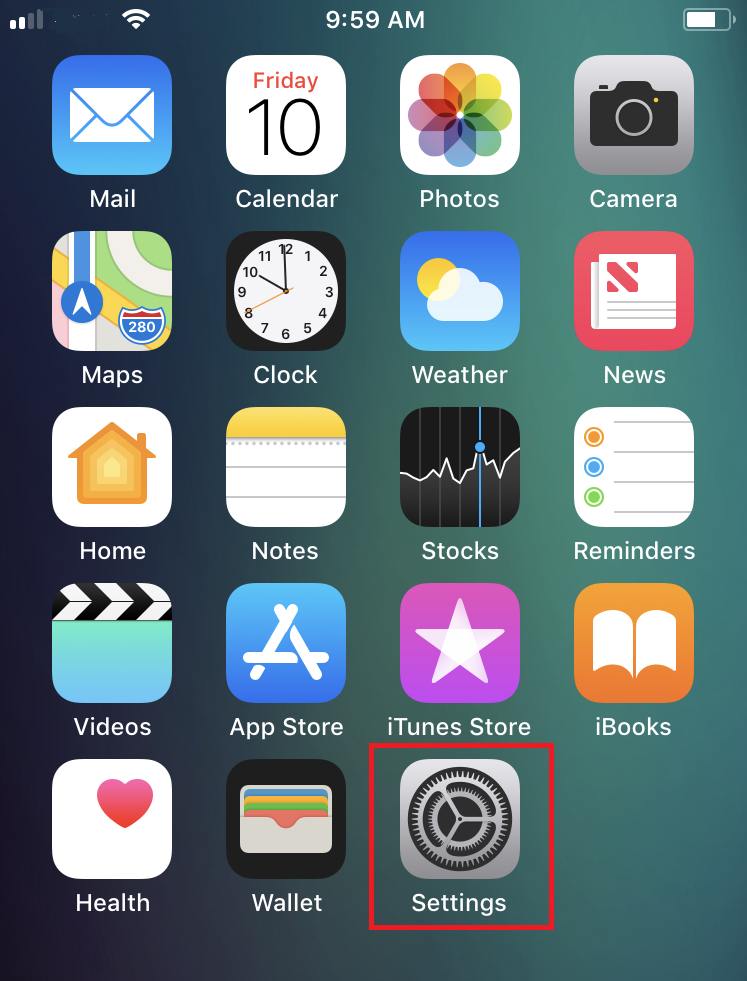
1. Dalla schermata principale seleziona Impostazioni (Figura 1), quindi Notifiche (Figura 2) e infine IBKR (Figura 3)
Figura 1
Figura 2 Figura 3
(1).png)
(1).png)
2. Nelle impostazioni della app IBKR, troverai una serie di opzioni differenti. Ti consigliamo di impostarle nella seguente maniera (Figura 4):
-
Consenti Notifiche: attivate
-
Blocco Schermo, Centro Notifiche, Banner: selezionato
-
Stile banner: Persistente
-
Badge: attivati
-
Mostra Anteprime: Sempre
Figura 4
.png)
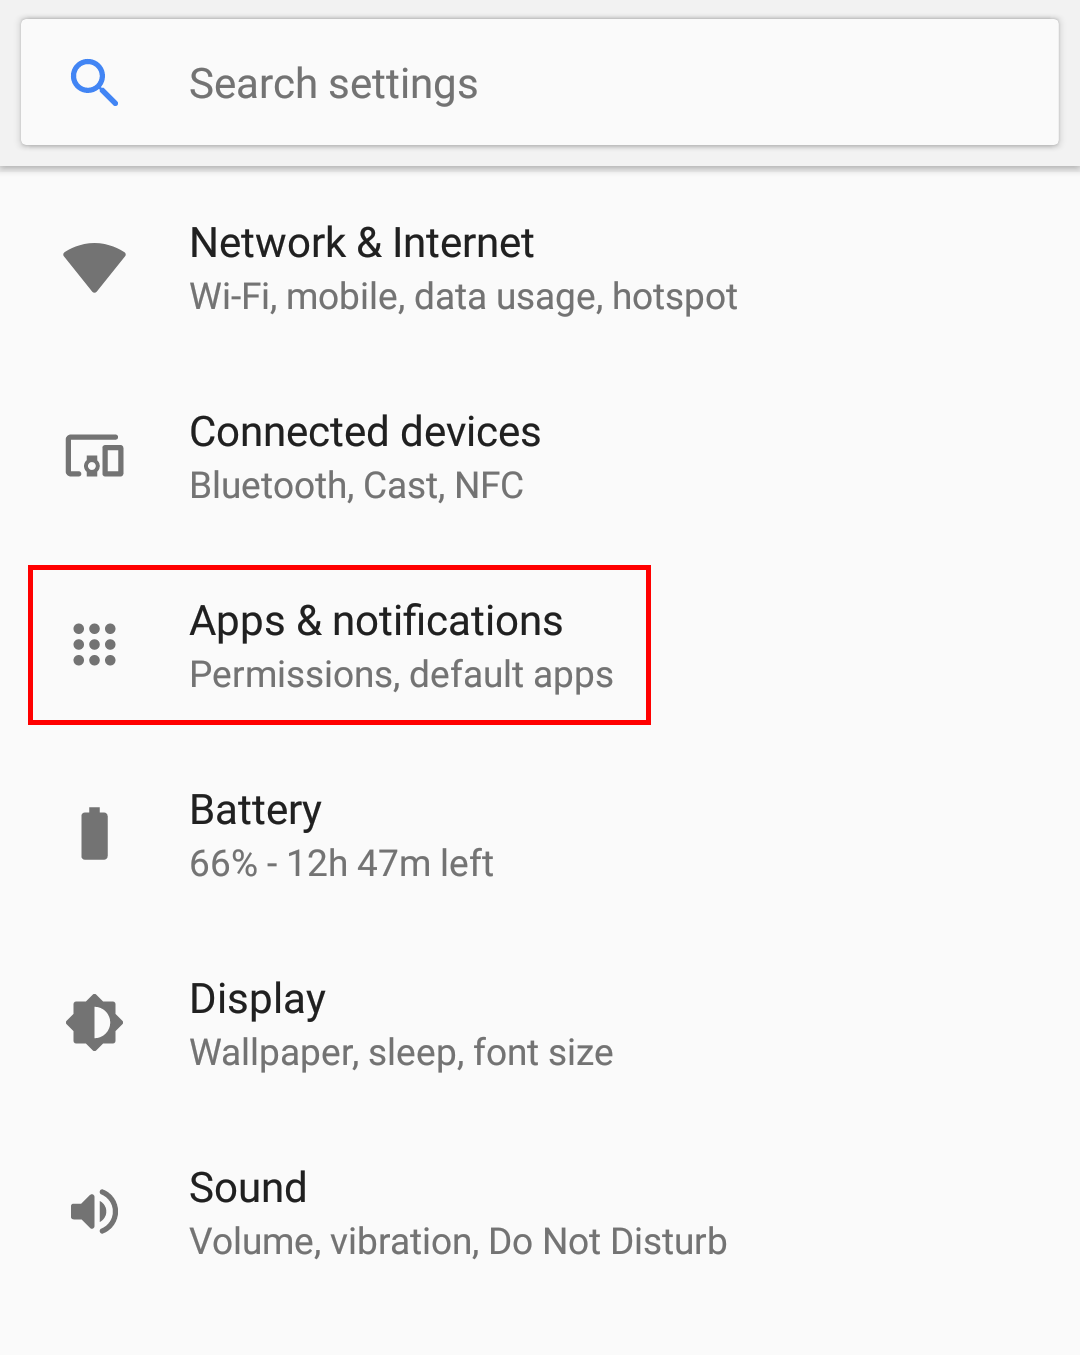
1. Vai su Impostazioni nel tuo telefono, quindi seleziona App e notifiche1 (Figura 1) poi IBKR Mobile (Figura 2) e infine notifiche App (Figura 3).
Figura 1
Figura 2 Figura 3
2. Assicurati che le notifiche per questa app siano tutte On e che gli interruttori Consenti i puntini di notifica, Consenti interruzioni, Sulla schermata di blocco siano tutti attivi (Figura 4). In base alle tue preferenze puoi anche attivare l'interrutore Ignora Non Disturbare.
Figura 4
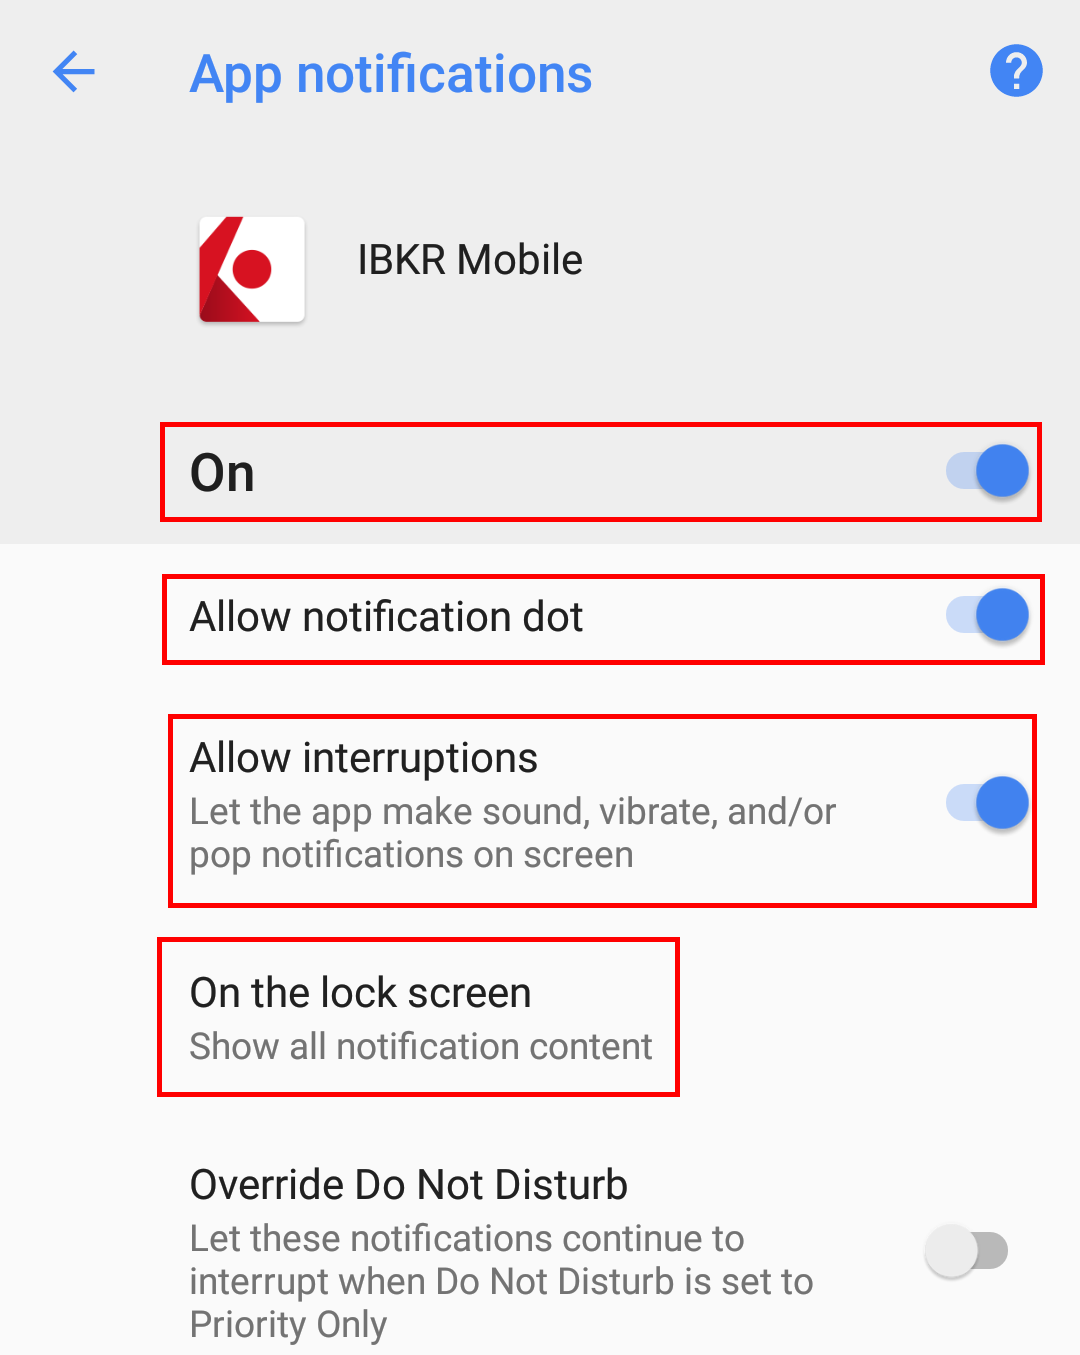
Figura 4
Ti ricordiamo che le etichette dei menu e la loro posizione potrebbe variare in base al tipo di fornitore e di versione del software che possiedi.
1. Le App e notifiche potrebbero avere un nome differente come Suoni e notifiche su alcuni tipi di dispositivo
Riferimenti:
- Consulta l'articolo KB2260 per le istruzioni su come attivare e usare il sistema di Autenticazione di IBKR Mobile
- Consulta l'articolo KB3234 per la risoluzione di problemi in caso di notifiche mancanti per IBKR Mobile
- Consulta l'articolo KB2748 per informazioni su come ripristinare il sistema di Autenticazione di IBKR Mobile
How to generate a ".har" file
Background:
When troubleshooting a non-trivial website issue, it is sometimes necessary for our Client Services team to obtain additional information about your browser communication. You may be asked record and provide a .har file. This file contains additional information about the network requests that are sent and received by your browser. Your browser can generate such file by recording content, timeline and status of HTTP/HTTPS requests and responses while the issue occurs.
In this article we explain how to generate a .har file. Please click on the browser that you use in the list below:
To generate the HAR file for Google Chrome:
1. Open Google Chrome and go to the page where the issue is occurring.
2. Press CRTL +SHIFT + I on your keyboard. Alternatively, click on the Chrome menu icon (three vertical dots at the top-right of your browser window) and select More Tools > Developer Tools
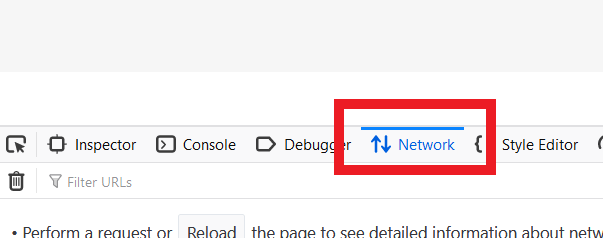
3. The Developers Tools opens as a docked panel at the side or bottom of Chrome. Select the tab Network (Figure 1.)
Figure 1.
.png)
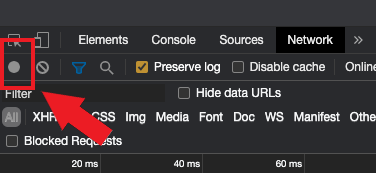
4. Look for a round Record button in the upper left corner of the Developer Tools toolbar and make sure it is red. If it is grey, click it once to start recording or just press CTRL+E (Figure 2.)
Figure 2.
5. Activate the checkbox Preserve log (Figure 3.)
Figure 3.
.png)
6. Click the Clear button to clear out any existing logs. The Clear button has a stop icon and is located on the right of the Record button (Figure 4.)
Figure 4.
![]()
7. Reproduce the issue you are experiencing while the network requests are being recorded.
8. Once you have reproduced the issue, right-click anywhere on the list of recorded network requests, select Save all as HAR with Content, and save the file to a location of your preference on your computer (e.g. on your Desktop).
9. From the IBKR Client Portal, go to the Message Center and create a new Web Ticket (or use an existing one when applicable)
10. Within the Web Ticket, attach the .har file previously generated. In case the IBKR Client Services has provided you with a reference ticker number or representative name, please add this information to the ticket body.
11. Submit the Web Ticket
To generate the HAR file for Firefox:
1. Open Firefox and go to the page where the issue is occurring
2. Press F12 on your keyboard. Alternatively click the Firefox menu icon (three horizontal parallel lines at the top-right of your browser window), then select Web Developer > Network
3. The Developers Network Tools opens as a docked panel at the side or bottom of Firefox. Select the tab Network (Figure 5.)
Figure 5.
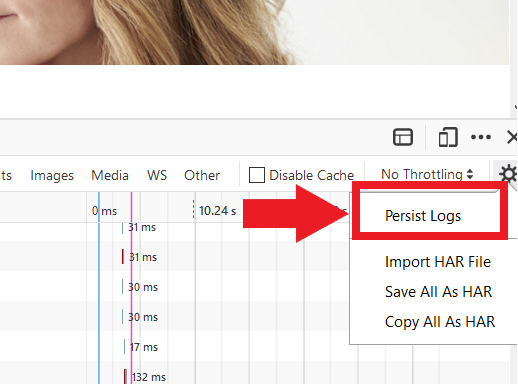
4. Activate the checkbox Persists logs (Figure 6.)
Figure 6.
5. Reproduce the issue you are experiencing. The recording of the network request starts automatically.
6. Once you have reproduced the issue, right-click anywhere on the list of recorded requests and select Save All As HAR
7. Save the file to a location of your preference on your computer (e.g. on your Desktop)
8. From the IBKR Client Portal, go to the Message Center and create a Web Ticket (or use an existing one when applicable)
9. Within the Web Ticket, attach the .har file previously generated. In case the IBKR Client Services has provided you with a reference ticker number or representative name, please add this information to the ticket body
10. Submit the Web Ticket
To generate the HAR file for Microsoft Edge:
1. Open Edge and go to the page where the issue is occurring.
2. Press F12 on your keyboard. Alternatively click the Edge menu icon (three horizontal dots at the top-right of your browser window), then select More Tools > Developers Tools
3. Click the Network tab (Figure 10.)
Figure 10.
.png)
4. Reproduce the issue that you were experiencing before, while the network requests are being recorded.
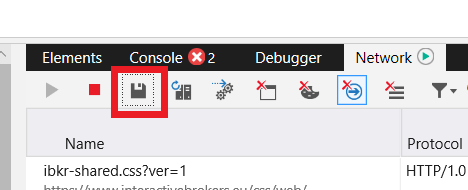
5. Once done click the floppy disk icon (Export as HAR) or press CTRL+S (Figure 11.)
Figure 11.
6. Provide a filename and a location of your preference on your computer (e.g. on the Desktop). Then click the Save button
7. From the IBKR Client Portal, go to the "Message Center" and create a Web Ticket (or use an existing one when applicable)
8. Within the Web Ticket, attach the .har file previously generated. In case the IBKR Client Services has provided you with a reference ticker number or representative name, please add this information to the ticket body.
9. Submit the Web Ticket
To generate the HAR file for Safari:
Note: Before generating the HAR file, make sure you can see the Develop menu in Safari. If you do not see this menu, click on the menu Safari, choose Preferences, go to the tab Advanced and activate the checkbox next to Show Develop menu in menu bar
1. Open the Develop menu and select Show Web Inspector or press CMD+ALT+I
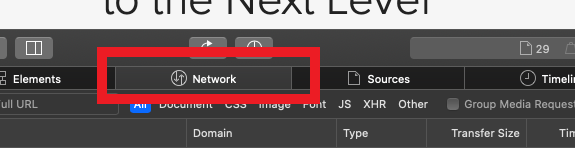
2. Click the Network tab (Figure 12.)
Figure 12.
3. Activate the checkbox Preserve log (Figure 13.)
Figure 13.
.png)
4. Click on the icon Export (or press CMD+S), provide a filename and a location of your preference on your computer (e.g. on the Desktop) and save the .har file
5. From the IBKR Client Portal, go to the "Message Center" and create a Web Ticket (or use an existing one when applicable)
6. Within the Web Ticket, attach the web archive file previously generated. In case the IBKR Client Services has provided you with a reference ticker number or representative name, please add this information to the ticket body.
7. Submit the Web Ticket
Introduzione alla negoziazione di valute (forex)
Overview:
IB offre sedi e piattaforme di trading rivolte sia agli operatori specializzati nel mercato forex sia a coloro che negoziano occasionalmente valute in relazione ad operazioni in titoli azionari o derivati denominati in diverse monete. Questo articolo presenta le nozioni fondamentali legate all'invio di ordini per la negoziazione di valute nella piattaforma TWS e fornisce alcune considerazioni in merito alle convenzioni sull'espressione delle quotazioni e alla presentazione delle informazioni relative alle posizioni.
Background:
Un'operazione in valute implica l'acquisto di una valuta e la contestuale vendita di un'altra; la combinazione delle due valute coinvolte è nota come "coppia valutaria". Gli esempi di seguito presentati sono basati sulla coppia EUR.USD; in ogni coppia la prima valuta (in questo caso EUR) è detta valuta di negoziazione, mentre la seconda (USD) è nota come valuta di regolamento.
Indice:
- Quotazione delle valute
- Creare una riga per le quotazioni
- Creare un ordine
- Il valore di un "pip"
- Presentazione delle informazioni sulle posizioni (post-negoziazione)
Quotazione delle valute
La quotazione di una coppia di valute indica il valore di mercato relativo di una valuta rispetto a quello di un'unità dell'altra valuta. La valuta utilizzata come riferimento è detta valuta quotata, mentre quella il cui valore relativo viene espresso è la valuta base. TWS fornisce un "ticker" per ogni coppia di valute. Lo strumento FXTrader consente poi di invertire la quotazione. I trader possono quindi acquistare la valuta base e vendere quella quotata e viceversa. Il simbolo della coppia EUR/USD è ad esempio:
EUR.USD
Laddove:
- EUR è la valuta base
- USD è la valuta quotata
La quotazione di questa coppia di valute indica quanti USD (la valuta quotata) occorrono per acquistare un'unità di EUR (la valuta base). Si tratta, in altre parole, del prezzo di 1 EUR espresso in USD.
Inviare un ordine di acquisto sulla coppia EUR.USD vuol dire quindi acquistare 1 EUR e vendere un importo equivalente in USD.
Creare una riga per le quotazioni
È possibile aggiungere una riga per le quotazioni in TWS seguendo questi passaggi:
1. Inserire la valuta di negoziazione (es. EUR) e premere "Invio".
2. Scegliere il tipo di prodotto "Forex".
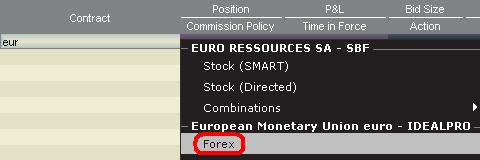
3. Selezionare la valuta di regolamento (es. USD) e scegliere la sede di negoziazione.
.jpg)
N.B.:
La sede IDEALFX fornisce accesso diretto alle quotazioni del mercato valutario intebancario ed è disponibile solo per ordini con una certa quantità minima (pari generalmente a 25,000 USD). Gli ordini con una quantità inferiore a quella minima richiesta trasmessi comunque a IDEALFX saranno automaticamente ritrasmessi a una sede di esecuzione più piccola deputata principalmente alla conversione di valute. Clicchi QUI per sapere di più sulle quantità minime e massime associate alla sede IDEALFX.
I dealer del mercato valutario esprimono le quotazioni in una specifica direzione. Di conseguenza, per trovare una certa coppia valutaria potrebbe essere necessario modificare il simbolo inserito. Inserendo il simbolo CAD, ad esempio, la valuta USD non sarà selezionabile come valuta di regolamento. Ciò dipende dal fatto che tale coppia è espressa come USD.CAD, ed è dunque selezionabile solo inserendo il simbolo USD e scegliendo il prodotto "Forex".
Creare un ordine
A seconda delle colonne mostrate, le coppie valutarie sono presentate nel modo descritto di seguito.
Le colonne Contratto e Descrizione mostreranno la coppia nel formato [valuta di negoziazione].[valuta di regolamento] (es. EUR.USD). La colonna Sottostante mostrerà solo la valuta di negoziazione.
Clicchi QUI per scoprire come modificare le colonne mostrate.

1. Cliccare con il tasto sinistro sul prezzo denaro (per vendere) o sul prezzo lettera (per acquistare).
2. Inserire la quantità della valuta di negoziazione che si intende acquistare o vendere. Il quantitativo dell'ordine è espresso nella valuta base, ovvero la prima valuta della coppia in TWS.
Il modello adottato da Interactive Brokers non prevede lo scambio di contratti che rappresentano un valore fisso della valuta base espresso nell'altra valuta, bensì il quantitativo dell'ordine è costituito dall'importo richiesto nella valuta base.
Immettendo un ordine per acquistare 100,000 EUR.USD, ad esempio, si acquisteranno 100,000 EUR vendendo al contempo un importo in USD equivalente calcolato in base al tasso di cambio mostrato.
3. Specificare il tipo di ordine desiderato, l'eventuale prezzo (ovvero il tasso di cambio) che si intende conseguire e trasmettere l'ordine.
Nota: Il quantitativo dell'ordine può essere pari a un numero qualsiasi di unità e non vi è alcun lotto/importo minimo da tenere in considerazione salvo per i quantitativi minimi stabiliti dalle sedi di negoziazione menzionati in alto.
Domande frequenti: Come si immette un ordine tramite FX Trader?
Il valore di un "pip"
Il "pip" è un'unità di misura della variazione di prezzo di una coppia valutaria; per la maggior parte delle coppie esso rappresenta la variazione minima, ma per alcune di esse sono possibili variazioni di una frazione di pip.
Per la coppia EUR.USD 1 pip è ad esempio pari a 0.0001, mentre per USD.JPY è pari a 0.01.
È possibile calcolare il valore di 1 PIP nella valuta quotata tramite la seguente formula:
(importo nozionale) x (1 pip)
Esempi:
- Ticker: EUR.USD
- Importo = 100,000 EUR
- 1 pip = 0.0001
Valore di 1 pip = 100,000 x 0.0001 = 10 USD
- Ticker: USD.JPY
- Importo = 100,000 USD
- 1 pip = 0.01
Valore di 1 pip = 100,000 x 0.0001 = 1000 JPY
È possibile calcolare il valore di 1 PIP in unità della valuta base tramite la seguente formula:
(importo nozionale) x (1 pip/tasso di cambio)
Esempi:
- Ticker: EUR.USD
- Importo = 100,000 EUR
- 1 pip = 0.0001
- Tasso di cambio = 1.3884
Valore di 1 pip = 100,000 x (0.0001/1.3884) = 7.20 EUR
- Ticker: USD.JPY
- Importo = 100,000 USD
- 1 pip = 0.01
- Tasso di cambio = 101.63
Valore di 1 pip = 100,000 x (0.01/101.63) = 9.84 USD
Presentazione delle informazioni sulle posizioni (post-negoziazione)
Prima di eseguire delle operazioni in un conto reale è essenziale comprendere le principali informazioni relative alle posizioni in valute. Nella piattaforma di trading di IB le posizioni in valute sono mostrate in due diverse sezioni, accessibili entrambi tramite la finestra "Conto".
1. Valore di mercato
La sezione "Valore di mercato" della finestra "Conto" mostra i dati in tempo reale sulle posizioni in valute, esprimendo i valori relativi alle valute prese separatamente (ovvero non come coppia).

La sezione "Valore di mercato" è l'unica in cui è possibile consultare i dati relativi alle posizioni in cambi in tempo reale. Per chiudere una posizione in una certa valuta non è affatto necessario sfruttare la stessa coppia utilizzata per aprirla. Dopo aver acquistato EUR.USD (ovvero acquistato EUR e venduto USD) e USD.JPY (cioè acquistato USD e venduto JPY) è ad esempio possibile chiudere la posizione risultante tramite la coppia EUR.JPY (ovvero vendendo EUR e acquistando JPY).
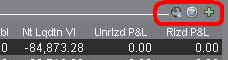
N.B.:
La sezione "Valore di mercato" può essere espansa o compressa. È consigliabile verificare che vi sia un segno "meno" di colore verde sopra la colonna "Valore di liquidazione netto". Un simbolo "più" potrebbe indicare la presenza di posizioni attive nascoste.
È possibile immettere ordini per chiudere un saldo in una certa valuta tramite la sezione "Valore di mercato" cliccando con il tasto destro del mouse sulla valuta prescelta e selezionando "Chiudere saldo valutario" o "Chiudi tutti i saldi in valuta non di base".

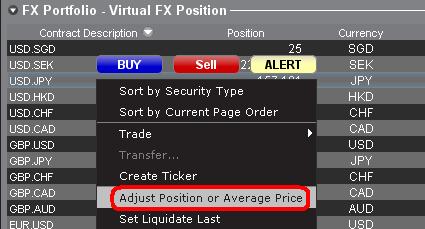
2. Portafoglio FX
La sezione "Portafoglio FX" della finestra "Conto" fornisce informazioni sulle Posizioni virtuali e mostra dati sulle posizioni espressi in relazione alle coppie valutarie (piuttosto che alle singole valute, come nel caso della sezione "Valore di mercato"). Questa particolare modalità di visualizzazione viene incontro alle convenzioni vigenti tra i trader di valute istituzionali e può generalmente essere ignorata dai trader di valute al dettaglio od occasionali. I valori associati alle posizioni in questa sezione non riflettono tutte le operazioni in valute; i clienti hanno tuttavia la possibilità di modificare tali quantità e i costi medi mostrati. La capacità di modificare queste informazioni senza dover eseguire delle operazioni reali può risultare utile a coloro che negoziano valute come attività aggiuntiva rispetto alla negoziazione di prodotti denominati in valute diverse da quella di base. Questa funzionalità consente di separate manualmente le conversioni automatiche (che vengono effettuate quando si negoziano prodotti denominati in valute diverse da quella di base) dalla negoziazione di valute in senso stretto.

La sezione "Portafoglio FX" aggrega le informazioni relative alle posizioni in valute, nonché i profitti e le perdite da esse derivanti, provenienti da tutte le altre finestre. Ciò a volte genera confusione nel cercare di determinare quali siano le informazioni corrette e aggiornate relative alle proprie posizioni. È possibile ridurre o eliminare tale confusione nei modi seguenti:
a. Comprimere la sezione "Portafoglio FX"
È possibile comprimere tale sezione cliccando sulla freccia a sinistra della dicitura "Portafoglio FX". Una volta compressa questa sezione le informazioni relative alle posizioni virtuali saranno rimosse da tutte le pagine. Nota: questa operazione non consente di mostrare le informazioni contenute nella sezione "Valore di mercato", bensì solamente di nascondere quelle contenute nella sezione "Portafoglio FX".

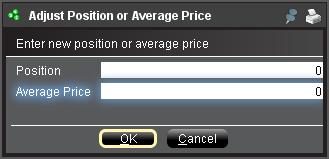
b. Modificare posizione o prezzo medio
Cliccando con il tasto destro su una delle posizioni nella sezione "Portafoglio FX" è possibile modificare la posizione o il prezzo medio. Una volta chiuse tutte le posizioni in valute diverse da quella di base e verificato che esse risultino chiuse anche nella sezione "Valore di mercato", è possibile reimpostare i campi "Posizione" e "Prezzo medio" su "0". Questa operazione ripristinerà tutti i valori relativi ai quantitativi delle posizioni in "Portafoglio FX" e consentirà di visualizzare informazioni più accurate su posizioni, profitti e perdite in tutte le schermate di trading. Nota: quello descritto è un processo manuale che deve essere ripetuto di volta in volta dopo aver chiuso una posizione in una certa valuta. È consigliabile verificare sempre le informazioni relative alle posizioni mostrate nella sezione "Valore di mercato" per assicurarsi che gli ordini trasmessi consentano di raggiungere gli obiettivi desiderati dal punto di vista dell'apertura o della chiusura delle posizioni.
Prima di eseguire delle operazioni vere e proprie tramite un conto di trading reale esortiamo i nostri clienti ad acquisire familiarità con la negoziazione di valute tramite un conto di trading simulato o approfittando della versione di prova gratuita. Non esiti a mettersi in contatto con noi per ricevere ulteriori informazioni sugli argomenti presentati in questo articolo.
Altre domande frequenti:
How to Add Another User to an Active IBKR Mobile Authentication (IB Key) for iPhone
Overview:
This page covers the steps required to add a user to the Authentication section in the IBKR Mobile app for iOS devices.
Requirements:
- The IBKR Mobile app must be installed and IBKR Mobile Authentication (IB Key) already activated on this iOS device.
- For more information on the installation and activation on iOS devices, please refer to KB2278.
Instructions:
1. On your iOS device, open the IBKR Mobile app.
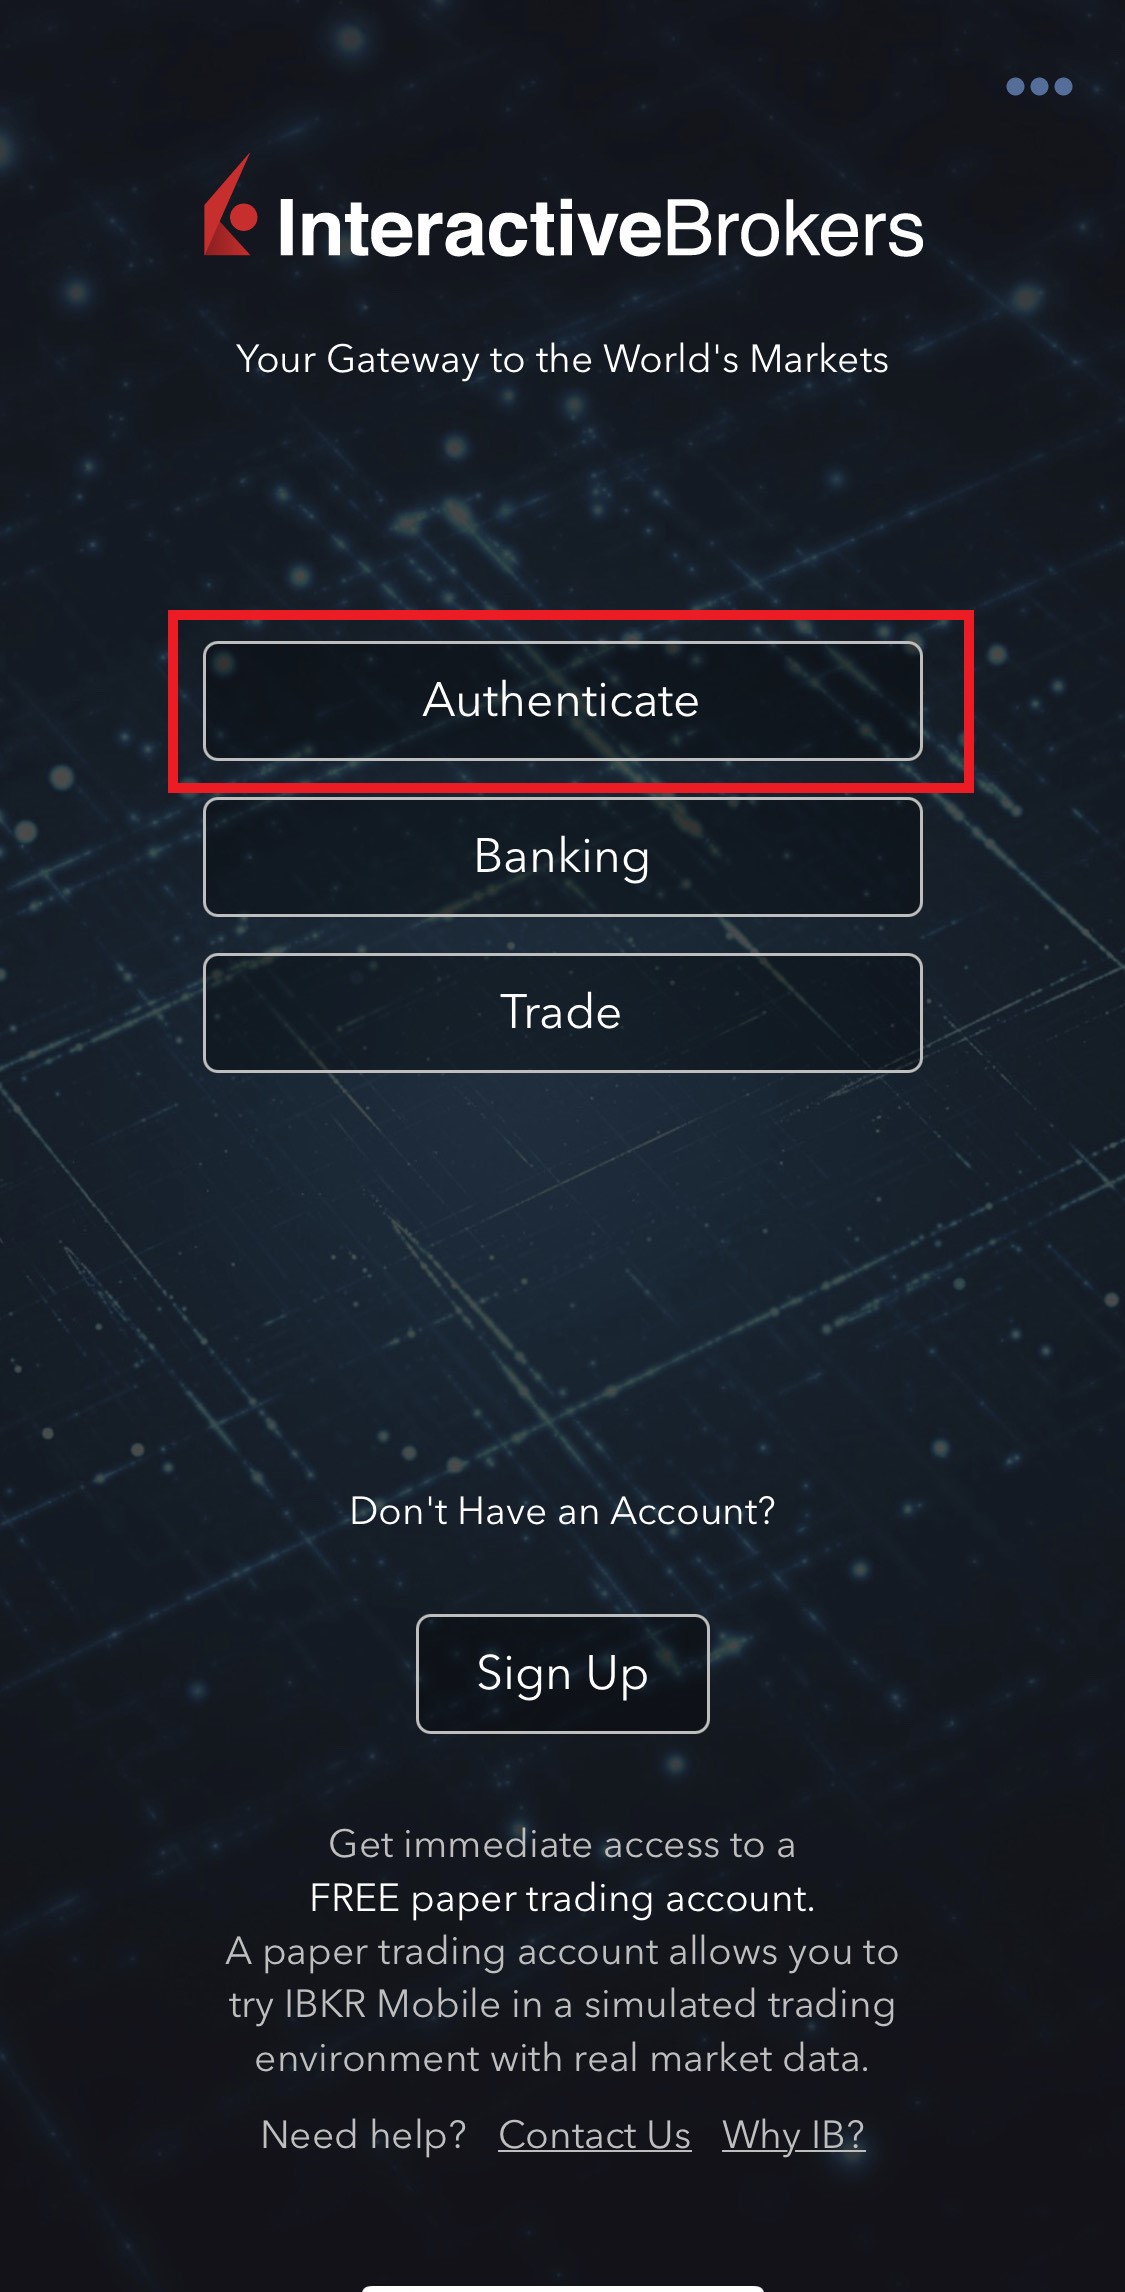
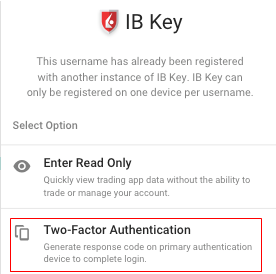
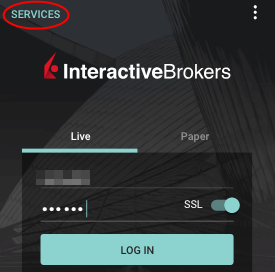
1.a. If the app opens with the login screen (Figure 1), tap on Services on the top-left corner (red arrow) and proceed with step 2.
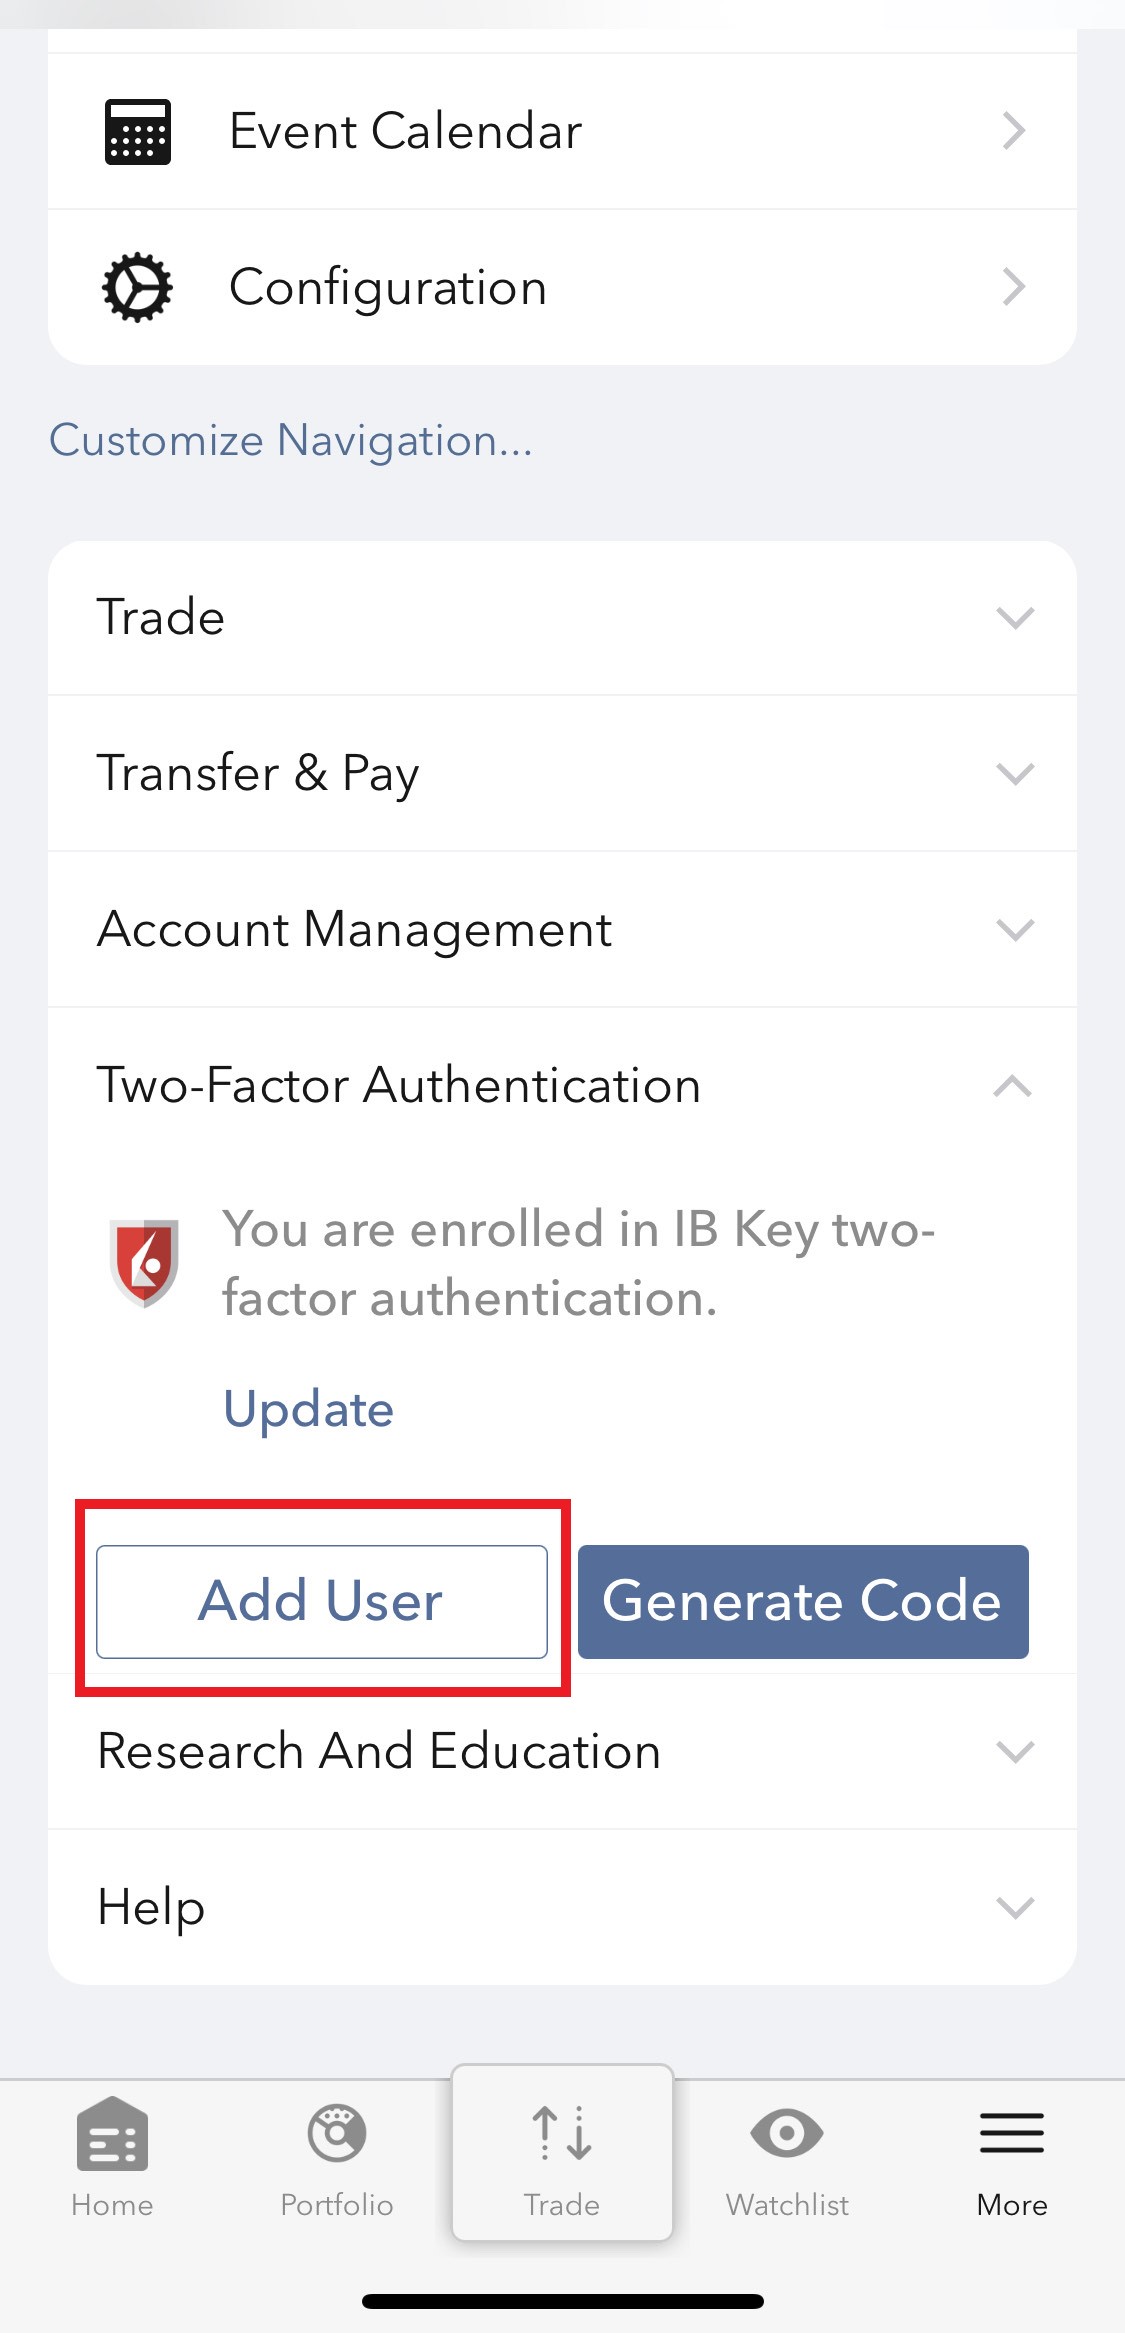
1.b. If the app opens with your Home Page, Portfolio, Watchlists, or similar, tap on More on the bottom-right corner (Figure 2). Then tap on Two-Factor Authentication (Figure 3), followed by Add User (Figure 4) and proceed with step 3.
Figure 1. Figure 2. Figure 3.
(1).jpeg)
.jpeg)
.jpeg)
Figure 4.
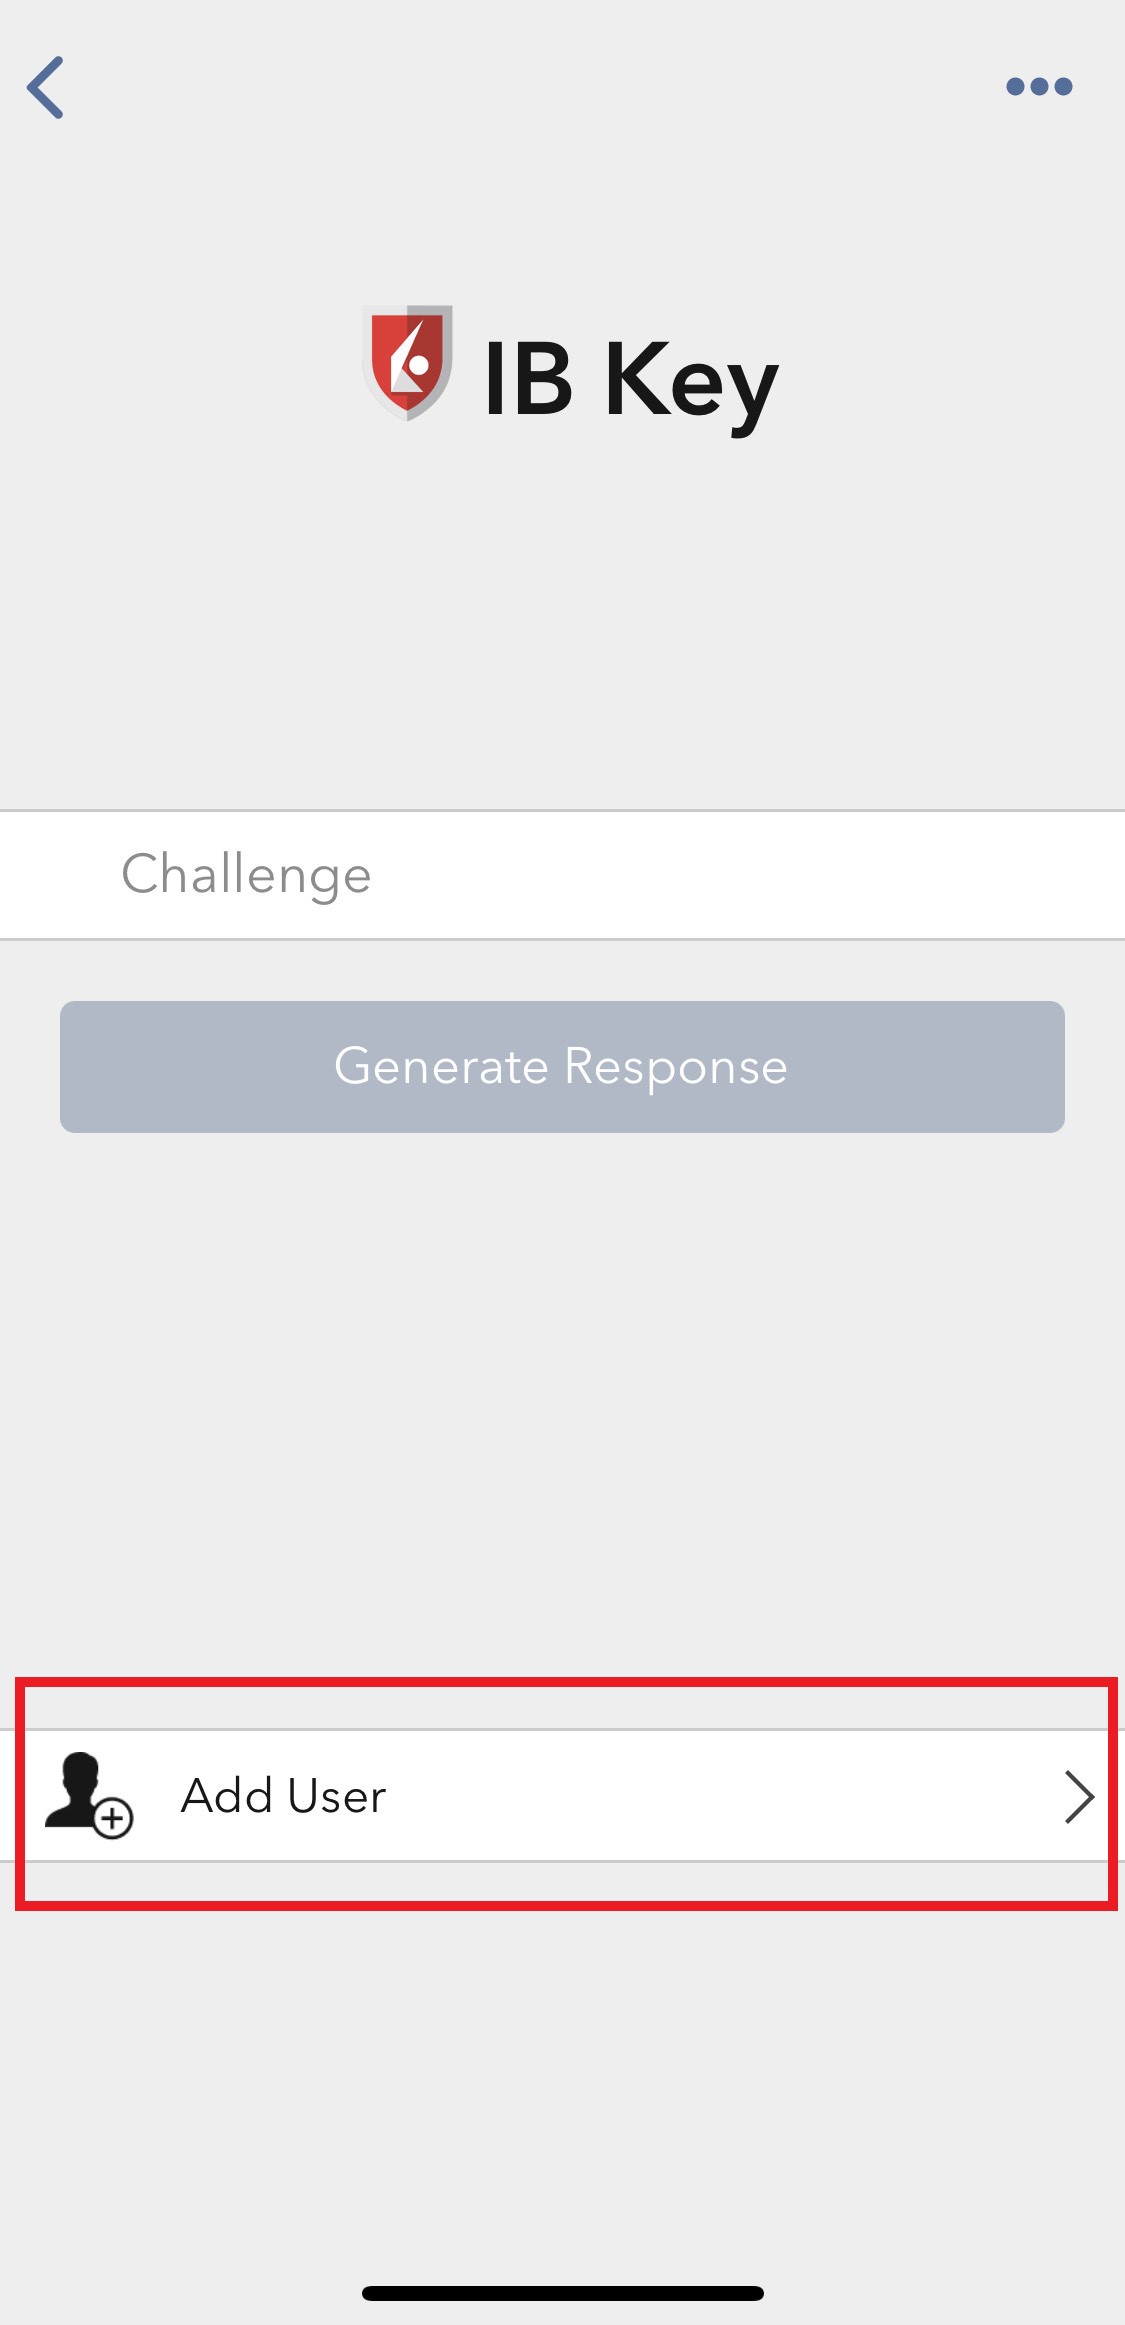
2. Tap on Authenticate (Figure 5) and then on Add User (Figure 6).
Figure 5. Figure 6.
3. Read the instructions and then tap on Continue (Figure 7).
Figure 7.
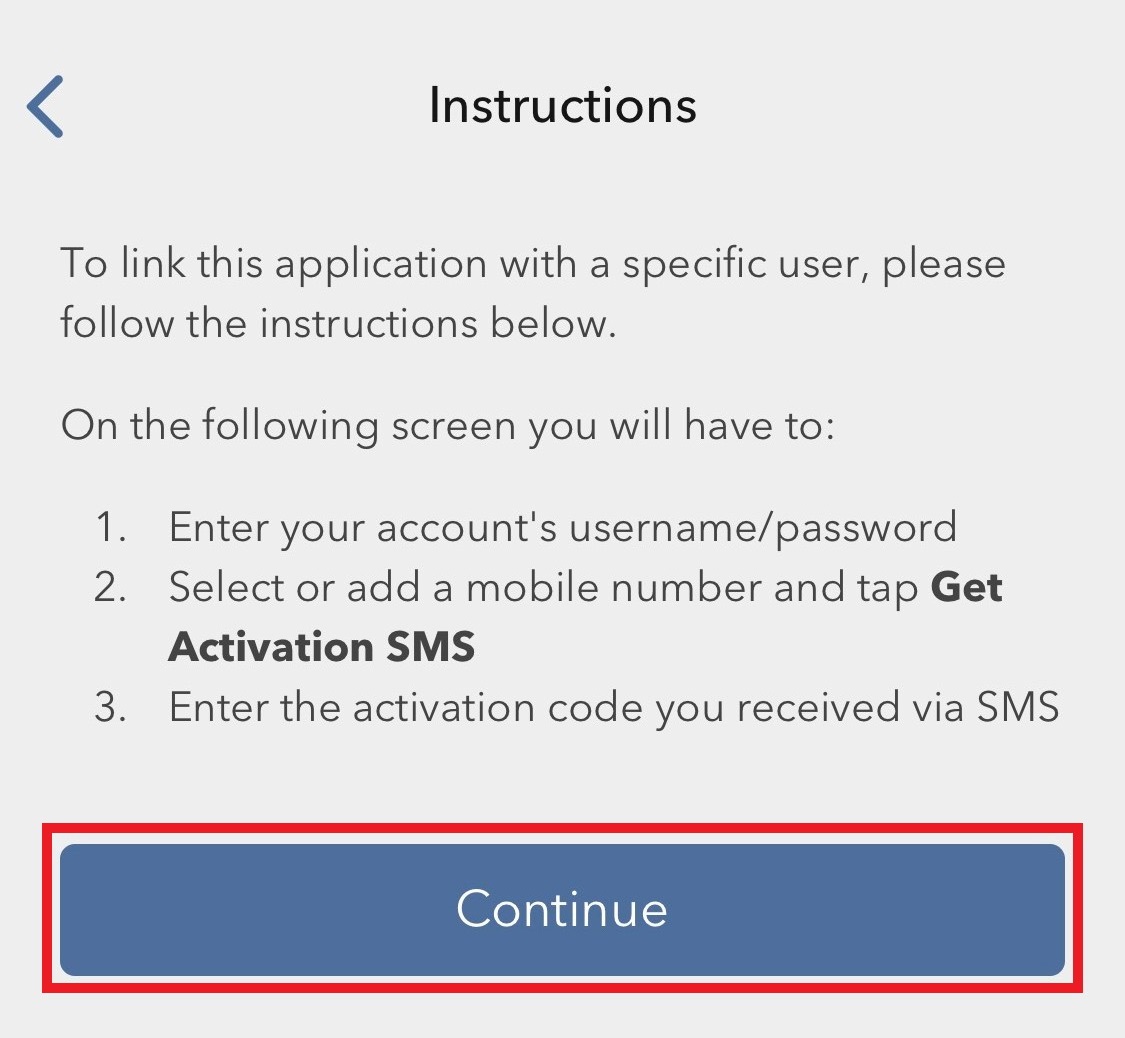
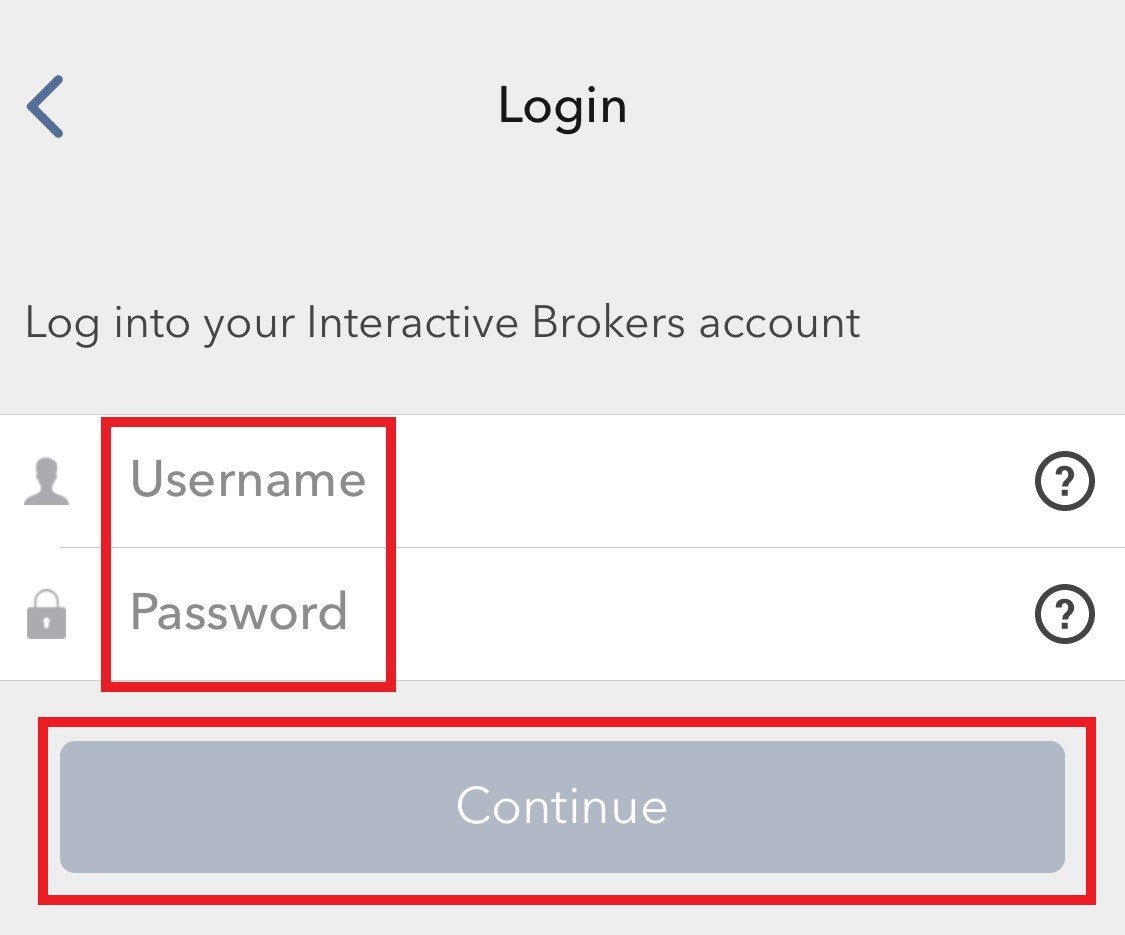
3. Enter your Username and Password, and then tap on Continue (Figure 8).
Figure 8.
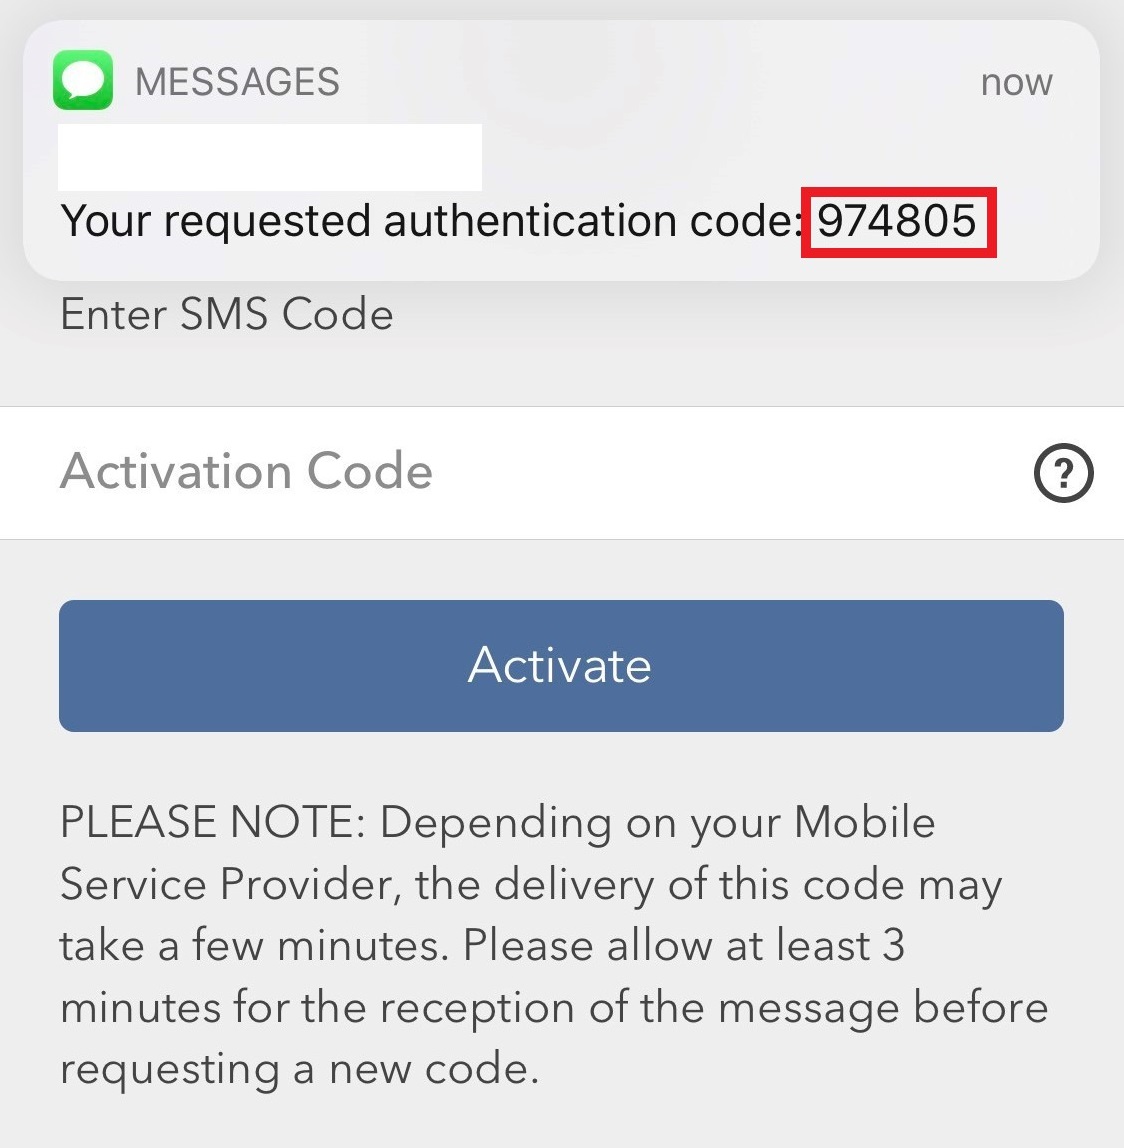
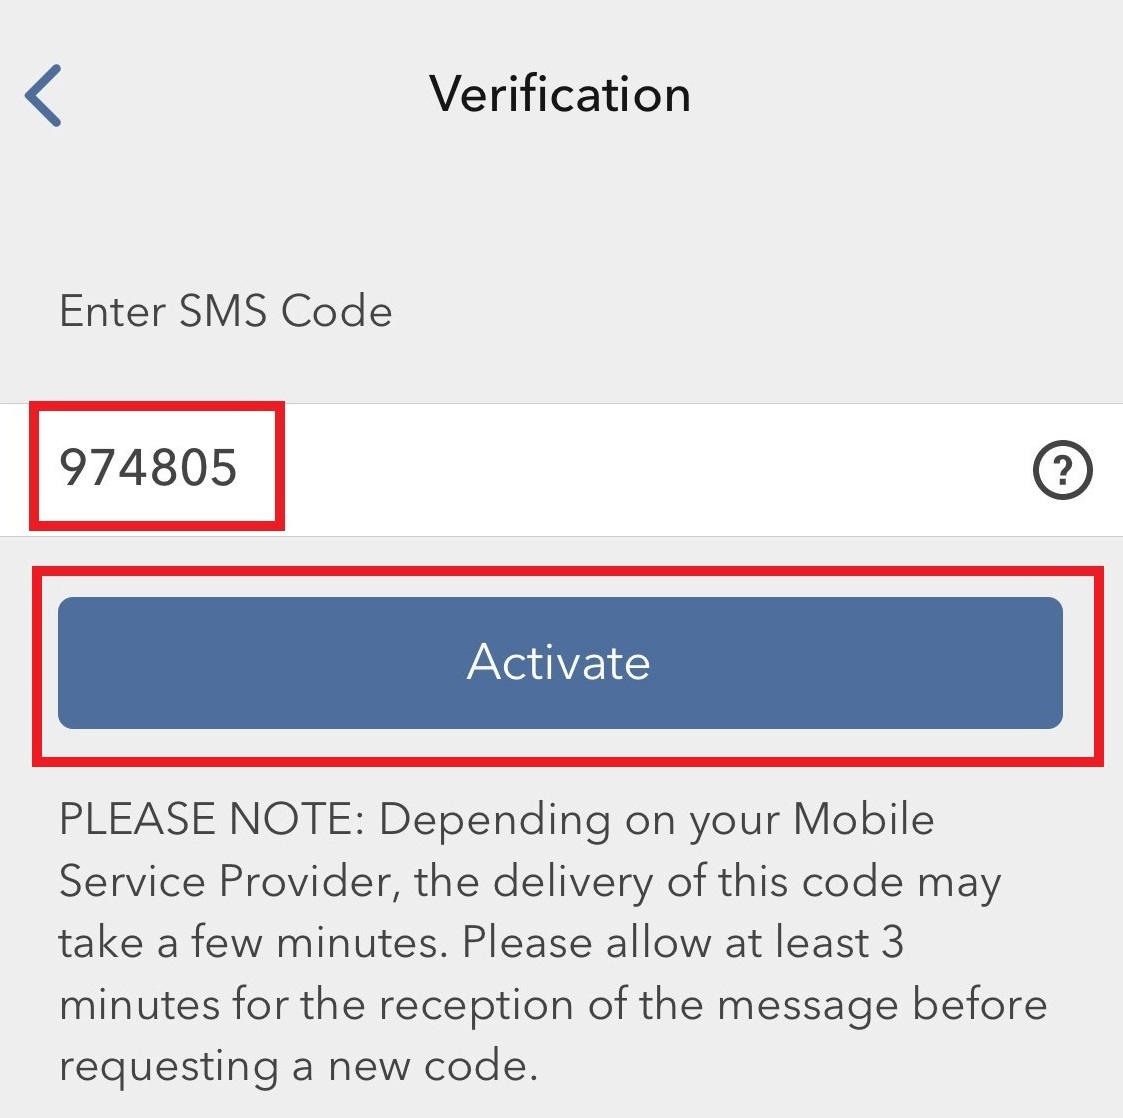
4. An Authentication Code will be sent via SMS to the mobile phone number listed on your account (Figure 9). Enter this Authentication Code in the Activation Code field and tap on Activate (Figure 10).
Figure 9. Figure 10.
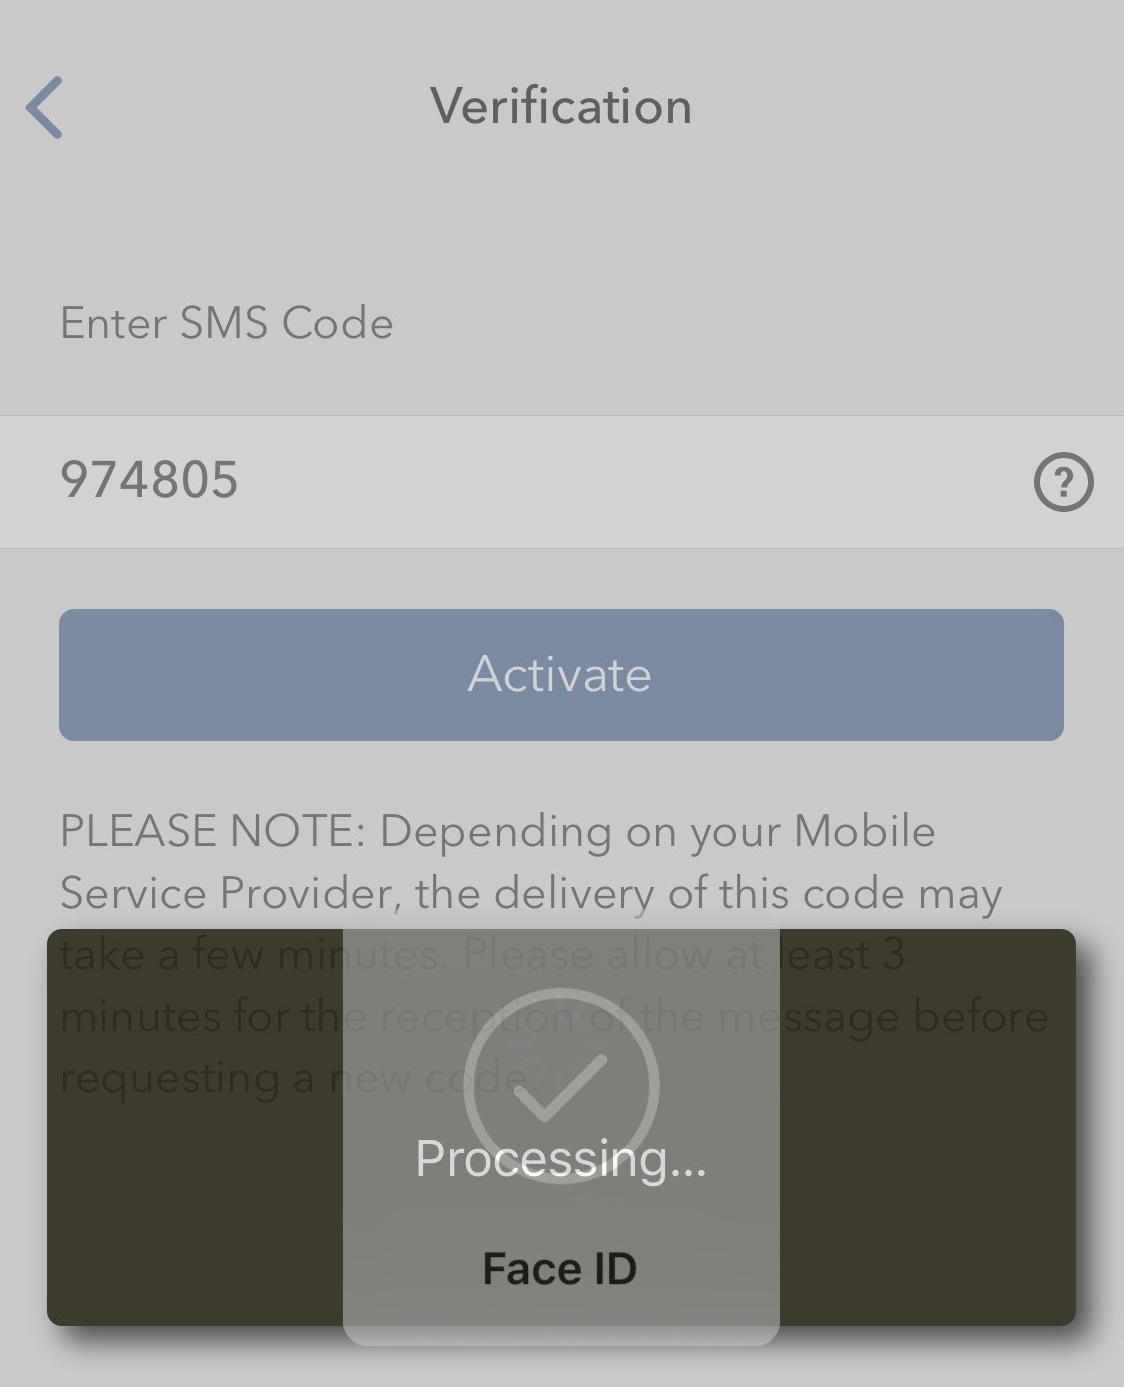
5. Depending on your smartphone's security settings, you will be asked to use your Passcode, Touch ID, or Face ID (Figure 11).
Figure 11.
6. If the activation has been successful, you will see a confirmation screen. Finally, tap on Done to complete the procedure (Figure 12).
Figure 12.
.jpeg)
Come accedere a IBKR Mobile se il sistema di Autenticazione IBKR Mobile (IB Key) è attivato su un altro dispositivo mobile
Background:
Questo articolo è rivolto ai clienti che hanno attivato il sistema di Autenticazione IBKR Mobile (IB Key) sul proprio smartphone, ma che possiedono un ulteriore dispositivo mobile che desiderano utilizzare per fare trading.
Dopo aver portato a termine le istruzioni descritte in questo articolo, sarai in grado di accedere alla piattaforma di trading IBKR Mobile sul tuo dispositivo secondario utilizzando il tuo smartphone per completare la procedura di autenticazione a due livelli.
Ai fini del presente articolo, i seguenti termini avranno il significato di seguito indicato:
Dispositivo di autenticazione: lo smartphone sul quale hai attivato il sistema di Autenticazione IBKR Mobile (IB Key)
Dispositivo di trading: il dispositivo sul quale intendi utilizzare l'app IBKR Mobile per fare trading.
Procedura:
Clicca su uno dei link di seguito in base al sistema operativo del tuo telefono:
Apple iOS
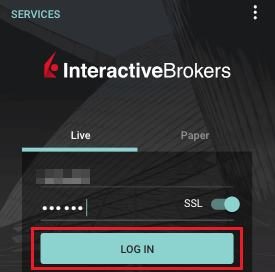
1. Avvia l'app IBKR Mobile sul tuo dispositivo di trading. Inserisci le tue credenziali nella schermata di accesso e tocca il pulsante Login
Figura 1
2. Tocca Autenticazione a due livelli (figura 2). Apparirà un codice di autenticazione (figura 3)
Figura 2 Figura 3
.png)
3. Avvia l'app IBKR Mobile sul tuo dispositivo di autenticazione
Figura 4
.png)
4a. Se l'accesso non viene eseguito automaticamente, tocca Servizi (figura 5) in alto a sinistra e quindi Autenticazione (figura 6).
Figura 5 Figura 6
4b. In caso contrario, tocca il pulsante Altro in basso a destra. Scorri quindi in basso e tocca il pulsante Autenticazione
Figura 7
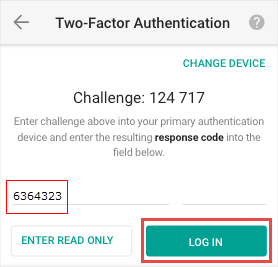
5. Inserisci il codice di autenticazione ottenuto al punto 2. Tocca quindi il pulsante Generare risposta (figura 8). Una volta fornito l'elemento di protezione richiesto (figura 9), riceverai una stringa di risposta (figura 10).
Figura 8 Figura 9 Figura 10
6. Sul tuo dispositivo di trading, inserisci la stringa di risposta nel campo "Inserire codice di risposta" e tocca il pulsante Invia per terminare il processo di autenticazione.
Figura 11
.png)
Android
1. Avvia l'app IBKR Mobile sul tuo dispositivo di trading. Inserisci le tue credenziali nella schermata di accesso e tocca il pulsante Login
Figura 1
2. Seleziona l'opzione Autenticazione a due livelli (figura 2). Apparirà un codice di autenticazione (figura 3)
Figura 2 Figura 3
(1).png)
3. Avvia l'app IBKR Mobile sul tuo dispositivo di autenticazione
Figura 4
4a. Se l'accesso non viene eseguito automaticamente, tocca Servizi (figura 5) e quindi Autenticazione (figura 6).
Figura 5 Figura 6
.png)
4b. In caso contrario, tocca il pulsante Menu (figura 7), quindi scorri in basso e tocca il pulsante Autenticazione (figura 8).
Figura 7 Figura 8
.png)
.png)
Figura 7 Figura 8
5. Inserisci il tuo PIN dell'app IBKR Mobile e il codice di autenticazione ottenuto al punto 2. Tocca il pulsante Generare risposta (figura 9). Apparirà quindi una stringa di risposta (figura 10)
Figura 9 Figura 10
.png)
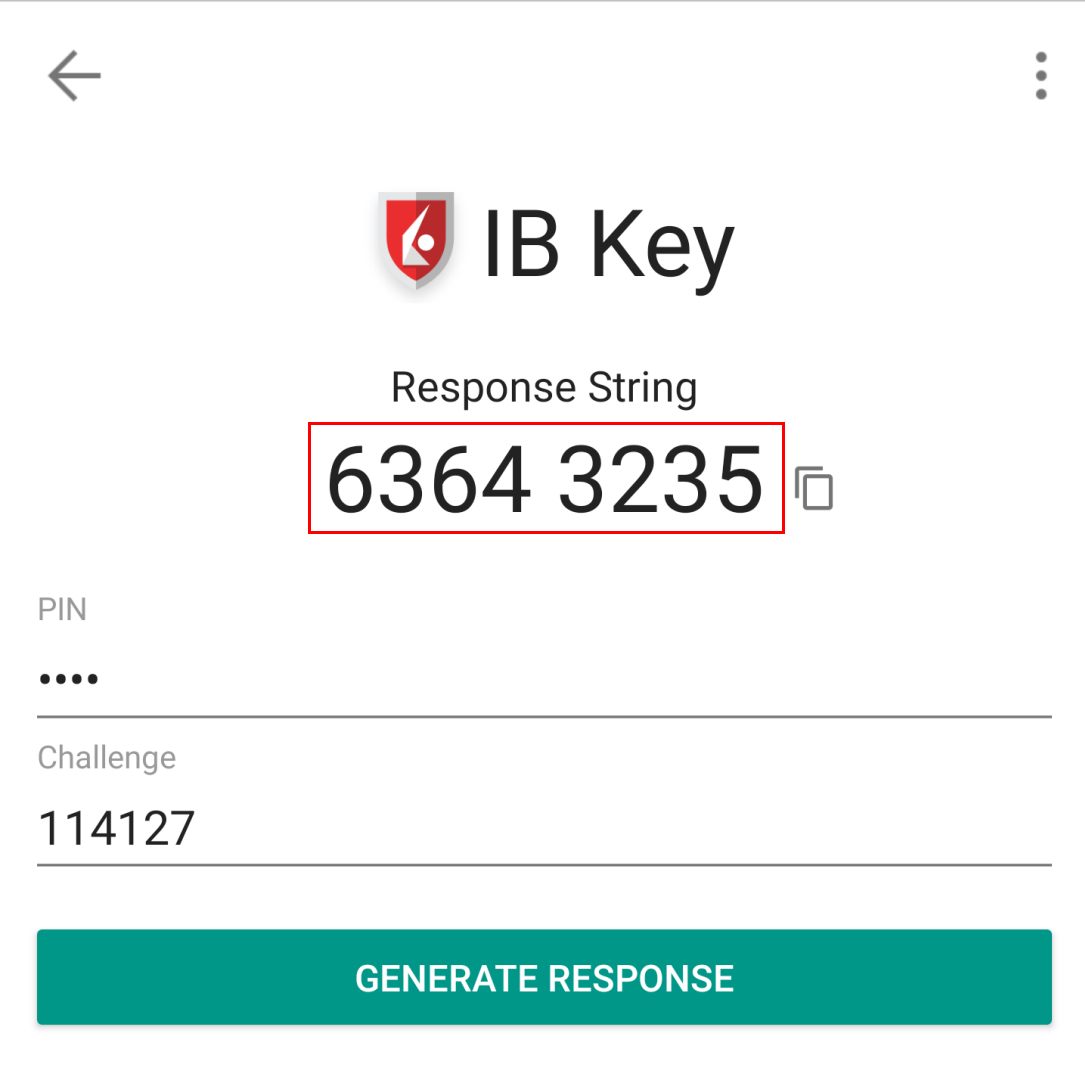
Figura 9 Figura 10
6. Sul tuo dispositivo di trading, inserisci la stringa di risposta nel campo "Inserire codice di risposta" e tocca il pulsante Accesso per terminare il processo di autenticazione.
Figura 11
Riferimenti
- Consulta l'articolo KB2260 per ottenere istruzioni generali sull'utilizzo del sistema di Autenticazione IBKR Mobile (IB Key)
- Consulta l'articolo KB3073 per ottenere istruzioni su come trasferire il sistema di Autenticazione di IBKR Mobile (IB Key) su un nuovo smartphone.
- Consulta l'articolo KB2748 per ottenere istruzioni su come recuperare il sistema di Autenticazione di IBKR Mobile (IB Key)
How to fix the "Cannot create ... file" error during TWS installation on MacOS
Background:
The filesystem permissions are controlled by your machines operating system. One of their functions is to secure your files, preventing unauthorized access or undesired modifications to the system and to your personal data.
Some software on your computer may modify or override the permissions assigned by the operating system. Under certain circumstances, this prevents the TWS installer from accessing the folder where the application core files have to be created (/users/youruser/home/Applications). In such cases, the TWS installation usually displays the error "Cannot create ... file. Shall I try again?"
In this article we explain how to reset the filesystem permission of the "Applications" folder located under your user home folder in order to allow a smooth run of the TWS installation.
Procedure:
1. On your keyboard, press ⌘CMD + ⇧Shift +H to open your home folder
Figure 1

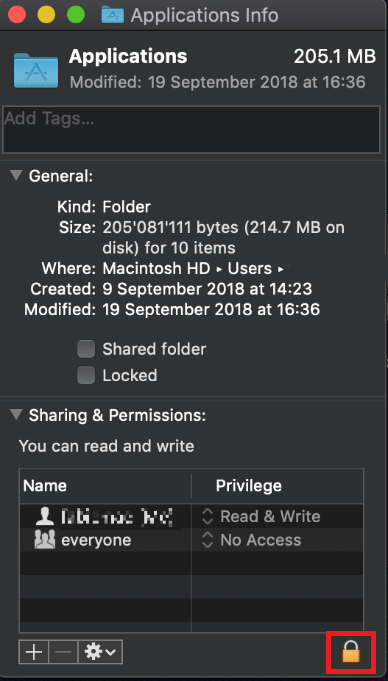
2. Select the folder "Applications" within your home folder and press ⌘CMD + I to open the Info panel
Figure 2

2. At the bottom right of the panel, click on the padlock
Figure 3
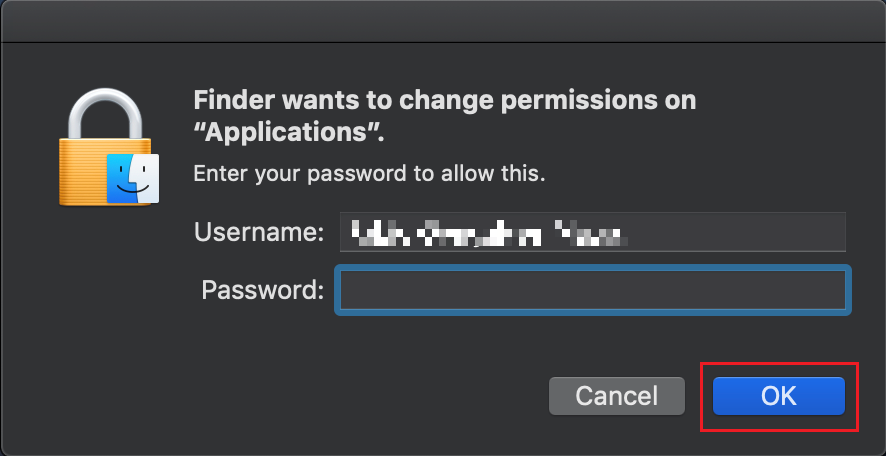
3. To unlock the permissions panel, enter your MacOS credentials and click OK
Figure 4
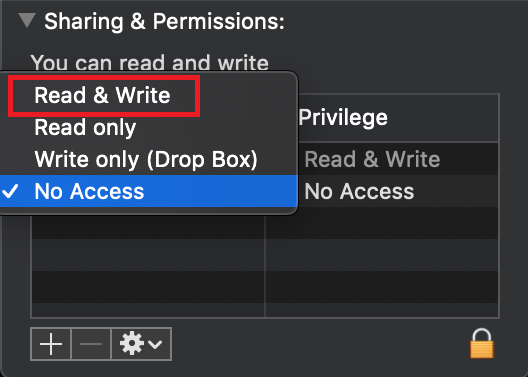
4. In the line correspondent to "everyone", click on "No Access" (Figure 5) and then select "Read & Write" (Figure 6)
Figure 5 Figure 6
.png)
5. Click on the icon bellow the permissions panel and select “Apply to enclosed items..."
Figure 7
.png)
6. Now run the TWS installer and click on Next> until you complete the installation
Figure 8
.png)
7. Once the installation has completed successfully, repeat the previous steps from 1. to 5. setting back the permissions of “everyone” to “Read Only” to revert your changes to the initial status
How to Log in to IBKR Mobile when IBKR Mobile Authentication (IB Key) is Enabled on Another Phone
Background:
This article is intended for clients who have activated the IBKR Mobile Authentication (IB Key) on their smartphone and possess as well an additional mobile device, on which they desire to trade.
Clients with this setup will be able to log in to the IBKR Mobile trading platform on their secondary device, using their smartphone to complete the Two-Factor Authentication step.
For the purposes of this article, we will use the following naming convention:
Authentication device: this is the smartphone on which you activated the IBKR Mobile Authentication (IB Key)
Trading device: this is where you want to use IBKR Mobile app for trading.
Procedure
Please click on one of the link below according to your phone operating system:
Apple iOS
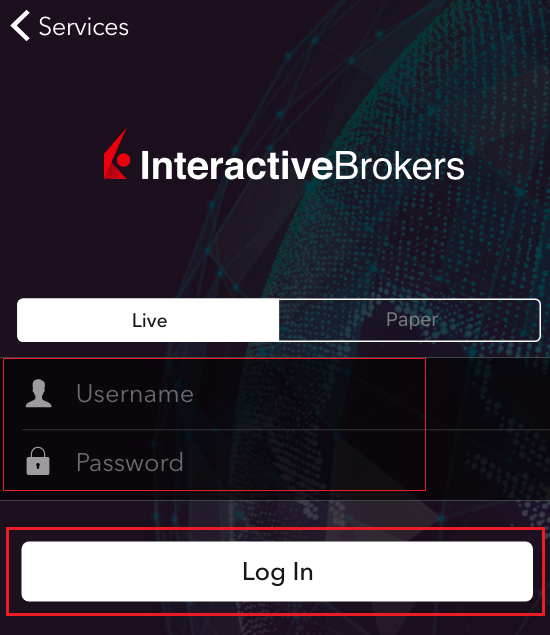
1. On your Trading device, launch the IBKR Mobile app. Enter your your credentials in the login screen and tap Log In
Figure 1
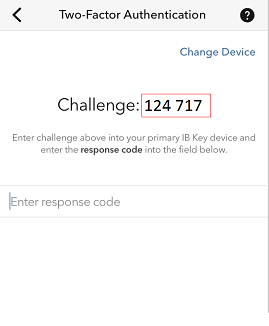
2. Tap Two-Factor Authentication (Figure 2). A Challenge code will be displayed (Figure 3)
Figure 2 Figure 3
3. On the Authentication device, launch the IBKR Mobile app
Figure 4
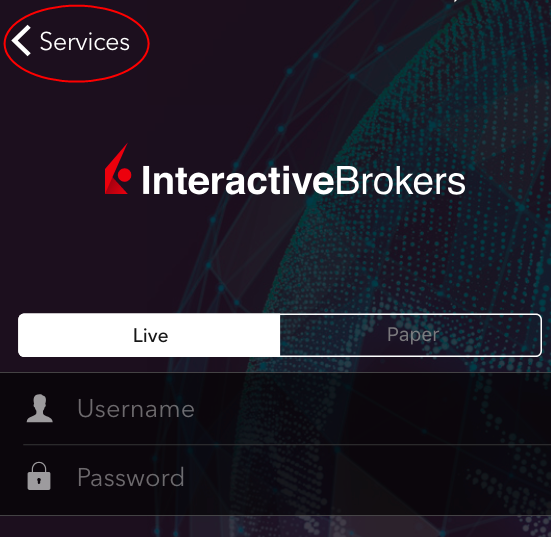
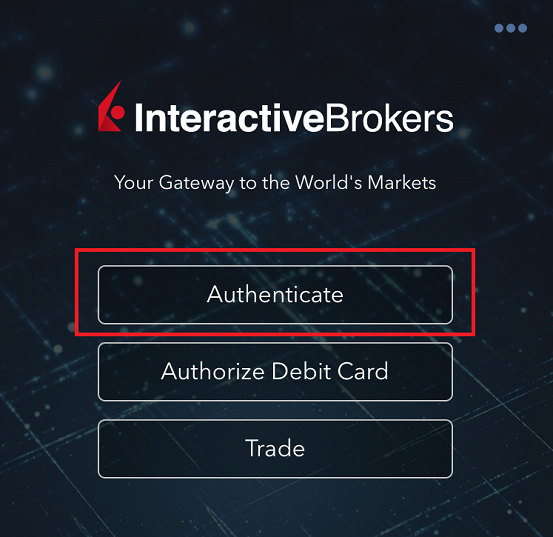
4a. If you are not automatically logged in, tap Services (Figure 5) on the top left, then tap Authenticate (Figure 6).
Figure 5 Figure 6
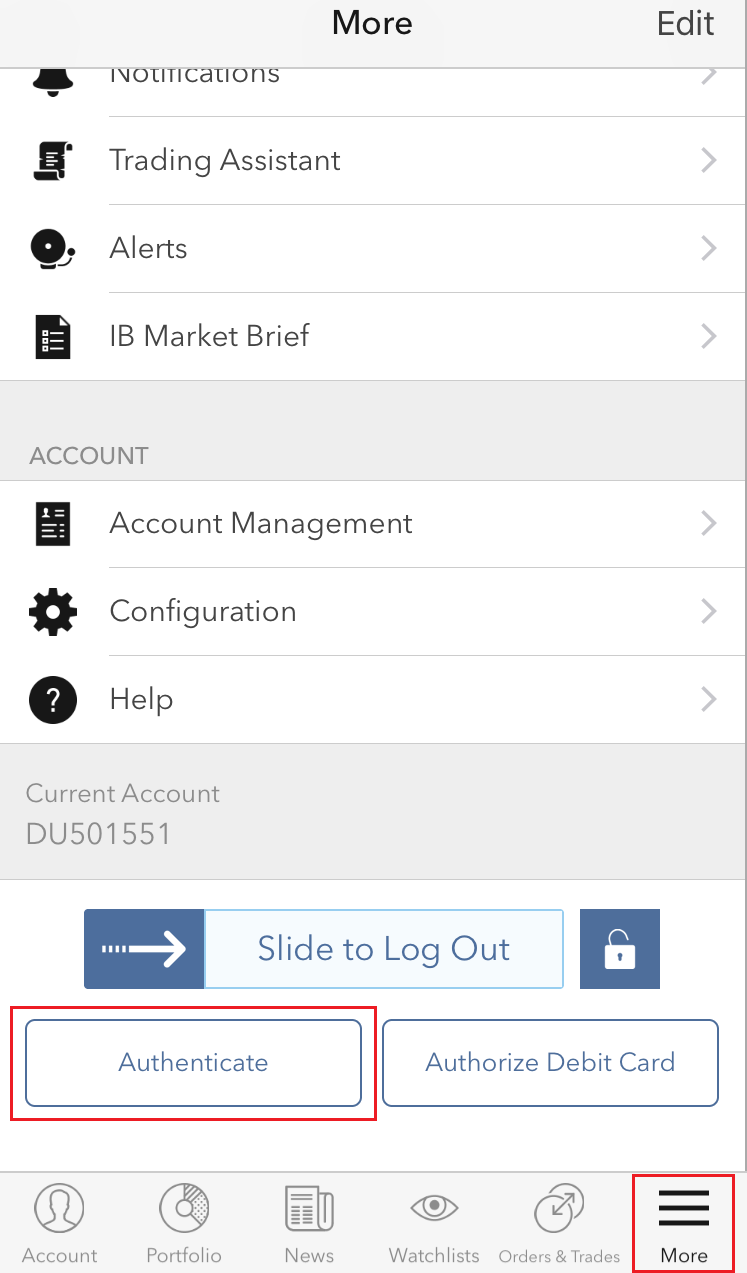
4b. If you are already logged in, tap on the More button on the bottom right. Then, scroll down and tap on Authenticate
Figure 7
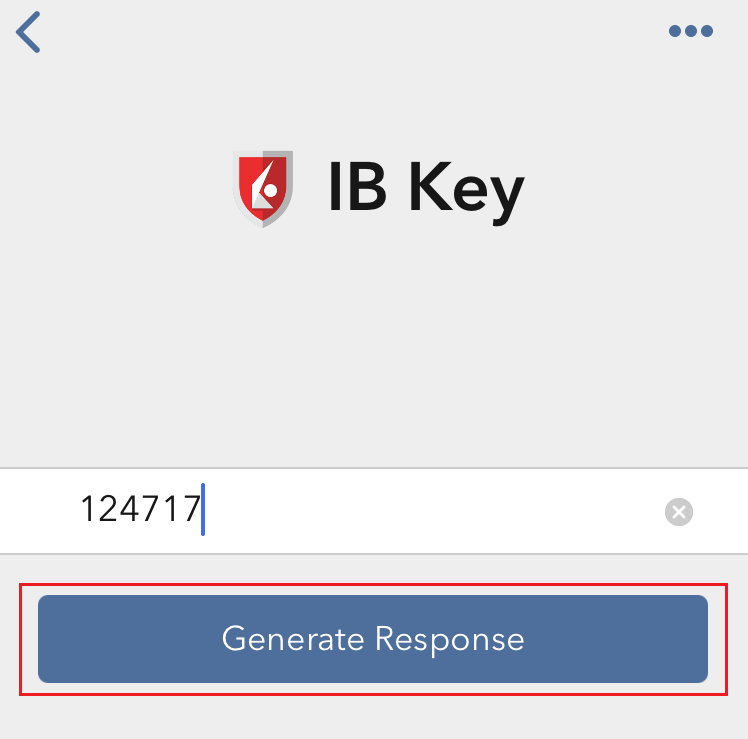
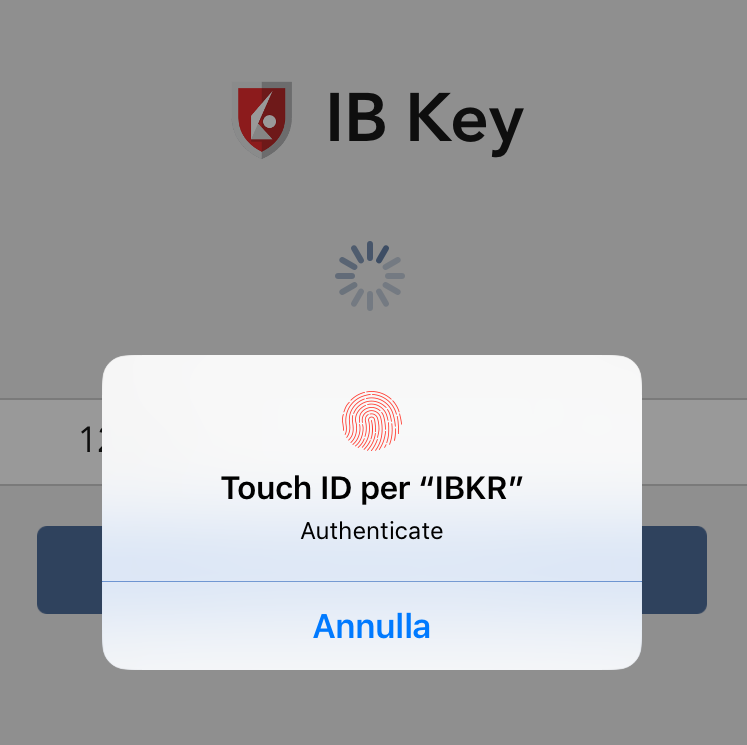
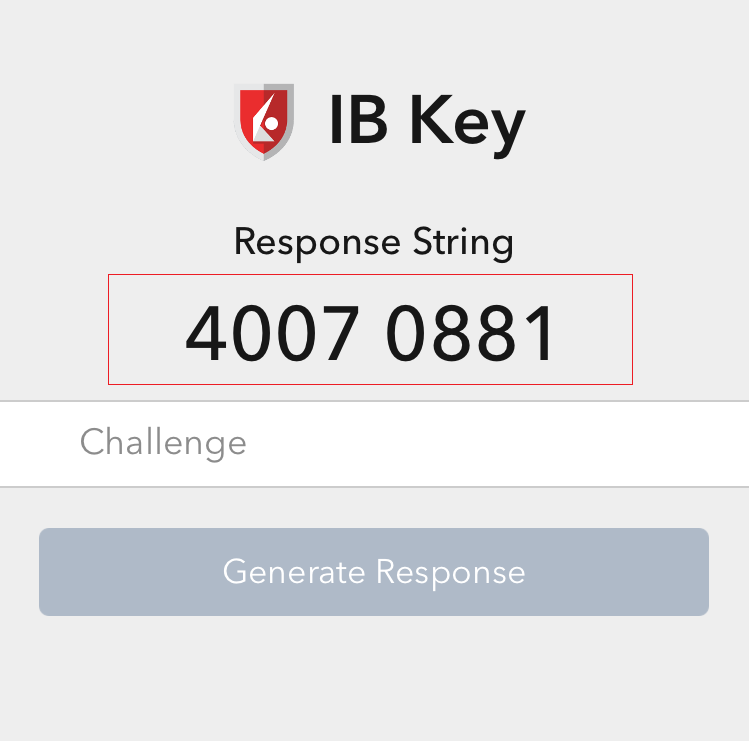
5. Enter the Challenge code you obtained at point 2. Then tap Generate Response (Figure 8). Once you have provided your security element (Figure 9), you will receive a Response String (Figure 10).
Figure 8 Figure 9 Figure 10
6. On your Trading device, enter the Response String into the "Enter response code" field and tap Send to finalize the authentication process.
Figure 11
Android
1. On your Trading device, launch the IBKR Mobile app. Enter your your credentials in the login screen and tap Log In
Figure 1
2. Tap on the option Two-Factor Authentication (Figure 2). You will see a Challenge code (Figure 3)
Figure 2 Figure 3
3. On the Authentication device, launch the IBKR Mobile app
Figure 4
4a. If you are not automatically logged in, tap Services (Figure 5) and then tap Authenticate (Figure 6).
Figure 5 Figure 6
4b. If you are already logged in, tap the Menu button (Figure 7), scroll down and tap Authenticate (Figure 8).
Figure 7 Figure 8
Figure 7 Figure 8
5. Enter your IBKR Mobile PIN and the Challenge code you obtained at point 2. Then tap Generate Response (Figure 9). A Response String will be displayed (Figure 10)
Figure 9 Figure 10
Figure 9 Figure 10
6. On your Trading device, enter the Response String in to the "Enter response code" field and then tap Log In to finalize the authentication process.
Figure 11
How do I enable the Notifications for the IBKR Mobile app
Overview:
What is a notification?
A push notification is a brief message which is sent ("pushed") from a back-end server to your device over the Internet. Apps developers use those attention-grabbing messages to quickly and effectively reach the recipients, even if they are not currently engaging with their application. Notifications can deliver information to users or advise them of a specific action they are invited or required to perform.
Background:
Why does the IBKR Mobile app use notifications?
The IBKR Mobile application uses notifications for informational purposes, as well as two-factor authentication. In the latter case, the user is invited to tap on the notification, which will automatically open the IBKR Mobile app and begin the authentication process.
This procedure explains how to manually enable notifications for the IBKR Mobile app. Please click the link below that matches your smartphone's operating system.
1. On your home screen, tap Settings (Figure 1), then Notifications (Figure 2) and finally IBKR (Figure 3)
Figure 1 Figure 2 Figure 3
2. In the IBKR app settings, you will see a number of different options. We recommend to set them in the following way (Figure 4):
-
Allow Notifications: enabled
-
Lock Screen, Notification Center, Banners: selected
-
Banner style: Persistent
-
Badges: enabled
-
Show Previews: Always
Figure 4
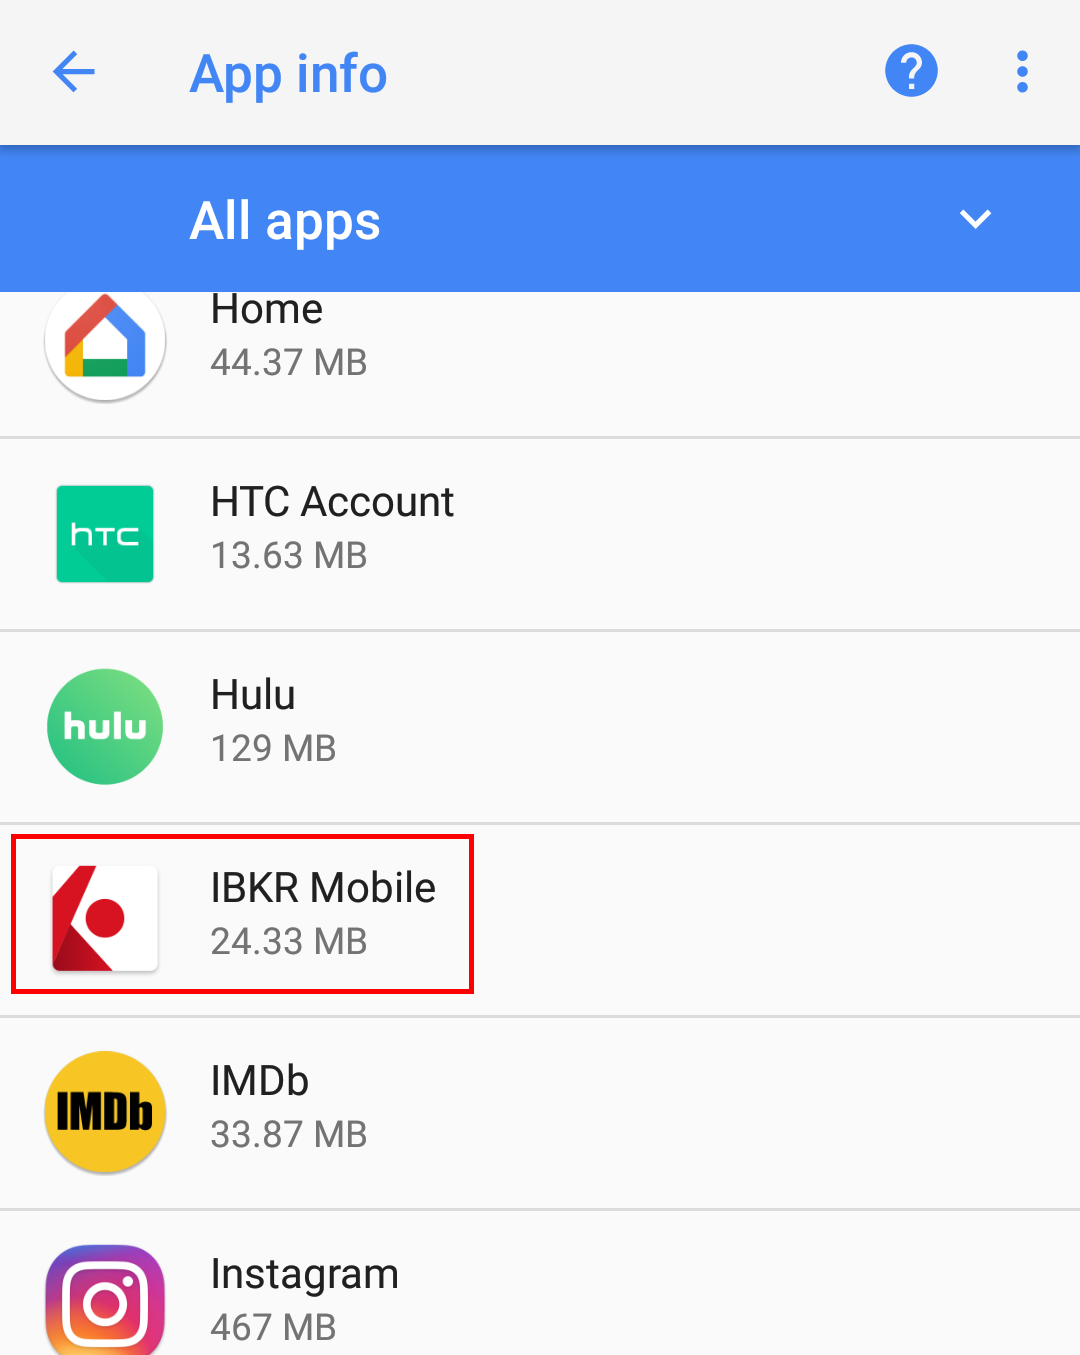
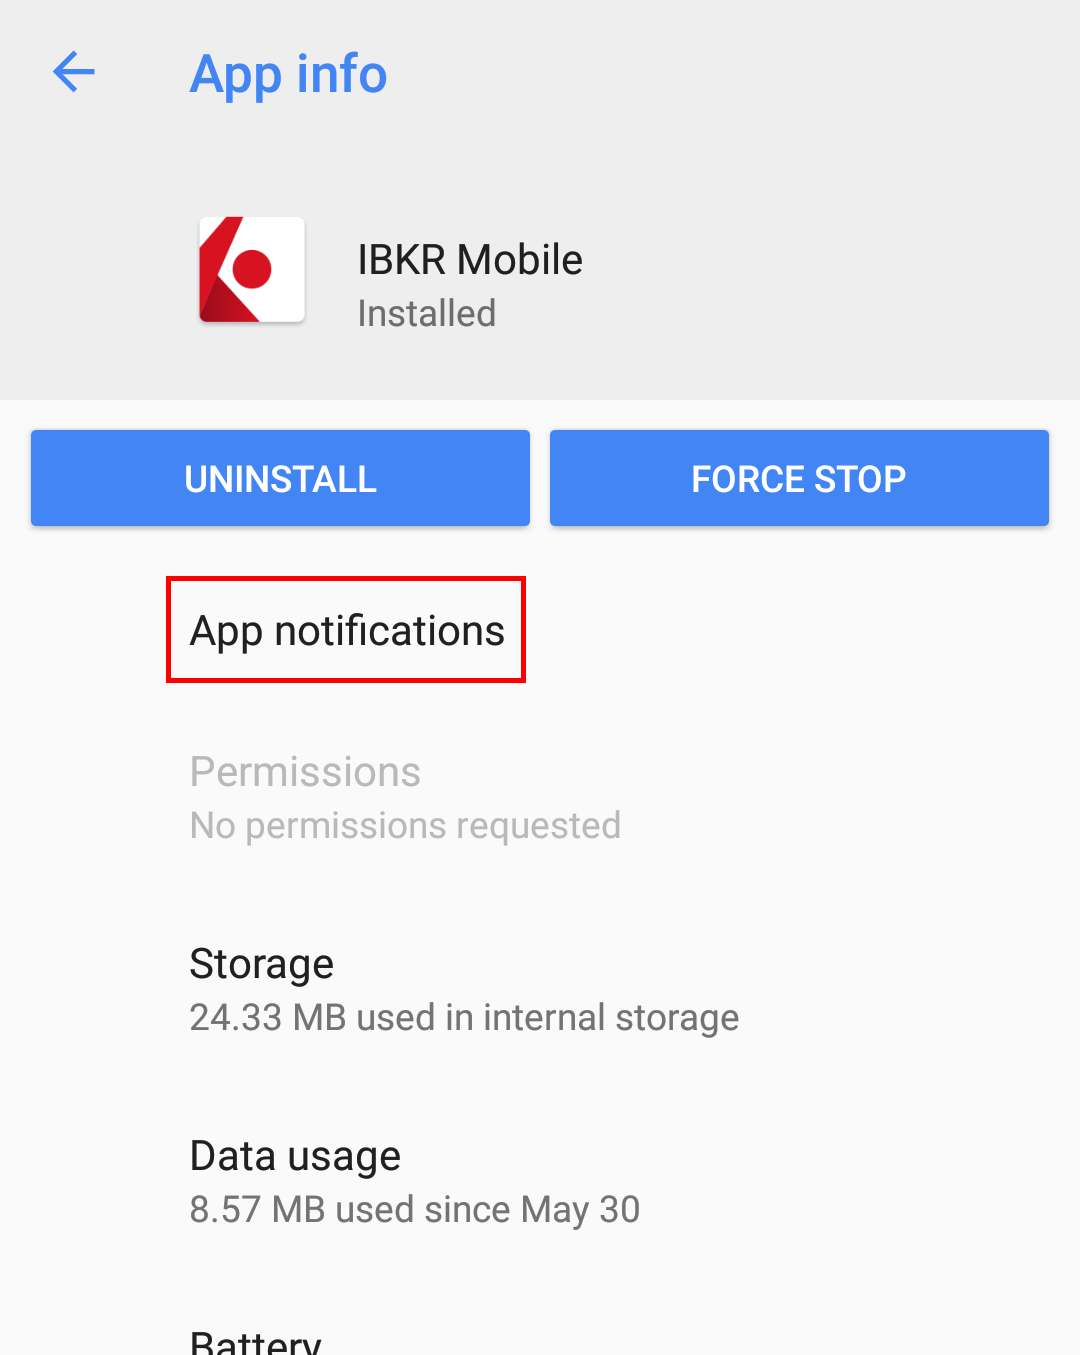
1. Go the Settings of your phone, then tap Apps & notifications1 (Figure 1) then IBKR Mobile (Figure 2) and finally App notifications (Figure 3)
Figure 1 Figure 2 Figure 3
Figure 1 Figure 2 Figure 3
2. Ensure that notifications for this app are globally On and the switches Allow notification dots, Allow interruptions, On the lock screen are all enabled (Figure 4). According to your personal preference, you may want to enable as well the switch Override Do Not Disturb
Figure 4
Figure 4
Please note that menu items labels and positions may vary according to your device vendor and software version.
1. The Apps & notifications item may be called Sound & notification on certain devices
References:
- See KB2260 for instruction on how to activate and operate IBKR Mobile Authentication
- See KB3234 for troubleshooting missing IBKR Mobile notifications
- See KB2748 for information about IBKR Mobile Authentication recovery