ASIC OTC Derivative Transaction Rules (Reporting) (“DTR”) and LEI Information
Background
ASIC Over the Counter (“OTC”) derivatives reporting regulations are designed to make the OTC derivatives markets more transparent by requiring counterparties to these transactions to report trades, positions, collateral and valuations to a derivative trade repository (trade repositories). All counterparties with reporting obligations under the DTRs must have a Legal Entity Identifier (“LEI”) in order to report. However, only IB Australia (“IBAU”) clients who have been permitted to trading in these OTC products and are operating as non-individual entities (e.g. corporations, corporate trusts, etc) are required to have an LEI.
An OTC derivative is a derivative that is not traded:
a) on a financial market that is:
subject to ASIC supervision under Pt 7.2A of the Corporations Act (such as ASX 24);
registered by the US Commodity Futures Trading Commission as a ‘designated contract market' under s5h of the Commodity Exchange Act 1936 (US); or
a regulated market’ as defined in Article 4(1)(21) of the Markets in Financial Instrument Directive 2014/65/EU (MIFID 11); or
b) on certain regulated markets (referred to as ‘regulated foreign markets’) that ASIC has determined are subject to sufficiently equivalent requirements and supervision.
For more details please refer to:
https://asic.gov.au/regulatory-resources/markets/otc-derivatives/frequently-asked-questions/
An example of an OTC products for IBAU clients are the IBAU issued CFDs (Contracts for Difference).
All IBAU clients who are subject to the DTR regulations and who require an LEI will see the LEI Election form upon logging into Account Management. Note that you will only see the LEI Form once upon logging into Account Management; once you make your election, you will not see the form again upon subsequent Account Management logins.
Who is Subject to the DTR Regulation?
All IBAU clients operating as non-individual accounts (e.g. corporations, corporate trusts, etc.) are required to comply with DTR obligations. In this context, non-individual means any account which is owned by one or two individuals as stated in the account title. Individual accounts in the name of a single person are not subject to DTR and so will not have access to this page.
Original LEI Elections
If you are subject to the DTR regulations and are an entity or corporate client and have not already made your LEI election, when you log into Account Management, you will be prompted to do so.
If you have an IBAU account; you can elect to:
- Instruct us to apply for LEI on your behalf. You will be prompted to fill out a simple form and sign an agreement. Obtaining an LEI can take up to three days.
- Provide your LEI, which you have already obtained. You will be prompted to enter your LEI.
- Do nothing (you do not have an LEI and you are not subject to the DTR regulation).
NOTE: THE INFORMATION ABOVE IS NOT INTENDED TO BE A COMPREHENSIVE OR EXHAUSTIVE GUIDANCE AND IT IS NOT A DEFINITVE INTEPRETATION OF THE REGULATION BUT A SUMMARY OF THE ASIC DERIVATIVE TRANSACTION REPORTING.
I am not receiving text messages (SMS) from IBKR on my mobile phone
Background:
Once your mobile phone number has been verified in the Client Portal, you should immediately be able to receive text messages (SMS) from IBKR directly to your mobile phone. This article will provide you with basic troubleshooting steps in case you are unable to receive such messages.
1. Activate the IBKR Mobile Authentication (IB Key) as 2-Factor security device
In order to be independent of wireless/phone carrier-related issues and have a steady delivery of all IBKR messages we recommend to activate the IBKR Mobile Authentication (IB Key) on your smartphone.
The smartphone authentication with IB Key provided by our IBKR Mobile app serves as a 2-Factor security device, thereby eliminating the need to receive authentication codes via SMS when logging in to your IBKR account.
Our IBKR Mobile app is currently supported on smartphones running either Android or iOS operating system. The installation, activation, and operating instructions can be found here:
2. Restart your phone:
Power your device down completely and turn it back on. Usually this should be sufficient for text messages to start coming through.
Please note that in some cases, such as roaming outside of your carrier's coverage (when abroad) you might not receive all messages.
3. Use Voice callback
If you do not receive your login authentication code after restarting your phone, you may select 'Voice' instead. You will then receive your login authentication code via an automated callback. Further instructions on how to use Voice callback can be found in IBKB 3396.
4. Check whether your phone carrier is blocking the SMS from IBKR
Some phone carriers automatically block IBKR text messages, as they are wrongly recognized as spam or undesirable content. According to your region, those are the services you can contact to check if a SMS filter is in place for your phone number:
In the US:
- All carriers: Federal Trade Commission Registry
- T-Mobile: Message Blocking settings are available on T-Mobile web site or directly on the T-Mobile app
In India:
- All carriers: Telecom Regulatory Authority of India
In China:
- Call your phone carrier directly to check whether they are blocking IBKR messages
References:
- How to login using SMS authentication
- Overview of Secure Login System
- Information and procedures related to Security Devices
- IBKR Mobile Authentication
How To Request an IBKR Debit Card
Overview:
IB LLC individual and joint accounts (excluding IRA accounts) are now eligible to request an IBKR Debit Card through Account Management.
In order to request an IBKR Debit Card, first login to Client Portal/Account Management and select Transfer & Pay. Under Transfer & Pay, click the option for "Integrated Cash Management".

The IBKR Debit Card Summary screen will populate. At the top of the page you will see a button to "Apply Now". Click the button to start your IBKR Debit Mastercard application.

The application page will populate with the Customer Agreement along with an option to Select an Account to link to your IBKR Debit Card. Click the "Add/Edit Accounts" button to make your selection.
.png)
Your accounts will populate on the right side of the screen. Once you have made your selection, your selected account will be highlighted at the bottom of the right-hand window. Once you are ready to confirm the account, click the "Continue" button.
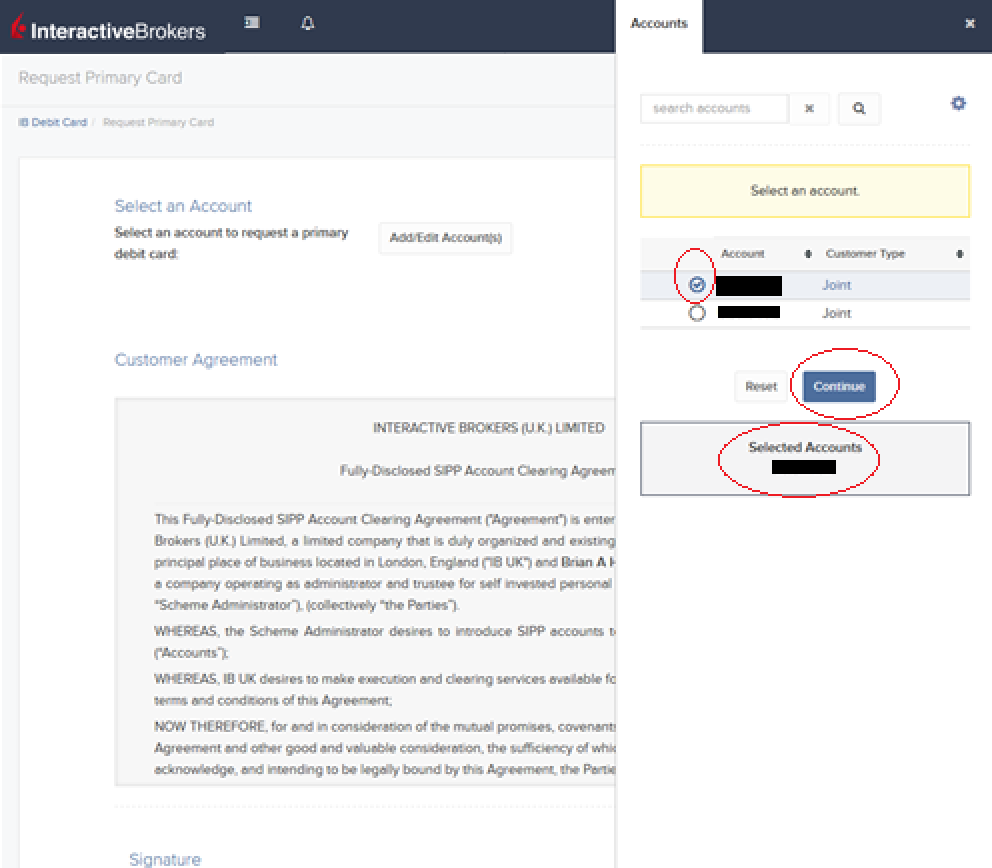
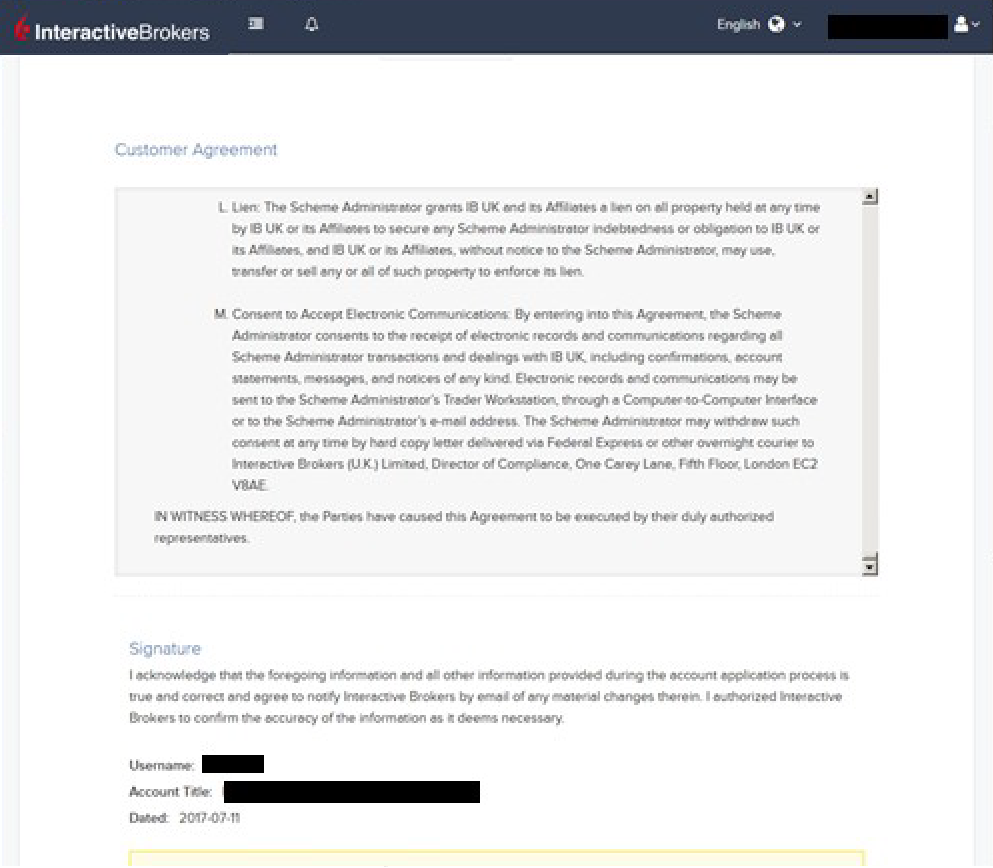
Scroll down to the bottom of the page where you will be prompted to agree to the terms set forth in the Customer Agreement by signing your name as it appears on the account. Click "Continue" to proceed.
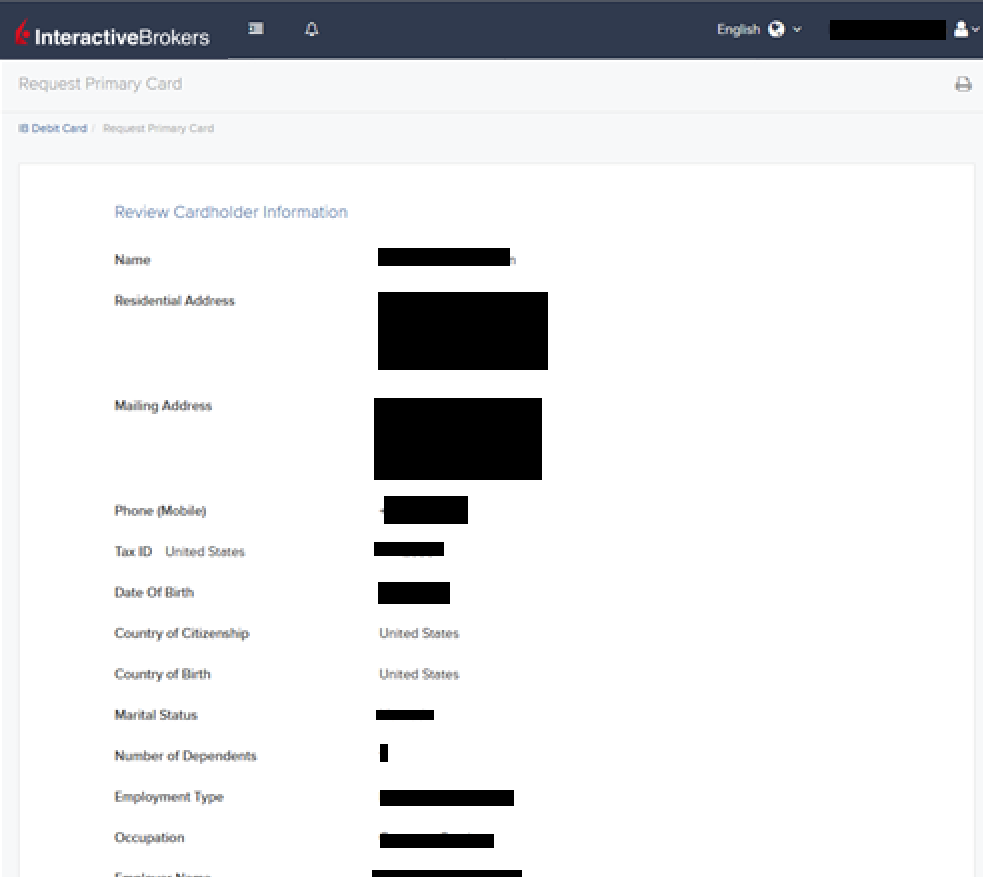
The next screen will ask you to review the Cardholder Information. The information should all be correct as it uses the information from your IBKR account. If the information is not correct, you will need to go into your account and change any incorrect information. If the information is correct, click "Continue" to proceed.
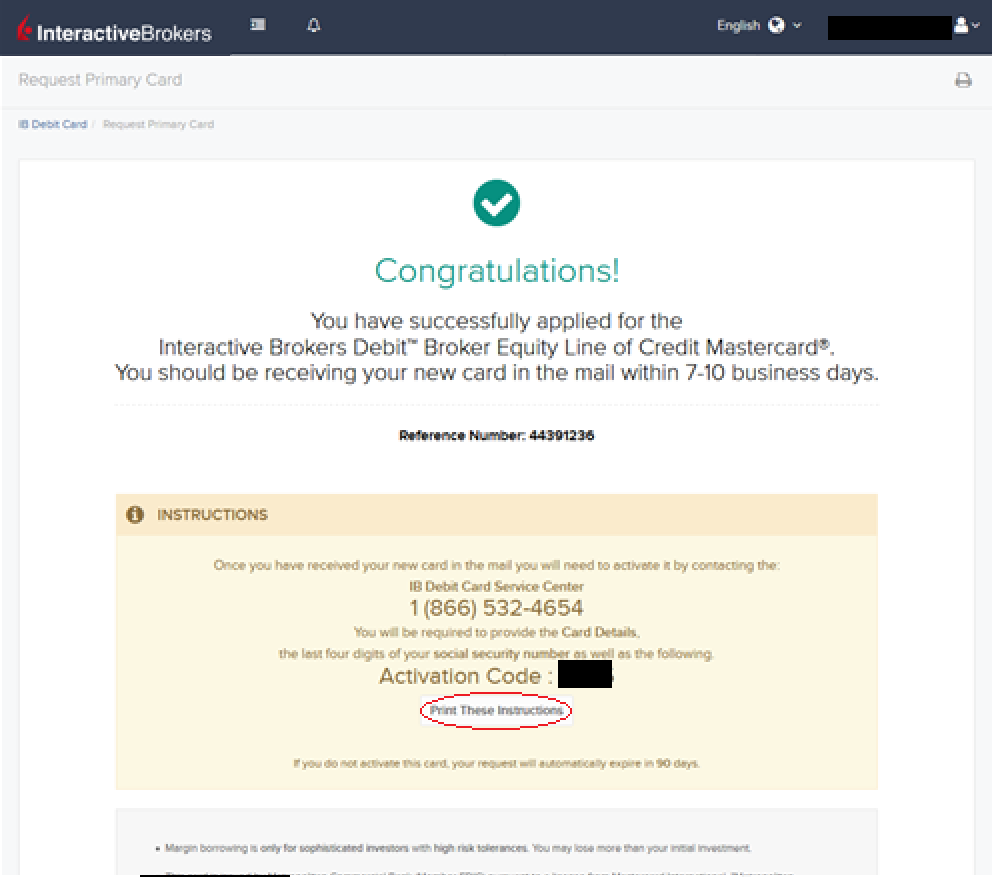
Once you confirm your Cardholder Information, your application will be submitted. You will receive a confirmation with a reference number, along with activation instructions for when you receive your IBKR Debit Card in the mail.
Forex Execution Statistics
Overview:
IBKR clients can now analyze the quality of their forex executions in comparison to forex trades by other IBKR customers through the FX Browser tool in Client Portal. The tool provides transaction data for the 15 forex transactions that occur immediately before and after in the same currency pair of the client's transaction.
Note:
The number of transactions may be limited to fewer than the stated 15 as the NFA also has placed a 15 minute window on the query. Meaning, if within a 15 minute window before and after the customer's execution there are fewer than 15 executions the customer's query will return only those executions which occurred within the time window.
Accessing the FX Browser Tool
To Access the FX Browser tool, login to Client Portal using the Login button on our website. Click the Help menu (question mark icon in the top right corner) followed by Support Center. Please note, at this time only data for the live account will be provided.
.png)
From there, select "See Trades on IBKR's FX Platform" from the list of Information & Tools:

Submitting a Query
When the FX Browser is launched, you will be presented with the following screen:
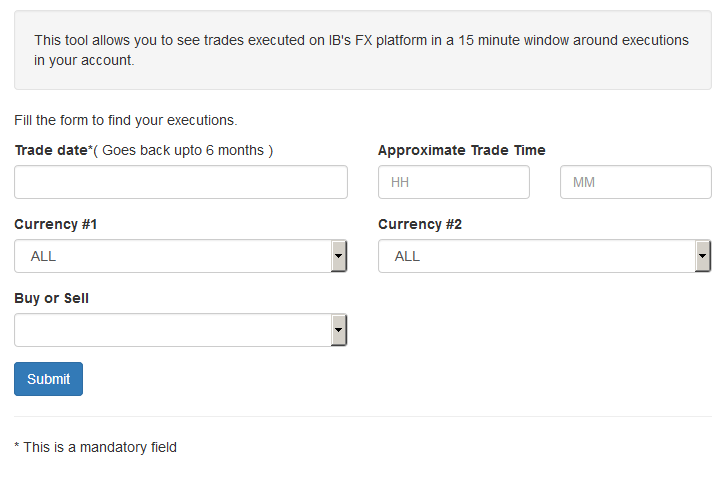
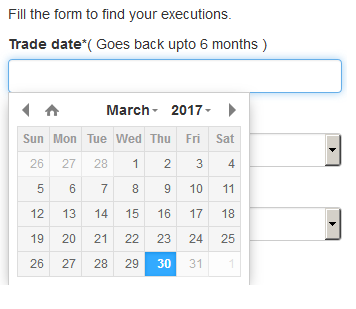
Please note that only Trade Date is a mandatory field in the query. When clicking on the Trade Date field, a calendar widget will populate and allow you to select your trade date. Only transactions from the last 6 months will be available to search.
Active customers may wish to limit the results by further selecting the currency pair, side or time of the execution.
Once the desired query has been entered, click on the Submit button.
The next screen will display the list of executions for the given account on the specified day. From there, you may select the execution you wish to receive the execution statistics on.
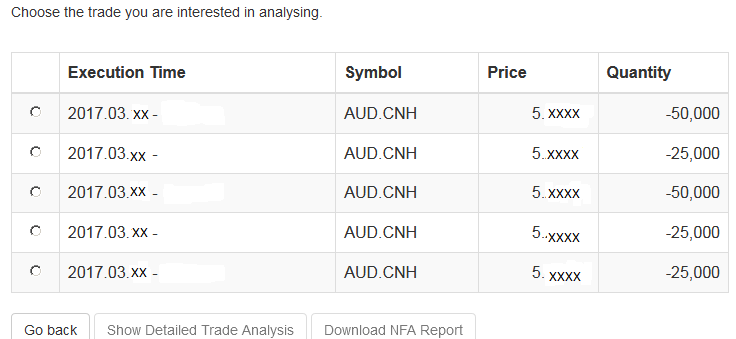
Once the execution you wish to view has been selected, click the "Download NFA Report" button.

Reading the Report
The results will be returned in a new tab and will contain the 15 executions before and 15 executions after the trade you selected on the previous screen. Per the note above, if fewer than 15 executions occurred in the 15 minute time frame only those executions will be displayed.
The query results will include the following information:
- Execution date and time, as expressed in Eastern time
- Side (buy or sell)
- Quantity (of Transaction Currency)
- Currency pair
- Execution price
- Commissions and other charges assessed by the FDM
- Currency denomination of commissions
Your trade will be marked as Trade Number "0" and the trades before and after your trade will be numbered from 1 to 15.
Error Messages
If the search criteria you enter does not bring up any trade information, you will be presented with the following error message:

How to update the US Social Security Number (SSN) or Individual Taxpayer Identification Number (ITIN) on your account
Background:
If you have been informed or believe that your account profile contains an incorrect US SSN/ITIN, you may simply log into your Account Management to update this information. Depending on your taxpayer status, you can update your US SSN/ITIN by modifying one of the following documents:
1) IRS Form W9 (if you are a US tax resident and/or US citizen holding a US SSN/ITIN)
2) IRS Form W-8BEN (if you are a Non-US tax resident holding a US SSN/ITIN)
Please note, if your SSN/ITIN has already been verified with the IRS you will be unable to update the information. If however the IRS has not yet verified the ID, you will have the ability to update through Account Management.
How to Modify Your W9/W8
1) To submit this information change request, first login to Account Management
2) Click on the Settings section followed by Account Settings
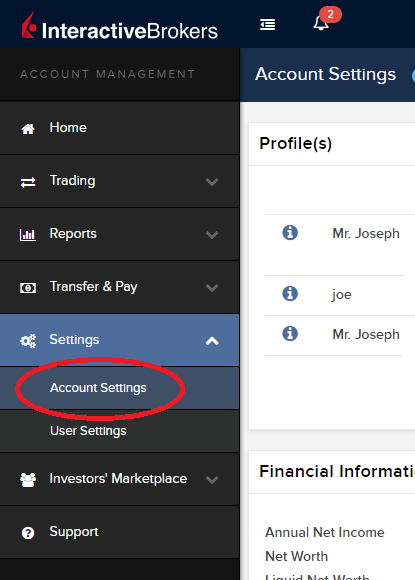
3) Find the Profile(s) section. Locate the User you wish to update and click on the Info button (the "i" icon) to the left of the User's name
.png)
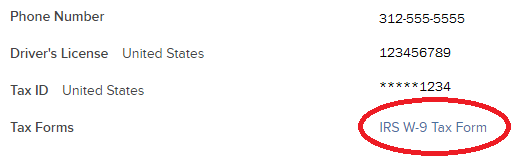
4) Scroll down to the bottom where you will see the words Tax Forms. Next to it will be a link with the current tax form we have for the account. Click on this tax form to open it
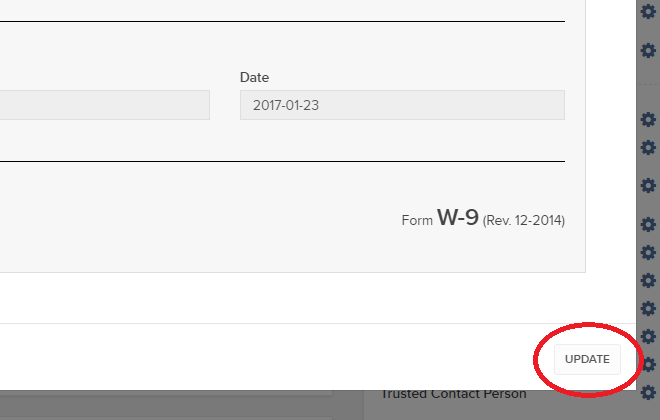
5) Review the form. If your US SSN/ITIN is incorrect, click on the UPDATE button at the bottom of the page
6) Make the requisite changes and click the CONTINUE button to submit your request.
7) If supporting documentation is required to approve your information change request, you will receive a message. Otherwise, your information change request should be approved within 24-48 hours.
Come verificare il proprio numero di telefono cellulare
Background:
Il presente articolo spiega come verificare il proprio numero di telefono cellulare.
Se la verifica del proprio telefono non è stata completata durane la procedura di apertura del conto, è possibile completarla in qualunque momento seguendo questi passaggi:
- Effettuare l'accesso a Gestione conto.
- Cliccare sulle voci Impostazioni e Impostazioni utente del menu laterale. Cliccare sulla rotella della configurazione corrispondente al numero di telefono cellulare. Se si sta utilizzando la versione classica di Gestione conto, questa sezione è raggiungibile dal menu in alto Gestione conto -> Anagrafica conto -> Dettagli -> Profilo, cliccando sul collegamento "Modifica"
.png)
- Cliccare sulla voce VERIFICA

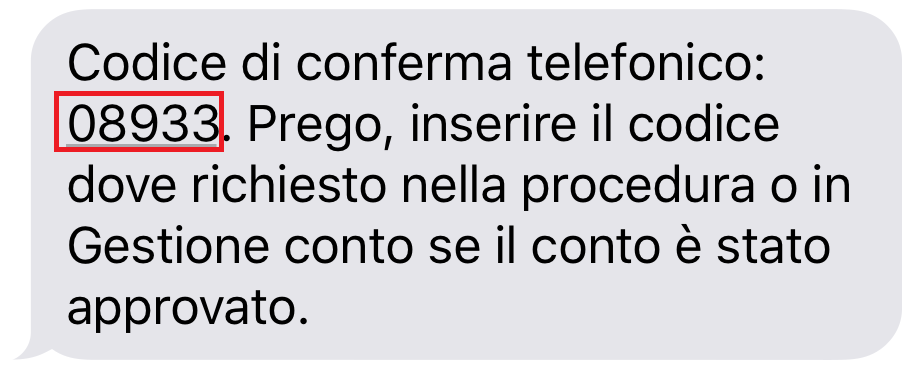
- Aprire l'applicazione dei messaggi del proprio telefono e individuare l'SMS contenente il Codice di conferma ricevuto.
ATTEZIONE: la tempistica per la consegna dei messaggi può variare e, in determinate circostanze, può impiegare diversi minuti.
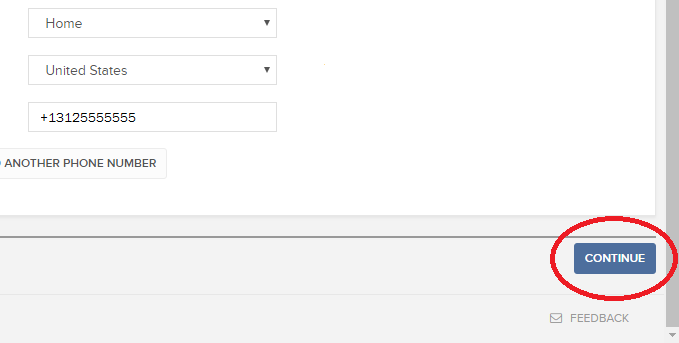
- Inserire il codice di conferma ricevuto nel campo numero di conferma, quindi cliccare su AVANTI.
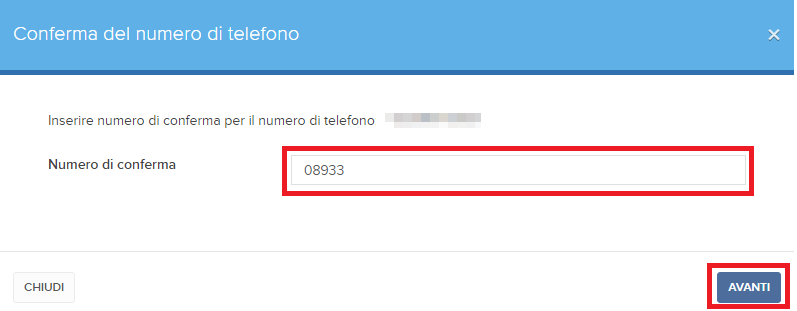
- Se il codice è stato accettato, apparirà un segno di spunta verde al di sotto della colonna SMS verificato. Cliccare su AVANTI per ultimare la procedura.

- Se non si dispone di un dispositivo SLS (sistema di accesso sicuro) per le proprie credenziali d'utente, da lì a poco si verrà automaticamente registrati tramite SMS nel sistema di autenticazione a due livelli. Per istruzioni in merito all'autenticazione durante l'accesso via SMS, si prega di consultare l'articolo KB3196.
FATCA Procedures - Grantor Trust Tax Information Submission
Overview:
Interactive Brokers is required to collect certain documentation from clients to comply with U.S. Foreign Account Tax Compliance Act (“FATCA”) and other international exchange of information agreements.
This guide contains instructions for a Trust to complete the online tax information and to electronically submit a W-9 or W-8BEN.
U.S. Tax Classification
Your U.S. income tax classification determines the tax form(s) required to document the account.
You must login to Account Management with the trust's primary username to access the Tax Form Collection page.
1. Tax Form Collection
The Tax Form Collection page lets account holders review and update important tax-related information and lets account holders electronically fill out an IRS Form W-9 (U.S. taxpayers) and IRS Form W-8 (non-U.S. taxpayers).
Accessing the Tax Form Collection Page
a. Click Manage Account > Account Information > Tax Information > Tax Forms.
b. Click the Update Tax Forms button to access the Collection page.
The Tax Form Collection page opens, displaying a form with tax-related information that should already be completed. (Advisors and brokers can check the status of client updates to this page on the Dashboard Pending Items tab.
c. Review the Trust’s information and update as required.
Confirm the primary tax residency of the trust beside the Tax Residency question, "In what country is the trust a resident for tax purposes?" Select the appropriate country in the drop down menu.
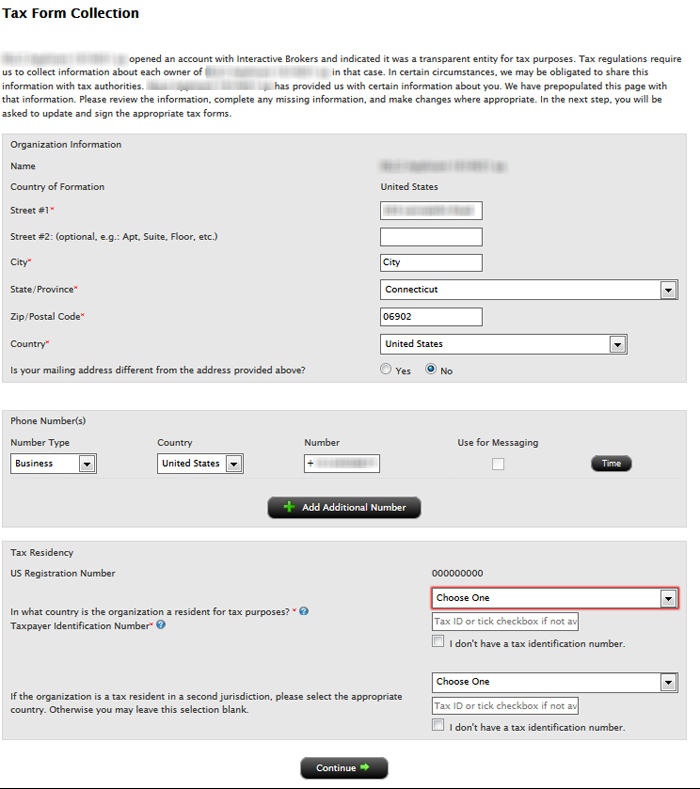
Select in the Tax Residency drop down menu the applicable country.
d. Click Continue.
2. Classification for US Tax Purposes
Confirming the Trust’s classification for U.S. purposes
a. Review the Trust’s status by confirming the question, “How are you classified for US tax purposes?” The answer is pre-filled based upon your information completed during the account application process.
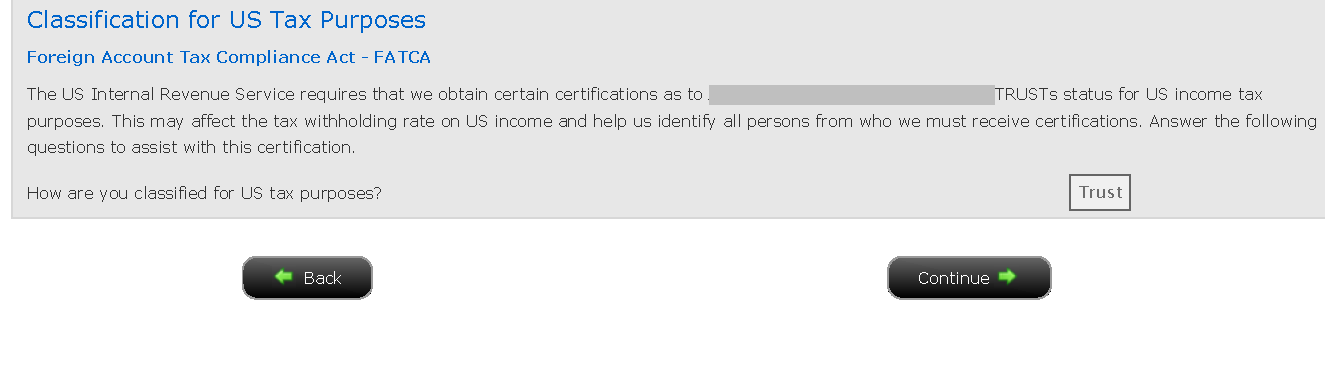
b. Click the Continue button to confirm the trust classification and complete the Form W-8 or W-9 for the entity.
c. Click the Continue button to identify each Grantor.
3. Identify Grantors
a. Click Manage Account > Account Information > Tax Information > Tax Forms.
b. Click the Create button beside each grantor to send each user the applicable tax questionnaire and to submit the tax certification form (W-8 or W-9).
Also, update the "Percentage of Ownership" to add up to 100%, if necessary.
.png)
c. Enter the required fields for the username and password for specified grantor and click the Continue button to complete the email delivery of the link.
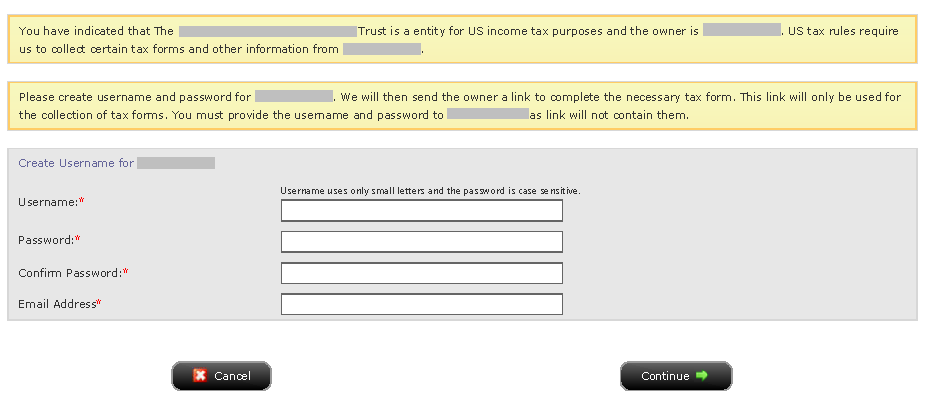
We will then send the owner a link to complete the necessary tax form. This link will only be used for the collection of tax forms. You must provide the username and password to the Grantor as link will not contain them.
Each Grantor must login with the username/password created and complete the pending tasks by going to Manage Account > Account Information > Tax Information > Tax Forms > Update Tax Forms.
d. Click the Continue button upon creating and sending usernames to each Grantor.
Disclaimer
This guide does not constitute tax or legal advice and Interactive Brokers cannot advise you on how to complete an IRS Forms W-8 or W-9. Instructions are for information purposes only and do not address all possible scenarios. Please consult your tax professional if you are unsure how to complete.
Le diamo il benvenuto in Interactive Brokers
Overview:
Una volta finanziato e approvato il proprio conto è possibile iniziare la propria attività di trading. Le informazioni di seguito indicate permettono di muovere i primi passi in qualità di nuovo cliente Interactive Brokers.
- Il proprio denaro
- Configurare il proprio conto per l'attività di trading
- Come effettuare trading
- Negoziare in tutto il mondo
- Cinque punti per ampliare la propria esperienza IB
1. Il proprio denaro
Versamenti e prelievi Informazioni generali. Tutte le transazioni sono amministrate tramite il sistema sicuro di Gestione conto
Versamenti
Innanzitutto, è necessario creare una notifica di versamento tramite Gestione conto > Finanziamento > Trasferimento fondi > Tipo di transazione: “Versamento” Come creare una notifica di versamento. Il secondo passaggio consiste nell'istruire la propria banca in merito al bonifico da emettere utilizzando i dettagli bancari forniti nella propria notifica di versamento.
Prelievi
È necessario creare le istruzioni di prelievo tramite il sitema sicuro di Gestione conto > Finanziamento > Trasferimento fondi > Tipo di transazione: "Prelievo" Come creare istruzioni di prelievo
Qualora si inoltrino istruzioni per un prelievo superiore ai limiti di prelievo previsti, questo verrà considerato un prelievo eccezionale e, di conseguenza, sarà necessario collegare il titolare del conto bancario al conto IB. Se il conto bancario ricevente è stato utilizzato per un versamento, il prelievo verrà processato; altrimenti, sarà necessario rivolgersi all'assistenza clienti e fornire la documentazione necessaria.
Risoluzione delle problematiche
Versamenti: se la propria banca ha inviato il denaro ma l'accredito dello stesso non è visualizzabile sul proprio conto IB. Possibili motivazioni:
a) Il trasferimento di fondi richiede circa 1-4 giorni lavorativi
b) Notifica di versamento mancante. È necessario crearla tramite il proprio sistema Gestione conto e inviare un ticket all'Assistenza clienti
c) Dettagli di modifica mancanti. Il proprio nome o il numero del conto IB non figura nei dettagli del trasferimento. È necessario contattare la propria banca per richiedere tutti i dettagli della modifica.
d) Gli ACH avviati presso IB prevedono un limite di 100K USD in un periodo di 7 giorni lavorativi. Qualora si apra un conto a margine di portafoglio con requisito iniziale di 110K, il bonifico bancario potrebbe rappresentare la soluzione di versamento migliore per ridurre i tempi di attesa relativi alla prima delle proprie transazioni. Qualora si selezioni l'opzione ACH, sarà necessario un tempo di attesa di circa due settimane oppure un declassamento temporaneo del conto a RegT.
Prelievi: se è stato richiesto un prelievo ma l'accredito del denaro non è visualizzabile sul proprio conto bancario. Possibili motivazioni:
a) Il trasferimento di fondi richiede circa 1-4 giorni lavorativi
b) Rifiutato. Oltre la soglia massima consentita per il prelievo. Si prega di controllare il saldo del proprio conto. Si prega di notare che, in base ai requisiti regolamentari, una volta versati i fondi, è previsto un periodo di attesa di tre giorni prima di poter procedere con il prelievo degli stessi.
c) La propria banca ha respinto i fondi. Probabilmente a causa della mancata corrispondenza tra il conto bancario ricevente e quello emittente.
2. Configurare il proprio conto per l'attività di trading
Differenza tra Conti cash e Conti a margine: se si sceglie l'applicazione FastTrack, il proprio conto diverrà automaticamente un conto cash con i permessi per le azioni statunitensi. Se si desidera beneficiare dell'effetto leva e negoziare a margine, si prega di consultare le presenti informazioni relative alla promozione del conto a conto a margine RegT
Permessi di trading
Per poter negoziare una particolare categoria di prodotti in un determinato Paese, è necessario ottenere i necessari permessi di trading tramite Gestione conto. Si prega di notare che i permessi di trading sono gratuiti. Tuttavia, potrebbe essere necessario dover firmare le informative sui rischi richieste dalle autorità di regolamentazione locali. Come richiedere i permessi di trading
Dati di mercato
Se si desidera disporre di dati di mercato in tempo reale per un particolare prodotto/mercato, è necessaria la sottoscrizione a un pacchetto dati di mercato addebitato dalla Borsa valori. Come effettuare la sottoscrizione ai dati di mercato
L'assistente dati di mercato fornisce assistenza nella scelta del pacchetto più adatto. Si prega di guardare questo Video che ne spiega il funzionamento.
I clienti hanno la possibilità di ricevere gratuitamente un pacchetto con dati di mercato differiti cliccando sul pulsante Dati di mercato differiti dalla riga di un ticker privo di sottoscrizione.
Conti per consulenti
Si consiglia di consultare rapidamente la guida utente primi passi per i consulenti per comprendere come aggiungere altri utenti al proprio conto consulente e assegnare loro l'accesso e molto altro ancora.
3. Come effettuare trading
Trader's University è lo spazio che permette di apprendere come utilizzare le nostre piattaforme. Qui è possibile trovare i nostri webinar dal vivo e registrati in 10 lingue diverse, oltre a tour e documentazione relativa alle nostre varie piattaforme di trading.
Trader Workstation (TWS)
I trader che necessitano di strumenti di investimento più sofisticati possono usufruire della nostra interfaccia progettata dai market maker, Trader Workstation (TWS), che permette di ottimizzare la velocità e l'efficienza di trading grazie a un'interfaccia di lavoro intuitiva, supporto su oltre 60 tipologie di ordine, strumenti di investimento specifici per tutte le strategie di trading, saldi contabili e monitoraggio della propria attività. L'offerta comprende due modelli:
TWS Mosaic: utilizzo intuitivo, facile accesso al trading, gestione degli ordini, liste prezzi e grafici, il tutto in un'unica finestra, oppure
TWS classica: gestione degli ordini avanzata per quei trader che necessitano di strumenti e algoritmi più avanzati.
Descrizione e informazioni generali / Guida rapida / Guida utente
Tour interattivi: Concetti base di TWS / Configurazione di TWS / TWS Mosaic
Come effettuare una transazione: Video su TWS classica / Video su Mosaic
Strumenti di trading: Descrizione e informazioni generali / Guida utente
Requisiti: Installazione di Java per Windows / Installazione di Java per MAC / Necessaria l'apertura delle porte 4000 e 4001
Login a TWS / Download di TWS
WebTrader
Quei trader che preferiscono un'interfaccia semplice e lineare possono utilizzare il nostro WebTrader su base HTML, che semplifica la visualizzazione dei dati di mercato, l'invio degli ordini e il monitoraggio del proprio conto e delle proprie operazioni. L'ultima versione di WebTrader è adatta a tutti i browser
Guida rapida / Guida utente di WebTrader
Introduzione: Video su WebTrader
Come effettuare una transazione: Video su WebTrader
Login a WebTrader
MobileTrader
Le nostre soluzioni mobili permettono di negoziare in mobilità con il proprio conto IB. Le applicazioni mobileTWS per iOS e mobileTWS per BlackBerry sono personalizzate per questi modelli più famosi, mentre la versione generica MobileTrader supporta la maggior parte degli altri dispositivi smartphone.
Descrizione e informazioni generali
Tipologie di ordini Tipologie di ordini disponibili e descrizione / Video / Tour / Guida utente
Paper Trading Descrizione e informazioni generali / Come ottenere un conto di Paper Trading
Una volta creato il proprio conto di paper trading, è possibile condividere i dati di mercato del proprio conto reale con il proprio conto di paper trading: Gestione conto > Gestione conto > Impostazioni > Paper trading
4. Negoziare in tutto il mondo
I conti IB sono in molteplici valute. Il proprio conto può detenere differenti valute allo stesso momento, al fine di poter negoziare molteplici prodotti in tutto il mondo da un unico conto.
Valuta di base
La propria valuta di base determina la conversione della valuta per i propri rendiconti e la valuta utilizzata per determinare i requisiti di margine. La valuta di base è determinata al momento dell'apertura del proprio conto. I clienti possono cambiare la propria valuta di base in ogni monento da Gestione conto.
Le valute non vengono automaticamente convertite nella valuta di base del cliente
La conversione valutaria deve essere effettuata manualmente dal cliente. In questo video è possibile apprendere come effettuare una conversione della valuta.
Per poter aprire una posizione denominata in una valuta non presente nel proprio conto, si hanno a disposizione due possibilità:
A) Conversione della valuta.
B) Prestito a margine IB. (Non disponibile per i conti cash)
Si prega di accedere a questo corso che illustra i meccanismi delle transazioni in valuta estera.
5. Cinque punti per ampliare la propria conoscenza IB
1. Ricerca dei contratti
Qui è possibile trovare tutti i nostri prodotti, simboli e specifiche.
2. Knowledge Base IB
Il Knowledge Base è un archivio contenente termini del glossario, articoli esplicativi, suggerimenti e linee guida circa la risoluzione delle problematiche progettato per offrire supporto ai clienti IB nella gestione dei propri conti. È sufficiente digitare un termine nel pulsante di ricerca per ottenere la risposta desiderata.
3. Gestione conto
Mentre le nostre piettaforme di trading offrono accesso ai mercati, Gestione conto garantisce l'accesso al proprio conto IB. Tramite Gestione conto è possibile gestire le operazioni relative al propprio conto come, per esempio, versamento o prelievo di fondi, visualizzare i propri rendiconti, modificare le sottoscrizioni ai dati di mercato e alle notizie, emendare i propri permessi di trading e verificare o modificare i propri dati personali.
Accedere a Gestione conto / Guida rapida di Gestione conto / Guida utente di Gestione conto
4. Sistema di accesso sicuro
Per fornire ai propri clienti il massimo livello di sicurezza online, Interactive Brokers ha messo a punto un Sistema di accesso sicuro (SLS) che sottopone l'accesso al proprio conto a un particolare tipo di autenticazione a due livelli. Il sistema di autenticazione a due livelli serve a confermare la propria identità al momento del login utilizzando due livelli di sicurezza: 1) Le informazioni in proprio possesso (la combinazione del proprio nome utente e della password); e 2) Il dispositivo in proprio possesso (un dispositivo di sicurezza creato da IB che genera un codice di sicurezza casuale monouso). Dato che la procedura di accesso al proprio conto richiede sia la conoscenza delle proprie credenziali (nome utente e password) sia il possesso fisico del dispositivo, la partecipazione al Sistema di accesso sicuro potenzialmente impedisce a qualunque persona non autorizzata di accedere al proprio conto.
Come attivare il proprio dispositivo di sicurezza / Come ottenere una carta codici di sicurezza / Come restituire il dispositivo di sicurezza
In caso di smarrimento della propria password o della propria carta codici di sicurezza, si prega di contattarci per richiedere assistenza immediata.
5. Relazioni e rendiconti
Di facile visualizzazione e personalizzazione, i nostri rendiconti e relazioni coprono tutti gli aspetti del proprio conto Interactive Brokers. Come visualizzare un Rendiconto attività
Delivery Settings for Shareholder Materials
IBKR’s default setting for distributing shareholder communications (e.g., proxy materials and annual reports) from U.S. and Canadian issuers is electronic delivery. Under this method the account holder will receive an email notice when information becomes available for a security they hold from our processing agent, Mediant Communications. This notification will provide the necessary links for accessing the information and voting through the Internet in lieu of receiving these documents via postal service. The technology which you will need to secure the information includes access to the Internet and a web browser supporting secure connections. In addition, you will need to be able to read the documents online and print a copy provided your system supports documents in a PDF format.
Other items of note:
- We recommend that you add the following addresses to your email address book to minimize the possibility of communications being routed to your junk folder or rejected by your email provider as spam: InteractiveBrokers@proxydocs.com, InteractiveBrokers@investorelections.com, InteractiveBrokers@proxypush.com, InteractiveBrokers@prospectusdocs.com.
- Issuers reserve the right, and are sometimes required by regulation, to send certain shareholder communications via postal mail regardless of the account holder’s preference for electronic delivery. This will most often be the case for interim or special meetings or for contested voting matters.
- Account holders may withdraw their consent to electronic delivery and revert to postal delivery at any time by submitting a request through the Message Center located within Client Portal. Note that changes to delivery settings are not applied to shareholder materials where the record date has already been sent. Account holders may, therefore, continue to receive deliveries for certain securities via the existing method for a period of 2 to 4 weeks after requesting a change.
- The information above applies solely to shareholder communications associated with U.S. and Canadian issuers. The delivery of communications for securities issued outside of these two countries is typically electronic, but managed directly by the issuer or its agent (i.e., not Mediant).
See also: Non-Objecting Beneficial Owner (NOBO)
Come effettuare versamenti tramite bonifici bancari
Per effettuare un versamento tramite bonifico bancario sul tuo conto avrai bisogno per prima cosa di fornire una notifica di versamento attraverso il Portale Clienti. Dopo aver eseguito l'accesso al Portale Clienti, seleziona il menu Trasferimenti & Pagamenti e quindi Trasferisci Fondi. Da qui potrai selezionare la voce "Versamento di fondi" come Tipo di Transazione e successivamente "Bonifico bancario" tra le opzioni di Metodo di versamento.
A questo punto ti verrà richiesto di inserire le istruzioni bancarie di consegna, incluso l'importo del versamento, la valuta di denominazione e l'istituzione mittente. Una volta che tutte le informazioni saranno state inserite, ti verranno tutti i dettagli (ossia il numero ABA, Codice Swift BIC e il numero di conto in banca) su di un modulo stampabile che potrai a tua volta fornire alla tua banca in modo da poter avviare il bonifico.
Ti ricordiamo che la creazione di questa notifica è essenziale in quanto le istruzioni necessarie affinché la tua banca possa effettuare il bonifico variano a seconda della valuta di denominazione utilizzata per effettuare il bonifico. Inoltre questa notifica serve a garantire che i fondi vengano assegnati correttamente al tuo conto non appena saranno stati ricevuti da noi.
In caso di ulteriori domande, ti invitiamo a contattare uno dei nostri Centri Servizi Cliente. I numeri da contattare e gli orari di servizio sono disponibili nella seguente pagina web: http://individuals.interactivebrokers.com/en/index.php?f=1560