如何共享安全设备
Overview:
IBKR允许个人在单个账户或其名下多个账户内使用多个不同的用户名。不想持有多个实物安全设备的个人可以选择将名下账户多个使用者合并、共享一个设备。下方列出了共享设备的要求和操作步骤。
注:使用移动IBKR验证程序(IB Key)的客户无需采用此设备共享步骤,IB Key支持直接从移动IBKR应用程序内启用多个使用者(菜单:验证 -> 添加使用者)。
Background:
要求
只有满足下列所有条件才能共享实物安全设备:
a) 参与使用者属于同一实体;或虽属于不同实体但身份信息相同(出生日期、国籍、法定居住国家、身份文件类型与号码、美国公民和居民的社会安全号码)。
b) 参与使用者当前没有临时安全设备(临时码、在线安全代码卡)。
c) 必须共享具有最高保护等级的实物设备。如果所有设备保护等级一样,则可任选一个。您可根据下表检查自己设备的安全等级:
|
安全等级 |
设备名称 |
设备图像 |
| 最高 | 数码安全卡+(DSC+) | 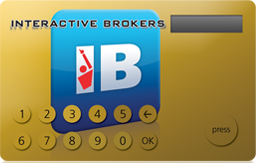 |
| 最低 | 安全代码卡(SLS卡) | 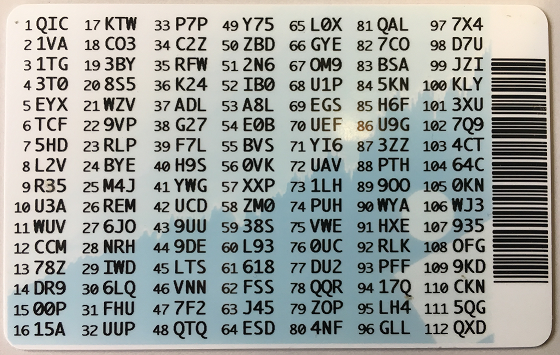 |
操作步骤:
1. 确定保护等级最高的设备和设备所属的使用者。我们称该等使用者为设备所有者
2. 用提出请求的使用者(不是设备所有者)登录客户端
3. 点击左上方的菜单图标,然后依次点击设置>使用者设置
(1).png)
4. 点击安全登录系统旁的齿轮图标(设置)

5a. 如果使用者没有任何活跃的设备,则系统将显示参加SLS菜单。选择“我已有一个使用另一用户名的安全登录设备” 然后点击继续
.png)
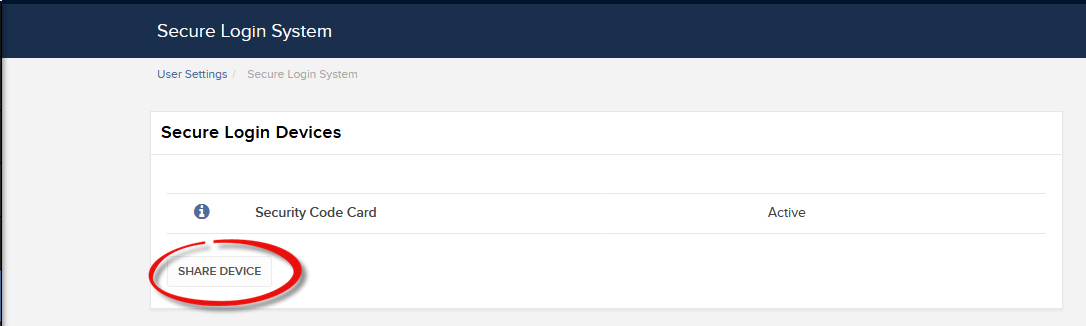
5b. 任何其它情况,系统会显示设备列表。点击共享设备继续
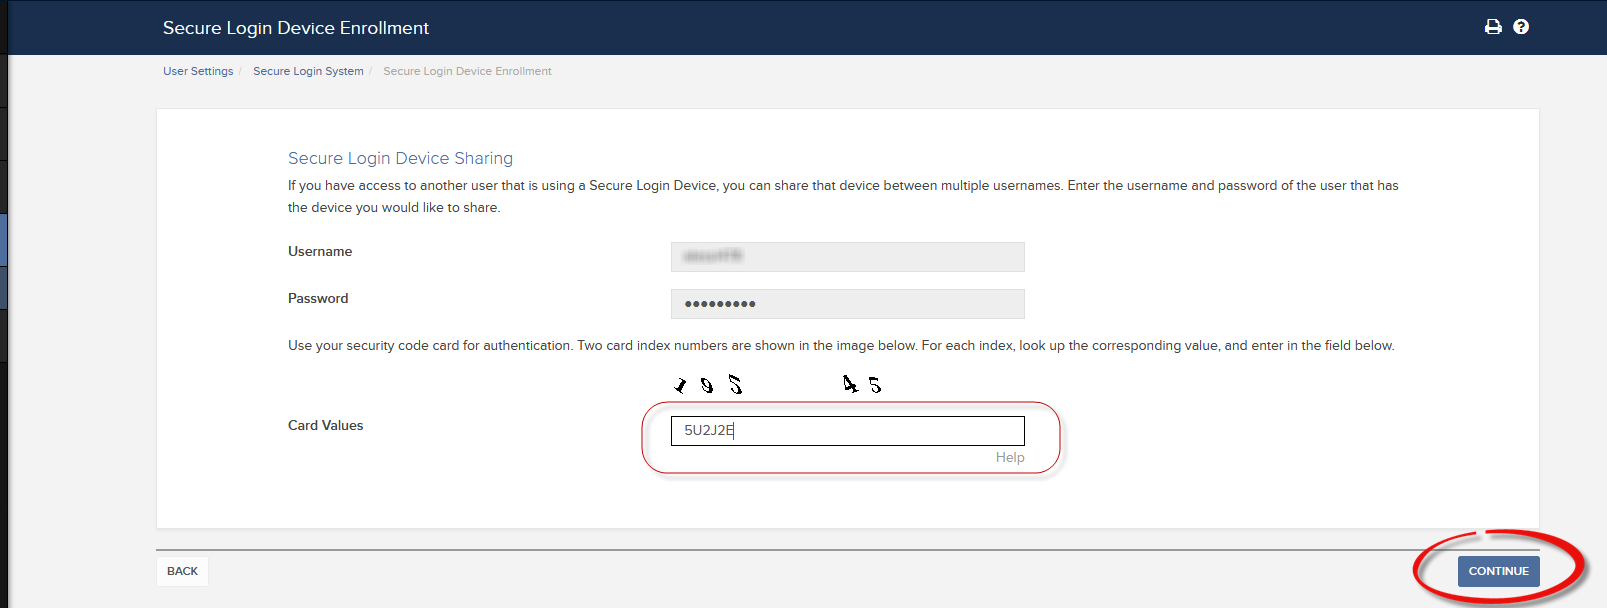
6. 输入在第1条中确定的设备所有者的登录信息,然后点击继续
.png)
7. 根据将要共享的SLS设备,系统会显示相应的安全要素(挑战码或索引号)。操作SLS设备,使用系统提供的安全要素生成响应码。在对应区域输入响应码,然后点击继续
8. 检查输入的信息是否正确,然后点击继续
a. 大多数情况下,您的共享请求都会自动立即获批、处理并实施。如果需要您的合规部门批准,在批准完成前,请求会保持待定状态。
b. 设备共享请求处理后,多余的设备您可自行妥善保存。今后您可能会要取消设备共享,重新激活该等设备。如果觉得不会再用该等设备,您可将其寄回给我们(仅限DSC+),具体请参见下方页面说明:
c. 下方为最常见的错误信息及其原因:
- 设备安全等级低:如果请求共享的设备安全等级相对更低,便会出现此错误提示。请选择安全等级最高的设备进行共享。
- 身份信息不同:
如果共享设备所涉及的实体/个人的身份信息不一致,便会出现此错误提示。请注意,如果使用者属于不同的实体/个人,则无法进行共享。
如果使用者属于同一实体/个人,可能会因为存档身份文件过时而导致出现不一致。这种情况下,您可联系我们的客户服务更正资料。
参考文章:
- 安全登录系统概述:KB1131或ibkr.com/sls
- 多重双因素验证系统(M2FS):KB2895
- 如何在多个使用者之间共享安全登录设备:KB2481
- 如何在退出后重新加入安全登录系统:KB2545
- 退出安全登录系统后的安全考虑:KB1198
- 安全设备是否收取任何费用?KB1861
- 如何排除客户端登录故障:KB1132
- 如何排除交易平台登录故障:KB1133
Operating your Digital Security Card+
The Digital Security Card (DSC) is a battery operated security device which generates a series of random codes to be entered along with your user name and password upon each log in attempt. As physical possession of the DSC is required to obtain the codes and log in, the device effectively prevents hackers who may have compromised your computer or information from accessing your account. Instructions for operating the DSC are outlined below.
Step 1 - When logging into your account, enter your user name and password as usual. If successful, a 6-digit Challenge Code will appear.
Step 2 - Turn on your device by pressing the “press” button until the 'PIN>' display appears, enter the 4-digit PIN code you specified at the time you requested the device and press the “OK” button.
Step 3 - Enter the 6-digit Challenge Code from the login screen (step A) into the device when the 'CHALLNG>' display appears, press the “OK” button and a response code will appear.
Step 4 - Enter the 8 digits of the response code (Step C) into the login Screen. Select the Login button to proceed.
Note that the buttons on your security cards are not touch sensitive and must to be pressed to operate.
Related Articles
KB1042 - Video instructions for logging in with the Secure Code Card
KB1942 - Reactivating the permanent Secure Login Device
KB1943 - Requesting a replacement Secure Login Device
KB1131 - Overview of the Secure Login System
How to fix the error: "Library dbcapi.dll cannot be loaded"
Background:
TWS users may receive the following error message upon configuring TWS to use the eSignal data feed:

This error may appear for the following reasons:
Issue A - You are not using the 32 bit version of TWS and/or eSignal:
The 32-bit versions of both TWS and eSignal have to be installed for the integration to work. In the section below you will find the instructions for installing the 32-bit TWS. Should you need assistance with the installation of the 32-bit eSignal, we suggest you to contact the eSignal customer support.
Issue B - There is an incompatibility with the file C:\Jts\dbcapi.dll:
To use 32-bit eSignal version 12, an incompatibility with the C:\Jts\dbcapi.dll file must be fixed. This involves copying a file from the eSignal installation and renaming it to dbcapi.dll.
Note: On certain systems you will need to apply the fixes for both issue A and B. If you applied the fix for issue A (or if you are already sure you are using the 32 bit version of both platforms) and you are still receiving the error message, then please apply as well the fix for issue B.
Instructions to resolve issue A
Installing 32-bit TWS
Please open the page http://www.ibkr.com in your browser and perform the steps below:
1) Click on the Log In button at the top right corner of the page.
2) Click on Download Trader Workstation: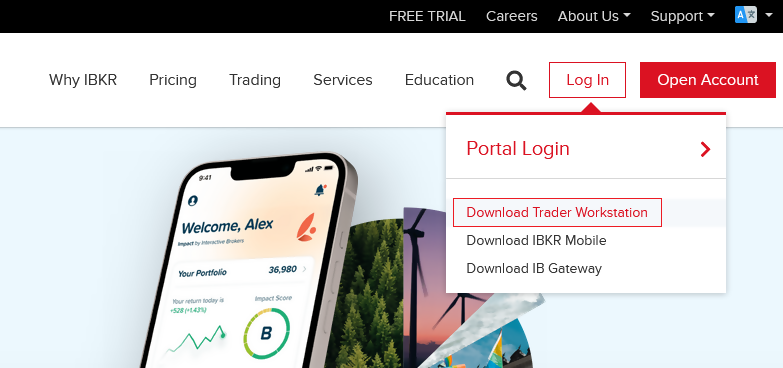
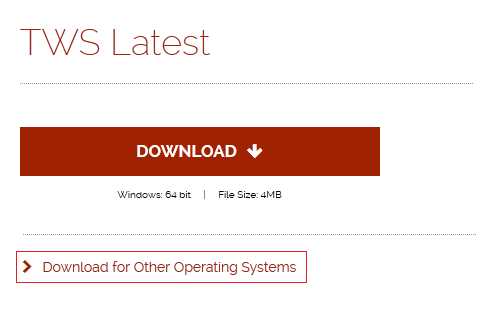
3) Click on the red button TWS Latest:

4) On the next page, click on the link Download for Other Operating Systems:
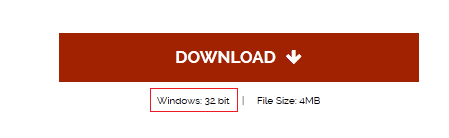
5) Click on the item Windows 32-bit:

6) Make sure that the description under the DOWNLOAD button has changed to "Windows: 32 bit". Click now on DOWNLOAD:
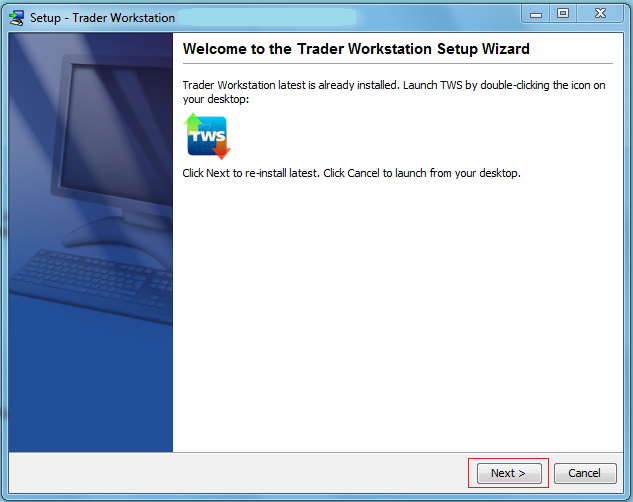
7) Launch the downloaded file. The Trader Workstation installation will start. At this point, you may see the warning message "Trader Workstation latest is already installed...". Ignore this warning and click on the button Next > to continue the installation:
8) Your "Trader Workstation" Desktop icon will be automatically updated. You can now launch the 32-bit Trader Workstation by a double click on that icon.
If you have launched the 32-bit TWS and the 32 bit version of eSignal but you still receive the same error message, please follow as well the instructions below.
Instructions to resolve issue B
Replacing dbcapi.dll for compatibility between 32-bit TWS and 32-bit eSignal 12
To correct an incompatibility with the dbcapi.dll file, we will replace that file with another version of it taken from the eSignal installation folder. Please follow the steps below to perform the substitution:
1) Navigate to C:\Jts and rename the file dbcapi.dll to dbcapi_old.dll
2) Navigate to the directory where 32-bit eSignal 12 is installed (most commonly C:\Program Files (x86)\Common Files\Interactive Data\DM).
3) Copy dbcapi_vc8.dll from that directory into the C:\Jts directory.
4) Move to the C:\Jts directory.
5) Right click on the dbcapi_vc8.dll file (now in the C:\Jts directory) and select rename. Type dbcapi.dll as the new filename.
.jpg)
6) TWS is now ready to accept the eSignal data feed.
How to install the TWS API Components on Mac / Unix
NOTE: If you have already agreed to the API License Agreement please start at Step 3 below.
Instructions
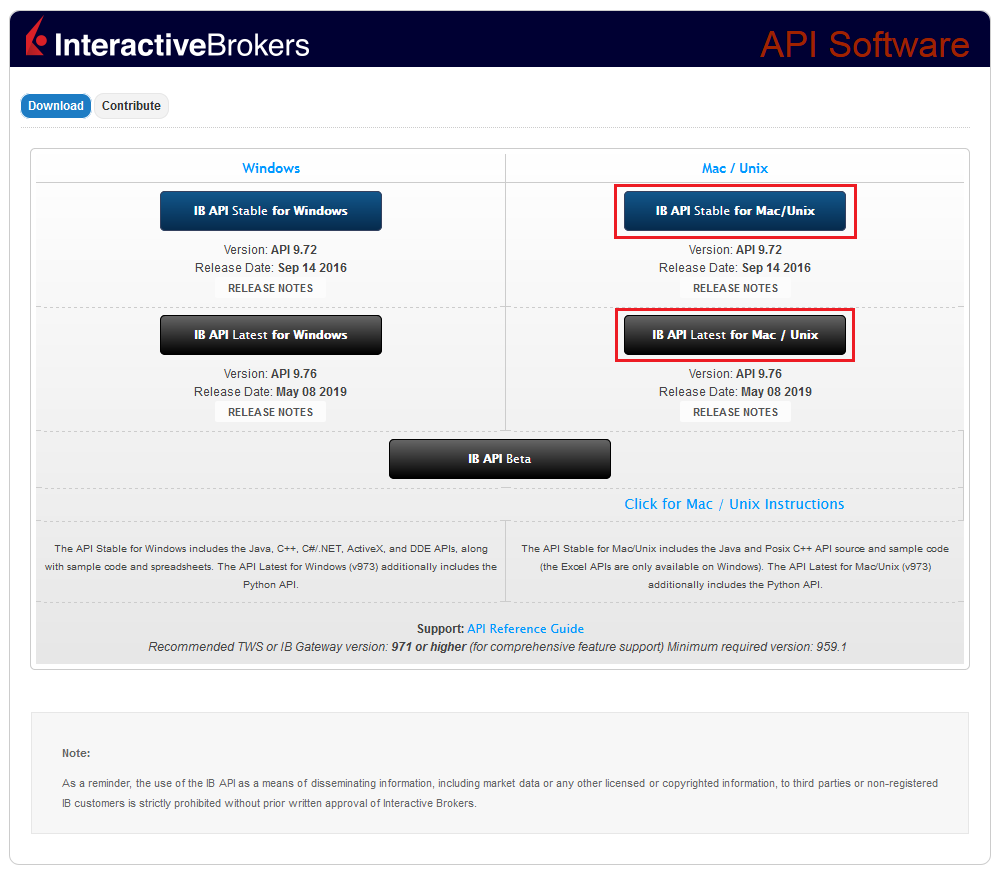
- Click directly on the button below to access the API software download page

- This will direct you to Interactive Brokers API License Agreement, please review it
- Once you have clicked "I Agree", refer to the Mac / Unix section to download the API Software version of your preference
- This will download twsapi_macunix.n.m.zip to your computer
(where n and m are the major and minor version numbers respectively) - Open Terminal (Ctrl+Alt+T on most distributions)
(On Mac press Command+Space to launch Spotlight, then type terminal and press Return) -
Navigate to the directory where the installer has been downloaded (normally it should be the Download folder within your home folder) and confirm the file is present
$ cd ~/Downloads
$ ls
- Unzip the contents the installer into your home folder with the following command (if prompted, enter your password):
$ sudo unzip twsapi_macunix.n.m.zip -d $HOME/

- To access the sample and source files, navigate to the IBJts directory and confirm the subfolders samples and source are present
$ cd ~/IBJts
$ ls

Legacy Instructions - API Version ≤ 9.71
Note: IB only offers API Version 9.72+. In the event you already have an existing legacy version and need to install it, please refer to the directions below:
- locate the file twsapi_macunix.n.m.jar on your computer
(where n and m are the major and minor version numbers respectively.) - Open Terminal (Ctrl+Alt+T on most distributions)
(On Mac press Command+Space to launch Spotlight, then type terminal and press Return) - Navigate to the directory where the .jar file has been located (normally it should be the Download folder within your home folder) and confirm it is present
$ cd ~/Downloads
$ ls - Extract the contents of the .jar file into your home folder
$ jar xf twsapi_macunix.n.m.jar -d $ HOME/ - To access the sample and source files, navigate to the IBJts directory and confirm the subfolders samples and source are present
$ cd ~/IBJts
$ ls
How to Share a Security Device
Overview:
IBKR allows individuals to maintain multiple user names within a single account or across distinct accounts under their control. Individuals who do not wish to maintain multiple physical security devices may elect to consolidate and share a single device across their users. The prerequisites and the procedure for sharing devices are outlined below.
Note: Clients using the IBKR Mobile Authentication (IB Key) should not use the present device sharing procedure, since the IBKR Mobile Authentication (IB Key) allows multiple users to be enabled directly from the IBKR Mobile app itself (menu item: Authenticate -> Add user).
Background:
Prerequisites
The possibility of sharing a physical security device will be granted only if ALL the conditions below are respected:
a) The participant users belong either to the same entity or to different entities but with the same identification data (Date of Birth, Citizenship, Country of Legal Residence, Identification Document type and number or Social Security Number for US Citizens and residents).
b) The participant users do NOT have a temporary security device (Temporary Code, Online Security Code Card) currently assigned to them.
c) The physical device offering the highest level of protection has to be shared. In case all the devices offer the same level of protection, whichever of them can be eligible. You can check the security level of your device in the table below:
|
Security level |
Device name |
Device image |
| Highest | Digital Security Card+ (DSC+) | |
| Lowest | Security Code Card (SLS card) | |
Procedure:
1. Among the possible candidates, identify the device offering the highest level of protection and the user that device belongs to. We will call that user the device owner
2. Log in to your Client Portal page with the requesting user (NOT the device owner)
3. Click on Menu icon in the top-left then select Settings and then User Settings
4. Click on the wheel (Settings) close to Secure Login System
5a. In case your user does not have any active device, the system will display the SLS enrollment menu. Select the item "I already have access to a Secure Login Device under a different username" and click on Continue
5b. In any other case, the system will display the device list. Click on Share Device to proceed further
6. Enter the credentials of the device owner you identified at point 1. and click on Continue.
7. According to the SLS Device about to be shared, the system will display a security element (either Challenge Code or Index Numbers). Operate the SLS Device and, using the security element provided by the system, generate a response code. Enter the response code in the correspondent field and click on Continue.
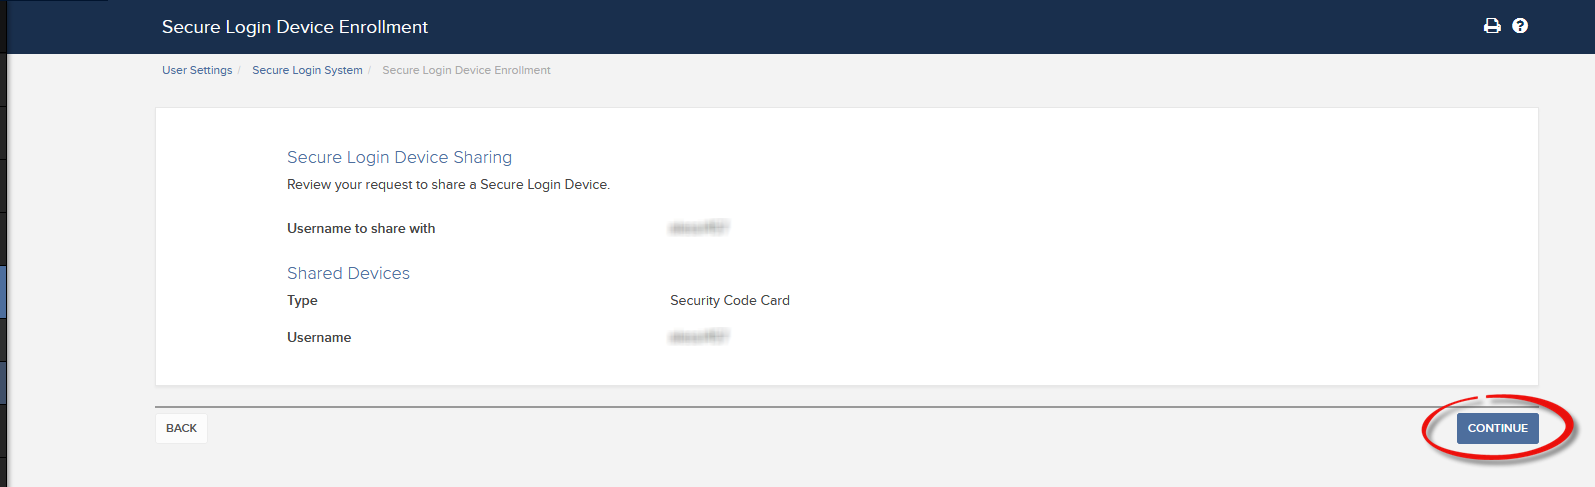
8. Once you have reviewed the correctness of the information entered, click on Continue.
9. The system will display the status of your request (see note a. for details). Click OK to finalize the procedure.
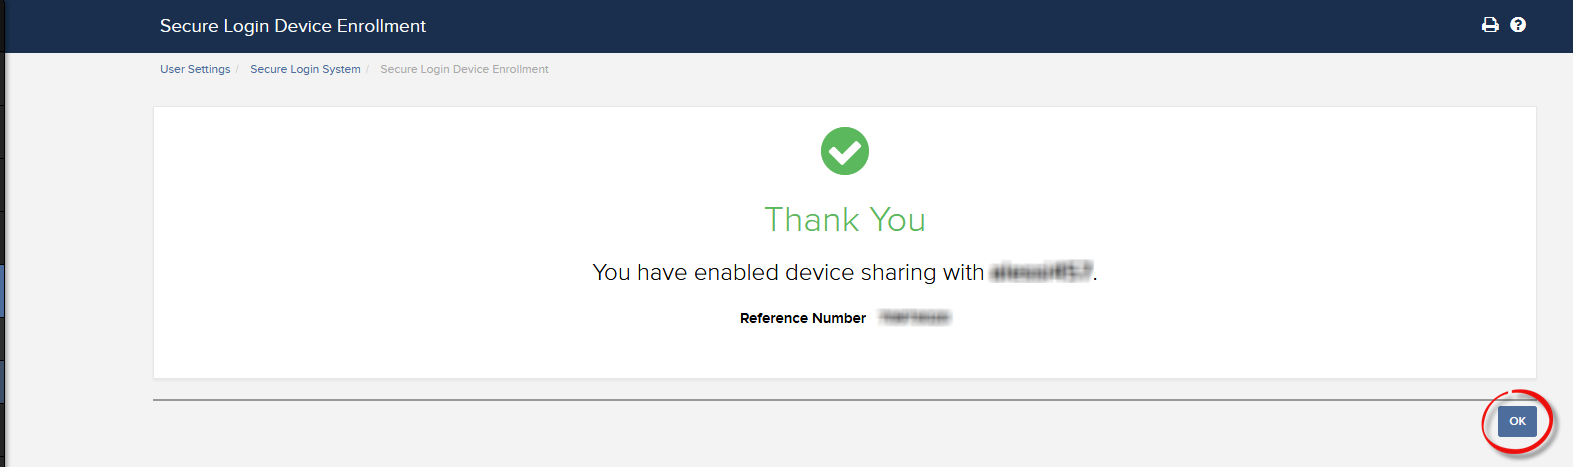
a. In the vast majority of cases your sharing request will be automatically and immediately approved, processed and enforced. In case the approval of our Compliance department is needed, your request will stay in a pending status until this step has been cleared.
b. Once the device sharing request has been processed, you could keep the redundant device/s in a safe place. In the future you might decide to cancel the device sharing and reactivate those devices instead. If you do not feel the need to store them, you can send them (only DSC+) back to us following the instructions contained on this page:
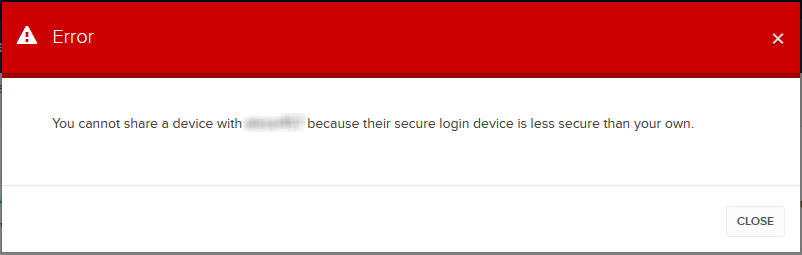
c. Here below you can see the most common error messages and their causes:
- Less secure device: This error is returned if you set up the less secure token as the one to be shared. Please identify the most secure device and share that one.
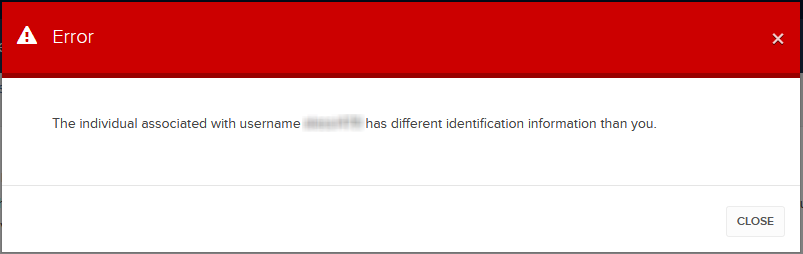
- Different identification information:
This error is returned if the identification data of the entities/individuals involved in the sharing does not match. If the users belong to different entities/individuals, please notice that the token sharing will NOT be possible by design.
If the users belong in fact to the same entity/individual, the mismatch could be due, for example, to an outdated identification document on record. In this case, you can contact our Client services to have the data rectified.
References:
- Overview of the Secure Login System: KB1131 or ibkr.com/sls
- Multiple Two-Factor Authentication System (M2FS): KB2895
- How to share the Security Login Device between two or more users: KB2481
- How to opt back into the Secure Login System: KB2545
- Security considerations following SLS opt-out: KB1198
- Are there any charges or expenses associated with the security devices? KB1861
- How to troubleshoot Client Portal Login Failures: KB1132
- How to troubleshoot Trading Platform Login Failures: KB1133
How to Transfer the TWS Layout Settings via USB or Network Drive
Overview:
The TWS layout settings can be saved on a USB or Network Drive, in order to import them from the same or from a different computer / TWS session. This article outlines the needed steps.
Please click one of the links below, according to your scenario:
B. I want to save my TWS settings on a USB or Network Drive and import them to a session with a different user
A. I want to save my TWS settings on a USB or Network Drive and import them to a session with the same user
1. Log in the Trader Workstation with the user whose layout settings you would like to export.
2. Click the top menu File > Layout Settings > Save Settings As...
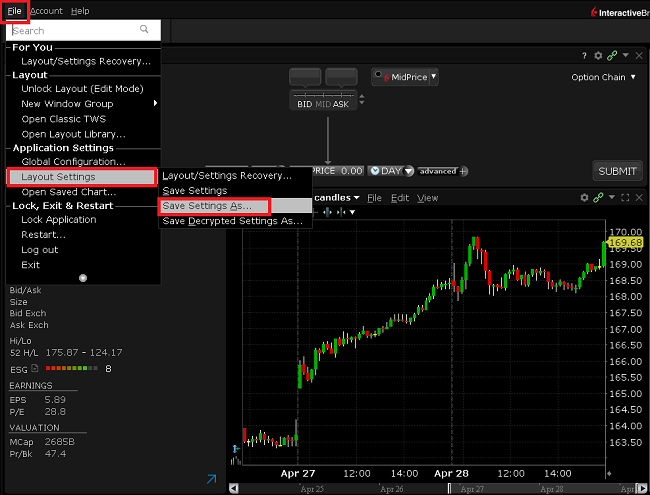
3. Expand the Look In drop-down and select where you want to save the file (e.g. USB or Network Drive). Use a file name which would be easy to identify (e.g. migrate) and click Save. The file will be saved with the extension '.xml'.
.png)
4. Proceed with the workflow, starting with step 5 in the following section.
B. I want to save my TWS settings on a USB or Network Drive and import them to a session with a different user
1. Log in the Trader Workstation with the user whose layout settings you would like to export.
2. Click the top menu File > Layout Settings > Save Decrypted Settings As...
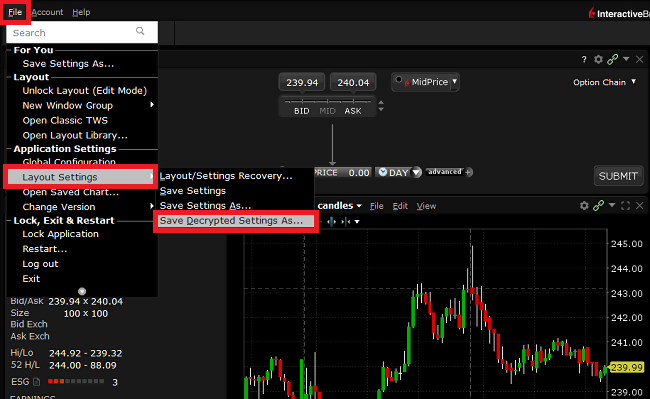
3. Take notice of the information about the file format and click Yes.

4. Expand the Look In drop-down and select where you want to save the file (e.g. USB or Network Drive). Use a file name which would be easy to identify (e.g. migrate) and click Save. The file will be saved with the extension '.xml'.
5. Close the TWS and log in again with the user which should import the layout (that can be a different computer).
6. Connect the USB or Network Drive to the computer.
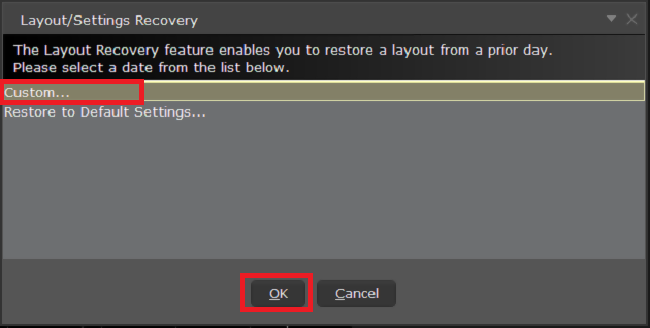
7. Click on the top menu File > Layout Settings > Layout/Settings Recovery...
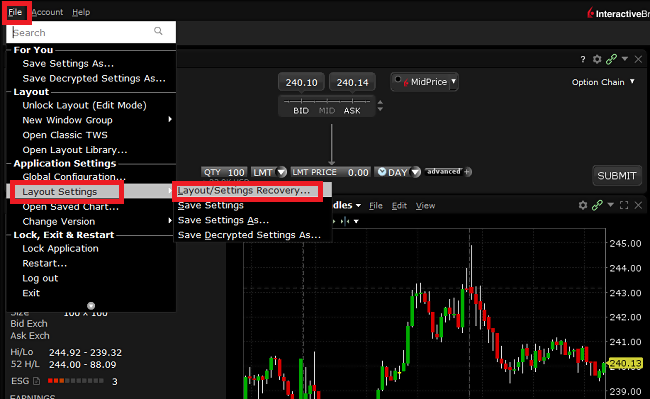
8. Select Custom... and click OK
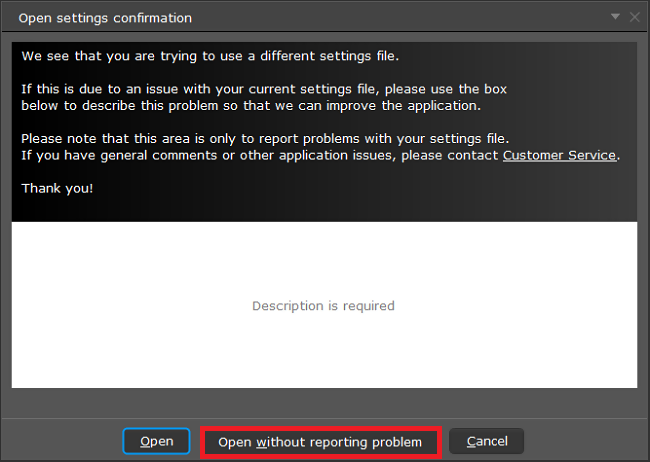
9. Expand the Look In drop-down and select the drive where you previously saved the TWS settings file (e.g. USB or Network Drive). Select the settings file (e.g. migrate.xml) and click Open.
.png)
10. Click Open without reporting problem
11. Your TWS will automatically restart, applying the new layout settings.
Related articles
See KB3146 for instructions on overcoming the "Downloading settings from server failed" error
See KB2320 for instructions on transferring settings from one user to another
See KB2282 for instructions on how to transfer settings from one computer to another
How to install MobileTWS on BlackBerry OS10
Background:
Currently, Interactive Brokers does not offer a native IBKR Mobile app for the Blackberry 10 Operating System. Due to a recent partnership between Amazon and Blackberry, clients who own a Blackberry device running Blackberry 10 OS can install the Android version of the IBKR Mobile app directly from the Amazon Store.
Blackberry 10 OS Devices:
- Q5, Z3, Leap, Classic, Passport, Q10, Z10, Z30, P'9982, P'9983
*Please notice that these devices have limited hardware capabilities and this could negatively affect the performance of the IBKR Mobile app.
Installation
You can download the IBKR Mobile app on your Blackberry phone directly from the Amazon Appstore.
How to install IBKR Mobile from the Amazon App Store:
- On your Blackberry phone open the Amazon App Store
 app.
app. -
Enter your Amazon e-mail and password, and tap Sign in.
(If you don't have an Amazon account, tap Create a new Amazon account.)

-
Tap on the search bar at the top, type IBKR Mobile then tap Search.

-
Tap on IBKR Mobile from the search results and install.

5. Once installed, tap on the IBKR Mobile app from one of your home screens to launch it

How to transfer TWS settings from one computer to another
Overview:
This article applies to:
- Platform(s): Windows, Mac, Linux
- TWS Build(s): Build 959 and Above
Background:
The 'Store Settings on Server' feature stores the Trader Workstation (TWS) settings/configuration in the cloud and retrieve them at anytime from another computer. This allows you to transfer settings from the same user on two different machines, but not between different accounts/users.
How to upload your TWS settings to the server:
To transfer settings from one computer to another for the same username you will need to enable the option Use/store settings on server:
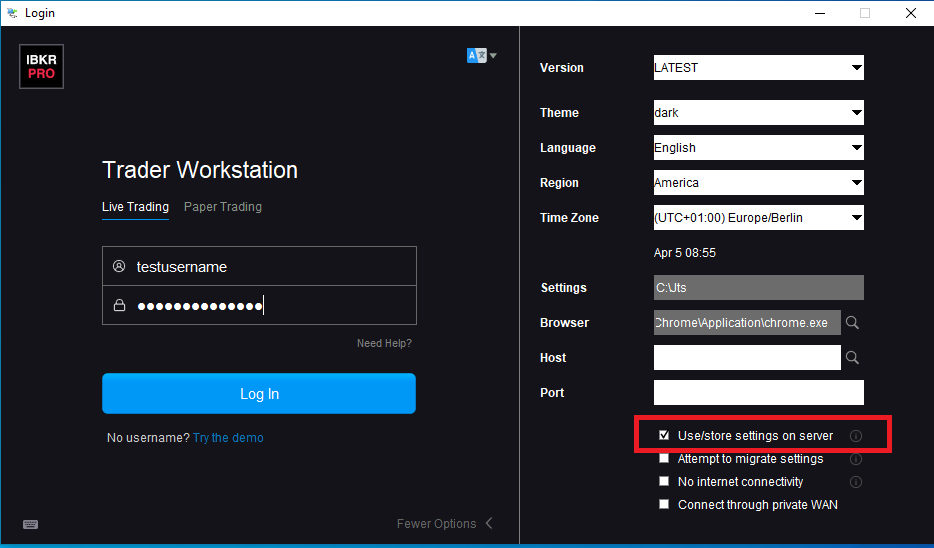
1. On the computer which currently has your settings, on the lower right of the login window, click on More Options >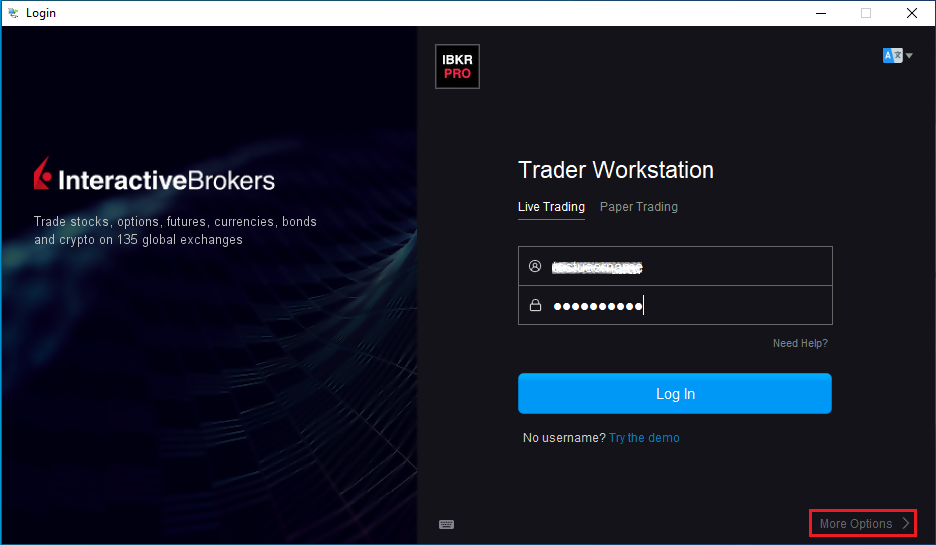
2. Make sure the Use/store settings on server option is unchecked and login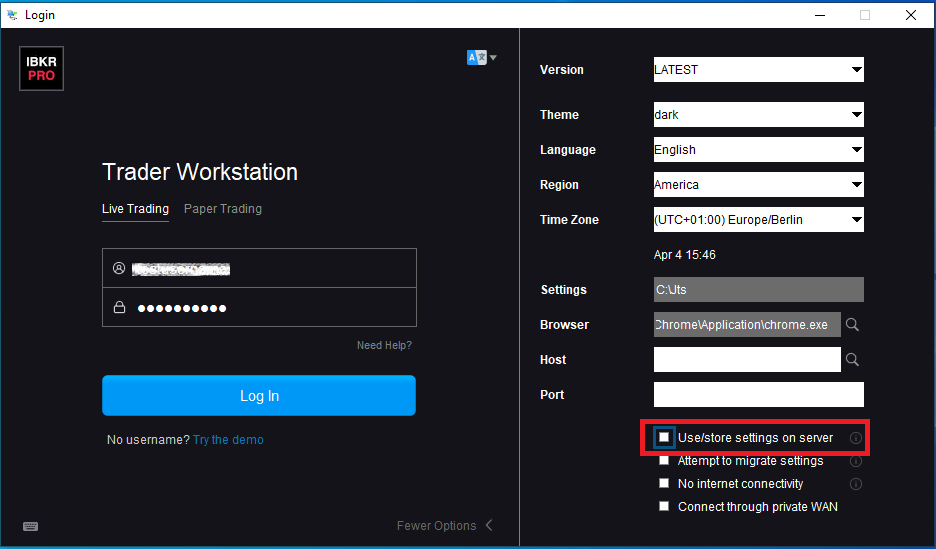
3. Once you are logged in, enable this function:
- If you are using the Classic layout, navigate to Edit >> Global Configuration >> Lock and Exit and check the box Use store settings on server
- If you are using the Mosaic layout navigate to File >> Global Configuration >> Lock and Exit and check the box Use store settings on server
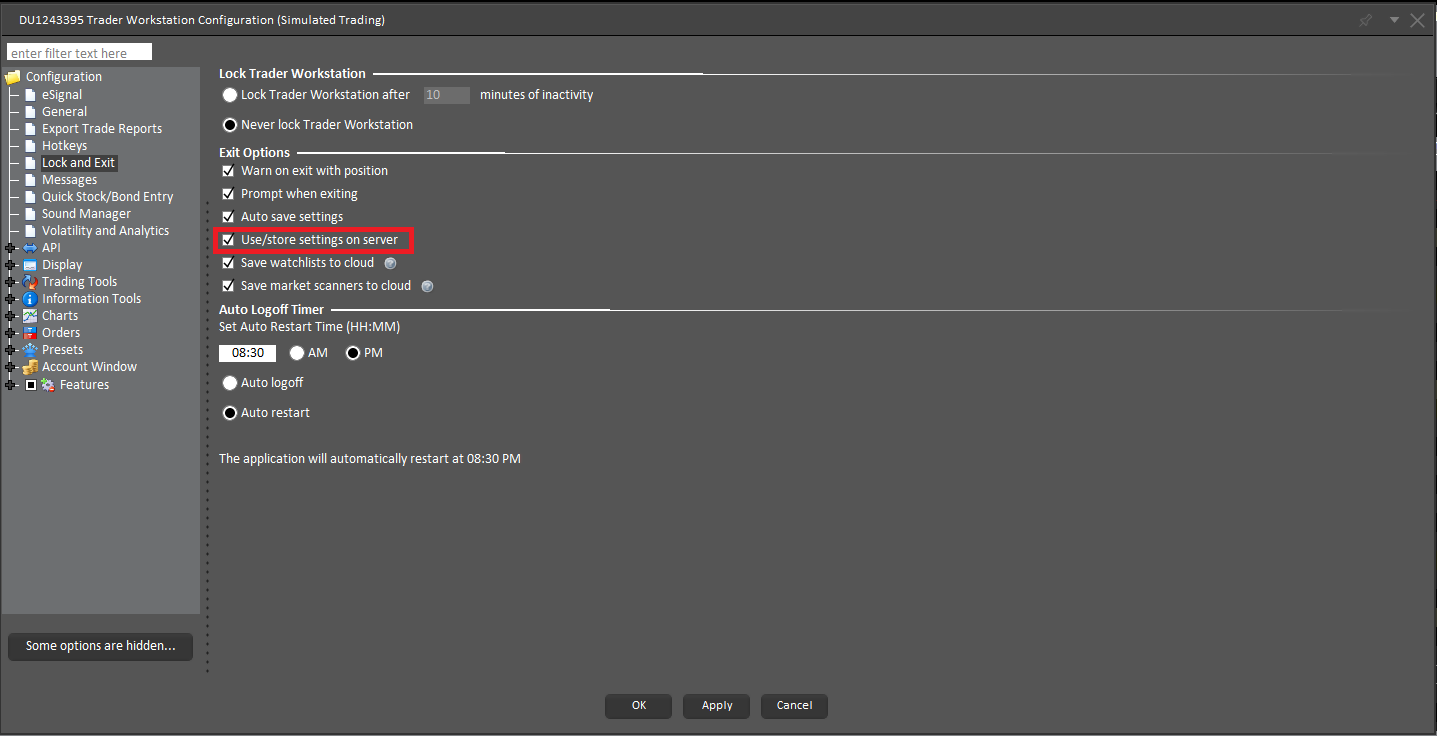
4. Select Apply and OK.
5. Click on File -> Save Settings.
6. To Exit the application navigate to File and Exit.
IMPORTANT NOTE: The above operation will only save one copy of the TWS settings on the server. The serve does not store any backup copies.
How to download your TWS settings from the server:
On any computer (on which you want to use the same settings as above): Login with the Use/store settings on server option checked on the login window. This will download the settings, which you previously saved on our server.
Related articles
See KB3146 for instructions on how to overcome the "Downloading settings from server failed" error
See KB2323 for instructions on how to restore TWS settings from external storage
See KB2320 for instructions on transferring settings from one user to another
Client Portal Login Failure using Safari as Browser
Background
Most recent versions of web browsers contain a feature which prompts users to save their user name and password when logging into various sites on the Internet. While convenient in practice, this feature introduces a significant security risk in that it allows anyone with access to the computer to log into those sites where the password has been saved.
Many sites that deal with highly sensitive information, including the Client Portal, have controls which do not allow this feature to be utilized. While most browsers such as Mozilla Firefox, Internet Explorer and Google Chrome allow for such controls, others such as Apple's Safari do not.
As a result, Safari users who attempt to use the password save feature may experience log in failures on future log in attempts.
Solution
Should this log in failure occur, you will need to remove the saved login credentials. To remove the login credentials, follow these steps:
1) When Safari is in the foreground, click on the menu Safari --> Preferences
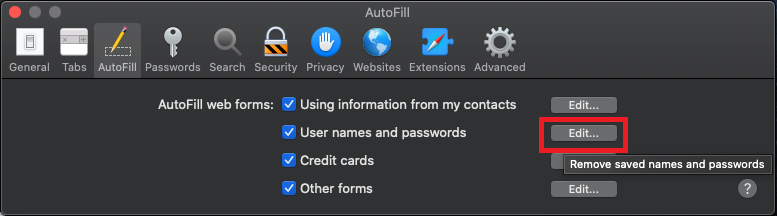
2) Click on the icon AutoFill on the toolbar
3) Click on the button Edit... next to "User names and passwords" (see Figure 1.)
Figure 1.
4) Locate the line related to the Client Portal web site and select it (see Figure 2.)
Figure 2.
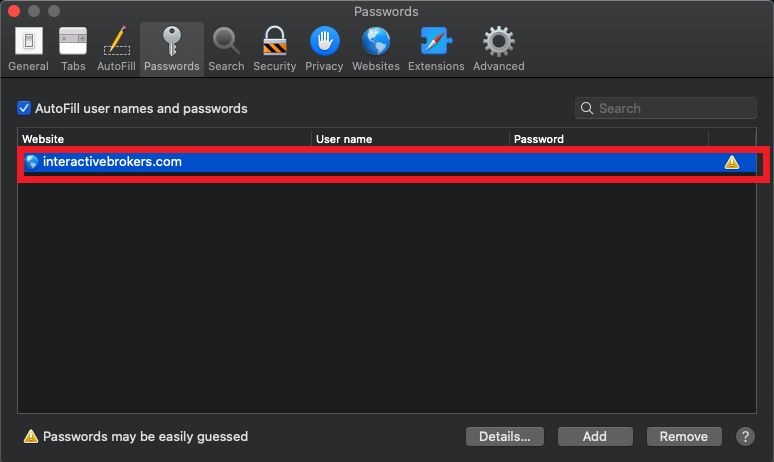
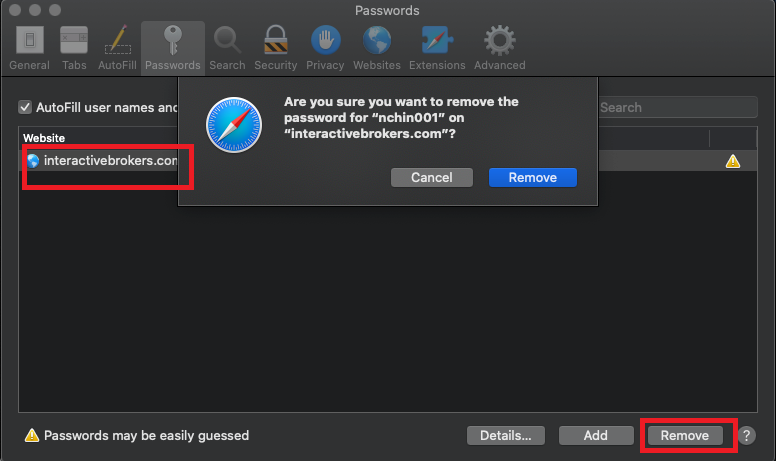
5) Click on the button Remove (see Figure 3.)
Figure 3.
6) Close and reopen Safari. You should now be able to log in . Upon log in you will be prompted whether to save user/pass again for the website. Please answer “Never for this website” or "Not now".