How to set up sFTP for using Certificate Authentication on Linux
These instructions apply to users who are receiving their statements via sFTP. If you elected to receive your statements via sFTP, you would first need to generate an RSA Key pair.
There are many Linux distributions and there are multiple methods to access the IBKR sFTP server. sFTP clients such as Filezilla can be used. In this article we explain how to realize the connection to the IBKR FTP server using Ubuntu Linux and Filezilla.
1. On your Linux machine, click on the Applications icon in the bottom left corner of you screen.


4. Once the software installation is complete, type puttygen -t rsa -b 2048 -o privatekey.ppk in order to generate the RSA Key pair.


8. Click on the FileZilla top menu File -> Site Manager...


- Select SFTP - SSH File Transfer Protocol as Protocol
- Enter xfer.interactivebrokers.com in the Host field
- Enter 32 in the Port field
- Select Key file as Logon Type
- Enter the username provided to you by Interactive Brokers in the User field


Important Note: do NOT send us your private key. Send us only your public one
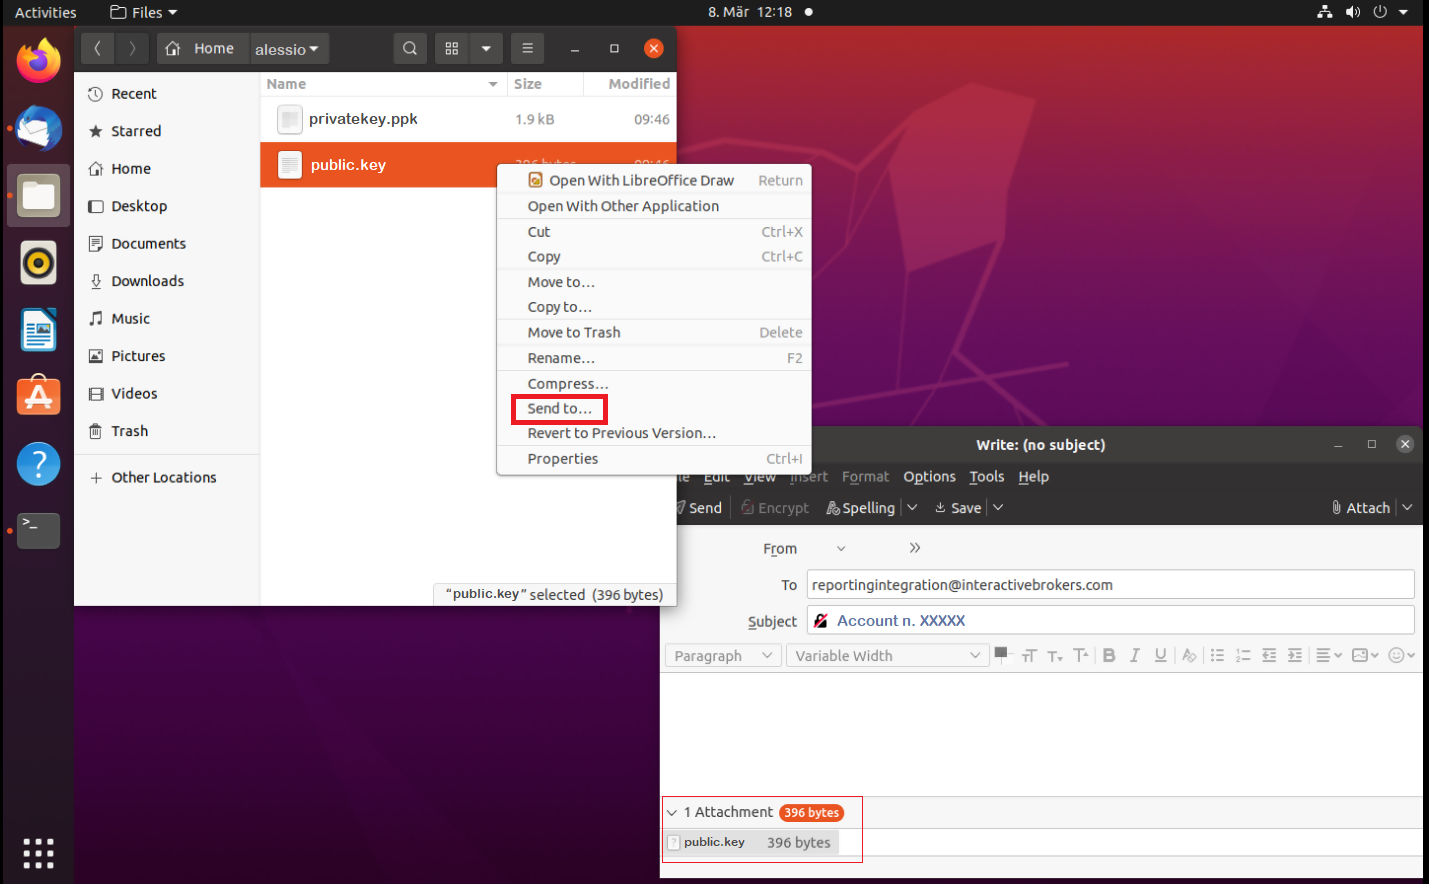
Once IBKR has configured the parameters for your connection on our servers, you will be notified. After that, you will be able to access your sFTP repository by using the Site connection you have created in FileZilla. In case you have not yet set up a Site connection, please follow the steps from 6. to 14. which are a prerequisite to the below steps:


Common issues and solutions
-
Ensure the correct login details are being used to connect to the sFTP server. The username and password you are entering should match the ones you have received from the Reporting Integration Team.
-
Confirm you have configured your sFTP Client to use the Private Key file for the logon authentication (see steps 9. and 10. of the above procedure.)
-
Try accessing the sFTP server using a different Client (CyberDuck, ect.)
-
Ensure the Private Key file being used to Authenticate the server login attempt is related to the Public Key you originally sent to the Reporting Integration Team.
-
Should the above checks be unable to resolve the issue, please generate a new RSA Public/Private Key pair and send only the Public part to the Reporting Integration Team, as per IBKB3842.
-
In case you have an antivirus or a security software installed on your machine, make sure it is not blocking the FTP connection attempt. Normally, security software allows to set up exceptions for specific connections in order to whitelist them.
-
Verify that the public IP Address of the machine running the sFTP client, is the same you have originally provided to the Reporting Integration Team for being whitelisted. You can discover your public IP Address by searching the Internet for “what is my IP”. If your current IP Address is not the same you provided to us, please send it to our Reporting Integration Team for being whitelisted.
-
Ask your network administrator/s to confirm that your firewall allows both incoming and outgoing traffic from/to xfer.interactivebrokers.com on port TCP 32.
-
Should the above steps be unable to resolve the issue, please generate a new RSA Public/Private Key pair and send only the new Public part to our Reporting Integration Team, as per IBKB3842.
KB3968 - Generate a key pair using GPG for Windows
KB4205 - Generate a key pair using GPG Suite on macOS
KB4108 - Decrypt your Reports using GPG for Windows
KB4210 - Decrypting Reports using your PGP Key pair on macOS
KB4407 - Generate RSA Key Pair on Windows
KB4410 - How to set up sFTP for using Certificate Authentication on macOS
KB4411 - How to backup your public/private Key pair
KB4323 - How to transfer your public/private key pair from one computer to another
Exchange name change
Overview:
Interactive Brokers is completing an effort to update and consolidate exchange names where appropriate. When this effort is complete, the following updates will be in effect:
- GLOBEX and CMECRYPTO will be consolidated to a single exchange, ‘CME’
- ECBOT will be updated to ‘CBOT’
- COMEX listed metals (previously reflected as NYMEX) will be updated to exchange ‘COMEX’
- NYMEX, no change
Given the breadth of products involved, we are migrating in four waves based on underlying products:
| Key | Effective Trade Date | Products |
| Wave 1 | October 30, 2022 | GLOBEX: ZAR, LB, DA, IXE |
| Wave 2 | November 6, 2022 | GLOBEX: EMD, BRE, CHF, SOFR3, E7, NKD CMECRYPTO: BTCEURRR, ETHEURRR, MET |
| Wave 3 | November 13, 2022 | GLOBEX: All remaining products CMECRYPTO: All remaining products ECBOT: ZO, ZR, 2YY, 30Y NYMEX: ALI, QI, QC |
| Wave 4 | December 4, 2022 | ECBOT: All remaining products NYMEX: All remaining "Metal" products |
I am trading via API, how does this impact me?
For API clients the only requirement would be to provide a new exchange name, for example: exchange=”CME”, for existing contracts for the affected exchanges.
Old exchanges names will no longer be available after the change.
More details can be found within our FAQs through the following link: Upcoming Exchange name Changes
Note: If you are using a third party software connected to TWS or IB Gateway and that software does not recognize the new contract definitions, please contact the third party vendor directly.
Diagnosztikai csomag feltöltése egy IBKR platformról
Egyes támogatással kapcsolatos problémák megoldásához a képernyőképek mellett szükséges feltölteni a diagnosztikai fájlokat és a naplókat is. Ez az információ megkönnyíti munkatársaink számára az Ön által tapasztalt probléma kivizsgálását és megoldását.
Az alábbi cikkben részletesen bemutatjuk, hogyan tud diagnosztikai fájlokat és naplókat feltölteni az Interactive Brokers különböző kereskedési platformjairól.
Megjegyzés: az IBKR napközben nem ellenőrzi a diagnosztikai adattárat. Amennyiben Ön úgy dönt, hogy spontán módon feltölt egy diagnosztikai csomagot, anélkül, hogy arra az Interactive Brokers felszólítaná, kérjük, tájékoztassa az Ügyfélszolgálatot az Üzenetközponton keresztül benyújtott hibajegy vagy egy telefonhívás útján, máskülönben a bejelentése észrevétlen marad.
Kérjük, hogy az alábbi linkek közül kattintson arra, amelyik megfelel az Ön által használt platformnak:
-
IBKR Mobile (Android)
-
IBKR Mobile (iOS)
- Windows és Linux operációs rendszer: nyomja le egyidejűleg a Ctrl+Alt+Q gombot
- Mac operációs rendszer: nyomja le egyidejűleg a Cmd+Option+H gombot


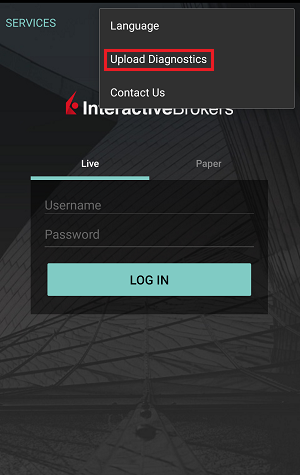


7. A mezőbe írja be a megjegyzéseit, és érintse meg a 'Kép csatolása' gombot a korábban a telefonjával készített képernyőkép(ek) csatolásához.

Az Ügyfélportálon a diagnosztikai nyomvonal az IBKB3512 számú cikkben ismertetett lépések végrehajtásával rögzíthető.
How to Upload a Diagnostic Bundle from an IBKR Platform
Some support related issues require diagnostics files and logs to be uploaded along with screenshots. The information will help our team to investigate and resolve the issue that you are experiencing.
This article will help you with detailed steps on how to upload diagnostics files and logs from various Interactive Brokers’ trading platforms.
Note: IBKR does not monitor the diagnostic bundle repository throughout the day. Should you spontaneously decide to upload a diagnostic bundle, without being instructed by Interactive Brokers, please inform our Client Services via Message Center ticket or phone call otherwise your error report will go unnoticed.
Please click on one of the links below, according to the platform you are using:
-
IBKR Mobile (Android)
-
IBKR Mobile (iOS)
- For Windows and Linux Operating system: Press Ctrl+Alt+Q
- For Mac: Press Cmd+Option+H
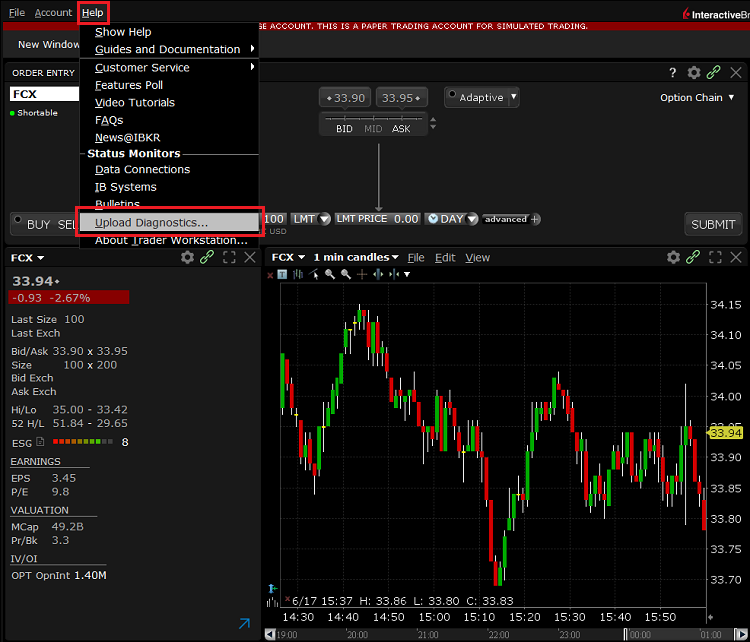
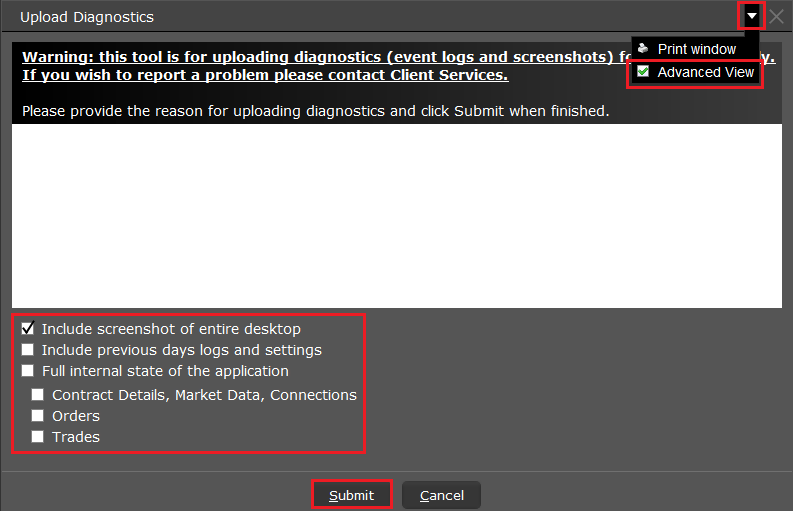
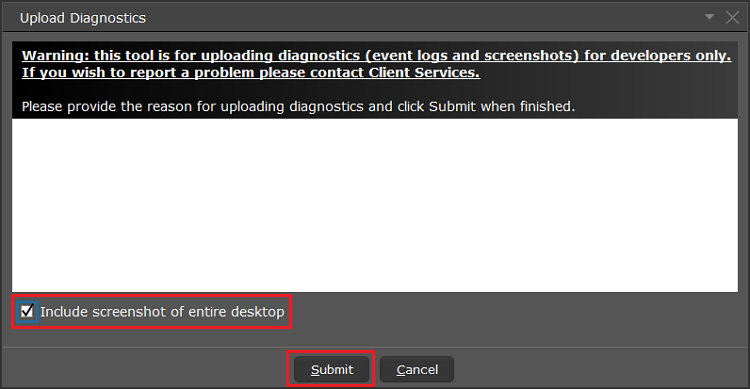


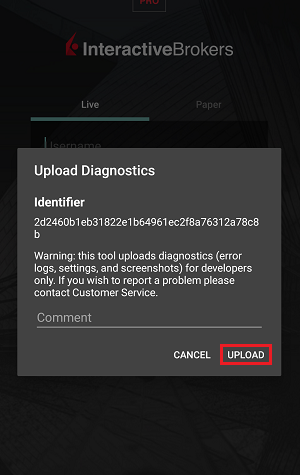
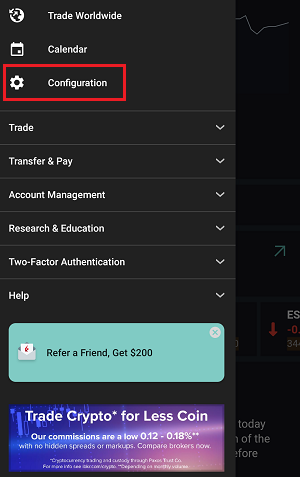
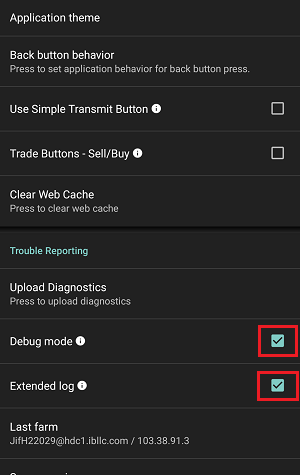
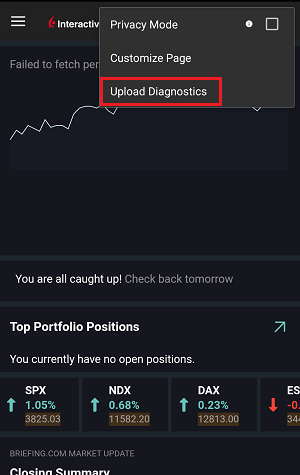
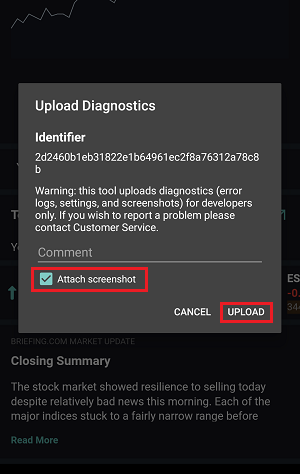
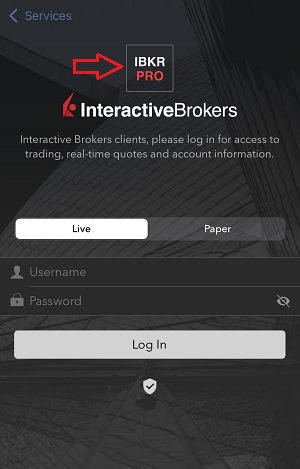
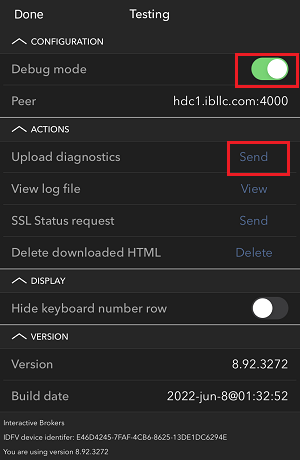
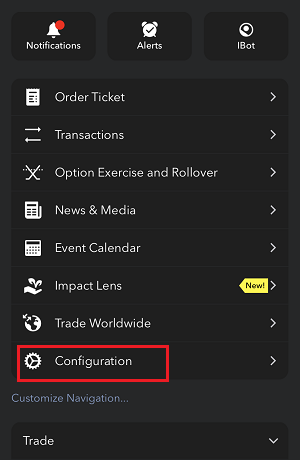
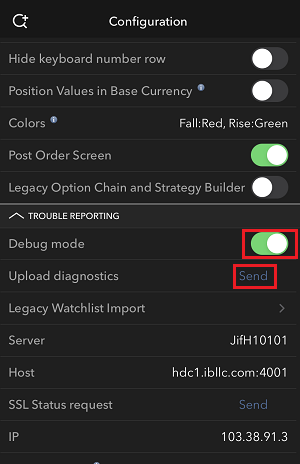
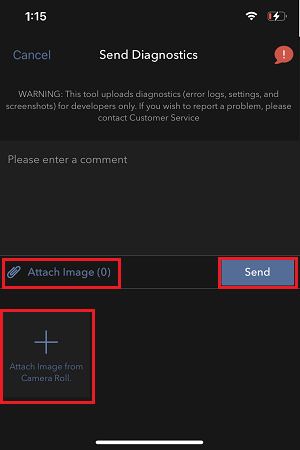
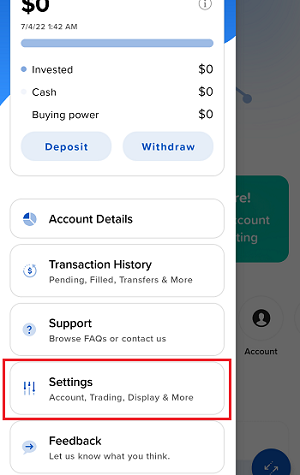
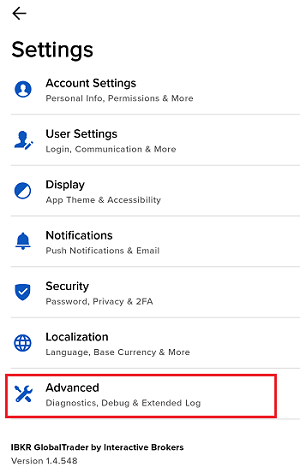
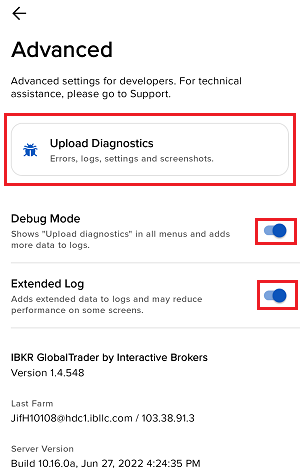
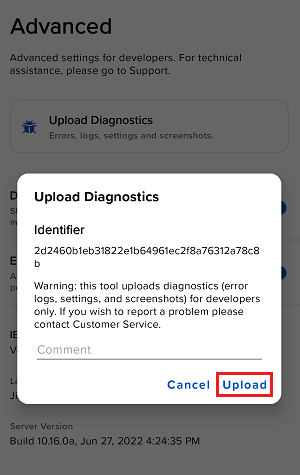
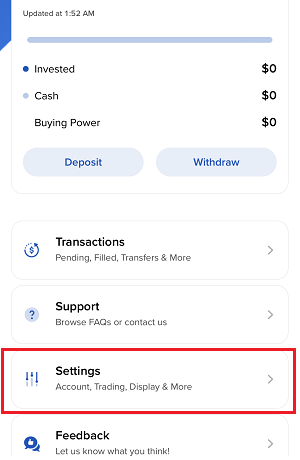
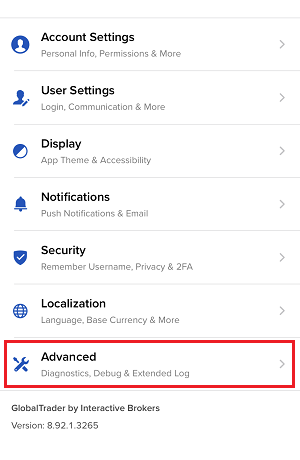
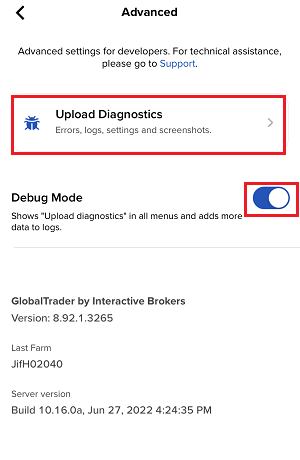
7. Enter your comments in the field and tap ‘Attach Image’ to attach the screenshot/s you previously saved in your camera roll
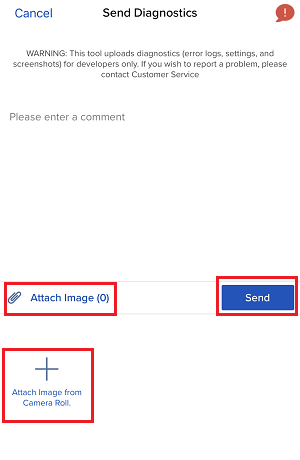
A diagnostic trace for Client Portal can be captured following the steps on IBKB3512
Hogyan lehet ".har" fájlt létrehozni?
A weboldallal kapcsolatos, összetettebb problémák elhárítása során esetenként szükséges, hogy az Ügyfélszolgálati csapatunk további információkat szerezzen be az Ön böngészőjének kommunikációjáról. Előfordulhat, hogy megkérjük Önt, hogy rögzítsen és adjon át a részünkre egy .har fájlt. Ez a fájl további információkat tartalmaz az Ön böngészője által küldött és fogadott hálózati kérésekről. A böngészője a HTTP/HTTPS kérések és válaszok tartalmának, időrendjének és állapotának rögzítésével képes ilyen fájlt létrehozni a probléma felmerülése során.
Ebben a cikkben összefoglaljuk a .har fájlok lérehozásának menetét. Kérjük, hogy az alábbi listából válassza ki az Ön által használt böngészőt:
HAR fájl létrehozása Google Chrome-ban:
1. Nyissa meg a Google Chrome-ot, és lépjen arra az oldalra, ahol a probléma jelentkezik.
2. Nyomja le a CRTL +SHIFT + I kombinációt a billentyűzeten. Alternatív megoldásként kattintson a Chrome menü ikonjára (három függőleges pont a böngészőablak jobb felső sarkában), és válassza ki a További eszközök > Fejlesztői eszközök menüpontot
3. A Fejlesztői eszközök dokkolt panelként nyílnak meg a Chrome ablak oldalán vagy alján. Válassza ki a Hálózat fület (1. ábra)
1. ábra
.png)
4. Keresse meg a Fejlesztői Eszközök eszköztár bal felső sarkában található kerek Felvétel gombot, és győződjön meg róla, hogy piros. Ha szürke, kattintson rá egyszer és kezdje el a felvétel rögzítését, vagy nyomja le a CTRL+E (2. ábra)
billentyűkombinációt.
2. ábra

5. Aktiválja a Napló megőrzése (3. ábra)
jelölőnégyzetet.
3. ábra
.png)
6. Kattintson a Törlés gombra az esetleges korábbi naplók törléséhez. A Törlés gomb rendelkezik egy stop ikonnal, és a Felvétel gombtól (4. ábra) jobbra helyzekedik el
4. ábra

7. Reprodukálja a tapasztalt problémát, miközben zajlik a hálózati kérések rögzítése.
8. Ha sikerült reprodukálni a problémát, kattintson a jobb egérgombbal a rögzített hálózati kérések listája felett bárhol, válassza ki az Összes mentése HAR fájként tartalommal opciót, és mentse el a fájlt az Ön által választott helyre a számítógépén (pl. az Asztalra).
9. Az IBKR Ügyfélportálról lépjen az Üzenetközpontra, és hozzon létre egy új webes hibajegyet (vagy, indokolt esetben, használjon egy meglévőt)
10. A webes hibajegyhez csatolja a korábban létrehozott .har fájlt. Ha az IBKR Ügyfélszolgálattól korábban kapott egy hivatkozási számot vagy kapcsolattartó nevet, kérjük, ezt az információt is írja be a hibajegy szövegtörzsébe.
11. Nyújtsa be a webes hibajegyet.
HAR fájl létrehozása Firefoxban:
1. Nyissa meg a Firefoxot, és lépjen arra az oldalra, ahol a probléma jelentkezik.
2. Nyomja le az F12 gombot a billentyűzeten. Alternatív megoldásként kattintson a Firefox menü ikonjára (három párhuzamos vízszintes vonal a böngészőablak jobb felső sarkában), majd válassza ki a Webfejlesztő > Hálózat
opciót
3. A Fejlesztői hálózati eszközök dokkolt panelként nyílnak meg a Firefox ablak oldalán vagy alján. Válassza ki a Hálózat fület (5. ábra)
5. ábra
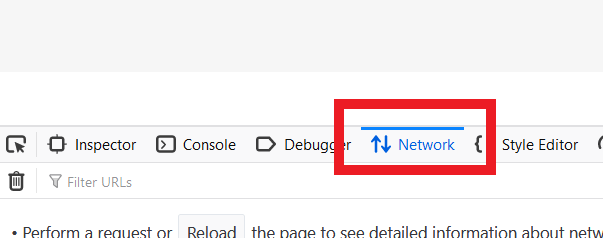
4. Aktiválja a Naplók megőrzése (6. ábra)
jelölőnégyzetet.
6. ábra
.png)
5. Reprodukálja a tapasztalt problémát. A hálózati kérések rögzítése automatikusan elindul.
6. Ha sikerült reprodukálni a problémát, kattintson a jobb egérgombbal a rögzített kérések listája felett bárhol, ÉS válassza ki az Összes mentése HAR-ként opciót.
7. Mentse el a fájlt az Ön által választott helyre a számítógépén (pl. Asztal).
8. Az IBKR Ügyfélportálról lépjen az Üzenetközpontra, és hozzon létre egy webes hibajegyet (vagy, indokolt esetben, használjon egy meglévőt).
9. A webes hibajegyhez csatolja a korábban létrehozott .har fájlt. Ha az IBKR Ügyfélszolgálattól korábban kapott egy hivatkozási számot vagy kapcsolattartó nevet, kérjük, ezt az információt is írja be a hibajegy szövegtörzsébe.
10. Nyújtsa be a webes hibajegyet.
HAR fájl létrehozása Microsoft Edge-ben:
1. Nyissa meg az Edge-et, és lépjen arra az oldalra, ahol a probléma jelentkezik.
2. Nyomja le az F12 gombot a billentyűzeten. Alternatív megoldásként kattintson az Edge menü ikonra (három vízszintes pont a böngészőablak jobb felső sarkában), majd válassza ki a További eszközök > Fejlesztői eszközök
menüpontot.
3. Kattintson a Hálózat fülre (10. ábra).
10. ábra
.png)
4. Reprodukálja a korábban tapasztalt problémát, miközben zajlik a hálózati kérések rögzítése.
5. Ha végzett, kattintson a floppy lemez ikonra (Exportálás HAR-ként) vagy nyomja le a CTRL+S (11. ábra)
billentyűkombinációt.
11. ábra
.png)
6. Válasszon egy fájlnevet és egy helyet a számítógépén (pl. az Asztalon). Majd kattintson a Mentés gombra
7. Az IBKR Ügyfélportálról lépjen az „Üzenetközpontra”, és hozzon létre egy webes hibajegyet (vagy, indokolt esetben, használjon egy meglévőt).
8. A webes hibajegyhez csatolja a korábban létrehozott .har fájlt. Ha az IBKR Ügyfélszolgálattól korábban kapott egy hivatkozási számot vagy kapcsolattartó nevet, kérjük, ezt az információt is írja be a hibajegy szövegtörzsébe.
9. Nyújtsa be a webes hibajegyet.
HAR fájl létrehozása Safariban:
Megjegyzés: a HAR fájl létrehozása előtt győződjön meg róla, hogy látja a Fejlesztés menüt a Safariban. Ha nem látja ezt a menüt, kattintson a Safari menüre, válassza a Preferenciákat, lépjen a Haladó fülre, és aktiválja a Fejlesztés menü mutatása a menü fülön jelölőnégyzetet.
1. Nyissa meg a Fejlesztés menüt és válassza ki a Webellenőr mutatása opciót, vagy nyomja le a CMD+ALT+I billentyűkombinációt.
2. Kattintson a Hálózat fülre (12. ábra).
12. ábra
3. Aktiválja a Napló megőrzése (13. ábra)
jelölőnégyzetet.
13. ábra
.png)
4. Kattintson az Export ikonra (vagy nyomja le a CMD+S billentyűkombinációt), adja meg az Ön által választott fáljnevet és egy helyet a számítógépén (pl. az Asztalon), és mentse el a .har fájlt.
5. Az IBKR Ügyfélportálról lépjen az „Üzenetközpontra”, és hozzon létre egy webes hibajegyet (vagy, indokolt esetben, használjon egy meglévőt).
6. A webes hibajegyhez csatolja a korábban létrehozott webarchívum fájlt. Ha az IBKR Ügyfélszolgálattól korábban kapott egy hivatkozási számot vagy kapcsolattartó nevet, kérjük, ezt az információt is írja be a hibajegy szövegtörzsébe.
7. Nyújtsa be a webes hibajegyet.
Generate RSA Key Pair on Windows
These instructions apply to users who are receiving their statements via sFTP. If you elected to receive your statements via sFTP, you would first need to generate an RSA Key pair.
To generate an RSA Key pair:
2. Run the installer and make sure to check PuTTYgen (key generator) as one of the components to install.
3. Start WinSCP and from the button Tools select Run PuTTYgen.
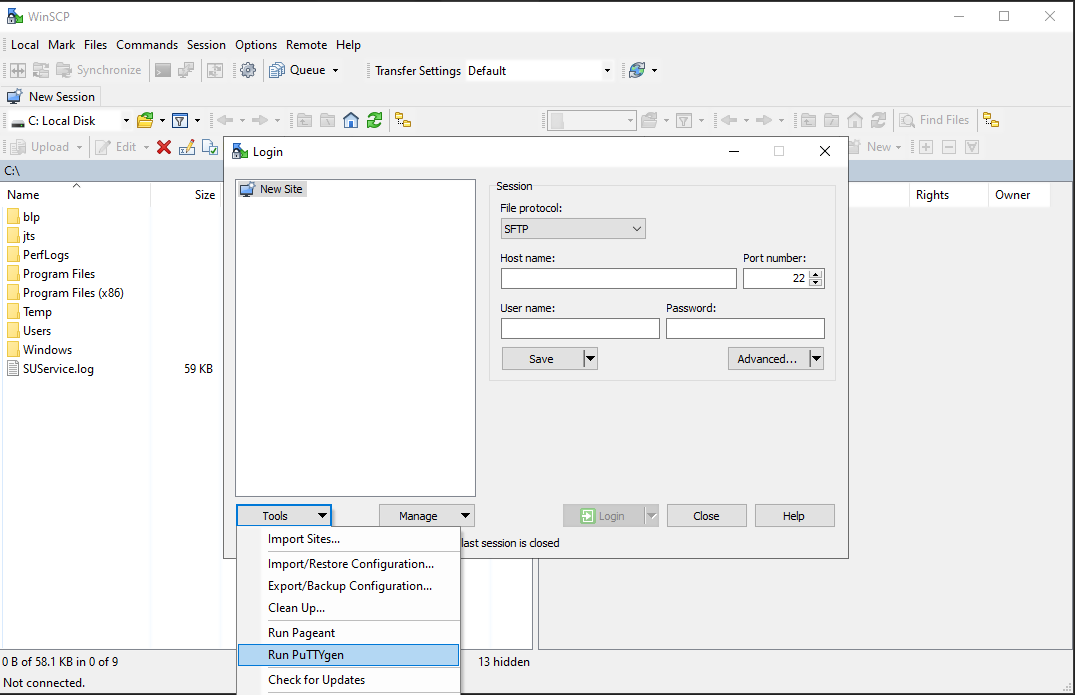
4. Once the tool PuTTYgen has been launched, click Generate. Select RSA as Type of key to generate, 2048 as Number of bits in generated key and click on the button Generate.
5. Click "Save private key" and give the file a name (like private). Leave the extension as .ppk ('ale.ppk', in the picture below is an example filename).
Important Note: do NOT save your public key yet. Save only your private one.
.png)
6. Open WinSCP, create a new connection and:
- Select SFTP as File protocol.
- Enter xfer.interactivebrokers.com in the Host name field.
- Enter 32 in the Port number field.
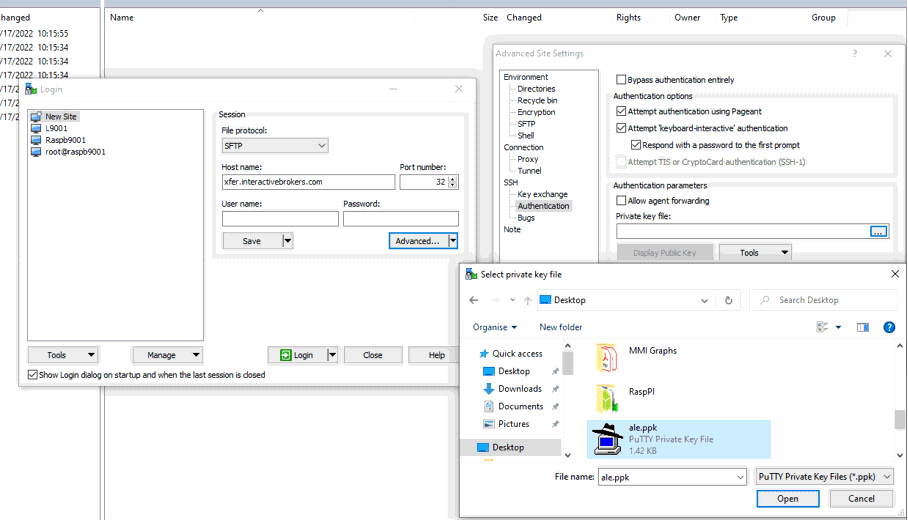
8. In the Advanced Site Settings screen, left side menu, expand SSH and select Authentication. Click on the button ... at the end of the field Private Key file and open the private key you previously saved at point 5):
9. Click on the button Display public key:
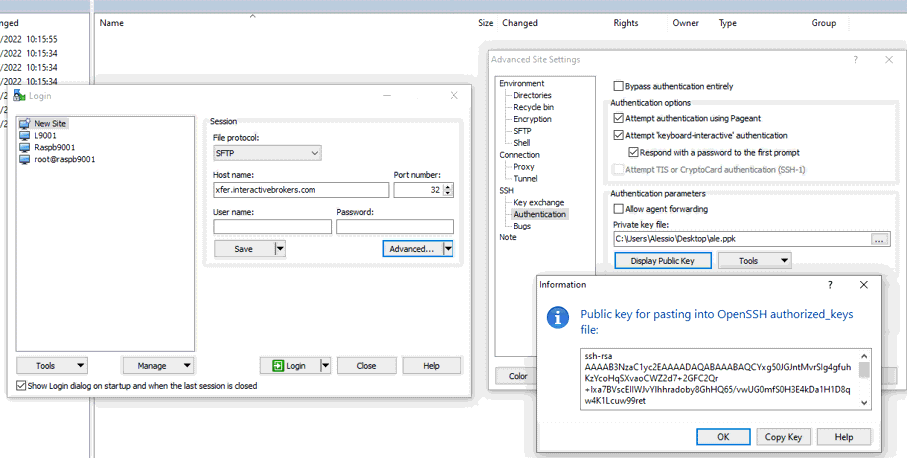
11. Open Notepad, press CTRL+V to paste the key string (which is one string of characters without spaces) and then save the file with the name public.key in a folder of your preference:

12. Send the file you saved at the previous step to us via Message Center ticket or email as per instructions on IBKB3842
KB3842 - Using GPG/RSA encryption keys to guarantee the privacy and security of your Reports
KB3968 - Generate a key pair using GPG for Windows
KB4205 - Generate a key pair using GPG Suite on macOS
KB4108 - Decrypt your Reports using GPG for Windows
KB4210 - Decrypting Reports using your PGP Key pair on macOS
Transferring your Key Pair From One Computer To Another
If you need to decrypt files that were encrypted with your private Key on an additional computer, you need to copy both your private and public keys (the entire Key pair) to that computer.
Note: this tutorial assumes you have already set up a Key pair. If you need guidance to set up the Key pair please refer to this article, which is a prerequisite to the instructions below.
How to transfer your Key pair:
Please select one of the below links, according to your Operating System:
Windows
1. On the machine where the encryption keys are stored, connect a USB drive to a free USB port.
2. Launch the Kleopatra application and select the encryption key you want to transfer. Then right-click on the selection and choose Backup Secret Keys...
Note: Do NOT use Export..., as this will only export the public part of the Key while you need to have a backup of both public and private parts.
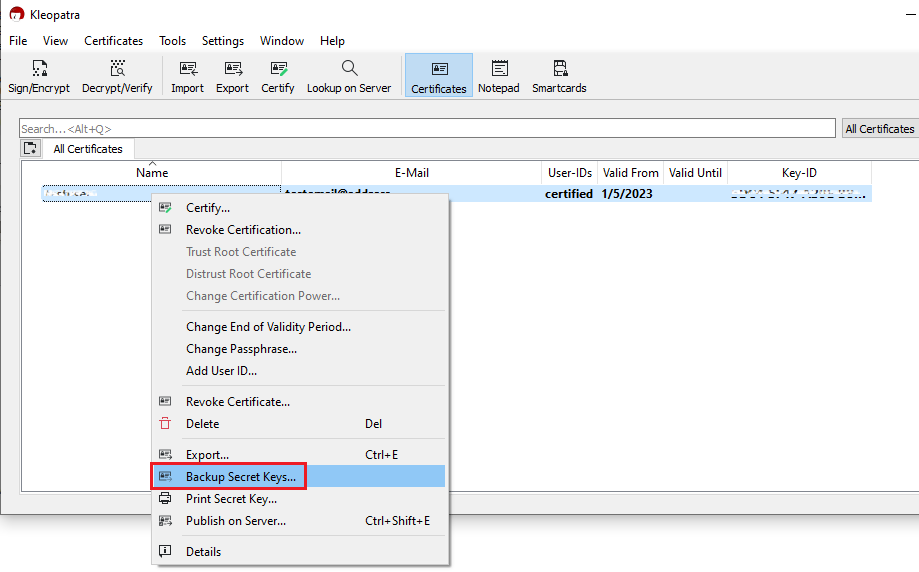
3. Select your USB drive as destination and a filename of your preference (e.g. secret-key-KEYID.asc) for your backup copy. Then click Save.

4. Enter the passphrase you have set when you created the Key and click OK.
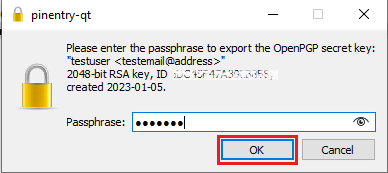
5. A pop-up will confirm the backup has been successfully created. Click OK.

6. Eject your USB drive safely through the Windows interface to prevent data loss and connect it to a free USB port on the other computer (the one you want to transfer the key to). All the next steps have to be executed on that machine.
7. Make sure the the GPA software is installed, otherwise please install it. Make sure that the component Kleopatra is selected as one of the sub components to include in the installation.
8. Launch the Kleopatra application and click on the top menu File and select Import...

9. Click on the letter correspondent to your USB drive and select the file you have previously saved (e.g. secret-key-KEYID.asc). Then click Open.

10. Click on Yes, It's Mine.

11. A pop-up will confirm the Key has been successfully imported. Click OK. You may now want to delete the key file from the USB drive and empty the Trash.

macOS
1. On the machine where the encryption keys are stored, connect a USB drive to a free USB port.
2. Launch the GPG Keychain application and select the encryption key you want to transfer. Please make sure that you see the text Type: Secrete and public key, in the Type column.
.png)
3. With the desired encryption key highlighted, click Export. Please make sure to check the box for the option Include secret key in exported file, as illustrated in the above screenshot. Save the key pair to the USB drive.
4. Eject the USB drive and connect it to a free USB port on the other computer (the one you want to transfer the key to). All the next steps have to be executed on that machine.
5. Make sure the GPG Tools suite is installed, otherwise please install it.
6. Launch the GPG Keychain application and click the icon Import on the top toolbar.
(1).png)
7. Click the USB Drive and select the previously saved .ASC file that contains the Public and Private key. Then click Open.
8. The confirmation should read Import successful.
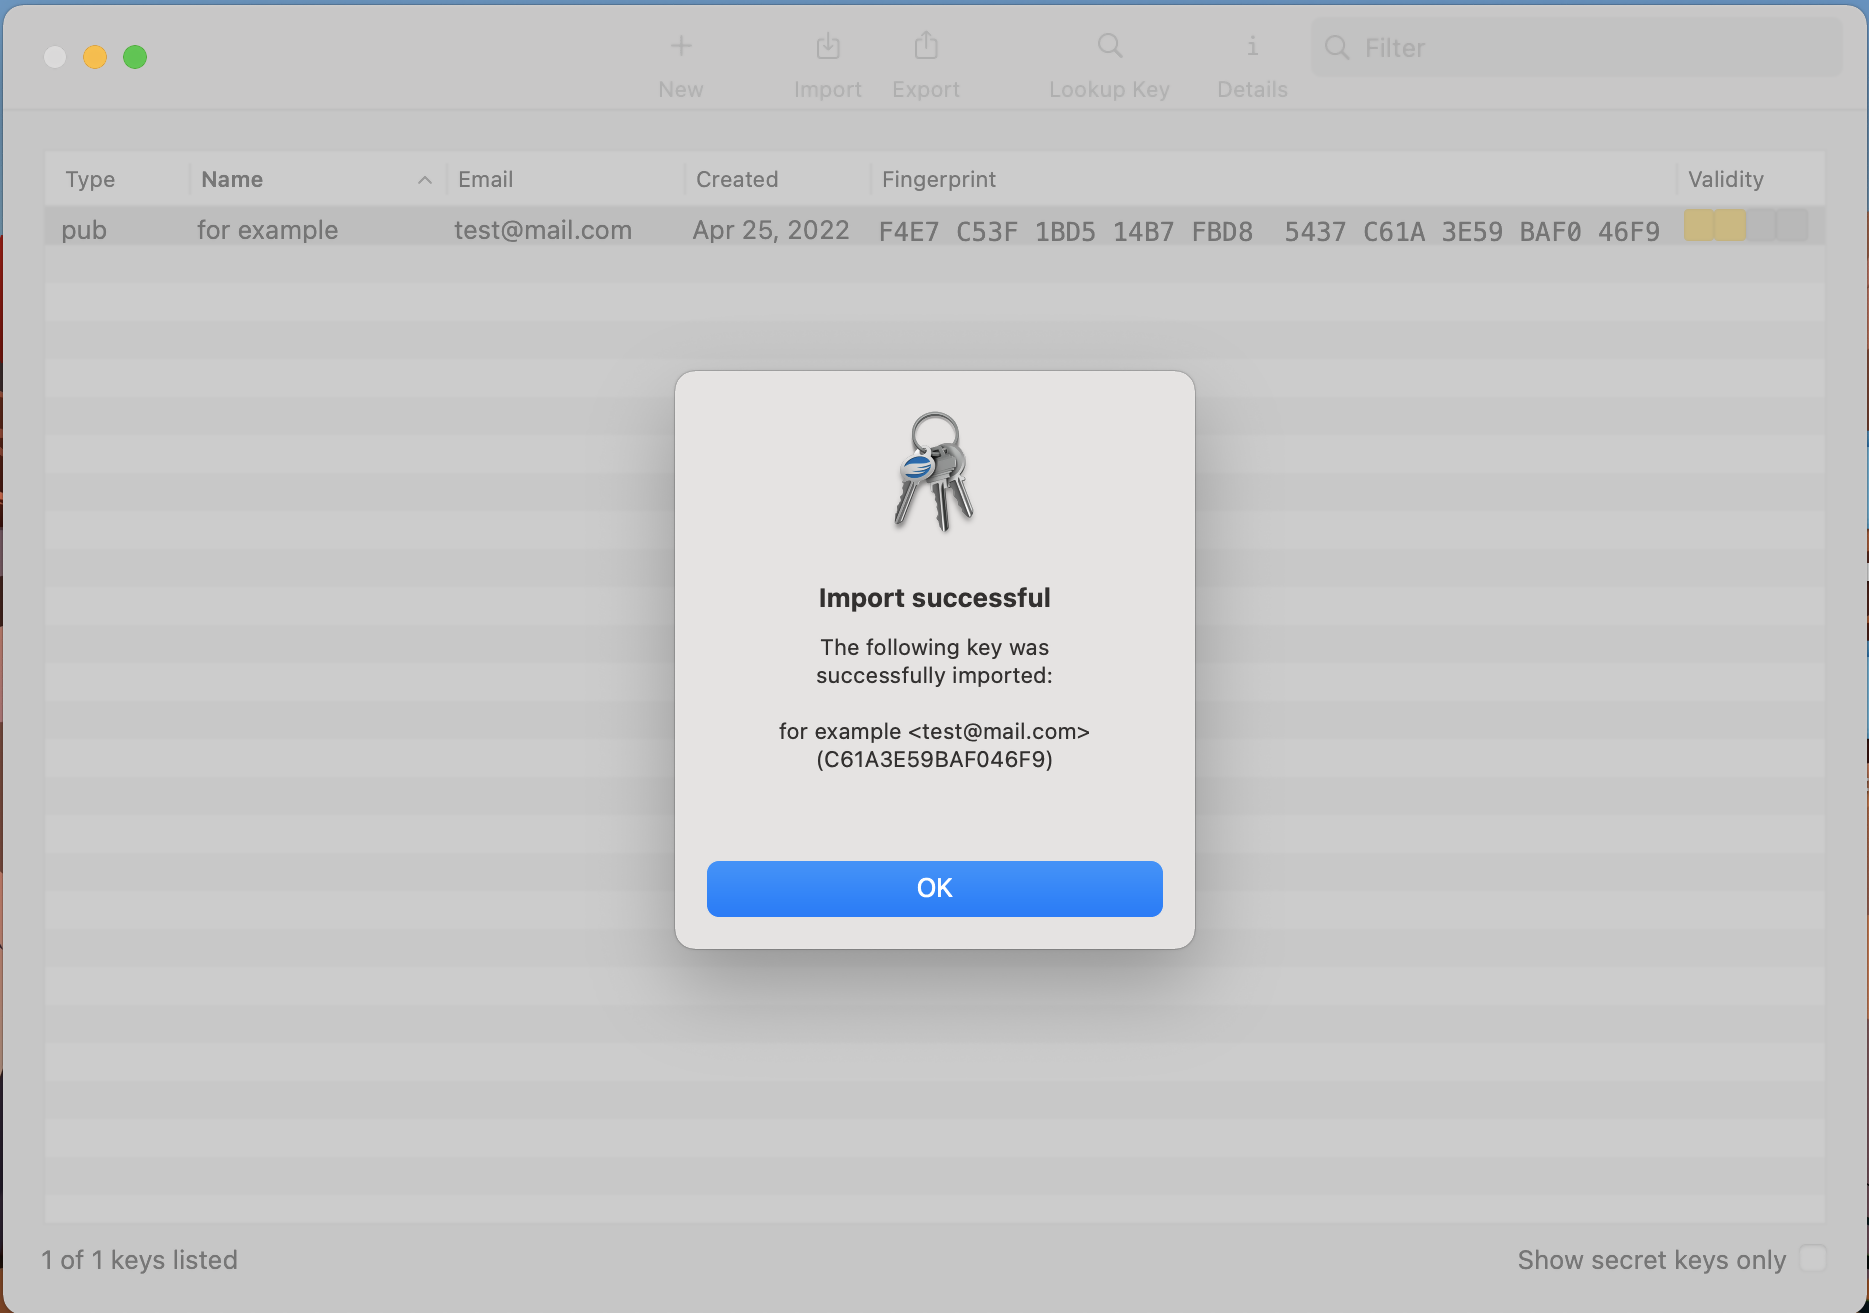
9. Once the key has been successfully imported, delete the key file from the USB drive and empty the Trash.
KB3842 - Using GPG/RSA encryption keys to guarantee the privacy and security of your Reports
KB3968 - Generate a key pair using GPG for Windows
KB4205 - Generate a key pair using GPG Suite on macOS
KB4108 - Decrypt your Reports using GPG for Windows
KB4210 - Decrypting Reports using your PGP Key pair on macOS
KB4407 - Generate RSA Key Pair on Windows
Decrypting Reports Using Your PGP Key Pair on macOS
Note: This tutorial assumes you received reports via email or via FTP that were encrypted with the public key you sent to IBKR . If you need guidance to set up the encrypted statement delivery, please refer to this article, which is a prerequisite to the instructions below.
1. Open Finder
2. Right click on the .gpg file you want to decrypt
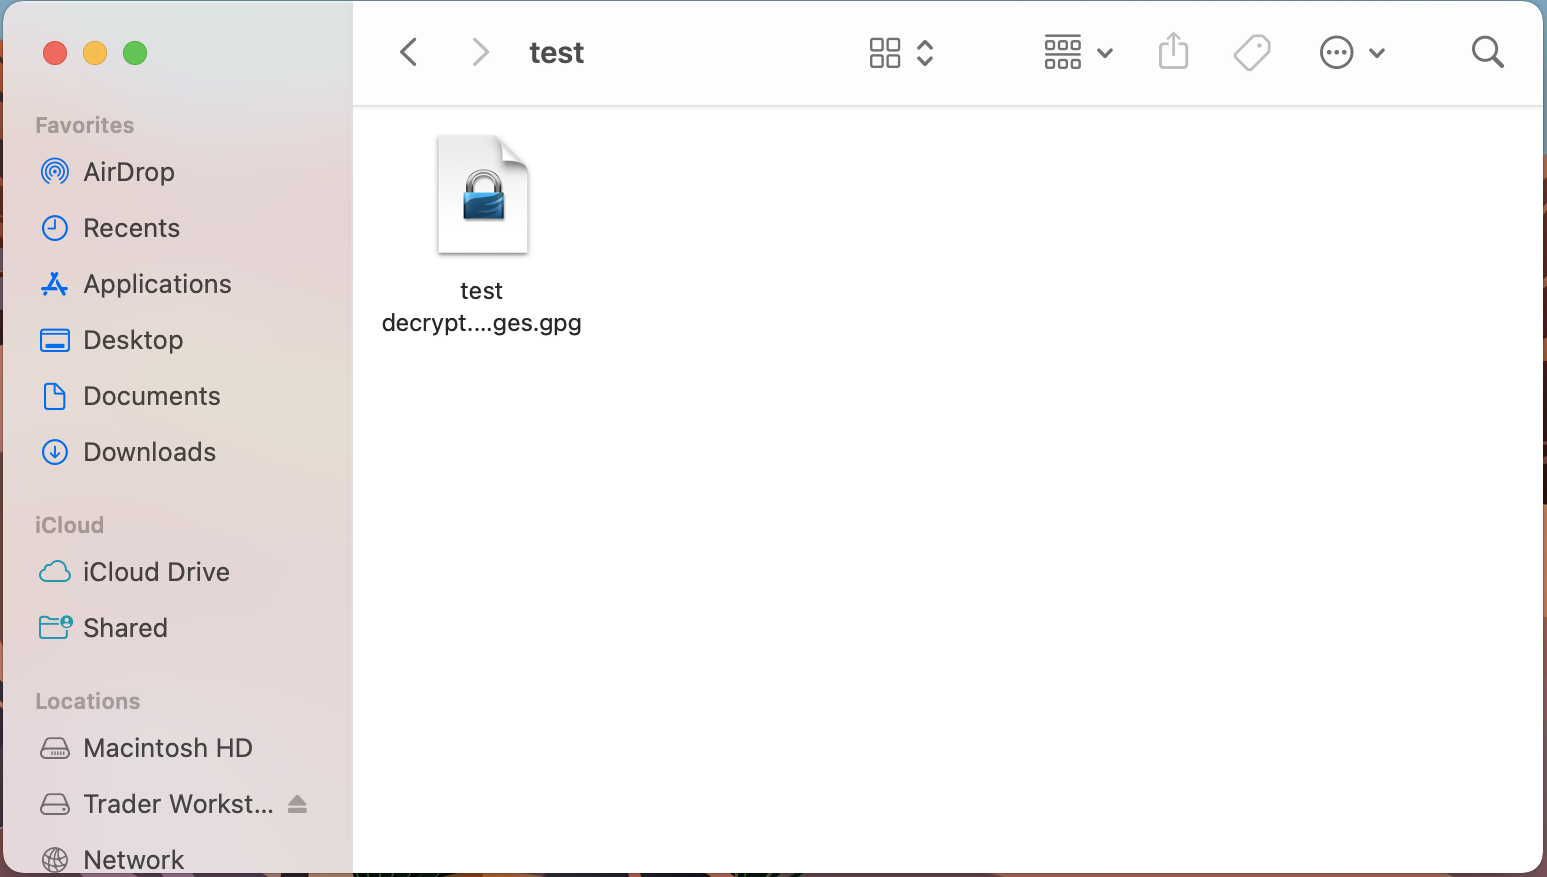
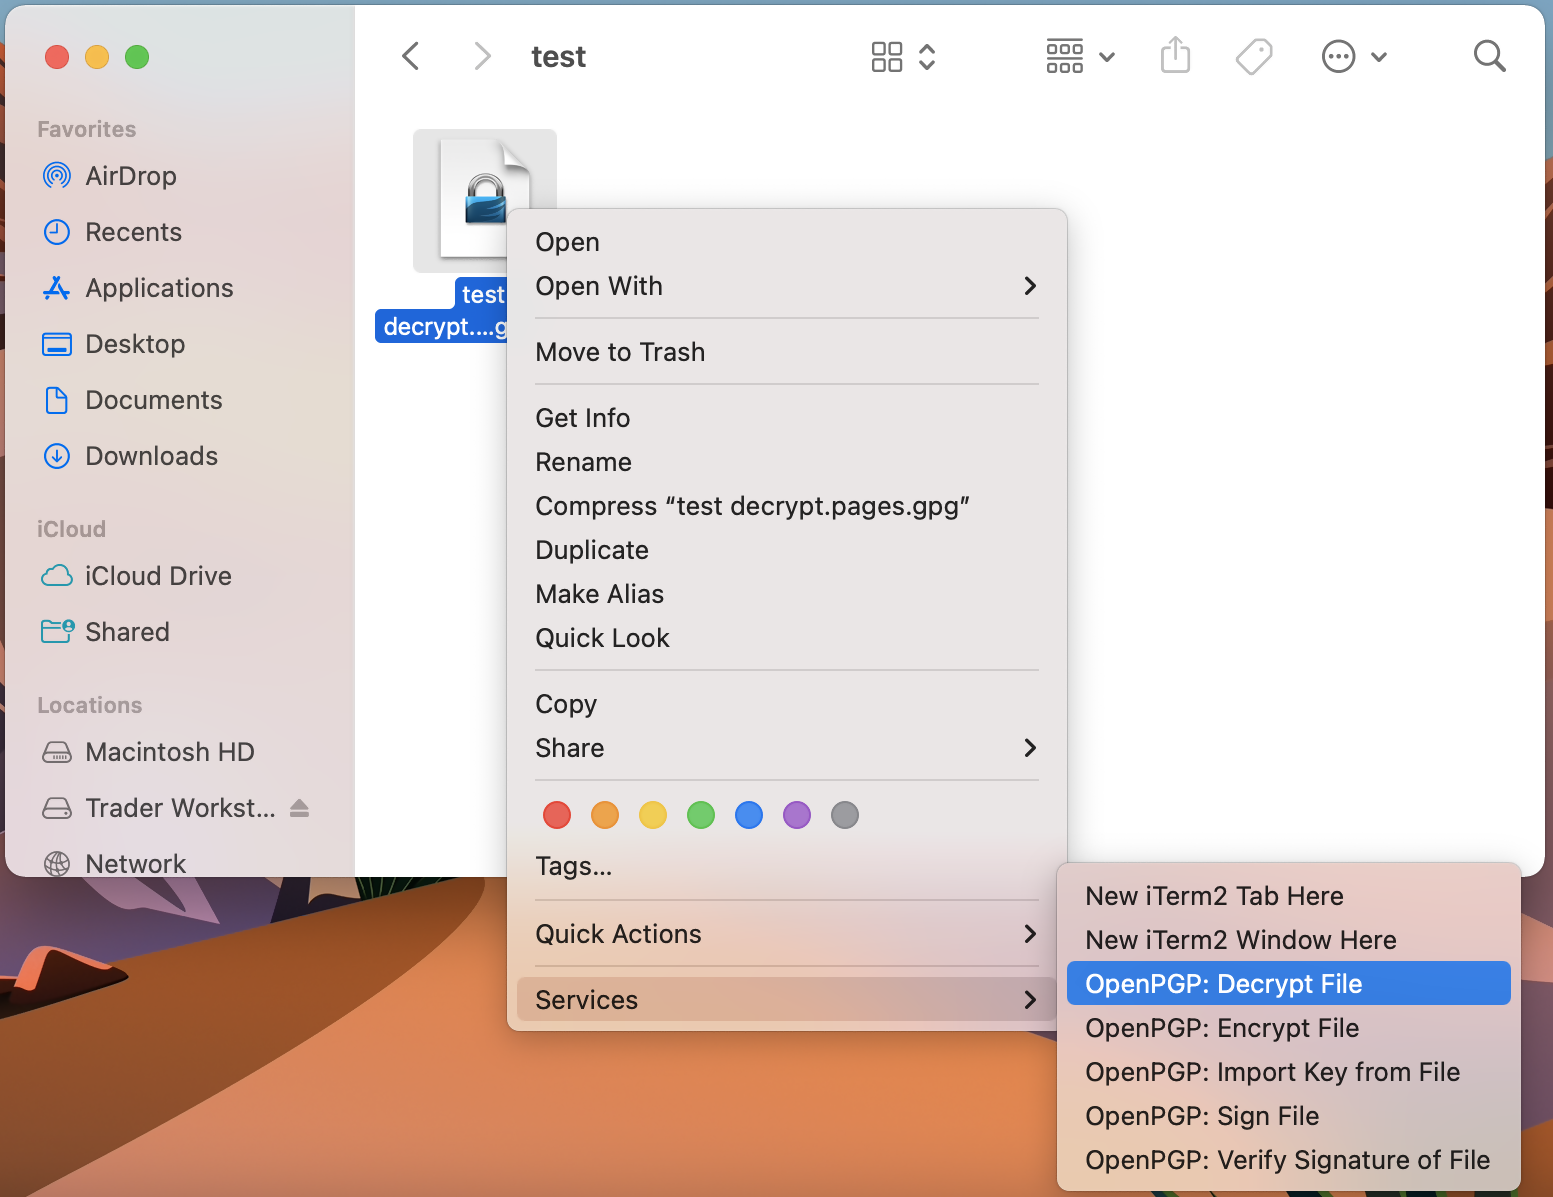
3. Select Services > OpenPGP: Decrypt File
Common Issues/Questions
- Decryption failed with error 'No Secret Key'
This is commonly caused when the wrong encryption key is used to decrypt the file. If decryption is being done on a computer other than the original computer used to create the public/private keys, the keys would have to be transferred from the original computer to the new computer.
If the above does not help, then a new public/private key pair needs to be created and sent to us.
KB3842 - Using GPG/RSA encryption keys to guarantee the privacy and security of your Reports
KB3968 - Generate a key pair using GPG for Windows
KB4205 - Generate a key pair using GPG Suite on macOS
KB4108 - Decrypt your Reports using GPG for Windows
KB4407 - Generate RSA Key Pair on Windows
Decrypt Your Reports Using GPG for Windows
Note: This tutorial assumes you received reports via email or via FTP that were encrypted with the public key you sent to IBKR. If you need guidance to set up the encrypted statement delivery, please refer to this article, which is a prerequisite to the instructions below.
How to decrypt files using Kleopatra:
1. Save all the encrypted Reports you received via email or FTP in a folder on your preference (e.g. Desktop)
2. Start the Kleopatra application (included in Gpa4win software). The entry for your Key should be listed in the All Certificates panel. Click the top menu File and select Decrypt/Verify...


Common Issues/Questions
- Decryption failed with error 'No Secret Key'
This is usually caused by the wrong encryption key being used to decrypt the file. If decryption is being done on a computer other than the original computer used to create the public/private keys, the keys would have to be transferred from the original computer to the new computer.
If the above does not help, then a new public/private key pair needs to be created and sent to us.
KB3842 - Using GPG/RSA encryption keys to guarantee the privacy and security of your Reports
KB3968 - Generate a key pair using GPG for Windows
KB4205 - Generate a key pair using GPG Suite on macOS
KB4210 - Decrypting Reports using your PGP Key pair on macOS
KB4407 - Generate RSA Key Pair on Windows
KB4409 - How to set up sFTP for using Certificate Authentication on Windows
KB4410 - How to set up sFTP for using Certificate Authentication on macOS
KB4411 - How to backup your public/private Key pair
KB4323 - How to transfer your public/private key pair from one computer to another
How to generate a ".har" file
When troubleshooting a non-trivial website issue, it is sometimes necessary for our Client Services team to obtain additional information about your browser communication. You may be asked record and provide a .har file. This file contains additional information about the network requests that are sent and received by your browser. Your browser can generate such file by recording content, timeline and status of HTTP/HTTPS requests and responses while the issue occurs.
In this article we explain how to generate a .har file. Please click on the browser that you use in the list below:
To generate the HAR file for Google Chrome:
1. Open Google Chrome and go to the page where the issue is occurring.
2. Press CRTL +SHIFT + I on your keyboard. Alternatively, click on the Chrome menu icon (three vertical dots at the top-right of your browser window) and select More Tools > Developer Tools
3. The Developers Tools opens as a docked panel at the side or bottom of Chrome. Select the tab Network (Figure 1.)
Figure 1.
.png)
4. Look for a round Record button in the upper left corner of the Developer Tools toolbar and make sure it is red. If it is grey, click it once to start recording or just press CTRL+E (Figure 2.)
Figure 2.

5. Activate the checkbox Preserve log (Figure 3.)
Figure 3.
.png)
6. Click the Clear button to clear out any existing logs. The Clear button has a stop icon and is located on the right of the Record button (Figure 4.)
Figure 4.

7. Reproduce the issue you are experiencing while the network requests are being recorded.
8. Once you have reproduced the issue, right-click anywhere on the list of recorded network requests, select Save all as HAR with Content, and save the file to a location of your preference on your computer (e.g. on your Desktop).
9. From the IBKR Client Portal, go to the Message Center and create a new Web Ticket (or use an existing one when applicable)
10. Within the Web Ticket, attach the .har file previously generated. In case the IBKR Client Services has provided you with a reference ticker number or representative name, please add this information to the ticket body.
11. Submit the Web Ticket
To generate the HAR file for Firefox:
1. Open Firefox and go to the page where the issue is occurring
2. Press F12 on your keyboard. Alternatively click the Firefox menu icon (three horizontal parallel lines at the top-right of your browser window), then select Web Developer > Network
3. The Developers Network Tools opens as a docked panel at the side or bottom of Firefox. Select the tab Network (Figure 5.)
Figure 5.

4. Activate the checkbox Persists logs (Figure 6.)
Figure 6.
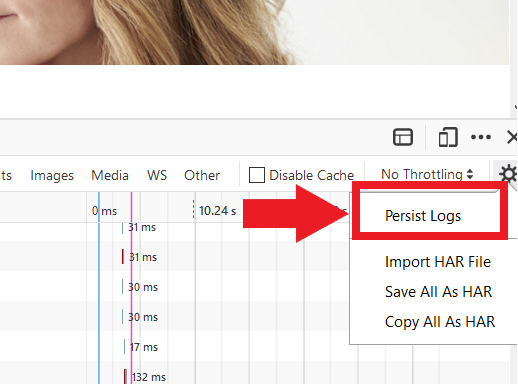
5. Reproduce the issue you are experiencing. The recording of the network request starts automatically.
6. Once you have reproduced the issue, right-click anywhere on the list of recorded requests and select Save All As HAR
7. Save the file to a location of your preference on your computer (e.g. on your Desktop)
8. From the IBKR Client Portal, go to the Message Center and create a Web Ticket (or use an existing one when applicable)
9. Within the Web Ticket, attach the .har file previously generated. In case the IBKR Client Services has provided you with a reference ticker number or representative name, please add this information to the ticket body
10. Submit the Web Ticket
To generate the HAR file for Microsoft Edge:
1. Open Edge and go to the page where the issue is occurring.
2. Press F12 on your keyboard. Alternatively click the Edge menu icon (three horizontal dots at the top-right of your browser window), then select More Tools > Developers Tools
3. Click the Network tab (Figure 10.)
Figure 10.
.png)
4. Reproduce the issue that you were experiencing before, while the network requests are being recorded.
5. Once done click the floppy disk icon (Export as HAR) or press CTRL+S (Figure 11.)
Figure 11.
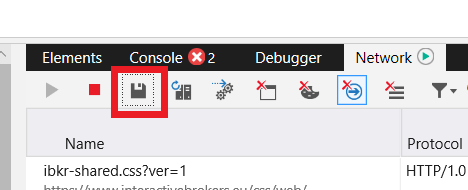
6. Provide a filename and a location of your preference on your computer (e.g. on the Desktop). Then click the Save button
7. From the IBKR Client Portal, go to the "Message Center" and create a Web Ticket (or use an existing one when applicable)
8. Within the Web Ticket, attach the .har file previously generated. In case the IBKR Client Services has provided you with a reference ticker number or representative name, please add this information to the ticket body.
9. Submit the Web Ticket
To generate the HAR file for Safari:
Note: Before generating the HAR file, make sure you can see the Develop menu in Safari. If you do not see this menu, click on the menu Safari, choose Preferences, go to the tab Advanced and activate the checkbox next to Show Develop menu in menu bar
1. Open the Develop menu and select Show Web Inspector or press CMD+ALT+I
2. Click the Network tab (Figure 12.)
Figure 12.

3. Activate the checkbox Preserve log (Figure 13.)
Figure 13.
.png)
4. Click on the icon Export (or press CMD+S), provide a filename and a location of your preference on your computer (e.g. on the Desktop) and save the .har file
5. From the IBKR Client Portal, go to the "Message Center" and create a Web Ticket (or use an existing one when applicable)
6. Within the Web Ticket, attach the web archive file previously generated. In case the IBKR Client Services has provided you with a reference ticker number or representative name, please add this information to the ticket body.
7. Submit the Web Ticket


