Добавление пользователей (не сотрудников) на частный счет
Overview:
Частные счета IBKR поддерживают создание нескольких пользователей. Владелец счета может добавить второго пользователя под своим собственным именем, чтобы одновременно открывать 2 сессии в TWS (одну с обычным доступом и другую для соединения через API). Кроме того, владелец счета может предоставить доступ 5 пользователям, не являющимся сотрудниками – например, членам семьи – в рамках Соглашения об ограниченной доверенности. Каждому из них также может быть предоставлен доступ второго пользователя.
Каждому новому пользователю будет присвоен уникальный логин для входа в "Портал клиентов" и выбранную торговую платформу. Процедура добавления пользователя (не сотрудника) описана ниже (инструкции по добавлению второго пользователя для владельцев частных счетов доступны в статье KB1004).
Background:
Процедура добавления пользователей (не сотрудников):
- Войдите в "Портал клиентов".
- Откройте меню пользователя (значок силуэта в правом верхнем углу) и выберите Параметры (Manage Account).
- Панель Пользователи и права доступа (Users & Access Rights) отображается справа от столбца конфигурации и содержит всех добавленных вами пользователей счета.
- Нажмите на значок конфигурации (шестеренка), чтобы открыть окно Пользователи и права доступа.
- Вы увидите две панели: панель Пользователи содержит список индивидов, добавленных на Ваш счет, а также род их связи с основным владельцем счета; панель Функции пользователей отображает все созданные Вами роли для пользователей.
- Добавляйте, изменяйте и удаляйте пользователей при помощи кнопок справа.
- Процедура добавления пользователя и предоставления прав доступа разделена на несколько этапов. Заполнив окно, нажмите Далее для перехода на следующую страницу. Если Вы хотите внести изменения в предыдущем этапе, нажмите Назад.
- На первой странице введите данные пользователя, включая логин, пароль, имя, отношение к владельцу основного счета и адрес эл. почты.
- На следующем этапе Вы можете выбрать роль пользователя из сохраненных. Роли пользователя автоматически применяют к новому пользователю набор ранее настроенных прав доступа. Выбрав роль, Вы можете пропустить все дополнительные окна и перейти на страницу предпросмотра.
- Дальше Вы можете предоставить новому пользователю права доступа к определенному набору функций. В каждом окне отметьте функции, доступ к которым Вы хотели бы дать.
- На последней странице Вы сможете заново просмотреть всю пользовательскую информацию, включая права доступа. Предоставленные новому пользователю права отмечены зеленым; остальные права отображаются зачеркнутыми. Если данные верны, нажмите Далее . Для внесения изменений нажмите Назад.
- Если Вы не подключены к "Системе безопасного входа" с двухфакторной аутентификацией, Вам на почту придет письмо с кодом подтверждения. Введите полученный по эл. почте код и нажмите Далее. Если вы не получили письмо, нажмите Запросить код подтверждения для отправки нового письма с кодом на Ваш эл. адрес.
- Нажмите "ОК", чтобы сохранить нового пользователя. Он появится на панели "Пользователи и права доступа".
ВАЖНО ЗНАТЬ:
1. Согласно требованиям поставщиков, основному пользователю счета будет начисляться дополнительная комиссия за подписку на рыночные данные за каждый добавленный счет пользователя.
2. Владелец счета может удалить учетную запись, нажав на ссылку Удалить рядом с именем пользователя в разделе Пользователи и права доступа.
IBKR Securities Class Action Recovery
Overview:
The Securities Class Action Recovery solution is an automated service that removes the administrative burden of participating in a securities class action lawsuit. There is no upfront fee to subscribe to this service, but all recovered amounts are subject to a 20% contingency fee, as detailed in the Terms & Conditions.
Who can participate in the IBKR Securities Class Action Recovery service?
IBLLC clients can participate in the service if they are eligible to trade US or Canadian stocks or bonds, hold an individual, joint or separate trading limit (STL) account with IBKR, or are a client of a fully disclosed introducing broker (IBroker) or a client of a Financial Advisor.
How do I enroll in IBKR Securities Class Action Recovery service?
Eligible clients can quickly and easily enroll or leave the service at any time by logging in to Client Portal and clicking the User menu (head and shoulders icon in the top right corner) followed by Settings. Under Account Settings find the Account Configuration section and click Securities Class Action Recovery to review the Terms & Conditions, subscribe to or unsubscribe from the service.
Eligible clients can quickly and easily enroll or leave the service at any time by logging in to Client Portal and clicking the User menu (head and shoulders icon in the top right corner) followed by Settings. Under Account Settings find the Account Configuration section and click Securities Class Action Recovery to review the Terms & Conditions, subscribe to or unsubscribe from the service.
How does the IBKR Securities Class Action Recovery service work?
Once enrolled, IBKR will notify you when a security you bought or sold is subject to a class action lawsuit and inform you of when a claim is filed. Any monetary compensation received in connection to your claim will be electronically deposited to your IBKR account. Please note that there could be a considerable amount of time between filing a claim and receiving compensation.
Once enrolled, IBKR will notify you when a security you bought or sold is subject to a class action lawsuit and inform you of when a claim is filed. Any monetary compensation received in connection to your claim will be electronically deposited to your IBKR account. Please note that there could be a considerable amount of time between filing a claim and receiving compensation.
Is there a fee to participate in the IBKR Securities Class Action Recovery service?
There is no upfront fee to subscribe to the service. However, all recovered amounts are subject to a 20% contingency fee deducted from the recovered funds. Please refer to the service's Terms & Conditions for details.
There is no upfront fee to subscribe to the service. However, all recovered amounts are subject to a 20% contingency fee deducted from the recovered funds. Please refer to the service's Terms & Conditions for details.
What happens if I unsubscribe from the IBKR Securities Class Action Recovery service while a lawsuit is active?
You are eligible to receive compensation for any settled claims as long as your activity and holdings for involved securities were transmitted to our service provider before you unsubscribed from the service. If you unsubscribe from the IBKR service and sign up with a third-party vendor, a duplicate claim may occur. To avoid rejected claims due to duplicate submissions please email us at proserve@ibkr.com to let us know which claim filing you would like to prevail.
You are eligible to receive compensation for any settled claims as long as your activity and holdings for involved securities were transmitted to our service provider before you unsubscribed from the service. If you unsubscribe from the IBKR service and sign up with a third-party vendor, a duplicate claim may occur. To avoid rejected claims due to duplicate submissions please email us at proserve@ibkr.com to let us know which claim filing you would like to prevail.
ASIC OTC Derivative Transaction Rules (Reporting) (“DTR”) and LEI Information
Background
ASIC Over the Counter (“OTC”) derivatives reporting regulations are designed to make the OTC derivatives markets more transparent by requiring counterparties to these transactions to report trades, positions, collateral and valuations to a derivative trade repository (trade repositories). All counterparties with reporting obligations under the DTRs must have a Legal Entity Identifier (“LEI”) in order to report. However, only IB Australia (“IBAU”) clients who have been permitted to trading in these OTC products and are operating as non-individual entities (e.g. corporations, corporate trusts, etc) are required to have an LEI.
An OTC derivative is a derivative that is not traded:
a) on a financial market that is:
subject to ASIC supervision under Pt 7.2A of the Corporations Act (such as ASX 24);
registered by the US Commodity Futures Trading Commission as a ‘designated contract market' under s5h of the Commodity Exchange Act 1936 (US); or
a regulated market’ as defined in Article 4(1)(21) of the Markets in Financial Instrument Directive 2014/65/EU (MIFID 11); or
b) on certain regulated markets (referred to as ‘regulated foreign markets’) that ASIC has determined are subject to sufficiently equivalent requirements and supervision.
For more details please refer to:
https://asic.gov.au/regulatory-resources/markets/otc-derivatives/frequently-asked-questions/
An example of an OTC products for IBAU clients are the IBAU issued CFDs (Contracts for Difference).
All IBAU clients who are subject to the DTR regulations and who require an LEI will see the LEI Election form upon logging into Account Management. Note that you will only see the LEI Form once upon logging into Account Management; once you make your election, you will not see the form again upon subsequent Account Management logins.
Who is Subject to the DTR Regulation?
All IBAU clients operating as non-individual accounts (e.g. corporations, corporate trusts, etc.) are required to comply with DTR obligations. In this context, non-individual means any account which is owned by one or two individuals as stated in the account title. Individual accounts in the name of a single person are not subject to DTR and so will not have access to this page.
Original LEI Elections
If you are subject to the DTR regulations and are an entity or corporate client and have not already made your LEI election, when you log into Account Management, you will be prompted to do so.
If you have an IBAU account; you can elect to:
- Instruct us to apply for LEI on your behalf. You will be prompted to fill out a simple form and sign an agreement. Obtaining an LEI can take up to three days.
- Provide your LEI, which you have already obtained. You will be prompted to enter your LEI.
- Do nothing (you do not have an LEI and you are not subject to the DTR regulation).
NOTE: THE INFORMATION ABOVE IS NOT INTENDED TO BE A COMPREHENSIVE OR EXHAUSTIVE GUIDANCE AND IT IS NOT A DEFINITVE INTEPRETATION OF THE REGULATION BUT A SUMMARY OF THE ASIC DERIVATIVE TRANSACTION REPORTING.
I am not receiving text messages (SMS) from IBKR on my mobile phone
Background:
Once your mobile phone number has been verified in the Client Portal, you should immediately be able to receive text messages (SMS) from IBKR directly to your mobile phone. This article will provide you with basic troubleshooting steps in case you are unable to receive such messages.
1. Activate the IBKR Mobile Authentication (IB Key) as 2-Factor security device
In order to be independent of wireless/phone carrier-related issues and have a steady delivery of all IBKR messages we recommend to activate the IBKR Mobile Authentication (IB Key) on your smartphone.
The smartphone authentication with IB Key provided by our IBKR Mobile app serves as a 2-Factor security device, thereby eliminating the need to receive authentication codes via SMS when logging in to your IBKR account.
Our IBKR Mobile app is currently supported on smartphones running either Android or iOS operating system. The installation, activation, and operating instructions can be found here:
2. Restart your phone:
Power your device down completely and turn it back on. Usually this should be sufficient for text messages to start coming through.
Please note that in some cases, such as roaming outside of your carrier's coverage (when abroad) you might not receive all messages.
3. Use Voice callback
If you do not receive your login authentication code after restarting your phone, you may select 'Voice' instead. You will then receive your login authentication code via an automated callback. Further instructions on how to use Voice callback can be found in IBKB 3396.
4. Check whether your phone carrier is blocking the SMS from IBKR
Some phone carriers automatically block IBKR text messages, as they are wrongly recognized as spam or undesirable content. According to your region, those are the services you can contact to check if a SMS filter is in place for your phone number:
In the US:
- All carriers: Federal Trade Commission Registry
- T-Mobile: Message Blocking settings are available on T-Mobile web site or directly on the T-Mobile app
In India:
- All carriers: Telecom Regulatory Authority of India
In China:
- Call your phone carrier directly to check whether they are blocking IBKR messages
References:
- How to login using SMS authentication
- Overview of Secure Login System
- Information and procedures related to Security Devices
- IBKR Mobile Authentication
How To Request an IBKR Debit Card
Overview:
IB LLC individual and joint accounts (excluding IRA accounts) are now eligible to request an IBKR Debit Card through Account Management.
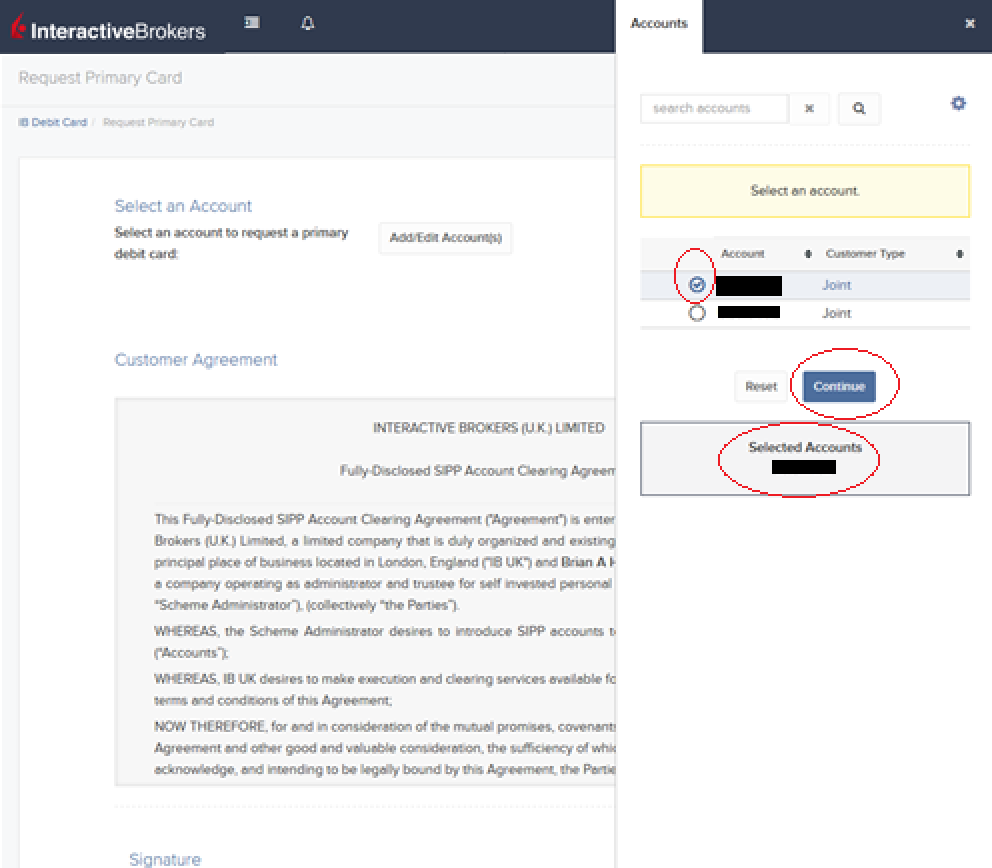
In order to request an IBKR Debit Card, first login to Client Portal/Account Management and select Transfer & Pay. Under Transfer & Pay, click the option for "Integrated Cash Management".

The IBKR Debit Card Summary screen will populate. At the top of the page you will see a button to "Apply Now". Click the button to start your IBKR Debit Mastercard application.

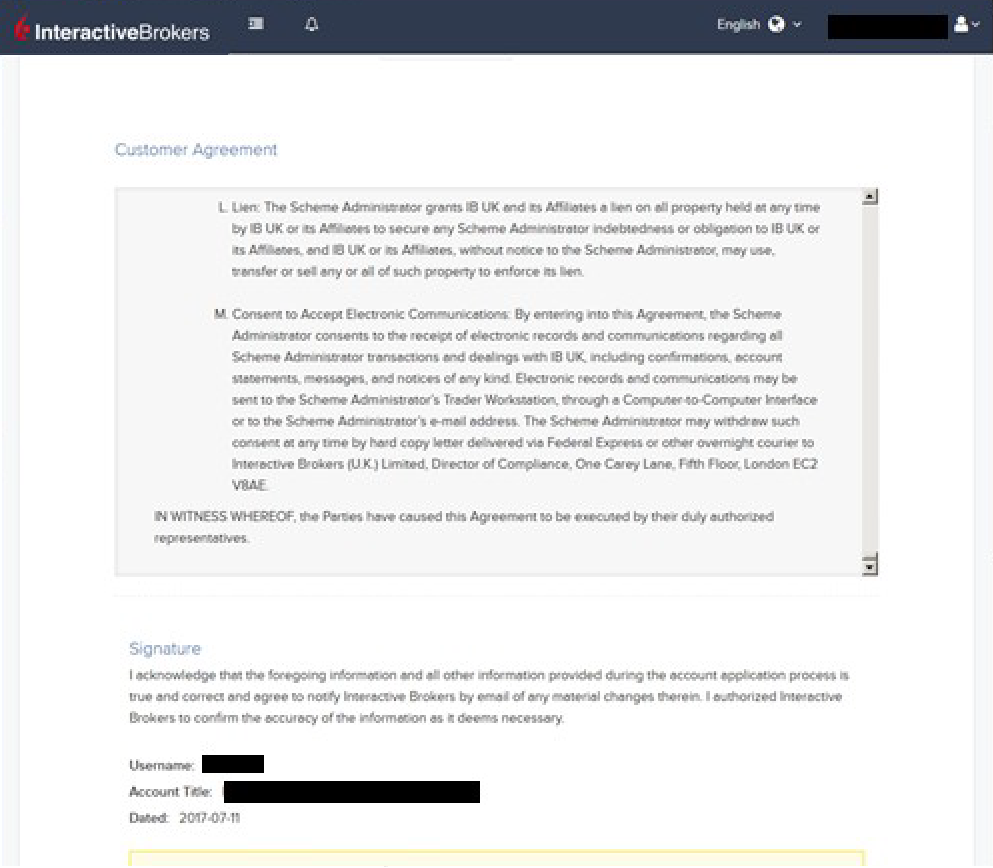
The application page will populate with the Customer Agreement along with an option to Select an Account to link to your IBKR Debit Card. Click the "Add/Edit Accounts" button to make your selection.
.png)
Your accounts will populate on the right side of the screen. Once you have made your selection, your selected account will be highlighted at the bottom of the right-hand window. Once you are ready to confirm the account, click the "Continue" button.
Scroll down to the bottom of the page where you will be prompted to agree to the terms set forth in the Customer Agreement by signing your name as it appears on the account. Click "Continue" to proceed.
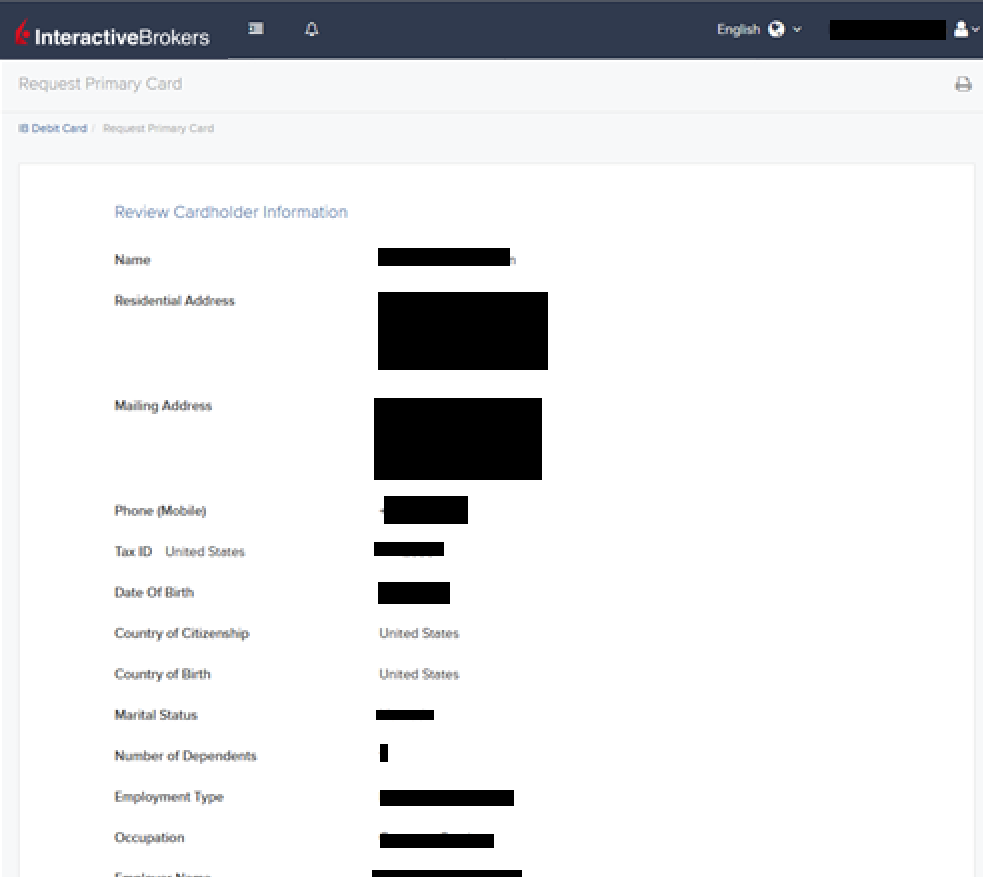
The next screen will ask you to review the Cardholder Information. The information should all be correct as it uses the information from your IBKR account. If the information is not correct, you will need to go into your account and change any incorrect information. If the information is correct, click "Continue" to proceed.
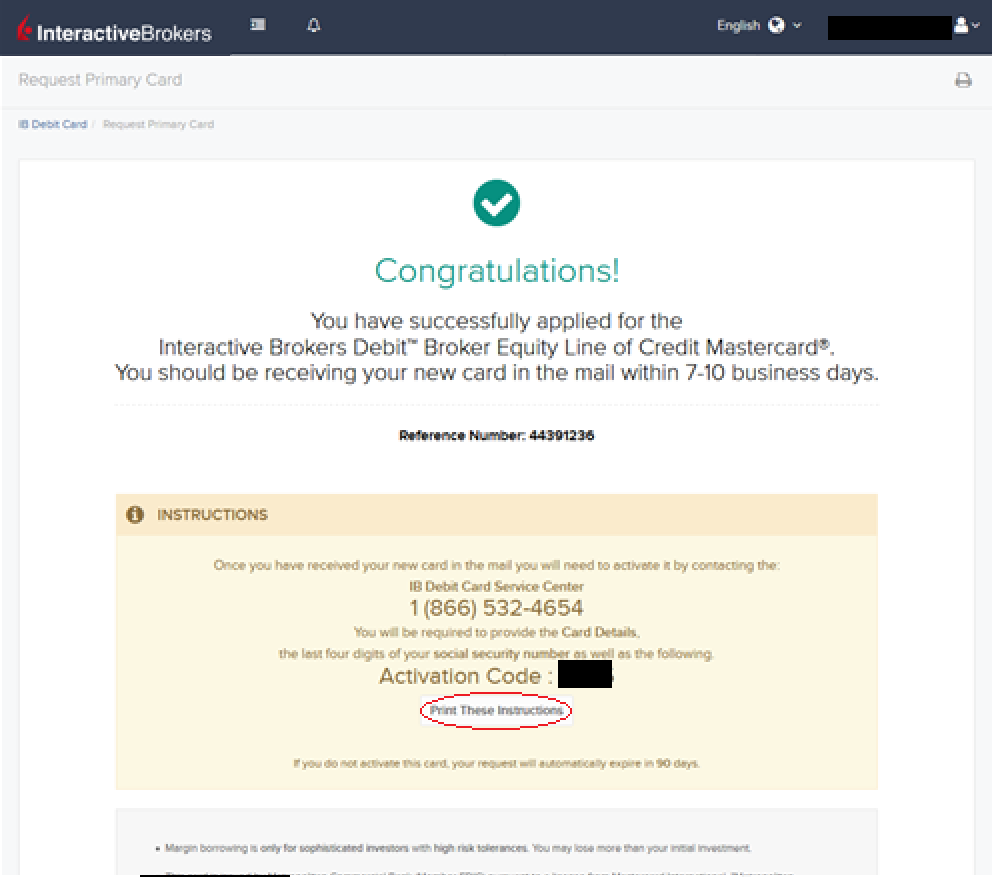
Once you confirm your Cardholder Information, your application will be submitted. You will receive a confirmation with a reference number, along with activation instructions for when you receive your IBKR Debit Card in the mail.
Forex Execution Statistics
Overview:
IBKR clients can now analyze the quality of their forex executions in comparison to forex trades by other IBKR customers through the FX Browser tool in Client Portal. The tool provides transaction data for the 15 forex transactions that occur immediately before and after in the same currency pair of the client's transaction.
Note:
The number of transactions may be limited to fewer than the stated 15 as the NFA also has placed a 15 minute window on the query. Meaning, if within a 15 minute window before and after the customer's execution there are fewer than 15 executions the customer's query will return only those executions which occurred within the time window.
Accessing the FX Browser Tool
To Access the FX Browser tool, login to Client Portal using the Login button on our website. Click the Help menu (question mark icon in the top right corner) followed by Support Center. Please note, at this time only data for the live account will be provided.
.png)
From there, select "See Trades on IBKR's FX Platform" from the list of Information & Tools:

Submitting a Query
When the FX Browser is launched, you will be presented with the following screen:
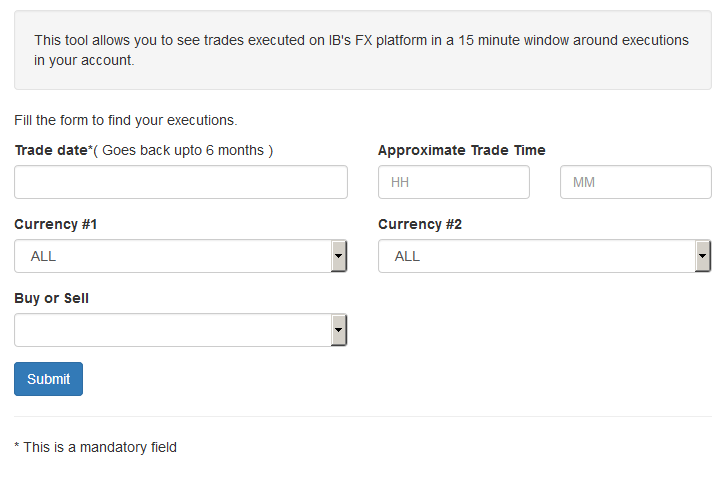
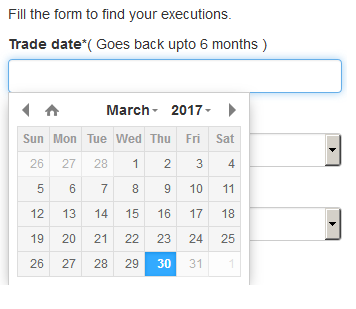
Please note that only Trade Date is a mandatory field in the query. When clicking on the Trade Date field, a calendar widget will populate and allow you to select your trade date. Only transactions from the last 6 months will be available to search.
Active customers may wish to limit the results by further selecting the currency pair, side or time of the execution.
Once the desired query has been entered, click on the Submit button.
The next screen will display the list of executions for the given account on the specified day. From there, you may select the execution you wish to receive the execution statistics on.
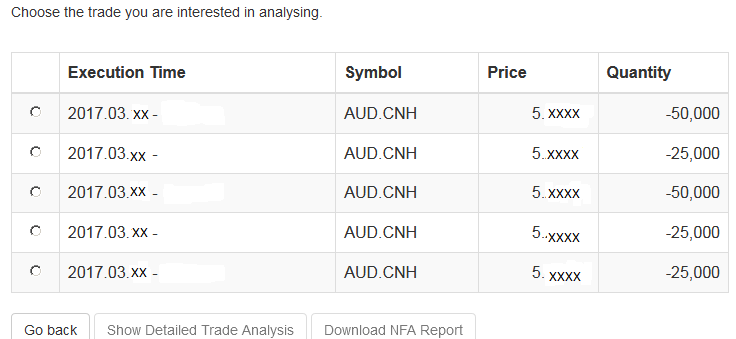
Once the execution you wish to view has been selected, click the "Download NFA Report" button.

Reading the Report
The results will be returned in a new tab and will contain the 15 executions before and 15 executions after the trade you selected on the previous screen. Per the note above, if fewer than 15 executions occurred in the 15 minute time frame only those executions will be displayed.
The query results will include the following information:
- Execution date and time, as expressed in Eastern time
- Side (buy or sell)
- Quantity (of Transaction Currency)
- Currency pair
- Execution price
- Commissions and other charges assessed by the FDM
- Currency denomination of commissions
Your trade will be marked as Trade Number "0" and the trades before and after your trade will be numbered from 1 to 15.
Error Messages
If the search criteria you enter does not bring up any trade information, you will be presented with the following error message:

How to update the US Social Security Number (SSN) or Individual Taxpayer Identification Number (ITIN) on your account
Background:
If you have been informed or believe that your account profile contains an incorrect US SSN/ITIN, you may simply log into your Account Management to update this information. Depending on your taxpayer status, you can update your US SSN/ITIN by modifying one of the following documents:
1) IRS Form W9 (if you are a US tax resident and/or US citizen holding a US SSN/ITIN)
2) IRS Form W-8BEN (if you are a Non-US tax resident holding a US SSN/ITIN)
Please note, if your SSN/ITIN has already been verified with the IRS you will be unable to update the information. If however the IRS has not yet verified the ID, you will have the ability to update through Account Management.
How to Modify Your W9/W8
1) To submit this information change request, first login to Account Management
2) Click on the Settings section followed by Account Settings
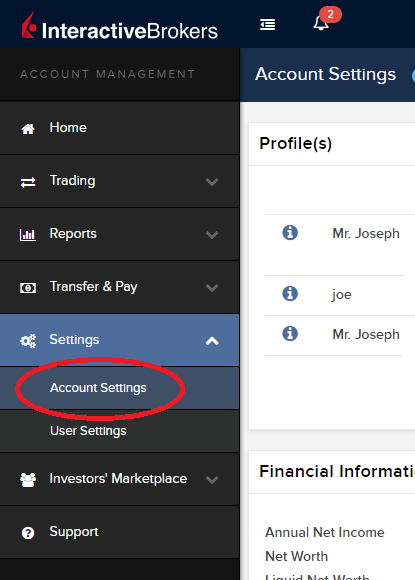
3) Find the Profile(s) section. Locate the User you wish to update and click on the Info button (the "i" icon) to the left of the User's name
.png)
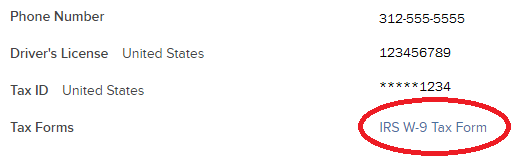
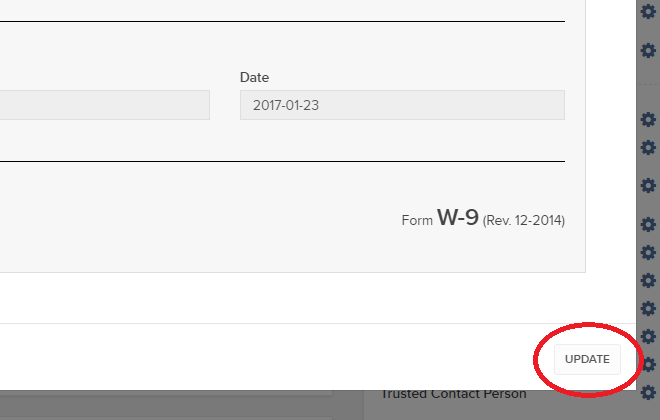
4) Scroll down to the bottom where you will see the words Tax Forms. Next to it will be a link with the current tax form we have for the account. Click on this tax form to open it
5) Review the form. If your US SSN/ITIN is incorrect, click on the UPDATE button at the bottom of the page
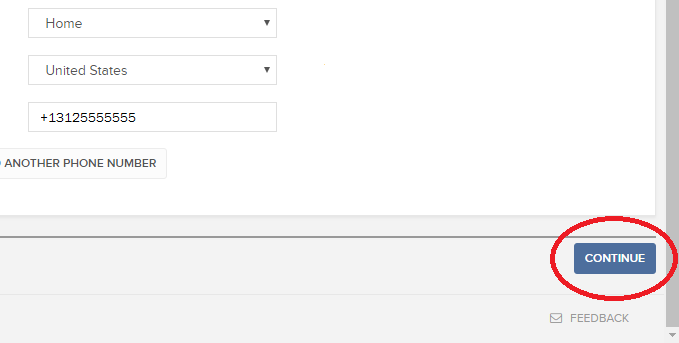
6) Make the requisite changes and click the CONTINUE button to submit your request.
7) If supporting documentation is required to approve your information change request, you will receive a message. Otherwise, your information change request should be approved within 24-48 hours.
Как подтвердить Ваш номер мобильного телефона
Background:
Данная статья объясняет, как подтвердить Ваш номер мобильного телефона.
Если Вы не подтвердили номер Вашего телефона в процессе подачи заявки, то это можно сделать в любой момент, выполнив следующие действия:
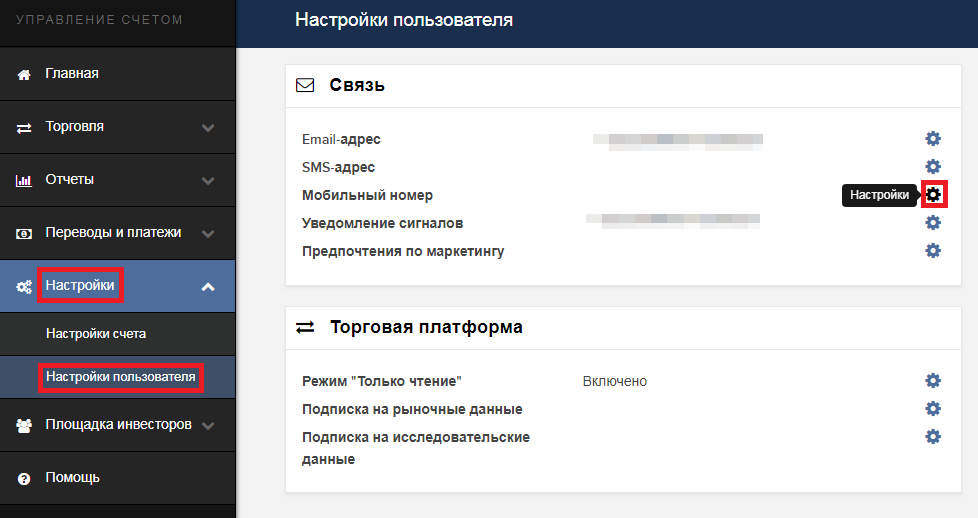
- Войдите в "Управление счетом"
- В боковом меню выберите Настройки, а затем Настройки пользователя. Щелкните по значку шестеренки рядом с полем "Номер мобильного телефона". Если Вы используете классическое "Управление счетом", то этот раздел можно открыть, выбрав Параметры -> Детали счета -> Подробная информация -> Профиль в меню сверху и нажав "Изменить"
- Нажмите ПОДТВЕРДИТЬ

- Перейдите в раздел сообщений в Вашем телефоне; там Вы найдете отправленное нами SMS с кодом подтверждения.
ПРИМЕЧАНИЕ: Время доставки варьируется и в некоторых случаях может занять несколько минут.
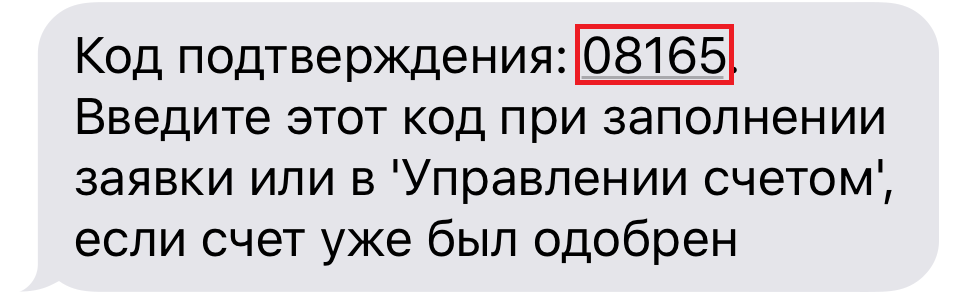
- Введите полученный код в поле Код подтверждения и нажмите ДАЛЕЕ.
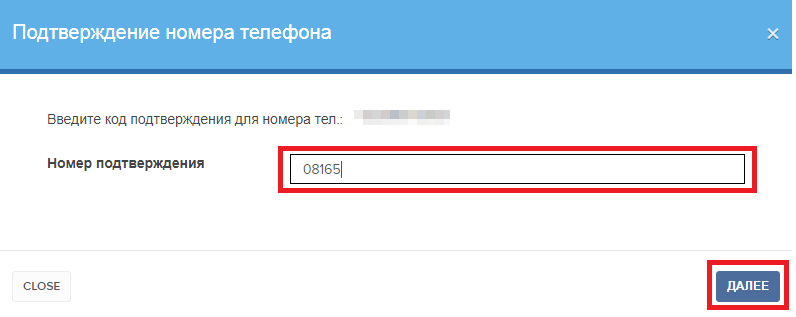
- Если код верен, то в столбце Подтвержден SMS появится зеленая отметка. Нажмите ДАЛЕЕ, чтобы завершить процедуру.

- Если у Вашего пользователя отсутствует активное устройство безопасного входа, то вскоре для него автоматически активируется система двухфакторной аутентификации. Подробнее о входе с аутентификацией посредством SMS можно узнать в статье KB3196.
FATCA Procedures - Grantor Trust Tax Information Submission
Overview:
Interactive Brokers is required to collect certain documentation from clients to comply with U.S. Foreign Account Tax Compliance Act (“FATCA”) and other international exchange of information agreements.
This guide contains instructions for a Trust to complete the online tax information and to electronically submit a W-9 or W-8BEN.
U.S. Tax Classification
Your U.S. income tax classification determines the tax form(s) required to document the account.
You must login to Account Management with the trust's primary username to access the Tax Form Collection page.
1. Tax Form Collection
The Tax Form Collection page lets account holders review and update important tax-related information and lets account holders electronically fill out an IRS Form W-9 (U.S. taxpayers) and IRS Form W-8 (non-U.S. taxpayers).
Accessing the Tax Form Collection Page
a. Click Manage Account > Account Information > Tax Information > Tax Forms.
b. Click the Update Tax Forms button to access the Collection page.
The Tax Form Collection page opens, displaying a form with tax-related information that should already be completed. (Advisors and brokers can check the status of client updates to this page on the Dashboard Pending Items tab.
c. Review the Trust’s information and update as required.
Confirm the primary tax residency of the trust beside the Tax Residency question, "In what country is the trust a resident for tax purposes?" Select the appropriate country in the drop down menu.
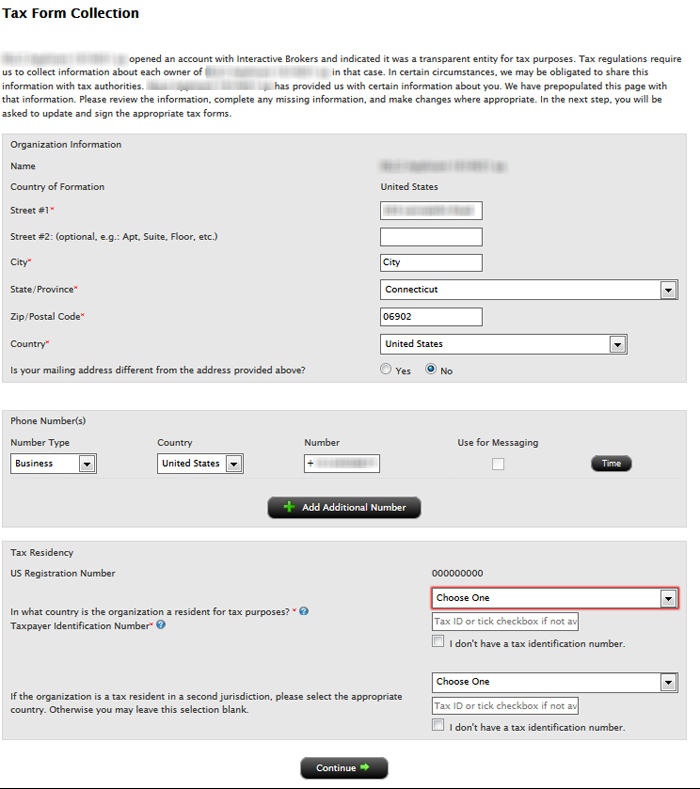
Select in the Tax Residency drop down menu the applicable country.
d. Click Continue.
2. Classification for US Tax Purposes
Confirming the Trust’s classification for U.S. purposes
a. Review the Trust’s status by confirming the question, “How are you classified for US tax purposes?” The answer is pre-filled based upon your information completed during the account application process.
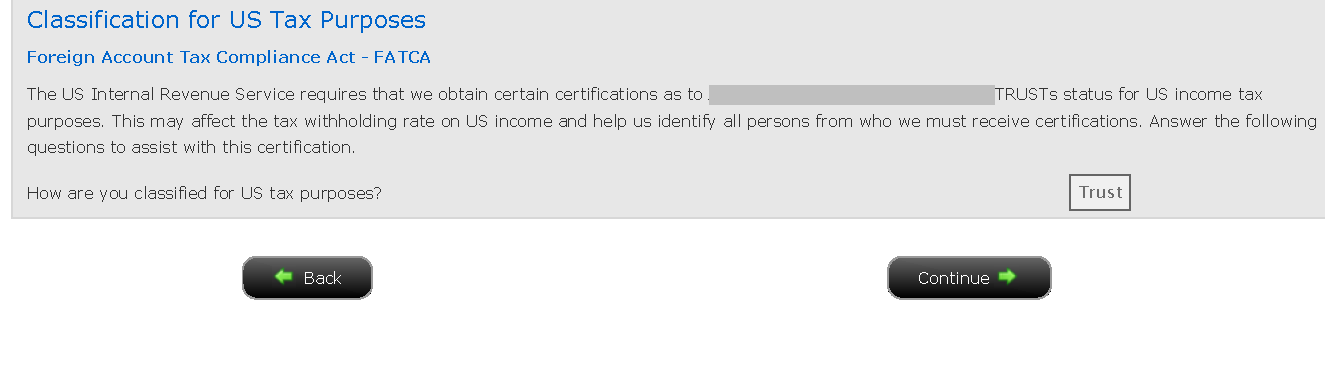
b. Click the Continue button to confirm the trust classification and complete the Form W-8 or W-9 for the entity.
c. Click the Continue button to identify each Grantor.
3. Identify Grantors
a. Click Manage Account > Account Information > Tax Information > Tax Forms.
b. Click the Create button beside each grantor to send each user the applicable tax questionnaire and to submit the tax certification form (W-8 or W-9).
Also, update the "Percentage of Ownership" to add up to 100%, if necessary.
.png)
c. Enter the required fields for the username and password for specified grantor and click the Continue button to complete the email delivery of the link.
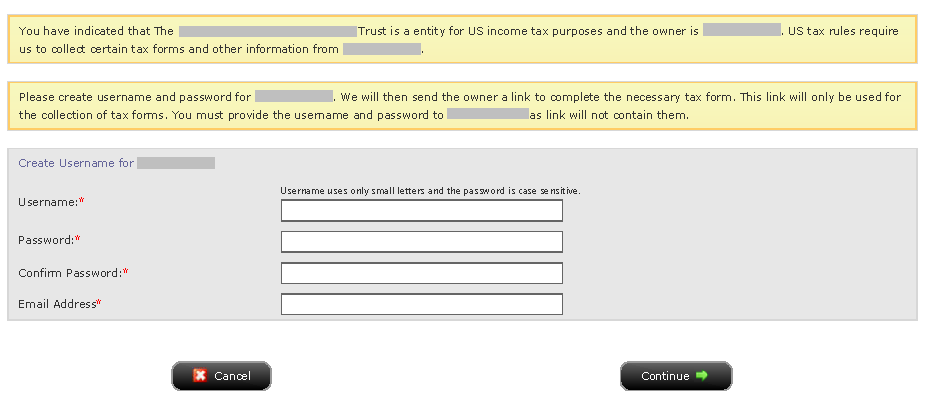
We will then send the owner a link to complete the necessary tax form. This link will only be used for the collection of tax forms. You must provide the username and password to the Grantor as link will not contain them.
Each Grantor must login with the username/password created and complete the pending tasks by going to Manage Account > Account Information > Tax Information > Tax Forms > Update Tax Forms.
d. Click the Continue button upon creating and sending usernames to each Grantor.
Disclaimer
This guide does not constitute tax or legal advice and Interactive Brokers cannot advise you on how to complete an IRS Forms W-8 or W-9. Instructions are for information purposes only and do not address all possible scenarios. Please consult your tax professional if you are unsure how to complete.
Добро пожаловать Interactive Brokers
Overview:
Теперь когда Ваш счет одобрен и профинансирован, Вы можете приступить к торговле. Нижеприведенная информация поможет Вам
как новому клиенту Interactive Brokers.
- Ваши деньги
- Настройте свой счет для торговли
- Как торговать
- Торгуйте по всему миру
- Пять вспомогательных инструментов при торговле в IB
1. Ваши деньги
Общая информация о депозитах и выводе средств. Все операции производятся через Ваш защищенный Личный кабинет ("Управление счетом")
Депозиты
Сначала Вам следует создать уведомление о депозите, перейдя в Управление счетом > Финансирование > Перевод средств > Тип транзакции: "Депозит" (Как создать уведомление о депозите). Следующий шаг - запросить у своего банка безналичный перевод (wire) с использованием реквизитов, указанных в Вашем уведомлении о депозите.
Вывод средств
Создайте инструкцию на вывод, перейдя в Управление счетом > Финансирование > Перевод средств > Тип транзакции: "Изъятие средств" (Как создать инструкцию на вывод средств)
Если сумма в инструкции превысит лимиты изъятия, то вывод средств будет считаться исключительным и потребует сопоставления имеющихся у IB данных с информацией владельца банковского счета-получателя. Если банковский счет уже был использован ранее для депозита, то вывод будет осуществлен; в ином случае Вы будете должны связаться со службой поддержки и представить необходимые документы.
Диагностика ошибок
Депозит: Банк отправил деньги, но они не были зачислены на мой счет в IB. Возможные причины:
а) Перевод средств занимает 1-4 рабочих дня
б) Отсутствует уведомление о депозите. Вам следует создать его в "Управлении счетом" и отправить тикет в службу поддержки
в) Отсутствуют необходимые данные. Ваше имя или номер счета в IB не включены в детали перевода. Вам нужно связаться со своим банком и сообщить о требующихся поправках
г) Для ACH-переводов, инициированных IB, действует ограничение суммой 100 тыс. USD каждые 7 рабочих дней. Если Вы открыли счет "Маржевый портфель", начальный депозит которого составляет 110 тыс., то для сокращения времени ожидания перед началом торговли Вам подойдет безналичный wire-перевод. В случае выбора ACH у Вас два возможных выхода: ждать почти 2 недели или временно изменить тип счета на "RegT".
Вывод: Я запросил вывод средств, но они не были зачислены на мой банковский счет. Возможные причины:
а) Перевод средств занимает 1-4 рабочих дня
б) Запрос отклонен. Максимальная сумма вывода превышена. Проверьте свободный остаток на своем счете. Имейте в виду, что, согласно регулятивным требованиям, на депозиты распространяется 3-дневный период удержания, прежде чем они снова смогут быть изъяты.
в) Ваш банк вернул средства. Причиной тому может быть несовпадение имени, связанного с отправляющим и получающим банковскими счетами.
2. Настройте свой счет для торговли
Разница между денежным и маржевым счетом: если Вы выбрали заявку FastTrack, то по умолчанию тип Вашего счета - денежный с разрешением на акции США. Если Вы хотите торговать с маржей и кредитным плечом, то прочтите как сменить тип счета на "Маржевый RegT"
Торговые разрешения
Для возможности торговать определенным классом активов в какой-либо стране Вам необходимо получить разрешение на него в Вашем "Управлении счетом". Обращаем внимание, что торговые разрешения бесплатны. Вас могут попросить подписать уведомления местных надзорных органов о риске. Как запросить торговые разрешения
Рыночные данные
Если Вы нуждаетесь в "живых" рыночных данных по конкретному продукту/бирже, то Вам следует подписаться на соответствующий информационный пакет, оплата за который взимается биржей. Как подписаться на рыночные данные
Программа-ассистент поможет Вам выбрать подходящий пакет данных. Посмотрите видео о том, как это работает.
Клиентам также предлагаются бесплатные запаздывающие рыночные данные, активируемые кнопкой "Бесплатные данные с задержкой" в строке тикера без подписки.
Счета консультантов
Прочтите руководство "Начало работы консультантом". В нем Вы узнаете, как создать дополнительных пользователей на Вашем счете консультанта, дать им права и многое другое.
3. Как торговать
Университет трейдинга - это основное место, которое научит Вас пользоваться нашими платформами. В нем Вы найдете вебинары (транслируемые в прямом эфире и записанные на 10 языках), обзоры и документацию наших программ.
Trader Workstation (TWS)
Трейдеры, нуждающиеся в более комплексной платформе, могут воспользоваться нашей программой Trader Workstation (TWS), которая повысит Вашу скорость торговли и ее эффективность при помощи простого в использовании табличного интерфейса, поддержки более 60-ти типов ордеров, специализированных торговых инструментов и мониторинга состояния и активности счета в реальном времени. Испытайте два варианта
Mosaic TWS: интуитивный интерфейс, быстрый доступ к торговле, простое управление ордерами, списки наблюдения, графики или
Классический TWS: расширенное управление ордерами для трейдеров, которым нужны продвинутые инструменты и алгоритмы.
Описание и общая информация / Краткое руководство / Руководство пользователя
Интерактивные обзоры: Основы TWS / Настройка TWS / Mosaic TWS
Как разместить сделку: Классический TWS (видео) / Mosaiс (видео)
Торговые инструменты: Описание и общая информация / Руководство
Требования: Как установить Java в Windows / Как установить Java на MAC / Порты 4000 и 4001 должны быть открыты
Войти в TWS / Скачать TWS
WebTrader
Трейдеры, предпочитающие простой и незагроможденный интерфейс, могут использовать WebTrader на базе HTML, который упрощает просмотр рыночных данных, отправку ордеров и отслеживание состояния счета и сделок. Доступ к WebTrader возможен через любой браузер
Краткое руководство / Руководство пользователя WebTrader
Введение: WebTrader (видео)
Как разместить сделку: WebTrader (видео)
Войти в WebTrader
MobileTrader
Наши мобильные приложения позволяют трейдерам торговать со своих счетов в IB на ходу. mobileTWS для iOS и mobileTWS для BlackBerry были специально разработаны для этих популярных моделей телефонов, в то время как стандартный MobileTrader поддерживает большинство остальных смартфонов.
Описание и общая информация
Типы ордеров Список и описание доступных типов ордеров / Видео / Обзор / Руководство
Тренировочная торговля (Paper Trading) Описание и общая информация / Как открыть тренировочный счет
Создав тренировочную учетную запись, Вы сможете просматривать рыночные данные со своего настоящего счета: Управление счетом > Параметры > Настройки > Тренировочная торговля
4. Торгуйте по всему миру
Счета IB - мультивалютные. На Вашем счете может храниться несколько валют одновременно, что позволит Вам торговать различными продуктами по всему миру с единого счета.
Базовая валюта
В Вашей базовой валюте будут составляться отчеты и рассчитываться маржинальные требования. Она устанавливается при открытии счета и может быть в любой момент изменена Вами в "Управлении счетом".
Мы не производим автоматическую конверсию валют в Вашу базовую
Пользователь должен осуществлять конверсию валют вручную. В данном видео объясняется, как это сделать.
Есть два варианта для открытия позиции в валюте, отсутствующей на Вашем счете:
а) Конверсия валют.
б) Маржинальный IB (недоступно для денежных счетов).
См. урок о механизме зарубежной сделке.
5. Пять вспомогательный инструментов при торговле в IB
1. Поиск контрактов
Здесь Вы сможете найти все наши продукты, символы и их характеристики.
2. База знаний IB
"База знаний" - это хранилище словарных терминов, советов по диагностике и руководств, предназначенных помочь клиентам IB в управлении их счетов. Просто введите интересующую Вас тему в строку поиска, и Вы найдете ответ.
3. Управление счетом
В то время, как наши платформы открывают двери на рынки, "Управление счетом" дает Вам доступ к Вашему счету IB. Используйте "Управление счетом" для выполнения таких задач, как депозит или вывод средств, просмотр выписок, настройка подписок на рыночные данные/новости, изменение торговых разрешений и проверка или корректировка Вашей личной информации.
Войти в "Управление счетом" / Краткое руководство / Руководство пользователя
4. Система безопасного входа
Чтобы обеспечить Вас наивысшим уровнем онлайн-безопасности, Interactive Brokers разработали "Систему безопасного входа". Она основывается на принципе двухфакторной аутентификации (SLS) Вашей личности в момент входа и требует двух типов идентификаторов: 1) выбранный Вами (комбинация Вашего пароля и имени пользователя); и 2) доступный только Вам (генерирование случайного одноразового кода Вашим устройством безопасности). Поскольку для входа в счет будет необходимо не только знать имя пользователя/пароль, но и физически обладать устройством безопасности, участие в "Системе безопасного входа" исключит возможность несанкционированного доступа.
Как активировать Ваше устройство защиты / Как запросить карту кодов безопасности / Как возвратить устройство защиты
Если Вы забыли свой пароль или потеряли карту кодов, пожалуйста, немедленно обратитесь к нам за помощью.
5. Выписки и отчеты
Наши легко читаемые и настраиваемые выписки и отчеты охватывают все аспекты Вашего счета в Interactive Brokers. Как посмотреть отчет по операциям