I want to activate IBKR Mobile Authentication (IB Key) for iPhone with the QR Code from Client Portal
You may have seen a QR code when you logged into Client Portal. In this article we will cover the steps for activating IBKR Mobile Authentication (IB Key) using that code.
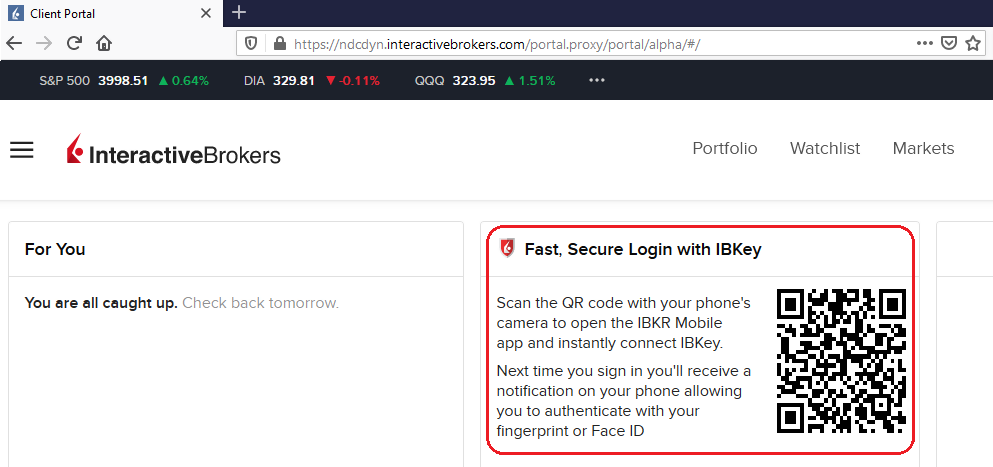
1) Log into Client Portal. You will see a banner recommending that you activate IBKR Mobile Authentication (IB Key) by scanning the accompanying QR Code:
Figure 1
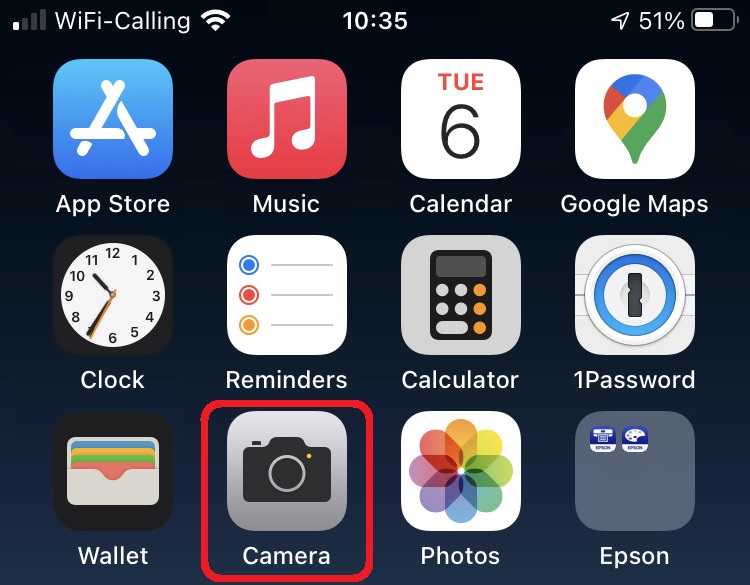
2) On your smartphone, launch the "Camera" app.
Figure 2
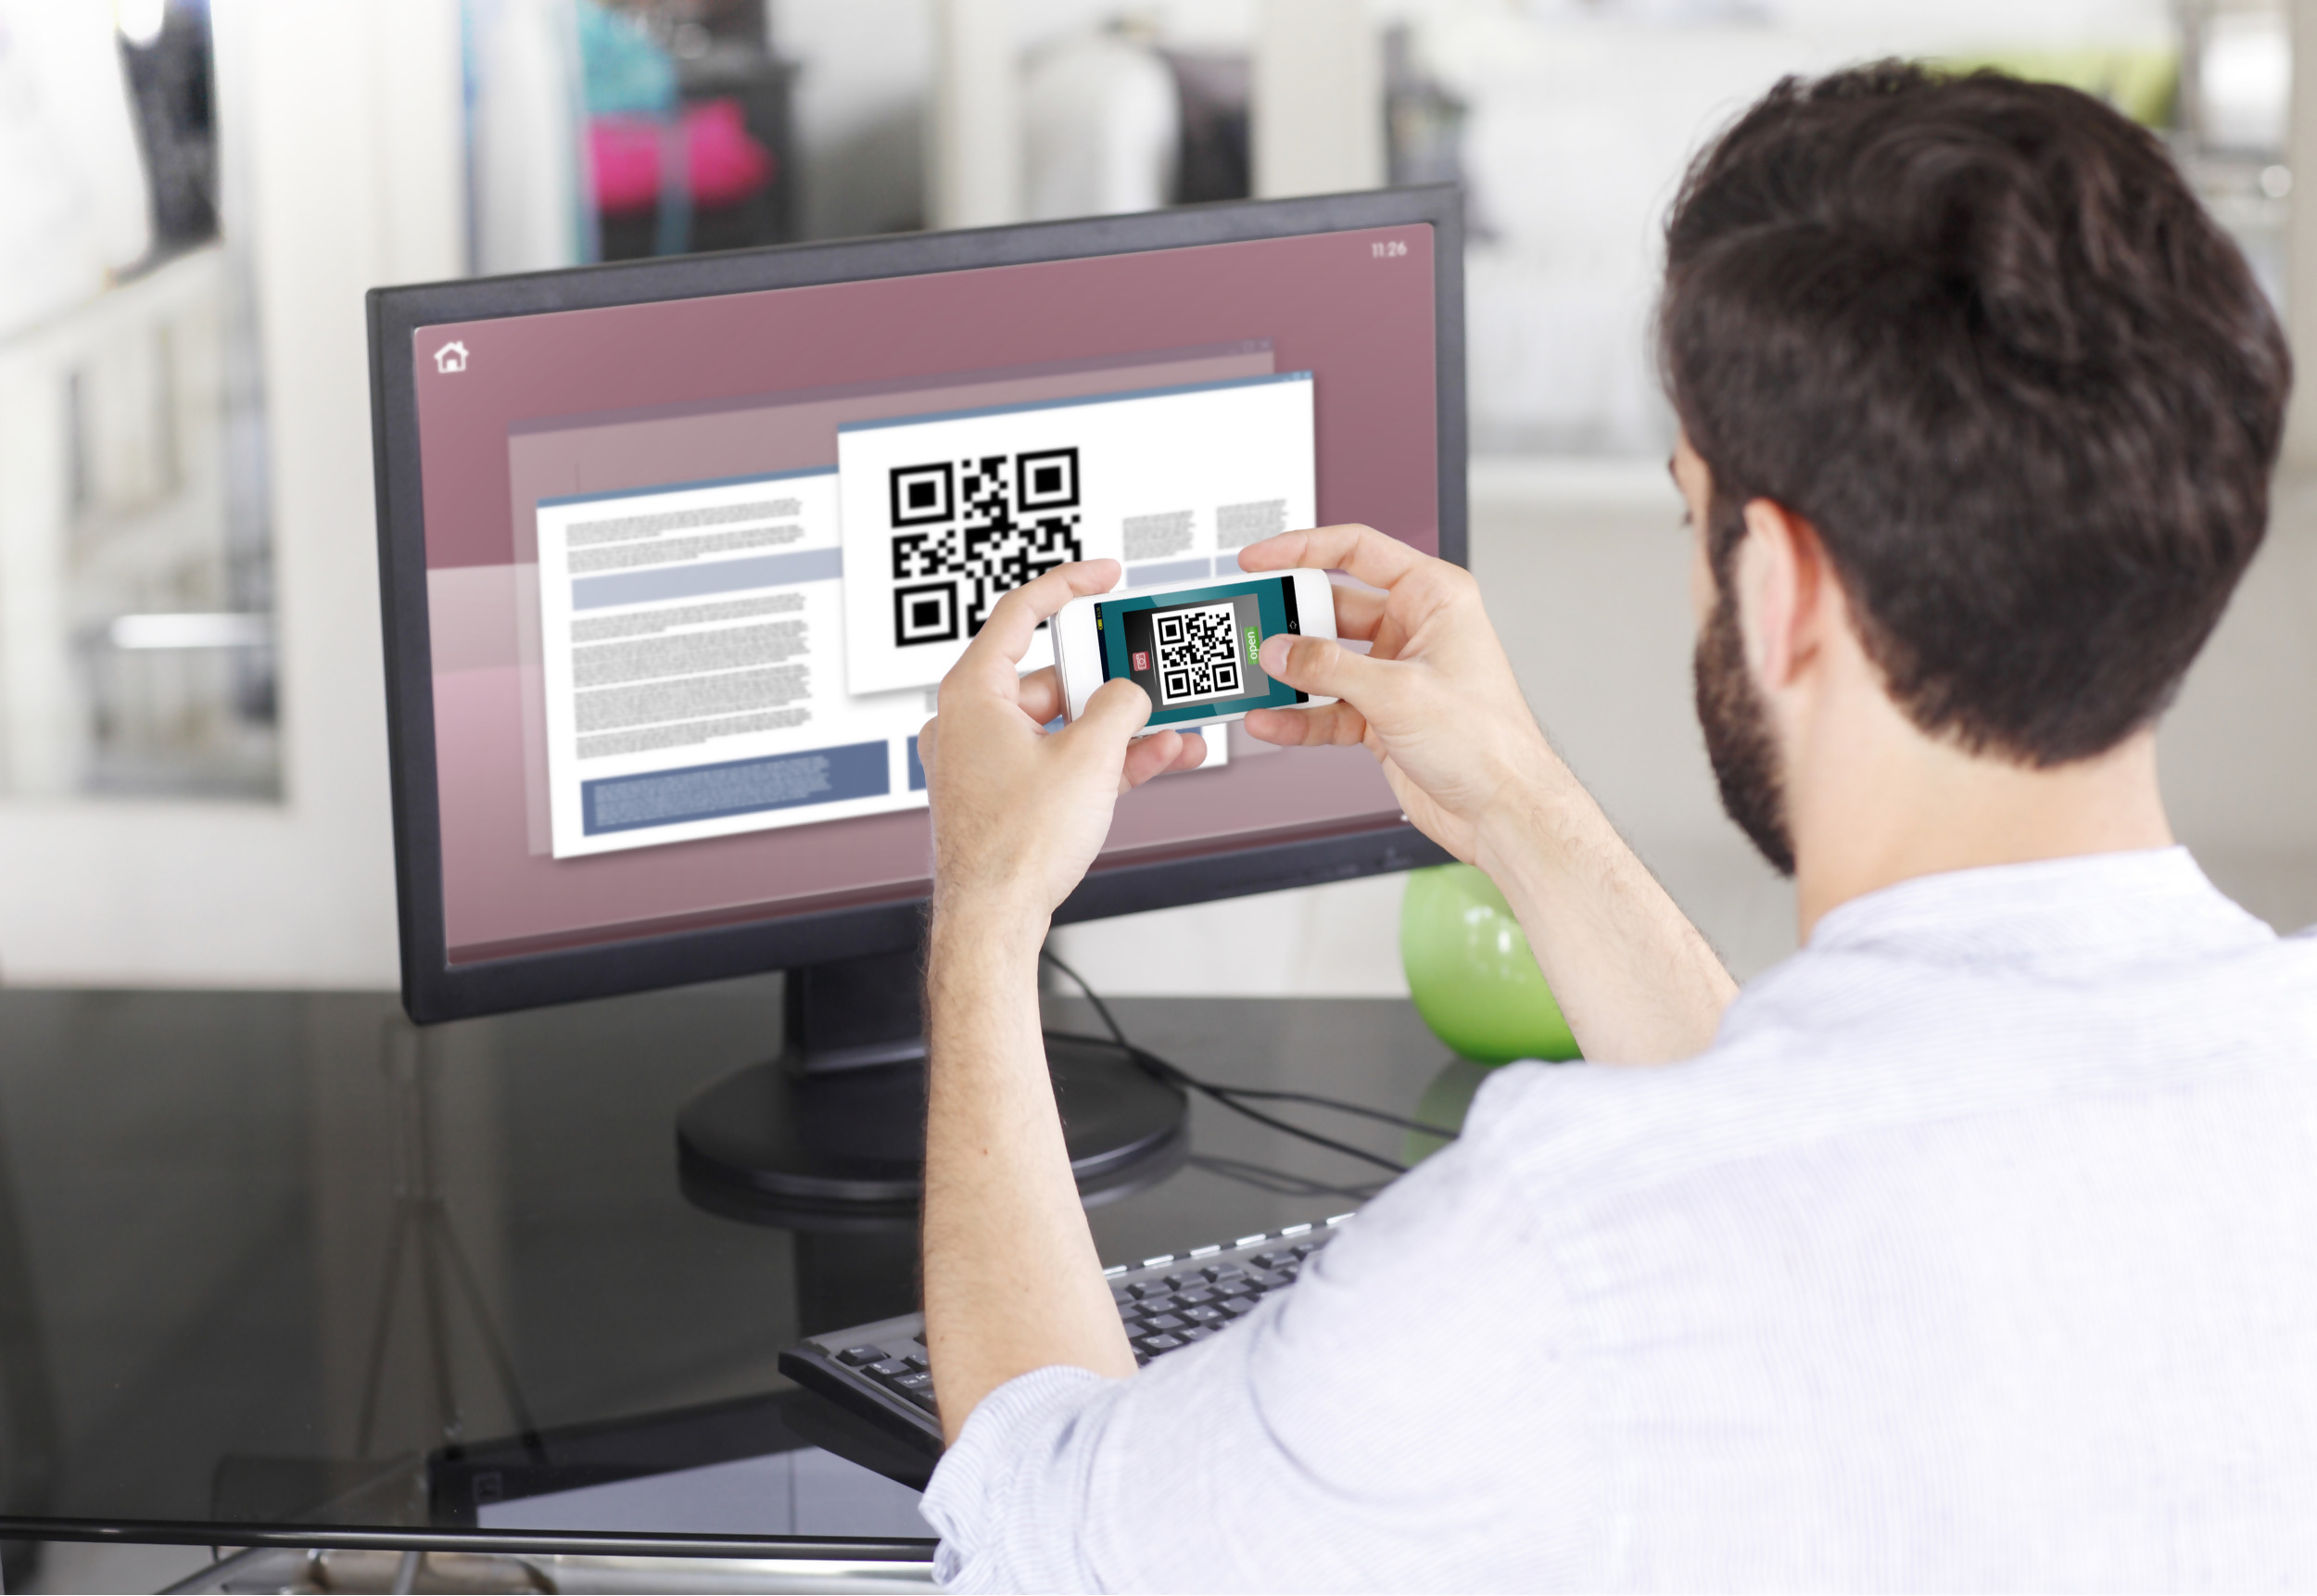
3) Point the lens of your smartphone camera towards the QR code. You don't need to "take a picture." When the code is in focus it is automatically captured. If your phone does not seem to recognize the QR code try to move your phone closer or farther away to the QR code in order to gain focus. If your phone does not recognize the QR code, please see the section Possible Issues and solutions at the bottom of this article.
Figure 3
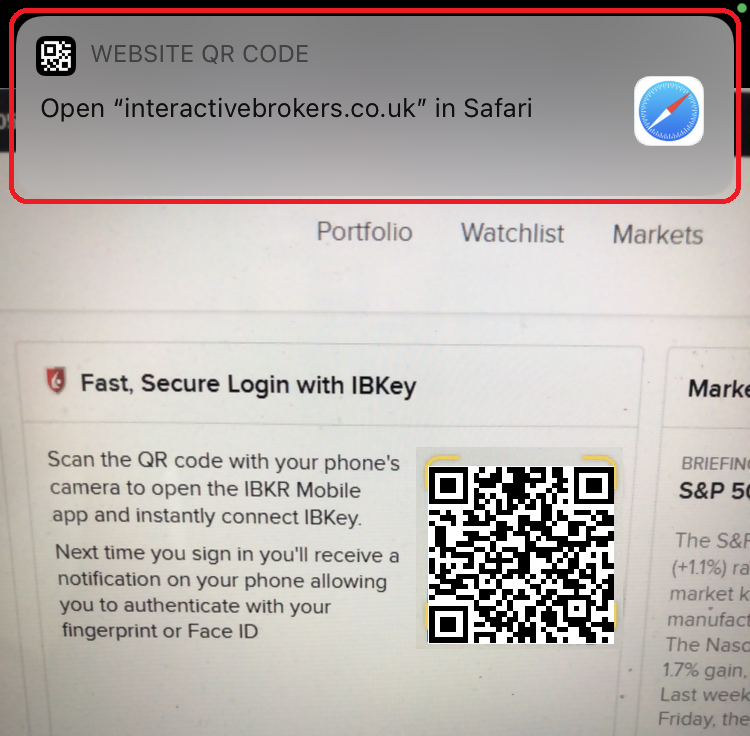
4) If your device was able to read the QR code successfully, you will see a banner on the top of your smartphone screen.
- If the banner asks you to open the IBKR web site on your smartphone browser (as in Figure 4.1), please proceed directly to next step, 5)
- If the banner asks you to open the IBKR Mobile app (as in Figure 4.2), please jump to step 8)
Figure 4.1 Figure 4.2
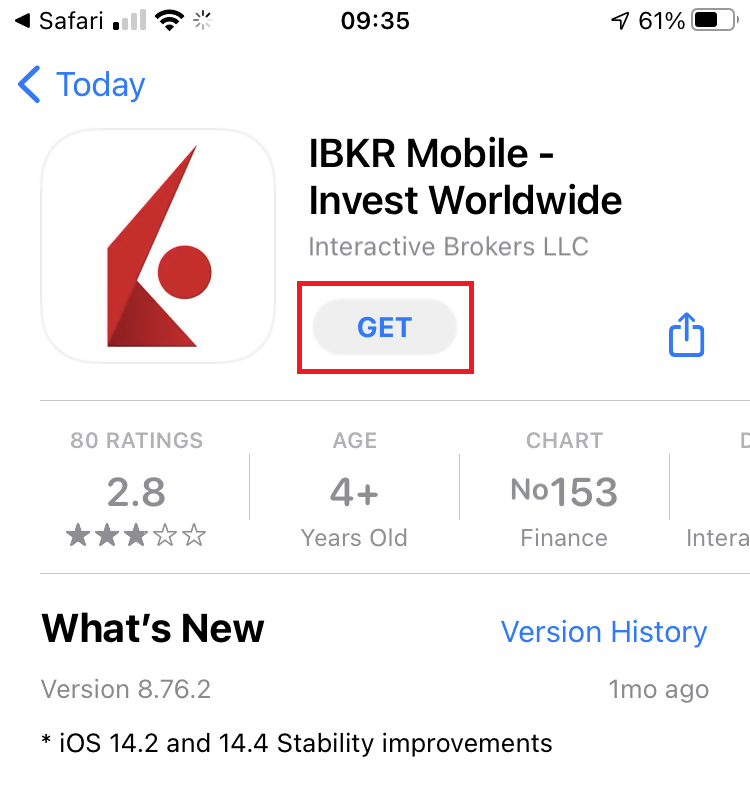
5) Tap on the banner on the top of your smartphone screen, asking you to open the IBKR Web site. You will be redirected to the AppStore.
Figure 5
6) Tap the download icon GET to install IBKR Mobile on your phone.
Figure 6
7) Once the installation is complete, do not launch the IBKR Mobile app. Open your camera and again focus on the QR code displayed in Client Portal.
Figure 7
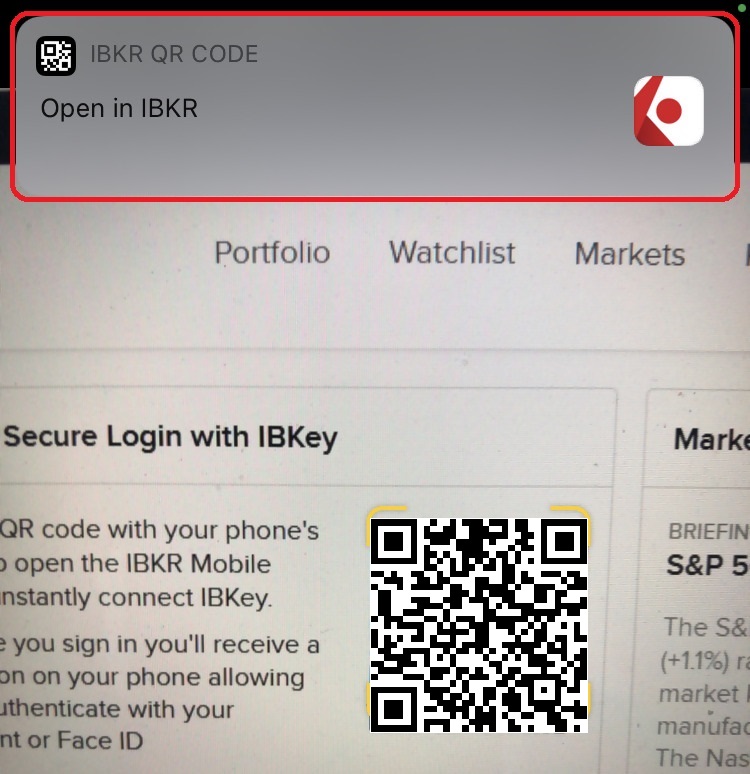
8) Tap on the banner on the top of your screen, asking you to open the IBKR Mobile app.
Figure 8
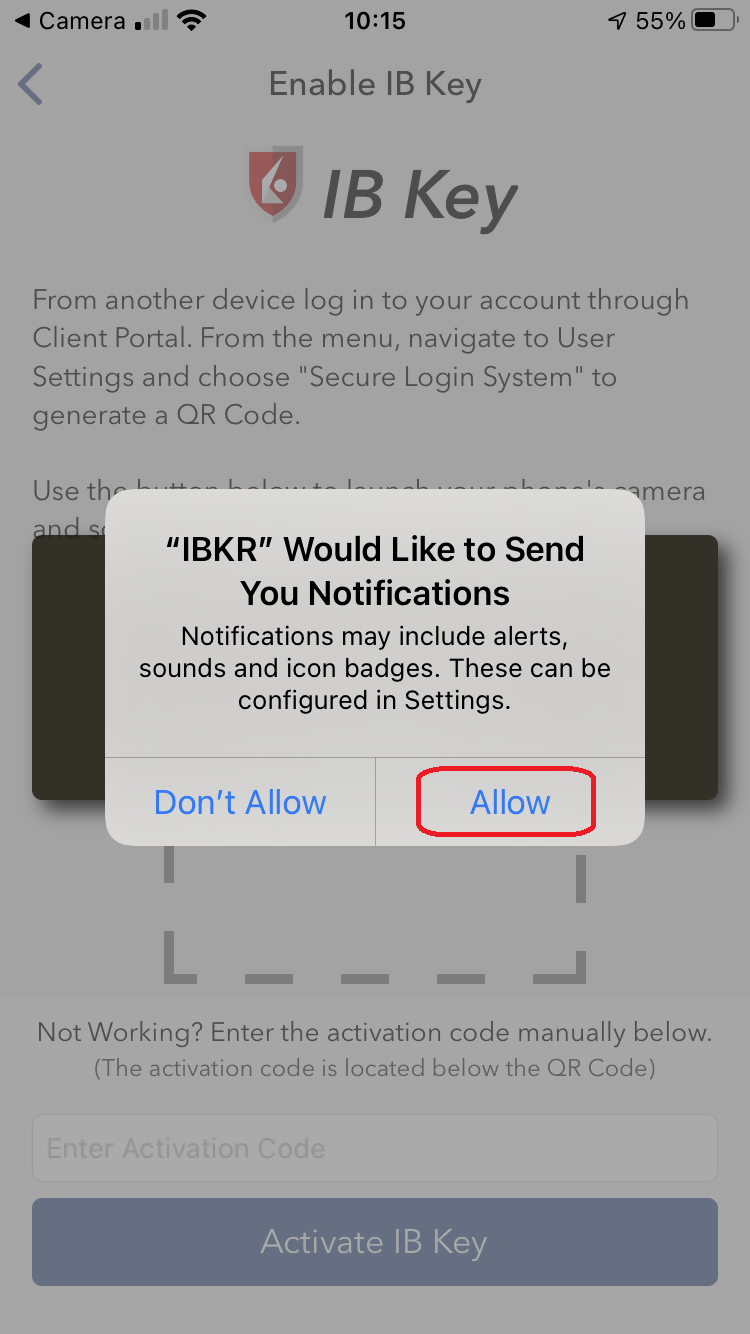
9) Tap Allow if asked whether to allow or disallow notifications for IBKR Mobile.
Figure 9
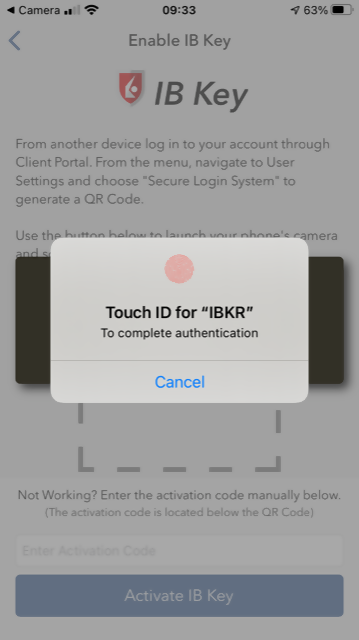
10) You will be asked to provide the security element you use to unlock your phone (FaceID, Fingerprint or Passcode).
Figure 10
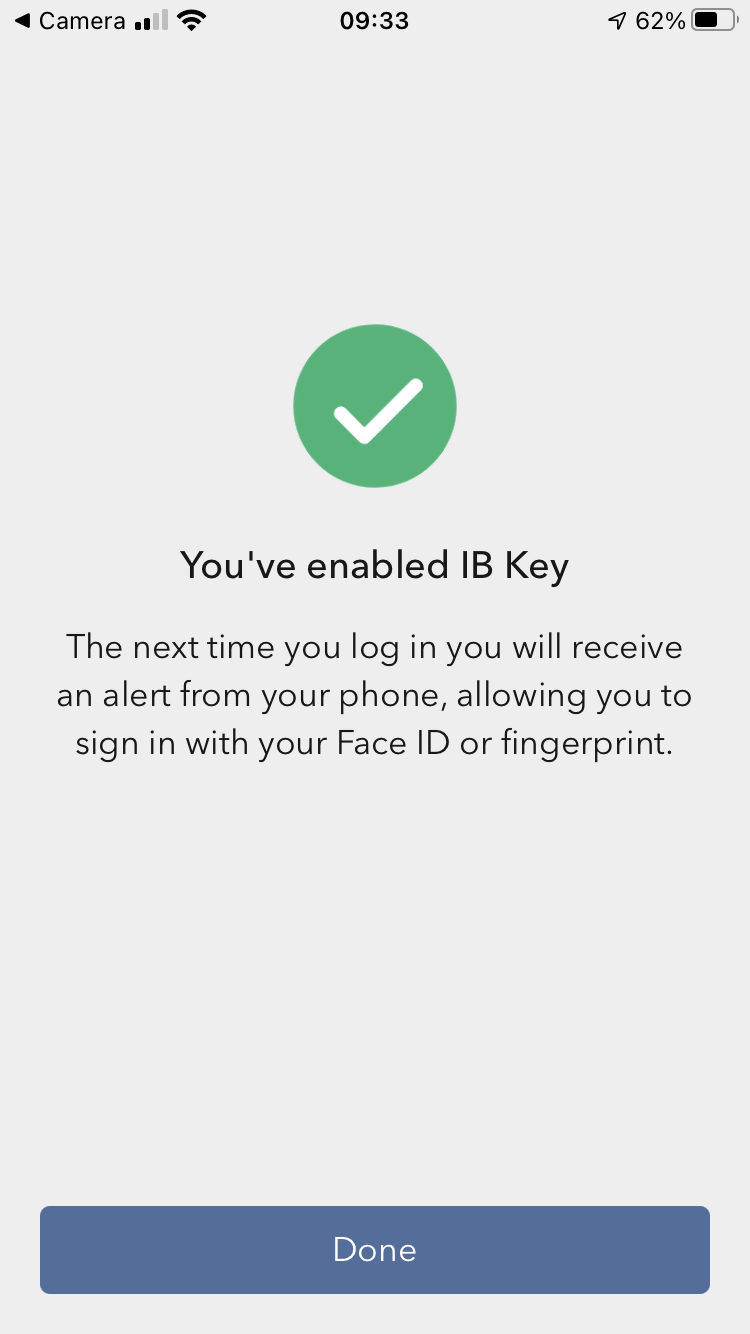
11) You will receive a message confirming the successful activation of IBKR Mobile Authentication (IB Key). Tap Done to complete the procedure
Figure 11
Possible issues and solutions
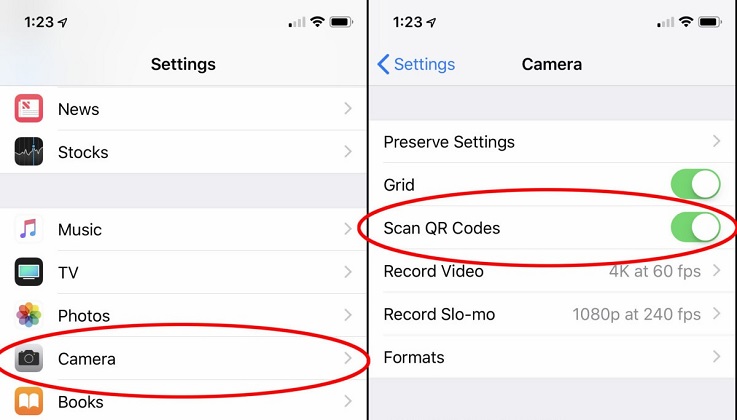
- My smartphone did not manage to read the QR code. What should I do?
Make sure you have activated the switch "Scan QR codes" from the Camera Settings of your smartphone.
Figure 12
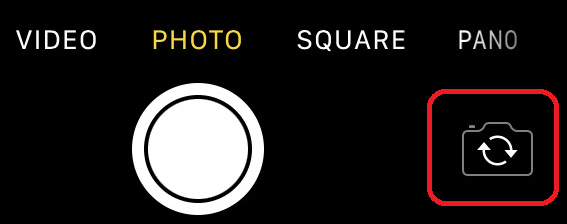
- My phone activates the front camera. How can I switch to the rear one?
Usually there is a specific button in the camera view to switch from front to rear lenses.
Figure 13
- During the IBKR Mobile Authentication (IB Key) activation, I receive an error message "An error has occurred. Please try again."
Figure 14
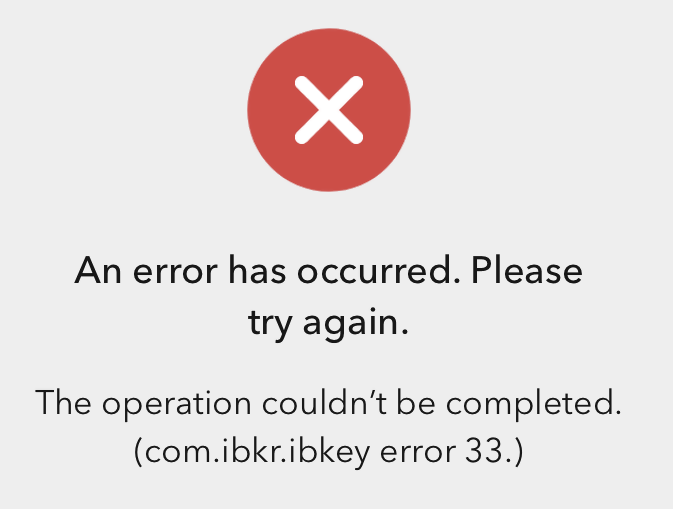
This error message may indicate you are attempting to activate an IBKR Mobile Authentication (IB key) instance that is already activated. Please try to log in to the Client Portal again. If you receive a notification on your smartphone once you have entered the credentials and you are able to complete the authentication once you tap on that notification, then your IBKR Mobile Authentication (IB Key) instance is already activated and you no longer need to follow the steps on this article.
Alternatively, the error message may be displayed when the QR code shown in the Client Portal was already used to attempt an activation and is expired. In this case, please log out of the Client Portal and log back in to obtain a fresh QR code.
References:
- See KB2260 for instruction on how to activate and operate IBKR Mobile Authentication (IB Key).
- See KB2748 for instructions on how to recover IBKR Mobile Authentication (IB Key).
- See KB3236 for instructions on how to enable notifications for the IBKR Mobile app.
- See KB3234 for troubleshooting missing IBKR Mobile notifications.
- See KB3073 for instructions on how to migrate the IBKR Mobile Authentication (IB Key) to a new smartphone.
IBKRモバイルアプリの通知を有効化する方法
概観:
通知とは
プッシュ通知とはバックエンドサーバーからインターネット経由でお客様のデバイスに送信(「プッシュ」)される簡略なメッセージです。アプリの開発者はユーザーがアプリを使用していない時でも、素早く効果的に注意をひくためにこのタイプのメッセージを使用します。アクションが必要な場合や案内をする場合にユーザーに通知が送信されます。
Background:
IBKRモバイルアプリが通知を使用する理由
IBKRモバイルアプリは情報のご提供と二段階認証プロセスのために使用されます。 二段階認証プロセスの場合には通知をタップするように表示されます。通知をタップするとIBKRモバイルアプリが自動的に開き、指示に沿って認証ができます。
ここではIBKRモバイル通知をマニュアルで有効化する方法をご説明します。ご利用のスマートフォンのオペレーティングシステムによって、下記より該当するリンクをクリックしてください。
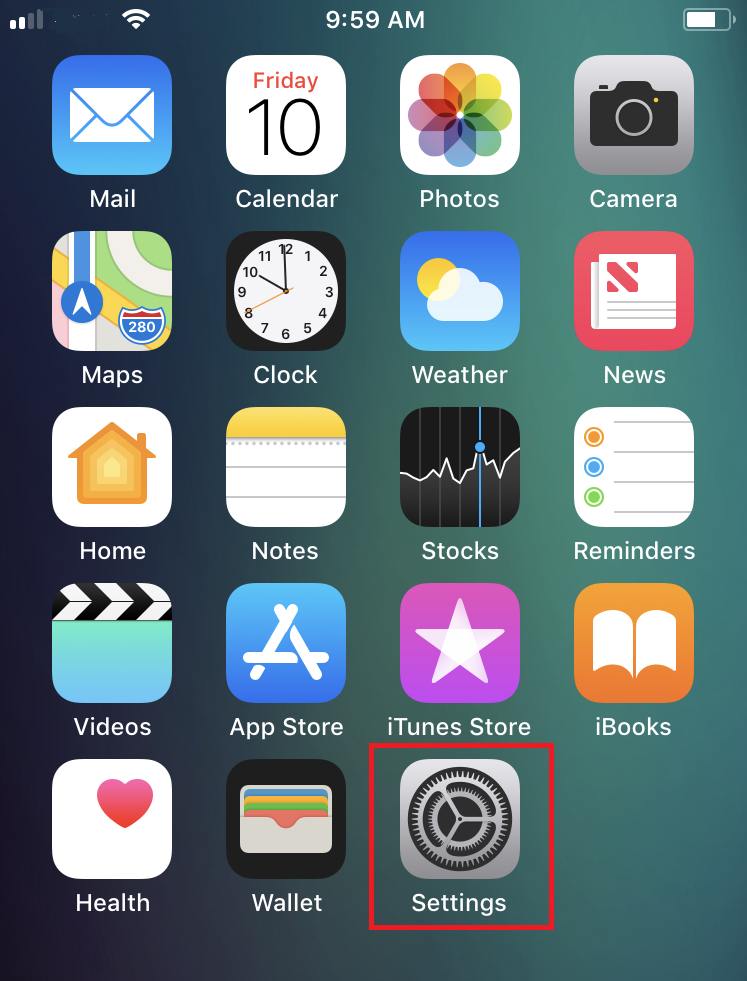
1. ホーム画面より、設定(図 1)、通知(図 2) 、IBKR(図 3)の順にタップしてください
図 1 図 2 図 3
(1).png)
(1).png)
2. IBKRアプリの設定に選択肢が表示されます。下記の設定をお薦めします(図 4):
-
通知を許可する: 有効
-
ロック画面、通知センター、バナー: 選択済み
-
バナースタイル: 固定
-
バッジ: 有効
-
プレビューを表示: 常時
図 4
.png)
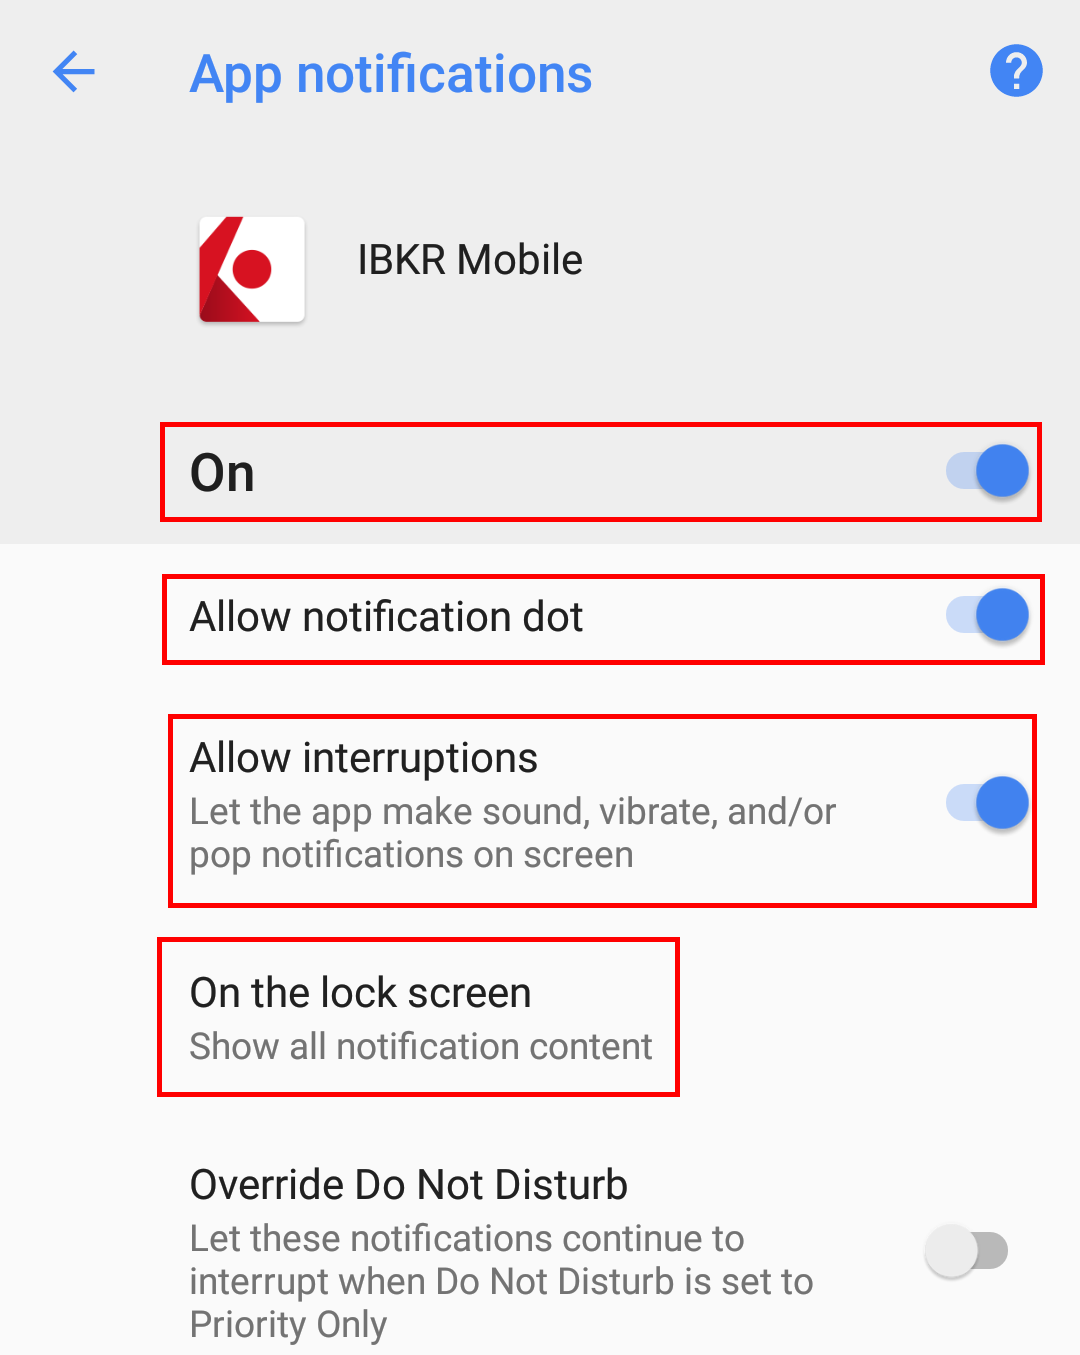
2. アプリの通知がすべてOn になっていることを確認し、通知ドットを許可する、割り込みを許可する、ロック画面上のスイッチがすべて有効になっていることも確認してください(図 4)。ご希望の場合には応答不可をオーバーライドする
を有効化することもできます 図 4
を有効化することもできます 図 4
ご利用のデバイスやソフトウェアのバージョンによって項目の場所や名称が異なります。
1. デバイスによっては、アプリ & 通知の項がサウンド & 通知のことがあります
参考文献:
- IBKRモバイル認証の有効および使用方法に関する詳細はKB2260 をご参照ください
- IBKRモバイル通知がない場合のトラブルシューティング手順に関する詳細は、KB3234 をご参照ください
- IBKRモバイル認証のリカバリーに関する詳細はKB2748 をご参照ください
セキュア・ログイン・システム利用の解約をキャンセルをする方法
概観:
セキュア・ログイン・システム(SLS)プログラムのご利用を解約(オプトアウト)されたお客様にはリスクが発生するため、特定の規制の対象となります(ピンクシートやOTCBB株式の取引など)。このような状況やSLS保護を利用する場合のベネフィットをご考慮いただき、セキュア・ログイン・システムご利用の再検討をお薦め致します。 こちらのページではセキュア・ログイン・システムの解約をキャンセルする手続きをステップごとにご説明します。
Background:
口座のセキュリティ設定を変更するには、主要なユーザーがクライアント・ポータルにログインする必要があります。セキュリティ設定を変更することのできないユーザーには、システムによる通知と変更許可のあるユーザーが表示されます。
セキュア・ログイン・システム利用を解約されていて、こちらの設定のキャンセルをご希望の場合には、以下の手順に沿ってキャンセルしてください:
1. ブラウザーを開いてibkr.comに進んでください。
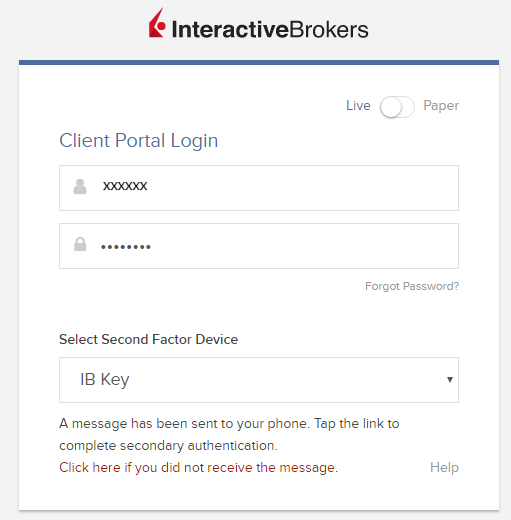
2. ログイン> ポータル・ロングインをクリックしてください
(1).png)
3. ログイン情報を入力し、セキュリティデバイスを利用して認証作業を完了させてください
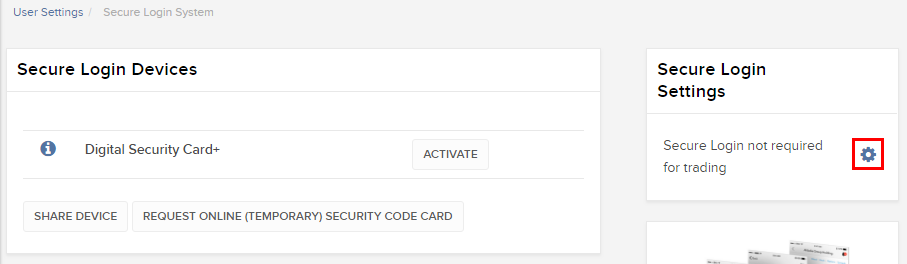
4. 左側のメニューより、 設定> ユーザー設定をクリックしてください。この後、セキュリティボックス内の設定「ギア」 アイコンをクリックしてください。これはセキュア・ログイン・システム1の横にあります
.png)
5. 「セキュア・ログイン設定」のボックスが表示されます。ボックス内にある設定 アイコンをクリックしてください。「取引にセキュアログインが必要ではありません」の設定画面に移動します。
6. 「ログイン時には常にセキュアログイン・デバイスの使用を希望します」の横にあるオプションボタンを選択して次に進むをクリックしてください
.png)
7. 設定更新の確認通知が送信されます。OK をクリックして作業を終了してください
.png)
留意点
1. クライアント・ポータルのクラシックバージョンをご利用の場合には、一番上にあるメニュー口座管理をクリックしてからセキュリティー >セキュア・ログイン・システム > セキュリティディバイスの解約(SLSオプトアウト) をクリックしてください。この後、該当するユーザーの横にあるオプションボタンをクリックして解約をキャンセルして下さい。
参考文献
- セキュア・ログインシステムの概要はKB1131をご覧ください
- デジタル・セキュリティー・カード+の交換リクエスト方法に関する詳細はKB1943をご覧ください
- セキュリティデバイスに関する詳細はKB2636をご覧ください
- 2人以上のユーザーで同じセキュア・ログイン・デバイスを使用する際のインストラクションはKB2481をご覧ください
- IBKRにセキュリティデバイスをご返却いただく際のインストラクションはKB975をご覧ください
- IBKRモバイル経由でのIB Key認証の有効化手順はKB2260をご覧ください
- マルチプル・ツーファクター認証システムに関する詳細はKB2895をご覧ください
- セキュリティデバイスにかかる費用に関する詳細はKB1861をご覧ください
- テンポラリー・パスコードの有効性に関する詳細はKB69をご覧ください
How to generate a ".har" file
Background:
When troubleshooting a non-trivial website issue, it is sometimes necessary for our Client Services team to obtain additional information about your browser communication. You may be asked record and provide a .har file. This file contains additional information about the network requests that are sent and received by your browser. Your browser can generate such file by recording content, timeline and status of HTTP/HTTPS requests and responses while the issue occurs.
In this article we explain how to generate a .har file. Please click on the browser that you use in the list below:
To generate the HAR file for Google Chrome:
1. Open Google Chrome and go to the page where the issue is occurring.
2. Press CRTL +SHIFT + I on your keyboard. Alternatively, click on the Chrome menu icon (three vertical dots at the top-right of your browser window) and select More Tools > Developer Tools
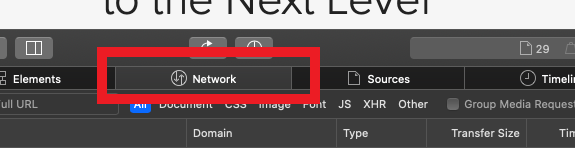
3. The Developers Tools opens as a docked panel at the side or bottom of Chrome. Select the tab Network (Figure 1.)
Figure 1.
.png)
4. Look for a round Record button in the upper left corner of the Developer Tools toolbar and make sure it is red. If it is grey, click it once to start recording or just press CTRL+E (Figure 2.)
Figure 2.
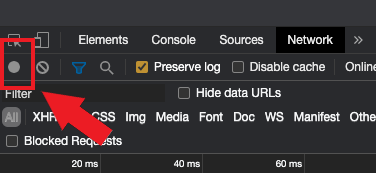
5. Activate the checkbox Preserve log (Figure 3.)
Figure 3.
.png)
6. Click the Clear button to clear out any existing logs. The Clear button has a stop icon and is located on the right of the Record button (Figure 4.)
Figure 4.
![]()
7. Reproduce the issue you are experiencing while the network requests are being recorded.
8. Once you have reproduced the issue, right-click anywhere on the list of recorded network requests, select Save all as HAR with Content, and save the file to a location of your preference on your computer (e.g. on your Desktop).
9. From the IBKR Client Portal, go to the Message Center and create a new Web Ticket (or use an existing one when applicable)
10. Within the Web Ticket, attach the .har file previously generated. In case the IBKR Client Services has provided you with a reference ticker number or representative name, please add this information to the ticket body.
11. Submit the Web Ticket
To generate the HAR file for Firefox:
1. Open Firefox and go to the page where the issue is occurring
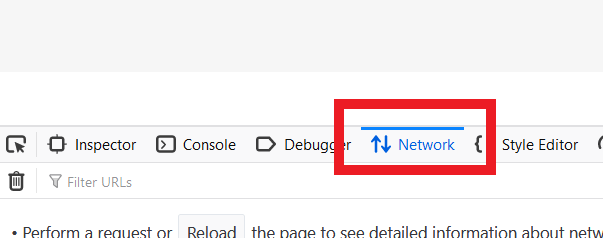
2. Press F12 on your keyboard. Alternatively click the Firefox menu icon (three horizontal parallel lines at the top-right of your browser window), then select Web Developer > Network
3. The Developers Network Tools opens as a docked panel at the side or bottom of Firefox. Select the tab Network (Figure 5.)
Figure 5.
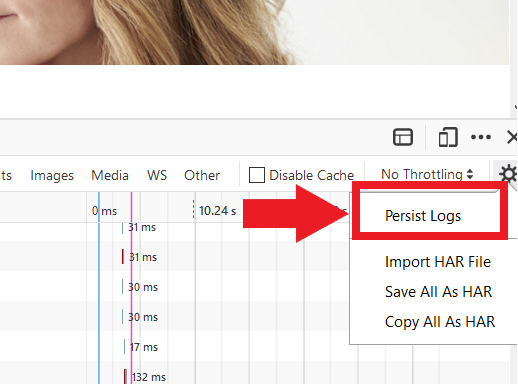
4. Activate the checkbox Persists logs (Figure 6.)
Figure 6.
5. Reproduce the issue you are experiencing. The recording of the network request starts automatically.
6. Once you have reproduced the issue, right-click anywhere on the list of recorded requests and select Save All As HAR
7. Save the file to a location of your preference on your computer (e.g. on your Desktop)
8. From the IBKR Client Portal, go to the Message Center and create a Web Ticket (or use an existing one when applicable)
9. Within the Web Ticket, attach the .har file previously generated. In case the IBKR Client Services has provided you with a reference ticker number or representative name, please add this information to the ticket body
10. Submit the Web Ticket
To generate the HAR file for Microsoft Edge:
1. Open Edge and go to the page where the issue is occurring.
2. Press F12 on your keyboard. Alternatively click the Edge menu icon (three horizontal dots at the top-right of your browser window), then select More Tools > Developers Tools
3. Click the Network tab (Figure 10.)
Figure 10.
.png)
4. Reproduce the issue that you were experiencing before, while the network requests are being recorded.
5. Once done click the floppy disk icon (Export as HAR) or press CTRL+S (Figure 11.)
Figure 11.
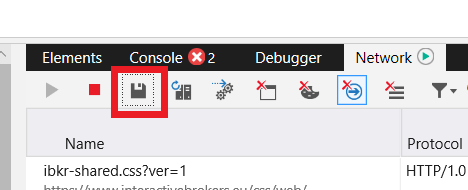
6. Provide a filename and a location of your preference on your computer (e.g. on the Desktop). Then click the Save button
7. From the IBKR Client Portal, go to the "Message Center" and create a Web Ticket (or use an existing one when applicable)
8. Within the Web Ticket, attach the .har file previously generated. In case the IBKR Client Services has provided you with a reference ticker number or representative name, please add this information to the ticket body.
9. Submit the Web Ticket
To generate the HAR file for Safari:
Note: Before generating the HAR file, make sure you can see the Develop menu in Safari. If you do not see this menu, click on the menu Safari, choose Preferences, go to the tab Advanced and activate the checkbox next to Show Develop menu in menu bar
1. Open the Develop menu and select Show Web Inspector or press CMD+ALT+I
2. Click the Network tab (Figure 12.)
Figure 12.
3. Activate the checkbox Preserve log (Figure 13.)
Figure 13.
.png)
4. Click on the icon Export (or press CMD+S), provide a filename and a location of your preference on your computer (e.g. on the Desktop) and save the .har file
5. From the IBKR Client Portal, go to the "Message Center" and create a Web Ticket (or use an existing one when applicable)
6. Within the Web Ticket, attach the web archive file previously generated. In case the IBKR Client Services has provided you with a reference ticker number or representative name, please add this information to the ticket body.
7. Submit the Web Ticket
外国為替取引(FX)に関して
概観:
IBでは、外国為替取引を中心としたトレーダーだけでなく、複数の通貨建ての株式やデリバティブ取引から外国為替取引を行うトレーダーも対象として取引場所や取引プラットフォームを提供しています。以下の記事では、TWSプラットフォームでのFX注文入力の基本と、クオートの慣習やポジション(取引後)の報告に関する注意点について説明します。
Background:
FX(外国為替)取引では、ある通貨の購入と別の通貨の売却を同時に行いますが、その組み合わせは一般的にクロスペアと呼ばれています。 以下の例では、EUR.USDのクロスペアをもとに説明します。クロスペアの第1通貨(EUR)を売却する取引通貨とし、第2通貨を決済通貨としています。
こちらのページの記事の特定のトピックに移動するには、下記リンクをクリックしてください。
外国為替気配値について
通貨ペアとは外国為替市場において、ある通貨単位の価値を別の通貨単位で表示するためのものです。別の通貨単位で価格を表示される元の通貨を基準通貨=取引通貨、一方で価格表示をする通貨をクオート通貨=決済通貨と呼びます。TWSでは、各通貨ペアに対して1つのティッカーシンボルとなります。FXTraderを使用すると、通貨ペアを逆にして、その価格を表示することもできます。トレーダーは基準通貨を売り、クオート通貨を買うことで通貨ペアの取引を行います。例えば、EUR/USDの通貨ペアのティッカーシンボルは次のようになります:
EUR.USD
となります。
- EURは基準通貨
- USDはクオート通貨
上記の通貨ペアの価格は、現在1ユーロ(基準通貨=取引通貨)が何米ドル(クオート通貨=決済通貨)になるのかを表しています。つまり、1ユーロの価格を米ドルで表示しているのです。
EUR.USDの買い注文は、表示されている取引価格に基づいてユーロを買い、そのユーロに相当する米ドルを売ることになります。
気配値の表示方法について
TWS上に通貨ペアの気配値を表示するための手順は以下のとおりです。
1. 取引通貨(例: EUR)を入力し、ENTERキーを押します。
2. 商品タイプのFX
を選択します。
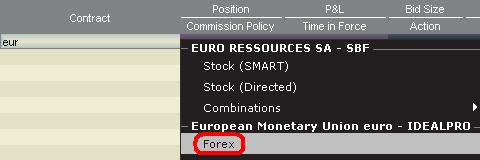
3. 決済通貨(例: USD)を選択し、FXの取引所を選択します。
.jpg)
注意事項
IDEALFXにおける最低発注量(通常25,000米ドル)を超える注文は、IDEALFXにおいてインターバンクの外国為替市場に直接アクセスすることができます。IDEALFXに発注された注文のうち最低発注量を満たさないものは、主に外国為替取引用の少額注文取引所に自動的に振り分けられます。IDEALFXの最小・最大取引量に関する詳細は こちらをご覧ください。
外国為替取引において為替ディーラーが通貨ペアを表示する方法は決まっており、 例えば、通貨にCAD(カナダドル)を選択した場合、 決済通貨を選択する選択肢上にUSD(米ドル)が表示されないことがわかります。 これは、このペアが「USD.CAD」の順番で表示することが決まっており、基準通貨となる「USD」を入力してから「Forex」を選択しないとCADとUSDの通貨ペアにアクセスできないためです。
注文の作成方法について
表示されているヘッダーに応じて、通貨ペアは次のように表示されます。
「コントラクト」と「詳細」のコラムには、取引通貨と決済通貨の形式で通貨ペアが表示されます(例: EUR.USD)。 「銘柄」のコラムには、取引通貨のみが表示されます。
表示されているヘッダーを変更する方法は、こちらをご覧ください。

1. 注文の発注にはBID=買気配(売り注文の作成のため)またはASK=売気配(買い注文の作成のため)を左クリックします。
2. 買い、または売りたい取引通貨(=基準通貨)の数量を指定します。注文の数量は、基準通貨=取引通貨で表されます。これはTWSで表示される通貨ペアの第1通貨です。
インタラクティブ・ブローカーズでは外国為替取引において、一定の決まった取引量を基準通貨(=取引通貨)で表す「コントラクト」という概念はなく、取引サイズは基準通貨(=取引通貨)における最小取引単位以上(例:ユーロの場合は1ユーロ)からとなります。
例えば、100,000 EUR.USDの買い注文は、表示されている為替レートに基づいて、100,000 EURを買い、同等の米ドルを売ることになります。
3. ご希望の注文タイプと為替レート(価格)を指定し、注文を発注します。
注意事項: 注文は全ての通貨の最小取引単位から行うことができ、上述のIDEALFX最低発注量の他に最小コントラクトや最小ロットサイズを考慮する必要はありません。
よくあるご質問: FXTraderではどのように注文を発注するのですか?
ピップ値について
ピップ値とは、通貨ペアの変化を表す尺度で、ほとんどの通貨ペアでは最小の変化を表します。通貨ペアの中には、少数ピップでの表示が可能なものもあります。
例えば、EUR.USDでは1ピップは0.0001、USD.JPYでは1ピップは0.01となります。
1ピップの値をクオート通貨単位で計算するには、以下の式を適用します。
(取引金額)x (1ピップ)
例:
- ティッカーシンボル = EUR.USD
- 取引金額 = 100,000ユーロ
- 1ピップ = 0.0001
1ピップの価値 = 100’000 x 0.0001= 10 USD
- ティッカーシンボル = USD.JPY
- 取引金額 = 100’000 USD
- 1ピップ = 0.01
1ピップの価値 = 100’000 x (0.01)= 1000円
基準通貨単位で1ピップの価値の計算するには、以下の式を適用します。
(取引金額)x (1ピップ/為替レート)
例:
- ティッカーシンボル = EUR.USD
- 取引金額 = 100’000ユーロ
- 1ピップ = 0.0001
- 為替レート = 1.3884
1ピップの価値 = 100’000 x (0.0001/1.3884)= 7.20ユーロ
- ティッカーシンボル = USD.JPY
- 取引金額 = 100’000 USD
- 1ピップ = 0.01
- 為替レート = 101.63
1ピップの価値 = 100’000 x (0.01/101.63)= 9.84 USD
取引後のポジション表示について
FXポジション情報はIBにおける取引の重要な側面であり、ライブ口座での取引を実行する前に理解しておく必要があります。 IBの取引ソフトウェアはFXポジションを2つの異なる場所に反映させ、その両方を口座ウィンドウから確認することができます。
1. 市場価格
口座ウィンドウの「市場価格」のセクションには、通貨ペアではなく個々の通貨単位で、リアルタイムの通貨ポジションが反映されます。

口座ウィンドウの「市場価格」のセクションは、トレーダーがリアルタイムに反映されたFXポジション情報を見ることができる唯一の場所です。 複数の通貨をFXの通貨ポジションとして保有する場合、ポジションを建てた時と同じ通貨ペアで決済する必要はありません。 例えばEUR.USDの買い(EURの買い、USDの売り)とUSD.JPYの買い(USDの買い、JPYの売い)を行ったトレーダーは、EUR.JPYの取引(EURの売り、JPYの買い)でポジションを決済することができます。
注意事項
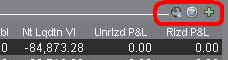
「市場価格」のセクションは拡張/縮小が可能です。 流動性資産価値のコラムのすぐ上に、緑色のマイナスの記号が表示されていることをご確認ください。 緑色のプラス記号が表示されている場合には、一部の保有ポジションが表示されていない可能性があります。
決済したい通貨を右クリックして「選択した通貨残高を口座通貨の残高へ両替」または「基準通貨以外の全ポジションのクローズ」を選択することで、「市場価格」のセクションから決済取引を行うことができます。

2. FXポートフォリオ
口座ウィンドウのFXポートフォリオのセクションでは、仮想ポジションを表示し、市場価格のセクションのよう個々の通貨ではなく、通貨ペアで表示されます。 この特別な表示方法は機関投資家のFXトレーダーに共通する習慣に合わせたもので、個人やFX取引を頻繁に行わないのトレーダーを対象とするものではありません。FXポートフォリオのポジション表示はすべてのFX取引を反映しているわけではありませんが、ここに表示されるポジション数と平均コストは変更することができます。 実際に取引を行うことなくポジション数と平均コストの情報を変更できるこの機能は、基準通貨に加えて非基軸通貨建ての商品の取引にも携わるトレーダーに向いています。 この機能を利用することにより、基準通貨建て以外の商品を取引する際に自動的に発生する通貨変換の係る取引を、明らかなFX取引と手動で分けて管理することができます。

FXポートフォリオのセクションには、他のすべての取引ウィンドウに表示されるFXポジションと損益情報が表示されます。 このため、実際のリアルタイムのポジション情報を判断するにあたって混乱が生じる傾向があります。 混乱を軽減また解消するため、下記の作業のいずれかを行っていただくことをお薦めします。
a. FXポートフォリオのセクションを非表示にする
「FXポートフォリオ」の左側にある矢印をクリックすると、FXポートフォリオのセクションを折りたたむことができます。 このセクションを折りたたむと、すべての取引ページにFXのバーチャルポジションの情報が表示されなくなります。(注意事項: FXポートフォリオの情報のみ表示されなくなり、市場価値の情報は表示されます。)

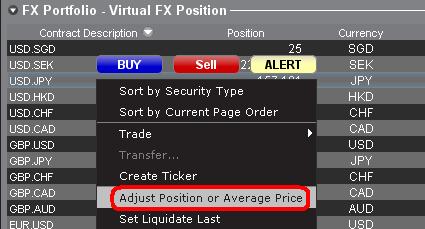
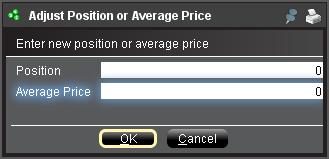
b. ポジションまたは平均価格の調整
口座ウィンドウのFXポートフォリオのセクションを右クリックすると、ポジションまたは平均価格を調整するオプションがあります。 非基準通貨によるポジションをすべて決済し、市場価格のセクションでも決済が確認できたら、ポジションおよび平均価格の欄を0にリセットすることができます。 この調整を行うことにより、FXポートフォリオのセクションに反映されるポジション数がリセットされ、画面上でより正確なポジションと損益情報を見ることができるようになります。注意事項: この作業は手動になるため、通貨ポジションが決済されるたびに行う必要があります。 ポジションに関する情報は常に市場価格のセクションからご確認の上、発注された注文のポジションがご希望通りに建ち、また決済されていることをご確認ください。
上記の内容をご参考にしていただき、ライブ口座でお取引を始める前にペーパー取引口座、またはデモ口座でFX取に慣れていただくことをお薦め致します。 上記の内容についてご不明な点などございましたら、お気軽にIBまでお問い合わせください。
その他のよくあるご質問:
How to Add Another User to an Active IBKR Mobile Authentication (IB Key) for iPhone
概観:
This page covers the steps required to add a user to the Authentication section in the IBKR Mobile app for iOS devices.
Requirements:
- The IBKR Mobile app must be installed and IBKR Mobile Authentication (IB Key) already activated on this iOS device.
- For more information on the installation and activation on iOS devices, please refer to KB2278.
Instructions:
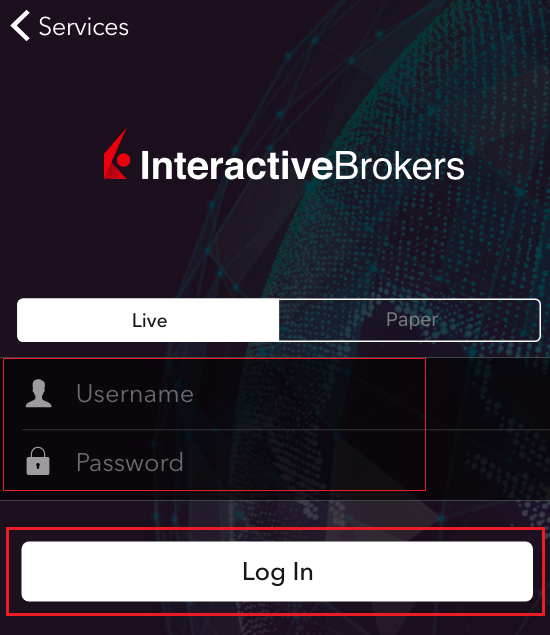
1. On your iOS device, open the IBKR Mobile app.
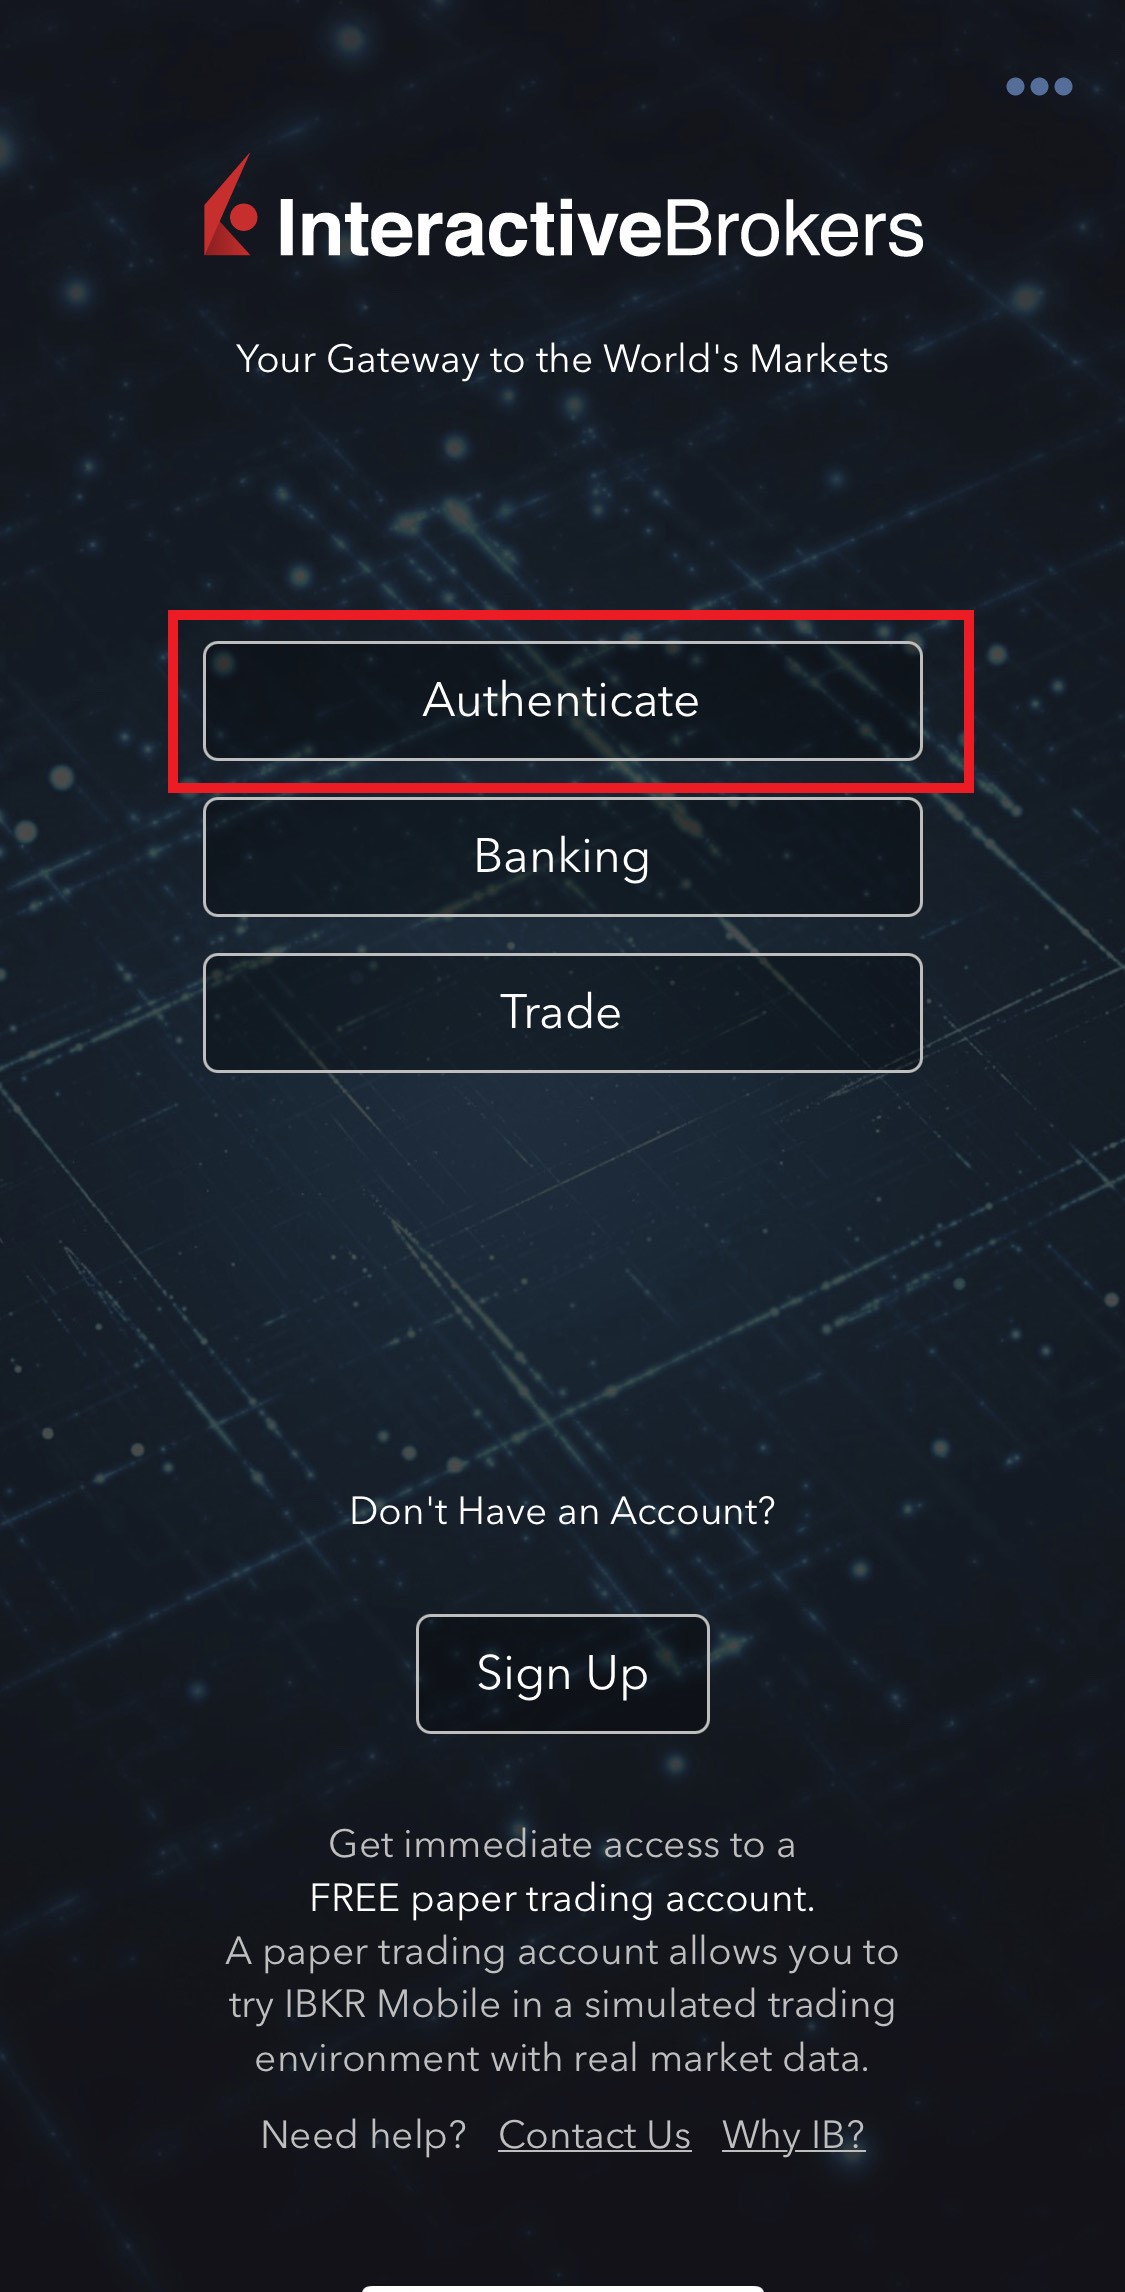
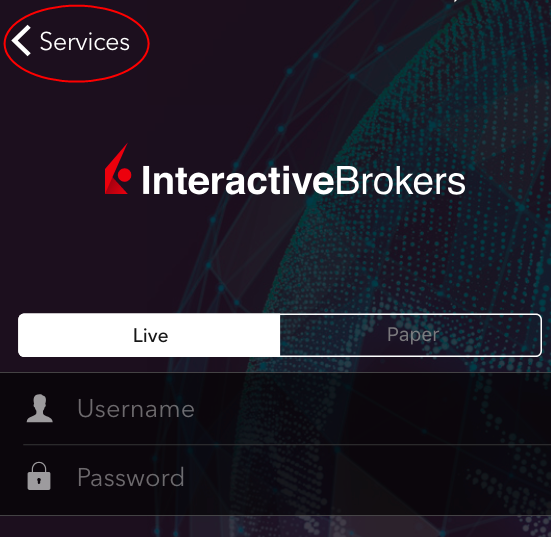
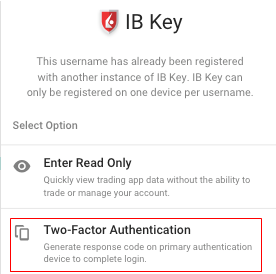
1.a. If the app opens with the login screen (Figure 1), tap on Services on the top-left corner (red arrow) and proceed with step 2.
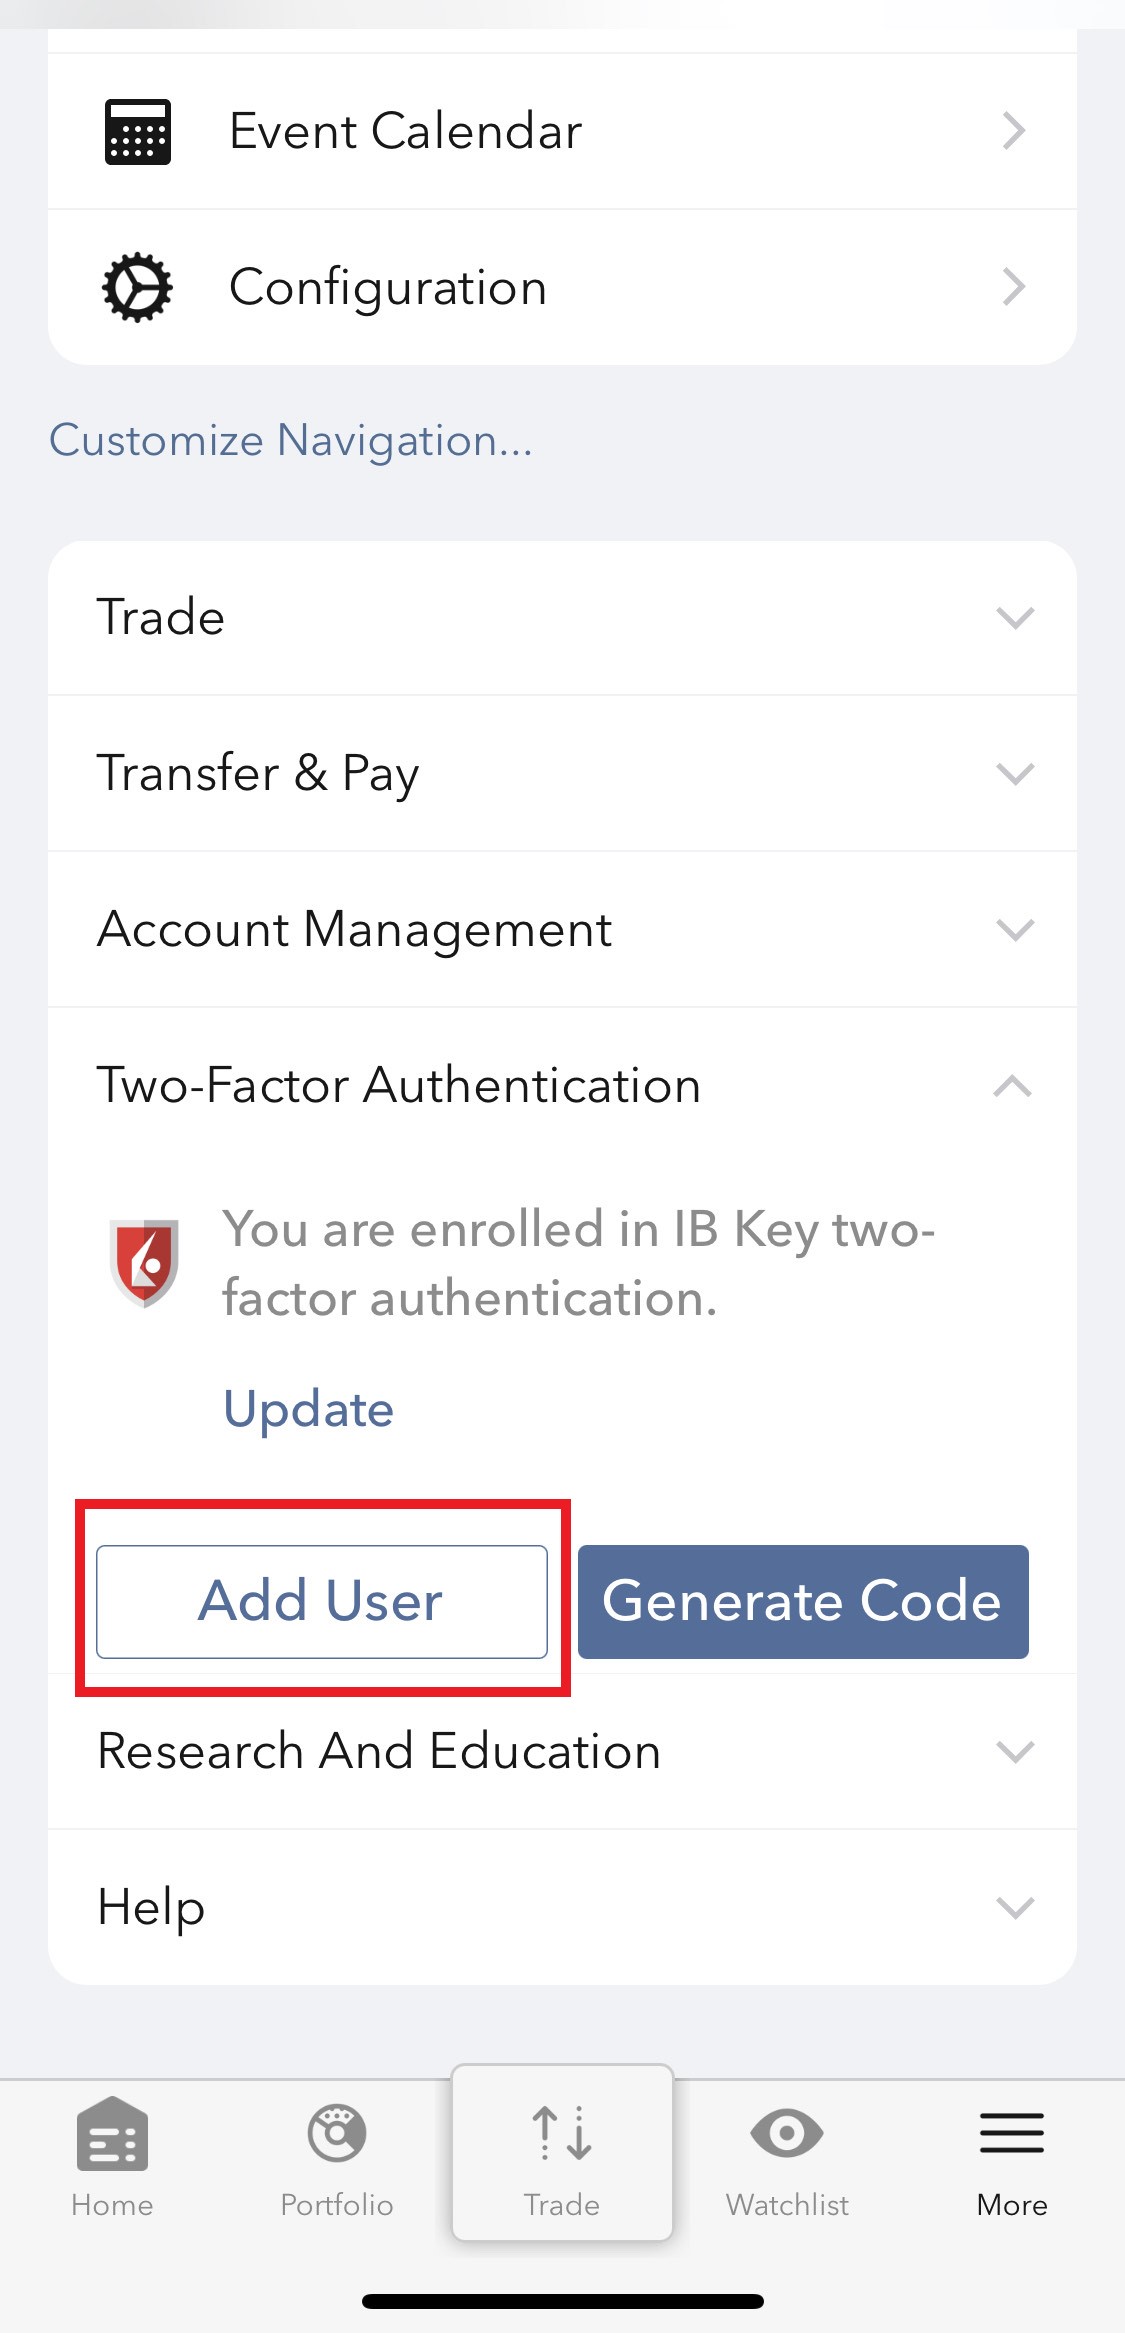
1.b. If the app opens with your Home Page, Portfolio, Watchlists, or similar, tap on More on the bottom-right corner (Figure 2). Then tap on Two-Factor Authentication (Figure 3), followed by Add User (Figure 4) and proceed with step 3.
Figure 1. Figure 2. Figure 3.
(1).jpeg)
.jpeg)
.jpeg)
Figure 4.
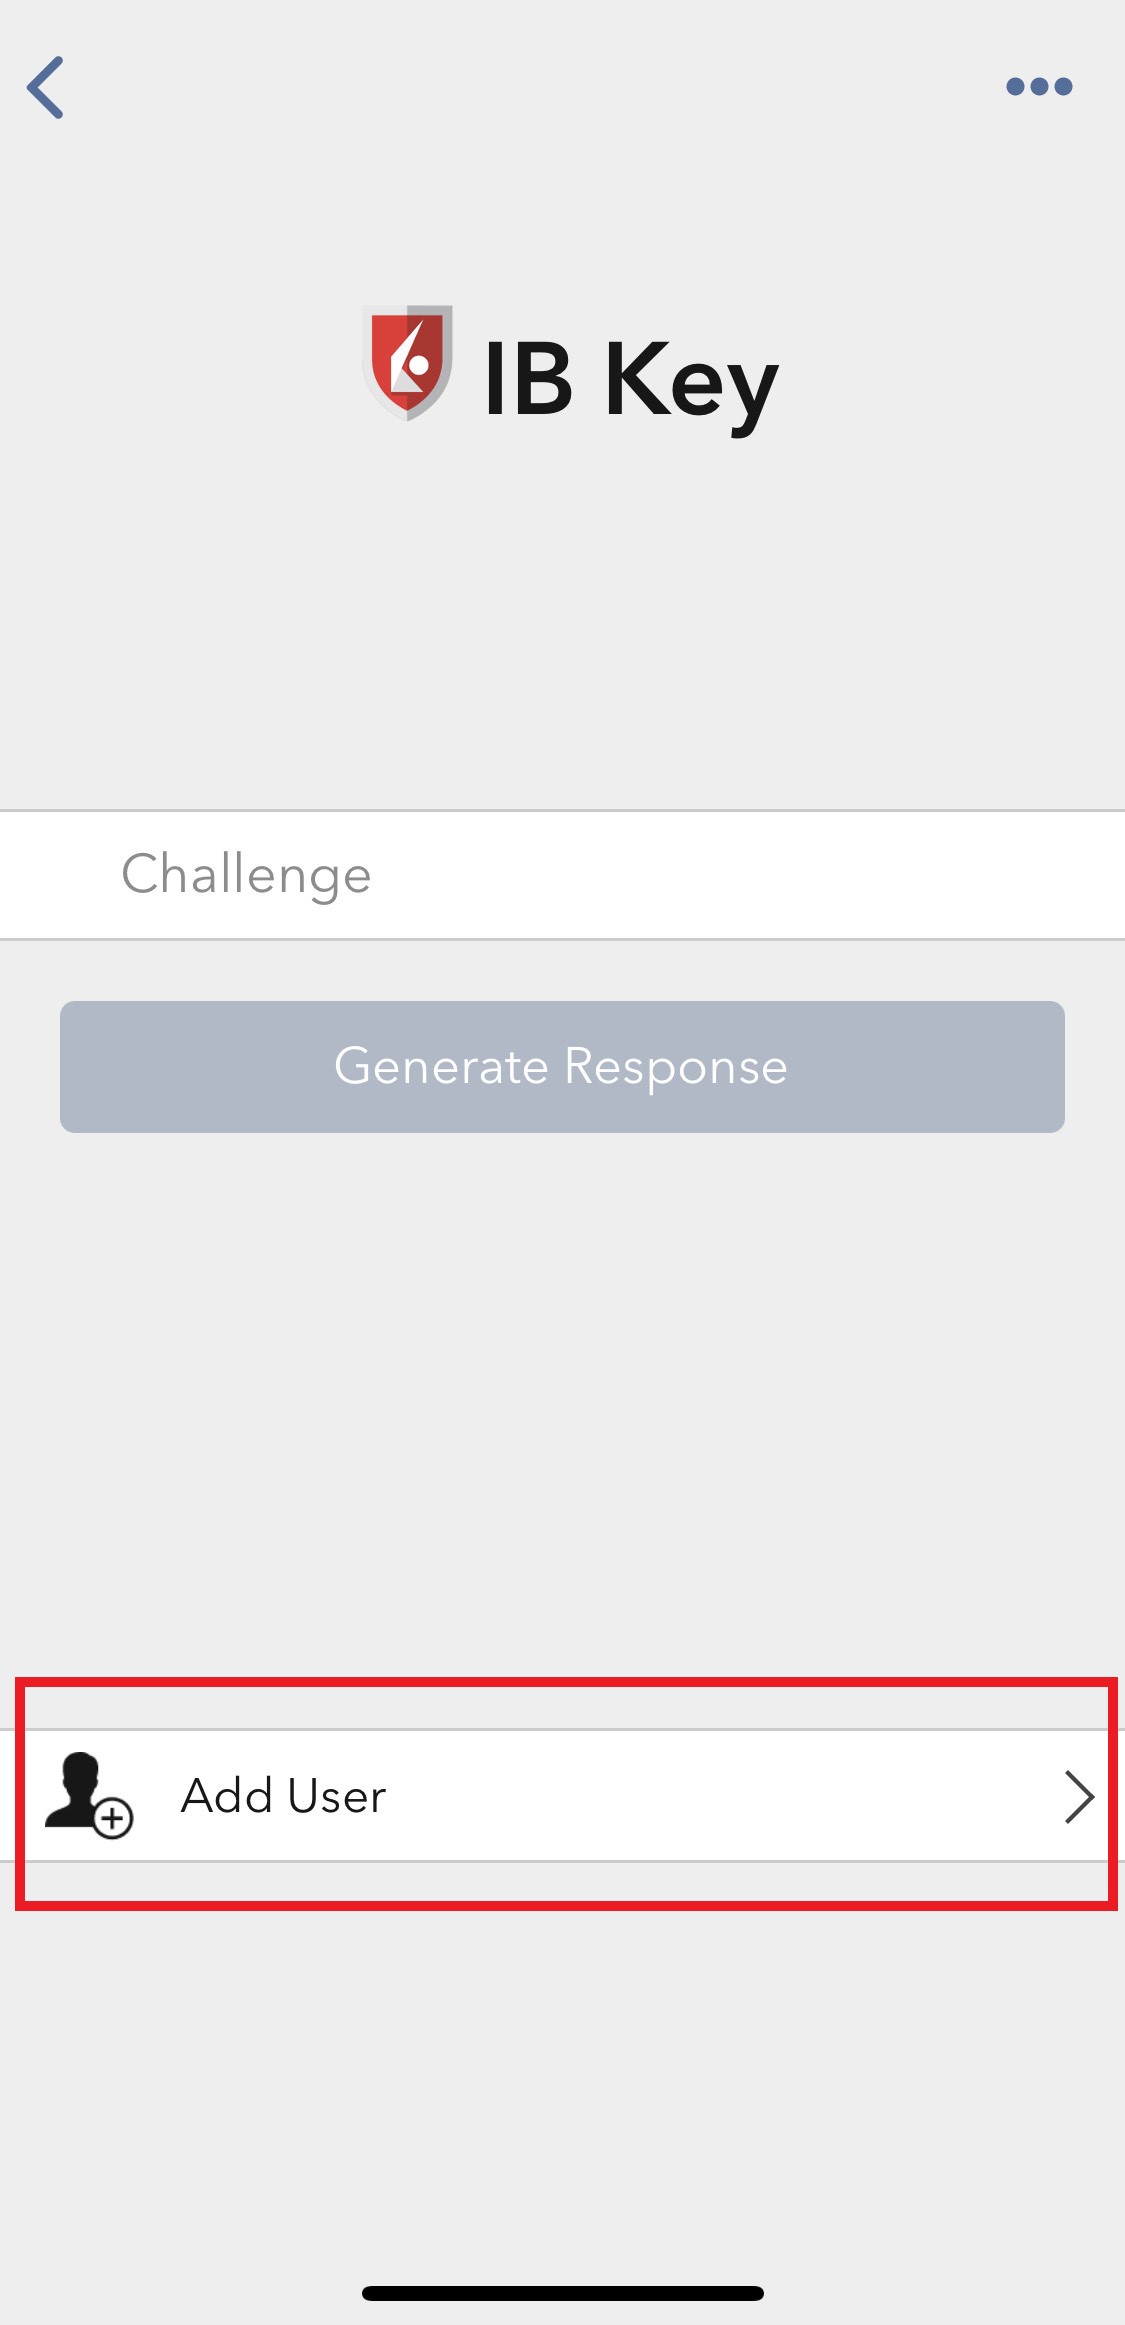
2. Tap on Authenticate (Figure 5) and then on Add User (Figure 6).
Figure 5. Figure 6.
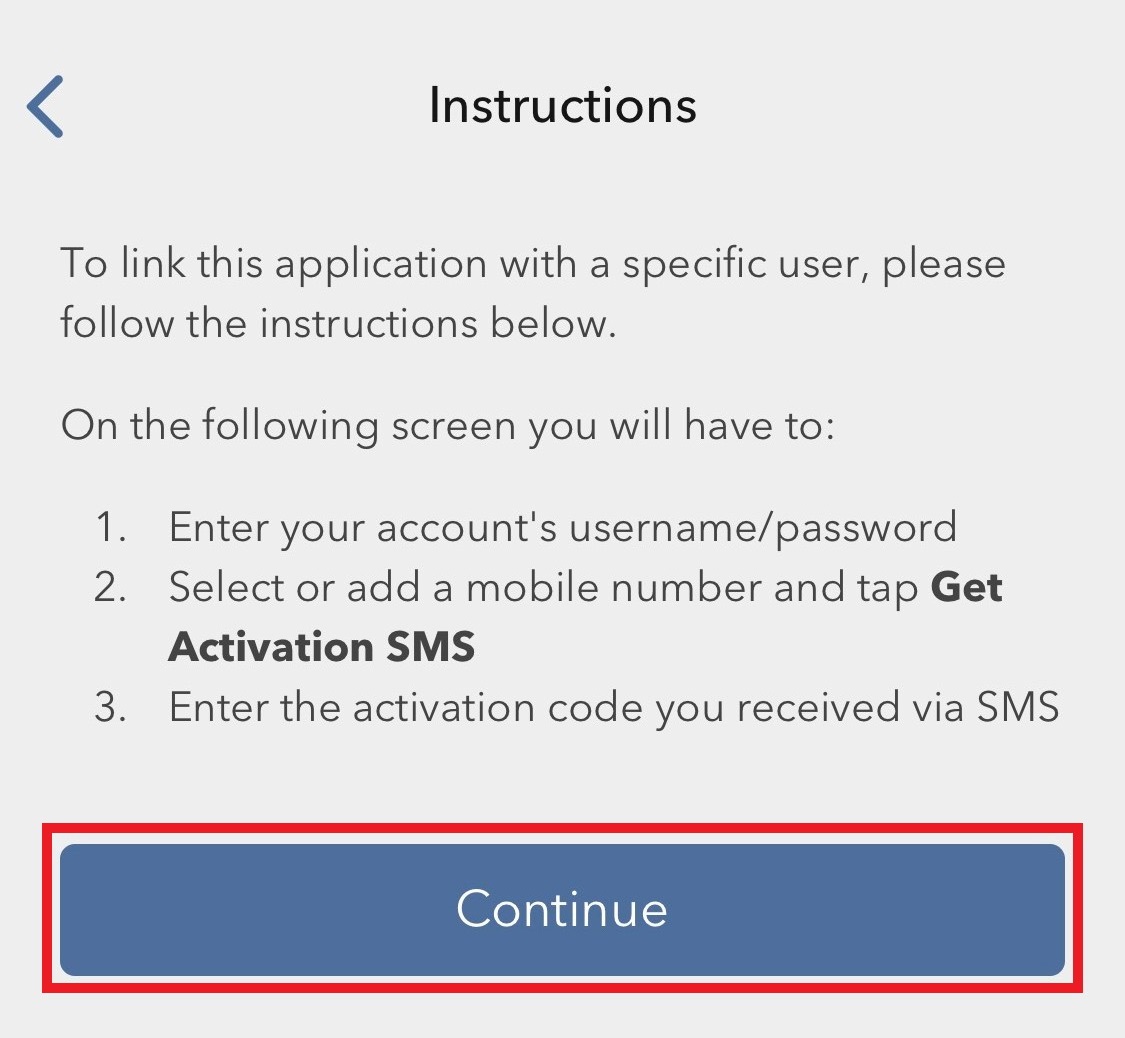
3. Read the instructions and then tap on Continue (Figure 7).
Figure 7.
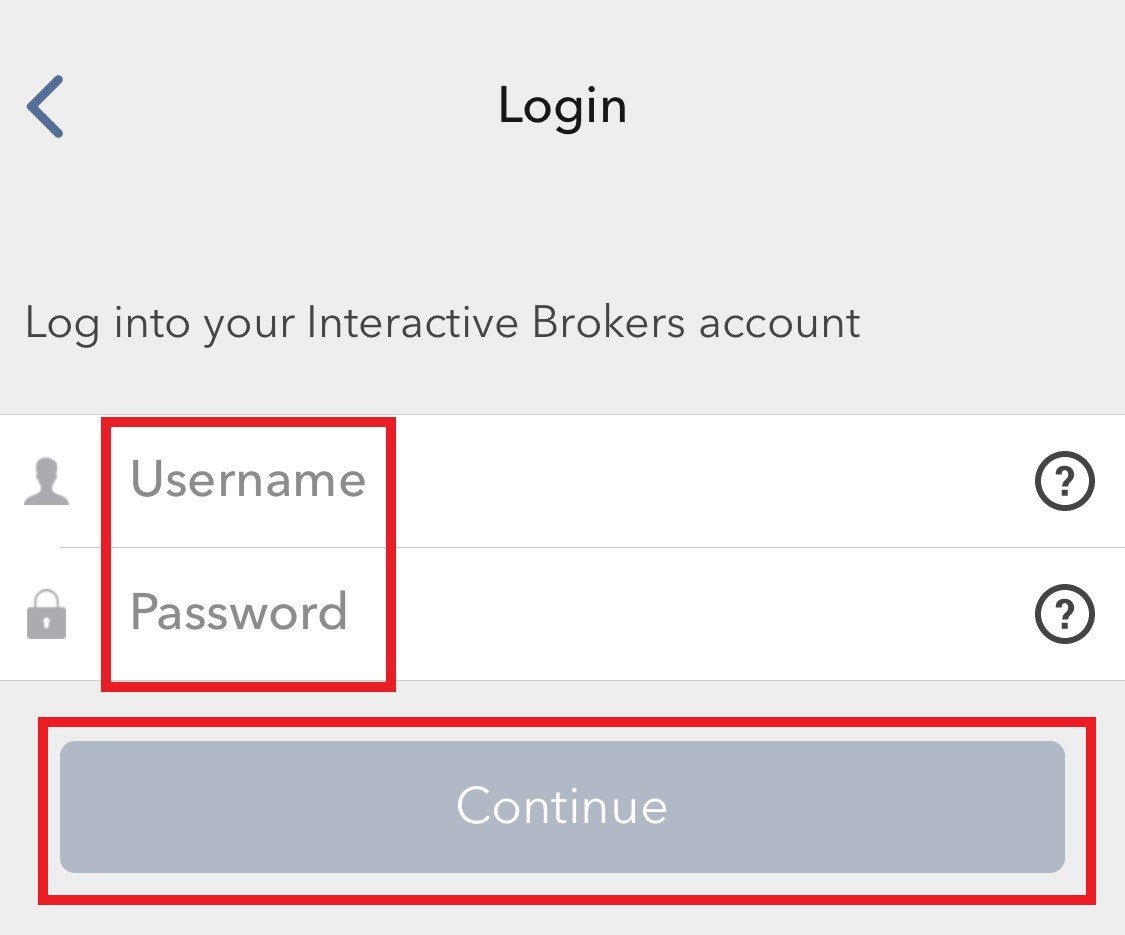
3. Enter your Username and Password, and then tap on Continue (Figure 8).
Figure 8.
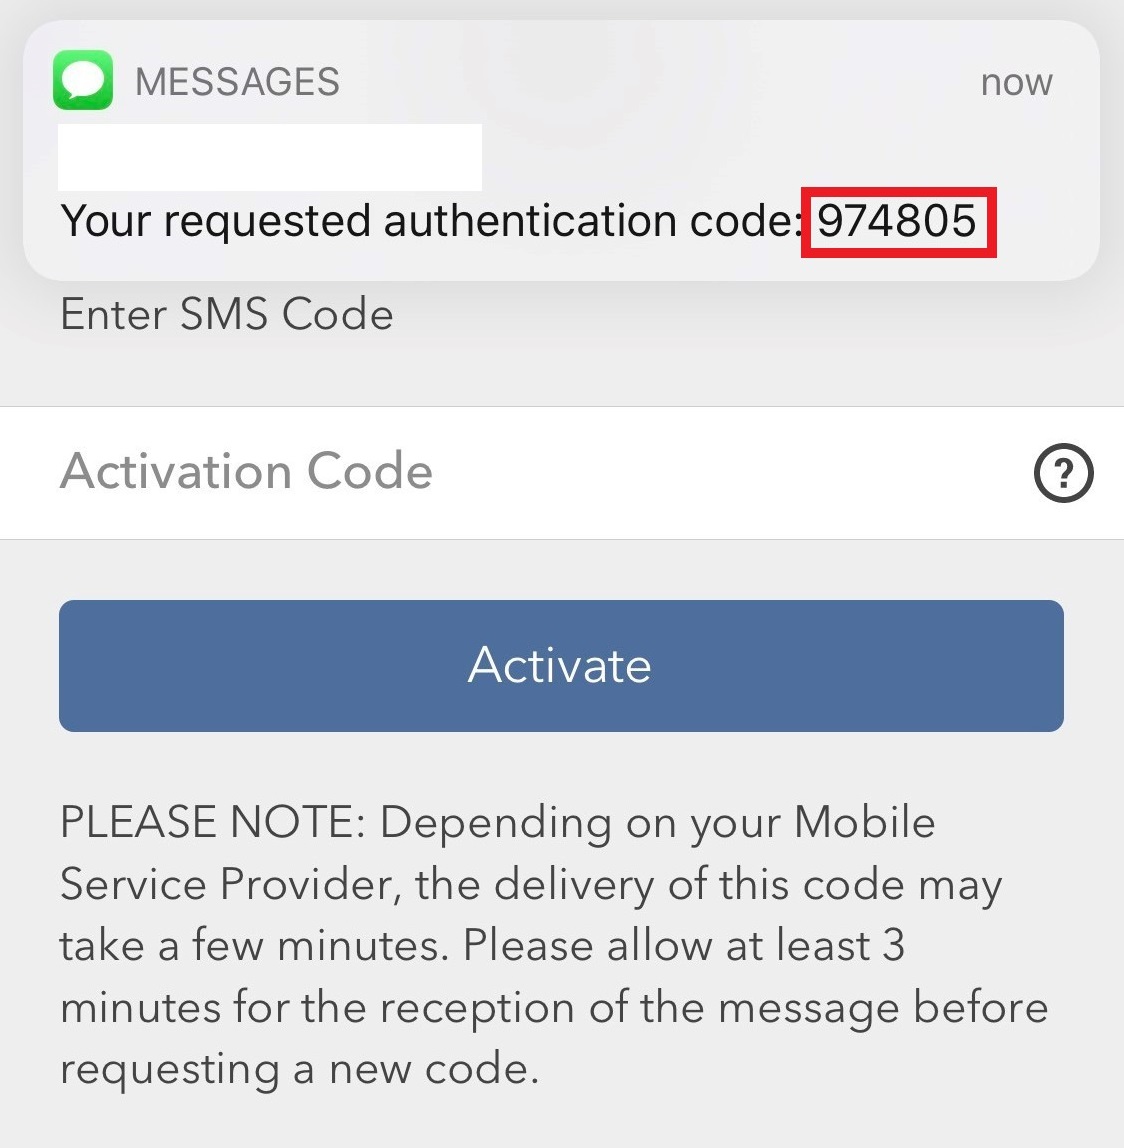
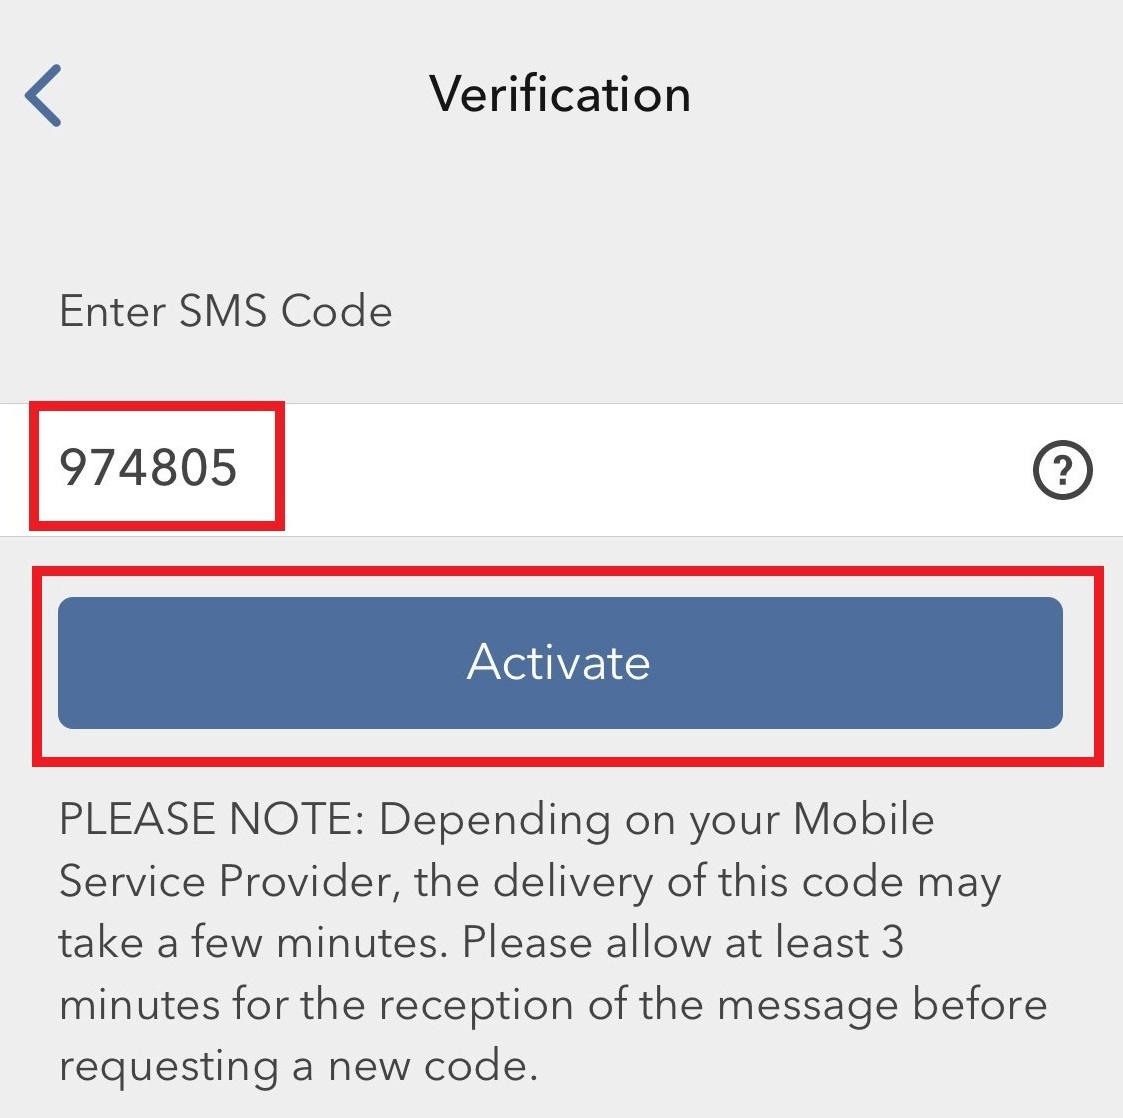
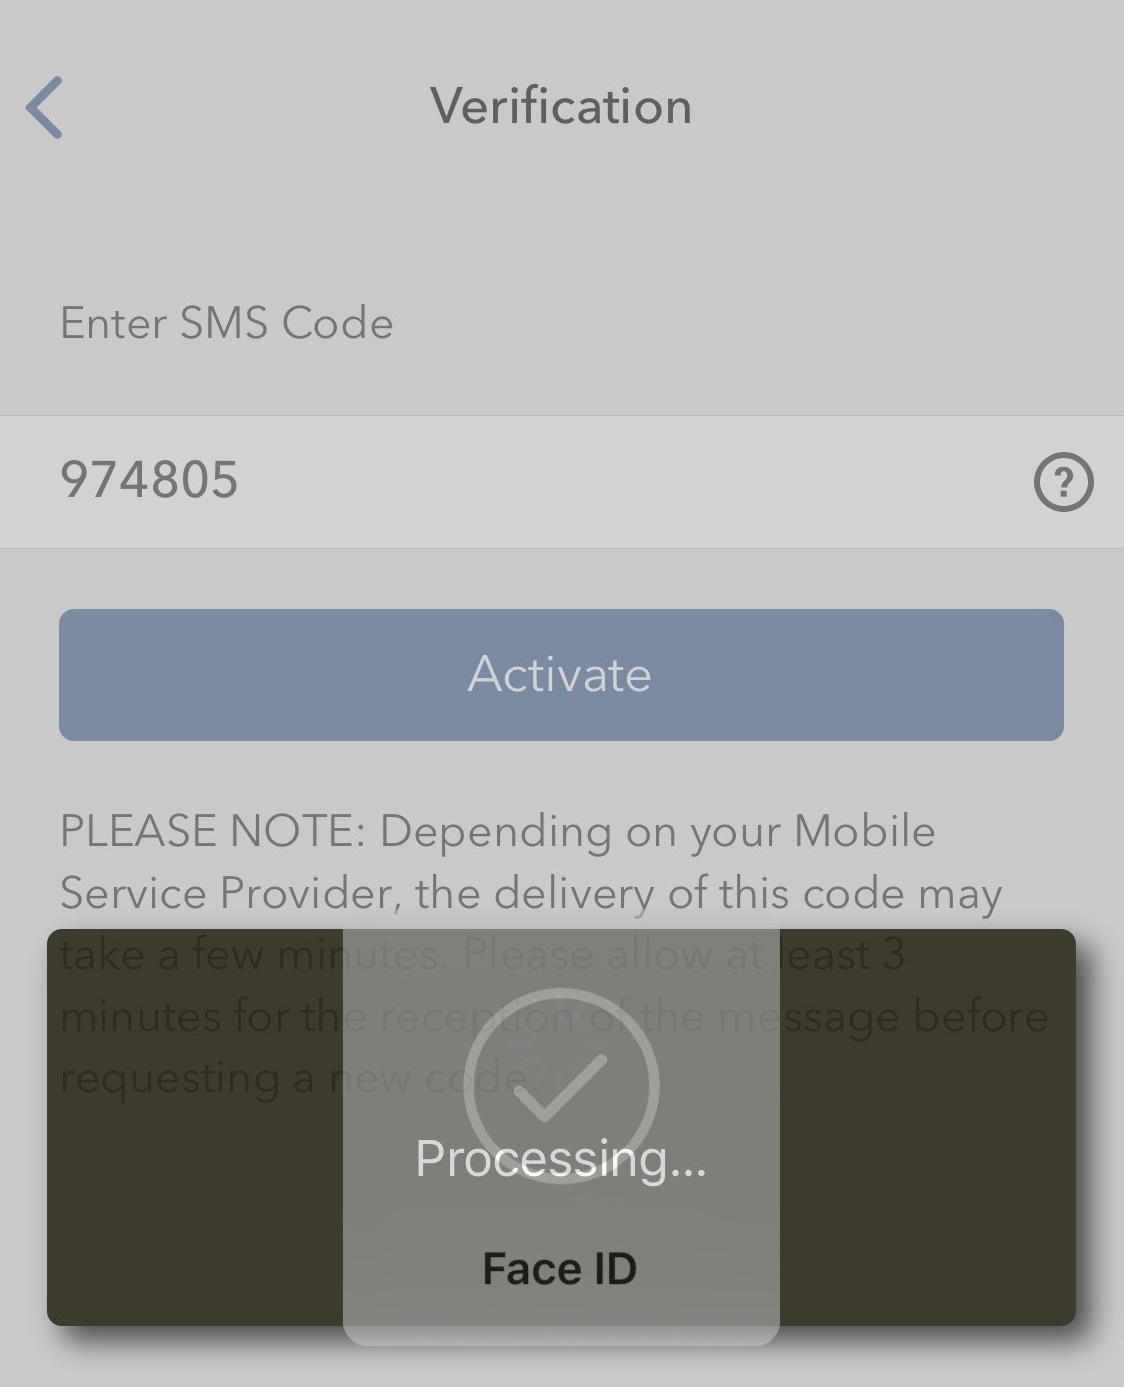
4. An Authentication Code will be sent via SMS to the mobile phone number listed on your account (Figure 9). Enter this Authentication Code in the Activation Code field and tap on Activate (Figure 10).
Figure 9. Figure 10.
5. Depending on your smartphone's security settings, you will be asked to use your Passcode, Touch ID, or Face ID (Figure 11).
Figure 11.
6. If the activation has been successful, you will see a confirmation screen. Finally, tap on Done to complete the procedure (Figure 12).
Figure 12.
.jpeg)
IBKRモバイル認証(IB Key)が別の端末に有効化されている場合のIBKRモバイルへのログイン方法
Background:
ここではご利用のスマートフォンにIBKRモバイル認証(IB Key)を有効化された上で、別にお持ちのモバイル端末で取引をご希望のお客様に必要となる手順をご説明致します。
この場合にはスマートフォンで二段階認証を行って、2つ目のデバイスのIBKRモバイル取引プラットフォームにログインすることができます。
このページでは以下の呼び方および定義を使用します:
認証デバイス: IBKRモバイル認証(IB Key)を有効化したスマートフォン。
取引デバイス: 取引用にIBKRモバイルアプリを使用するデバイス。
手順
携帯電話のオペレーティングシステムによって、以下より該当するリンクをクリックしてください:
Apple iOS
1. 取引デバイスでIBKRモバイルアプリを起動します。ログイン画面上でログイン情報を入力してログインをタップしてください。
図 1
2. 二段階ログイン認証 (図 2)をタップしてください。 チャレンジコードが画面に表示されます。(図 3)
図 2 図 3
.png)
3.認証デバイスでIBKRモバイルアプリを起動します。
図 4
.png)
4a.自動的にログインしない場合には、ページ左上のサービス (図 5)をタップしてから、認証(図 6)をタップしてください。
図 5 図 6
4b.すでにログインされている場合には、右端下の詳細ボタンをタップしてください。下にスクロールして認証をタップしてください。
図 7
5. 手順2で受信したチャレンジコードを入力してください。この後パスコード作成 (図 8)をタップしてください。セキュリティ要素をご入力いただくと(図 9、レスポンスストリング(図 10が送信されます)。
図 8 図 9 図 10
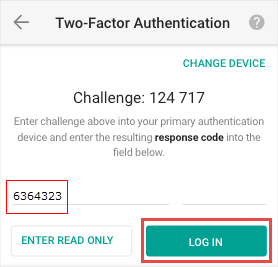
6. 取引デバイスの「レスポンス・コード入力」欄にレスポンスストリングを入力してから送信をタップして、認証プロセスを完了させます。
図 11
.png)
アンドロイド
1. 取引デバイスでIBKRモバイルアプリを起動します。ログイン画面上でログイン情報を入力してログインをタップしてください。
図 1
2. 二段階ログイン認証 (図 2)のオプションをタップしてください。 チャレンジコードが画面に表示されます。(図 3)
図 2 図 3
(1).png)
3.認証デバイスでIBKRモバイルアプリを起動します。
図 4
4a.自動的にログインしない場合には、サービス (図 5)をタップしてから、認証(図 6)をタップしてください。
図 5 図 6
.png)
4b.すでにログインされている場合には、メニュー ボタンをタップして(図 7)下にスクロールし認証 をタップしてください(図 8)。
図 7 図 8
.png)
.png)
図 7 図 8
5.IBKRモバイルのPINと手順2で受信したチャレンジコードを入力してください。この後レスポンスを作成 (図 9)をタップしてください。レスポンスストリングが表示されます(図 10)
図 9 図 10
.png)
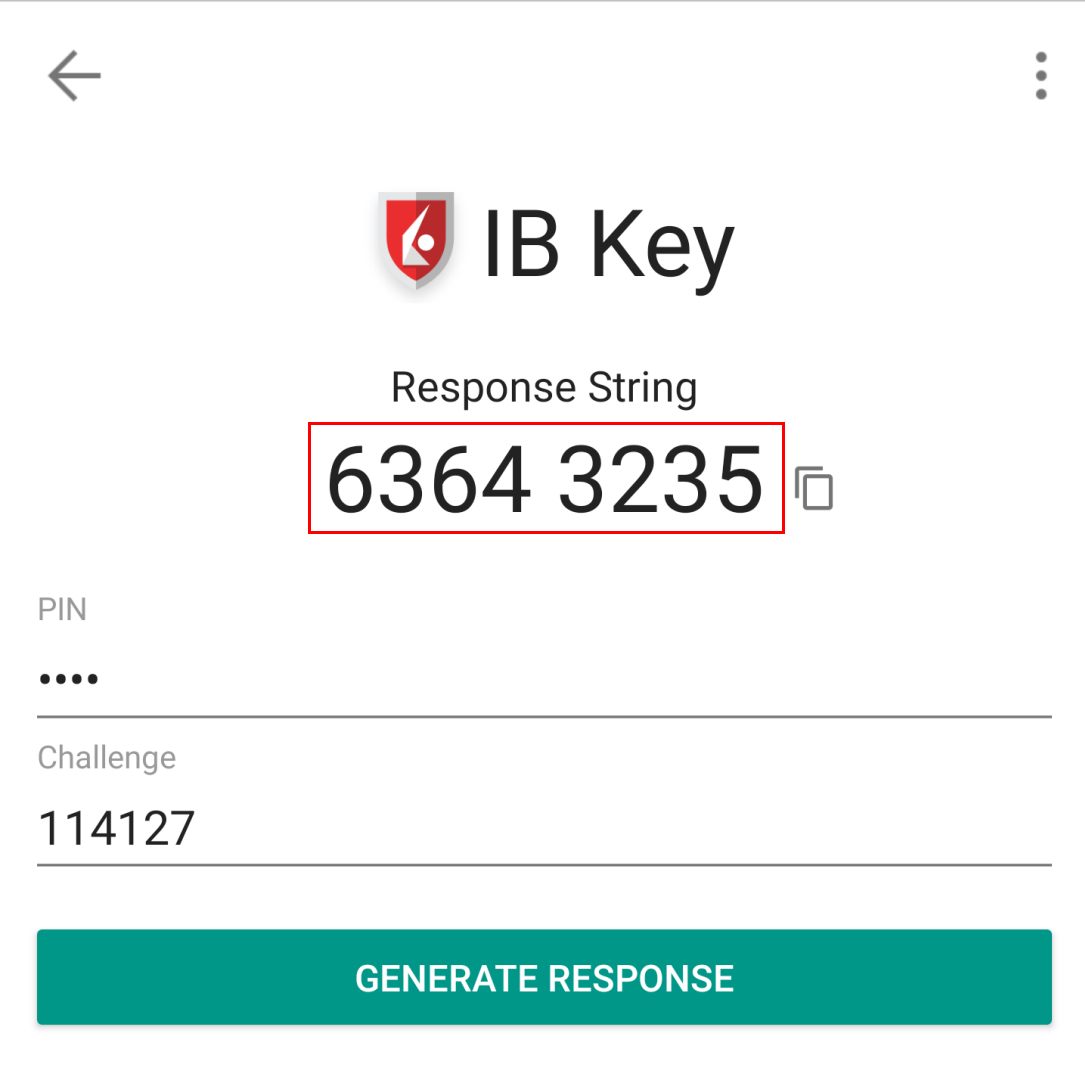
図 9 図 10
6. 取引デバイスの「レスポンス・コード入力」欄にレスポンス・ストリングを入力してからログインをタップして、認証プロセスを完了させます。
図 11
How to fix the "Cannot create ... file" error during TWS installation on MacOS
Background:
The filesystem permissions are controlled by your machines operating system. One of their functions is to secure your files, preventing unauthorized access or undesired modifications to the system and to your personal data.
Some software on your computer may modify or override the permissions assigned by the operating system. Under certain circumstances, this prevents the TWS installer from accessing the folder where the application core files have to be created (/users/youruser/home/Applications). In such cases, the TWS installation usually displays the error "Cannot create ... file. Shall I try again?"
In this article we explain how to reset the filesystem permission of the "Applications" folder located under your user home folder in order to allow a smooth run of the TWS installation.
Procedure:
1. On your keyboard, press ⌘CMD + ⇧Shift +H to open your home folder
Figure 1

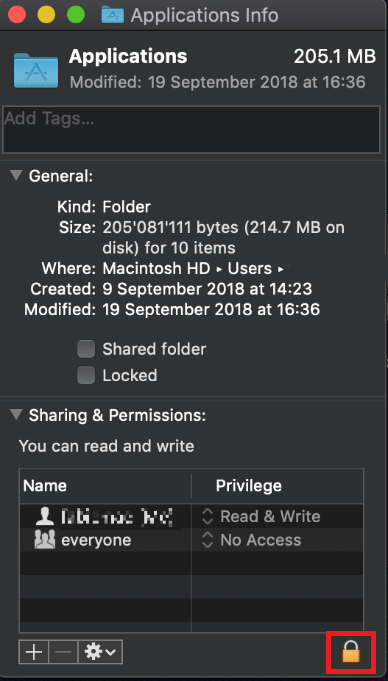
2. Select the folder "Applications" within your home folder and press ⌘CMD + I to open the Info panel
Figure 2

2. At the bottom right of the panel, click on the padlock
Figure 3
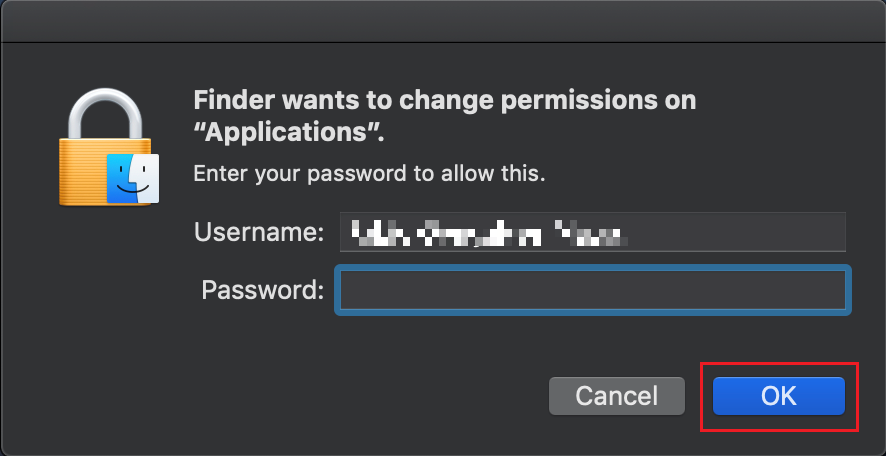
3. To unlock the permissions panel, enter your MacOS credentials and click OK
Figure 4
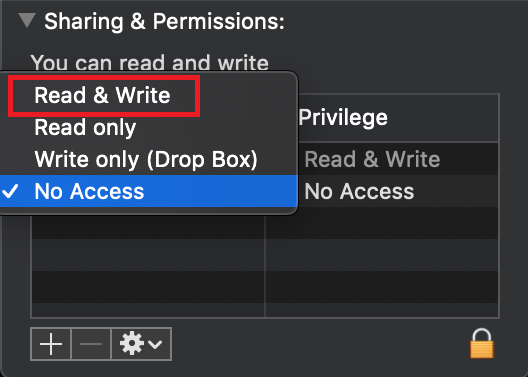
4. In the line correspondent to "everyone", click on "No Access" (Figure 5) and then select "Read & Write" (Figure 6)
Figure 5 Figure 6
.png)
5. Click on the icon bellow the permissions panel and select “Apply to enclosed items..."
Figure 7
.png)
6. Now run the TWS installer and click on Next> until you complete the installation
Figure 8
.png)
7. Once the installation has completed successfully, repeat the previous steps from 1. to 5. setting back the permissions of “everyone” to “Read Only” to revert your changes to the initial status
How to Log in to IBKR Mobile when IBKR Mobile Authentication (IB Key) is Enabled on Another Phone
Background:
This article is intended for clients who have activated the IBKR Mobile Authentication (IB Key) on their smartphone and possess as well an additional mobile device, on which they desire to trade.
Clients with this setup will be able to log in to the IBKR Mobile trading platform on their secondary device, using their smartphone to complete the Two-Factor Authentication step.
For the purposes of this article, we will use the following naming convention:
Authentication device: this is the smartphone on which you activated the IBKR Mobile Authentication (IB Key)
Trading device: this is where you want to use IBKR Mobile app for trading.
Procedure
Please click on one of the link below according to your phone operating system:
Apple iOS
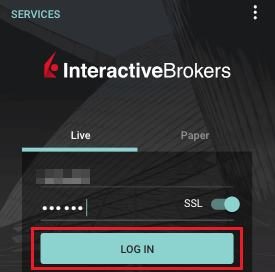
1. On your Trading device, launch the IBKR Mobile app. Enter your your credentials in the login screen and tap Log In
Figure 1
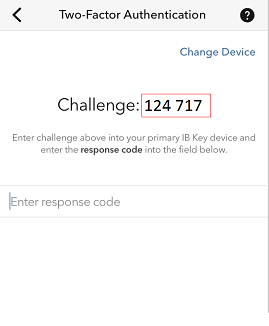
2. Tap Two-Factor Authentication (Figure 2). A Challenge code will be displayed (Figure 3)
Figure 2 Figure 3
3. On the Authentication device, launch the IBKR Mobile app
Figure 4
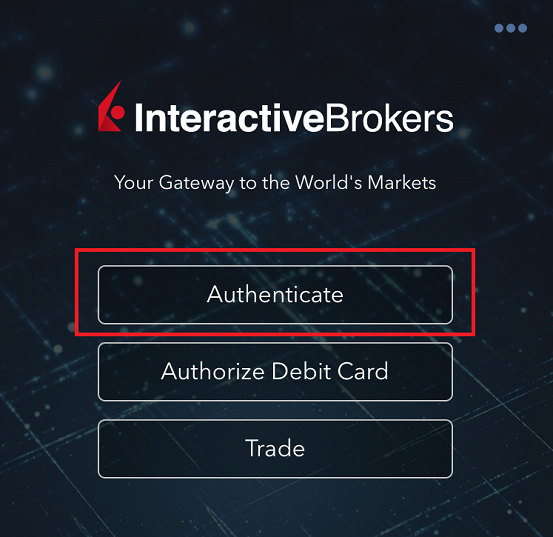
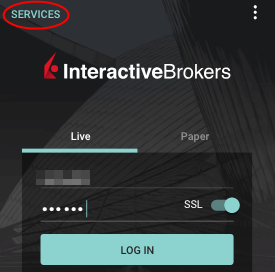
4a. If you are not automatically logged in, tap Services (Figure 5) on the top left, then tap Authenticate (Figure 6).
Figure 5 Figure 6
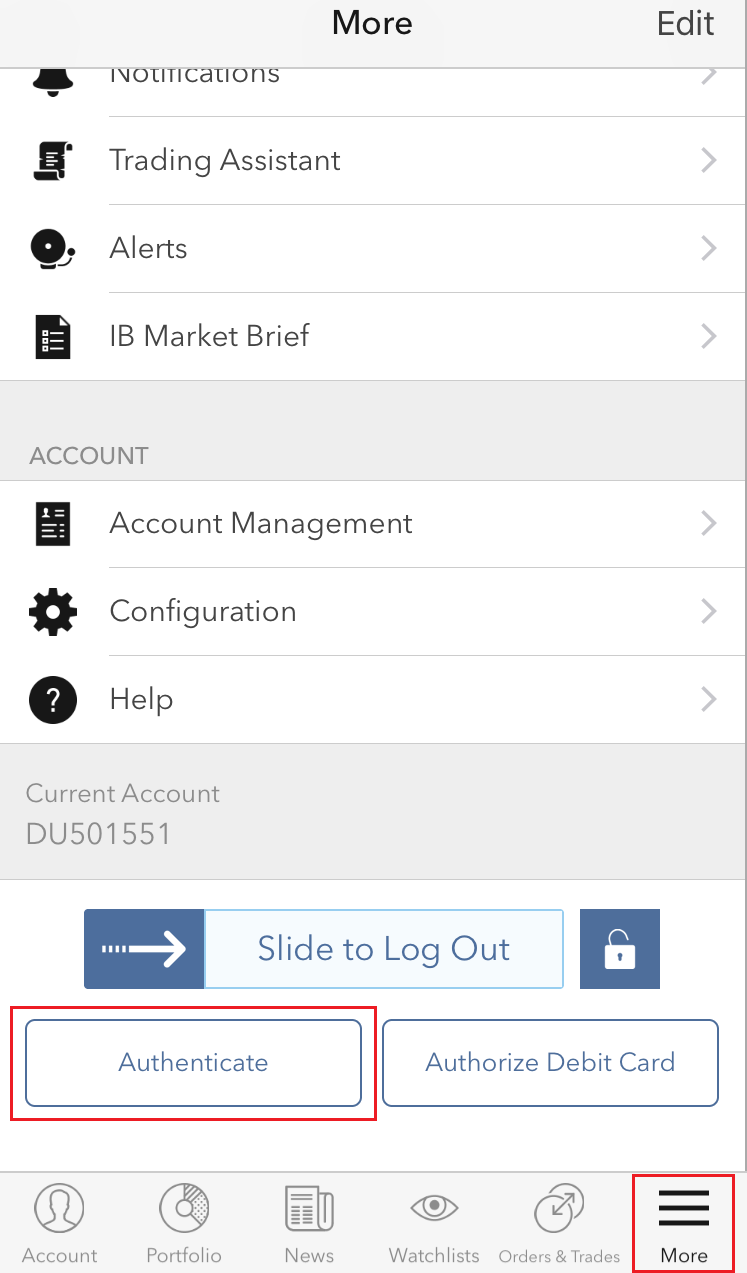
4b. If you are already logged in, tap on the More button on the bottom right. Then, scroll down and tap on Authenticate
Figure 7
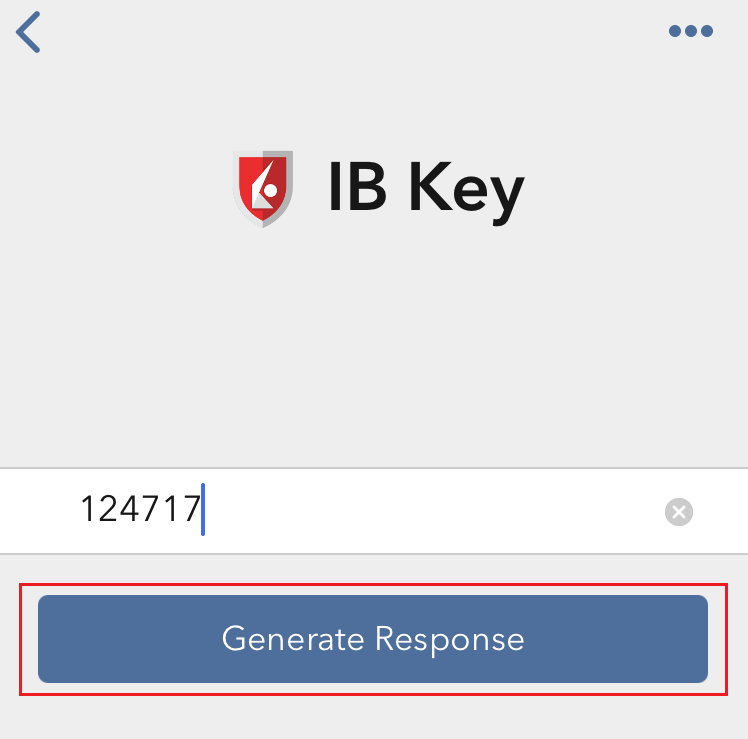
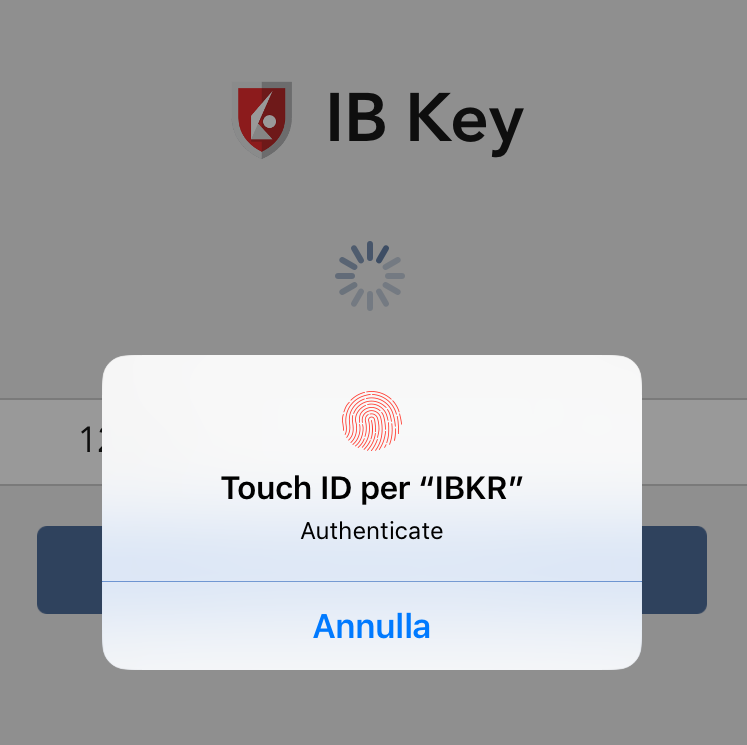
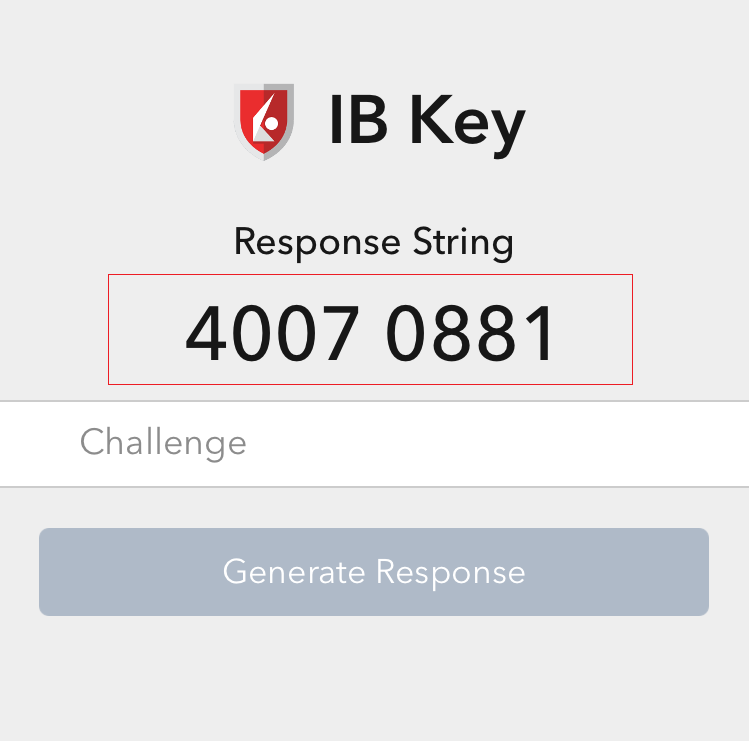
5. Enter the Challenge code you obtained at point 2. Then tap Generate Response (Figure 8). Once you have provided your security element (Figure 9), you will receive a Response String (Figure 10).
Figure 8 Figure 9 Figure 10
6. On your Trading device, enter the Response String into the "Enter response code" field and tap Send to finalize the authentication process.
Figure 11
Android
1. On your Trading device, launch the IBKR Mobile app. Enter your your credentials in the login screen and tap Log In
Figure 1
2. Tap on the option Two-Factor Authentication (Figure 2). You will see a Challenge code (Figure 3)
Figure 2 Figure 3
3. On the Authentication device, launch the IBKR Mobile app
Figure 4
4a. If you are not automatically logged in, tap Services (Figure 5) and then tap Authenticate (Figure 6).
Figure 5 Figure 6
4b. If you are already logged in, tap the Menu button (Figure 7), scroll down and tap Authenticate (Figure 8).
Figure 7 Figure 8
Figure 7 Figure 8
5. Enter your IBKR Mobile PIN and the Challenge code you obtained at point 2. Then tap Generate Response (Figure 9). A Response String will be displayed (Figure 10)
Figure 9 Figure 10
Figure 9 Figure 10
6. On your Trading device, enter the Response String in to the "Enter response code" field and then tap Log In to finalize the authentication process.
Figure 11
How do I enable the Notifications for the IBKR Mobile app
概観:
What is a notification?
A push notification is a brief message which is sent ("pushed") from a back-end server to your device over the Internet. Apps developers use those attention-grabbing messages to quickly and effectively reach the recipients, even if they are not currently engaging with their application. Notifications can deliver information to users or advise them of a specific action they are invited or required to perform.
Background:
Why does the IBKR Mobile app use notifications?
The IBKR Mobile application uses notifications for informational purposes, as well as two-factor authentication. In the latter case, the user is invited to tap on the notification, which will automatically open the IBKR Mobile app and begin the authentication process.
This procedure explains how to manually enable notifications for the IBKR Mobile app. Please click the link below that matches your smartphone's operating system.
1. On your home screen, tap Settings (Figure 1), then Notifications (Figure 2) and finally IBKR (Figure 3)
Figure 1 Figure 2 Figure 3
2. In the IBKR app settings, you will see a number of different options. We recommend to set them in the following way (Figure 4):
-
Allow Notifications: enabled
-
Lock Screen, Notification Center, Banners: selected
-
Banner style: Persistent
-
Badges: enabled
-
Show Previews: Always
Figure 4
1. Go the Settings of your phone, then tap Apps & notifications1 (Figure 1) then IBKR Mobile (Figure 2) and finally App notifications (Figure 3)
Figure 1 Figure 2 Figure 3
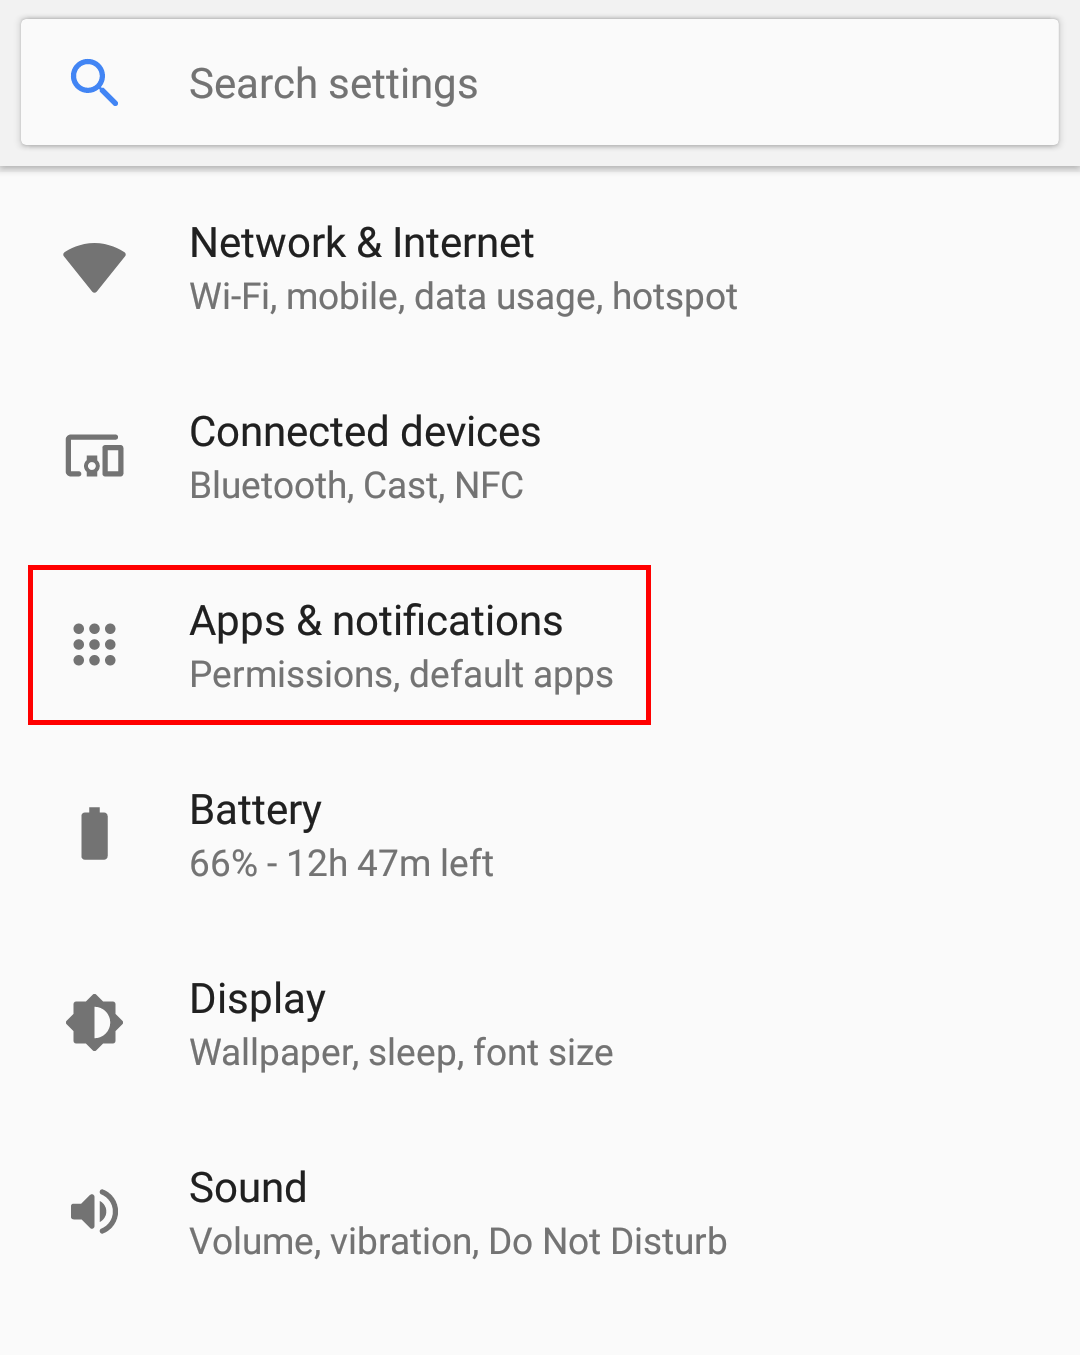
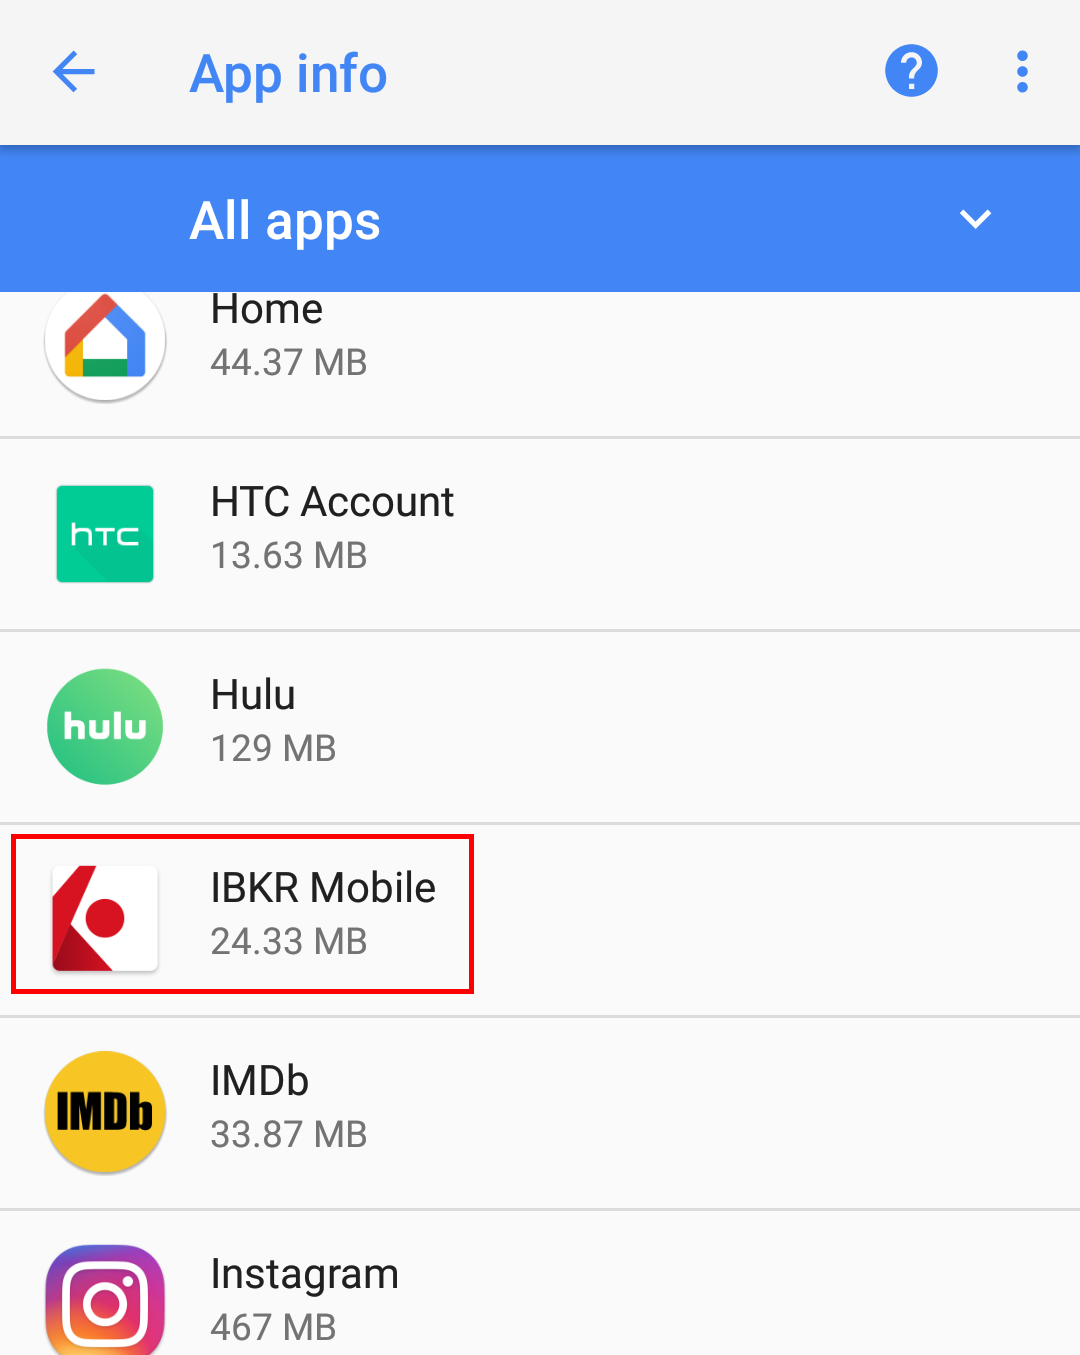
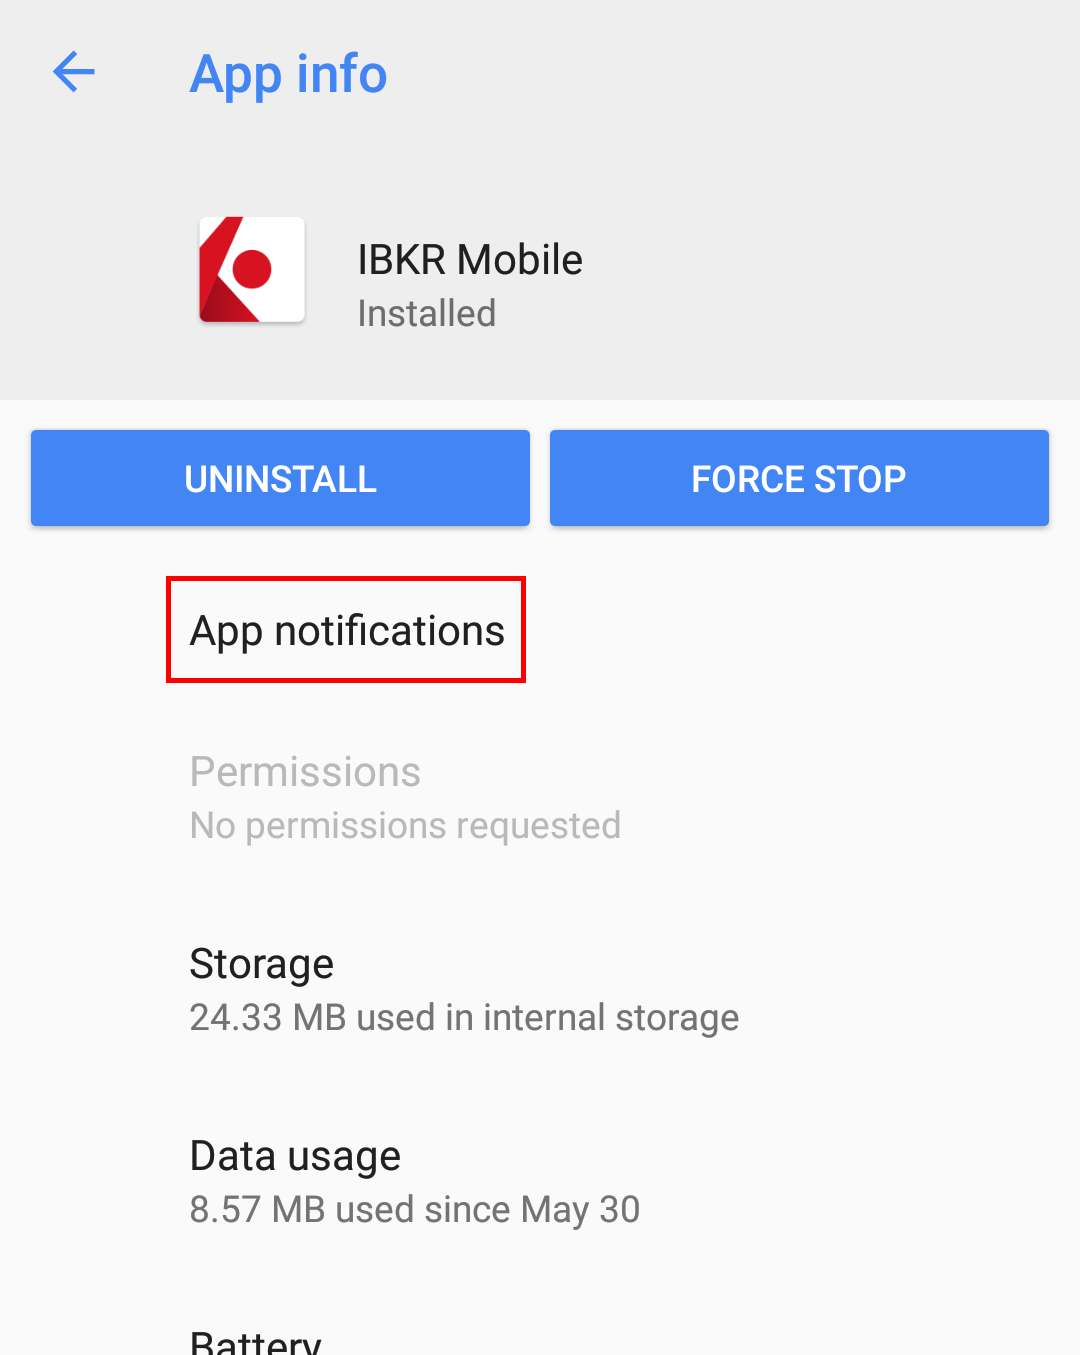
Figure 1 Figure 2 Figure 3
2. Ensure that notifications for this app are globally On and the switches Allow notification dots, Allow interruptions, On the lock screen are all enabled (Figure 4). According to your personal preference, you may want to enable as well the switch Override Do Not Disturb
Figure 4
Figure 4
Please note that menu items labels and positions may vary according to your device vendor and software version.
1. The Apps & notifications item may be called Sound & notification on certain devices
References:
- See KB2260 for instruction on how to activate and operate IBKR Mobile Authentication
- See KB3234 for troubleshooting missing IBKR Mobile notifications
- See KB2748 for information about IBKR Mobile Authentication recovery