Cryptocurrency Products Offered by IBKR
Overview:
Below is a list of many of the Cryptocurrency products offered by IBKR*. If you don't see the product you are looking for, you can search the IBKR contract database through the Contract Search tool available on our website. Select the Support menu followed by your account type (Individual or Institution). Here you can do a Simple search by entering the product name or symbol, an Advanced search which allows you add filters to the search, or a search by specific product type.
Cryptocurrency
- BTC- Bitcoin
- ETH- Ethereum
- LTC- Litecoin
- BCH- Bitcoin Cash
Stocks/ETFs
US
- GBTC (PINK)- Grayscale Bitcoin Investment Trust
- BCHG (PINK)- Grayscale Bitcoin Cash Trust
- ETCG (PINK)- Grayscale Ethereum Classic Trust
- ETHE (PINK)- Grayscale Ethereum Trust
- GDLC (PINK)- Grayscale Digital Large Cap Fund
- LTCN (PINK)- Grayscale Litecoin Trust
Non-US
- BITCOINXB (SFB)- Bitcoin Tracker One
- COINETH (SFB)- XBT Provider Ethereum
- COINETHE (SFB)- XBT Provider Ethereum
Indices
- NYXBT (NYSE)- NYSE Bitcoin Index
- GXBT (Cboe)- The Gemini Bitcoin Trace Price Index (No new contracts offered for trading as of June 2019)
- BRR (CME)- CME Bitcoin Reference Rate Index
- BRTI (CME)- CME Bitcoin Real Time Index
Futures
- GXBT (Cboe/CFE)- The Gemini Bitcoin Trace Price Futures (No new contracts offered for trading as of June 2019)
- BRR (CME)- CME Bitcoin Reference Rate Futures
- ETHUSDRR (CME) – CME Ether Dollar Reference Rate Futures
- BAKKT (ICECRYPTO)- Bakkt Bitcoin Futures
*Some or all of the above products may not be available to IBKR clients located in certain jurisdictions.
Back to Table of Contents: Bitcoin and Other Cryptocurrency Products @ IBKR
Bitcoin and Other Cryptocurrency Products @ IBKR
Cryptocurrency Products Offered by IBKR
Cryptocurrency Products Market Data
Trading Bitcoin Futures with IBKR
Bitcoin Futures Product Page
https://www.interactivebrokers.com/en/index.php?f=25379
IBKR Margin Requirements
https://www.interactivebrokers.com/en/index.php?f=24176
How to update the US Social Security Number (SSN) or Individual Taxpayer Identification Number (ITIN) on your account
Background:
If you have been informed or believe that your account profile contains an incorrect US SSN/ITIN, you may simply log into your Account Management to update this information. Depending on your taxpayer status, you can update your US SSN/ITIN by modifying one of the following documents:
1) IRS Form W9 (if you are a US tax resident and/or US citizen holding a US SSN/ITIN)
2) IRS Form W-8BEN (if you are a Non-US tax resident holding a US SSN/ITIN)
Please note, if your SSN/ITIN has already been verified with the IRS you will be unable to update the information. If however the IRS has not yet verified the ID, you will have the ability to update through Account Management.
How to Modify Your W9/W8
1) To submit this information change request, first login to Account Management
2) Click on the Settings section followed by Account Settings
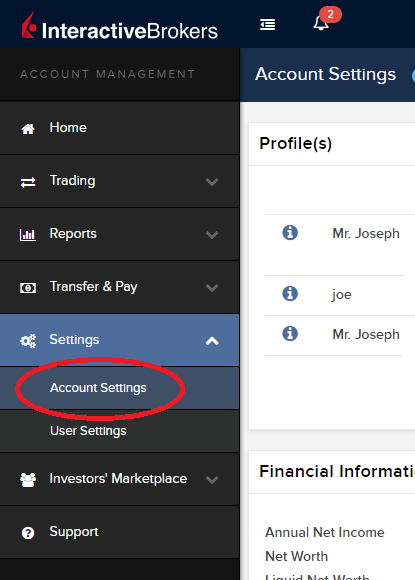
3) Find the Profile(s) section. Locate the User you wish to update and click on the Info button (the "i" icon) to the left of the User's name
.png)
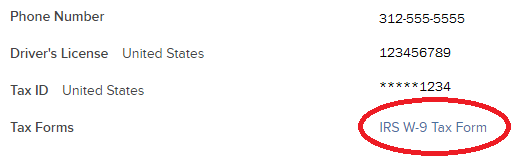
4) Scroll down to the bottom where you will see the words Tax Forms. Next to it will be a link with the current tax form we have for the account. Click on this tax form to open it
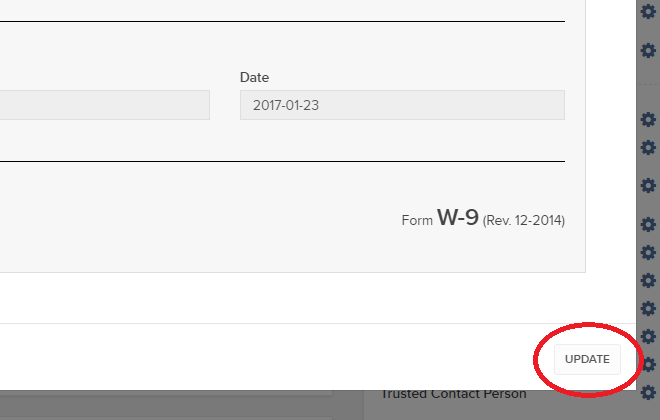
5) Review the form. If your US SSN/ITIN is incorrect, click on the UPDATE button at the bottom of the page
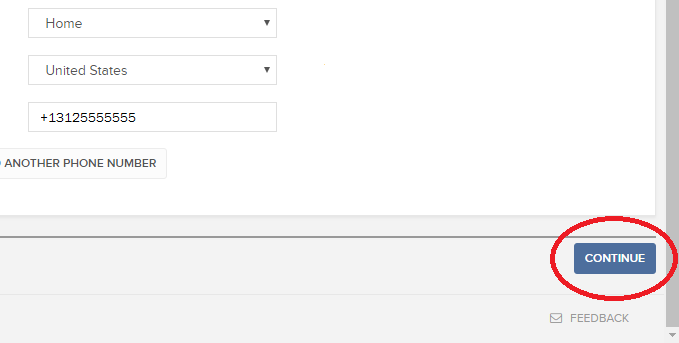
6) Make the requisite changes and click the CONTINUE button to submit your request.
7) If supporting documentation is required to approve your information change request, you will receive a message. Otherwise, your information change request should be approved within 24-48 hours.
How to adjust font size in TWS
Background:
By default, Trader Workstation (TWS) is designed to display in a font size and style which can be read comfortably for the average user across various screen sizes and resolutions. With the advent of new technologies, there has been an exponential push to make monitors with higher display sizes and your layout may need to be further adjusted manually. This document serves to explain how to manually adjust the font size for TWS.
Procedure
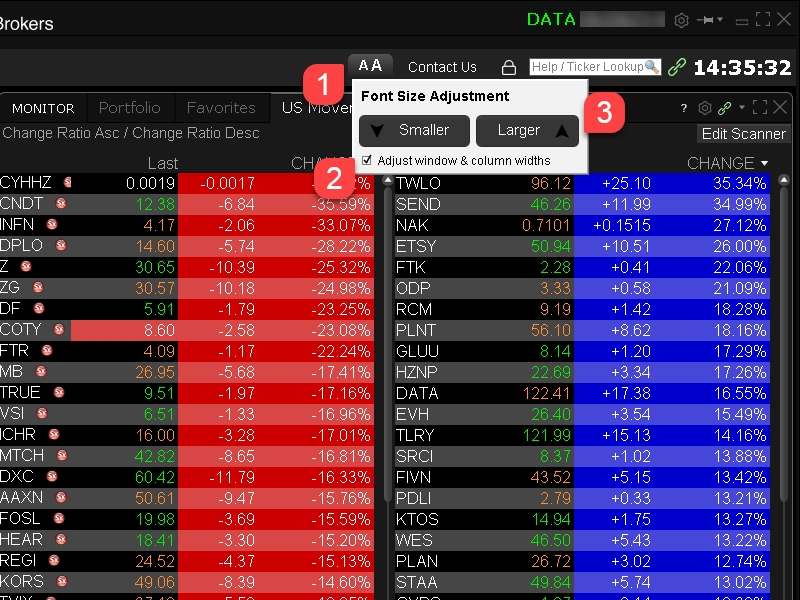
To adjust font size throughout TWS:
- From the Anchor window, click the Font Size Adjustment icon.

- Check the button Adjust window & column widths to ensure all windows will resize automatically to keep the same font:window ratio. (If unchecked, only font size will change but window size will remain the same).
- Click the button Smaller or Larger until the font size is correct.
Notice that the font size will change immediately as you click the button. - Click the Font Size Adjustment icon when done.
Note: It is possible that currently not all windows will be adjusted in the same way.
How to check and solve connectivity issues affecting the Trader Workstation (TWS)
Background:
The Trader Workstation (TWS) software needs to connect to our gateways and market data servers in order to work properly. Connectivity issues affecting your local network or your Internet Service Provider network may negatively affect the TWS functionality. In this article we will indicate how to test your connectivity using an automated connectivity test web page.
How to test the connectivity using the automated "IB Connectivity Test" web page?
1) Launch the Firefox browser and open this link with that browser: http://www.interactivebrokers.com/cgi-bin/conn_test.pl
Note: due to browser specific constraints, the above connectivity test link will only produce consistent results on the Mozilla Firefox browser. If you do not have Firefox, you can download and install it form here.
2) Please wait until all the tests have been completed and results have been displayed. If you see "Success" as outcome for all tests, your connectivity to IB Servers is reliable at the present moment. No additional connectivity troubleshooting or configuration should be needed.
3) If you see "Fail" as outcome for one or more test/s, please click on the link "Fail" itself in order to display the "IB Network Troubleshooting Guide". That section will help you conduct some manual tests to identify the cause of the failure.
Note for Corporative environments and Proxy server users: the automated "Connectivity Test" page may return misleading results in case your machine is accessing the Internet through a Proxy server. This usually happens if you are connected to a company network. If this is your case, we kindly ask you to contact your Network Administrator or your IT Team and ask them to perform a manual connectivity tests towards the destination servers indicated in the table on the top of the IB automated "Connectivity Test" web page itself. The manual connectivity test should be conducted using destination TCP ports 4000 and 4001. Should they prefer to have the server list in another format or should they need to set up the firewall / IP Management rules, you can forward them this page.
Bienvenue chez Interactive Brokers
Overview:
Maintenant que votre compte est approvisionné et approuvé, vous pouvez commencer à trader. Les informations ci-dessous vous aideront à démarrer en tant que nouveau client d'Interactive Brokers.
- Votre argent
- Configurer votre compte pour le trading
- Comment trader
- Trader à travers le monde
- Cinq rappels pour tirer pleinement parti de nos services
1. Votre argent
Dépôts et retraits Informations générales. Toutes les transactions sont gérées par le biais de votre Gestion de compte sécurisée.
Dépôts
Tout d'abord, vous créez une notification de dépôt depuis Gestion de compte> Approvisionnement > Transferts de fonds > Type de transactions : “Dépôt” Comment créer une notification de dépôt. La seconde étape consiste à demander à votre banque d'effectuer un virement en utilisant les coordonnées bancaires fournies dans votre Notification de dépôt.
Retraits
Créez une instruction de dépôt via Gestion de compte > Approvisionnement > Transfert de fonds > Type de transaction : "Retraits" Comment créer des instructions de retrait
Si vous demandez un retrait dépassant les limites de retrait, il sera considéré comme un retrait exceptionnel et par conséquent, le détenteur du compte et le compte IB devront être les mêmes. Si le compte bancaire du destinataire a été utilisé pour un dépôt, le retrait sera traité. Dans le cas contraire, vous devez contacter le service clientèle et fournir les documents requis.
Résolution de problèmes
Dépôts : ma banque m'a envoyé de l'argent mais je ne vois pas ce montant crédité sur mon compte IB.
Raisons possibles :
a) Un transfert d'argent prend entre 1 et 4 jours ouvrés
b) La notification de dépôt est manquante. Vous devez la créer via votre Gestion de compte et envoyer un ticket au service clientèle
c) Les informations de modification sont manquantes. Votre nom ou le numéro de compte IB ne sont pas indiqués dans les informations de transfert. Vous devez contacter votre banque et demander les informations complètes.
d) La compensation par ACH initiée par IB est limitée à 100k USD par périodes de 7 jours. Si vous avez ouvert un compte Portfolio Margin avec une exigence de dépôt minimum de 110k, un virement est sans doute la meilleure option pour réduire le temps d'attente avant votre première transaction. Si vous avez opté pour une compensation par ACH, un temps d'attente de presque 2 semaines est à prévoir. Une autre solution est d'utiliser temporairement un compte RegT.
Retraits : J'ai demandé un retrait mais je ne vois pas cet argent crédité sur mon compte bancaire.
Raisons possibles :
a) Un transfert de fonds prend entre 1 à 4 jours ouvrés
b) Rejet. Le montant demandé excède le montant maximum disponible. Veuillez vérifier le solde de votre compte. Veuillez noter que conformément aux exigences réglementaires, lorsque les fonds sont déposés, ils doivent être détenus pendant une période de 3 jours avant qu'ils ne soient disponibles.
c) Votre banque a retourné les fonds. La raison en est sans doute que les noms du compte bancaire destinataire et émetteur ne correspondent pas.
2. Configurez votre compte pour le trading
Différence entre un compte de marge et un compte au comptant : si vous avez choisi de faire une demande d'ouverture de compte FastTrack, le type de compte par défaut est un compte au comptant avec autorisations de trading d'actions américaines. Si vous souhaitez trader avec un effet de levier et réaliser des opérations sur marge, voici comment faire une demande de compte de marge Reg T.
Autorisations de trading
Afin de trader une classe d'actifs particulière dans un pays donné, vous devez obtenir les autorisations de trading via votre Gestion de compte. Veuillez noter que les autorisations de trading sont obtenues gratuitement. Il vous sera par contre demandé de signer des clauses d'informations du risque conformément à la réglementation imposée par les organismes régulateurs du pays. Comment demander des autorisations de trading
Données de marché
Si vous voulez recevoir des données de marché en temps réel pour un produit ou une Bourse en particulier, vous devez vous abonner à une des liasses de données de marché qui sont facturées par la Bourse. Comment s'abonner aux données de marché
L'assistant de données de marché vous aidera à choisir la bonne liasse. Consultez la vidéo vous expliquant leur fonctionnement.
Les clients ont la possibilité de recevoir gratuitement des données de marché en différé en cliquant sur le bouton correspondant aux données gratuites en différé sur une ligne de symbole pour laquelle ils n'ont pas de souscription.
Comptes gérants indépendants
Jetez un oeil à notre guide "Comment commencer en tant que gérant indépendant". Vous trouverez ici des informations sur la manière de créer des utilisateurs supplémentaires sur votre compte de gérant et comment leur conférer des droits d'accès.
3. Comment trader
L'Academie du trading est le lieu où vous apprendrez comment utiliser nos plateformes. Vous y trouverez nos webinaires, live ou enregistrés dans 10 langues différentes, ainsi que de la documentation sur nos différentes plateformes de trading.
Trader Workstation (TWS)
Les traders qui ont besoin d'outils de trading plus sophistiqués peuvent utiliser notre Trader Workstation (TWS). Élaborée pour les teneurs de marché, cette plateforme vous propose une interface tableur qui prend en charge plus de soixante types d'ordres, des outils de trading adaptés à toutes les stratégies et un aperçu de votre solde et de vos activités en temps réel, pour trader plus rapidement et plus efficacement.
Essayez nos deux versions :
TWS Mosaic : intuitive, accès simple au trading, gestion des ordres, listes de suivi, graphiques, disponibles dans une fenêtre unique
TWS Classic : une gestion des ordres avancée pour les traders ayant besoin d'outils plus sophistiqués et d'algorithmes.
Description et informations générales / Guide de prise en main rapide / Manuel utilisateur
Visites guidées interactives : Les bases de TWS / Configuration de TWS / TWS Mosaic
Comment passer un ordre : Vidéo Classic TWS / Vidéo Mosaic
Outils de trading : Description et informations générales / Guide utilisateurs
Conditions préalables : Comment installer Java pour Windows / Comment installer Java pour MAC / Les ports 4000 et 4001 doivent être ouverts
Se connecter à TWS / Télécharger TWS
WebTrader
Les traders qui préfèrent une interface simplifiée peuvent utiliser notre plateforme HTML WebTrader, qui offre une présentation claire et simplifiée des données de marché et vous permet d'envoyer des ordres, de suivre l'évolution de vos comptes et de vos exécutions. Utilisez la dernière version du WebTrader pour votre navigateur
Guide de prise en main rapide / Manuel d'utilisation de WebTrader
Introduction : Vidéo WebTrader
Comment passer un ordre : Vidéo WebTrader
Connexion WebTrader
MobileTrader
Nos solutions mobiles vous permettent de trader sur votre compte IB durant vos déplacements. MobileTWS pour iOS et mobileTWS pour Blackberry sont conçus spécialement pour ces appareils tandis que la version plus générique MobileTrader prend en charge la plupart des autre smartphones.
Description et informations générales
Types d'ordres Types d'ordres disponibles et descriptions / Vidéos / Visites guidées / Manuel d'utilisation
Trading simulé Description générale et informations / Comment obtenir un compte de trading simulé
Une fois votre compte de trading simulé créé, les données de marché de votre compte simulé et de votre compte réel seront mises en commun : Gestion de compte > Gérer un compte > Paramètres > Trading simulé
4. Tradez dans le monde entier
Les comptes IB sont des comptes multi-devises. Votre compte peut contenir différentes devises au même moment. Cela vous permet de trader de multiples produits dans le monde à partir d'un seul compte.
Devise de base
Votre devise de base détermine la devise utilisée sur vos relevés de compte et celle utilisée pour déterminer les exigences de marge. La devise de base est déterminée lorsque vous ouvrez un compte. Les clients peuvent modifier la devise de base à tout moment sur leur Gestion de compte.
Nous ne convertissons pas automatiquement les devises dans votre devise de base
Les conversions de devises doivent être réalisées manuellement par le client. Sur cette vidéo, vous apprendrez comment effectuer une conversion de devise. Afin d'ouvrir une position libellée dans une devise différente de celle utilisée sur votre compte, vous avez deux possibilités :
A) Conversion de la devise
B) Prêt sur marge IB. (Non disponible pour les comptes au comptant)
Ce cours vous explique les mécanismes des transactions Forex.
5. Rappels utiles
1. Recherche de contrats
Vous trouverez ici tous nos produits, symboles et spécifications.
2. Base de connaissance IB
La base de connaissance est composée d'un glossaire terminologique, de guides pratiques ainsi que de conseils et recommandations en cas de problèmes. Elle vise à aider les clients IB à gérer leurs comptes. Saisissez votre requête dans la fenêtre de recherche et vous obtiendrez une réponse à votre question.
De la même manière que votre plateforme de trading vous donne accès aux marchés, la Gestion de compte vous permet d'accéder à votre compte IB. Utilisez la Gestion de compte pour gérer les tâches liées à votre compte telles que le retrait ou dépôt de fonds, la consultation de vos relevés, la souscription aux données de marché ou leur modification, les autorisations de trading et la vérification ou modification de vos informations personnelles.
Connexion Gestion de compte / Guide d'utilisation rapide de la Gestion de compte / Guide d'utilisation de la Gestion de compte
Afin de vous garantir le plus haut niveau de sécurité en ligne, Interactive Brokers a mis en place une système d'accès sécurisé
(Secure Login System - SLS) par lequel l'accès à votre compte se fait par un processus d'authentification en deux temps. Cette double authentification permet de confirmer votre identité au moment de la connexion de deux manières : 1) Par une information dont vous avez connaissance (votre nom d'utilisateur et mot de passe ); et 2) Par quelque chose que vous possédez (un appareil de sécurité fourni par IB qui génère un code de sécurité aléatoire, valable une seule fois). Votre nom d'utilisateur et mot de passe ainsi que la possession physique de l'appareil étant requis, participer au système d'accès sécurisé élimine la possibilité pour quiconque d'accéder à votre compte.
Comment activer votre appareil de sécurité / Comment obtenir une carte de sécurité / Comment retourner un appareil de sécurité
Si vous oubliez votre mot de passe ou perdez votre carte de sécurité, veuillez nous contacter pour une assistance immédiate.
Facile à consulter et à personnaliser, nos relevés et rapports recouvrent tous les aspects de votre compte Interactive Brokers. Comment consulter un relevé d'activités
IBKR Mobile Companion App for Apple Watch
Overview:
Interactive Brokers takes our intuitive and ergonomic mobile trading platform to the next level by providing you a companion app for the Apple Watch.
Background:
The companion app is designed to display information when a user has logged in to the IBKR Mobile app on their iPhone. It will work in both the Live Trading and Read Only Modes but does not support active trading. This companion app is only available for informational purpose only.
Table of contents
What does the app do?
At 'glance view' the app will display the following information; Amount of FYI Notification, Account Number, Daily P&L, Net Liquidation Value, Number of Open Orders, Number of Trades Executed, Excess Liquidity and number of Positions you currently own. It will also display the time when it has fetched the information from your iPhone.
Example:
.jpg)
Requirements
- Must have iPhone 5s or greater, using iOS 11 or later.
- Must have the IBKR Mobile app installed on your iPhone (version 11 or greater)
- Must have your Apple Watch paired to your iPhone (refer to: Set up your Apple Watch for directions)
- Must have watchOS 5 running on your Apple Watch.
Important: The Apple Watch applications are only 'companion' apps. This means they are not installed directly on the watch itself, but rather are a function of an application already installed on your iPhone.
How is the app installed?
1. Install the latest version of the IBKR Mobile app on your iPhone.
2. Pair your Apple Watch to your phone.
3. Launch the Watch app on your phone.
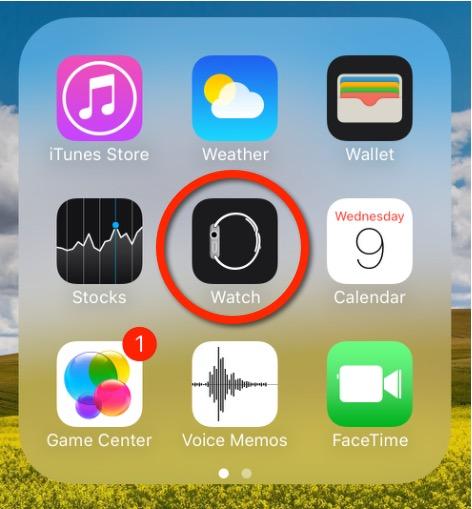
4. Scroll down on the main screen until you see your list of apps, locate the IBKR Mobile app and Tap on it.
.jpg)
5. Enable Show App on Apple Watch by swiping the slider to the right (green).
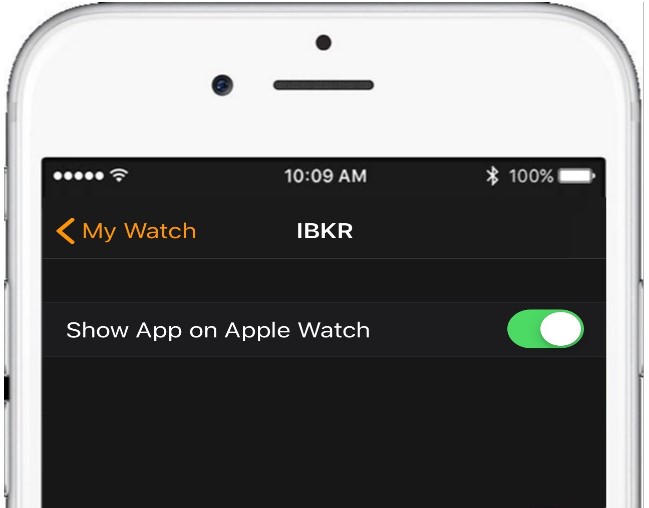
6. After the top slider is set to green, you will see a text informing you that the app is being installed. At this stage the phone is sending the application to your watch per Bluetooth. This might take a short moment (approximately 30-60 seconds.) Once completed the companion app has been installed.
Note: Once enabled it will take 24 hours before P&L shows up on the watch after activation.
How do I confirm the app is installed?
On your Apple Watch click on the crown to access your Home Screen, you should now see an icon for the IBKR Mobile App.

How to install Java on a Linux computer
Overview:
This article will walk you through the process of installing the official Oracle Java platform on your Linux machine.
Background:
There are many Linux distributions available and many of them come with one or more Java platform/s pre-installed. In the vast majority of the cases the Java platform which comes pre-installed on a Linux machine is not the official Oracle Java, but another one such as OpenJKD or IBM Java.
The Trader Workstation has been developed on the official Oracle Java platform and shows the most stable behavior and the best performances when run by the official Oracle Java process. Therefore we recommend to all the Linux users, who want to run the Trader Workstation, to install the official Oracle Java platform and set it as the preferred Java environment to be used by the operating system.
For the purpose of this guide, we will divide the Linux distributions nowadays available into three big families:
- APT based Linux distributions (Ubuntu, Mint) - those distributions use the Advanced Packaging Tool to fetch and install software packages in a semi-automatic way, resolving and taking care of dependencies.
- RPM based Linux distributions (Suse, OpenSUSE, Red Hat, CentOS, Fedora, Oracle Linux) - those distributions allow the installation of software packages (.rpm files), which contain the binary files to be installed on the system and an integrated dependency checker script. The .rpm packages allow a simplified and smooth installation of software without requiring a deep knowledge of the system.
- Other Linux distributions - those distributions may or may not use a specific package manager but all of them allow the installation of software using the source code package (.tar.gz) through a series of command to be issued on the Terminal.
How to install the official Oracle Java on APT based Linux distributions
The most simple way to install Java on Ubuntu or Mint is using the webupd8 repository. This method will install the latest version of JDK 8 and the JRE 8 browser plugin. The supported versions are: Ubuntu 15.04, 14.10, 14.04, 12.04 - Linux Mint 17.1, 17, 13
For details, please refer to: http://www.webupd8.org/2012/09/install-oracle-java-8-in-ubuntu-via-ppa.html
a. On your Linux machine, open the "Terminal". If you need help with accessing and using the Terminal, please refer to: https://help.ubuntu.com/community/UsingTheTerminal
b. Become root, by typing su on the Terminal and entering the super user password. Instead of becoming root, you can choose to use the sudo feature (which gives your user the root privileges for a single command). If you want to use sudo, just add sudo before each one of the commands you will enter in the Terminal. You will be requested to enter the sudo password.
c. Add the webupd8 repository by tiping add-apt-repository ppa:webupd8team/java Follow the instructions on the screen. You should be asked to press [ENTER] to continue. Once done, the repository will be added.
d. Type the command apt-get update
e. Enter the command: apt-get install oracle-java8-installer The process will download and install automatically the required packages along with their dependencies. Once the command has completed, the Oracle Java platform will be ready to be used.
Should you prefer to have control of all the phases of the installation, instead of relying on the APT facility, please refer to the instructions on this page: http://www.wikihow.com/Install-Oracle-Java-JRE-on-Ubuntu-Linux
How to install the official Oracle Java on RPM based Linux distributions
a. On your Linux machine, open the "Terminal". If you need help with accessing and using the Terminal, please refer to: https://help.ubuntu.com/community/UsingTheTerminal
b. Become root, by typing su on the Terminal and entering the super user password. Instead of becoming root, you can choose to use the sudo feature (which gives your user the root privileges for single commands). If you want to use sudo, just add sudo before each one of the commands you will enter in the Terminal. You will be requested to enter the sudo password.
c. Create the folder /usr/java by issuing the command mkdir /usr/java. If the directory already exists you will see a message indicating that. In this case you can proceed directly to point d.
d. Go to the page https://www.java.com/en/download/linux_manual.jsp
e. If you have a 32 bit system, download the file "Linux RPM" . If you have a 64 bit system, download the file "Linux64 RPM". In either case, please instruct your browser to save the file in the folder /usr/java or move the file to that foder once it has been downloaded.
f. Go back to the Terminal and move to the /usr/java folder by typing cd /usr/java
g. List the content of the folder by typing the command ls -la You should see the file you downloaded. It will be called jre-XuYY-linux-ARCH.rpm (where X is the Java family, YY the update number and ARCH will be i586 for 32 bit installer and x64 for 64 bit installer)
h. Launch this command to perform the installation: rpm -ivh jre-XuYY-linux-ARCH.rpm Obviously you need to use the real file name, for example jre-8u65-linux-x64.rpm
Once the installation has been performed, the Oracle Java should be ready to be used. Usually a system restart is not required on Linux machines. In case you see warning or error message/s during the installation, please check their content and search the Internet for possible solutions. Most of the time the warning/error messages maight refer to missing dependencies (this means that another package needs to be installed before you can install Java) or to unsufficient privileges (this means that you are launching the command with a regular user instead of "root"). If you cannot find the proper course of actions to overcome the issue, please refer to the support documentation or forums for your current Linux distribution.
How to install the official Oracle Java on other Linux distributions
If your Linux distribution does not support RPM or APT package managers, the installation of Oracle Java can be performed manually in this way:
a. On your Linux machine, open the "Terminal".
b. Become root, by typing su on the Terminal and entering the super user password. Instead of becoming root, you can choose to use the sudo feature (which gives your user the root privileges for single commands). If you want to use sudo, just add sudo before each one of the commands you will enter in the Terminal. You will be then required to enter the sudo password.
c. Create the folder /usr/java by issuing the command mkdir /usr/java. If the directory already exists you will see a message indicating that. In this case you can proceed directly to point d.
d. Go to the page https://www.java.com/en/download/linux_manual.jsp
e. If you have a 32 bit system, download the file "Linux" . If you have a 64 bit system, download the file "Linux x64". In either case, please instruct your browser to save the file in the folder /usr/java or move the file to that foder once it has been downloaded.
f. Go back to the Terminal and move to the /usr/java folder by typing cd /usr/java
g. List the content of the folder by typing the command ls -la You should see the file you downloaded. It will be called jre-XuYY-linux-ARCH.tar.gz (where X is the Java family, YY the update number and ARCH will be i586 for 32 bit installer and x64 for 64 bit installer)
h. Launch this command to perform the installation: tar zxvf jre-XuYY-linux-ARCH.tar.gz Obviously you need to use the real file name, for example jre-8u65-linux-x64.tar.gz
i. Once done, enter command ls -la You will see the folder /usr/java/jre1.X.0_YY (where X is the Java family, YY the update number)
l. The Java executables are now present in the folder /usr/java/jre1.X.0_YY/bin
m. Now check which is the symbolic link used by the system to access the java executables by entering the commands:
which java - you will receive an output similar to this: /usr/bin/java From now on we will refer to this path as javasympath.
which javac - you will receive an output similar to this: /usr/bin/java From now on we will refer to this path as javacsympath.
which javaws - you will receive an output similar to this: /usr/bin/java From now on we will refer to this path as javawssympath.
Unless your are launching the java applications using the full path (for example /usr/java/jre1.X.0_YY/bin/java ...), you would need to tell your system which java executables should be used when a generic java command is issued. In order to to this, you can either update your alternatives files (if your system supports them) or the symbolic links. Here below you can see the instructions, according to your system:
- If your system uses the alternatives files:
n. Issue the following commands, paying attention to make the necessary substitutions .
update-alternatives --install javasympath java /usr/java/jre1.X.0_YY/bin/java 1
update-alternatives --install javacsympath javac /usr/java/jre1.X.0_YY/bin/javac 1
update-alternatives --install javawssympath javaws /usr/java/jre1.X.0_YY/bin/javaws 1
- If your system does not use the alternatives files:
n. Issue the following commands, paying attention to make the necessary substitutions .
ln -sf /usr/java/jre1.X.0_YY/bin/java javasympath
ln -sf /usr/java/jre1.X.0_YY/bin/javac javacsympath
ln -sf /usr/java/jre1.X.0_YY/bin/javaws javawssympath
How to fix the error: "Library dbcapi.dll cannot be loaded"
Background:
TWS users may receive the following error message upon configuring TWS to use the eSignal data feed:

This error may appear for the following reasons:
Issue A - You are not using the 32 bit version of TWS and/or eSignal:
The 32-bit versions of both TWS and eSignal have to be installed for the integration to work. In the section below you will find the instructions for installing the 32-bit TWS. Should you need assistance with the installation of the 32-bit eSignal, we suggest you to contact the eSignal customer support.
Issue B - There is an incompatibility with the file C:\Jts\dbcapi.dll:
To use 32-bit eSignal version 12, an incompatibility with the C:\Jts\dbcapi.dll file must be fixed. This involves copying a file from the eSignal installation and renaming it to dbcapi.dll.
Note: On certain systems you will need to apply the fixes for both issue A and B. If you applied the fix for issue A (or if you are already sure you are using the 32 bit version of both platforms) and you are still receiving the error message, then please apply as well the fix for issue B.
Instructions to resolve issue A
Installing 32-bit TWS
Please open the page http://www.ibkr.com in your browser and perform the steps below:
1) Click on the Log In button at the top right corner of the page.
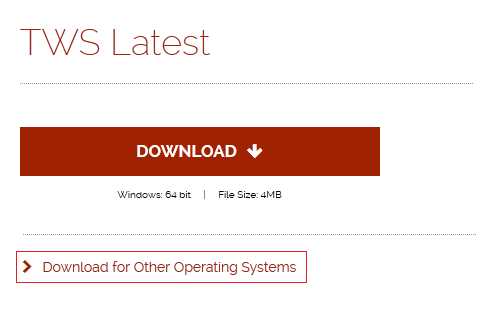
2) Click on Download Trader Workstation: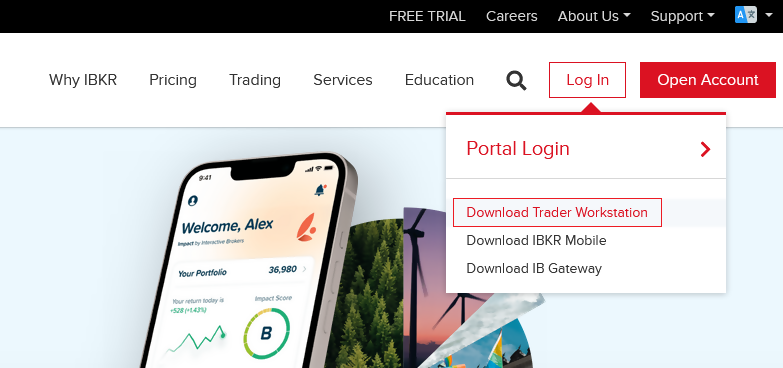
3) Click on the red button TWS Latest:

4) On the next page, click on the link Download for Other Operating Systems:
5) Click on the item Windows 32-bit:

6) Make sure that the description under the DOWNLOAD button has changed to "Windows: 32 bit". Click now on DOWNLOAD:

7) Launch the downloaded file. The Trader Workstation installation will start. At this point, you may see the warning message "Trader Workstation latest is already installed...". Ignore this warning and click on the button Next > to continue the installation:
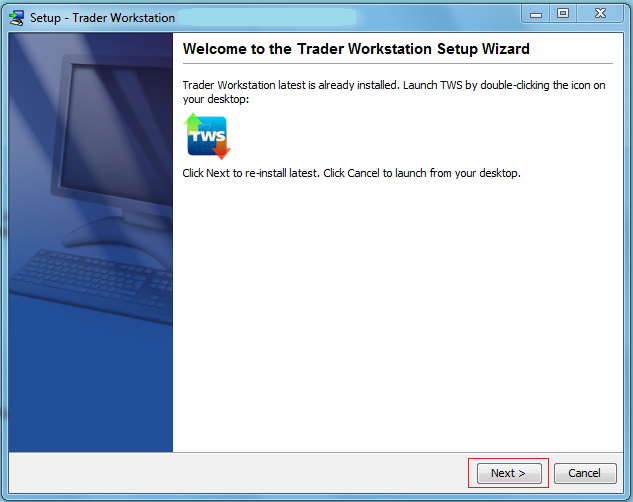
8) Your "Trader Workstation" Desktop icon will be automatically updated. You can now launch the 32-bit Trader Workstation by a double click on that icon.
If you have launched the 32-bit TWS and the 32 bit version of eSignal but you still receive the same error message, please follow as well the instructions below.
Instructions to resolve issue B
Replacing dbcapi.dll for compatibility between 32-bit TWS and 32-bit eSignal 12
To correct an incompatibility with the dbcapi.dll file, we will replace that file with another version of it taken from the eSignal installation folder. Please follow the steps below to perform the substitution:
1) Navigate to C:\Jts and rename the file dbcapi.dll to dbcapi_old.dll
2) Navigate to the directory where 32-bit eSignal 12 is installed (most commonly C:\Program Files (x86)\Common Files\Interactive Data\DM).
3) Copy dbcapi_vc8.dll from that directory into the C:\Jts directory.
4) Move to the C:\Jts directory.
5) Right click on the dbcapi_vc8.dll file (now in the C:\Jts directory) and select rename. Type dbcapi.dll as the new filename.
.jpg)
6) TWS is now ready to accept the eSignal data feed.
How to opt back into the Secure Login System
Overview:
Clients who have performed an opt-out from the Secure Login System (SLS) program expose themselves to certain risks and are therefore subject to certain restrictions (e.g. ability to trade Pink Sheet and OTCBB stocks). Considering this, along with the protection benefits afforded through a complete SLS protection, you may decide to opt back into the Secure Login System. The following article provides the step-by-step instructions for accomplishing this.
Background:
Please note that in order to modify the security settings for an account, the primary user needs to login to the Client Portal. If your user is not allowed to change the security settings, the system will show you a notice and will point you to the user which has such rights.
In order to opt back into the Secure Login System, please proceed as follows:
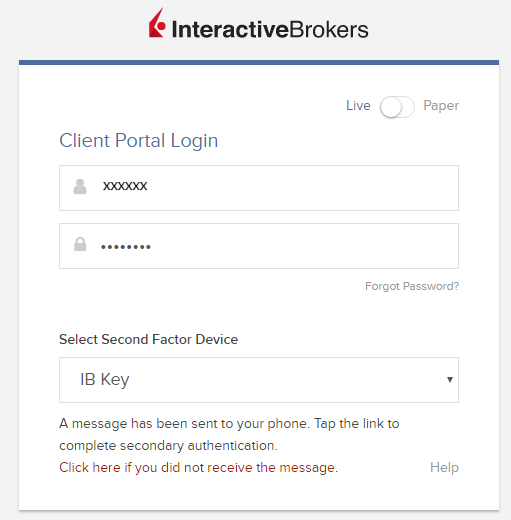
1. Open your browser and go to the web page ibkr.com.
2. Click on Log In > Portal Login
(1).png)
3. Enter your credentials and complete the authentication using your security device
4. Click the User menu (head and shoulders icon in the top right corner) followed by Settings.
5. Under the User Settings section find Security and click Secure Login System.
6. You will see a box titled "Secure Login Settings". Within that box, click on the Configure "gear" icon. This will take you to the settings for Secure Login not required for trading.
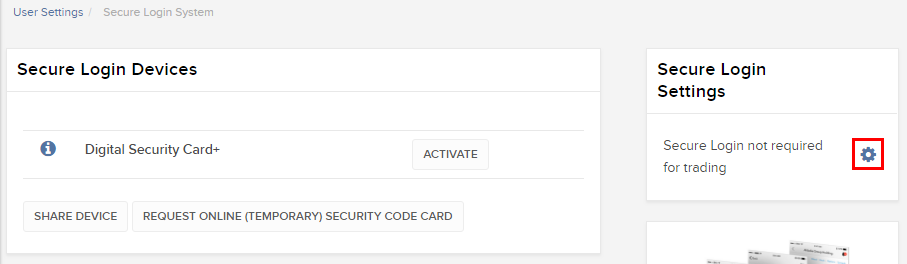
7. Select the radio button next to "I want to always use my Secure Login Device when logging in" and click on Continue
.png)
8. You will receive a confirmation that your settings have been updated. Click on OK to finalize the procedure
.png)
References
- See KB1131 for an overview of the Secure Login System
- See KB1943 for instructions on requesting a replacement Digital Security Card+
- See KB2636 for information and procedures related to Security Devices
- See KB2481 for instructions about sharing the Security Login Device between two or more users
- See KB975 for instructions on how to return your security device to IBKR
- See KB2260 for instructions on activating the IB Key authentication via IBKR Mobile
- See KB2895 for information about Multiple 2Factor System (M2FS)
- See KB1861 for information about charges or expenses associated with the security devices
- See KB69 for information about Temporary passcode validity